1
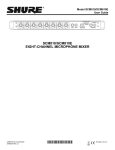
U-1000 Series
1000 Channel PLL Frequency Synthesized UHF
Wireless Microphone and Instrument System
nady.com
Owners Manual
TABLE OF CONTENTS
INTRODUCTION ................................................................................................2
SYSTEM FEATURES..........................................................................................3
OPERATING INSTRUCTIONS ..........................................................................4
U-1000, U-2000 Receiver ................................................................................5
UH-1000 Handheld Transmitter ........................................................................7
UB-1000 Bodypack Transmitter ......................................................................11
System Operation ..........................................................................................15
Cautions and Troubleshooting ........................................................................18
TIPS ..................................................................................................................19
SPECIFICATIONS ............................................................................................20
SERVICE INFORMATION ................................................................................21
ACCESSORIES ................................................................................................22
INTRODUCTION
Thank you for choosing the Nady U-1000 Series wireless system, and
congratulations on your choice. The Nady U-1000 Series systems are by far the
best performance and price value available in professional UHF wireless.
Offering clear channel operation on the wide open, uncluttered UHF band for
interference-free performance in any application or locale, the U-1000 Series
delivers 1000 user switchable channels, frequency synthesized in 24 groups
and 40 channels in the each frequency band. Band-1 721.000- 745.975 MHz,
and Band-2 795.000- 819.75 MHz range. The U-1000 Series systems feature
Nady’s proprietary companding and low noise circuitry for an industry best 120
dB Dynamic Range, and the clearest, most natural sound available in wireless
today.
Using this Manual
This booklet gives instructions for the operation of the UHF-1000/2000 systems:
transmitter models UB-1000 Bodypack, and UH-1000 Handheld Microphone,
receiver models U-1000 single, and U-2000 dual.
Please read this instruction booklet completely before operating your system.
This manual will first explain the benefits of the UHF-1000/2000 and then will
take you step by step on how to operate your new system. Each section will
give you detailed information. Also, included in this manual is complete system
specifications, and servicing information.
2
ACCESSORIES
PART NUMBER
DESCRIPTION
3008-11 ............USB cable (included w/each Rx)
3008-10 ............Audio cable 1/4” to 1/4” mono plug (included w/each Rx)
12017-50 ..........WMC-11 Rubber mic clip for handheld wireless microphone
(included w/each UH-1000)
Adapters (one included w/each Rx)
3007-98 ..............Power Supply, 115VAC for U-1000 Rx
3008-00 ..............Power Supply, 230VAC for U-1000 Rx
3007-99 ..............Power Supply, 115VAC for U-2000 Rx
3008-01 ..............Power Supply, 230VAC for U-2000 Rx
Antennas (pair included w/each Rx)
3008-02 ..............Antenna for U-1000/2000 Rx, Band 1
3008-03 ..............Antenna for U-1000/2000 Rx, Band 2
Bodypack Inputs (one included w/each UB-1000)
3008-08 ..............Instrument cable w/3-pin mini XLR to 1/4” male mono plug
10300-82 ..........LM-14/O Omnidirectional lavalier mic w/3-pin mini XLR
10300-83 ..........LM-14/U Unidirectional cardioid lavalier mic w/3-pin mini XLR
10300-63 ............HM-1 Headmic (TM) Unidirectional headworn mic
w/3-pin mini XLR
10300-65 ..........HM-3 Headmic (TM) Unidirectional headworn mic
w/3-pin mini XLR
Optional Accessories
3008-05 ..............Remote Antenna for U-1000/2000 Rx, Band 1
3008-06 ..............Remote Antenna for U-1000/2000 Rx, Band 2
3008-07 ..............AD-4U UHF Antenna Distribution System
3008-04 ..............Antenna Rack Kit for U-1000/2000 Rx
10300-14 ..........Condenser element cartridge for UH-1000
10219-90 ..........SMCC-2 Aluminum flight case for multiple mics
and transmitters
22
SYSTEM FEATURES
U-1000 RECEIVER (Single Channel)
and U-2000 RECEIVER (Dual Channel)
• Unsurpassed UHF performance with 120 dB dynamic range and operation up
to 500 feet line-of-sight
• Rugged 19” 1U rackmountable UHF-1000/2000 receiver with dual removable
antennas (for convenient front panel placement), 1000 user switchable UHF
frequencies and True Diversity circuitry for eliminating dropouts and
maximizing range
• Sophisticated IF filtering for multiple UHF-1000/2000 system operation in the
same location simultaneously
• Tone Squelch™ circuitry for protection from RF interference
• Front panel back-lit LCD display indicates the channel/frequency selected,
received RF and AF levels, A/B diversity status.
• Convenient UP or DOWN buttons for easy volume control.
• Front panel ON/OFF button.
• User friendly configuration menus.
• RF Scan feature measures and provides interference free channel selections.
• Download feature sends User information to the transmitters via convenient
USB connection.
• Back panel balanced XLR mic level and unbalanced 1/4” jack audio outputs,
and jacks for dual antennas
• Externally powered with 15 VDC (800 mA) AC adapter
UB-1000 and UH-1000 TRANSMITTERS
Choice of transmitters: UH-1000 handheld or UB-1000 bodypack,
both 1000-channel selectable
• UH-1000 and UB-1000 both operate on 2 AA batteries for the longest reliable
and economical battery life.
• UH-1000 handheld is a sleek, durable unit with an internal antenna system.
The powerful audio section provides maximum feedback rejection, and
minimal handling noise.
• UB-1000 bodypack is a versatile unit with unique 3-Pin Mini XLR input
connector for instrument, lavalier mic, or headworn mic (with convenient DC
phantom powering). An input level control allows optimal audio gain
adjustment.
• Both the UH-1000 and UB-1000 transmitters feature On/OFF, Mute control,
Low battery and Mute LED, and LCD display.
• User friendly configuration menus.
3
OPERATING INSTRUCTIONS
SPECIFICATIONS
U-1000, U-2000 Receiver
For best operation, the receiver should be placed at least 1 meter above the
ground and 1 meter away from a wall or metal surfaces. The transmitter should
also be at least 1 meter away from the receiver. Keep antennas away from
noise source such as motors, automobiles, neon light, signal processors,
computer, as well as large metal objects.
INSTALLING ANTENNAS
Install antennas by connecting the two antennas included with your system to
the two each RF screw-on connectors located on the back of your
UHF-1000/2000 receiver.
RECEIVER SETUP
U-1000 RECEIVER (FRONT)
1
2
3
4
5
6
7
8 9
10
U-1000 RECEIVER (BACK)
12 13
11
14
16
15
SERVICE INFORMATION
U-2000 RECEIVER (FRONT)
4 5
1
2
6 7 8 9
3
10
2
U-2000 RECEIVER (BACK)
BALANCED
BALANCED
M IC
M IC
LINE
AF OUT
LINE
AF OUT
DC IN
12V -15V
ANT.
A
ANT.
B
11
1.
2.
3.
4.
5.
6.
7.
8.
12 13
14
Input Impedance ........................................UH-1000: 10 K Ohms
UB-1000: 500 K Ohm (Instr.),
10 K Ohms (Lav), 20 K Ohms (HM)
Controls ......................................................UH-1000: On/Off switch, Mute, Set,
and UP or DOWN buttons
UB-1000: On/Off switch, Mute, Set,
and UP or DOWN buttons, 3-Pin Mini
XLR input for: lavalier, head mic,
or music instrument
LED Indicator ............................................Unit “ON” (single flash), Low Battery Alert
(steady), Mute (flashing)
Connectors ................................................UH-1000: None
UB-1000: Mini 3-Pin XLR USB Port,
connecting cord supplied with receiver
Antenna Type ............................................UH-1000: Integral
UB-1000: External permanent, 3 inch
Battery Type ..............................................2 X AA alkaline
Battery Life ................................................8-12 hours nominal
Dimensions ................................................UH-1000: 10.75” x 1.625” dia
(27.30 cm x 4.13 cm).
UB-1000: 3.875” x 2.5” x .875” [L / W / H]
(9.84 cm x 6.35 cm x 2.22 cm)
Weight (w/o batteries) ................................UH-1000: 10.8 oz (.306 Kg.)
UB-1000: 5.7 oz (.161 Kg.)
16
15
Slot for front mount antenna
Power switch
LCD display
UP button
DOWN button
MENU
SET
SCAN
9.
10.
11.
12.
13.
14.
15.
16.
4
USB port
Slot for front mount antenna
Antenna B socket
MIC / Line level switch
Unbalanced out
Balanced out
DC IN jack
Antenna A socket
U.S.) If you are experiencing operational problems with your system, check out
the support page on the Nady website: www.nady.com for help and for
contacting the Nady Service Department. Should your Wireless System require
service, you must contact the Nady Service Department at (510) 652-2411 for a
Return Authorization (R/A) Number and a service quote (if out of warranty).
Make sure the R/A Number is clearly marked on the outside of package.
Cashiers’ check or money order is enclosed (if not prepaid with credit card), and
ship the unit prepaid to: Nady Systems, Inc., Service Department, 6701
Shellmound Street, Emeryville, CA 94608. Include a brief description of the
problem you are experiencing. For service of a unit under Warranty follow the
instructions of your Warranty Card regarding Warranty Service.
(International) For service, please contact the NADY distributor in your country
through the dealer from whom you purchased this product.
DO NOT ATTEMPT TO SERVICE THIS UNIT YOURSELF, AS THAT WILL
VOID YOUR WARRANTY.
21
SPECIFICATIONS
OPERATING INSTRUCTIONS
U-1000, U-2000 Receiver
SYSTEM SPECIFICATIONS
Operating Frequency Range ....................1000 channels switchable
Freq. Synthesized ......................................PLL system with frequency stability <0.005%
Frequency Response ................................30 HZ-15 KHZ ±3 dB
Dynamic Range..........................................120 dB
Harmonic Distortions ................................<0.5%
Modulation..................................................FM ±25 KHz nominal
Operating Range........................................250 feet typical (depending on site
conditions) up to 500+ feet optimum
line of sight
RECEIVER SPECIFICATIONS
Receiving System ......................................Dual conversion superheterodyne
with True Diversity (2 complete receiver
sections with optimum audio selected)
Sensitivity ..................................................-107 dBm, nominal
Selectivity ..................................................60 dB nominal ± 75 KHz offset
Image Rejection ........................................-70 dB, minimum
Spurious Rejection ....................................65 dB, nominal
Mute Threshold ..........................................-65 dBm to -100 dBm Adjustable
Audio Output Level ..................................Unbalanced output: 360 mV Adjustable
Mic Level Balanced Output ......................24 mV Adjustable
Audio Output Impedance ..........................Balanced and unbalanced: both 600 ohms
Controls ......................................................Power On/Off switch, Level control,
UP or DOWN Channel select buttons,
Mute (RF squelch) adjust
LCD Display................................................Single backlit LCD panel indicating
channel/frequency selected, received
AF and RF level, and A/B diversity status
USB Port ....................................................U-1000, U-2000 (connecting cord supplied)
Power Requirements ................................115 VAC or 240 VAC, external
AC-DC adaptor
Antenna ......................................................Right angle or external remote
Dimensions ................................................U-1000/2000 19” full rack x 1 RU
19” x 11.75” x 1.75” [W / D / H]
(49 cm x 30 cm x 4.5 cm)
Weight (power supply included)..................U-1000 113 oz. (49.5 Kg.)
U-2000 120 oz. (52.5 Kg.)
TRANSMITTER SPECIFICATIONS
Models Available........................................UH-1000 handheld mic, UB-1000 bodypack
RF Output Power ......................................1 mW-50 mW max
(country and band dependent)
Harmonic and Spurious Emissions ........- 50 dB
Audio Input Level ......................................UH-1000: 24 mV RMS (nom.)
UB-1000: 225 mV (Instr.), 150 mV (HM),
75 mV (Lav)
20
Powering the Receiver
Plug the AC-DC ADAPTOR provided in the 15 VDC INPUT JACK (17) on the
back of the receiver. Then plug the adapter into an AC outlet. (Note: Any 15V
DC source with 800 mA capability can also be used.) Connect either the XLR
balanced or 1/4” unbalanced output to your mixing board, effects, or amplifier.
To turn ON, Press the POWER SWITCH (2) for 1 second. The LCD DISPLAY
(3) will flash the company and model number. Then the channel assignment RF
LEVEL METER, and the AUDIO LEVEL METER will display when the
transmitter is activated.
To turn OFF, Press the POWER SWITCH (2) for 3 seconds and release. The
receiver will turn off.
Refer to the System Operation instructions, Scan Function, (pg. 17) to select
operating frequency.
RECEIVER SETUP MENUS
Control Menus have two modes, Preset and User.
To make changes Hold the SET (7) button for 2 seconds and use the UP (4) or
DOWN (5) buttons. To save changes hold the SET (7) button for 3 seconds.
The UP (4) or DOWN (5) buttons control volume when not in SET mode.
The receiver will remember the last Menu of User Name, Group and Channel,
User Edit, or Channel Frequency, when it is turned off. That menu will appear
when it is turned on.
Menu pages in Preset or User mode
Cycle Menu pages by pressing the MENU (6) button.
USER MODE CYCLE — 1, 2, 3, 5, 6, 7
PRESET MODE CYCLE — 1, 2, 3, 4, 6, 7
USER MODE
1. Preset or User mode
PRESET MODE
In the Preset User Menu, hold the SET (7) button
for 3 seconds. The curser will blink. Select from
Preset or User with the UP (4) or DOWN (5) buttons. After finishing the edit hold
the SET (7) button until the curser stops blinking.
2. Company and Model number
(can not be edited)
NADY
NADY 1000
3. User Name
The user name field has 12 character spaces.
USER NAME
Choose from upper and lower case alphabet, 27
RF
AF
special characters (including space), and 10
numbers. In the User Name Menu, hold the SET
(7) button for 3 seconds. The curser will blink, press the UP (4) or DOWN (5)
buttons to cycle the character selection, press the SET button to advance to the
5
OPERATING INSTRUCTIONS
TIPS
U-1000, U-2000 Receiver
next location. After finishing the edit hold the SET (7) button until the curser
stops blinking.
4. Group and Channel (Preset)
Choose the UHF-1000 operating frequency by
selecting one of the 24 Groups and one of the 40
Channels in each group. The first two top digits on
the left are the Group and the second top two
digits to the right are the Channel.
CF: 01 - 01
RF
AF
In the Group and Channel Menu, hold the SET (7) button for 3 seconds.
The curser will blink in the Group selection and the frequency is displayed, use
UP (4) or DOWN (5) buttons to cycle the Group selection. Press SET (7), the
curser will advance to the Channel selection, press the UP (4) or DOWN (5)
buttons to cycle the selections. After finishing the edit hold the SET (7) button
until the curser stops blinking.
5. User Edit
USER EDIT: - 01
The user edit memory stores 40 selections of
channel frequencies. If the frequencies are not
RF
AF
between 721.000-745.975 MHz for Band-1 or
795.000-819.975 MHz for Band-2 they will not be saved.
In the User Edit Menu, hold the SET (7) button for 3 seconds.
The curser will blink and the memory location and frequency are displayed,
press the UP (4) or DOWN (5) buttons to cycle the memory locations. Press the
SET (7) button, the curser will blink in the frequency, press the SET (7) button to
cycle the frequency digits. Press the UP (4) or DOWN (5) buttons to cycle the
frequency assignment. After finishing the edit hold the SET (7) button until the
curser stops blinking, the User Name menu will appear.
6. Channel Frequency
Choose an operating frequency by selecting the
Channel and Group. Same as above Group and
Channel menu, except it displays the Carrier
frequency.
721.000 MHz
RF
AF
7. Squelch Level
There are eight choices between -100 and -65
SQUELCH LEVEL
dBm. In the Squelch Level Menu, hold the SET (7)
-100 dBm (1)
button for 3 seconds. The curser will blink in the
Squelch Level selection, use the UP (4) or DOWN
(5) buttons to cycle the selections. After finishing the edit hold the SET (7)
button until the curser stops blinking.
The RF and AF level meters, diversity operation, and audio output connections
of the receiver are described in the System Operation section (pgs 16,17).
6
• For operation with external antenna, low loss RF shielded cable should be
used and the length of the cable should not exceed 3m.
• Do not place the receive antenna within 1 meter of another receiver or
antenna.
• The receiver antenna should be kept away from any metal surface.
• If the Volume Control of the receiver is set too high, it may over-drive the input
of the mixer, causing distortion. Conversely, if the receiver output is set too
low, the overall signal to noise ratio of the system may be reduced. Adjust the
output level of the receiver such that highest sound pressure level going into
the microphone causes no input overload in the mixer, and yet permits the
mixer level controls to operate in their normal range (not too high or too low).
This provides the optimum signal to noise for the entire system.
• Before inserting the batteries, please make sure that they are inserted
according to the correct polarity.
• For PLL frequencies agile version, before operation please make sure that the
corresponding receiver MUST have the same frequency group and channel
number as the transmitter.
• After making a channel change, please make sure that the corresponding
change is made on the matching receiver also. To be exact, changes MUST be
made at both the transmitter and receiver.
• Use only brand new Alkaline batteries. Do not use “general purpose “
batteries. When batteries are weak, replace the batteries altogether at the
same time. Do not mix and use new and old batteries together.
• Position the receiver such that it has the least possible obstructions between it
and the transmitter. Line of sight is best!
• The transmitter and the receiver should be as close as possible but not less
than 1 meter.
• A receiver cannot receive signals from two or more transmitters
simultaneously.
• Turn the transmitter off when it is not in use. Remove the batteries if it is not to
be used for a period of time.
(Note: Scratchy noises can sometimes occur when some electric guitars with
dirty pots or connections are used with any wireless system. Therefore, the
supplied INSTRUMENT CORD has a factory installed capacitor inside the 1/4”
plug. This capacitor provides first order filtering of the RF signal from the cord
into the guitar and eliminates virtually all scratchy noises. Should your
equipment still give you scratchy noises, we suggest these steps to eliminate
them:
1) Make sure all guitar volume and tone pots are clean and all contacts are
solid-this is very important.
2) A 47pf capacitor soldered across the hot to ground terminals of the guitar’s
volume and tone pots will provide extra filtering.)
19
SYSTEM OPERATION
(Note: The UH transmitter CAP (7) must be removed before installing the USB
cable.) (Note: Only one transmitter can be used with one UHF-1000 receiver. It
is not possible to use two transmitters on the same frequency and mix the
output of these transmitters into one wireless receiver. If you have any
questions, please contact the Nady Systems Customer Service Department.
See SERVICE section, pg. 21.)
CAUTIONS AND TROUBLESHOOTING
Feedback
Observe care in selecting P.A. volume, transmitter location and speaker
placement so that acoustic feedback, howling and screeching, will be avoided.
Please also note the pickup pattern characteristics of the microphone selected.
Omni directional mics pick up sound equally from all directions, and are prone
to feedback if not used carefully. Unidirectional mics are more resistant to
feedback, but pick up sound sources best that are directly in front of the mic.
Also, mics that are farther from the sound source, such as lavaliers, require
more acoustic gain and thus are also more prone to feedback than close-source
mics such as handheld or headworn models that are used close to the mouth.
Microphone Damage
Headset and lavalier mic users, note that the microphone element can easily be
destroyed by the buildup of salts and minerals from perspiration and saliva. It is
good practice to put a windscreen on the mic at all times to protect it.
No Audio
If you’re not getting audio through the system, carefully check all setup. The
receiver and transmitter must be set to operate on the same RF channel.
RF Interference
If you encounter receiving interference (from other than an operating TV
station), often it can be overcome by adjusting the receiver’s squelch control.
Please note that wireless frequencies are shared with other radio services.
According to FCC regulations, wireless microphone operations are unprotected
from interference from other licensed operations in the band. If any interference
is received by any Government or non-Government operation, the wireless
microphone must cease operation or change frequencies. The above statement
is valid only for use in the U.S.A.
18
OPERATING INSTRUCTIONS
UH-1000 Handheld Microphone
TRANSMITTERS SETUP
Installing Batteries
UH-1000 transmitters require 2 “AA “ size batteries to operate. Insert the
batteries according to the correct polarity as indicated. To open the battery
compartment, press the release latch and open the cover.
(CAUTION: Many batteries are known to have leakage problem of conductive
and corrosive liquid. Please observe the rule to remove the batteries if they are
not to be used for a period of a few days. This battery compartment is designed
to accommodate the most common size Alkaline batteries.)
Powering the Transmitter
To turn ON, Press the POWER SWITCH (5), for 1 second.
The LCD DISPLAY (2) will flash the company and model number. Then the
menu will appear.
To turn OFF, Press the POWER SWITCH (5) for 3 seconds and release. The
transmitter will turn off.
Auto Turn Off function. If the transmitter Audio mute switch is in the OFF
position and the transmitter is left On. It will turn OFF after 30 minutes. This
foolproof feature will save the batteries.
Menu pages in Preset or User mode
Cycle Menu pages by pressing the UP (9) or DOWN (10) buttons.
Transmitter Setup Menus
Control Menus have two modes, Preset and User.
To make changes Hold the SET (8) button for 2 seconds and use the UP (9) or
DOWN (10) buttons. To save changes hold the SET (8) button for 3 seconds.
The transmitter will remember the last Menu of User Name, Group and
Channel, or User Edit, when it is turned off. That menu will appear when it is
turned on.
1. User/Preset mode
In the Preset or User menu, hold the SET (8) button for 3 seconds. The curser
will blink. Select from User or Preset with the UP
(9) or DOWN (10) buttons. After finishing the edit
USER MODE
hold the SET (8) button until the curser stops
PRESET MODE
blinking.
7
OPERATING INSTRUCTIONS
SYSTEM OPERATION
UH-1000 Handheld Microphone
Connecting Audio Output
There are two audio outputs on the back of the receiver. Mic-level balanced and
Line-level unbalanced. Use shielded audio cable for the connection between the
receiver and the mixer. If the mixer / amp is a 1/4” phone jack, connect a cable
from the 1/4” unbalanced audio output from the receiver.
+
The 1/4” output can be set to either mic line level using
Gnd
the MIC LINE SWITCH (12) If the mixer has an XLR
input, connect a cable from the balanced XLR audio
output from the receiver to the mixer input. XLR output
connection is shown above.
(Note: As when making any connection, make sure the amplifier or mixing board
volume is at the minimum level before plugging in the receiver to avoid possible
sound system damage.)
1
Receiver Volume
The UP or DOWN buttons on the front panels serve as the Volume Controls of
the receiver. It can be pressed at any moment. The normal VOLUME setting is
13 for one-to-one unity gain. If the volume is set too high, you may overload
your mixer or amp.
2
3
4
5
8
10
9
Scan Function
When SCAN button is pressed, receiver will start the auto scanning function. It
will compare 200 of the preset frequencies with the environment and select 40
of them and save them in Group 24. Turn off all of the transmitters. The SCAN
process will take about 3 minutes to complete. These channel frequencies are
interference free frequencies, but they may not be inter-modulation free
amongst themselves. To abort the SCAN process, press the SCAN button
again, the memory will return to the original setting.
6
7
1.
2.
3.
4.
5.
Receiver Squelch
There are eight choices between -100 and -65 dBm. Use the lowest setting
possible. If there is audio output from the receiver when your transmitter is OFF,
adjust the squelch control so the system will receive the signal from your
transmitter but squelch or eliminate the unwanted background RF noise. This
adjustment can cause a reduction in usable range of the wireless transmitter, so
set the control to the lowest position that reliably mutes the unwanted RF signal.
Capsule with metal grill
LCD display
Battery weak / Audio MUTE indicator
Audio MUTE switch
Power ON/OFF switch
6. Battery Compartment
7. Cap
8. SET button
9. UP button
10. DOWN button
8
Download Function
This convenient feature will synchronize the transmitter to the receiver without
entering the information by hand. The transmitter is connected to the receiver
via the USB cable, the receiver download Icon will be on. Press the SCAN
button; the receiver will display TX Down-Loading. The receiver will send
Channel Frequency, User Name, Preset or User Mode, Scan and Edit
information to the transmitter. When the download process is finished the
transmitter Battery Weak /Audio Mute LED will flash once. User names will be
shortened to 8 characters.
17
SYSTEM OPERATION
Level adjustment
UB-1000 Transmitter
The input level has four choices. “1” is the lowest gain, and “4” is the highest.
For instrument, lavalier mic, and HM-1 headset mic use the normal setting of
“3”. For HM-1 use setting “1”.
When ready to speak, move the audio MUTE switch to the OFF position. Adjust
the volume of the receiver for optimum performance, a transmitter sensitivity
control is provided. Experiment and set for maximum possible gain without
audible distortion on the high level peaks. (Note: Turning down the gain too
much can compromise the signal-to-noise and is not recommended.)
Level adjustment
UH-1000 Transmitter
The input level has four choices. “1” is the lowest gain, and “4” is the highest.
The normal setting is “3”.
When ready to speak, move the audio MUTE switch to the UP position. Adjust
the volume of the receiver for optimum performance, a transmitter sensitivity
control is provided. Experiment and set for maximum possible gain without
audible distortion on the high level peaks. (Note: Turning down the gain too
much can compromise the signal-to-noise and is not recommended.)
(Note: Microphone elements can easily be destroyed by the buildup of salts
and minerals from perspiration and saliva. It is good practice to put a
windscreen on the mic at all times to protect it.)
Transmitter Mute
The mute will stop audio inputs to the transmitter from leaving the receiver
audio outputs.
UB-1000 transmitter slide the Mute Switch in the ON position.
UH-1000 transmitter slide the Mute Switch DOWN.
The Battery Weak /Audio Mute LED will blink.
Auto Turn Off function. If the transmitter Audio mute switch is in the ON position
and the transmitter is left On. It will turn OFF after 30 minutes. This foolproof
feature will save the batteries.
Receiver RF and AF Level meters
The UHF-1000 receiver RF icon displays the RF signal strength and AF display
icon displays the audio signal level, from the transmitter.
Receiver Diversity Operation
During operation only one of the A or B Diversity display icons will be lit,
indicating the receiver’s True Diversity circuitry is selecting antenna input A or B
for the best signal. This is normal and ensures that the received audio will not
be interrupted. Sometimes, especially at ranges greater than 75 feet, the
squelch circuit will activate in certain locations of the transmitter with respect to
the receiver. Such areas are called “null spots” and indicate that the transmitter
is out of range for that given location, and the user should move closer to the
receiver or to another area to re-establish the radio link.
16
OPERATING INSTRUCTIONS
UH-1000 Handheld Microphone
2. “NADY UH-1000” (can not be edited)
NADY
UH-1000
3. User Name
The User Name field has 8 character spaces. Choose
from upper and lower case alphabet, 27 special characters (including space),
and 10 numbers.
USER NAME
In the User Name Menu, hold the SET (8) button for 3
seconds. The curser will blink, press the UP (9) or
CF: 01 - 01
DOWN (10) buttons to cycle the character selection,
press SET to advance to the next location. After finishing the edit hold the SET
button until the curser stops blinking.
4. Group and Channel
Choose the operating frequency by selecting one of the 24 Groups and one of
the 40 Channels in each group. The first two top digits on the left are the Group
and the second top two digits to the right are the Channel. The battery status is
also displayed.
CF: 01 - 01
In the Group and Channel Menu, hold the SET (8)
721.000
button for 3 seconds.
The curser will blink in the Group selection and the
frequency is displayed, use UP (9) or DOWN (10) buttons to cycle the Group
selection. Press SET (8), the curser will advance to the Channel selection,
press the UP (9) or DOWN (10) buttons to cycle the selections. After finishing
the edit hold the SET (8) button until the curser stops blinking.
5. User Edit
The user edit memory stores 40 selections of channel frequencies. If the
frequencies are not between 721.000-745.975 MHz for Band-1 or 795.000819.975 MHz for Band-2 they will not be saved.In the User Edit Menu, hold the
SET (8) button for 3 seconds.
The curser will blink and the memory location and
EDIT - 01
frequency are displayed, press the UP (9) or DOWN
721.000
(10) buttons to cycle the memory locations. Press the
SET button, the curser will blink in the frequency, press
the SET (8) button to cycle the frequency digits. Press the UP (9) or DOWN (10)
buttons to cycle the frequency assignment. After finishing the edit hold the SET
(8) button until the curser stops blinking, the User Name menu will appear.
9
OPERATING INSTRUCTIONS
SYSTEM OPERATION
UH-1000 Handheld Microphone
6. Sensitivity Set Level (Input level sensitivity)
In input level sensitivity has four choices. “1” is lowest
gain, and “4” is highest gain.
SENS SET
LEVEL [ 3 ]
In the Sens Set Level Menu, hold the SET (8) button
for 3 seconds. The curser will blink; press the UP (9) or DOWN (10) buttons to
select 1 of 4 level setting. After finishing the edit hold the SET (8) button until
the curser stops blinking.
7. Battery Type
Select between rechargeable NiMH and Alkaline batteries. As Alkaline (or
Normal) and Rechargeable (NiMH) batteries have different voltages and behave
differently. Correct battery status display information depends on the correct
battery type selection.
In the Battery Select Menu, hold the SET (8) button for
3 seconds. The curser will blink; press the UP (9) or
DOWN (10) buttons to select NiMH or AKLN. After
finishing the edit hold the SET (8) button until the
curser stops blinking.
NiMH
ALKL_ =
Low Battery
The LCD display battery icon shows the battery condition. When the battery is
weak, the Battery Weak /Audio Mute LED (3) will stay on.
The microphone and instrument connections, Mute, and level adjustments of the
transmitter are described in the System Operation section (pgs. 15, 16).
Frequency Selection
The transmitter and receiver must be on the same frequency to operate
correctly. Use the Channel frequency, or Group and Channel menus described
in the Receiver and Transmitter setup instructions.
Instrument Connection
Using the UB-1000 transmitter in the “instrument” setting
Insert an audio cord with a 1/4” mono phone plug in the AF OUT jack on the
rear panel of the receiver. Plug the other end of the cord into an amplifier,
effects, or mixing board. Adjust the VOLUME on the UHF-1000/2000 receiver
until the volume level is 13 or comfortable, depending on your application . This
setting is roughly equivalent to a direct instrument cord connection. Turning the
volume up to MAX will provide 4 dB gain over a cord.
Connecting instruments and microphones to the UB transmitter depends on
customer requirements. Lavalier / Headset microphone or instrument inputs can
be connected to the bodypack transmitter via the audio input connector.
Instrument Use: Connect the mini XLR to the transmitter input connector. Plug
the 1/4” phone plug into the instrument. When ready to play, move the audio
MUTE switch to the OFF position. Adjust the volume of the receiver to setting
13 for, one-to-one, unity gain.
Microphone Connection
Using the UH-1000 handheld microphone transmitter, or the UB-1000
transmitter with either a headworn or lavalier microphone
For microphone use, either the BALANCED output XLR or the 1/4” line level AF
OUT jack can be utilized. Set the MIC LINE SWITCH (12) to either mic level or
line level output depending on your application . Plug a cord with either
connector into the appropriate output and plug the other end into your amplifier
or mixing board. (Note: Make sure the volume is turned down when making
connections.)
Microphone Use: (with either a lavalier or headworn microphone)
Connect the mini XLR connector from the LAVALIER or HEADWORN MIC to
the transmitter input connector. To use the lavalier mic, attach it at chest level.
Do not place it too close to the mouth; a distance of about six inches usually
works best. To use the headworn mic, place it on the head and adjust the boom
so that the mic is about one inch to the side of the front of the mouth.
UH transmitter
The UH-1000 handheld transmitter has a built-in microphone, with a choice of
either a dynamic or a condenser cartridge.
10
15
OPERATING INSTRUCTIONS
OPERATING INSTRUCTIONS
UB-1000 Bodypack Transmitter
UB-1000 Bodypack Transmitter
6. Sensitivity Set Level (Input level sensitivity)
In input level sensitivity has four choices. “1” is lowest
gain, and “4” is highest gain.
SENS SET
LEVEL [ 3 ]
In the Sens Set Level Menu, hold the SET (10) button for 3 seconds. The curser
will blink; press the UP (11) or DOWN (12) buttons to select 1 of 4 level setting.
After finishing the edit, hold the SET (10) button until the curser stops blinking.
7. Battery Type
Select between rechargeable NiMH and Alkaline batteries, as Alkaline and
Rechargeable (NiMH) batteries have different voltages and behave differently.
Correct battery status display information depends on the correct battery type
selection.
NiMH
In the Battery Select Menu, hold the SET (10) button
ALKL_ =
for 3 seconds. The curser will blink; press the UP (11)
or DOWN (12) buttons to select NiMH or AKLN. After finishing the edit, hold the
SET (10) button until the curser stops blinking.
Low Battery
The LCD display battery icon shows the battery condition. When the battery is
weak the Battery Weak /Audio Mute LED (3) will stay on.
The microphone and instrument connections, Mute, and level adjustments of the
transmitter are described in the System Operation section (pgs 15, 16).
TRANSMITTERS SETUP
Installing Batteries
UB-1000 transmitters require 2 “AA “ size batteries to operate. Insert the
batteries according to the correct polarity as indicated. To open the battery
compartment, press the release latch and open the cover.
(CAUTION: Many batteries are known to have leakage problem of conductive
and corrosive liquid. Please observe the rule to remove the batteries if they are
not to be used for a period of a few days. This battery compartment is designed
to accommodate the most common size Alkaline batteries.)
Powering the Transmitter
To turn ON, Press the POWER SWITCH (5), for 1 second.
The LCD DISPLAY (6) will flash the company and model number. Then the
menu will appear.
To turn OFF, Press the POWER SWITCH (5) for 3 seconds and release. The
transmitter will turn off.
Auto Turn Off function. If the transmitter Audio mute switch is in the OFF
position and the transmitter is left On. It will turn OFF after 30 minutes. This
foolproof feature will save the batteries.
Menu pages in Preset or User mode
Cycle Menu pages by pressing the UP (11) or DOWN (12) buttons.
Transmitter Setup Menus
Control Menus have two modes, Preset and User.
To make changes Hold the SET (10) button for 2 seconds and use the UP (11)
or DOWN (12) buttons. To save changes hold the SET (10) button for 3
seconds.
The transmitter will remember the last Menu of User Name, Group and
Channel, or User Edit, when it is turned off. That menu will appear when it is
turned on.
1. User/Preset mode
USER MODE
In the Preset or User menu, hold the SET (10)
button for 3 seconds. The curser will blink. Select PRESET MODE
from User or Preset with the UP (11) or DOWN
(12) buttons. After finishing the edit, hold the SET (10) button until the curser
stops blinking.
14
11
OPERATING INSTRUCTIONS
OPERATING INSTRUCTIONS
UB-1000 Bodypack Transmitter
UB-1000 Bodypack Transmitter
2. “NADY UB-100” (can not be edited)
1
NADY
UB-1000
3. User Name
The User Name field has 8 character spaces. Choose
from upper and lower case alphabet, 27 special characters (including space),
and 10 numbers.
USER NAME
In the User Name Menu, hold the SET (10) button for 3
CF: 01 - 01
seconds. The curser will blink, press the UP (11) or
DOWN (12) buttons to cycle the character selection, press SET to advance to
the next location. After finishing the edit, hold the SET button until the curser
stops blinking.
6
7
5
721.000
10
1
12
11
2
3
9
4. Group and Channel
Choose the operating frequency by selecting one of the 24 Groups and one of
the 40 Channels in each group. The first two top digits on the left are the Group
and the second top two digits to the right are the
CF: 01 - 01
Channel. The battery status is also displayed.
In the Group and Channel Menu, hold the SET (10)
button for 3 seconds.
The curser will blink in the Group selection and the frequency is displayed, use
UP (11) or DOWN (12) buttons to cycle the Group selection. Press SET (10),
the curser will advance to the Channel selection, press the UP (11) or DOWN
(12) buttons to cycle the selections. After finishing the edit, hold the SET (10)
button until the curser stops blinking.
4
5. User Edit
The user edit memory stores 40 selections of channel frequencies. If the
frequencies are not between 721.000-745.975 MHz for Band-1 or 795.000819.975 MHz for Band-2 they will not be saved.
EDIT - 01
In the User Edit Menu, hold the SET (10) button for 3
721.000
seconds.
8
1.
2.
3.
4.
5.
6.
Antenna
Battery weak / Audio MUTE indicator
Audio MUTE switch
Mini-XLR connector
Power ON/OFF switch
LCD display
7. Mini USB port
8. Cover release button
9. Battery Compartment
10. SET button
11. UP button
12. DOWN button
12
The curser will blink and the memory location and frequency are displayed,
press the UP (11) or DOWN (12) buttons to cycle the memory locations. Press
the SET button, the curser will blink in the frequency, press the SET (10) button
to cycle the frequency digits. Press the UP (11) or DOWN (12) buttons to cycle
the frequency assignment. After finishing the edit, hold the SET (10) button until
the curser stops blinking, the User Name menu will appear.
13