1
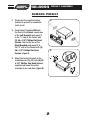
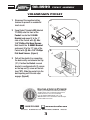
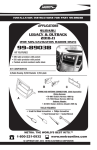
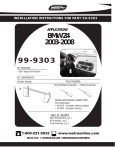
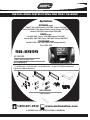
INSTALLATION INSTRUCTIONS FOR PART 98-8999
Applications
MITSUBISHI (page1)
3000 GT 1991-1999, Diamante 1997-2004, Eclipse 1995-2005,
Galant*1994-2009 (* With Manual Climate Control), Mirage 1997-2003,
Montero 1996-2005, Montero Sport 2000-2004
SUBURU (page2)
Baja 2003-2005, Forester 1998-2008, Impreza 1993-2007,
Impreza WRX 2002-2005, Legacy 1995-2004, Outback 2000-2004
VOLKSWAGEN (page3)
Golf 2001-2005, Jetta**2001-2005 (** No Including New A5)
Passat 2001-2005
98-8999
KIT FEATURES
• Holds Three CD Jewel Cases
KIT COMPONENTS
A) VW Pocket Trim Plate • B) Subaru Pocket Trim Plate • C) Mitsubishi Trim Plate • D) Pocket
• E) (2) VW Brackets • F) (2) Left Brackets • G) (2) Right Brackets • H) (4) #8 x 1/4” Phillips Pan Head Screws
I) (6) #6 x 1/4” Phillips Flat Head Screws
A
E
F
D
C
B
G
H
I
TOOLS REQUIRED:
Phillips Screwdriver
1-800-221-0932
www.metraonline.com
© COPYRIGHT 2002-2008 METRA ELECTRONICS CORPORATION
98-8999
POCKET ASSEMBLY
MITSUBISHI POCKET
1
Disconnect the negative battery
terminal to prevent an accidental
short circuit.
2
Snap Pocket Trimplate MIT onto
the front of the Pocket. Locate one
of the Left Brackets and mount it
to the “L” side of the Pocket with
(2) #6 x 1/4" Phillips Flat Head
Screws. Next locate one of the
Right Brackets and mount it to
the “R” side of the Pocket with (2)
#6 x 1/4" Phillips Flat Head
Screws. (Figure A)
3
A
B
B2
Mount the factory brackets to the
shaded bosses (Fig. B2) with (4) #8
x 1/4" Phillips Pan Head Screws
supplied and mount the entire
assembly to the sub-dash. (Figure B)
1
98-8999
POCKET ASSEMBLY
SUBARU POCKET
1
Disconnect the negative battery
terminal to prevent an accidental
short circuit.
2
Snap Pocket Trimplate SUB onto
the front of the Pocket. Locate one
of the Left Brackets and mount it
to the “L” side of the Pocket with
(2) #6 x 1/4" Phillips Flat Head
Screws. Next locate one of the
Right Brackets and mount it to
the “R” side of the Pocket with (2)
#6 x 1/4" Phillips Flat Head
Screws. (Figure A)
3
A
B
B2
Mount the factory brackets to the
shaded bosses (Fig. B2) with (4) #8
x 1/4" Phillips Pan Head Screws
supplied and mount the entire
assembly to the sub-dash. (Figure B)
2
98-8999
POCKET ASSEMBLY
VOLKSWAGEN POCKET
1
Disconnect the negative battery
terminal to prevent an accidental
short circuit.
2
Snap Pocket Trimplate VW (labeled
TP-9008) onto the front of the
Pocket. Locate the X-5599L
Bracket and mount it to the “L”
side of the Pocket with (3) #6 x
1/4" Phillips Flat Head Screws.
Next locate the X-5599R Bracket
and mount it to the “R” side of the
Pocket with (3) #6 x 1/4" Phillips
Flat Head Screws. (Figure A)
3
A
B
Pull out the plastic tray separating
the dash cavity and remove the tray
(“A”). Position the Pocket so each
bracket is configured with (2) screws
on the top and (1) screw on the bottom (“B”). Slide the pocket into the
dash opening until the side clips
engage. (Figure B)
KNOWLEDGE IS POWER
Enhance your installation and fabrication skills by
enrolling in the most recognized and respected
mobile electronics school in our industry.
Log onto www.installerinstitute.com or call
800-354-6782 for more information and take steps
toward a better tomorrow.
1-800-221-0932
www.metraonline.com
REV. 08/12/08 © COPYRIGHT 2002-2008 METRA ELECTRONICS CORPORATION
3
INST98-8999