1
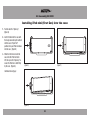
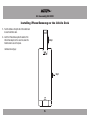
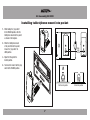
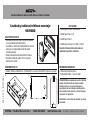
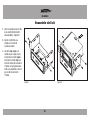
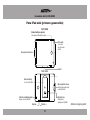
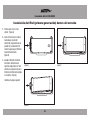
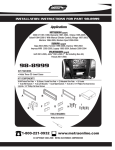
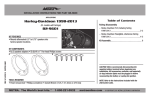
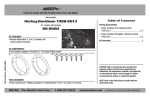
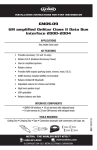
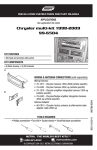
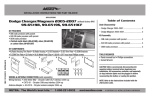
INSTALLATION INSTRUCTIONS FOR PART 98-9000
Pocket and tablet/phone mount
98-9000
KIT FEATURES
•Intendedforusewithasingle-DINradioinstalledintoa
varietyofMetradashkits.
•Pocketandtablet/phonemountconnecttogetherfora
solidmountinfrontoftheaftermarketradio.
•Willchargetheconnecteddevicethroughmount.
•3.5mmaudioinputjackonfrontofpocket.
REV. 4/7/2014 INST98-9000
B
•98-9001foriPhone4and4s
•98-9002foriPhone5
•98-9003forSamsungS3,S4,Note1,andNote2.
See metra-online.com for specific
vehicle applications
KIT COMPONENTS
•A)Pocket•B)Tablet/phonemount•C)ATCfuseholder(notshown)•D)5-ampATCfuse(notshown)
A
APPLICATIONS
•98-9000foriPadmini(1stgen)
TOOLS REQUIRED
•Panelremovaltool•Phillipsscrewdriver
•Socketwrench
CAUTION: Metra recommends disconnecting the
negative battery terminal before beginning any
installation. All accessories, switches, and especially
air bag indicator lights must be plugged in before
reconnecting the battery or cycling the ignition.
NOTE: Refer to the instructions included with the
aftermarket radio.
METRA. The World’s best kits.™
1-800-221-0932
metraonline.com
© COPYRIGHT 2014 METRA ELECTRONICS CORPORATION
98-9000
Kit Assembly
1. Installthepocketalongwitha
singleDINradiointotheMetra
installationkit.(FigureA,B)
2. ConnectRCAtoanAUXinputon
aftermarketradio.
3. Theredandblackwiresfromthe
pocketareforchargingthrough
thepocket.Connecttheblackwire
toground.Connecttheredwireto
afused12-voltaccessorypower
source.Afuseandfuseholder
havebeensuppliedinthiskitfor
the12-voltpowerwire.
(Figure A)
(Figure B)
2
Kit Assembly 98-9000
iPad mini (first Gen)
Front
Finger Push-out Window
To push out iPad mini from the case
Audio Pin
Plugs into ipad’s
audio jack
Open Base Port
Back
IR Lens
Mounting Arm
Connects to 98-9000
Open Base Port
Hold the key to insert or
release iPad mini
Power on/off button
Red Switch
Turn iPad mini on or off
Volume -
Volume +
3
To Lock and Unlock
from the 98-9000
Continued on next page
Kit Assembly 98-9000
Installing iPad mini (first Gen) into the case
1. Pushtoclosethe”Openkey”
(FigureA)
2. InsertiPadminiintothecasewith
thechargeconnectorportmatched
withthecase’s“OpenPort”
position,thenpushiPadminidown
intothecase.(FigureB)
3. WhentheiPadminiisinsidethe
case,slidetheiPadminitothe
left,thenpressthe“Openkey”to
ensuretheiPadminiisheldfirmly
bythecase.(FigureC).
(Figure A)
(Figure C)
Continued on next page
(Figure B)
4
Kit Assembly 98-9000
Removing iPad mini (first Gen) from the case
1. SlightlyslidetheiPadminitowards
thedirectionofthe”Openkey”
(FigureA)
Note: to prevent damge of
locking parts, please do not pull
the “Open key” too hard when
removing the iPad mini from
the case.
2. Useyourindexfingertopush
upontheiPadminithroughthis
circularhole.(FigureB)
3. TakeouttheiPadminifromthe
casefollowingthedirection
indicated.(FigureC)
(Figure A)
(Figure C)
(Figure B)
5
Kit Assembly 98-9000
Installing iPhone/Samsung on the Vehicle Dock
1. Pushthebuttonontherightsideofthevehicledock
toraisetheActivitieslock.
2. InserttheiPhone/Samsungintothesocketofthe
VehicleDockadapter,atthesametime,lowerthe
Activitieslocktosecurethephone.
Step 2
Continued on next page
Step 1
6
Kit Assembly 98-9000
Installing tablet/phone mount into pocket
1. Whileholdingthe“grayswitch”
totheUNLOCKposition,slidethe
tablet/phonemountintothepocket
asshowninthediagrams.
2. Whenthetablet/phonemount
isfullyinsertedintothepocket,
releasethe“grayswitch”to
LOCKposition.
Gray
Lock
Button
3. Adjustthetiltangletothe
desiredposition.
4. Toremovethemount,holdthegray
switchtotheUNLOCKposition.
FirstLock-Inposition
7
FullLock-Inposition
INSTALLATION INSTRUCTIONS FOR PART 98-9000
KNOWLEDGE IS POWER
REV. 4/7/2014 INST98-9000
Enhance your installation and fabrication skills by
enrolling in the most recognized and respected
mobile electronics school in our industry.
Log onto www.installerinstitute.com or call
800-354-6782 for more information and take steps
toward a better tomorrow.
Metra recommends MECP
certified technicians
METRA. The World’s best kits.™
1-800-221-0932
metraonline.com
© COPYRIGHT 2014 METRA ELECTRONICS CORPORATION
INSTRUCCIONES DE INSTALACIÓN PARA LA PIEZA 98-9000
Cavidad y tableta/teléfono montaje
98-9000
CArACtEríStICAS dEL kIt
•DiseñadoparausoconunradiodeunsoloDINinstalado
enunavariedaddekitsdetableroMetra
•Lacavidadylamonturadelatableta/teléfonoseconectan
juntasparaunmontajesólidoenfrentedelradiode
mercadosecundario.
•Cargaráeldispositivoconectadomediantelamontura
•Conectordeentradadeaudiode3.5mmenlaparte delanteradelacavidad.
REV. 4/7/2014 INST98-9000
B
•98-9001paraiPhone4y4s
•98-9002paraiPhone5
•98-9003paraSamsungS3,S4,Note1yNote2.
Consulte el sitio web metra-online.com para
aplicaciones específicas al vehículo
COmPONENtES dEL kIt
•A)Cavidad•B)Monturadetableta/teléfono•C)PortafusibleATC(nosemuestra)•D)FusibleATCde5amperes(nosemuestra)
A
APLICACIONES
•98-9000paraiPadmini(1ageneración)
HErrAmIENtAS rEquErIdAS
•Herramientaparaquitarpaneles
•DestornilladorPhillips•Llaveparadados
PRECAUCIÓN: Metra recomienda desconectar el terminal
negativo de la batería antes de comenzar cualquier
instalación. Todos los accesorios, interruptores y,
especialmente, las luces indicadoras de airbag deben
estar enchufados antes de volver a conectar la batería o
comenzar el ciclo de ignición.
Nota: Remítase a las instrucciones incluidas con el radio
de posventa.
METRA. The World’s best kits.™
1-800-221-0932
metraonline.com
© COPYRIGHT 2014 METRA ELECTRONICS CORPORATION
98-9000
Ensamble del kit
1. Instalelacavidadjuntoconelradio
deunsoloDINdentrodelkitde
instalaciónMetra.(FiguraA,B)
2. ConecteelcableRCAauna
entradaauxenelradiode
mercadosecundario.
3. Loscablesrojoynegroenla
cavidadsonparacargaratravés
deesta.Conecteelcablenegroa
tierra.Conecteelcablerojoauna
fuentedecorrientedeaccesoriode
12voltios.Sehaproporcionadoun
fusibleyunportafusibleenestekit
paraelcabledecorrientede
12voltios.
(Figura A)
(Figura B)
2
Ensamble del kit 98-9000
Para iPad mini (primera generación)
Parte frontal
Ventana táctil para expulsar
Para expulsar el iPad mini del estuche
Pin de audio
Se conecta al
conector de audio
del iPad
Abra el puerto de la base
Parte trasera
Lente IR
Brazo de montaje
Se conecta a 98-9000
Abra el puerto de la base
Sostenga la llave para insertar
o soltar el iPad mini
Botón de encendido/apagado
Interruptor rojo
Apagar o encender iPad mini
Volumen -
Volumen +
3
Para bloquear y
desbloquear del 98-9000
Continúa en la página siguiente
Ensamble del kit 98-9000
Instalación del iPad (primera generación) dentro del estuche
1. Presioneparacerrarla“llave
abierta”.(FiguraA)
2. InserteeliPadminienelestuche
haciendoqueelpuertodel
conectordecargacoincidaconla
posiciónde“puertoabierto”del
estuche,luegoempujeeliPadmini
haciadentrodelestuche.
(FiguraB)
3. CuandoeliPadminiestédentro
delestuche,deslícelahaciala
izquierda,luegopresionela“llave
abierta”paraasegurarsedequeel
iPadminiestáfirmementesujetada
enelestuche.(FiguraC)
(Figura A)
(Figura C)
Continúa en la página siguiente
(Figura B)
4
Ensamble del kit 98-9000
Cómo retirar el iPad (primera generación) dentro del estuche
1. DesliceunpocoeliPadminihacia
ladireccióndela“llaveabierta”.
(FiguraA)
2. Nota: para evitar dañar las
partes de bloqueo, no tire de la
“llave abierta” con demasiada
fuerza cuando retire el iPad mini
del estuche.
3. Usesudedoíndiceparaempujarel
iPadminihaciaarribaporelorificio
circular.(FiguraB)
4. SaqueeliPadminidelestuche
siguiendolasinstrucciones
indicadas.(FiguraC)
(Figura A)
(Figura C)
(Figura B)
5
Ensamble del kit 98-9000
Instalación de iPhone/Samsung en el conector del vehículo
1. Oprimaelbotónenelladoderechodelconectorde
vehículoparaelevarelsegurodeactividades.
2. InserteeliPhone/Samsungenelreceptáculodel
adaptadordelconectordelvehículoyalmismotiempo
bajeelsegurodeactividadesparasujetarelteléfono.
Paso 2
Continúa en la página siguiente
Paso 1
6
Ensamble del kit 98-9000
Instalación de la montura de la tableta/teléfono en la cavidad
1. Mientrassostieneel“interruptor
gris”enlaposiciónDESBLOQUEAR,
deslicelamonturadelatableta/
teléfonoenlacavidadcomose
muestraenlosdiagramas.
Botón
de
bloqueo
gris
2. Cuandolamonturadelatableta/
teléfonoseinsertecompletamente
enlacavidad,suelteel“interruptor
gris”alaposiciónBLOQUEAR.
3. Ajusteelángulodeinclinaciónala
posicióndeseada.
4. Pararetirarlamontura,sostenga
elinterruptorgrisenlaposición
DESBLOQUEAR.
Primeraposicióndebloqueo
7
Posicióndebloqueocompleto
INSTRUCCIONES DE INSTALACIÓN PARA LA PIEZA 98-9000
EL
CONOCIMIENTO
ESOWER
PODER
K
NOWLEDGE
IS P
Mejoresushabilidadesdeinstalaciónyfabricación
REV. 4/7/2014 INST98-9000
Enhance your installation and fabrication skills by
enrolling
in the most recognized and respected
inscribiéndoseenlaescueladedispositivoselectrónicos
mobile
electronics school in our industry.
móvilesmásreconocidayrespetadadenuestraindustria.
Log
onto www.installerinstitute.com or call
Regístreseenwww.installerinstitute.comollameal
800-354-6782 for more information and take steps
800-354-6782paraobtenermásinformaciónyavance
toward a better tomorrow.
haciaunfuturomejor.
Metra recomienda técnicos
con certificación del Programa
de Certificación en Electrónica
Móvil (Mobile Electronics
Certification Program, MECP).
METRA. The World’s best kits.™
1-800-221-0932
metraonline.com
© COPYRIGHT 2014 METRA ELECTRONICS CORPORATION