1
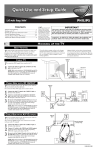
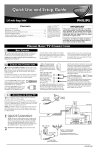
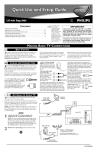
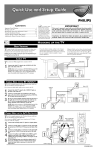
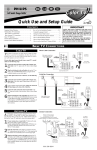
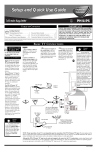
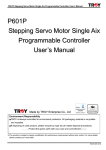
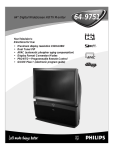
Rear-projection
S M A R T.
T V E R Y S M A R T.
T
HDTV Monitor
Quick-Use and Setup Guide
CONTENTS
Important Notice/Warning............................................................1
Hooking up the TV ..................................................................1–2
Operating the Television and Remote Control ........................2–3
Using the Installation Features ................................................4–6
Adjusting the Manual Converge Controls....................................7
IMPORTANT
As an Energy Star®
Partner, Magnavox has determined this product meets the
Energy Star® guidelines for
energy efficiency. Energy
Star® is a U.S. registered
mark. Using products with the
Energy Star® label can save
energy. Saving energy reduces
air pollution and lowers utility
bills.
HOOKING
This owner's manual is used with several different television models.
Not all features (and drawings) discussed in this manual will necessarily match those found with your television set. This is normal and
does not require that you contact your dealer or request service.
WARNING: TO PREVENT FIRE OR SHOCK HAZARD DO NOT
EXPOSE THIS UNIT TO RAIN OR EXCESSIVE MOISTURE.
UP THE TV
BEST VIEWING
T
he major benefit of this projection television is its large viewing screen. To see this large screen at its best, test various
locations in the room to find the optimal spot for viewing.
NOTE: Be sure to allow a free flow of air to and from the perforated back cover of the set.
To avoid cabinet warping, cabinet color changes,
and increased chance of set failure, do not place
the TV where temperatures can become excessively
hot—for example, in direct sunlight or near a
heating appliance.
CABLE TV
Magnetic fields, such as those of external speakers, may cause the picture to distort if the speakers are placed too close to the television. Move the
magnetic field source away from the TV until there
is no picture distortion.
Cable TV
Signal
T
his connection WILL supply Stereo sound to the TV.
1
Connect the cable TV signal to the ANTENNA IN 75Ω
jack on the back of the TV.
Back of TV
NOTE: Refer to the sections on TUNER MODE and AUTO
PROGRAM on page 4 of this guide. Set TUNER MODE to
the CABLE option. Run AUTO PROGRAM to store all
available cable channels in the TV’s memory.
1
HD INPUT-AV 5
DVI
ANTENNA IN 75Ω
HD INPUT-AV 5
DVI
HD INPUT-AV 4
G/Y
OUTPUT
INPUT-AV 1
R/Pr
INPUT-AV 2
HD INPUT-AV 4
G/Y
ANTENNA IN 75Ω
OUTPUT
INPUT-AV 1
VIDEO
S-VIDEO
L
Pb
Pr
R
B/Pb
VIDEO
B/Pb
VIDEO
S-VIDEO
L
V
L
L
AUDIO
Y
R/Pr
INPUT-AV 2
Y
SYNC
AUDIO
H
R
L
AUDIO
R
S-VIDEO
L
L
AUDIO
VIDEO
S-VIDEO
L
Pb
V
L
L
R
AUDIO
SYNC
AUDIO
Pr
R
H
R
L
L
AUDIO
AUDIO
R
R
CABLE BOX WITH RF IN/OUT
Cable TV
Signal
T
his is for example purposes only. The back of your cable box
may be labeled somewhat differently.
This connection WILL NOT supply stereo sound to the TV.
1
2
3
Connect the cable TV signal to the CABLE IN jack on
the back of the cable box.
Connect a coaxial cable (not supplied) to the TO TV
jack on the back of the cable box and to the ANTENNA
IN 75Ω jack on the back of the TV.
Be sure to set the Output Channel switch on the back of
the cable box to CH 3 or 4, then tune the cable box on the
TV to the corresponding channel. Once tuned, change
channels at the cable box, not the TV.
NOTE: Refer to the sections on TUNER MODE and AUTO
PROGRAM on page 4 of this guide. Set TUNER MODE to
the CABLE option. Run AUTO PROGRAM to store all
available cable channels in the TV’s memory..
CABLE BOX WITH A/V OUTPUTS
T
his is for example purposes only. The back of your cable box
may be labeled somewhat differently.
This connection MIGHT supply stereo sound to the TV. Check
with your cable TV company.
1
2
3
Back of TV
1
2
ANTENNA IN 75Ω
INPUT-AV 1
S-VIDEO
L
OUTPUT
CH
CABLE
IN
TO TV
NOTE: Refer to the sections on TUNER MODE and AUTO
PROGRAM on page 4 of this guide. Set TUNER MODE to
the CABLE option. Run AUTO PROGRAM to store all
available cable channels in the TV’s memory.
G/Y
OUTPUT
R/Pr
INPUT-AV 2
3
Pb
V
L
L
AUDIO
4
B/Pb
VIDEO
S-VIDEO
L
Pr
R
SYNC
AUDIO
H
R
L
AUDIO
R
L
AUDIO
R
Back of Cable Box
(example only)
3
Cable TV
Signal
Connect the cable TV signal to the CABLE IN jack on
the back of the cable box.
Be sure to set the Output Channel switch on the back of
the cable box to CH 3 or 4, then tune the cable box on the
TV to the corresponding channel. Once tuned, change
channels at the cable box, not the TV.
HD INPUT-AV 4
Y
VIDEO
3
Back of Cable Box
(example only)
OUTPUT
CH
Connect A/V cables to the VIDEO and AUDIO outputs
on the back of the cable box and to the corresponding
INPUT-AV 2 jacks on the back of the TV.
HD INPUT-AV 5
DVI
3
CABLE
IN
4
L
VIDEO
OUT
TO
TV
AUDIO
OUT
R
1
2
Back of TV
HD INPUT-AV 5
DVI
HD INPUT-AV 4
G/Y
ANTENNA IN 75Ω
OUTPUT
INPUT-AV 1
INPUT-AV 2
Y
VIDEO
S-VIDEO
L
Pb
AUDIO
R
B/Pb
VIDEO
S-VIDEO
L
L
L
Pr
R/Pr
AUDIO
R
V
SYNC
H
L
AUDIO
R
L
AUDIO
R
3135 035 22994- English
HOOKING
ANTENNA TV
UP THE TV
Antenna Signal
T
his connection WILL supply stereo sound to the TV.
1
Connect the antenna signal to the ANTENNA IN 75Ω jack
on the back of the TV.
1
Back of TV
Rear of TV
NOTE: Refer to the sections on TUNER MODE and AUTO
PROGRAM on page 4 of this guide. Set TUNER MODE to
the ANTENNA option. Run AUTO PROGRAM to store all
available cable channels in the TV’s memory.
HD INPUT-AV 5
DVI
HD INPUT-AV 4
G/Y
R/Pr
ANTENNA IN 75Ω
OUTPUT
INPUT-AV 1
INPUT-AV 2
Y
B/Pb
VIDEO
S-VIDEO
L
VIDEO
S-VIDEO
L
Pb
V
L
L
AUDIO
AUDIO
L
L
SYNC
Pr
AUDIO
AUDIO
H
R
R
R
R
OPERATING THE TELEVISION AND REMOTE CONTROL
TELEVISION
USING THE TV BUTTONS
S
hould your remote control be lost or broken, you can still
change some of the basic picture and sound settings with the
buttons on the TV. Follow the steps below to familiarize yourself
with the functions of the TV buttons.
VOLUME
A
-
1
2
CHANNEL
A
+
?
>
SOURCE
SELECT
MENU
Press POWER/STANDBY to turn the TV on (or off).
Allow about 10 seconds for the TV to power on.
HELPFUL HINT
Press the VOLUME + or – buttons to decrease or
increase the sound level.
Press the VOLUME + and – buttons simultaneously to display the onscreen menu. After the menu appears, use these
buttons to enter submenus and make selections or adjustments. (Use the CHANNEL buttons to move up and down
in the menu or submenus.) Press both VOLUME buttons
simultaneously to back out of the onscreen menus.
You can press any of the buttons on
the front of the TV to turn the TV on,
but you must press the
Power/Standby button to turn the set
off.
VOLUME
A
A
-
+
CHANNEL
?
>
SOURCE
SELECT
MENU
3
4
Press SOURCE SELECT to choose from among the signal inputs you have connected to the TV.
Press the CHANNEL buttons to select TV channels.
Remote Sensor
Window
Power Standby
Button
BATTERY USAGE CAUTION
REMOTE CONTROL
To prevent battery leakage that may
result in injury to you or damage to the
remote control:
• Install ALL batteries correctly, + and –,
as marked on the unit.
• Do not mix batteries (OLD and NEW or
CARBON and ALKALINE, etc.)
• Remove batteries when the remote control is not used for a long time.
Do not take apart, heat, or put batteries
in fire.
INSTALLING BATTERIES
T
o load batteries into the remote, follow these steps.
1
2
3
Gently press the tab on the battery cover on the back of
the remote and lift the battery cover off the remote.
Place the two “AA” size batteries in the remote’s battery case. Ensure that the (+) and (–) ends of the batteries
line up correctly with the (+) and (–) inside the case.
HELPFUL HINTS
Press the battery cover back into place.
POINTING THE REMOTE
When operating the remote control, point the remote toward
the remote sensor window on the TV.
X
VO
NA
AG
M
2
• Be sure to point the remote toward the
sensor window on the TV.
• Be within about 30 feet (10 meters) of
the TV.
• Avoid dropping the remote on hard surfaces.
• Do not use harsh chemicals to clean the
remote. Use only a soft, lightly moistened cloth.
OPERATING THE TELEVISION AND REMOTE CONTROL
POWER
TV
VCR
SWAP
ACC
ACTIVE
CONTROL FREEZE
PIP CH
DN
UP
SOUND
STATUS/
EXIT
PICTURE
MENU/
SELECT
REMOTE CONTROL
Power
Number Buttons
Press to turn the TV on or off.
Press to select TV channels. When selecting single-digit channels,
press the number of the desired channel. The TV will pause for a few
seconds and then tune to the selected channel.
Format
Press to select a picture-format mode for a video source connected to
the ANTENNA, AV1, CVI, AV2, or AV3 (side panel) inputs. Each
press of the button selects a different mode—4:3, EXPAND 4:3,
PANORAMA, WIDE SCREEN, or AUTO. Control the picture format of a video source connected to the HD inputs (AV4) with the HD
set-top box or progressive-scan-capable DVD player providing the
video source.
Volume +/–
Press to adjust the TV sound level.
Cursor Buttons
Up/Down: allows you to select the next or previous menu item in the
menu. Left/Right: allows you to access the submenus and adjust the
settings. When no onscreen displays or menus are present, use the
Cursor Ring Left/Right to select a picture format for a video source
connected to the ANTENNA, AV1, CVI, AV2, or AV3 (side panel
inputs) on the TV.
AV
Press repeatedly to select the different signal sources connected to the
TV: TV, AV1, CVI, AV2, AV3 (side jack panel), and AV4. (See page
17 in the Directions for Use manual.)
Exit
Channel +/–
Pressing the button once shows the current channel number, name (if
set), time (if set), and sound setting (stereo, mono, SAP, or mute).
Pressing the button twice shows the current AutoLock™ settings.
Pressing the button once when an onscreen display is showing
removes the onscreen display.
Press to select channels in ascending or descending order or cycle
through the signal inputs.
Mute
Press to turn the TV sound off. To restore the sound to its previous
level, press the button again.
SmartPicture
Press to select a SmartPicture™ control. Choose from four factory-set
controls—Movies, Sports, Weak Signal, and Multimedia—and a
PERSONAL control that you set according to your own preferences
through the onscreen Picture menu. (See page 19 in the Directions for
Use manual.) The four factory-set controls will enhance the TV picture according to the particular type of program you are watching. It
may also be used to enhance pictures with weak signals.
MENU
Press to display the onscreen menu. Press to return to a higher menu
level.
A/CH
Press to alternate between the currently viewed channel and
the previously viewed channel.
SmartSound
Press to select an SmartSound™ control. (See page 18 in the
Directions for Use manual.) Choose from three factory-set controls—
Voice, Music, and Theatre—and a Personal control that you set
according to your own preferences through the onscreen Sound menu.
The three factory-set controls will tailor the TV sound so as to
enhance the type of program you are watching.
ADJUSTING
OR
A
menu is simply a list of options. You can adjust or set your
TV’s onscreen menu options by pressing buttons on the remote
control. The following steps will familiarize you with how to use
the remote control with the onscreen menu.
1
2
MENU
SETTING MENU OPTIONS
IMAGE
SON
FONCTIONS
INSTALLATION
AIGUS
GRAVE
BALANCE
AVL
INCR SURROUND
Press the MENU button to bring the menu to the screen.
Then, as necessary, press the CURSOR BUTTON DOWN
or UP to highlight a menu option. Press the CURSOR
BUTTON RIGHT to enter the submenu for the option.
Within the submenu, press the CURSOR BUTTON
DOWN or UP to highlight an option.
Based on the submenu you are in, you can press the CURSOR BUTTON RIGHT or LEFT to make an adjustment,
select a setting, or enter a list or another submenu.
You can return to the submenu from a list by pressing the
CURSOR BUTTON LEFT.
To go from a submenu to the previous menu, highlight the
option at the top of the screen and press the CURSOR
BUTTON UP. You can also press MENU to return to the
previous menu.
Press EXIT to exit the menu.
HELPFUL HINTS
SOUS-MENU SON
SON
AIGUS
GRAVE
BALANCE
AVL
INCR SURROUND
30
Faites vos réglages et
sélections à partir
d’un sous-menu
SON
BALANCE
AVL
INCR SURROUND
CASQUE
STEREO
MONO
OU
STEREO
STEREO
SOUS-MENU
INSTALLATION
1
2
Vous pouvez également
accéder à une liste à partir
d’un sous-menu pour faire
vos sélections.
INSTALLATION
LANGUE
MODE SYNT.
PROGR. AUTO.
ÉDITER CANAL
AutoChron
AV3
AV4
1
2
3
SOUS-MENU
FONCTIONS
INSTALLATION
LANGUE
MODE SYNT.
PROGR. AUTO.
ÉDITER CANAL
AutoChron
AV3
AV4
1
2
3
SOUS-MENU
MINUTERIE
FONCTIONS
Passez d’un sous-menu
à l’autre et faites
des sélections ou
des réglages.
3
MINUTERIE
VERR. AUTO.
MÉDAILLON
SOUS-TITRE
FORMAT
HEURE
HEURE DÉBUT
HEURE ARRÊT
CANAL
ACTIVER
FONCTIONS
MINUTERIE
HEURE
HEURE DÉBUT
HEURE ARRÊT
CANAL
ACTIVER
8:06 PM
• If you don’t press any
remote buttons, the menu
will automatically disappear after about 20 seconds.
To bring the menu back,
press MENU.
• Sometimes not all the menu
items are visible on the
screen. If more items exist in
the menu, a cursor arrow
will appear. Also, a bullet
will appear for each remaining item, up to a maximum
of three. This will help you
determine how many items
are left in the menu. Keep
pressing the CURSOR BUTTON DOWN until you display all items.
• Should your remote become
lost or otherwise unavailable
for use, you can use the buttons on the front of the TV
to access the onscreen menu
and make adjustments or settings. See page 2. A replacement remote can be ordered
by calling 1-800-705-2000.
PICTURE
SOUND
FEATURES
INSTALL
USING THE INSTALLATION FEATURES
LANGUAGE
TUNER MODE
AUTO PROGRAM
CHANNEL EDIT
AutoChron
HELPFUL HINT
LANGUAGE
T
he menu LANGUAGE control enables you to set the TV’s
onscreen menu and onscreen displays to be shown in English,
French, or Spanish. Follow the steps in this section to set the control.
1
2
3
4
5
IMAGE
SON
FONCTIONS
INSTALLATION
Press the CURSOR BUTTON DOWN repeatedly until
INSTALL is highlighted. Then press the CURSOR BUTTON RIGHT to enter the INSTALL submenu.
ENGLISH
FRANÇAIS
ESPAÑOL
INSTALL
Press the CURSOR RING RIGHT again to highlight the
menu LANGUAGE options list.
LANGUAGE
TUNER MODE
AUTO PROGRAM
CHANNEL EDIT
AutoChron
Press the CURSOR BUTTON DOWN or UP to select
your menu language.
Instantaneously, the onscreen displays appear in the language that you choose.
3
5
ENGLISH
FRANÇAIS
˜
ESPANOL
Faites vos sélections et
l’affichage à l’écran apparaît
instantanément dans
la langue de votre choix.
OU
Français
Espagnol
INSTALLATION
1
2,4
TUNER MODE
S
1
2
3
4
Press the MENU button. The onscreen menu appears.
Press the CURSOR BUTTON DOWN repeatedly until
INSTALL is highlighted.
5
6
Press the EXIT button to exit the menu.
INSTALAR
LANGUE
MODE SYNT.
PROGR. AUTO.
ÉDITER CANAL
AutoChron
FRANÇAIS
ESPAÑOL
ENGLISH
OU
IDIOMA
SINTONIZADOR
AUTO PROG.
EDITAR CANAL
AutoChron
ESPAÑOL
ENGLISH
FRANÇAIS
HELPFUL HINT
INSTALLATION
et the TUNER MODE control according to the type of signal you have
connected to the TV—ANTENNA or CABLE. If you select AUTO, the
TV will automatically detect the type of signal you have connected.
LANGUE
MODE SYNT.
PROGR. AUTO.
ÉDITER CANAL
AutoChron
INSTALLATION
CÂBLE
ANTENNE
AUTO
LANGUE
MODE SYNT.
PROGR. AUTO.
ÉDITER CANAL
AutoChron
CÂBLE
ANTENNE
AUTO
Press the CURSOR BUTTON RIGHT to enter the
INSTALL submenu. Then press the CURSOR BUTTON
DOWN once to highlight TUNER MODE.
If you select the Tuner
Mode option that
matches your signal
source rather than
AUTO, the time
required for AUTO
PROGRAM to store
channels to the TV’s
memory can be reduced.
Press the CURSOR BUTTON RIGHT to highlight the
TUNER MODE options list.
Press the CURSOR BUTTON DOWN or UP repeatedly
until you select the option that matches your signal connection, CABLE or ANTENNA. If you want the TV to determine the type of signal, select AUTO. (You have selected
an option when the dot and triangle are next to the option.)
2,3
5
Proceed to the section on “Auto Program.”
AUTO PROGRAM
T
he AUTO PROGRAM feature will scan for channels with
active broadcast signals and store those channels in the TV’s
memory. It will tune up to 69 channels for antenna, and up to 125
channels for cable. After you run AUTO PROGRAM, you can use
the CH(annel) +/– buttons to quickly and easily select stations.
You can also press the PROG. LIST (Program List) button on your
remote to see a list of the channels.
1
2
3
4
LANGUAGE
TUNER MODE
AUTO PROGRAM
CHANNEL EDIT
AutoChron
Press the MENU button. The onscreen menu appears.
Press the EXIT button to exit the menus.
The LANGUAGE control makes only the
TV’s onscreen menu
items appear in English,
French, or Spanish text.
The control does not
change the language of
Closed Captioning (CC)
text that may be included
with programs.
INSTALL
LANGUE
MODE SYNT.
PROGR. AUTO.
ÉDITER CANAL
AutoChron
1
4
HELPFUL HINTS
INSTALLATION
LANGUE
MODE SYNT.
PROGR. AUTO.
ÉDITER CANAL
AutoChron
INSTALLATION
RECHERCHE
Press the MENU button. The onscreen menu appears.
Then press the CURSOR BUTTON DOWN repeatedly
until INSTALL is highlighted.
When the programming is done, press the STATUS EXIT
button to exit the menu.
CÂBLE
PATIENTER SVP
CANAL 12
c CHECK IT OUT
Press the CURSOR BUTTON RIGHT to enter the
INSTALL submenu. Then press the CURSOR BUTTON
DOWN repeatedly until AUTO PROGRAM is highlighted.
Press the CURSOR BUTTON RIGHT to begin the automatic search for channels. The progress of autoprogramming
is displayed.
LANGUE
MODE SYNT.
PROGR. AUTO.
ÉDITER CANAL
AutoChron
2,3
4
1
4
After you’ve run AUTO
PROGRAM, check the
results. Press the
CH(annel) +/– buttons
on your remote to cycle
through your available
channels.
• It is strongly recommended that you run
Auto Program.
Otherwise, the TV may
not tune the channels
properly, resulting in
improper pictures.
• If you change signal
sources—to a new cable
company or from antenna to cable, for example—be sure that Tuner
Mode is properly set for
the new source. Then run
Auto Program again.
This will ensure that the
channels are correctly
stored in the TV’s
memory.
• If you have made
AutoLock™ settings,
remember that you must
remove any channel
blocks before Auto
Program will work.
(See pages 35-43 in the
Directions for Use
USING THE INSTALLATION FEATURES
CHANNEL EDIT
LANGUE
MODE SYNT.
PROGR. AUTO.
ÉDITER CANAL
AutoChron
T
1
2
3
4
5
AutoChron
AV3
AV4
1
2 SAUTÉ
3
4
1
2
INSTALLATION
LANGUE
MODE SYNT.
PROGR. AUTO.
ÉDITER CANAL
AutoChron
SETTING TIME AUTOMATICALLY
The steps in this section tell you how to set AutoChron™ to
download the time from your PBS station to your TV. After successful setup, AutoChron™ will automatically maintain the correct time using your PBS station until you set the time manually.
8
LANGUE
MODE SYNT.
PROGR. AUTO.
ÉDITER CANAL
AutoChron
Channels that Auto
Program (see page 4)
determined not to contain active broadcast signals are marked
SKIPPED.
5
A
1
2
3
4
5
6
7
INSTALLATION
AV3
AV4
1
2
3
3
utoChron™ gives you the option of setting the time manually or
automatically.
Press the MENU button. The onscreen menu appears. Then
press the CURSOR BUTTON DOWN repeatedly until
INSTALL is highlighted.
Press the CURSOR BUTTON RIGHT to enter the
INSTALL submenu. Then press the CURSOR BUTTON
DOWN repeatedly until AutoChron is highlighted.
Press the CURSOR BUTTON RIGHT to enter the
AutoChron SET TIME area.
Press the CURSOR BUTTON RIGHT again to select
AUTO. Within a few seconds, a menu containing the timezone options appears.
If necessary, press the CURSOR BUTTON UP or DOWN
to highlight your correct time zone. Then press the CURSOR
BUTTON RIGHT. Within a few seconds, the option of
Daylight Savings Time appears on screen.
If the Daylight Savings Time option you want to select is
not highlighted, press the CURSOR BUTTON UP or
DOWN to highlight the option. Then press the CURSOR
BUTTON RIGHT to activate your selection.
Press the number buttons on your remote to enter the channel number for your PBS station (02, 15, or 121, for example). Wait until the TV completes its search. If the time was
not found, you will need to locate the correct channel number
for your PBS station and input that number.
Press the EXIT button to exit the menu.
LANGUAGE
TUNER MODE
AUTO PROGRAM
CHANNEL EDIT
AutoChron
HELPFUL HINT
INSTALLATION
his feature allows you to edit or skip channels from the channel
list that have bad or weak signals or channels you do not want
to watch.
Press the MENU button. The onscreen menu appears. Then
press the CURSOR BUTTON DOWN repeatedly until
INSTALL is highlighted. Press the CURSOR BUTTON right
to enter the INSTALL submenu.
Press the CURSOR BUTTON DOWN repeatedly until
CHANNEL EDIT is highlighted. Then press the CURSOR
BUTTON RIGHT or LEFT to access the CHANNEL EDIT
list.
Press the CURSOR BUTTON UP or DOWN to scroll
through the list of channels. Or press the NUMBER buttons
on your remote control to select a specific channel.
With the channel you want to edit selected, press the
CURSOR BUTTON RIGHT to mark the channel as
SKIPPED. (Channels you mark SKIPPED will not appear
when you use the CH[annel] +/– buttons to change channels
while watching TV.)
When you want to add a channel that has been marked
SKIPPED, press the CURSOR BUTTON UP or DOWN to
highlight the channel. Then press the CURSOR BUTTON
RIGHT to remove the word SKIPPED.
Press the EXIT button to exit the menu.
PICTURE
SOUND
FEATURES
INSTALL
INSTALLATION
INSTALLATION
RÉGLER HEURE
LANGUE
MODE SYNT.
PROGR. AUTO.
ÉDITER CANAL
AutoChron
AUTO
MANUEL
7
RÉGLER HEURE
AUTO
MANUEL
2,3,
4
5,6
8
HEURE D’ÉTÉ ?
OUI
NON
LANGUE
MODE SYNT.
PROGR. AUTO.
ÉDITER CANAL
AutoChron
CENTRAL
MONTAGNE
PACIFIQUE
CHERCHER
HEURE
LANGUE
MODE SYNT.
PROGR. AUTO.
ÉDITER CANAL
AutoChron
COMPOSER CANAL
02
PBS
INSTALLATION
INSTALLATION
1
FUSEAU HORAIRE ?
INSTALLATION
INSTALLATION
LANGUE
MODE SYNT.
PROGR. AUTO.
ÉDITER CANAL
AutoChron
LANGUE
MODE SYNT.
PROGR. AUTO.
ÉDITER CANAL
AutoChron
CHERCHER
HEURE
PATIENTER SVP
15
PBS
LANGUE
MODE SYNT.
PROGR. AUTO.
ÉDITER CANAL
AutoChron
CHERCHER
HEURE
HEURE TROUVÉE
FIN:ENTRER STATUS
11:15 AM
OU
The message shown to the
right indicates that
AutoChron™ is not finding
a PBS station at the channel you input. Check the
channel number for your
PBS station.You will need
to input the correct number for the time to be
found.
INSTALLATION
LANGUE
MODE SYNT.
PROGR. AUTO.
ÉDITER CANAL
AutoChron
CHERCHER
HEURE
HEURE NON-TROUVÉE
COMPOSER CANAL
15
PBS
INSTALLATION
LANGUE
MODE SYNT.
PROGR. AUTO.
ÉDITER CANAL
AutoChron
SETTING TIME MANUALLY
1
2
3
4
Follow steps 1–3 above, then press the CURSOR BUTTON DOWN to highlight MANUAL and CURSOR BUTTON RIGHT to enter the MANUAL time input area.
Use the number buttons on your remote control to input
the first digit for the time. You can also press the CURSOR
BUTTON UP or DOWN to select a digit. Press the CURSOR BUTTON RIGHT to move to the next digit input slot
and input the time.
If you should need to change a number you have input, you
can cursor left or right to the digit input slot to make the
correction.
After you have input the time, press the CURSOR
BUTTON RIGHT to enter the AM/PM area. Then press
the CURSOR BUTTON UP or DOWN to select AM or
PM.
Press the EXIT button to exit the menu.
INSTALLATION
RÉGLER HEURE
AUTO
MANUAL
2
4
3
1
5
LANGUE
MODE SYNT.
PROGR. AUTO.
ÉDITER CANAL
AutoChron
ENTRER HEURE
11:00 AM
HELPFUL HINTS
• After setting the
clock, you will be
able to access the
time by pressing the
EXIT button. Or you
can view the time
constantly in the
upper right-hand corner of the screen by
turning the DISPLAY
control on (see page
31 in the Directions
for Use manual).
PICTURE
SOUND
FEATURES
INSTALL
USING THE INSTALLATION FEATURES
LANGUAGE
TUNER MODE
AUTO PROGRAM
CHANNEL EDIT
AutoChron
NAME
MODE SYNT.
PROGR. AUTO.
ÉDITER CANAL
AutoChron
NOM DU CANAL
T
he channel NAME feature allows you to list the “call” letters
of your favorite stations beside their channel numbers when
they appear on the screen. The TV has in memory a list of the 50
most popular channel names (NBC, ABC, or FOX, for example).
You also can enter a custom name (up to five characters).
1
2
3
4
INSTALLATION
MODE SYNT.
PROGR. AUTO.
ÉDITER CANAL
AutoChron
NOM DU CANAL
PERSONNEL
Press the NUMBER buttons, the CH(annel) +/– buttons,
or the AV button to select a TV channel or input source to
which you want to assign a name or whose name you want
to modify.
Press the MENU button. The onscreen menu appears.
Then press the CURSOR BUTTON DOWN repeatedly
until INSTALL is highlighted. Press the CURSOR BUTTON RIGHT to enter the INSTALL submenu.
At this point you can choose between options of creating a
personal name for the channel or selecting a preset one
from a list.
PERSONNEL
Créez votre propre nom
pour un canal.
1
1
Press the CURSOR BUTTON DOWN repeatedly until
the NAME control is highlighted. Then press the CURSOR
BUTTON RIGHT to highlight the NAME options area.
To create your own personal name for the channel or
change a personal name you created previously, press
the CURSOR BUTTON RIGHT. Then press the CURSOR BUTTON UP or DOWN to select the first character
of the name. You can input up to five characters for the
name. When finished, press the MENU button.
Or
To choose from the list of preset names, press the CURSOR BUTTON UP or DOWN to highlight your choice
for the channel name. Press the CURSOR BUTTON
RIGHT to select the name. Then press the MENU button.
5
HELPFUL HINTS
INSTALLATION
WXWXYWXYZWXYZ3
OU
5
Choisissez à partir d’une liste
d’options préréglées.
4
2
3
Press the EXIT button to exit the menu.
When you press the EXIT button when no onscreen display
is present or change to the channel you’ve named, the name
will appear on screen next to the channel number or signal
source name (except AV4).
6
INSTALLATION
MODE SYNT.
PROGR. AUTO.
ÉDITER CANAL
AutoChron
NOM DU CANAL
USA
VH
WGN
WOR
WTHR
• The five PERSONAL
name characters you
can input may be letters, a dash, or the
numbers 0 through 9.
• If you begin inputting
a personal name or
changing an existing
one and decide you’d
rather select a name
from the preset list,
press the MENU button. This will return
you to the INSTALL
submenu, with NAME
highlighted. Simply
press the CURSOR
BUTTON RIGHT to
highlight the NAME
options area again and
choose a preset name
as explained in step 4
to the left.
ADJUSTING THE MANUAL CONVERGE CONTROLS
CONVERGE RED/BLUE
C
onvergence is the correct lining up of the red and blue light paths
on the TV screen. If the paths don’t line up, color fringes will appear
around objects on screen. If no color fringes show, then no convergence
adjustments are necessary. NOTE: Allow the TV to warm up 20 minutes
before adjusting convergence. See the chart to the right for guidance as
to which convergence controls to use.
1
2
3
Press the MENU button. The menu appears. Press the CURSOR BUTTON RIGHT to enter the PICTURE submenu. Then
press the CURSOR BUTTON DOWN until MANUAL CONVERGE is highlighted.
Press the CURSOR BUTTON RIGHT to enter the MANUAL CONVERGE submenu. If you want to adjust the Red
Convergence, press the CURSOR BUTTON RIGHT to enter
the adjust mode. If you want to adjust the Blue Convergence,
press the CURSOR BUTTON DOWN to highlight CONVERGE BLUE, then press the CURSOR BUTTON RIGHT to
enter adjust mode.
In adjust mode, press the CURSOR BUTTON RIGHT,
LEFT, UP, or DOWN to adjust the cross hair until the color
outline around it is gone. (The adjustment is automatically
saved in the TV’s memory.) To return to the MANUAL CONVERGE menu, press the MENU button. To exit the onscreen
display, press the EXIT button.
MULTIPOINT RED/BLUE
T
1
2
3
4
5
Adjust the
CONVERGE
RED control.
Then if any red
outlines remain,
adjust the
MULTIPOINT
RED control.
Converge Red
Adjust the
CONVERGE
BLUE control.
Various
Then if any blue
images
outlines remain,
throughout
adjust the
the entire
picture have MULTIPOINT
blue outlines. BLUE control.
2,3
Converge Red
1
IMAGE
CONVERGER
CONVERGE ROUGE
CONVERGE BLEU
MULTI-PNT ROUGE
MULTI-PNT BLEU
SAUVEGARDER M.P.
IMAGE
CONVERGER
CONVERGE ROUGE
CONVERGE BLEU
MULTI-PNT ROUGE
▲ MULTI-PNT BLEU
SAUVEGARDER M.P.
2
3,4
É
pour Naviguer
Quitter pour effectuer des réglages
pour Naviguer
Quitter pour effectuer des réglages
pour effectuer des réglages
Quitter pour naviguer
pour Naviguer
Quitter pour effectuer des réglages
pour effectuer des réglages
Quitter pour naviguer
1,5
6
IMAGE
CONVERGER
CONVERGE ROUGE
CONVERGE BLEU
MULTI-PNT ROUGE
▲ MULTI-PNT BLEU
SAUVEGARDER M.P.
▲
6
Press the MENU button. The menu appears. Press the
CURSOR BUTTON RIGHT to enter the PICTURE menu.
Then press the CURSOR BUTTON DOWN until MANUAL CONVERGE is highlighted.
Press the CURSOR BUTTON RIGHT to enter the
MANUAL CONVERGE submenu. Press the CURSOR
BUTTON DOWN until MULTIPOINT RED or MULTIPOINT BLUE is highlighted. Then press the CURSOR
BUTTON LEFT or RIGHT to enter Navigate mode.
Press the CURSOR BUTTON LEFT, RIGHT, UP, or
DOWN to move to a cross hair that has a color outline.
Then press the EXIT button to enter adjust mode.
Press the CURSOR BUTTON LEFT, RIGHT, UP, or
DOWN to adjust the cross hair image until the color outline is gone.Then press the EXIT button to return to NAVIGATE mode. Repeat steps 3 and 4 until all misaligned
cross images have been adjusted.
After making your adjustments, you must store them in
the TV’s memory using SAVE MULTIPOINT.
NOTE: If you are not satisfied with the adjustments you
just made and want to start over, you can use the UNDO
MULTIPOINT control. This control allows you to undo the
adjustments, but it will work only if you use it before saving.
To save your multipoint adjustments, press the MENU
button. This returns you to the MANUAL CONVERGE
menu. Press the CURSOR BUTTON DOWN until SAVE
MULTIPOINT is highlighted. Then press the CURSOR
BUTTON LEFT or RIGHT to store your adjustments in the
TV’s memory.
OR
To undo the multipoint adjustments you just made,
press the MENU button. This returns you to the MANUAL CONVERGE menu. Press the CURSOR BUTTON
DOWN until UNDO MULTIPOINT is highlighted. Press
the CURSOR BUTTON LEFT or RIGHT to undo the
adjustments. Press the CURSOR BUTTON UP until MULTIPOINT RED or MULTIPOINT BLUE is highlighted.
Press the CURSOR BUTTON LEFT or RIGHT to enter
Navigate mode. Then Follow steps 3–5 above to make your
adjustments again.
OR
To restore the TV’s convergence to factory settings,
press the MENU button. This returns you to the MANUAL CONVERGE menu. Press the CURSOR BUTTON
DOWN until RESTORE FACTORY is highlighted. Then
press the CURSOR BUTTON LEFT or RIGHT to restore
the TV’s convergence to factory settings.
Press the EXIT button to exit the submenu.
Various
images
throughout
the entire
picture have
red outlines.
Action
PICTURE
MANUAL CONVERGE
CONVERGE RED
CONVERGE BLUE
MULTIPOINT RED
MULTIPOINT BLUE
SAVE MULTIPOINT
▲
he Multipoint Red/Blue Convergence controls enable you to adjust
the convergence at specific points on the TV screen.
NOTE: The onscreen display will leave the screen after 20 seconds of
inactivity. If this happens, simply press the MENU button to bring the
MANUAL CONVERGE submenu back.
Screen
appearance
pour effectuer des réglages
Quitter pour naviguer
É
SAUVEGARDER M.P.
IMAGE
CONVERGER
CONVERGE ROUGE
CONVERGE BLEU
MULTI-PNT ROUGE
▲ MULTI-PNT BLEU
SAUVEGARDER M.P.
IMAGE
CONVERGER
CONVERGE ROUGE
CONVERGE BLEU
MULTI-PNT ROUGE
▲ MULTI-PNT BLEU
SAUVEGARDER M.P.
MÉMORISÉ
HELPFUL HINT
If you should experience a power outage
before saving your multipoint-convergence settings, your settings will
be lost.
OU
ÉLIMINER M.P.
IMAGE
CONVERGER
CONVERGE BLEU
MULTI-PNT ROUGE
MULTI-PNT BLEU
▲ SAUVEGARDER M.P.
UNDO MULTIPOINT
IMAGE
CONVERGER
CONVERGE BLEU
MULTI-PNT ROUGE
MULTI-PNT BLEU
▲ SAUVEGARDER M.P.
UNDO MULTIPOINT
RÉINSTALLÉ
OU
REMET L'ORIGINL
IMAGE
CONVERGER
MULTI-PNT ROUGE
MULTI-PNT BLEU
SAUVEGARDER M.P.
▲ ÉLIMINER M.P.
REMET L'ORIGINL
7
IMAGE
CONVERGER
MULTI-PNT ROUGE
MULTI-PNT BLEU
SAUVEGARDER M.P.
▲ ÉLIMINER M.P.
REMET L'ORIGINL
RÉINSTALLÉ