1
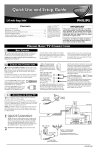
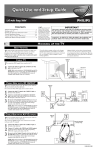
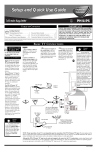
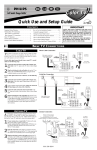
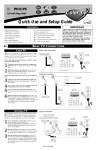
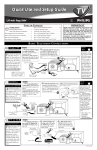
Quick Use and Setup Guide
CONTENTS
As an Energy Star®
Partner, Philips
Consumer Electronics
has determined this
product meets the
Energy Star® guidelines
for energy efficiency.
Energy Star® is a U.S.
registered mark. Using
products with the Energy
Star® label can save
energy. Saving energy
reduces air pollution and
lowers utility bills.
Important Notice/Warning . . . . . . . . . . . . . . . . . . . . . . . . . . . . . . . . . . . . . . . . . .1
Making Basic TV Connections . . . . . . . . . . . . . . . . . . . . . . . . . . . . . . . . . . . .1–2
Operating the Television and Remote Control . . . . . . . . . . . . . . . . . . . . . . . . .2–4
Using the Installation Features . . . . . . . . . . . . . . . . . . . . . . . . . . . . . . . . . . . . .4–7
Using Auto IntelliSense™ to Adjust Picture Convergence . . . . . . . . . . . . . . . . . .7
Using the Picture-in-Picture (PIP) Feature . . . . . . . . . . . . . . . . . . . . . . . . . . . . . .8
Rear-projection
HDTV Monitor
IMPORTANT
This owner's manual is used with several different television models. Not all features (and drawings) discussed in this manual will necessarily
match those found with your television set. This is
normal and does not require that you contact
your dealer or request service.
WARNING: TO PREVENT FIRE OR SHOCK
HAZARD DO NOT EXPOSE THIS UNIT TO
RAIN OR EXCESSIVE MOISTURE.
MAKING BASIC TV CONNECTIONS
BEST VIEWING
T
he major benefit of this projection television is its large viewing screen. To see this large screen at its best, test various
locations in the room to find the optimal spot for viewing.
NOTE: Be sure to allow a free flow of air to and from the perforated back cover of the set.
CABLES AND CONNECTORS
I
f you are new to making TV hookups, you may want to read
this section. (The cables and connectors discussed are not supplied with your set. You can buy them at most stores that sell
audio or video products. Or call our Customer Care Center at
1-800-531-0039.)
This publication provides you with examples of basic connections.
See pages 6–17 in the Directions for Use manual for more information on connections, along with connection examples.
A 75-ohm coaxial cable connects signals
from an antenna or a cable TV company
to the antenna jack on the back of the TV.
Coaxial cables use “F” connectors.
A two-way signal splitter enables you to
take a single antenna or cable TV signal
and supply it to two different inputs.
ANTENNA
OR
To avoid cabinet warping, cabinet color changes,
and increased chance of set failure, do not place
the TV where temperatures can become excessively
hot—for example, in direct sunlight or near a
heating appliance.
Magnetic fields, such as those of external speakers, may cause the picture to distort if the speakers are placed too close to the television. Move
the magnetic field source away from the TV until
there is no picture distortion.
A 300- to 75-ohm twin-lead
adapter accepts the antenna
cables (called twin-lead wires)
from an antenna, allowing you
to connect the antenna signal to
the TV.
and left audio channels, respectively. Use an audio
cable with a white connector when making mono,
or nonstereo, connections. The connectors of
video cables used to connect component video or
RGB (high-resolution) jacks are often color coded
red, green, and blue. Component video connections provide you with the highest possible color
and picture resolution.
An S-Video cable connects
devices such as DVD players,
VCRs, or camcorders to your
TV. S-Video provides better picture performance
than regular (composite) video connections.
S-Video cables can be used only with S-Videocompatible accessory devices. You must also connect the left and right audio cables along with SVideo because the S-Video jack carries only the
picture signal, not the sound.
Video and audio cables
with standard RCA
(phono) connectors connect the video and audio
jacks of accessory
devices such as VCRs
and DVD players to the
jacks on the TV.
To simplify making connections, the connectors
are usually color coded. The jacks on your TV are
likewise color coded to match the colors of the
connectors. The coding is as follows: yellow for
video (composite) and red and white for the right
CABLE TV
T
his section shows you how to make a basic TV connection
using a cable TV or antenna signal.
If you have cable TV service, you’ll simply connect the coaxial
cable lead-in from the cable TV company to your TV. If you intend
to connect a VHF/UHF antenna, you may need a 300- to 75-ohm
adapter, which is not supplied with your TV.
NOTE: You should be able to buy optional accessories such as a
VHF/UHF antenna or a 300- to 75-ohm adapter at most stores
that sell electronics. Or you can call our Customer Care Center
at 1-800-531-0039.
Cable TV
Company
Coaxial Cable
Lead-in from
Cable TV Company
1
ANTENNA IN 75Ω
Rear of TV
AMP SWITCH
EXT
INT
_
+
HD INPUT-AV 5
Coaxial Cable
1
2
Connect the Cable TV or antenna signal to the
ANTENNA IN 75Ω jack on the rear of the TV.
NOTE: If you are using an antenna with a round coaxial
cable (75Ω), then you are ready to connect to the back of
the TV. If your antenna has a flat, twin-lead wire (300Ω),
you must first attach the antenna wires on a 300- to 75ohm adapter. Then push the round end of the adapter onto
the ANTENNA IN 75Ω jack on the rear of the TV.
Insert the TV’s power plug into the wall power outlet.
DVI
CENTER CHANNEL AMP INPUT
OR
HD INPUT-AV 4
G/Y
R/Pr
INPUT-AV 1
OUTPUT
INPUT-AV 2
Y
VIDEO
S-VIDEO
L
Pb
SUBWOOFER
B/Pb
VIDEO
S-VIDEO
L
V
L
L
L
L
SYNC
AUDIO
Pr
R
AUDIO
AUDIO
AUDIO
H
R
R
R
300- to 75-ohm
Adapter
Outdoor or Indoor Antenna
(Combination VHF/UHF)
Twin-lead Wire
The combination antenna receives normal
broadcast channels 2–13 (VHF) and 14–69 (UHF).
Coaxial Cable
Lead-in from Antenna
3135 035 20562
MAKING BASIC TV CONNECTIONS (CONTINUED)
CABLE CONVERTER BOXES
F
ollow the steps below to connect a cable converter box to
your TV.
To make the connections in this example, you will need one coaxial cable (75Ω).
NOTE: The coaxial cable is not supplied with your TV. You should be
able to buy one at most stores that sell electronics. Or you can call our
Customer Care Center at 1-800-531-0039.
Coaxial Cable
Lead-in from
Cable TV Company
2
Coaxial Cable
(Not Supplied)
1
Cable
Converter
ANTENNA IN 75Ω
Rear of TV
AMP SWITCH
EXT
INT
_
+
HD INPUT-AV 5
Box
DVI
CENTER CHANNEL AMP INPUT
HD INPUT-AV 4
G/Y
INPUT
R/Pr
INPUT-AV 1
1
2
3
Connect your cable TV signal to the INPUT jack on the
back of the cable converter box.
OUTPUT
INPUT-AV 2
Y
VIDEO
OUTPUT
S-VIDEO
L
Pb
SUBWOOFER
B/Pb
VIDEO
S-VIDEO
L
V
L
L
L
L
SYNC
AUDIO
R
Pr
AUDIO
AUDIO
AUDIO
H
R
R
Connect a coaxial cable from the OUTPUT jack on the
back of the cable converter box to the ANTENNA IN 75Ω
jack on the rear of the TV.
R
Insert the TV’s power plug into the wall socket.
OPERATING THE TELEVISION AND REMOTE CONTROL
HELPFUL HINTS
TELEVISION
• You can press any of the buttons on
the front of the TV to turn the TV
on, but you must press the
Power/Standby button to turn the
set off.
• As shown in the illustration below,
pressing the VOLUME – and
SOURCE SELECT buttons simultaneously activates Auto
IntelliSense™. This feature automatically adjusts the picture’s convergence (color alignment) if the
picture appears fuzzy. For more on
Auto IntelliSense™, see page 7.
USING THE TV BUTTONS
S
hould your remote control be lost or broken, you can still
change some of the basic picture and sound settings with the
buttons on the TV. Follow the steps below to familiarize yourself
with the functions of the TV buttons.
Intellisense
JUST PUSH THESE BUTTONS SIMULTANEOUSLY
for fast picture
convergence
VOLUME
A-
A+
CHANNEL
?
>
SOURCE
SELECT
MENU
1
2
Press POWER/STANDBY to turn the TV on (or off).
Allow about 10 seconds for the TV to power on.
Press the VOL(ume) + or – buttons to decrease or
increase the sound level.
Press the VOL(ume) + and – buttons simultaneously to display the onscreen menu. After the menu appears, use these
buttons to enter submenus and make selections or adjustments. (Use the CH[annel] Up and Down buttons to move
up and down in the menu or submenus.) Press both
VOL(ume) buttons simultaneously to back out of the
onscreen menus.
3
4
POWER
TV
VCR
SWAP
ACC
ACTIVE
CONTROL FREEZE
PIP CH
DN
UP
PICTURE
SOUND
Intellisense
JUST PUSH THESE BUTTONS SIMULTANEOUSLY
for fast picture
convergence
Press SOURCE SELECT to choose from among the signal inputs you have connected to the TV.
Power Standby
Button
Remote Sensor
Window
Press the CH(annel) Up and Down buttons to select TV
channels.
REMOTE CONTROL
BATTERY USAGE CAUTION
To prevent battery leakage that
may result in injury to you or damage to the remote control:
INSTALLING BATTERIES
T
o load the supplied batteries into the remote, follow these
steps.
1
2
3
Auto IntelliSense is a trademark
of Philips Consumer Electronics
Company. Copyright 2002
Philips Consumer Electronics.
• Install ALL batteries correctly, + and –,
as marked on the unit.
• Do not mix batteries (OLD and NEW
or CARBON and ALKALINE, etc.)
Gently press and hold the indention on the back of the
remote and slide the battery cover off the remote.
• Remove batteries when the remote
control is not used for a long time.
Place the two “AA” size batteries in the remote’s battery case. Ensure that the (+) and (–) ends of the batteries
line up correctly with the (+) and (–) inside the case.
Do not take apart, heat, or put batteries in fire.
HELPFUL HINTS
Slide the battery cover back into place.
POW
ER
TV
ACC
VCR
ACC
VCR
TV
OK
PIP CH
SWAP
POINTING THE REMOTE
DN
DN
SOUN
EE ZE
VE
ACTI ROL FR
CONT
UP
UP
D
U/
MEN CT
SELE
US/
STATEXIT
Press the TV mode button on the remote to ensure that the
remote sends its commands to the TV. When operating the remote
control, point the remote toward the remote sensor window on the
TV.
URE
PICT
TV MODE
Button
MUTE
CH
VOL
3
2
1
6
5
4
7
TV/VCR
CH
A/CH
A/
9
8
0
PIP
POSI
c CHECK IT OUT
You can set up your TV remote control to work with accessory
devices such as VCRs, DVD players, and cable converter boxes.
See pages 18–23 in the Directions for Use manual.
2
RF
SU
CC
TION
• Be sure to point the remote toward the
sensor window on the TV or accessory
device you are using the remote to
operate.
• Press the correct mode button for the
device you want to operate: TV, VCR,
ACC (for accessories other than VCRs).
• Be within about 30 feet (10 meters) of
the TV or accessory device you are
using the remote to operate.
• Avoid dropping the remote on hard surfaces.
• Do not use harsh chemicals to clean the
remote. Use only a soft, lightly moistened cloth.
OPERATING THE TELEVISION AND REMOTE CONTROL
POWER
TV
VCR
SWAP
SOUND
ACC
ACTIVE
CONTROL FREEZE
PIP CH
DN
UP
PICTURE
REMOTE CONTROL
VCR control buttons
Power
Press to pause, rewind, stop, play, or fast forward a videotape.
Press to turn the TV on or off.
TV • VCR • ACC (Mode buttons)
Measures and corrects all incoming signals to provide the
best picture-quality settings. (See page 58 in the Directions
for Use manual.) Press to turn Active Control™ on or off.
When Active Control™ is on, it automatically and continuously controls Sharpness and Noise Reduction settings.
Active Control™
Press to send remote signals to either the TV, VCRs, or other
accessory devices such as cable TV converters, satellite
receivers, DVDs, or laser disc players. (You may need to
program the remote to work accessory devices. See pages
18–23 in the Directions for Use manual that came with your
TV.)
POWER
Picture
PIP buttons: SWAP, PIP CH DN/UP, FREEZE
Press to operate the Picture-in-Picture (PIP) features. See
page 8 in this publication for more information on using
these buttons.
Sound
Press to select an AutoSound™ control. (See page 25 in the
Directions for Use manual.) Choose from three factory-set
controls—Voice, Music, and Theatre—and a Personal control that you set according to your own preferences through
the onscreen Sound menu. The three factory-set controls
will tailor the TV sound so as to enhance the type of program you are watching.
Status/Exit
Pressing the button once shows the current channel number,
name (if set), time (if set), Sleep Timer setting, and sound
setting (stereo, mono, SAP, or mute). Pressing the button
twice shows the current AutoLock™ settings. Pressing the
button once when an onscreen display is showing removes
the onscreen display.
TV
ACC
VCR
SWAP
ACTIVE
CONTROL FREEZE
PIP CH
DN
UP
Menu/Select
PICTURE
SOUND
Volume +/–
Press to adjust the TV sound level.
Number Buttons
Press to select TV channels. When selecting single-digit
channels, press the number of the desired channel. The TV
will pause for a few seconds and then tune to the selected
channel.
A/CH
Press to alternate between the currently viewed channel and
the previously viewed channel.
Rec ¶
Press to select channels in ascending or descending order or
cycle through the signal inputs.
Mute
Press to turn the TV sound off. To restore the sound to its
previous level, press the button again. (See pages 17 and 55
in the Directions for Use manual.)
MUTE
CH
VOL
1
2
3
4
5
6
Surf
Press to select previously entered channels. With the TV’s
AutoSurf™ control, you can place up to 10 favorite channels or sources in memory. Then by pressing the Surf button, you can quickly view the selected channels. (See
page 27 in the Directions for Use manual that came with the
TV to learn how to select a series of your favorite channels
using the Surf button.)
Format
7
8
9
0
SURF
TV/VCR
A/CH
SURF
REC •
TV/VCR
Press while in VCR mode to view the playback of a videotape. Press again to return to TV mode.
Press to display the onscreen menu. Press to return to a
higher menu level.
Channel +/–
MENU/
SELECT
STATUS/
EXIT
Cursor Ring
Up/Down: allows you to select the next or previous menu
item in the menu. Left/Right: allows you to access the submenus and adjust the settings. When no onscreen displays or
menus are present, use the Cursor Ring Left/Right to select
a picture format for a video source connected to the
ANTENNA, AV1, CVI, AV2, or AV3 (side panel inputs) on
the TV.
Press to select an AutoPicture™ control. Choose from four
factory-set controls—Movies, Sports, Weak Signal, and
Multimedia—and a PERSONAL control that you set
according to your own preferences through the onscreen
Picture menu. (See page 26 in the Directions for Use manual.) The four factory-set controls will enhance the TV picture
according to the particular type of program you are watching. It may also be used to enhance pictures with weak signals.
FORMAT
PIP ON/OFF
SLEEP
Press to select a picture-format mode for a video source connected to the ANTENNA, AV1, CVI, AV2, or AV3 (side
panel) inputs. Each press of the button selects a different
mode—4:3, EXPAND 4:3, PANORAMA, WIDE SCREEN,
or AUTO. Control the picture format of a video source connected to the HD inputs (AV4 or AV5) with the digital
equipment providing the video source (HD set-top box or
progressive-scan-capable DVD player, for example).
SAP
AV
ITR/
RECORD
DOLBY V PROG.LIST
HOME
VIDEO
HOME
MOVIES
PERSONAL
Sleep
Press to set the TV to automatically turn itself off after a
period of time. Choose 15, 30, 45, 60, 90, 120, 180, or 240
minutes before the TV will automatically turn off. (See
page 29 in the Directions for Use manual.)
Program List
POSITION
PIP
Press repeatedly to select the different signal sources connected to the TV: TV, AV1, CVI, AV2, AV3 (side jack
panel), AV4, and AV5. (See page 24 in the Directions for
Use manual.)
Press to display a list of channel numbers and their names.
(See the “Tuner Mode,” “Auto Program,” “Channel Edit,”
and “Name” sections on pages 5 and 7 in this guide for
setup.) Each channel will appear as a selectable menu item.
The current channel will be highlighted as default. Five
channels will be listed on screen at one time. Press the
Cursor Ring up or down to scroll the list and and highlight a
channel. Press the Cursor Ring right to tune to the highlighted channel. Channels marked “Skipped” in the Channel Edit
control will not appear in the list. Each channel that is being
blocked by AutoLock™ will appear with a padlock icon to
indicate that the channel is not viewable. (See page 28 in the
Directions for Use manual.)
Clock
Dolby V
Press to access the onscreen Timer menu, where you can set
the time for the TV’s clock or set the TV’s Timer features,
such as channel switch over, power on set, and power off
set. (See page 6 in this publication for setting the time manually. See pages 41–45 in the Directions for Use manual for
information on using the TV’s Timer feature.)
Press to select various factory surround sound listening
modes.
Press this button simultaneously with the 3 button when in
VCR mode to record.
SAP
Press to select between main sound and SAP (Second Audio
Program) when you tune to a program offering SAP. (See
page 39 in the Directions for Use manual.)
AV
Press to light the buttons on the remote control.
Dolby* Virtual (Virtual Dolby Surround) (with Virtual
Dolby Surround signals)
Dolby Virtual uses two speakers to simulate the surround effect
produced by a multichannel system.
Incredible Surround™
• In Stereo sound mode—when Incredible Surround™ is turned
on—it seems as though the loudspeakers are spread farther apart
from each another.
• In Mono sound mode—when Incredible Surround™ is turned
on—enables you to hear a spatial sound effect.
PIP
(See page 37 in the Directions for Use manual.)
Position
Press to move the PIP picture to any of the four corners of
the screen.
Back Light button
Press to turn PIP (picture-in-picture) on or off or control the
size of the PIP window. (See page 8 in this publication for
more information on PIP.)
Active Control, AutoPicture, AutoSound, AutoSurf, and Incredible Surround are trademarks of Philips Consumer Electronics North America. Copyright 2002 Philips Consumer Electronics.
*Manufactured under license from Dolby Laboratories. “Dolby” and the double-D symbol are trademarks of Dolby Laboratories.
3
OPERATING THE TELEVISION AND REMOTE CONTROL
POWER
TV
VCR
SWAP
ACC
ACTIVE
CONTROL FREEZE
PIP CH
DN
UP
SOUND
PICTURE
MENU
REMOTE CONTROL
ADJUSTING
OR
SETTING MENU OPTIONS
A
SOUND
TREBLE
BASS
BALANCE
AVL
INCR . SURROUND
PICTURE
SOUND
FEATURES
INSTALL
menu is simply a list of options. You can adjust or set your
TV’s onscreen menu options by pressing buttons on the remote
control. The following steps will familiarize you with how to use
the remote control with the onscreen menu.
TREBLE
BASS
BALANCE
AVL
INCR . SURROUND
1
2
Press the MENU/SELECT button to bring the menu to
the screen. Then, as necessary, press the CURSOR RING
DOWN or UP to highlight a menu option. Press the CURSOR RING RIGHT to enter the submenu for the option.
1
TV
ACTIVE
CONTROL FREEZE
PIP CH
DN
3
Make adjustments
or selections
within a submenu.
MONO
UP
PICTURE
SOUND
OR
STEREO
MENU/
SELECT
STATUS/
EXIT
Within the submenu, press the CURSOR RING DOWN
or UP to highlight an option.
Based on the submenu you are in, you can press the CURSOR RING RIGHT or LEFT to make an adjustment, select
a setting, or enter a list or another submenu.
You can return to the submenu from a list by pressing the
CURSOR RING LEFT.
To go from a submenu to the previous menu, highlight the
option at the top of the screen and press the CURSOR
RING UP. You can also press MENU/SELECT to return to
the previous menu.
Press STATUS/EXIT to exit the menu.
BALANCE
AVL
INCR . SURROUND
HEADPHONE
STEREO
ACC
VCR
SWAP
30
SOUND
POWER
Press the TV mode button to ensure that the remote control is in TV mode.
HELPFUL
HINTS
SOUND SUBMENU
STEREO
INSTALL SUBMENU
MUTE
3
2
CH
VOL
INSTALL
LANGUAGE
TUNER MODE
AUTO PROGRAM
CHANNEL EDIT
AutoChron
1
2
3
4
5
6
7
8
9
0
SURF
Also from a Submenu, enter
a list to make selections.
INSTALL
AV3
AV4
1
2
3
LANGUAGE
TUNER MODE
AUTO PROGRAM
CHANNEL EDIT
AutoChron
TV/VCR
A/CH
POSITION
AV3
AV4
1
2
3
PIP
FEATURES SUBMENU
TIMER SUBMENU
FEATURES
TIMER
AutoLock
PIP
CLOSED CAP
FORMAT
Go from one submenu
to another and make
settings or adjustments.
FEATURES
TIMER
TIME
START TIME
STOP TIME
CHANNEL
ACTIVATE
TIME
START TIME
STOP TIME
CHANNEL
ACTIVATE
8:06 PM
• If you don’t press
any remote buttons, the menu
will automatically
disappear after
about 20 seconds.
To bring the
menu back, press
MENU/SELECT.
• Sometimes not all
the menu items
are visible on the
screen. If more
items exist in the
menu, a cursor
arrow will appear.
Also, a bullet will
appear for each
remaining item,
up to a maximum
of three. This will
help you determine how many
items are left in
the menu. Keep
pressing the
CURSOR RING
DOWN until you
display all items.
• Should your
remote become
lost or otherwise
unavailable for
use, you can use
the buttons on the
front of the TV to
access the
onscreen menu
and make adjustments or settings.
See page 2.
USING THE INSTALLATION FEATURES
PICTURE
SOUND
FEATURES
INSTALL
LANGUAGE
TUNER MODE
AUTO PROGRAM
CHANNEL EDIT
AutoChron
HELPFUL HINT
LANGUAGE
T
1
2
3
4
Press the MENU/SELECT button. The onscreen menu
appears.
5
Press the STATUS/EXIT button to exit the menus.
LANGUAGE
TUNER MODE
AUTO PROGRAM
CHANNEL EDIT
AutoChron
PICTURE
SOUND
FEATURES
INSTALL
he menu LANGUAGE control enables you to set the TV’s
onscreen menu and onscreen displays to be shown in English,
French, or Spanish. Follow the steps in this section to set the
control.
TV
5
ACTIVE
CONTROL FREEZE
PIP CH
DN
Press the CURSOR RING RIGHT again to highlight the
menu LANGUAGE options list.
UP
PICTURE
SOUND
ENGLISH
FRANCAIS
ESPAÑOL
3
Make your
selection and
instantaneously
the onscreen
display appears
in the language
you chose.
ENGLISH
FRANCAIS
˜
ESPANOL
The LANGUAGE control makes only the
TV’s onscreen menu
items appear in English,
French, or Spanish text.
The control does not
change the language of
Closed Captioning (CC)
text that may be included
with programs.
OR
French
Spanish
MENU/
SELECT
STATUS/
EXIT
Press the CURSOR RING DOWN or UP to select your
menu language.
Instantaneously, the onscreen displays appear in the language that you choose.
LANGUAGE
TUNER MODE
AUTO PROGRAM
CHANNEL EDIT
AutoChron
ACC
VCR
SWAP
LANGUAGE
TUNER MODE
AUTO PROGRAM
CHANNEL EDIT
AutoChron
INSTALL
POWER
Press the CURSOR RING DOWN repeatedly until
INSTALL is highlighted. Then press the CURSOR RING
RIGHT to enter the INSTALL submenu.
INSTALL
INSTALLATION
MUTE
2,4
CH
VOL
1
2
3
4
5
6
7
8
9
0
SURF
TV/VCR
A/CH
POSITION
PIP
4
1
LANGUE
TUNER MODE
PROGRAM.AUTO
CHANGER CANAL
AutoChron
INSTALAR
FRANCAIS
ESPAÑOL
ENGLISH
OR
IDIOMA
SINTONIZADOR
AUTO PROG.
EDITAR CANAL
AutoChron
ESPAÑOL
ENGLISH
FRANCAIS
USING THE INSTALLATION FEATURES
LANGUAGE
TUNER MODE
AUTO PROGRAM
CHANNEL EDIT
AutoChron
PICTURE
SOUND
FEATURES
INSTALL
TUNER MODE
S
1
2
3
4
5
6
Press the STATUS/EXIT button to exit the menu.
PICTURE
SOUND
FEATURES
INSTALL
LANGUAGE
TUNER MODE
AUTO PROGRAM
CHANNEL EDIT
AutoChron
CABLE
ANTENNA
AUTO
LANGUAGE
TUNER MODE
AUTO PROGRAM
CHANNEL EDIT
AutoChron
CABLE
ANTENNA
AUTO
POWER
Press the CURSOR RING RIGHT to enter the INSTALL
submenu. Then press the CURSOR RING DOWN once to
highlight TUNER MODE.
Press the CURSOR RING RIGHT to highlight the
TUNER MODE options list.
INSTALL
LANGUAGE
TUNER MODE
AUTO PROGRAM
CHANNEL EDIT
AutoChron
et the TUNER MODE control according to the type of signal
you have connected to the TV—ANTENNA or CABLE. If you
select AUTO, the TV will automatically detect the type of signal
you have connected.
Press the MENU/SELECT button. The onscreen menu
appears. Press the CURSOR RING DOWN repeatedly until
INSTALL is highlighted.
HELPFUL HINT
INSTALL
TV
ACTIVE
CONTROL FREEZE
PIP CH
DN
5
ACC
VCR
SWAP
UP
2,3
PICTURE
SOUND
MENU/
SELECT
STATUS/
EXIT
Press the CURSOR RING DOWN or UP repeatedly until
you select the option that matches your signal connection,
CABLE or ANTENNA. If you want the TV to determine
the type of signal, select AUTO. (You have selected an
option when the dot and triangle are next to the option.)
MUTE
4
CH
VOL
Proceed to the section on “Auto Program.”
1
2
3
4
5
6
7
8
9
0
SURF
1
TV/VCR
A/CH
AUTO PROGRAM
HELPFUL HINTS
INSTALL
INSTALL
LANGUAGE
TUNER MODE
AUTO PROGRAM
CHANNEL EDIT
AutoChron
T
he AUTO PROGRAM feature will scan for channels with
active broadcast signals and store those channels in the TV’s
memory. It will tune up to 69 channels for antenna, and up to 125
channels for cable. After you run AUTO PROGRAM, you can use
the CH(annel) +/– buttons to quickly and easily select stations.
You can also press the PROG. LIST (Program List) button on
your remote to see a list of the channels.
LANGUAGE
TUNER MODE
AUTO PROGRAM
CHANNEL EDIT
AutoChron
SEARCH
CABLE
PLEASE WAIT
CHANNEL 12
POWER
c CHECK IT OUT
1
2
3
4
PICTURE
SOUND
FEATURES
INSTALL
LANGUAGE
TUNER MODE
AUTO PROGRAM
CHANNEL EDIT
AutoChron
Press the MENU/SELECT button. The onscreen menu
appears. Then press the CURSOR RING DOWN repeatedly until INSTALL is highlighted.
TV
4
Press the CURSOR RING RIGHT to begin the automatic
search for channels. The progress of autoprogramming is
displayed.
PICTURE
MUTE
When the programming is done, press the STATUS
EXIT button to exit the menu.
CHANNEL EDIT
CH
1
2
3
4
5
6
Press the STATUS/EXIT button to exit the menu.
INSTALL
AV3
AV4
1
2
3
LANGUAGE
TUNER MODE
AUTO PROGRAM
CHANNEL EDIT
AutoChron
POWER
3
TV
ACC
VCR
SWAP
5
• Philips strongly recommends that you run Auto
Program. Otherwise, the
TV may not tune the channels properly, resulting in
improper pictures.
• If you change signal
sources—to a new cable
company or from antenna
to cable, for example—be
sure that Tuner Mode is
properly set for the new
source. Then run Auto
Program again. This will
ensure that the channels
are correctly stored in the
TV’s memory.
• If you have made
AutoLock™ settings,
remember that you must
remove any channel blocks
before Auto Program will
work.(See pages 46–54 in
the Directions for Use
manual.)
HELPFUL HINT
LANGUAGE
TUNER MODE
AUTO PROGRAM
CHANNEL EDIT
AutoChron
Press the CURSOR RING DOWN repeatedly until
CHANNEL EDIT is highlighted. Then press the CURSOR
RING RIGHT or LEFT to access the CHANNEL EDIT
list.
With the channel you want to edit selected, press the
CURSOR RING RIGHT to mark the channel as
SKIPPED. (Channels you mark SKIPPED will not appear
when you use the CH[annel] +/– buttons to change channels while watching TV.)
When you want to add a channel that has been marked
SKIPPED, press the CURSOR RING UP or DOWN to
highlight the channel. Then press the CURSOR RING
RIGHT to remove the word SKIPPED.
1
INSTALL
Press the MENU/SELECT button. The onscreen menu
appears. Then press the CURSOR RING DOWN repeatedly until INSTALL is highlighted. Press the CURSOR
RING right to enter the INSTALL submenu.
Press the CURSOR RING UP or DOWN to scroll
through the list of channels. Or press the NUMBER buttons on your remote control to select a specific channel.
2,3
MENU/
SELECT
VOL
T
5
UP
SOUND
STATUS/
EXIT
his feature allows you to edit or skip channels from the channel list that have bad or weak signals or channels you do not
want to watch.
1
2
3
4
ACTIVE
CONTROL FREEZE
PIP CH
After you’ve run AUTO
PROGRAM, check the
results. Press the
CH(annel) +/– buttons on
your remote to cycle
through your available
channels. Or press the
PROG. LIST button to
show a list of the channels
and tune to them. See
page 28 in the Directions
for Use manual for more
on Program List.
ACC
VCR
SWAP
DN
Press the CURSOR RING RIGHT to enter the INSTALL
submenu. Then press the CURSOR RING DOWN repeatedly until AUTO PROGRAM is highlighted.
If you select the Tuner
Mode option that
matches your signal
source rather than
AUTO, the time
required for AUTO
PROGRAM to store
channels to the TV’s
memory can be reduced.
ACTIVE
CONTROL FREEZE
PIP CH
DN
UP
PICTURE
SOUND
4
MENU/
SELECT
STATUS/
EXIT
MUTE
2
CH
VOL
1
2
3
4
5
6
7
8
9
0
SURF
TV/VCR
A/CH
POSITION
5
PIP
1
AV3
AV4
1
2 SKIPPED
3
Channels that Auto
Program (see above) determined not to contain active
broadcast signals are
marked SKIPPED.
USING THE INSTALLATION FEATURES
PICTURE
SOUND
FEATURES
INSTALL
LANGUAGE
TUNER MODE
AUTO PROGRAM
CHANNEL EDIT
AutoChron
AutoChron
A
utoChron™ gives you the option of setting the time manually or
automatically.
SETTING TIME AUTOMATICALLY
INSTALL
INSTALL
LANGUAGE
TUNER MODE
AUTO PROGRAM
CHANNEL EDIT
AutoChron
8
Press the STATUS/EXIT button to exit the menu.
Press the CURSOR RING RIGHT to enter the
INSTALL submenu. Then press the CURSOR RING
DOWN repeatedly until AutoChron is highlighted.
AUTO
MANUAL
5,6
8
ACTIVE
CONTROL FREEZE
PIP CH
DN
2,3,
4
ACC
VCR
SWAP
UP
SEARCH FOR
TIME
LANGUAGE
TUNER MODE
AUTO PROGRAM
CHANNEL EDIT
AutoChron
DAYLIGHT
SAVING TIME?
LANGUAGE
TUNER MODE
AUTO PROGRAM
CHANNEL EDIT
AutoChron
YES
NO
ENTER CHANNEL
-PBS
MUTE
1
CH
Press the CURSOR RING RIGHT to enter the
AutoChron SET TIME area.
1
2
3
4
5
6
7
8
9
0
SURF
TV/VCR
A/CH
POSITION
INSTALL
INSTALL
MENU/
SELECT
STATUS/
EXIT
If necessary, press the CURSOR RING UP or DOWN to
highlight your correct time zone. Then press the CURSOR
RING RIGHT. Within a few seconds, the option of
Daylight Savings Time appears on screen.
CENTRAL
MOUNTAIN
PACIFIC
PICTURE
SOUND
Press the CURSOR RING RIGHT again to select
AUTO. Within a few seconds, a menu containing the timezone options appears.
TIME ZONE?
INSTALL
INSTALL
VOL
7
PIP
If the Daylight Savings Time option you want to select
is not highlighted, press the CURSOR RING UP or
DOWN to highlight the option. Then press the CURSOR
RING RIGHT to activate your selection.
LANGUAGE
TUNER MODE
AUTO PROGRAM
CHANNEL EDIT
AutoChron
LANGUAGE
TUNER MODE
AUTO PROGRAM
CHANNEL EDIT
AutoChron
PLEASE WAIT
15
The message shown to the
right indicates that
AutoChron™ is not finding
a PBS station at the channel you input. Check the
channel number for your
PBS station.You will need
to input the correct number for the time to be
found.
TIME FOUND
END: PRESS STATUS
11:15 AM
OR
INSTALL
LANGUAGE
TUNER MODE
AUTO PROGRAM
CHANNEL EDIT
AutoChron
TIME NOT FOUND
RE-ENTER CHANNEL
15
PBS
Press the number buttons on your remote to enter the
channel number for your PBS station (02, 15, or 121, for
example). Wait until the TV completes its search. If the
time was not found, you will need to locate the correct
channel number for your PBS station and input that number.
SETTING TIME MANUALLY
1
Follow steps 1–3 in the section “Setting Time
Automatically” above, then press the CURSOR RING
DOWN to highlight MANUAL and CURSOR RING
RIGHT to enter the MANUAL time input area.
2
Use the number buttons on your remote control to input
the first digit for the time. You can also press the CURSOR
RING UP or DOWN to select a digit. Press the CURSOR
RING RIGHT to move to the next digit input slot and input
the time.
If you should need to change a number you have input, you
can cursor left or right to the digit input slot to make the
correction.
3
4
LANGUAGE
TUNER MODE
AUTO PROGRAM
CHANNEL EDIT
AutoChron
SET TIME
POWER
TV
1
2
3
4
5
6
7
LANGUAGE
TUNER MODE
AUTO PROGRAM
CHANNEL EDIT
AutoChron
AUTO
MANUAL
Follow the steps below to set AutoChron™ to download the time
from your PBS station to your TV. After successful setup,
AutoChron™ will automatically maintain the correct time using
your PBS station until you set the time using the AutoChron™
MANUAL option (see below).
Press the MENU/SELECT button. The onscreen menu
appears. Then press the CURSOR RING DOWN repeatedly until INSTALL is highlighted.
INSTALL
SET TIME
After you have input the time, press the CURSOR
RING RIGHT to enter the AM/PM area. Then press the
CURSOR RING UP or DOWN to select AM or PM.
Press the STATUS/EXIT button to exit the menu.
HELPFUL HINTS
INSTALL
• The CLOCK button
\ on your remote
provides another way
in which you can set
the TV’s clock.
• After setting the
clock, you will be
able to access the
time by pressing the
STATUS/EXIT button. Or you can view
the time constantly in
the upper right-hand
corner of the screen
by turning the DISPLAY control on (see
page 42 in the
Directions for Use
manual).
INSTALL
LANGUAGE
TUNER MODE
AUTO PROGRAM
CHANNEL EDIT
AutoChron
SET TIME
AUTO
MANUAL
LANGUAGE
TUNER MODE
AUTO PROGRAM
CHANNEL EDIT
AutoChron
ENTER TIME
11:00 AM
POWER
TV
ACC
VCR
SWAP
ACTIVE
CONTROL FREEZE
PIP CH
DN
UP
4 1
PICTURE
SOUND
3
MENU/
SELECT
STATUS/
EXIT
MUTE
2
4
5
6
7
8
9
0
SURF
TV/VCR
CH
VOL
A/CH
SURF
REC •
1
2
3
4
5
6
FORMAT
AV
ITR/
RECORD
7
8
9
0
SURF
TV/VCR
DOLBY V PROG.LIST
HOME
VIDEO
POSITION
A/CH
POSITION
6
PIP
PIP ON/OFF
SLEEP
SAP
HOME
MOVIES
PERSONAL
PIP
CLOCK
Button
USING THE INSTALLATION FEATURES
PICTURE
SOUND
FEATURES
INSTALL
LANGUAGE
TUNER MODE
AUTO PROGRAM
CHANNEL EDIT
AutoChron
NAME
T
• The five PERSONAL
name characters you
can input may be letters, a dash, or the
numbers 0 through 9.
• If you begin inputting
a personal name or
changing an existing
one and decide you’d
rather select a name
from the preset list,
press the
MENU/SELECT button. This will return
you to the INSTALL
submenu, with NAME
highlighted. Simply
press the CURSOR
RING RIGHT to highlight the NAME
options area again and
choose a preset name
as explained in step 4
to the left.
INSTALL
TUNER MODE
AUTO PROGRAM
CHANNEL EDIT
AutoChron
NAME
he channel NAME feature allows you to list the “call” letters
of your favorite stations beside their channel numbers when
they appear on the screen. The TV has in memory a list of the 50
most popular channel names (NBC, ABC, or FOX, for example).
You also can enter a custom name (up to five characters).
1
HELPFUL HINTS
INSTALL
TUNER MODE
AUTO PROGRAM
CHANNEL EDIT
AutoChron
NAME
PERSONAL
PERSONAL
Create your own personal name
for a channel.
Press the NUMBER buttons, the CH(annel) +/– buttons,
or the AV button to select a TV channel or input source to
which you want to assign a name or whose name you want
to modify.
POWER
WX-
2
3
4
5
Press the MENU/SELECT button. The onscreen menu
appears. Then press the CURSOR RING DOWN repeatedly until INSTALL is highlighted. Press the CURSOR RING
RIGHT to enter the INSTALL submenu.
WXY-
4
TV
SWAP
5
ACC
VCR
ACTIVE
CONTROL FREEZE
PIP CH
DN
UP
PICTURE
SOUND
WXYZ3
4
OR
Choose from a list of preset options.
Press the CURSOR RING DOWN repeatedly until the
NAME control is highlighted. Then press the CURSOR
RING RIGHT to highlight the NAME options area.
MENU/
SELECT
STATUS/
EXIT
INSTALL
TUNER MODE
AUTO PROGRAM
CHANNEL EDIT
AutoChron
NAME
MUTE
3
CH
VOL
At this point you can choose between options of creating a
personal name for the channel or selecting a preset one
from a list.
To create your own personal name for the channel or
change a personal name you created previously, press
the CURSOR RING RIGHT. Then press the CURSOR
RING UP or DOWN to select the first character of the
name. You can input up to five characters for the name.
When finished, press the MENU/SELECT button.
Or
To choose from the list of preset names, press the CURSOR RING UP or DOWN to highlight your choice for the
channel name. Press the CURSOR RING RIGHT to select
the name. Then press the MENU/SELECT button.
WXYZ-
1
2
3
4
5
6
7
8
9
0
SURF
TV/VCR
A/CH
1
SURF
REC •
FORMAT
2
1
USA
VH
WGN
WOR
WTHR
1
PIP ON/OFF
SLEEP
SAP
AV
ITR/
RECORD
DOLBY V PROG.LIST
HOME
VIDEO
POSITION
HOME
MOVIES
PERSONAL
PIP
Press the STATUS/EXIT button to exit the menu.
When you press the STATUS/EXIT button when no
onscreen display is present or change to the channel you’ve
named, the name will appear on screen next to the channel
number or signal source name.
USING AUTO INTELLISENSE™ TO ADJUST PICTURE CONVERGENCE
Y
our projection TV has three color projection tubes: one for red,
one for green, and one for blue. When mixed in proper proportion,
the beams of light coming from the tubes can produce any color. To
create a clear picture, however, these color beams must be precisely
aligned. This alignment is called convergence. Bumps and vibrations,
moving the set, or the presence of magnetic fields can cause the color
beams to become improperly aligned, or misconverged, resulting in a
fuzzy picture. Using the Auto IntelliSense™ feature, you can automatically adjust convergence in 20 seconds or less.
NOTE: Allow the TV to warm up for 20 minutes before using Auto
IntelliSense™.
ACTIVATING AUTO INTELLISENSE™ USING THE TV BUTTONS
With the TV on, press the VOL – and SOURCE SELECT buttons simultaneously.
ACTIVATING AUTO INTELLISENSE™ USING
THE ONSCREEN PICTURE SUBMENU
Within the PICTURE submenu, highlight INTELLISENSE and
then press the CURSOR RING LEFT or RIGHT to activate
the feature.
TV Buttons
Intellisense
for fast picture
convergence
JUST PUSH THESE BUTTONS SIMULTANEOUSLY
IntelliSense Focus In Progress
HELPFUL HINT
PICTURE
TINT
COLOR TEMP
EYE FIDELITY
DYN . CONTRAST
INTELLISENSE
7
IntelliSense Focus In Progress
If you desire, you can make
additional convergence
adjustments to suit your personal preferences or to further fine-tune the picture. To
do this, use the MANUAL
CONVERGE controls in the
PICTURE submenu. See
pages 33 and 34 in the
Directions for Use manual
that also came with your set.
USING THE PICTURE-IN-PICTURE (PIP) FEATURE
T
he Picture-In-Picture (PIP) feature allows you to display a
subscreen within your main screen and watch two video
sources at once. Because your set has two tuners, you can enjoy
all the benefits of PIP without using a VCR as a second tuner for
your PIP picture. Tune to your favorite show on the main screen
with tuner one while scanning other channels with tuner two in
the PIP window. Also view the AV1, AV2, or AV3 sources in the
PIP window. NOTE: CVI cannot be displayed in the PIP window, and AV4 and AV5 do not function with PIP. (For information on connecting accessory devices to the AV inputs, see the
Directions for Use manual that came with your set. Connection
information begins on page 6.)
With the dual-window option you can divide the main screen in
half, showing the main picture on the left side and the PIP picture on the right.
PIP Window
Main Screen
USING THE PIP BUTTONS
1
2
3
4
5
4
Press the PIP button to turn PIP on.
TV
UP
PICTURE
SOUND
Press the PIP button a second time to make the PIP window smaller.
SWAP
Button
MENU/
SELECT
STATUS/
EXIT
To select a video source to watch in the PIP window, press
the PIP CH(annel) DN/UP buttons.
If you press and hold the PIP CH UP button for three seconds, the set will automatically perform a forward scan for
channels. Press and hold the PIP CH DN button for three
seconds, and the set will automatically perform a backward scan for channels. Auto scanning will stop if you
press any key, and it will also stop upon reaching the
channel at which scanning began.
FREEZE
Button
ACTIVE
CONTROL FREEZE
PIP CH
DN
To prevent uneven picture-tube
aging, do not leave stationary
images on screen for extended
periods of time. Vary your picture viewing. See page 62 in
the Directions for Use manual.
ACC
VCR
SWAP
Press the PIP button a third time to turn on the dualwindow screen. The PIP window is on the right, equally
sharing the screen with the main picture.
WARNING
POWER
MUTE
CH
VOL
1
2
3
4
5
6
7
8
9
0
SURF
TV/VCR
A/CH
POSITION
1,2,
3,5
PIP
To turn PIP off, press the PIP button a fourth time.
POSITION
Button
POSITION
Ski Vacations
P.O. Box 55512
Anytown, USA 87654
1-800-555-1212
MOVING THE PIP SCREEN
Press the POSITION button. Each time you press this button, the
PIP screen moves to another corner of the main screen.
FREEZE
FREEZING THE PIP SCREEN
Press the FREEZE button. The picture in the PIP screen stands
still. Stopping motion allows you to write down onscreen phone
numbers or addresses.
SWITCHING THE MAIN AND PIP SCREENS
Press the SWAP button. The main screen and PIP screen change
places.
SWAP
ADJUSTING PIP TINT
FEATURES
TIMER
AutoLock
PIP
CLOSED CAP
FORMAT
T
he Picture-in-Picture (PIP) TINT control allows you to adjust
the PIP picture to obtain natural skin tones.
1
2
3
4
TINT
FEATURES
PIP
TINT
Press the MENU/SELECT button. The onscreen menu
appears. Then press the CURSOR RING DOWN twice to
highlight FEATURES.
POWER
Press the CURSOR RING RIGHT to enter the FEATURES submenu. Then press the CURSOR RING DOWN
repeatedly until the PIP item is highlighted. Press the CURSOR RING RIGHT to enter the PIP submenu.
TV
Press the CURSOR RING RIGHT or LEFT to adjust the
TINT to the desired level.
Press the STATUS/EXIT button to exit the menu.
ACTIVE
CONTROL FREEZE
PIP CH
DN
4
ACC
VCR
SWAP
UP
PICTURE
SOUND
2,3
MENU/
SELECT
STATUS/
EXIT
MUTE
CH
VOL
1
2
3
4
5
6
7
8
9
0
SURF
TV/VCR
A/CH
POSITION
8
PIP
1
44