1
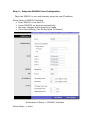
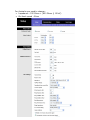
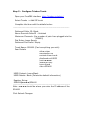
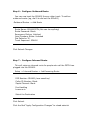
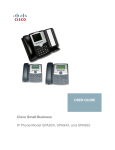
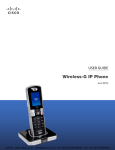
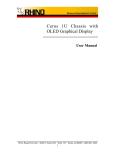
Linksys SPA400
Trixbox Integration Guide
Access Point – Connecting You & Your Customers.
Contact : [email protected]
Overview:
The Linksys SPA400 is a 4 Line FXO gateway capable of connecting 4
PSTN lines to your asterisk system to make and receive calls. This
guide is a step by step on how to configure Trixbox to utilize the
features of the SPA400. Limitations:
* The voicemail function of the SPA400 cannot be used.
* You cannot select which line of the SPA400 to use. They are
treated as a single group of 1-4 lines. The SPA400 will know
which lines are available by the line voltage when plugged in.
Configure the SPA400:
Step 1 – Obtain the IP address if the SPA400
Option 1(Easiest): You will need to check your DHCP server to see
what IP address has been allocated to the SPA400 (Will usually be in
the Status area of your Modem/Router).
Option 2(Harder): If you only have a few devices on your network
you can use angry IP scanner (http://www.angryziber.com) which will
search your network for devices. You should be able to work out the
SPA400 address. Try searching for port 5060 also to help identify.
Option 3: You can download the SPA9000 setup utility from
http://www.linksys.com it will scan the network for SPA400s and show
the IP address.
Note the IP Address: ___________________________________
Step 2 – Access the SPA400
In your favourite web browser type the IP address of the SPA400, it
should ask for a username and password.
The default username is Admin (Note capital A)
The default password is blank
Step 3 – Set the SPA400 to a Fixed IP address
Asterisk needs to access your SPA400, so it needs to be set to a
fixed ip address. To do this: Under Setup -> Basic Setup
• Select Fixed IP address and enter a valid fixed IP address for
your network.
• Be sure to enter a DNS server, if you do not know enter the
Telstra DNS server 139.130.4.5 – You can leave the secondary
blank
• Set your time zone.
• Click Save Settings
• Restart System
Sample Config – Use Address Valid For Your Network
Check with the network administrator if unsure.
Note the IP address in the Notes Section.
Step 4 – Setup the SPA400 Voice Configuration.
Open the SPA400 in your web browser using the new IP address.
Select Setup->SPA9000 Interface.
• Enter SPA400 in the User ID:
• Leave SPA9000 on discover automatically
• No other changes should need to be made
• Click Save Settings (You Do Not Need To Restart)
Screenshot of Setup -> SPA9000 Interface
Select Setup -> Voice
For Australia you need to change:• Impedance : 220 Ohms + (820 Ohms || 120nF)
• On-Hook speed : 26ms
Step 5 – Configure Trixbox Trunk.
Open your FreePBX interface: http://trixbox.ip/admin/
Select Trunks -> Add SIP trunk
Complete the form with the details below:
---------------------------------------------------------------------Outbound Caller ID: Blank
Never Override CallerID : Unticked
Maximum Channels: (the number of pstn lines plugged into the
SPA400)
Dial Rules: Leave Empty
Outbound Dial Prefix: Empty
Trunk Name: SPA400 (Can be anything you wish)
Peer Details:
allow=ulaw
canreinvite=no
context=from-trunk
dtmfmode=rfc2833
host=x.x.x.x
insecure=very
type=friend
user=SPA400
USER Context: Leave Blank
USER Details: Blank (Delete the default information)
Register String:
[email protected]/SPA400
----------------------------------------------------------------------Note : x.x.x.x should be where you enter the IP address of the
SPA400
Click Submit Changes.
Step 6 – Configure Outbound Route.
You can now treat the SPA400 like any other trunk. To add an
outbound router (eg, dial 9 to dial out the SPA400)
Outbound Routes -> Add Route
Route Name: SPA400PSTN (this can be anything)
Route Password: Blank
Emergency Dialing: Unticked
Intra Company Route: Unticked
Dial Patterns: 9|.
Trunk Sequence: SPA400
Click Submit Changes
Step 7 – Configure Inbound Route.
This will setup an inbound route for people who call the PSTN lines
plugged into the SPA400.
Setup -> Inbound Routes -> Add Incoming Route
DID Number: SPA400 (case sensitive)
Caller ID Number: Blank
Zaptel Channel: Blank
Fax Handling
Leave as is
Select the Destination
Click Submit
Click the Red “Apply Configuration Changes” to reload asterisk
Complete:
You should now be able to make and receive calls via your SPA400.
Email [email protected] for further support if required.
Congratulations
Notes:
SPA400 IP Address: _____________________________
SPA400 Username: ______________________________
SPA400 Password: ______________________________
Number of Lines: _____
Installed By: _______________________________
Date: ______________________________