1
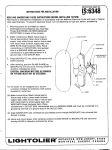
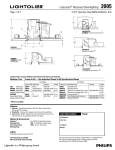
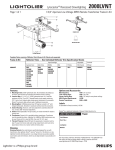
INSTRUCTION
INSTRUCTIONS PROCEDURE
FRAME=fN KIT WITH REM~E
IS:2000LVNT
FOR LOW VOLTAGE
TRANSFORMER
Page 1 of 2
0191
READ AND UNDERSTAND THESE INSTRUCTIONS
SHEET NO
BEFORE INSTALLING FIXTURE.
This fixture is intended for installation
in accordance
with the National Electrical Code or local regulations.
asaure full compliance
with local codes and regulations, check with your local electrical inspector before
installation. To prevent electrical shock, turn off electricity
Retain these instructions for maintenance
reference
at fuse box before proceeding.
N~E
FRAME-fN KIT IS PROVIDED WITHOUT TRANSFORMER. TRANSFORMER
OTNERB. LIGHlOLIER CAT #B60S AND 8609 TRANSFORMERS MAy BE USED.
CAUTION: THIS
MUST BE PROVIDED
SY
FRAME-IN KIT IS RATED AT 42VA. USE ONLY 12V. AC. INPUT.
FIG. A
FIG. B
FIG. C
1. FRAME-IN
2. CLOSE-IN
3. SNAPON
WARNING—(RISK
WIRING
To
FIG. D
4. PUSH-UP
OF FIRE) DO NOT INSTALL INSULATION WITHIN 3 INCHES OF FiXTURE SIDES OR
COMPARTMENT,
NOR ABOVE FIKTURE IN SUCH A MANNER TO ENTRAP HEAT.
1. FRAME.IN (Fig. A)
Faaten MOUNTING FRAME to wood joist. Line
2.
N~E
For wat plaster ceiling, uae Plaster
Ring Accessory No. 1959 (order aaparately).
4&=---3.
SNAPIN
(Fig. C).
4.
PUSH-UP (Fig. D).
I
SEE SEPARATE
REFLECTOR TRIM
INSTRUCTION
SHEETS.
FIG
SEE BACK PAGE FOR LAMPING
L
‘OTO”cL’p
G
INSTRUCTIONS.
LK59-ITC>949
[=@sEcAucus>
NEw JERSEY,07096
*
MO NT REAL,
QUEBEC,
C AN ADA
~&OOOLVNT
LAMPING
Page 2 of 2
NOTE Socket manufacturers have suggested that
socket may fail after 3 to 6 relampings. If this
occurs socket can be replaced by disconnecting
male connectors (attached to socket leads) from
female connectors (attached to fixture leads) and
replacing it with a naw socket procured thtiugh
Lightolier (Fig H.).
MALECONNECTORS
(Altaohedto socketWires)
INSULATING
SLEEVING
1. Make sure that power is OFF when Iamping
or relamping. Remove LAMP RING from
SOCKET
CUP by pulling
etraight
down.
2. Ineeft LAMP @fR-16) between LAMP
SPR NGS until face of lamp sits firmly
GLASS LAMP GUARD
(Fig. l).
3, Attach
SOCKET
to hi-pin
prongs
on
-+Q
~
FEMALE CONNECTORS
(Attached to Fixture V4res)
on LAMP
MR16 SOCKET L
FIG. H
4. Insert LAMP RING with LAMP and GLASS
LAMP GUARD
back into SOCKET
CUF!
cf5-’-s0cKET
LAMP
- LAMP SPRING
-#
GLASS LAMP
GUARD &
LAMP RING
t
FIG. I
AIMING
1.
ANGLE ADJU=MENT
(Fig. J)
OCKET CUP
For vertical adjustment, insert blade of
screwdriver into the open slot of YOKE.
2. Using the screwdriver as a lever, tilt the entire
LAMP HOLDER to the desired angle.
3. ~~L~#mtal
adjustment,
rotate tie
LAMP
LAMP HOLDER
NOTE
1. LOW VOLTAGE FIXTURES should be
dimmed
only wNh speciel dimmers
intended
specifically
for that
purpose.
Use Llghtoller
Lytemode
Scenlst, Crescendo VA, Neptune VA,
Preclslon VA, Esayset VA, Sunriee VA, Redlsnt VA or
APERTURE TRIM
ASSEMSLY
Yo
~,
equivalent
products
by others ,or verieblo
sutotranaformera or electronicdlmmeraintendedfor
~.
~.,
~.y::,?
use with low voltageflstuma.2. QW voltsgefixtures
mey produoe eudible sound when ueed with
dimme~ which may be objectional in acoustically
critical
sreaa.
FIG. J
NOTE Followthe mex. wire length recommended
below to minimize voltsge drop. Voltage drop will
affect the brlghtneaa
and color of the light.
e
~