1
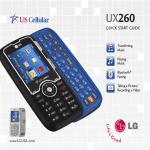
QUICK START GUIDE
QWERTY Keyboard
Download an App
Update Facebook®
Status
Use Google™
Voice Actions
GPS Navigation
Optional Accessories
lgusa.com/genesis
Bluetooth Headset
(HBM-235 – Purple and Black)
Bluetooth Headset
(HBM-570 – Silver, Dark Blue,
Pink, and Purple)
Bluetooth Headset with
Speakerphone/Solar Charging
Cradle (HBM-810)
Bluetooth Stereo Headset
(HBS-700)
Bluetooth Headset with Vehicle
Power Charger (HBM-585)
Vehicle Power Charger
Maximize your phone with these cutting-edge accessories at
lgusa.com/genesis
All materials in this guide including, without limitation, the design, the text, and any marks are the property of LG
Electronics, Inc. Copyright © 2011 LG Electronics, Inc. ALL RIGHTS RESERVED. Features and specifications are subject to
change without prior notice. Genesis™ is a trademark of LG Electronics, Inc. Google and the Google logo are trademarks
of Google Inc. Android and Android Market are trademarks of Google Inc. The Bluetooth® word mark and logos are
registered trademarks owned by Bluetooth SIG, Inc. Other trademarks and trade names are those of their respective
owners. Unless otherwise specified herein, all accessories referenced herein are sold separately.
FPO
Getting to Know Your Phone
1
15
8
9
2
11
12
13
14
3
7
4
6
5
10
BACK
FRONT
Customize Your Phone
1.Earpiece
2. Touch Screen
3. Home Key
4. Menu Key
5.Microphone
6. Search Key
7. Back Key
8. Camera Lens
9. Flash
10. Speaker
Add shortcuts, favorites, apps, and widgets to your
choice of five or seven home screens, and add live
wallpaper for a moving, interactive background.
Organize your Genesis to fit your lifestyle!
Add Home Screens
1. From the Home screen, press
2. Touch 7 > OK.
> Home settings.
Add Widgets
1. Swipe to a screen with space and then press
and hold an empty part of the screen.
2. Touch Widgets, and then select an item from
the list.
Add Applications
1. Swipe to a screen with space and then touch
.
2. Press and hold an application and then drop it on
the screen.
Remove Widgets/Applications
1. To remove an item, press and hold it and then drag
and drop it in .
SIDES
11.
12.
13.
14.
15.
Camera Key
Volume Up/Down Keys
Power/Lock Key
Micro USB Charging Port
3.5 mm Headset Jack
QWERTY Keyboard
1
2
19
3
4
18
5
17
6
7
16
8
9
Adjust Sound Settings
1.Touch Screen
2. Menu Key
3. Home Key
4. Back Key
5. Search Key
6. Caps/Shift Key
7. Voice Commands Key
10
11
12
13
14
15
8. Function Key
9. Vibrate Mode Key
10. Symbols Key
11. Space Key
12. Browser Key
13. Enter Key
14. Messaging Key
Adjust sound settings and make your Genesis suit
your style with unique ringtones for incoming calls and
notifications.
> Settings.
1. From the Home screen, press
2. Touch Sound.
• Under General, you may turn on silent mode, adjust
vibrate settings, and change ringtone, media, and
alarm volumes.
• Change phone and notification ringtones under
Incoming calls and Notifications.
• Under Feedback, you may adjust dial pad sounds,
choose to hear sound when making selections
or unlocking the touch screen, enable or disable
haptic feedback, and set emergency call behavior.
15.
16.
17.
18.
19.
Power/End Key
Delete Key
Directional Key
OK Key
Send Key
Touch Screen and Navigation
LG Genesis features external and internal touch screens
that make navigation as quick and easy as a simple tap
or swipe of the finger.
Navigation Tips
• Use your fingertip to lightly touch the screen and
select options.
• Use quick flicks of your finger on the touch screen
to scroll up/down and left/right.
• The Notification Bar includes timely information,
including new message, email, and voicemail
notifications; missed calls; and calendar reminders.
Touch the bar and slide it down with your finger to
see full details. Press
to close the bar.
•
and
: Return to previous screen.
•
and
: Return to the main home screen.
•
: Open the Application Launcher, where you can
find all of your applications.
•
and
: Open a contextual menu with more
options for the current screen.
Set Up Gmail™
Entering Text
The internal touch screen does not permit text entry.
Use the full keyboard for entering text when composing
text messages, emails, etc.
In addition to providing mobile access to your Gmail
inbox and syncing your Gmail contacts, setting up
a Google account on Genesis will allow you to take
advantage of many of your phone’s other great features,
such as Google Talk™ and Android Market™
.
Sign in to a Google Account
1. From the Home screen, touch
> Gmail.
2. Read the information and touch Next to continue.
3. Touch Sign in. (You may also create a Google Account
if you don’t yet have one. Just touch Create and
follow the on-screen steps.)
4. Enter the username and password associated with
your Google Account and touch Sign in again.
5. Touch Finish setup.
6. Once syncing is complete, you will be taken to
your inbox. Touch OK to close the What’s new in
Gmail? prompt.
7. Touch an email to read it, or press
for
more options.
Make a Phone Call/Send a Message
Set Up Email
Genesis’ responsive touch screens and QWERTY
keyboard make dialing phone numbers and sending
text messages quick and easy.
Make a Phone Call
1. From the home screen, touch
.
2. Dial the number you want to call or start spelling
the name of the desired contact. You will see a list
of contact options to choose. Touch
to expand
the list.
3. Touch the desired contact and then touch
to place the call.
Send a Message
1. From the home screen and with the flip open,
press
.
2. Enter a number in the To field or touch
to access your contact list.
3. Enter your message.
4. Touch Send.
Leave your laptop at home—Genesis provides
support for Exchange accounts and a variety of
POP3/IMAP accounts.
1. From the Home screen, touch Email.
2. If you have already set up an account, press
> Accounts >
> Add Account. Otherwise,
enter your email address and password, and then
touch Next.
3. Some popular email services will prompt you with
customized setup prompts. For all other accounts, you
must choose whether you’re setting up a POP3, IMAP,
or Exchange account. Steps may vary from this point
depending on which account type you choose.
4. To set up an Exchange account, you’ll need to enter
your company’s domain, password, and server
address. (Consult your IT department for more
information.) When you’re ready, touch Next.
5. Adjust your account options and then touch Next.
6. You may rename your account. Touch Done.
Manage Contacts
Your Genesis has room for an unlimited number of
contacts (dependent on available memory). Guard that
information against loss by copying your contacts to a
microSD™ card.
Add Contact
1. From the Home screen, touch
.
2. Press
> New contact.
3. Enter the contact’s information. Touch
to add
information fields. When you’re finished, touch Done.
Edit Contact
1. From the Contacts screen, touch a contact name.
2. Press
> Edit contact.
3. When you’re finished, touch Done to save your
changes.
Download an App
Back Up Contacts to SD Card
1. From the Contacts screen, press
> More.
2. Touch Import/Export > Export to SD card.
3. Touch the contacts you wish to export, or press
Select all.
4. Touch Done and then touch OK.
With thousands of apps available in Android Market,
you’re sure to find just the right one for every need.
Download an App
1. From the Home screen and with a Google Account
already set up on your phone, touch
> Market.
2. Read the Terms of Service and touch Accept.
3. You can browse featured apps, select a category, or
search for an app. To search, touch
, enter the
search term, and touch
again.
4. Touch an app to view details.
5. Touch FREE (free apps) or the price (paid apps) to
install. (To purchase a paid app, you’ll need to set up
a payment method with Google Checkout™
. )
6. Read the application access information and
touch OK.
7. Once the app has been downloaded and installed,
you can find it in the Downloads section of the
Launch Screen.
Uninstall an App
1. From the Home screen, press
> Settings >
Applications > Manage applications.
2. Touch an application and then touch Uninstall.
>
Manage Settings
Take a Picture/Video
Genesis features a control panel that is accessible by
swiping down on the bar at the top of the screen. This
helpful panel lets you enable or disable Bluetooth®,
Wi-Fi®, and more.
•
•
•
•
•
Touch
Touch
Touch
Touch
Touch
to
to
to
to
to
switch to and from Vibrate Mode.
enable or disable Wi-Fi.
enable or disable Bluetooth.
enable or disable GPS and Location On.
enable or disable Airplane Mode.
Capture every moment with the 5.0 megapixel
camera and camcorder, and then share your
photos and videos via multimedia messages,
email, or your favorite social network.
Take a Picture
, and
1. From the Home screen, press
then rotate the phone for a landscape view.
2. Adjust zoom, brightness, and other
customizable settings by touching the
screen to bring up the controls. When
you’re ready, press
.
3. To upload your photo, touch Share and
select a destination from the list.
Record a Video
1. From the Home screen, press
, and
then rotate the phone for a landscape view.
2. Switch to the camcorder by dragging the
Mode icon to Video mode .
3. To record video for sending, touch
and
then touch MMS.
4. Press
to begin recording. Press
to
stop recording.
5. To upload your video, touch Share and select
a destination from the list.
Update Facebook Status
Use Wi-Fi
Genesis comes preloaded with Facebook and
Twitter™ applications—no extra downloads from
Android Market are necessary. Keep your friends
in the loop with just a few taps of the screen.
> Facebook
1. From the Home screen, touch
for LG.
2. Touch OK to continue.
3. Enter your Facebook email and password and
then touch Log in.
4. If you wish, you can import your Facebook friends
into Contacts. If not, touch Skip.
5. Touch the What’s on your mind? field and enter
your message.
6. Touch Share.
Genesis’ Wi-Fi capability lets you browse the web
wherever you find a wireless signal—at home, work,
and even the airport.
Connecting to a Network
1. From the Home screen, press
> Settings >
Wireless & networks.
2. Touch Wi-Fi. Once enabled, touch Wi-Fi settings.
3. Genesis will automatically search for available
networks. Touch a network name.
4. Touch Connect. If the network requires a password,
enter it and then touch Connect.
Note: Many open networks commonly found at restaurants and
hotels will require you to launch the browser after connection to
finish an online login process.
Use Google Voice Actions
Google Voice Actions let you perform many of your
everyday tasks on your phone using only your voice!
Just touch
and say a command:
Use Web Browser
Surf the web with Genesis’ full HTML browser and
bookmark your favorite sites for easy access in
the future!
• To send a text message, say “Send text to [recipient]
[message].” For example, “Send text to Chloe Smith
I’ll be there in fifteen minutes.”
• To get directions, say “Navigate to [address/city/
business name].” For example, “Navigate to 101
Peach Street,” or “Navigate to the Getty Center.”
• To place a call, say “Call [contact name] [phone
type]” or “Call [business name] [location].” For
example, “Call Ben Davis mobile,” or “Call Sal’s Deli
Minneapolis.”
• To send an email to yourself, say “Note to self
[message].” For example, “Note to self, pick up
dry cleaning.”
Many other Voice Actions are available, such as visiting
a website, viewing a map, or listening to music. Learn
more by visiting google.com/mobile/voice-actions.
1. From the Home screen, touch
.
2. Touch the URL field and enter an address. When
you’re finished, touch
.
3. To bookmark a page, touch
.
4. Touch Add.
5. You may edit the bookmark’s name and location.
When you’re ready, touch OK.
Bluetooth Pairing
Take advantage of the freedom of Bluetooth wireless
technology with Genesis.
1. From the Home screen and with the device you wish
.
to pair with in pairing mode,* press
2. Touch Settings > Wireless & networks.
3. Touch Bluetooth to turn Bluetooth power on.
4. Touch Bluetooth settings > Scan for devices.
5. Touch the name of the device you wish to pair with.
6. Touch Pair to pair and connect.**
*Please consult the documentation included with the Bluetooth
device for information on placing the device into pairing mode.
GPS Navigation
**Some devices require a password to connect. Please consult
the Bluetooth device’s manual for the code (usually 0000
or 1234).
You’ll always find your destination with Your Navigator
Deluxe and Google Maps™ Navigation on your Genesis.
Enjoy voice-guided,* turn-by-turn directions on an
interactive map.
Navigate with Your Navigator Deluxe
1. From the Home screen and with GPS enabled, touch
> Your Navigator Deluxe.
2. Read the warning and touch Accept.
3. From here you can select Drive To to receive turnby-turn directions, search for local businesses, check
traffic, and more.
Navigate with Google Maps Navigation
1. From the Home screen and with GPS enabled, touch
> Navigation.
2. Read the warning and touch Accept.
3. From here you may speak or type your destination,
or navigate to an address saved in Contacts or
Starred Places. Touch Type Destination.
4. Enter a destination and touch
.
*A download from Android Market is required before you can
use voice-guided navigation.
Note: You can pre-plan a trip at uscc.telenav.com and have the
directions sent to your phone.
QUICK START GUIDE
QWERTY Keyboard
Download an App
Update Facebook®
Status
Use Google™
Voice Actions
GPS Navigation
Optional Accessories
lgusa.com/genesis
Bluetooth Headset
(HBM-235 – Purple and Black)
Bluetooth Headset
(HBM-570 – Silver, Dark Blue,
Pink, and Purple)
Bluetooth Headset with
Speakerphone/Solar Charging
Cradle (HBM-810)
Bluetooth Stereo Headset
(HBS-700)
Bluetooth Headset with Vehicle
Power Charger (HBM-585)
Vehicle Power Charger
Maximize your phone with these cutting-edge accessories at
lgusa.com/genesis
All materials in this guide including, without limitation, the design, the text, and any marks are the property of LG
Electronics, Inc. Copyright © 2011 LG Electronics, Inc. ALL RIGHTS RESERVED. Features and specifications are subject to
change without prior notice. Genesis™ is a trademark of LG Electronics, Inc. Google and the Google logo are trademarks
of Google Inc. Android and Android Market are trademarks of Google Inc. The Bluetooth® word mark and logos are
registered trademarks owned by Bluetooth SIG, Inc. Other trademarks and trade names are those of their respective
owners. Unless otherwise specified herein, all accessories referenced herein are sold separately.
FPO