1
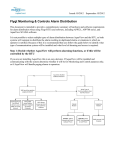
CIMScan Monitoring System General User’s Manual For CIMScan Version 6 by CIMTechniques, Inc. 1215 Prince Street Beaufort, SC 29902 USA (800) 246-9456 - (843) 521-9897 - (843) 521-9818 FAX [email protected] Revised May 26, 2011 CIMScan User’s Manual CIMScan is an incredibly easy to configure and use real-time monitoring system. It is typically used to alert users to abnormal conditions that have been detected where critical materials are stored or processed. While the system is normally used to monitor temperatures, it can be used for anything for which a sensor is available. Notifications of alarm conditions are provided via email, pager, and cellular telephone text messages, as well as voice telephone if the CIMAlert option has been purchased. All measurement data is stored in a standard relational database for analysis and reporting. Custom reports can be generated with a variety of third party reporting packages. Table of Contents How CIMScan Works..........................................................................................................3 Logging onto CIMScan........................................................................................................6 Group Status Page..............................................................................................................7 Menu Bar.............................................................................................................................9 Group Status Page with Alarms Detected........................................................................ 10 Acknowledging an Alarm...................................................................................................11 Displaying a Trend Chart.................................................................................................. 12 Adding a User-Generated Note.........................................................................................13 Generating a Report..........................................................................................................14 Viewing Statistics Reports.................................................................................................15 Modifying Your User Profile.............................................................................................. 16 2 How CIMScan Works The diagram below shows how the CIMScan monitoring system gathers measurement information and sends it to the server. There it is stored and compared against userassigned alarm limit. If an alarm is detected, selected users are immediately notified of the condition. CIMScan supports both wired and wireless sensors. A sensor typically consists of a probe connected to some sort of interface device. Typically, wired sensors are connected to data collection devices called monitoring stations through a common sensor network called the “SensorBus.” Monitoring Stations have the ability to interface 3 with up to eight sensors. Both wired and wireless monitoring stations are also available. Wired monitoring stations connect directly to a facility’s local area network (LAN), while wireless devices communicate through the LAN via a device called a Gateway. Wireless sensors can communicate with a monitoring station, but more often than not they interface to the local area network through a Gateway device. Both short range (3550 feet) and long range (150-250 feet) wireless sensors are available. The range can be increased for wireless sensors by using Repeaters. Whenever measurement data is available at a remote sensor or monitoring station, it is immediately forwarded to the server over the LAN. How Sensor Data is Processed Every sensor in a CIMScan system has a unique serial number. Every time measurement data is sent to the server, this serial number is included. The server then uses the serial number to determine the monitoring group to which the sensor belongs and what parameters are associated with it (name of the appliance containing the sensor and its location, the alarm limits, units of measure, etc.). As the measurement data is received, it is stored in the database for future reporting and analysis. The data is also compared with the user-assigned alarm limits for the sensor. If an alarm or warning condition is detected, the sensor status is updated appropriately and a message is generated to alert selected users of the problem. How Alert Messages are Delivered Alert messages are generated whenever an alarm or a warning condition is detected or if a system error, such as a sensor failure, occurs. The system will continue to send alert messages on a user-specified interval until the alert is acknowledged. The interval is called the “Acknowledgement Timeout.” Each user is assigned an “escalation level” beginning with 1. Users with an escalation level of “1” will receive the initial message. A user with a level of “2” will receive the second message. This process repeats until all escalation levels have been covered. The system can be configured so that users will only receive messages generated at their escalation level, or it can be set up to send messages to all users at or below the current escalation level. The diagram on the following page shows how the escalation process works. 4 Consider a situation where an alarm is detected in refrigerator 2R12 in the blood bank. The system generates an alert message as shown above (#1) and sends it to Sue and Jim because they have been assigned Escalation Level #1. Assume that neither Sue nor Jim acknowledged the alarm. After the Acknowledgement Timeout period, the system advances the escalation level and sends the alert message to Mike (#2). Mike acknowledges the alert and further notification ceases for the moment Assume that the alarm condition persists. After the Uncorrected Event Notification Timeout has expired (#3), the system will generate a new message informing the users that the alarm has not been corrected. The message will be initially sent to Sue because she is at Escalation Level #1. If Sue acknowledges the message, escalation will cease, again, for the moment. The system will react again if the alarm remains uncorrected after a second Uncorrected Event Notification Timeout has occurred (#4). The example above shows what will happen if no one acknowledges the third set of messages. The system will go through all four defined escalation levels, sending the message to the appropriate people. Once it reaches the top escalation level, the system will repeatedly send the message at the Acknowledgement Timeout interval until the message is acknowledged by someone. Alarm Acknowledgement Alarm acknowledgement can only be accomplished by logging onto the system and selecting the point or points to be acknowledged on the group status page. The steps to take to acknowledge an alarm are discussed later in this document. 5 Logging onto CIMScan Logging onto your CIMScan system is easily accomplished by opening your web browser and typing in the name (or IP address) of the server hosting CIMScan followed by “/cimscan/login.asp.” This will display the login page as shown below. Simply enter your User ID and Password in the fields provided and click the “Login” button. 6 Group Status Page After logging in, the main group status page will be displayed as shown in the annotated screenshot below. The page is divided into three sections. The top section contains the main menu followed by a list of monitoring points in alarm. These sections will be discussed later in this manual. The bottom section contains a spreadsheet that contains the current information for all the monitoring points in the group. Location........the physical area where the appliance to be monitored is located Name............the name of the appliance being monitored Select...........choose sensor(s) Parameter....the parameter being monitored (temp, humidity, pressure, etc.) Value............the current measurement value for each sensor Units.............the units of measure (°C, %RH, psi, etc.) Status...........symbol that shows the current alarm status for each point Time.............the time that the last measurement was received from each sensor 7 Users can select one or more monitoring points to be included in a trend chart (plot of values vs. time). Users can also add free-form notes to the data log for one or more monitoring points by selecting the points and using the “Select Action” dropdown list as shown in the screenshot below. Users can select all the monitoring points in the list by clicking on the “Select/Unselect All” checkbox at the bottom of the grid. Conversely, all the selected points can be deselected by clicking the checkbox a second time. Displaying a trend chart and adding user notes are discussed in more detail later in this manual. 8 Menu Bar A simple menu bar is displayed at the top of each page in CIMScan to allow users to select Home......Clicking on “Home” will display the Group Status Page Admin......Displays submenus that provide a path to the administration functions available in CIMScan. Normal users usually only have a single administrative function which is editing their user profile. Help........The on-line manuals are available by clicking on the “Help” menu Reports...A variety of reports can be generated by clicking on “Reports.” Logoff......Users can manually logoff by clicking here. The system will automatically log you off after a specified period of inactivity. 9 Group Status Page with Alarms Detected The main group status page below would have been displayed if you had logged onto the system and more points were in alarm, warning, or error. Points that have exceeded the warning limit are displayed with a yellow background. Points in alarm are shown over red, and points in error are over blue such as the loss of communication between the server and the remotes. If the system is configured to require alarm acknowledgement, the “Acknowledged (Ackd)” column will be displayed in the alarm list. To acknowledge an alarm simply select the desired monitoring point(s) in the alarm list and click on “Add Acknowledgment” as described in the next section. 10 Acknowledging an Alarm Alarms can be easily acknowledged by selecting them in the alarm list and then clicking on “Add Acknowledgement” in the dropdown list at upper right hand corner of the grid. This will display the acknowledgement dialog box. Simply perform the steps below to complete the transaction. 11 Displaying a Trend Chart Users can display a chart containing one or more monitoring points by selecting the points as previously described and clicking on “Trend” in the dropdown list at the upper right hand corner of either the alarm list or the current status grid. This will display a chart containing a plot of the point(s) vs. time as shown below. Users can move the mouse cursor (hand) over the plot to display the current value at the top of the chart and the time stamp (in red) right below the trend line. The chart can be easily zoomed by using the already available Preset Time Period buttons. The time period can also be easily adjusted by using the handles in the timeline. Placing the cursor between the two handles and sliding it left or right will allow the user to move a set time range. Lastly, another way to adjust the time period is to manually type in the date and time in the Time Slots at the bottom of the chart. 12 Adding a User-Generated Note Free-form notes can be added to one or more monitoring points by selecting the desired points and selecting “Add Notes” in the dropdown list associated with the grids. This will display a blank notes dialog. Simply enter your note using the keyboard as shown below. Clicking on the “Add” button will redisplay the dialog box with a confirmation that the note had been entered for the selected monitoring points. Click the “X” on the upper right hand corner of the dialog box to close. 13 Generating a Report Reports can be generated directly from the main menu by clicking on “Reports” and selecting the report that you want to generate. The next step is to select the group for which the report will be generated. The reporting page will be expanded to show a list of all the monitoring points available in the group selected. Select the appropriate monitoring points and the period of the report. Choosing the “User-Specified Date and Time” period will allow the user to specify the starting and ending date/times. Remember to use the “Select/Unselect All” box to select all of the monitoring points in the group to be included in the report. Finally, click the “Submit” button to generate the report. 14 Viewing Statistics Reports To view Statistics reports by hour, day, week, and month, go to the main Reports tab and make the desire selection. Choose the desired group, sensor, and time period as described in the previous section. The Statistics Report contains three sections: Summary, Chart, and Detail. User may choose which section to view by using the Tabs at the upper left hand corner of the window. Before viewing, the user must highlight a sensor first by placing the mouse cursor on the desired sensor in the Summary page. 15 Modifying Your User Profile Click on the “Admin” menu then select “My Profile” to display your User Profile. A typical user profile page is shown below. On this page you can change your contact information as well as your starting and ending workday times. You can enter your workday time by using the “ ” and “” buttons next to the time fields. Simply click on “Update” button to make changes up to date. Example of how to use multiple emails and phones are shown below: 16 You can send text messages to a cell phone if you know the service provider. The table below shows the email address to use for each of the popular providers. T-Mobile: [email protected] Virgin Mobile: [email protected] Cingular: [email protected] Sprint: [email protected] Verizon: [email protected] Nextel: [email protected] US Cellular: [email protected] SunCom: [email protected] Powertel: [email protected] AT&T: [email protected] Alltel: [email protected] Metro PCS: [email protected] where phonenumber = the cell phone’s 10 digit phone number for more listing, please use the following links: http://en.wikipedia.org/wiki/List_of_SMS_gateways http://www.sweetnam.eu/index.php/List_of_Internet_to_SMS_gateways http://www.mutube.com/projects/open-email-to-sms/gateway-list/ Most pager providers also provide access via an email address. Check with your provider for the address to use. 17