1
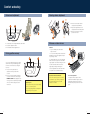
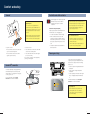
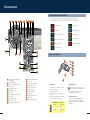
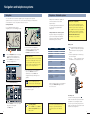
LR3
QUICK START GUIDE
02
04
08
09
10
11
12
16
18
20
VEHICLE ACCESS
COMFORT AND SAFETY
CLIMATE CONTROL
EXTERIOR LIGHTING
FACIA OVERVIEW
WIPERS AND WASHERS
ON-ROAD AND OFF-ROAD
AUDIO SYSTEM
NAVIGATION AND TELEPHONE SYSTEMS
GAS STATION INFORMATION
Some of the information in this guide may not
apply to your vehicle.
You must refer to your Owner's Handbook for
full operating instructions.
Vehicle access
Remote control
Dependent upon specification and vehicle
configuration, the operation of the remote
control may differ from the following.
Tailgate
• Press once to lock all doors and activate
the alarm.
2
• Press once to deactivate the alarm and
unlock the driver’s door (Single point
entry).
• A second press will unlock all other
doors.
Customer configurable button. Can be
programmed to remotely operate one of the
following functions:
• Headlamp on (default).
• Panic alarm.
• Air suspension.
Refer to Programming the remote control
in the Owner’s Handbook.
1
Opening the upper tailgate
Opening the lower tailgate
With all the doors unlocked, press the release
switch 1 on the underside of the exterior handle
and pull to open.
With the upper tailgate open, press the touch
pad 2 on the lower tailgate waist moulding.
Clock setting
Automatic relock
If the vehicle is unlocked with the remote
control, it will automatically relock and arm the
alarm if a door or the tailgate is not opened
within one minute.
Key blade
Press button (arrowed in illustration) to release
the key blade.
Single point entry
This is a security feature that unlocks only the
driver’s door. It can be disabled on individual
remote controls by simultaneously pressing and
holding the lock and unlock buttons for three
seconds. The vehicle will lock and then unlock in
the currently selected mode to confirm the change.
Central locking
Master lock and unlock switches
1. Press to unlock all doors and tailgate.
2. Press to lock all doors and tailgate.
The clock displayed on the audio unit and in the
message centre is set via the audio unit menu.
To adjust the time:
1. Press the MENU OK button.
2. Rotate the rotary control clockwise until
Clock is displayed and highlighted.
3. Press the control to select and enter the
clock setting mode.
4. Dependent upon specification of audio unit,
the time display may be changed between
12 and 24 hour modes.
5. Select Set to display the hour setting. Rotate
the control to adjust and press to confirm.
6. The display then shows the minute setting.
Rotate the control to adjust and press to
confirm.
News
Clock
1
2
3
4
5
6
09
Time
Set
1
2
3
AM
4
5
09
6
Speed-related locking
If enabled, the doors and tailgate will automatically
lock when the vehicle's speed exceeds 5 mph.
This feature can be disabled or enabled in the
Settings option accessed via the trip computer.
2
3
Comfort and safety
Driver’s seat adjustment
Steering column adjustment
2
1
1. Move the lever located under the
steering wheel fully downward.
2. Adjust the height and reach of the
steering wheel to the desired position.
3. Move the lever fully up to lock the
position of the wheel.
2
3
3
1
Windows and door mirrors
1. Seat fore/aft, cushion height and front tilt control switch.
2. Seat recline adjustment switch.
3. Lower backrest lumbar support switch.
Windows
Driving position memory
2
1
Once you have adjusted the driver's seat and
exterior mirrors for your ideal driving position,
the vehicle can memorise these settings for
future use.
1. Press the memory store button to
activate the memory function for five
seconds.
2. Press one of the preset buttons within five
seconds to memorise the current settings.
MEMORY STORED will be displayed on the
message centre accompanied by an audible
chime to confirm the settings have been
memorised.
2
• To open a window, press and hold the
respective switch.
• To close the window, pull and hold the switch.
Window movement can be stopped at any time
by releasing the switch.
The front windows have a one touch facility that
allows them to be fully opened or closed with a
single operation of the switch. Firmly press or lift
the switch and release. Movement can be
stopped by operating the switch again.
1
Press the right-hand side of switch 1 to inhibit
the operation of the rear window switches.
Operating note
A seat position will only be memorised during
the five second active period.
Resonance with lowered windows
Door mirror adjustment
If a resonance/booming sound occurs when
a rear window is open, lowering an adjacent
front window about 25 mm (1 inch) will
eliminate the condition.
To adjust the mirrors, rotate the mirror
adjustment knob 2 left or right to select the
appropriate mirror. Move the knob in any
direction to adjust the position of the mirror
glass.
Any existing settings will be over-written when
programming a memory position.
4
5
Comfort and safety
Sunroof
Seat belts and child restraints
Operating note
The sunroof can be operated with the
starter switch in position I or II and for 40
seconds after position 0 has been selected,
providing that neither front door has been
opened.
1
With the starter switch in position I or 0, the
switch will need to be pressed and held
until the roof reaches the desired position.
2
To open the sunroof:
To close the sunroof:
• Press and release the rear of the switch 1 to
open the roof to the tilt position.
• Press and release the rear of the switch
again to open the roof fully.
• Press and release the front of the switch 2 to
close the roof to the tilt position.
• Press and hold the front of the switch again
to close the roof fully.
If the sunroof is moving, it can be stopped by
pressing the switch again.
A warning light on the instrument pack will
illuminate to alert you that the driver's
and/or front passenger's seat belt is
unbuckled.
Automatic Locking Reels (ALR)
With ALR enabled, as the seat belt retracts, it
will automatically lock preventing re-extension.
Ensure passengers do not fully extend the
restraints and inadvertently engage this
feature during normal use.
All passenger seat belts have ALR fitted for use
with child seats or securing large items.
• To enable: extend belt to maximum length.
• Allow seat belt to retract onto the child
seat/item (a clicking sound will be heard as
the belt retracts). Ensure there is no slack by
pressing the seat/item firmly into the vehicle
seat.
• To disable: unbuckle the belt and allow the
belt to fully retract.
Recommended child seat
Land Rover strongly recommends the use
of LATCH (Lower Anchors and Tethers for
CHildren) child seats.
LATCH child seats can only be fitted in the
second-row outer seating positions.
Passenger air bag
The front passenger seat is fitted with an
occupancy sensor system that determines the
state of seat occupancy and sets the air bag
status to suit;
Homelink® transmitter
The buttons (arrowed) can be programmed to
transmit radio frequencies that can operate
external devices i.e. garage doors, entry gates,
security systems, etc....
PASS
AIRBAG
OFF
For more information, refer to Garage
transceiver in the Owner's Handbook.
PASS
AIRBAG
OFF
• Seat unoccupied - air bag deactivated and
indicator off.
• Seat occupied - air bag activated and
indicator off.
• Seat occupied by a child seat or low weight
object - air bag deactivated and indicator
on.
For further information, refer to Occupant
detection in the Owner’s Handbook
Operating note
If the indicator becomes permanently
illuminated when the seat is definitely
empty, please contact your Land Rover
Dealer immediately.
6
7
Climate control and exterior lighting
Climate control
Exterior lighting
Dependent upon specification, the control panel may differ from the one shown.
Exterior lamps master switch
1
1
3
2
2
4
1
AUTO
A
Temperature selection
Recommended mode
Select AUTO as the normal operating mode.
This will help prevent window misting.
Rotate the controls 1 to adjust the temperature
for the respective side of the passenger
compartment.
AUTO (automatic) MODE
Operating note
Press AUTO to select automatic operation of
the system, both LEDs in the switch will
illuminate.
It is not possible to achieve a temperature
differential of more than 7°F between the left
and right.
The system will adjust the heat output, blower
speed, air intake and airflow distribution to
maintain the selected temperature(s) and
reduce misting without further adjustments.
Blower speed
The air distribution and blower controls can be
operated to override the automatic settings.
This will extinguish the appropriate LED in the
AUTO control.
External water deposits
The air conditioning system removes moisture
from the air and deposits excess water
beneath the vehicle. Puddles may form, but
this is normal and no cause for concern.
Rotate the blower control 2 to adjust airflow
through the vents.
Air distribution control
Press to select the desired distribution setting.
An LED will illuminate in the switch.
Windshield and side window vents
Face level vents
Foot level vents
More than one setting can be selected to
achieve the desired distribution.
B
1.
2.
3.
4.
Exterior lamps off
Side lamps
Headlamps
Autolamps
In AUTO mode and the starter switch in
position II, a sensor monitors the exterior
light levels and will automatically switch the
side lamps and dipped headlamps ON and
OFF as required.
A. Front fog lamps
Pull the switch to position A to switch on the
front fog lamps.
B. Rear fog lamps
Pull the switch to position B to switch on the
rear fog lamps.
Fog lamps cannot be operated if the lamps
master switch is in AUTO.
Direction indicators
Move the lever up or down to activate the
direction indicators.
Moving the lever up or down against spring
pressure and then releasing will flash the
indicators three times. Useful for lane changing.
Headlamp high beam
Push the lever away from you to select
headlamp high beam. A warning indicator
will illuminate on the instrument pack.
To flash the headlamps, pull the lever towards
the steering wheel and then release.
Heated windshield (when fitted)
Heated rear window
8
9
Facia overview
Warning indicators (information)
1
2
3
4
5
22
6
7
1
2
ABC
4
GHI
5
JKL
8
The following will illuminate during normal driving to indicate that a particular system or
feature is operating. If any other warning indicator illuminates, refer to Owner’s Handbook.
10 11
Seat belt reminder
Side lamps on
Door open
Headlamp high beam on
LOW gear range selected
Rear fog lamps on
Hill Descent Control (HDC) on
Front fog lamps on
Cruise control active
Electric parking brake on
3
DEF
6CD-465
6
MNO
7
8
9
PQRS
TUV
WXYZ
0
9
CD 3
Tr 1 5
1
2
3
4
14 : 54
2 : 43
5
6
Direction indicator
21
12
20
19
13
Wipers and washers
5
18
14
17
15
3
2
1
0
16
A
1
2
3
4
5
6
7
8
9
10
11
10
Direction indicators/headlamps/trip
computer switch
Cruise control switches
Instrument pack/warning indicators and
message centre
Audio/telephone switches
Wiper/washer switch
Audio system
Dynamic stability control (DSC) switch
Touch screen
Hazard warning switch
Master locking switches
Passenger air bag status indicator
12
13
14
15
16
17
18
19
20
21
22
Heater/air conditioning controls
Gear selector
Terrain response control switch
Transfer gearbox switch
Hill Descent Control switch
Air suspension control
Electric parking brake
Starter switch
Steering column adjustment
Hood release
Exterior lamps master switch
4
B
Windshield wiper
Windshield washer
Intermittent wipe or rain sensor operation.
Normal speed operation.
High speed operation.
Single wipe - press down and release to
operate.
5. Rotate collar to adjust speed of intermittent
wipe or sensitivity of the rain sensor.
1.
2.
3.
4.
Intermittent wipe
Rain sensor
Short delay.
Most sensitive
to rain.
Long delay.
Least sensitive
to rain.
Press and release the button on the end of
the lever to operate the windshield washer.
Press and hold the button to operate the
windshield washer and wipers.
Rear wiper and washer
Pull the lever to position A for intermittent
operation of the rear wiper. Pull and hold the
lever in position B to operate the rear washer
and wiper.
11
On-road and off-road
Electric parking brake
Cruise control
Applying
Cruise control enables the driver to maintain a
constant road speed without using the accelerator
pedal.
• With the vehicle stationary, pull up the
parking brake lever and then release it. The
red warning indicator in the instrument pack
will illuminate.
1. SET +: to set a road speed or increase the
speed in 1 mph steps when cruise control is
operating.
2. SET -: to set a road speed or decrease the
speed in 1 mph steps when cruise control is
operating.
3. RESUME: resumes a SET speed retained in
memory.
4. CANCEL: cancel cruise control but retains
the set speed in memory.
Releasing
• The starter switch must be in position I or II.
Apply the foot brake and press down on the
parking brake lever.
• If the vehicle is stationary with the parkbrake
applied and either D (Drive) or R (Reverse)
selected, pressing the accelerator will
automatically release the parking brake.
1
2
3
4
Cruise control will automatically disengage
when the brake pedal is used or when the
vehicle speed falls below 18 mph.
Automatic transmission
Gearshift interlock
The starter switch must be in position II, the foot
brake applied and the selector release button
pressed before the gear selector can be moved
from P (Park) to R (Reverse).
2
Sport mode
4
R
+
N
D
In Sport mode, automatic gear
changing is maintained but the
gearshift changes are modified to
improve performance.
To select Sport mode, move the
gear selector from the D (Drive)
position towards the left hand
side of the vehicle.
The word SPORT will appear on
the instrument pack display and the LED in the
gear selector surround will illuminate.
With the gear selector in Sport, the
transmission will stay in lower gears for
longer with downshifts occurring more readily.
Fuel consumption will be adversely affected.
If Terrain Response is fitted, Sport mode is
only available if the General program is
selected.
12
1
3
M
S
Air suspension
The gear selector must be in the P position
before the starter key can be removed.
P
-
CommandShift ™
CommandShift gear selection can be used as an
alternative to automatic gear selection and is
particularly effective when rapid acceleration or
engine braking is required.
P
M
5
R
S
+
N
M
D
S
6
-
7
1. Select Sport mode. The transmission will
automatically select the gear most appropriate
to the vehicle’s road speed and accelerator
position.
2. Moving the selector lever forward (+) or
backward (-) and then releasing will manually
select a higher or lower gear (when available).
The message TRANSMISSION
COMMANDSHIFT SELECTED will appear in
the message centre.
3. Subsequent gear selections will display the
selected gear on the instrument pack display.
4. To deselect CommandShift mode, move the
selector lever back to the D position.
Vehicle height will be automatically adjusted
according to road speed in order to maintain
driveability and handling.
Some of the Terrain Response programs will
automatically adjust the suspension height.
Vehicle height can be manually adjusted via the
raise/lower lever 1. Height changes may only be
made when the engine is running and the driver and
passenger doors are closed.
Indicators 2 or 7 will illuminate to show the direction
of movement. They extinguish when the height
change movement is completed.
Off-road height 3, provides improved ground
clearance and approach, departure and break-over
angles.
On-road height 4, is the normal height for the
vehicle.
Access height 5, lowers the vehicle to provide easier
entry, exit and loading of the vehicle. This position
may be selected up to 40 seconds after the starter
switch is turned off.
Crawl (locked at Access height) 6, allows the vehicle
to be driven at low speeds at access height, to give
increased roof clearance.
13
On-road and off-road
Terrain response system
Transfer gearbox
HIGH range should be used for all normal road
driving and also for off-road driving across dry
level terrain.
General
Suitable for surfaces that match typical road
surfaces.
Grass-Gravel-Snow
LOW range should be used in situations where
low speed manoeuvring is necessary, or in
extreme off-road conditions.
Suitable for surfaces which are firm but
have a slippery surface, e.g. grass, snow,
loose gravel, pebbles or icy conditions.
Range changing
Mud-Ruts
The Terrain Response system is always
active and cannot be switched off. When
the vehicle is started the system will
normally start in the General program.
Sand
Manual selection of a special program, by
rotating the knob, will provide benefits in
how the vehicle can be driven over different
surfaces or terrains by automatically
adjusting the vehicle’s drive and suspension
systems.
Suitable for soft, predominantly dry, yielding
sandy ground, e.g. sand dunes and
deserts. If the sand is damp or wet, the
Mud-Ruts program may be more beneficial.
It is recommended that a special program
be engaged whenever driving conditions
could become difficult, and cancelled once
the conditions for use are no longer present.
Only selectable when the transfer gearbox
is in LOW range. Suitable for crossing wet or
dry, solid unyielding ground requiring high
levels of wheel displacement, e.g. clusters
of boulders or rocky river beds.
Wading
When wading through water, select the
program suitable for the surface beneath the
water. The maximum depth of the water
should not exceed 600 mm (24 inches).
Hill Descent Control (HDC)
The recommended method for range changing is with
the vehicle stationary. With the engine running, and the
main gearbox in N (Neutral), move the transfer gearbox
lever to the required position and then release. The
indicators on the switch and instrument pack display will
flash during range changing. When range changing is
complete a chime will sound and a message will be
displayed on the message centre.
Suitable for soft, muddy, uneven or deeply
rutted ground. It is recommended that LOW
range is selected on the Transfer gearbox.
Rock Crawl
Parking aid
With the ignition on, the front and rear parking
aids are activated whenever reverse gear is
selected. A short confirmation tone will sound
after one second.
If an obstruction is detected by the sensors, an
intermittent tone will sound (higher pitch for
objects detected by the front sensors). As the
vehicle moves closer to the obstruction the
intermittent tone increases in frequency.
When the distance between the sensor and the
obstruction is less than approximately 30 cm
(1 foot), the tone becomes continuous.
The parking aid is automatically switched off
when the vehicle’s forward speed exceeds
16 km/h (10 mph).
2
3
Front parking aid - manual operation
When driving into a limited space, the front
parking aid can be manually activated by
pressing the switch on the facia. The switch
will illuminate and a short confirmation tone
will sound.
HDC operates in conjunction with the anti-lock
braking system to provide greater control in off-road
situations particularly when descending severe
gradients.
Press the switch (arrowed in illustration) to
select HDC. HDC can be selected at speeds
below 80 km/h (50 mph) but will not be fully
active until the vehicle speed reduces below 50 km/h
(30 mph), confirmed by a continuously illuminated
HDC indicator in the instrument pack.
Press the switch again to deselect HDC.
14
15
Audio system
Audio system controls
Satellite radio
Call Sirius
SAT Info.
Clock
2
In order to activate and use the satellite radio,
you will need to call the satellite radio service
provider (Sirius) and provide them with the
Electronic Serial Number (ESN) of your audio unit.
9
To view the ESN:
7
3
1. Press the MENU OK button.
ESN 1234567890AB
1
4
5
1. Press to switch audio unit on/off and rotate
to adjust the volume.
2. Press the appropriate mode button to select
FM, AM, CD or AUX.
3. Press button repeatedly to scroll through the
sound settings options. With the desired
sound setting selected, rotate control 1 to
adjust. Confirm new setting by pressing
button 3.
4. Press to automatically search for a radio
station or select a track on a CD.
6
5
4
8
5. Press to manually search for a radio station
or to search in a CD track
6. Press to eject the currently selected CD.
7. Press to access the audio unit menu.
8. Rotate control to scroll through menu options
or adjust settings. Press control to select a
menu item or confirm a change.
9. Telephone.
The use of discs with paper labels or double
sided dual format discs (CD/DVD) should be
avoided as they could become jammed.
Press to switch between Radio, CD or AUX.
Press to increase volume.
Press to decrease volume.
Press and release to scroll through preset radio stations or CD tracks.
Press and hold for two seconds to search up for the next radio station
or to advance through the CD track.
5. Press and release to scroll through preset radio stations or CD tracks.
Press and hold for two seconds to search down for the next radio
station or to reverse through the CD track.
1
Loading CDs
2
The audio unit features an integral
6-disc autochanger.
3
To insert a single disc, press the CD button,
then one of the number buttons (1 to 6). When
prompted by the information display, insert the
disc, label side up. The autochanger will load
the CD in the selected position.
4
5
Radio operation
Storing radio stations
1
2
3
4
5
6
Press either the FM or AM button to select the
required waveband. Repeated presses of either
button will scroll through the FM and AM
waveband memory options.
16
CD operation
1
To automatically store radio stations, press and
hold either the FM or AM button. Autostore will
be shown on the information display and the
stations will be stored under the preset
numbers in the selected waveband.
To recall a preset station, press and release one
of the numbered preset buttons.
To fully load the autochanger, press and hold
the CD button. The information display will show
Loading All. When prompted, insert a disc,
label side up. This process is repeated until all
six CD positions are occupied.
2
ABC
4
GHI
1.
2.
3.
4.
14 : 54
98.2 Autostore
The telephone number for Sirius can be found
in the menu under Call Sirius.
Compatible disc types
Steering wheel controls
FM
2
2. Rotate control to select SAT Info.
3. Press control to display the ESN.
7
PQRS
5
JKL
8
TUV
0
3
DEF
6CD-465
6
MNO
9
WXYZ
CD 3
Tr 1 5
1
2
3
4
14 : 54
2 : 43
5
6
Playing CDs
When in CD mode, press the appropriate CD
number (1 to 6) to start playing the selected
disc. Playback commences and progresses
sequentially through all of the loaded discs.
Playback can be paused by briefly pressing
one of the other mode buttons (FM, AM or
AUX). Playback will resume when the CD button
is pressed again.
Ejecting CDs
To eject a single disc, select the required disc
by pressing one of the number buttons 1 to 6
and then press the eject button (arrowed).
To eject all loaded discs, press and hold the
eject button, the discs will be ejected one at a
time. Remove disc(s) only when the display
shows the message Remove Disc.
To manually store a selection of radio presets,
refer to the Owner’s Handbook.
17
Navigation and telephone systems
Navigation
Telephone – Bluetooth system
The screen allows touch-control of the navigation system. Only a light touch is required to
operate the function, excess pressure on the screen could result in damage. On initial activation,
ensure that both the correct country and area have been selected.
Setting a destination
To set a destination and start using the
navigation system, use the following procedure:
HIN
WAS
4770 WASHINGTON STREET EXT
INGT
ON S
T
Route
Preference
ON
KW
OO
DR
Pairing a handset to the vehicle’s system
Prepare the mobile phone for pairing to the
system. See the telephone manufacturer’s
instructions for further details, or follow the
table below for generic commands.
There are a number of mobile phones that
have been tested for full functionality with the
Land Rover system, however not all phones
are compatible and some may only be partially
compatible. For the latest list of compatible
phones and software versions, please refer to
www.ownerinfo.landrover.com.
Alternatively consult your Dealer.
Way Point
Route preferences
When set, route preferences are remembered
and used for calculating all new routes. If you
encounter problems with the type of routes
being selected or the guidance being given,
please check the route preferences.
6. Once calculated, the screen highlights the
route. Touch 3 Routes to select an
alternate route, or touch Start to start
navigation. Drive away, following the voice
guidance.
Stored
Locations
Navigation
Set Up
Route
Options
Touch the audible repeat icon to
hear the last voice instruction again.
3. Touch the Destination Entry icon.
Destination Entry
When your destination is reached, voice and
visual confirmation is given.
1 2
Address
SOS
Emergency
2
Point of
Interest
Select From
Map
Memory
Point
Previous
Destination
Nokia
Motorola
Ericsson
1 Select Menu
Select Menu
Select Menu
2 Select Settings
Select Settings
Select Connectivity
3 Select Bluetooth
OR Connectivity
then Bluetooth
Select Connection
Select Bluetooth
4 Select On
Select Bluetooth link
Select My Devices
5 Select Search for
audio devices
Select Hands-free
With New Device
highlighted, select
Add. Press OK to
confirm
6 After search,
select Land Rover
Select Look for
devices
After search,
select Land Rover
7 Enter pass code
2121. Press OK
to confirm.
After search,
select Land Rover
Select Connect
8 No connection?
Select Bluetooth
(Menu) then Paired
devices Land Rover
Permission to bond?
Select Yes, and enter
pass code 2121
Enter pass code
2121 after prompt
1. With a paired or docked handset, press the
button on the audio unit, or operate the
answer call switch 1 on the steering wheel
controls.
2. Enter the required telephone number using
the numeric keypad.
3. Press the
button, or operate the answer
call switch 1 on the steering wheel to send.
1
When the handset has been successfully paired
to the system, Bluetooth will appear on the
Phone menu screen.
2
Receiving a call
3
4
To answer an incoming call, press the
button on the audio unit, or operate the answer
call switch 1 on the steering wheel controls.
5
4. Touch the Address icon, then enter details
using the on-screen keypad.
Touch OK to enter.
18
Destination
The following procedure demonstrates how
to connect the most popular brands of
mobile phone.
Mobile phone compatibility
Making a call
Navigation Menu
1
D
5. Once found, the screen displays the
destination. To change the route settings,
touch Route Preference, or touch
Destination to start the route calculation.
1. Press the Navigation button on the display
surround, and when prompted, touch
Agree to access the initial Home menu.
2. Touch the Home icon on the screen to
access the navigation menu.
Change
DR
XT
ROC
Destination
Way Point DC
HIPLEY
RD, WASHINGTON
Destination
Entry
Route
Preference
RU
DR
HIPLEY RD
ROC
KW
OO
DR
D
ST
1/16 mi
1/8
1/16mi
mi
ON
XT
RU
N
GTO
HIPLEY RD
H
WAS
4770 WASHINGTON STREET EXT
Mobile phones with Bluetooth capability can
communicate with the vehicle’s inbuilt
telephone feature.
Cancelling guidance
Touch the Home icon, select Route
options, Cancel guidance and touch
Yes to confirm.
If more than one paired Bluetooth phone is
in range, the system will automatically
select the last phone used in Bluetooth
mode.
To end, or reject an incoming call, press the C
button on the audio unit, or operate the end call
switch 2 on the steering wheel.
19
Gas station information
Fuel filling
Tire pressures
Fuel filler flap location
Tire pressure label
A small arrow on the fuel gauge
indicates which side the fuel filler
flap is located.
Fuel filler flap opening
Press and release the
centre of the left edge of
the fuel filler flap (where
arrowed) to open.
Operating note
The fuel flap has a spring loaded release, do
not force it open.
The correct tire pressures are shown on a label
attached to the pillar behind the driver’s door.
TIRE PRESSURE REMINDER
For your convenience, record the tire pressures
specific to your vehicle.
Docking the filler cap
Front
Rear
The filler cap is secured to the vehicle by a
strap. For your convenience a holder is
provided on the flap to store the cap whilst
refuelling.
Fuel specification
The correct fuel specification for your vehicle is
shown on the inside of the fuel filler flap.
Equipment necessary for use of fuels
containing more than 10 per cent ethanol is
not fitted to this vehicle.
Do not use E85 fuels (85 per cent ethanol
content). If E85 fuels are used serious engine
and fuel system damage will occur.
Part No. LRL 18 96 53 701
20
© Land Rover 2006