1
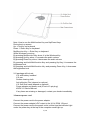
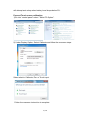
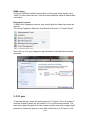
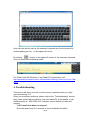
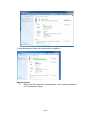
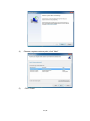
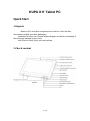
KUPA X11 Tablet PC
Quick Start
1.Unpack
Remove X11 and other component from the box .Save the box,
documents receipts and other packaging
materials for future use. Please contact shipper and seller immediately if
there are any damage to box or the
unit.Check to verify if the unit received has.
2.Check content
1 / 22
Note: How to use the Multifunction Key and Up/Down Keys
During boot up screen:
Up -> Up Key on keyboard
Down -> Down Key on keyboard
Multifunction Key -> Enter Key on keyboard
While Windows is running
By pressing Multifunction Key alone, it is the Windows Key
By pressing Up Key alone, it increases the audio volume
By pressing Down Key alone, it decreases the audio volume
By pressing and hold Multifunction Key and pressing Up Key, it increases the
brightness level
By pressing and hold Multifunction Key and pressing Down Key, it decreases
the brightness level
X11 package will include
X11 with battery installed
X11 pen
Screen cleaning cloth
Anti-reflective Film (depend on options)
X11 Soft Shell case (depend on options)
Power adapter and power cord (2 feet or 3-pin plug)
KUPA X11 User's Manual
If any items are missing or damaged, contact your dealer immediately
3.Connect power cord
Connect the power cord to the power adaptor.
Connect the power adapter's DC output to the X11’s DCIN 19V port.
Connect the power cord to the power outlet, at this time the indicator light
under the power key at the top of the computer would light up.
2 / 22
4.Boot up X11
Press the power key for 2 seconds to start X11.
When you boot up X11 at the first time, please do not force to shut down the
PC halfway till the
system is completely activated.
Operation Manual
1.Common Operation
1.1 Express Setup
Boot up X11
Press the power key for 2 seconds to start the PC.
Shutdown X11
Click the start menu button “close tablet pc” to shut down the tablet under
normal condition.
If the operating system fail to shut down the tablet, press the power key for 3
seconds to force shutdown.
Please DO NOT do so if the tablet is under normal condition as this may cause
data loss and system problem.
The system prompt interface may occur when restart the tablet PC after forced
shutdown.
Quick Sleep/Wakeup
When power button is pressed while X11 is running Windows 7, X11 will enter
the sleep mode immediately.
While in sleep mode, X11's power button will flash intermittently. User can
wake up X11 quickly by pressing the power button.
Charging
It is recommended that during first times of use, user completely depletes the
battery and then recharge the full for best battery life. This is known as battery
cycling. It is also recommend to perform battery cycling at least once a month
for optimal battery life.
Under normal operation, Windows operating system will alert user to recharge.
The system will alert user again when battery level falls under 7%. The system
3 / 22
will attempt auto sleep when battery level drops below 5%.
Pen and Touch screen calibration
1)Go into “control panel” select “Tablet PC Option".
2) Under Display Option, Select Calibrate and follow the onscreen steps.
Select what to Calibrate, Pen or Touch input.
Follow the onscreen instruction to complete.
4 / 22
Save the calibration data.
User could remove saved calibration data by pressing "Reset" in the Tablet PC
Option.
Setting display resolution
Please using the recommended display resolution corresponding to the model,
which is also the default resolution, for optimal image and video quality. For
X11, it is 1366 by 768.
If the current display resolution is not the recommended one, adjust in the
“display” “screen resolution” option.
Adjust the display orientation
The default display orientation of this tablet PC is landscape, when you rotate
the tablet PC the screen display more than 90 degrees either way, X11 would
change the display orientation after a short pause. When browsing texts or
pages , adjust the orientation to vertical may be more comfortable for you.
Adjust display orientation autorotation
Press with either finger or pen on an used portion of the desktop for 2 seconds
then select the “Graphics
Properties” . You will see an Intel graphic control box. To disable auto rotation
option, uncheck the Enable
5 / 22
Rotation Option in the Rotation section. To enable auto rotation option, check
the Enable Rotation Option in the Rotation section.
1.2 Drivers
Device drivers
Kupa has already installed necessary drivers needed for Windows 7 on X11.
In the situation when you do need to download driver, please visit Support
section on www.kupaworld.com .
Update hardware drivers in Windows7 system
In the event that you do need to update your driver:
1) Long press the desktop “computer” icon, right click to start the menu .
2) Click "Properties" → "Device Manager."
3) Right click the device which need installing the drivers, then select the
“properties” option
4) Click the “driver tab”
5) Click the “update driver”, choose a specific location (disk symbol: \folder) to
place the drivers, then select “install the driver” to install, follow the prompts to
complete the operation.
1.3 Network
Connect the Internet
X11 can connect to the Internet through Wi-Fi or 3G wireless network. X11 is
also capable of connecting to a network using a RJ45 network cable if user
installs an USB Ethernet adapter.
Configuring Wi-Fi Connection
1) Click on
screen,
at the lower right corner of
6 / 22
the Windows desktop
2) Select the target Wireless Access Point, click “connect”
3) Connecting to the Wireless Access
7 / 22
4)Enter Wi-Fi access password, Click ”OK”
Reminder: When connecting to the same Wi-Fi again, the password does not
need to be entered again.
Connecting to 3G Network
To connect to cellular provider network:
1) Insert the sim card into the sim card slot. The side of sim card with exposed
IC contact should faces up and the end of sim card with a cut corner should be
inserted into the sim card slot.
2) Check your Network Manager and look for "Mobile Broadband Connection”
3) Please contact cellular network provider for further assistance as each
network may requires additional setting particular to its own.
Dual front/rear cameras
The best shooting distance for the front camera is within 1.3 meters, for the
rear camera the best shooting distance is within 3.0 meters.
8 / 22
HDMI output
X11's mini HDMI port allows transmission of video and audio signals (up to
1080P) to other video devices. User will need additional cable for audio/video
connection.
Fingerprint scanner
To best utilize fingerprint scanner, user should glide the finger tip across the
scanner.
The set up Fingerprint Scanner, click Biometric Devices" in "Control Panel.
Then click on "Use your fingerprint with Windows" and follow the onscreen
directions.
2. X11 pen
To activate the pen, press the upper button of X11 stylus. The X11 screen is
sensitive to pen tip when the tip is within 0.5 cm of the screen surface. The
best way to place the pen tip on the screen and then use wrist to apply slight
pressure to control the pen tip. Lower part of the button on X11 pen is "Left
9 / 22
click" on a mouse while upper part of button is "Right Click".
Right Click
To do right click input as one normally would with a mouse, user can:
1) Press and hold pen or finger tip on intended area for right click for 2
seconds and the right click action will be performed
2) press and hold one finger tip on tip on intended area for right click and
quickly follow another finger tap anywhere on the screen
3) Press the upper button on the digital pen.
Hand writing and drawing
Microsoft Office 2010:
1)Create a new Word document, select "Ink Tools”
2)Select Pen and pick a color and start writing
Use Pen function in Windows Journal
Windows Journal also has convenient pen writing function
10 / 22
3. Touchscreen Operation
Using finger tips, user could zoom, rotate and pinch to control programs.
Please refer to each program for its own touch functions.
Onscreen keyboard
Windows 7 and X11 has an on screen keyboard that allows user to type using
pen or touch quickly and accurately. The onscreen keyboard also features
handing writing recognition function.
By click in any part of Windows that requires typing, such as in Notepad , an
icon such like this
on screen key.
will appear. By clicking that icon, user can call up the
11 / 22
User can also quickly call up the onscreen keyboard any time they want by
double tapping an icon on the upper left corner.
By clicking
button on the upper left corner of the onscreen keyboard,
user can enter the handwriting mode.
For further help with Windows 7 and Tablet PC functionality, visit:
http://windows.microsoft.com/en-US/windows7/Getting-more-out-of-your-Tabl
et-PC
4. Troubleshooting
This section will show you how to solve common problems that you might
encounter during X11.
When you encounter problems, please refer to the “Troubleshooting” section
first. If user cannot solve problems, sent your tablet PC to the dealer or call
KUPA America at 855-KUPA LLC customer service hotline for technical
support.
1) X11 won't shut down or respond
Press the power key for 3 seconds to force shutdown the tablet
12 / 22
2) X11 will not boot after power button is pressed
Battery may be drained. Connect the power adapter and try again.
Make sure power adapter connection is plugged in correctly and
securely
Use may want to disconnect all the external devices before trying again.
3) What to do if water got into the X11?
Don't power on X11 or that will cause more serious damages.
Remove as much water out of X11 as you can and find a soft cloth or dry
tissue to wipe off the water gently, be cautious not to damage the display
screen surface.
Then, use an electric fan blowing at low speed to dry X11 off and try
booting it.
If X11 does not boot, contact customer service immediately.
4) Battery life is too short
Check to see whether the battery is fully charged
Check to see whether the battery hasn't been used for a long time after
fully charged, if so , please re-charge it before using .
Due to the chemical feature of the charged battery, the battery life may
be shortened after several charges. To recondition your battery, completely
run down the battery and fully recharge it.
Please Follow the battery maintenance instruction in this manual
For additional question, please visit www. kupaworld.com.
Additional Notes
When using the tablet PC outdoors
To use X11 outdoor, Kupa recommends
1) Be sure that the battery is more than 70%.
2) Place X11 inside of the protective bag or the holster to prevent dust and
impact to happen. Do not put too many items in the bag to prevent the display
screen from crushing.
3) Take power adapter and user manuals along for extended trip.
Maintenance of touch screen
Due to its crystal glass structure, the LED touch screen is the most
vulnerable part of X11.
Only use Kupa X11 pen and fingertips on X11's touch screen.
DO NOT use other sharp objects, or market to write on the touch screen,
or use excessive force.
DO NOT place any objects on the screen.
Place X11 in the protective case or backpack when traveling with it. Do not
13 / 22
put too many stuff between the backpack and the LCD display screen to avoid
crushing.
The surface of the LCD will attract dust due to static, so the user is
recommended to buy LCD cleaning cloth to clean the LCD screen.
DO NOT use general cleaning agents to clean the LCD screen, only use
clean agents that are specifically made to clean LCD screen.
Avoid having water on the internal LCD screen, and wipe any water off
immediately from X11.
Camera Lens Care
To ensure clarity of pictures and videos, please wipe away dirt and
fingerprints off the lens cover. Only use soft cotton clothes for wiping, no hard
objects or abrasive chemicals shall be used.
Do not use the camera for an extended time, the heat generated
from overuse may shorten the life of the camera circuitry.
Maintenance of X11 body
Avoid place X11 on top of hard objects to prevent abrasions or dents.
Do not block ventilation vents on the back and the side of X11.
Cleaning and maintenance
Before performing any cleaning or maintenance, follow these steps.
Step 1: Turn off the power, remove the connected power adapter and
attached devices and cables.
Step 2: Remove dust off ports and openings.
Step 3: Use a soft cloth to wipe the surface of the tablet, be careful not to
let any water or clean agent inside X11
Step 4: Only turn on X11 after it is completely dry.
If X11 hasn't been used for an extended time, we recommend:
Fully recharge battery before using.
Run touch screen calibration in Windows 7 control panel again.
Precaution
Be aware of following situations and stop operating X11 if needed.
Impact or Pressure Damage
Do not press or hit the tablet PC with excessive force or it may lead to
component failure.
Overheating
X11 is designed with advanced power circuitries to increase performance,
extend battery life while keeping the temperature comfortable for user. If user
ever notice the X11 becomes too hot to hold with hand, it is recommended that
user stop operating X11 and shut it down immediately. If the problem persists,
14 / 22
please contact your local Kupa representatives.
SIM Card Overheating
It's normal for SIM card to heat up during operation. Some SIM cards may
even get very hot after using for long time. Therefore, touching the SIM card
and it is best to wait until the SIM card is cooled down.
Mobile Phones
Using mobile phone may affect the sound system of the tablet PC.
Although this does not affect its operation, we still recommend you to keep the
distance between the phone and the tablet PC at least 30cm.
CPU Performance
Due to inherent design of Intel Mobile CPU, its performance can vary due
to
External devices may require additional CPU resources and slow down the
system performance
- Depending on the power option profile, X11 usually runs faster when it is
connected to AC adapter than when it is operating only on battery power
- The number of concurrently running applications
- The performance may be reduced in area with low atmospheric pressure
(elevation higher than 1000m/3280feet)
- System temperature, the higher then system temperature, the lower the
processor performance.
Under low pressure or high/low temperature, X11 may automatically
shutdown to protect system. Automatic shutdown function reduces the risk of
data loss or damage to the device. To avoid data loss, please backup your
data to your external storage regularly. For best performance, please use your
X11 within normal operation parameters listed in the specification section.
Working environment
Working in a suitable environment is very important for both you and your
X11. Unsuitable working environment can increase stress, chance of injuries
and damages to your X11.
X11 is designed to fit with today's mobile work demand and lifestyle. To
use X11 without any auxiliary support besides hands and arms, we
recommend placing X11 on one arm and holder the edge of X11 with hand of
the supporting arm. This creates the best balance and allows extended use
with less fatigue.
For using X11 on a table or any surface, it is recommended to place X11
on a flat and smooth surface without block the ventilation holes underneath
X11.
Operating temperature: 32°to 104°F (0°to 40°C)
Storage temperature: 14°to 140°F (-10°to 60°C)
15 / 22
Relative humidity: 5% to 95% noncondensing
System Configuration
Specification
Processor
Intel Oaktrail 1.5 GHz with integrated GPU
Chipset
Intel Whitney Point Sm35
Display
10.1" LED backlight
1366 by 768 (16:9) WXGA Resolution
Ambient Light Sensor automatically adjusts the brightness of the screen in
relationship to the level of available light in user's environment
Dual Input System
Digital stylus: Electromagnetic based input offering pin-point accuracy
(<0.1mm error) and pressure sensitive (1024 levels) input
Multi-Finger Touch Screen Capacitive sensing touch screen input system
that offers convenient and intuitive multitouch functionalities
Graphic Chip
Intel GMA 600: Supports OpenGL 2.1, OpenVG 1.0, Directx 9.L
Hardware Video Decoding: 1080P30 Frames/S HD decoding
Hardware Video Encoding: 720P30 H.264 BP@L3 Encode, MPEG4
Encode and H.263 Video Conferencing Codec
Hardware Video Codec Support: H.264 (MP/HP 4.0/4.1), DivX, MPEG4,
MPEG2, VC1, WMV9
Storage
64GB, 128GB SSD*
Memory
2GB DDR2 800MHz
Network
Wi-Fi: IEEE 802.11 b/g
Celluar*: 3G UMTS/HSDPA/HSUPA (850, 900, 1900, 2100 MHz)
GSM/EDGE (850, 900, 1800, 1900 MHz)
Bluetooth: 2.1 + EDR technology
16 / 22
Camera
Front Camera: 2 Megapixels
Back Camera: 3 Megapixels
Power
Battery: 53Wh lithium-ion polymer battery
Continuous Operation: 10 hours on a single full charge
Standby: 30 days on single full charge
Power Supply: 100-240V AC 50/60Hz 1.0A Max
Power Output:19.0V === 2.1A
Dimensions and weight
Weight: 2.1 lb (950 g)
Height: 0.58 inch (14.8 mm)
Length: 10.71 inch (272 mm)
Width: 7.32 inch (186 mm)
Ports
2 USB 2.0
1 mini HDMI
3.5 mm headset jack (for both audio out and microphone in)
1 SIM slot*
Switches
Wi-Fi + Bluetooth Switch
Wireless Keyboard 2.4Ghz Switch
Buttons
Power Buttons
Multifunction key: Enter Key(Boot) / Windows Key(Windows)
Up:Up Key(Boot) / Audio Volume Up(Windows)
Down:Down Key(Boot) / Audio Volume Down(Windows)
Multifunction + Up key: Increase Brightness (Windows)
Multifunction + Down key: Decrease Brightness (Windows)
System Function
Intelligent Power Management
X11 has Intelligent Power Management chip that determines the battery
level and temperature level while manages power usage. User can use power
option in Windows to determine the level of battery charge as well fine tune
some of the advanced power options.
Hibernation
17 / 22
This function allows X11 to save system data on hardware and going to
sleep without fully shutdown. This allows users quickly get back to previous
working environment while saving power.
Sleep
With this function, X11 enters a lower power usage stage whiling keeping
system data in the RAM, thus allowing faster wake up than Hibernation.
However Sleep mode uses more power than Hibernation mode.
System backup
1) Go to "Control Panel" , then "System and security", then select “Backup
and Restore”
2) Click “backup instantly”
18 / 22
3) Start backup and close the window after completion
System restore
1)
Right click the "computer" iconproperties , click “system protection”
on “control panel” page
19 / 22
2)
Click “System Restore”
3)
Click “Next”
20 / 22
4)
5)
Choose a system restore point, click “Next”
Click “Finish”
21 / 22
View kupa official website for more feature information www.kupaworld.com
Copyright and Declaration
Copyright
This manual is published by KUPA AMERICA Company with all rights
reserved. Under the copyright laws, this manual cannot be reproduced in any
form without the prior written consent from KUPA.
Trademarks
The product names and trademarks covered in this manual are only for
illustrative purposes. All other brand and product names are trademarks or
registered trademarks of their respective companies
Statement
For natural disasters, intentional or unintentional negligence using,
third-party misconduct, accident or other abnormal conditions in the damage
caused by the users, KUPA is not responsible. KUPA is not responsible for
damages caused by non-compliance with the instruction manual operating, or
for damages caused by using or unable to use this product (such as loss of
business profits or business interruption, etc.)
22 / 22