1
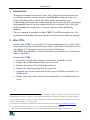
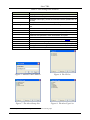
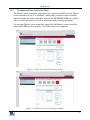
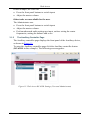
Kramer Electronics, Ltd.
Site-CTRL and
Web Access
Online User Guide
(Documentation Revision 2)
Software Version 1.9. 2902
To check that you have the latest version, go to the
DOWNLOADS section of our Web site at:
http://www.kramerelectronics.com/support/downloads.asp
Contents
Contents
1
2
2.1
2.2
2.3
Introduction
Site-CTRL
Loading the Software
The Room List Tab
The Settings Tab
1
1
2
3
5
2.3.1
The Event Log Tab
2.4
3
3.1
The Site-CTRL Menu
Web Access
The Main Page
8
9
10
3.1.1
3.1.2
3.1.3
3.1.4
3.1.5
3.1.6
The Master Room Controller Page
The Auxiliary Controller Page
The Devices Tab
The Macro Tab
The Scheduled Tasks Tab
The Settings Tab
11
12
13
14
15
18
7
Figures
Figure 1: The Room List Tab – for the Administrator
Figure 2: The Room List Tab – for the User
Figure 3: The Settings Tab – for the Administrator
Figure 4: The Settings Tab – for the User
Figure 5: Add an E-mail Address
Figure 6: The IP List
Figure 7: The Alert Group List
Figure 8: The Alert Type List
Figure 9: The Event Log Tab
Figure 10: Entering the IP Number in the Address Bar
Figure 11: Web Access Login
Figure 12: Web Access Main Page (User)
Figure 13: Web Access SV-551 Settings (User)
Figure 14: Web Access SV-551 Settings (Admin)
Figure 15: Web Access RC-63DL Settings (User and Administrator)
Figure 16: Web Access Main Page (Admin)
Figure 17: Web Access Main Page with Connected Ports
Figure 18: Web Access Protocol Commands
Figure 19: Web Access Macro Buttons (User and Admin)
Figure 20: Scheduled Tasks Tab as Set in K-Config
Figure 21: Scheduled Tasks Tab
Figure 22: Adding a Macro to the Schedule
Figure 23: Macro Added to the Schedule
Figure 24: Select a Macro to Modify
Figure 25: Schedule Changes Window
Figure 26: Web Access Settings Tab (User)
Figure 27: Web Access Settings Tab (Admin)
3
3
5
5
6
6
6
6
7
9
9
10
11
11
12
13
13
14
14
15
16
16
16
17
17
18
18
i
Contents
Tables
Table 1: The Room List Features
Table 2: The Settings Tab Features
Table 3: The Event Log Features
Table 4: Site-CTRL Menu
Table 5: User and Administrator Available Operations using Web Access
ii
4
6
7
8
9
KRAMER: SIMPLE CREATIVE TECHNOLOGY
Introduction
1 Introduction
Welcome to Kramer Electronics! Since 1981, Kramer Electronics has been
providing a world of unique, creative, and affordable solutions to the vast
range of problems that confront the video, audio, presentation, and
broadcasting professional on a daily basis. In recent years, we have redesigned
and upgraded most of our line, making the best even better! Our 1,000-plus
different models now appear in 11 groups 1 that are clearly defined by
function.
This user manual is intended for Site-CTRL™ and Web Access users. The
installation and configuration procedures are described in a different manual 2.
2 Site-CTRL
Kramer Site-CTRL is a powerful A/V assets management tool. It offers realtime monitoring and control of Kramer Master controllers 3 installed in an A/V
site and the A/V equipment connected to them. The Kramer
Site-CTRL downloadable version can monitor and control up to 100 Kramer
Master controllers 4.
Kramer Site-CTRL:
• Generates a single page summary of the entire installed A/V site
• Reports the communication status for each room
• Reports the status of the local display devices
• Reports the remaining lamp life for projectors
• Supports easy access to the built-in Web pages of Master controllers via
Web Access
• Raises alerts and sends e-mails when prompted by a user-defined special
event
1 GROUP 1: Distribution Amplifiers; GROUP 2: Switchers and Matrix Switchers; GROUP 3: Control Systems; GROUP 4:
Format/Standards Converters; GROUP 5: Range Extenders and Repeaters; GROUP 6: Specialty AV Products; GROUP 7:
Scan Converters and Scalers; GROUP 8: Cables and Connectors; GROUP 9: Room Connectivity; GROUP 10: Accessories
and Rack Adapters; GROUP 11: Sierra Products
2 Download up-to-date Kramer user manuals and guides from the Internet at this URL: http://www.kramerelectronics.com
3 For example, the Kramer SL-1, SL-10, SL-12, SV-551, SV-552 and WP-500 master controllers
4 A similar solution for larger installations is also available. Consult your local Kramer support team for details
1
Site-CTRL
The easy-to-use Kramer Site-CTRL consists of three main tabs: Room List,
Settings 1 and Event Log.
The Room List tab displays the status of the Kramer room controllers in a
summarized layout, and lets you identify the room by its IP number, name (for
example, Science Lab 1), or description. From this screen the user can also
monitor the status of the display (on, standby and so on), monitor the projector
lamp hours (per room) and perform routine procedures such as initiating a
simple ON/OFF macro (via Web Access, see Section 3), as well as switching
a display device to the standby mode.
For remote operation of more room specific functions, the user can easily
access—via the Room List display—the dynamic Web pages 2 of the Kramer
Master controllers (for example, the Kramer SV-551 BrainBox™) installed in
the monitored rooms.
Using the Kramer Site-CTRL with the Kramer Master room controllers lets
the installer and the user easily achieve effective control over the A/V site.
2.1 Loading the Software
After installation, you can click the Site-CTRL icon on your desktop or you
click the START icon on your desktop. You will be prompted to enter your
user name and password 3 to login:
For the administrator:
For the user:
After logging in, the Room List tab appears.
1 For the system Administrator only
2 Via the Web Access software
3 The factory default password is admin. The password can be changed via the Settings tab
2
KRAMER: SIMPLE CREATIVE TECHNOLOGY
Site-CTRL
2.2 The Room List Tab
The Room List tab lists the status of the rooms controlled by the Site-CTRL
system. Figure 1 and Table 1 define the Room List tab features and functions.
Figure 2 shows the Room List tab for the user.
Figure 1: The Room List Tab – for the Administrator
Figure 2: The Room List Tab – for the User
3
Site-CTRL
Table 1: The Room List Features
Features
IP
Filter Area Name
Room Status
Function
Lets you observe only a room with a certain IP number
Lets you observe defined room names only 1
Select the room status types to be displayed (OK, Warning and/or Error)
Room list area
Enabled
Enables access to the different actions related to the room (for the administrator only)
Status
Indicates the room status
Name
Indicates the room name
IP
Indicates the IP address of the room controller
Main Display Status
Lamp Hours Usage
Indicates the status of the main display (for example, the room projector)
Shows the lamp hours (in percentage) of the projector lamp
Description
Shows the room description (entered by the administrator via the Settings tab)
Actions
Displays the actions you may take with this room controller:
Web – Open the Web Access page (see Section 3)
On – activates the All On event macro 2
2
Off – activates the All Off event macro
Password – change the password for accessing the machine (for the administrator
only)
Refresh – refresh the information line
Delete – delete the information line (for the administrator only)
Add Room
Add a new room to the list (for the administrator only)
Refresh All
Refresh this window
1 The name is case sensitive
2 Defined in the K-Config software
4
KRAMER: SIMPLE CREATIVE TECHNOLOGY
Site-CTRL
2.3 The Settings Tab
The settings tab is mainly intended for the administrator. The user can only set
the language (English or Russian) and check the Write Minor Log Events box.
The Settings tab lets you set an e-mail notification in case of a defined event
for a certain room or certain type of problem, and set the Handshake interval
between the different rooms. Figure 3 and Table 2 define the features and
functions of the settings tab. Figure 4 shows the Settings tab for the user.
Figure 3: The Settings Tab – for the Administrator
Figure 4: The Settings Tab – for the User
5
Site-CTRL
Table 2: The Settings Tab Features
Features
General Area
Function
Language: select English or Russian (available also for the user)
Check to Write Minor Log Events (available also for the user)
Handshake Interval [min]: set the communication test rate (available also for
the user)
Change Admin Password: click to change the password
Email Settings Area
SMTP Server - the SMTP server address through which the e-mail is
sent
From Address: the name by which the user is identified
Authentication check box: further authentication for entering the server
Login: enter username if further authentication is required
Password: enter password if further authentication is required
Enable Secure Connection
Email Notification Area
Email – set the e-mail address for event notification (see Figure 5)
IP- e-mail will be sent regarding a selected list of IP numbers (see Figure 6)
Alert Groups – set the alert groups that will induce an e-mail (see Figure 7)
Alert Types – set the alert types that will induce an e-mail 1 (see Figure 8)
Severity – set the severity of the event that will induce an e-mail
Figure 5: Add an E-mail Address
Figure 6: The IP List
Figure 7: The Alert Group List
Figure 8: The Alert Type List
1 For example, different people will get an e-mail for different alarm groups
6
KRAMER: SIMPLE CREATIVE TECHNOLOGY
Site-CTRL
2.3.1
The Event Log Tab
The Event Log tab lists the controlled room events. The Filter area lets you
filter the information displayed. Figure 9 and Table 3 define the Event Log
tab:
Figure 9: The Event Log Tab
Table 3: The Event Log Features
Features
Function
Filter area:
Date from/Date to: set the time frame for the list
Severity: filter the severity you want displayed
IP: set the IP number you want displayed
Group: set the name group you want displayed (not case sensitive)
Details: set the details you want displayed (not case sensitive)
Event types: select the event types you want displayed
Event Log list:
Lists the events according to the filters used:
Event type
Severity
Name (filtered via Group)
Date
Time
IP
Details (sent to the software from the device)
Export to Excel
Export the list of events to an excel file
Delete Selected Log Records
Delete the selected lines (not available to the user)
Deselect All Records
Clear selection
Select All Log Records
Select all the lines
7
Site-CTRL
2.4 The Site-CTRL Menu
The Site-CTRL menu is available only for the Administrator 1. Table 4
defines the Site-CTRL menu.
Table 4: Site-CTRL Menu
Menu Item
New
Clears the room list and the settings
Function
Open
Opens an existing Site-CTRL configuration
Save
Save configuration
Save as
Save configuration in a new name
About
Revision information
1 Except for About which is available also to the user
8
KRAMER: SIMPLE CREATIVE TECHNOLOGY
Web Access
3 Web Access
Web Access lets you monitor and control the room and is automatically
generated by Kramer K-Config.
You can login to Web Access either via the Site-CTRL Room List tab (see
Section 2.2) or via your Internet browser.
To enter Web Access via your Internet browser, make sure that your PC is
connected via a network to the Room Controller, and do the following:
1. Open your Internet browser.
2. Enter the unit’s IP number 1 in the Address bar of your browser.
Figure 10: Entering the IP Number in the Address Bar
3. You will be prompted to enter your user name (User or Admin) and
password 2 to login:
Figure 11: Web Access Login
The administrator can control the room via Web Access, performing tasks
such as scheduling, switching inputs, setting the audio and so on. The tasks
available for the user are limited. Table 5 summarizes the tasks performed by
the User and the Administrator:
Table 5: User and Administrator Available Operations using Web Access
Tasks
Master Room
Controller
User
Click inputs/configurable
buttons, audio adjustment
Administrator
Select buttons, audio adjustment, advanced audio
settings
Auxiliary Controller
Click configurable buttons
Click configurable buttons
Device Serial
commands
Click serial command
Click serial command
Macros
Activate
Activate
Scheduled Tasks
No access
Write, delete and edit tasks
Settings
View only
Change: Name (Master and Auxiliary devices), IP
Address, DHCP, Gateway, Subnet Mask, Date, Time
1 The default IP number is 192.168.1.39, and may be changed by the system integrator
2 The factory default password is admin. The password can be changed via Kramer K-Config
9
Web Access
3.1 The Main Page
After logging in, the Web Access main page appears:
Figure 12: Web Access Main Page (User)
The main page lists the devices that are set up in the controlled room, such as
the:
• Master room controller (for example, the SV-551)
• Auxiliary controller (for example, the RC-63DL)
• Devices that are connected to the control ports of the Master room
controller 1 or to the ports of the Auxiliary controller (for example, a Sony
projector)
The main page includes the:
• Master Room Controller front panel buttons and settings, see Section 3.1.1
• Auxiliary controller front panel buttons, see Section 3.1.2
• The Devices tab, see Section 3.1.3
• The Macro tab, see Section 3.1.4
• The Scheduled Tasks tab (for the Admin), see Section 3.1.5
1 Defined via the Port Manager window in Kramer K-Config
10
KRAMER: SIMPLE CREATIVE TECHNOLOGY
Web Access
3.1.1
The Master Room Controller Page
The Master room controller page shows the options available for the Master
room controller in use. For example, when using a master room controller
which includes an audio amplifier (such as the SV-551/SV-552) you will be
able to switch the inputs as well as adjust the audio settings per input.
To enter the Master room controller page click the Master room controller
button (SV-551 in this example). The following screen appears:
Figure 13: Web Access SV-551 Settings (User)
Figure 14: Web Access SV-551 Settings (Admin)
11
Web Access
In this example, the User can:
• Press the front panel buttons to switch inputs
• Adjust the master volume
Other tasks are unavailable for the user.
The Administrator can:
• Press the front panel buttons to switch inputs
• Adjust the master volume.
• Perform advanced audio settings per input, such as setting the center
frequencies, setting the balance and so on
3.1.2
The Auxiliary Controller Page
The Auxiliary controller page displays the front panel of the Auxiliary device,
as shown in Figure 15.
To enter the Auxiliary controller page click the Auxiliary controller button
(RC-63DL in this example). The following screen appears:
Figure 15: Web Access RC-63DL Settings (User and Administrator)
12
KRAMER: SIMPLE CREATIVE TECHNOLOGY
Web Access
3.1.3
The Devices Tab
The Devices tab lets you access the driver commands of a device that is on the
list. The device at the top of the list is defined to appear first via the Kramer
K-Config software.
Figure 16: Web Access Main Page (Admin)
The main page lists the Master room controller (for example, the SV-551), the
Auxiliary controller (for example, RC-63DL) with the display device that was
assigned to the main port 1 (for example, a Sony projector).
If more than one device driver is assigned to the ports, the main page shows
the list of devices 2 and lets you turn the power ON or OFF via the ON/OFF
button located on the right side of each device (see Figure 17):
Figure 17: Web Access Main Page with Connected Ports
1 Via Kramer K-Config
2 Clicking the small arrow on the side of the of the Master Controller opens the list of devices (see Figure 18)
13
Web Access
To carry out a driver command, do the following:
1. Click a device button to access its driver commands. The following screen
appears:
Figure 18: Web Access Protocol Commands
2. Click a protocol command button.
The serial commands are arranged according to groups that are defined via
K-Config. Driver commands that are not assigned to a group can be found
under “Other commands”.
3.1.4
The Macro Tab
The Macro tab is available to the User and the Administrator. The Macro
screen lets you carry out custom macro sequences (triggers) as defined in the
K-Config software:
Figure 19: Web Access Macro Buttons (User and Admin)
14
KRAMER: SIMPLE CREATIVE TECHNOLOGY
Web Access
3.1.5
The Scheduled Tasks Tab
The Scheduled Tasks tab lets you set a weekly schedule. The schedule can be
configured either via the K-Config software 1 or directly via Web Access.
If the schedule was written to the device via K-Config, it will automatically
show in the Scheduled Tasks tab:
Figure 20: Scheduled Tasks Tab as Set in K-Config
You can also manually edit or delete the existing scheduled tasks and create
new ones.
To write the scheduled tasks, do the following:
1. Select the Scheduled Tasks tab.
The following screen appears:
1 The schedule appears in the Scheduled Tasks tab
15
Web Access
Figure 21: Scheduled Tasks Tab
2. Select the custom trigger (macro) for scheduling, the day of the week and
the time, and then click Add:
Figure 22: Adding a Macro to the Schedule
The macro is added to the schedule:
Figure 23: Macro Added to the Schedule
16
KRAMER: SIMPLE CREATIVE TECHNOLOGY
Web Access
To modify the schedule:
1.
Click appropriate area:
Figure 24: Select a Macro to Modify
The following window appears:
Figure 25: Schedule Changes Window
You can disable the macro, change the time or delete the macro and then
click OK.
17
Web Access
3.1.6
The Settings Tab
The Settings tab lists the configuration data of the Master and Auxiliary
devices. The User cannot change any data in this table:
Figure 26: Web Access Settings Tab (User)
Some of the Administration configuration settings can be changed, as shown
in Figure 27:
Figure 27: Web Access Settings Tab (Admin)
18
KRAMER: SIMPLE CREATIVE TECHNOLOGY
Web Access
Warning!
Changing the IP properties of the device (IP Address, DHCP ON/OFF,
Gateway or Subnet Mask) through the Web Access Setting page will make it
unavailable on Site-CTRL until the room will be added to the room list (see
Section 2.2) with its updated IP properties
Click Save to accept changes. The following window appears:
Click OK.
19