1
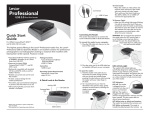
ODEON
INSTALLATION INSTRUCTIONS
P/SVITREOUS CHINA P/S-TRAP TOILET
P-TRAP 180mm K-8711T S-TRAP 255mm K-8753T
S-TRAP 305mm K-8766T
BEFORE YOU BEGIN
·
· Please read these instructions carefully to familiarize
yourself with the required tools, materials, and installation
sequences. Follow the sections that pertain to your
particular installation . This will help you avoid costly
mistakes. In addition to proper installation, read all
operating and safety instructions.
· All information in these instructions is based upon the
latest product information available at the time of
publication. Kohler China reserves the right to make
changes in product characteristics, packaging, or
availability at any time withoutnotice.
· These instructions contain important care, cleaning, and
warranty information-please leave instructions for the
consumer.
,
·
·
ORDERING INFORMATION
Odeon P-trap 180mm Toilet
Includes seat
Includes Bowl
Includes Tank
Odeon S-trap 255mm Toilet
Includes seat
Includes Bowl
Includes Tank
Odeon S-trap 305mm Toilet
Includes seat
Includes Bowl
Includes Tank
Service parts
Fill valve
Mounting Plate Assy
Flush Valve Assy
180mm
K-8711T
K-8741T-*
K-8709T
K-8710T
K-8753T
K-8741T-*
K-11184T
K-8710T
K-8766T
K-8741T-*
K-8767T
K-8710T
255mm
305mm
K-8711T
K-8741T-*
K-8709T
K-8710T
K-8753T
K-8741T-*
K-11184T
K-8710T
K-8766T
K-8741T-*
K-8767T
K-8710T
K-82984-B
K-1004142
K-1004139
K-82984-B
K-1004142
K-1004139
NOTES
·
·
·
·
·
·
·
·
·
·
·
·
·
·
·
Observe all local plumbing and building codes.
Shut off the water supply.
Seat post holes are on 155mm (6-1/8") centers.
Passageways is 60mm (2-3/8").
Water depth from rim is 245mm (9-5/8")
Ensure that the new drain and shut-off valve have the
correct roughing-in dimensions. See Fig.#1.
Be very careful while working with vitreous china products.
Vitreous china can break or chip if the bolts or nuts are
overtightened, or if carelessly handled.
Carefully inspect the new fixture for any sign of damage.
Fixture dimensions are nominal and conform to tolerances
established by ASME Standards (A112. 19.2M).
155mm(6-1/8")
60mm(2-3/8")
245mm(9-5/8")
1
·
·
·
ASME(A112. 19.2M)
528137
1037406-T01-A
-1-
, 2004
ã
ã Copyright Kohler China Ltd., 2004
TOOLS AND MATERIALS REQUIRED
(Not supplied)
(
·
·
·
·
·
·
·
·
·
·
·
·
·
·
·
·
·
·
·
·
·
·
254mm adjustable wrench
Metal file (file cut)
Tape measure
Tubing cutter
Level
Hacksaw
Putty knife
Screwdriver
Straight pipe coupling
Connection packing
Toilet supply shut-off valve, 10mm (3/8") recommended
)
254mm
10mm(3/8")
WARNING: Risk of external leakage. The fill valve
nut has been factory-tightened, wrench tighten 1/4 turn
past finger tight.
1/4
NOTICE: If no shut-off valve exists, install a shut-off valve
below the tank before installing the new toilet.
Flexible hose are recommended to connect the supply line to
the fill valve. If you use a rigid connection, take care not to
apply side forces to the bottom of the fill valve.
ROUGHING-IN
204
204
204
25
777 10
785 10
776 10
394
388
102
Unit:mm
:
20
392
178
396
159
100
484
255
90
158
166
P-trap 8711T
433
344
428
337
429
337
267362
390
156
S-trap
93
736
699
698
390
102
474
305
95
158
265362
390
155
S-trap
8753T
162
259
363
8766T
Fig.#1
1
INSTALLATION
1. REMOVE EXISTING TOILET
Turn off water supply. flush the toilet and use a sponge to
remove the remaining water from the tank and bowl.
Disconnect the supply shut-off valve (if present) and remove
the old tank and bowl.
1037406-T01-A
1.
(
-2-
)
2. ASSEMBLE TANK BOLTS&WASHERS
Slip bolt heads into mounting plate on bottom of tank. Place
large foam washer on base of flush valve. See Fig. #2a.
Place tank on bowl and attach with nuts and washers from
under bowl. See Fig.#2b.
2.
2a£
2b£
NOTE: Do not use white cement or high lime content
cements to install this toilet. The expansion of cement due to
a rise in temperature may make the toilet crack or cause
damage. Kohler is not responsible for any damage caused by
installation with the use of cement.
Fig.#2a
2a
Fig.#2b
2b
3.
3. SELECT P-TRAP OR S-TRAP to installation
your toilet according to the drain and shut-off valve's
Roughing-in dimensions.
£
S-trap installation
P-trap installation
50
100
5/
120
25
5
120
180
50
180
30
100
255 /30 5
Fig.#3a
3a
1037406-T01-A
Fig.#3b
3b
-3-
4. INSTALL THE TOILET & CONNECT WATER SUPPLY
4.
8mm
4-4.5mm
Place the toilet in its final location. Use plastic drill guide and
8mm drill bit to drill floor mounting holes for installation over
concrete. Use 4mm to 4.5mm drill for wood floor installation.
See Fig.#4a.
4a£
3 Install anchors and caps.
3
WARNING: Do not overtighten floor bolts, as damage
to the vitreous can occur.
Fig. #4a
4a
NOTE: Do not use white cement or high lime content
cements to install this toilet. The expansion of cement due to
a rise in temperature may make the toilet crack or cause
damage. Kohler is not responsible for any damage caused by
installation with the use of cement.
4 Connect fill valve to water supply with hose only.
4
4
NOTE: use hose only, length:
200-300mm mini.
(Not provided.)
200-300mm
(
)
1037406-T01-A
-4-
£
5.
5.CHECK WATER LEVEL
Turn on water supply check for leaks. If necessary, adjust
black float adjustment clip, and sliding float up or down on
metal float rod until water level at marked water line 5A .
5A
Float
Float
Adjustment clip
190
5A
5B
Fig. #5
5
2
Make sure the arrow on the green float on the white flush
(
valve is secure and pointing to #2. (Fig. 5B )
6. ADJUST OVERFLOW HEIGHT (If necessary)
Adjust overflow tube so that the top is 20mm above the
waterline. Push locking mechanism to the side and adjust
tube height. Push locking mechanism back into position to
lock tube height. See Fig.#6.
1
6.
(
)
20mm
£
maxi
6
2
Fig. #6
6
1037406-T01-A
5B )
-5-
7. CONNECT PUSH BUTTON
Put large flange through hole in lid. Screw retaining ring onto
flange. Turn the screw inside the push button flange to secure
tank lid to flush valve assembly. Make certain that the flush
valve assembly is adjusted high enough that the button
touches the assembly. See 6 . Put green and white push
rods into corresponding holes and trim flush with the top of
the flange. See Fig. 7 . Install flush buttons. See Fig. 8 .
7.
6
8 £
7
3
1&1 1/2 tour
4
5
6
7
8
1
Fig. #7
7
1037406-T01-A
-6-
2
8. Install seat with hardware provided. See Fig.#8.
8.
Fig. #8
8
1037406-T01-A
-7-
8£
TROUBLESHOOTING CHART
SYMPTOMS
PROBABLE CAUSES
1. Float valve turns on/off A. Flush valve seal worn, dirty or damaged.
by itself without toilet
being flushed
CORRECTIVE ACTION
A. Inspect, clean and, if necessary replace seal.
2. Float valve continues
to run, allowing water
to enter tank.
A. Foreign particles lodged under the float valve
seal (located under float valve cap)
A. Shut off water supply; remove float valve cap
assembly by rotating 1/8 turn
counterclockwise. Cover uncapped lower
valve unit with an inverted cup (holding it to
prevent overspray), and turn water on and off
a few times. Clean float valve seal surface
(located under float valve cap). Replace float
valve cap assembly by engaging lugs and
rotating 1/8 turn clockwise. Turn water on.
Install filter in supply line to prevent recurring
problems.
B. Float valve seal (located under float valve cap) B. Replace seal.
may be cracked or split.
C. Tank water level set above overflow level.
C. During fill cycle, hold float under water a few
seconds to allow it to fill with water ballast.
Adjust float by squeezing float adjustment clip,
and sliding float up or down on float rod until
water level is at marked water line.
3. Incorrect water level
height.
A. Float height incorrect.
A. Adjust float by squeezing float adjustment clip,
and sliding float up or down on float rod until
water leve is at marked water line.
4. Long or noisy tank fill
A. Plugged valve inlet or supply line.
A. Perform corrective action 2.A.
5. Poor flush.
A.
B.
C.
D.
A.
B.
C.
D.
6. Toilet overflows.
A. Toilet trapway is obstructed.
B. Soil pipe or vent is obstructed.
A. Use plunger to unclog.
B. Clear obstruction from soil pipe or vent pipe.
1.
A.
A.
Water usage is too low.
Trapway obstructed.
Soil pipe or vent is obstructed.
Supply shut-off valve not fully open.
Adjust the water tank level.
Unclog trapway.
Clear obstruction from soil pipe or vent.
Open supply shut-off valve.
/
2.
A.
(
A.
)
1/8
(
)
(
1/8
B.
C.
(
B.
C.
)
3.
A.
A.
4.
A.
A.
5.
A.
B.
C.
D.
A.
B.
C.
D.
6.
A.
B.
A.
B.
1037406-T01-A
-8-
2A
)
CONSUMER RESPONSIBILITIES
If you live in a hard water area, make certain that the holes in
the toilet rim are kept clean to ensure proper bowl flushing.
Toilet bowl cleaners should be used at least once a week.
Use a long-handled brush to clean the rim holes, and to clean
as far into the trap as possible to prevent mineral deposits
from forming.
Most toilet bowl cleaners are not harmful to the vitreous china
surface of the toilet bowl. Please follow the bowl cleaner
manufacturers instructions carefully.
Do not use abrasive cleaners or solvents.
£
WARNING: Risk of property or product damage.
Do not use in-tank cleaners. Products containing
chlorine (calcium hypochlorite) can seriously damage
fittings in the tank. This damage can cause leakage
and property damage.
Kohler Company shall not be responsible or liable for any
damage to these tank fittings caused by the use of cleaners
containing chlorine (calcium hypochlorite).
LIMITED ONE-YEAR WARRANTY
Plumbing Fixtures and Fittings Limited
One-year Warranty
Kohler plumbing fixtures and fittings are warranted to be free
of manufacturing defects.
This product is warranted for one year from date of purchase.
Kohler China will be responsible for any problems caused by
manufacturing defects provided with the invoice. Kohler
China will, at its election, repair, replace or make appropriate
adjustment where Kohler China inspection discloses any
such defects occurring in normal usage within one year after
purchase.
Implied warranties including that of merchantability and
fitness for a particular purpose are expressly limited in
duration to the duration of this warranty, Kohler China
disclaims any liability for special, incidental or consequential
damages. Damages to the product caused by misuse, abuse
and installation that is not in accordance with the owner's
manual are not covered by this warranty.
To obtain quick warranty service, please contact your dealer,
or write to Kohler China. (Original sales receipt must be
provided as the proof of purchase.)
(
(
Kohler China Investment Company Ltd.
Central Customer Service Center
19/F, Shanghai Square, 138 Huai Hai Road,
Luwan District, Shanghai, PRC
Zip Code: 200021
)
138
19
200021
This is our exclusive written warranty.
1037406-T01-A
)
-9-
ODEON
SERVICE PARTS PAGE
P/SVITREOUS CHINA P/S-TRAP TOILET
P-TRAP 180mm K-8711T S-TRAP 255mm K-8753T
S-TRAP 305mm K-8766T
Model
K-8711T
K-8753T
K-8766T
Bowl
K-8709T
K-11184T
K-8767T
Tank
K-8710T
K-8710T
K-8710T
Seat
K-8741T-**
K-8741T-**
K-8741T-**
1004136-**
Tank Cover
1004140
Flush Button Assy.
1021422
Green Flush
Stick
1021425
Flush Button
Support
1021423
Black Flush
Stick
83143
Seal
82984-B
Float Valve
Assy.
G1/2 Shank
1004139
Flush Valve Assy.
1021421
Flush
Valve
Body
1021426
Overflow Tube
Fixture
1021424
Flapper
53154
Gasket
1007746
Nut
84929
Washer
1021447
Right Hand
Hinge
84897
Locknut
1021449
Screw
1000687
Tank/Plate
Gasket
1021448
Hardware
Assembly
1021446
Left Hand Hinge
1004142
Mounting
Plate & Bolts
1032265
Gasket
1004141
Floor
Mounting Kit
**
** Color code must be specified when ordering.
1037406-T01-A
-10-
K-8741T-**
Odeon Seat