1
Use & Care Guide
E
L
1
T
14-Cup Capacity
Heavy Duty
Food
Processor
Model No,
100.90002
CAUTION: Reed, underst
and follow all Important
Safeguards and Opereting
Instructions in this Manual
before using this producL
Sears, Roebuck and Co.,
Hoffman Estates, IL 60179 U.SoAo
www.kenmore.com
E
KENMORE ELITE FULL WARRANTY
tf this product lails due Ioa defect in mateda_ or workmanship within live years from ths
date of purchase, return it to any Sea_s stere of other Kenmore outlet in the United Stales
for free repiaeemenL
if the motor of this product ever fails due to a defect in material or workmanship, return this
product to any Sears store or olher Kenmore culler in the United States for free replacement
This warranty does not inctude expsndab_e parts such as filters or biades, which can wear
oul from normal uss within the warranly period.
This warranty applies !or only 90 days if this product is ever used for other than private
household purposes
This warranty applies only while this product is used in the Uniled Slates,
This warranty gives you specllic legal rights, and you may also have other righls which vary
from state to state
Sears. Roebuck and Co, Holfman Estates, IL 60179
When using electrical appliances, basic safety precautions should always be
followed, Including the folJowtng:
1 Read al! instructions,,
2 To protect agafnsl risk of eleclrica_ chock do not put Food Processor in water
or other liquid
3 Close supervision is necessary when any appliance ts used by or near children,
4
UNPLUG from outlet when not in use, before putting on or taking off parts,
and before cleaning
5
AVOID contact with moving parts
6
DO NOT opsrate any appliance with a damaged cord or plug, or al er he app iance
malfunctions or has been dropped or damaged in any manner Return appliance o
the nearest authodzed service facility for exarninalion, repair or adjustmBnt
7 The use of accessory attachments not recommended
may cause fire, electric shock or personal iniury
8 DO NOT use outdoors
9
or sold by ths manufacturer
DO NOT tel the cord hang over Ihe edge of table or counter
10 Keep hands and ulensils away trem moving btades or discs white processing loud
to reduce the risk of severe injury to parsons or damage to the food processor
A scraper may be ussd but must be used only wllen the food processor is not running
11 Blades are sharp Har'_dle carefulJy
12. To reduce Ihe risk of injury, never place cu_ing btade or discs on base without first
putting bowl property in place
t3
Be cerlain cover is securely locked in place before operating appliance
14 NEVER
feed
15
food by hand. Always use food pusher,
DO NOT attempt to defeat the cover intsrlock mechanism
16 Toprolectagatnste{ectdcaisheck,
thisapplianceisequippedwilhacordhavtng
a 3-prong groundingotype piug for Insedion into a proper grounding-type receptacle
DO NOT altar the p_ug for use in a 2-prong receptacle If the plug will nof fit into
a receptacle, have the proper receptacle installed by a qualified elecldcian
_7 SAVETHESE
INSTRUCTIONS!
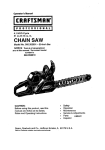
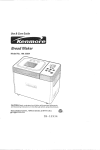
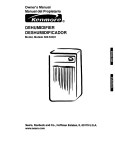
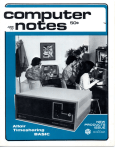
Fig. I
Food
Chute
Slide
Button
Loop
_,
Fine Slice/
Shred Disc
Bowl Cover
Center
_
Disc
Stem
Bowl
St_cetShred
Disc
Grafing
Disc
Dough
Blade
Control
Panel
Julienn_ e
Disc
BladeMUtti'Purp°se
G
French Fry
Spatula/Scraper
Disc
Before
using
thefood
prceessor_
wash
allparis
except
the Base
in hot, soapy water,
Rinse dry,,These pads can also be placed in the dishwasher on the lop rack Do not
put in or near the utensil baskel
CAUTION:
CAUTlON:Bladeearesbarp_Handlece_reful_y.
CAUTION:
NEVER place food processor's motorlbase
t
tn water
or other liqulds_
NOTE: DO NOT attempt to chop ice in this Food Proceasor_ it will damage the
Bowl and dull the Chopping BladeoThls unit will not whip cream, beat egg
whites to a desirable volume, grind coffee beans, spices or other items with
high oi! contentp or slice or shred hard-cooked eggs, marshmallows,
or soft cheeses.
IMPORTANT: For your protection, this unit has an interlock system,.
The Processor will not operate unless the Bowl is properly locked onto
Base and Cover is properly locked onto the Bowl Do not attempt to operate
the unit without the Bowl, Bowl Lid, and Food Chute Lid correctly in place.
ASSEMBLY
i
Make sure th_ Control Knob Switch is in the OFF posilion and the power cord
is unplugged..
2
Be sure Food Processor base is on a flat, dry, clean, stable sudace before you
begin p_ocessing
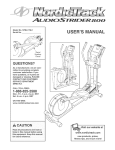
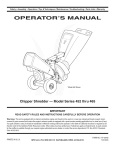
3 To assemble, pul lhe Bowl on the Base by aligning the BDWI handle wilh the unlock icon
on the base Turn the Bowl counterclockwise until It clicks into place (see Fig 2 and 2a)
The Bowl handle should _ow face straight to the center front,
NOTE: There is only one position for the Bowl to lock onto lhe Base The unit will not operate
if the Bowl does nol lock onto the Base
ASSEMBLY cont.
Fig, 2a
Fig. 2
4
I
........
__
On the Bowl Cover are the food chute, food chute lid, and movable loop, which serves
as a housing for the food pusher Nso included is the shaft containing the spring
mechanL, m that controis the slide button used to lock the food ehole lid into place
These are part of lhe Bowl Cover assembly
5
Place the Bowl Cover Assembty onto the Bowl, A_ign the arrow on Ihe Cover and the
unlock Icon on the Bow_(see F_g 2 and 2a) Turn the Cover counterclockwise towards
the senior front until it clicks
NOTE: There is only one position for the Bow! Cover to tuck onto Bowl The unit will not
operate If the Bowl Cover does not lock onto the Bowl, or if the Food Chute Lid does not
]alch onto lhe Food Chute
6
Make sure the loud chule lid is securely latched inlo place
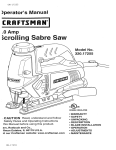
7 To open the Food Chute Lid, pull the Slide ReJease Button out
and Movable Loop (see Fig 3 and 3a) up and back to open
Llfl the Food Chute Lid
Fig° 3
8, When the food pusher is not being used to feed items down through the food chute,
it should be locked into place tn the movable loop This [s usually the case when using
blades down in the bowiinslead of discs at the top of the bowl,
When locked together, the _'oodpusher and movable Ioop can also act as one iarger food
pusher To lock the food pusher t'nlo the movable loop, siide the tab located on the food
pusher Into the slot on the rim of the movabte loop
5
CONTROLS
When Ihe processor is ptugged in. the blue Power light illuminates to show the{ the unit Is
connected to a power source When the base. bowl and cover assembty is correctly
connected and lacked into place, the OFF button is also illuminated blue to show that the
unit is ready to operate, if the OFF button is not giewing blue, the bowl and cover are not
locked together correctly
PULSE: When the PULSE button is pushed and held, it ilturnirmles blue and the Food
Processor operates As soon as you tet go of the button, the Processor shuts elf and the
PULSE button tight goes out Use PULSE for short processing tasks, such as chopping nuls.
raw meats or vegetables This atlows you much greater control of the consistency of whal
you are processing,
ON: When the ON butlon is pushed, tt lfluminates biue and the oni1 wiil run continuously
The processor wilt stay on until you push lhe OFF button This is good lot tess tender food
end items that fake a while longer to process.,
CHOPPING:
!
Lock the Bowl onfo the Base as described in Assembly,
2
Place the Mullipurpese,'Chopping
Center Post (see Fig 4),
CAUTION:
Blades
Blade Ohio the
'i
are sharp_ Handle carefully., J
3
Place food to be chopped Into Bowl Refer to Food Guide to
prepare feed for chopping
4
Lock Bow[ Cover Assemb}y onto Bowl. as described in
Assembly.
5
Lock the Food Pusher into the Movabfe Loop by rotating
counterclockwise until the food pusher's lab is under slot
in the movable loop s lid, then _ock food chastelid into the
spring operated slide bullon by pressing down firmly
6
Plugthe cord into an electric oulleL The Food Processors power ;ight illuminates blue
to show il is connected to a power source, and the OFF button illuminates if base bowl
and cover aseemb y are a locked into piece
7
Push the ON button to run conslantly, or for better control over consistency, push and
held PULSE button
When finished processing;
,. it Pulsing. stop pressing butlon and unit aulomaticafly stops
', if you turned processor to ON. push the OFF bulton to stop
• Allow the rnuIilporpoee/chopplng blade to stop rotating
CHOPPING cont,
NOTE: Before opening the Bowl Cover Assembly, turn the unit OFF and unplug
the cord°
9
To remove bow! cover, unlock by turning clockwise until cover unlatches, and _i1[off
10 Lift the chopping blade by its base and remove, Unlock the Bowl by turning it clockwise,
(see Assembly on pages 4 and 5), and lift off Empty the processed food,
_
when
ARNING:
handling. MultipurposetChopptng
Blade is very sharp_ Use caution
J
I
TO SLICE OR SHRED:
_
unplugged before use° Never use your hand to push food into processor°
CAUTION:
Make
sure control
switch
is turned to OFF and unit is
The use of heavy
pressure
will notknob
speed
operation,
1 Lock the Bowl Ohio lhe Base as described in Assembly,
2
_
Slide the disc stem down onto the center post of the base, then place the slice/shred
discs, with the desired side facing up for either slicing or shredding, onto the disc stem
and push down, At this point the disc wilt be at the top of the bowl
ARNING:
handling,
Slicing/Shredding
Discs is very sherp. Use caution when
J
i
3- Lock lhe Food Pusher onto the movable loop by rotaling counterclockwise until tab Is
under slol in the loop's lid At lhis point, the movable loop works as part of the food pusher
Lock Ihe Bowl Cover Assembly onto the Bowl. Open the Food Chute Lid by pulling out
lhe slide button, and li_t up and out on the looplfood pusher (see Fig, 3 and 3a), and leave
in the open position
4 Fitl lhe food chule with pieces of food such as potato, cabbage, green pepper, whote
lomatn, etc, and lock the food chute lid See the Shredding or Slicing Guide for sizes
of food pieces
5 Close food chule lid and latch into place Plug the power cord into electric outlet Biue
Power light and blue OFF light should itlumir_ate to show that the |cod processor is properly
assembred and ready to operate
TO SLICE OR SHRED cont.
6 Press the ON button, then press down lightly but firmly on food pusher and movable loop
to feed items down and onto slice!shred disc When the chute is empty, press OFF, unplug,
af_owthe disc to slop relating, and unlatch the food chute lid
7 Te process more food, place load into the food chute and repeat above steps When
finished, press OFF, unplug, and allow disc to stop rotaling
_
CAUTtON:
opening
the Bowl
have turned theBefore
unit OFF
and unplugged
sure you
Assembly,
Cover
be
the carrie
B Open bowl cover by turning clockwise, and remove disc with disc stem.
_WARhandling,
NING:
SlicinglShredding
Disc fs
very
sharp Use caution when
f
]
9. Unlock Bowl by turning clockwise towards Unlock icon and lift bowl oil
Empty the processed food.
FOR JULIENNE OR FRENCH FRIES
You can use the iufienne or French try disc with the processor to make !ong French fres or
melchstick jutienne strips Bath procedures are the same and the size of disc is the only
difference Both requlfe that you process the food lw}ce, or double-eFtce it.
Insert any food inlo food chute horizontally Apply pressure to Ihe pusher wl;ile using the
PULSE button unll! the food is sliced Remove lhe slices from the work bowl and reassemble
them Reinsert them into the lead chule with the slices vertical to the disc, wedging them tn
tighlly Slice them again
_
Never use your hand to push food tnto processor.The usa of heavy
AUTION: Make sure unit is turned OFFend unplugged before use,
pressure will not speed operation,
1 Lock the Bowl onto the Base as d_.scribed in Assembly.
2 Slide the disc stem down onto Ihe center post of the base, then place etther the jutienne
or French fry disc onlo the disc stem and push down At this po_ntthe disc wilt be al the
top of the bowl.
FOR JULIENNE OR FRENCH FRIES conL
_
WARNING:
when handling=,Juitenne/French
Fry Discs are
very sharp,
Use caution
3 Lock the Food Pusher onto the movable loop by rotaling counterclockwiseuntif tab is under
slot fn lhe loop's lid At this point, the movable loop works as part of Ihe food pusher Lock
the Bowl Cover Assembty onto the Bowl Open the Food Chute Ud by pultingoul lhe slide
button, and lift up and out on the Iooptfood pusher (see Fig 0), end leave in the open position.
4 insert any loud _ikezucchinis, potatoes, turnips, or apples into feed chute horizontally,
and lock the food chute lid
NOTE: If the food does not fit inlo 1hechute, try inserting it from the bottom of the feed chute
The open_ng there Is slightly larger.
5 Close food chute lid and latch into piece Plug Ihe power cord into e_ectrinoutlet Blue
Power fight and blue OFF light should illuminate to show that the food processor is properly
assembled and ready to operate
8 Press _he PULSE button, then press down lightlybut firmly on food pusher end movable
loop to feed items down end onto stice/shred disc. When the ohule is emply, let go of PULSE
button, unptug, atlow the disc to stop totaling, and unlatch the food chute Iid
7 Remove the slices from the work bowl and reassemble them. Reinsert them into the feed
chute with the slices perpendicular to the disc wedging them in tightly (see fig, 0).
if food does not fit into chule, try inserting it from the bottom of the feed chute The opening
there Is sltghtiy larger Slice them again When finished, press OFF, unptug, and allow disc
Io slop relating
NOTE: Before opening the Bowt Cover Assembty, turn the unit OFF and unplug the cord
Continue by removing parts and emptying food, as described above
GRATING
The grating disc Isused for grating parmesan, romano, or other hard cheese,
or for grating ice,
_
Never use your hand to push food into processor.The use of heavy
AUTION:
Make
sureoperation,
unlt is turned OFF and unplugged before use°
pressure
will not
speed
t. Lock Ihe Bow! onto the Base as described In Assembly.
2. Slide the disc stem down onlo the center post of the base. then piece grafing disc, with
the sharp punch he_es facing upwards, onlo the disc slam and push down. At this point
the disc will be el the top of the bowie
WARNING:
Grating Disc is sharp. Use caution when handling.,
]
J
3
Lock bowl cover assembly ontobowl
4. Make sure the food chute lid is fetched into p{ace
5
Fill the chute with pieces of cheese, or ice cubes
6 Insert food pusher into the movable loop Plug food processor cord into eleclrie outlet
Biue Power light and blue OFF tight should illuminate to show that the food processor is
connected to power end ready to operate
_
AUTION:
Food
pusher
must
etweys be used when processing food,
NEVER
use hand
to push
food
directly.
1
/
7 Push the ON button, then press down lightly but firmly on food pusher lo feed items
down and onto grating disc When the chuie is empty, press OFF.
B To process additional items, unplug the food processor and add more Items into the
movabIe loop. Insert food pusher lnlo movable loop and plug food processor cord into
electric outlel Blue Power light and blue OFF light should be illuminated to show that
the food processor is again ready to operate
9
Push the ON button, then press down lightly bu! firmly on food pusher to feed items
down and onto grating disc When _he chute is empty, press OFF, unplug, and wait until
disc stops rotating
' OFF
AUTION:
opening
and unplugBefore
the cord.
the Bowl Cover Assembly, turn the unit
10 Take off the bowl cover and carefully lilt out disc and disc stem.. Unlock Bowl by lurning
clockwlse towards Unlock }con and tilt bowl elf Empty the processed food
to
TO PROCESS LONG ANDTHiN FOOD ITEMS
_
unpluggedbefore
use.
Never
useknob
yourswitch
hand toispush
food
CAUTtON: Make
sure
control
turned
to into
OFF processor_
and unit is
The use of heavy pressurewill not speed operation.
1 Lock the Bowl onto the Base as described in Assembfy
2. Sllde the disc stemdown onlo thecenterpeel of lhe base, then placethe slice/shred
disc, w[Ih the desiredside facing up for either slicingor shredding, onto the disc slam
and push down At this point the disc witlbe at the topof the bowl
_
WARNING:
WARNING:Slicing/ShreddingDiscs
is very sharp.
Use caution when
handling.
3 Lockbowlcoverassembtyontobow!
4 Make sure the food chute lid tslatched into place
5 Fil!the movable loop wtthlong and thin foodItems such as potatoes,pepperonl,
carrots,or celery.
6 Insertfood pusher Into the movableloop. Plugfood processorcordintoelectric
outlet.Bfue Power light and blue OFF light should Illuminateto show thatthe food
processor tsconnected to power and readyto operate.
_
WARNING:
Food
pusher
always be used when
NEVER use hand
to push
foodmust
directly,
processing
food.
]
]
7 Push the ON button, then pressdown lightlybut firmly on food pusherto feed Items
down and onto slice/shreddisc. When the chutela empty,press OFF
8- To processadditionalitems unplugthe food processorandadd more long pieces
Intothe movable loop. Insert foodpusher Into movable loop and plug foodprocessor
cordInto electricoutIet,Blue Power light and blueOFF light shouldbe Illuminated to
show that the food processor ts again readyto operator
9 Pushthe ON button,then press down lightlybut firmlyon food pusher to feed items
down and onto slfceishred diso_When the chuteIs empty, press OFF, unplug, and
walt until disc stopsrotating.
CAUTION:
Before opening the Bowl Cover Assembly, turn the unit
OFF and unplug the cord.
10 Take off the bowl cover and carefullylift out dlscand disc stem, Unlock Bowl by
turningclockwise towardsUnlock Icon and lift bowl off° Empty the processed food.
USING THE DOUGH BLADE
The dough blade can mix end knead dough in a fraction of the time it takes to do il by hand
There are two general types of yeast dough
1 Typical bread dough is made with a fiour mixture that centains at leas150% white flour
It is uniformly sort, pliable and etightiystick when properly kneaded it always cleans the
inside of the work bowl completely when properly kneaded
2. Typical sweet dough contains a higher preporlion of sugar, butler and/or eggs than typical
bread dough, it is rich and sticky, and does net clean the Inside of the work bowl It requires
tess kneading after the ingredients are mixed
DO NOT try to use the food processor to knead dough that is too stiff to knead comfortably
by band
Because the dough blade does not extend to the oulside rim or the work bow_, it cannot pick
up all the flour when small amounts are precessed Therefore, use the dough blade when
a recipe calls for mere than 3V2-cups or f_eur If a recipe calls for Iess than 3V2-cups of
f_our, use the multipurpose b_ade
PROCESSING
HOT FOODStLIQUIDS
Hot foods and tiqutds under 212 ° F can be processed in the bowl Anything over this
temperature is too hot
Be sure to process smatl amounts of liquids (2 cups or less) at a time Larger amounts
may leak from lhe bowl
_2
NOTE:
DO NOT ATTEMPT
to sharpen the cutting edges of the any Blade or Disc They
are permanentty sharpened al lhe faclory and wilf be _ulned by attempled sharpening
I
Before cleaning, be sure the food processor cord is unplugged
2 Whenever possible, rinse parts immediately after each p[oeassing for easy cleanup,
3 Wipe Ihe Base, Control Panel, and _'eetwith a damp cloth and dry thoroughly Stubborn
spots can be removed by rubbing with a damp cloth and a mild, non-abrasive cleaner,
DO NOT immerse the Base in liquid
4
All removable pairs can be washed by hand or in a dishwasher in the top rack Do not
put in or near the utensil basket
5
tf washing removable parts by hand, wash tn hot, sudsy water, dnse and dry thoroughly,
6
If necessary use a smalf nylon bristle brush to thoroughfy clean the Bowl and Bowl
Cover Assembly, This type of brush will also help prevent cutting yourself on the
Chopping Blade and Slicing/Shredding Disc
7
Do not use rough scouring pads or cleansers on any plastic or meta! parts
8
Do not fill the Bowl with boiling walar or place any of the parts in boiling water"
9
Some foods, such as carrots, may lemporarily slain the Bowl To remove stains, make
a paste of 2 tablespoons beklngsoda and 1 tablespoon warm water Apply the pasle
to the stains and rub with a cloth Rinse and dry
FOOD
AMOUNT
DIRECTIONS
Baby Food
Up _e4 cups (t O00m!)
Add up {o 4 cups cooked vegetables end/or
moat Io Bowl, along wilb 1/4 cop tiqaid per
cup oI sottd food Process continuously lo
{tseifed fioBnesa
Bread Crumbs
Up to 5 slices
Cu_ eilhor fresh or dry breed slices Into
1 1/2 to 2-inch pl_r*es, Add to Bowl and
process to flr*ecrumbs
Up to 5 cups
UBa for making crumbs from gral}am
crackers, checolale or vanilla wafers
3 caps (75Dm!)
Pulse to chop Io desired fineness Can
ak_o add super to make cranberry relish
Egg& Chapped
Up t_) "_2
Peel {in! nod ha_ve hard-cooked eggs
Add Io BoWL Pulse Io chop, r*hor*kls_
_l*_eues_ uttar 4t_ plttSeS
Garlic, mirmed
upm12
Be sureBowl Is dry, Drop clove(s)down
f_d r*hulaw_tla unil is _unnlng,
_4eet.
chopped
Raw or Cooked)
Up to2V2 cups
[600mI)
Cut the meal into
1-Inch cubes Add to
bowl end pulse Io chop.
Mushmoms_ cbeppsd
Up Io12 Medium
Halve lar_a odes or*t1 add Io Bowl
Io desired fineness,
Hals Chopped
2 cups (3DOtal)
Add lo 8owl and PI_o
Onions, Chopped
Up lo 2 large
Cookie/Cracker
Cranberries
Crumbs
Mt;_ced
Pulse
to chop
Quarter aod _dd to Bowl
Pulse 1 or 2 limes
lo r*oeraeiy creep, F'ol _Jrasn onions, up to 2
cups cut tnlo 1¸,{nob pieces
Parmseae et P,omaoo
Cheese, g_ted
Up lo t t/2 sups (375ml)
Al_w cheese to reach roam tempsralure
Cul inle 1.,Inch eubaa Add Io bowl attd
pulse Io coarse chop; process conltnuoualy
1o finely
grote
Up Is2 cups
Add 1o Bow{ orld Paise Iochop todesired
foleoass, ebuul lO Is15 seooa_ds Process
_lher herbs in same way
Up to I pepper
Col {ale1.inch ptecaa A_d te bowl and
pulse Io chop
Scrips,
Pureed or Creamed
2 caps
Add u ) Io 2 r-ups hal {tess lhaO 176_F)
vegstablesoup far puroelr_g and r-roaming
P_ocsss to desirsdsmoothness
Squash (BulIsrr*ut)
PumpNn or Sweel
Potatoes pureed
Up to 5 sups
1-1acubes
Addli4cupoloouknp
Fq dle[r,
pu
loud Pulse In fieely chop lben proceet,
r*oI1Unuously 1opuree,
Parsley
Chopped
Pepper; Green, Red_
Yellow Chopped
14
FOOD
AMOUNT
DIRECTIONS
Sl,
rewberflos,Pureed
2 cups
Hulland helvelargeberde_. Add Iobowl
end pulse Iod_op, Process conIInueusIy
puree
Tomatoes, Chopped
4 n'_dlum
Querier tommoBs
(o desired slze
FOOD
Add up _o4 and pulse
DIRECTIONS
Cebbege
Use shredding d_sc(orvery lil_e
c,'Ibbe(le
or slew_Cut intopiecesIo fil
chule
Shred, using light prr,resure Emply BewI as cebbeg_
Carrots
Post(lee In chute and et'tred
i
:,Cheese,
Cheddar
Che Bee, Met.z_reIle
Cheese
rnusIbe well chilted Cut to fit chele
Cheese
must be ¢hified in freezer fer 30
minut_e prior to shredd}n!/
Use _gh! pressure
Cut 1o fit chute
F_teloes
Cut le fit chute
Zucchini
Cut Io I_tchule either ienglhwtee
15
or hc;dz;rt_fiy
reaches
disc
DIRECTIONS
FOOD
Apple
Cabbage
Halve end alack hotlzonlalIy
i Le lluco
Halve head
in chu_s Use hrm pressure
col _o tit ch_la
CEIITOI9
Cul doJit chute
Celery
Ren",oveairingPack chulo folb_el resulls
Cucumber
CId to tit (;hul_ II nec_._t;ar y
Stack Chela wilh must_roome
on theL r sides tar lenglhwtse
Halve end fill chela, pssIllonlng
Peaches ( P_a
Peppers; Green.
Red Yellow etc
HaNs and cam
Position
onions updghl
slices
_t coarsely chr_pped rasutls
updgbl in cho_e and s_lce using light pTe_sule
K,aepwhole, eul stem sncloiland sand, keep _op end inlactFilpepper
Inlo chela, inlacl end In the tap o_ueezlng _IIghlly In lit i#nece_ca{y
Co'_ largeones Into quaffersel sldps, depending on desired rt_ull_
Slice using moderate pressure
Peppe_an_
Cot Inle 3,,In length_
Remove Inndible ca_ing
F'ctaloos
P_el il desired
Strawberries
Hull Arrange
Tamatoo_
Use small tcmsl_Ds for whole slices,
halveI1oscessaly U_o gssllyhuifilmp_essu_e
Turnips
Peel Cul turnips _o tit chut_
Zucchini
Sl}ce elf ends
Postlion
in chute,
cutting large polatoec
berries on Iflelt sides (or lengthwise
Use small squash
1B
tn halves
slices
for whore ,_Itces: I_alve large_ ones to hi chela
17
Get itfixed, at your home or oursl
Your Home
For repair - In your home - of all major brand appliances,
lawn and gardenequipment,or heating and coolingsystems,
no matter who made It, no matter who sold Itl
For the replacementpads, accessoriesand
owner's manuals thatyou need to do-it-yourself.
For Sears professionalinstallationof home appliances
and itemstikegarage dooropeners and water heaters
I-B00-4-MY-HOME
®
caEIanytime, day or night
(1_00-469=4663)
(USA, and Canada)
www,searl.com
www.loarLc8
For expert home ao/ut/onsadvice: www.managernyhome.com
Our Home
Forrepair of carry-inproductslike vacuums,lawn equipment,
and electronics,call or go on-linefor the nearest
Sears Parts & Repair Servlca Center
1-800-488.!222 (u SA_)
1-800.469-4663 (Canada)
Call anytime,day or night
www_sDsm_com
www_saarLoa
To purchases protect}onagreementon a productservicedbySears:
%800-827-6655 (u,sA)
1-800.361-6665 (Canada)
Parape_r servicio
dereparacfOn Au Canadapourservicean_n_Is:
a domld_'o,y para ordenarptezas:
1-800-LE-FOYER
Mc
I-eBe-SU-HOGAR®
(1-soo-s3_7)
(1-888r764-6427)
V_Fv'W_ eBB
r]_ C_I
.........
S rs
€_See_Brand_LLC
® Registered Trademark / TM Treffemark I w SaUce Mark of Seers Brenda, LLC
® Mama Reg_atmdaI'r_ Mama de F_brlcs / _u Mama de Se _'K;_ode Seam Brenda, LLC
_¢ Marque do r_ommeme/_r_ Marque d6poa_e de Sears Stands, LLC