1
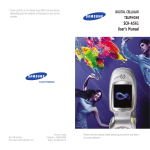
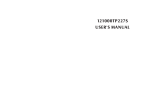
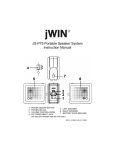
Vintage design big button Dual (FSK & DTMF) Caller ID telephone with LCD display Instruction Manual JT-P433 Please read this manual carefully before operating and save it for future reference. Have a question? Please visit http://www.jWIN.com Vintage Design Telephone with Caller ID V10M10_IM_EN_01282008 USER SAFETY GUIDE INSTRUCTIONS ON ENVIRONMENT PROTECTION Do not dispose of this product in the usual household garbage at the end of its life cycle; bring it to a collection point for the recycling of electrical and electronic appliances. This symbol on the product means the instructions for use or the packaging will inform about the methods of disposal. The materials are recyclable as mentioned in its marking. By recycling, material recycling, and other forms of re-utilization of old appliances, you make an important contribution to the protection of the environment. Please inquire at your local community administration for an authorized disposal location. Important Safety Instructions When used as directed, this unit has been designed and manufactured to ensure your personal safety. However, improper use may result in electric shock, fire hazards or other dangers. Please read all safety and operating instructions carefully before installation and use. Remember to keep this instruction manual handy for future reference. Take special note of all warnings contained in these instructions and on the unit itself. • • • • • • • • • • • • • Read and follow all instructions in this manual. Unplug this telephone from wall jack before cleaning with a damp cloth. Do not use liquid or aerosol cleansers to clean this product. Do not use this telephone in or near water (e.g. a bath tub, a sink, or a pool). To reduce the risk of electric shock, do not push objects through any slots of the phone or disassemble the telephone. Pushing objects into the telephone or opening (or removing) covers exposes wires and poses serious risks. Do not disassemble and/or reassemble this telephone yourself. Contact technical support when service is required. Do not place this telephone on a bed, rug, or on any similar surface or near a heat source. Openings for ventilation must not be blocked or covered. Do not place this telephone on an unstable cart, stand, or table as it may fall, resulting in damage. Avoid using this telephone during electrical storms to prevent the risk of electric shock from lightning. Unplug this telephone from the phone jack and contact Customer Support if the following conditions occur: o When it is exposed to rain or water o When it fails to operate normally o When it is dropped or its case is damaged o When it exhibits a distinct change in performance Do not use this telephone to report a gas leak in the vicinity of the leak. Follow all safety instructions and use this telephone with caution when installing or modifying telephone lines. o Do not install telephone wire during a lightning storm. o Only install telephone jacks in dry locations unless the jack is specifically designed for wet locations. Avoid touching un-insulated telephone wires or terminals unless the telephone line is disconnected at the network interface. -1- www.jWIN.com Vintage Design Telephone with Caller ID V10M10_IM_EN_01282008 USER SAFETY GUIDE Compliance (USA and Canada) This product complies with the standards in Part 68 of the FCC Rules in the USA and CS-03 in Canada. 1. This product must be connected to the public switched telephone network through a modular telephone outlet or jack. 2. Upon the request of the local telephone service provider, the user of this product must provide the following information: • The “line” to which this telephone equipment will be connected (telephone number) • The telephone equipment’s FCC registration number and ringer equivalence number. This information is printed on the back or bottom of the unit. 3. If it is determined that this equipment is malfunctioning, the FCC requires that it not be used and that it must be unplugged from the modular outlet until the problem has been corrected. 4. If the product causes harm to the telephone network, the telephone company may temporarily discontinue telephone service. Whenever possible, the telephone company will contact a customer prior to a service interruption. If advanced notice is not possible, the customer will be notifies as soon as possible. The customer will be given the opportunity to correct the problem. -2- www.jWIN.com Vintage Design Telephone with Caller ID V10M10_IM_EN_01282008 -3- www.jWIN.com Vintage Design Telephone with Caller ID V10M10_IM_EN_01282008 TABLE OF CONTENTS Getting Started General Features ……………………………………………………………………... In the Package ………………………………………………………………………... Location of Controls ………………………………………………………………..… Getting the Telephone Ready for Use ……………………………………………... Installing the Batteries ……………………………………………………………….. 6 6 7 8 8 Operational Instructions Basic Setup ……………………………………………………………………………. Receiving Caller ID Information …………………………………………………….. Reviewing the Caller ID List …………………………………………………………. Erasing Data from the Caller ID List ………………………………………………... Calling a Number from the Caller ID List …………………………………………... Last Number Redial ………………………………………………………………….. Flash Function ………………………………………………………………………… Basic Instructions for Making a Phone Call ………………………………………... Basic Instructions for Receiving a Phone Call …………………………………….. 9 11 11 11 11 11 12 12 12 Troubleshooting and Specifications …………………………………………….. 13 -4- www.jWIN.com Vintage Design Telephone with Caller ID V10M10_IM_EN_01282008 GETTING STARTED Thank you for purchasing the JT-P433 Vintage design big button Dual (FSK & DTMF) Caller ID telephone with LCD display. Please read and follow the instructions in this manual carefully to ensure that your product operates correctly. General Features • • • • • • • • • • • • • • • • • • • • • • • Supports Dual caller ID systems (FSK and DTMF) Voice reporting functions for incoming calls Wide angle view LCD Extra large milk white backlight LCD Extra large dial pad Extra loud receiver volume up to 90dB Extra loud ringer volume up to 90dB Extra bright incoming call LED Supports 4 languages (English, Turkish, Spanish, and French) Incoming call memory (maximum 90 numbers) Built-in phonebook up to 25 numbers Outgoing call up to 17 numbers New incoming call indication 16-digit telephone number and name display 16 selectable ringer melodies 4 level LCD contrast Full-performance speakerphone for hands-free operation Visual ringer LED Tone/Pulse selectable Ringer Volume Control (1/ 2/Off) Receiver Volume Control (1~4) Redial function Real time clock and date display In the Package • • • • • Vintage design big button telephone with LCD display Telephone line cord AC adapter (UL/cUL listed) o Input: 120V 60Hz, o Output: DC 9V, 100mA o Center Negative Instruction manual Warranty card -5- www.jWIN.com Vintage Design Telephone with Caller ID V10M10_IM_EN_01282008 GETTING STARTED Location of Controls 1 2 3 4 5 6 9 10 7 8 11 12 13 14 15 16 1. RECEIVER 2. NUMBER keypad 3. LCD SCREEN 4. SET / BACK button 5. DEL button 6. AUTO / VIP button 7. STORE / M1 / M2 buttons 8. SNOOZE button 9. VOLUME button 10. SPEAKER PHONE button 11. UP/ DOWN button 12. REDIAL / P button -6- 13. FLASH button 14. HOLD button 15. speaker 16. DC 9V JACK www.jWIN.com Vintage Design Telephone with Caller ID V10M10_IM_EN_01282008 GETTING STARTED Getting the Telephone Ready for Use 1. Choose a desired flat, level surface location for the unit. 2. Plug one end of the coiled telephone cord into the jack on the handset, and the other into the matching jack on the unit’s base. 3. Plug one end of the flat telephone cord into the jack in the rear of the unit’s base (marked TEL-LINE), and the other end into the wall jack which supplies telephone service. Installing the Batteries The JT-P433 requires three (3) AA batteries, which are used to operate the telephone, the LCD display, and to retain Caller ID data and any settings programmed into the phone. Using an optional 9V adapter (see Notes below) will increase the battery’s life span, requiring less frequent battery replacement. 1. Remove the battery compartment cover at the bottom of the unit. 2. Carefully install four (3) AA batteries by observing the polarity direction shown in the battery compartment. 3. Replace the cover. Notes: • Whether installing batteries for the first time or replacing them, do not mix old and new batteries, nor should alkaline, standard (zinc-carbon), or rechargeable (nickel-cadmium) batteries be used together. • When not using the phone for a long period of time, remove the batteries to prevent possible leakage and corrosion. Keeping the phone powered by the optional AC adapter, discussed below, will preserve all data and settings in the phone’s memory. • If neither the batteries nor an AC adapter are connected, the JT-P430 will still be able to place and receive calls, but the telephone, the ability to store Caller ID data, and the LCD display functions will not operate. • When batteries are used without an AC adapter, they should be replaced when the display dims. • When replacing the batteries without an AC adapter connected, it’s the best to pick up the handset before removing the batteries. Doing so prevents the loss of stored Caller ID data and programmed settings while the batteries are being replaced. If not done, it’s possible that all settings and data in the phone’s memory will be lost. -7- www.jWIN.com Vintage Design Telephone with Caller ID V10M10_IM_EN_01282008 OPERATIONAL INSTRUCTIONS Basic Setup Note: Please be sure the telephone lines are connected well and batteries or AC adapter are installed before starting setting. Press the SET/BACK button to enter the setting menu, use ▲UP or ▼DOWN buttons to select from the menu including Set Language, Set Local Area Code, Set Time/Date and LCD Contrast. Press the FLASH button to exit the setting manual. A. SET LANGUAGE When the LCD displays “SET LANGUAGE”, press the SET/BACK button to enter. Use the ▲UP or ▼DOWN buttons to select the desired language (English, French, Spanish, Turkish). Press the SET/BACK button to confirm. B. LCD CONTRAST When the LCD displays “LCD CONTRAST”, press the SET/BACK button to enter. Press the ▲UP or ▼DOWN buttons to select the desired contrast level from 1 to 4. Press the SET/BACK button to confirm. C. SET DATE/TIME When the LCD displays “SET DATE/TIME”, press the SET/BACK button to enter. Press the ▲UP or ▼DOWN buttons to set the present year. Press the SET/BACK button to confirm the year. Use the same method to set month ,day, hour and minute D. SET LOCAL AREA CODE When the LCD displays “LOCAL AREA CODE”, press the SET/BACK button to enter. Press the ▲UP or ▼DOWN buttons to select the first digit of area code. Press the SET/BACK button to confirm the first digit. Use the same method to set the rest of the digits E. SET LONG DISTANCE CODE When the LCD displays “LONG PREFIX”, press the SET/BACK button to enter Press ▲UP or ▼DOWN to select the code Press the SET/BACK button to confirm the code F. SET IP NUMBER (SSN=SPECIAL SERVICE NUMBER) Note: The Special Service Number (SSN) is a sequence of digits that can be stored in your telephone and used to gain access to certain features of a telephone network prior to dialing an actual phone number. Unless you are completely familiar with the use of an SSN sequence, it is best to skip this feature. When the LCD displays “SET SSN”, press the SET/BACK button to enter Press ▲UP or ▼DOWN to select the first digit Press the SET/BACK button to confirm the first digit Use the same method to set the rest of the digits -8- www.jWIN.com Vintage Design Telephone with Caller ID V10M10_IM_EN_01282008 OPERATIONAL INSTRUCTIONS Basic Setup-continued G. SET ALARM CLOCK When the LCD displays “ALARM”, press the SET/BACK button to enter The LCD will display “OFF” and “-1-“ (means the 1st group of alarm clock). Press ▲UP or ▼DOWN to select the alarm group. There are a total of three (3) groups to be selected. Press the SET/BACK button to enter the setting Press ▲UP or ▼DOWN to select “ONE TIME”, “P.D”(everyday) or “OFF” Press the SET/BACK button to confirm Press the SET/BACK button to enter hour setting Press ▲UP or ▼DOWN buttons to select the desired alarm hour from 1 to 12 am or pm Press the SET/BACK button to confirm Use the same method to set the alarm minute Press the FLASH button to set the alarm time Notes: 1. The alarm will keep around 50 seconds every time. Press any button (except the star & SNOOZE button) or pick the handset to stop the alarm. 2. During alarm period, any incoming call will stop the alarm function 3. During alarm period, press SNOOZE to delay the alarm time. It will alarm again after five (5) minutes. Press any button (except the star button and SNOOZE) or put the handset to stop the alarm function. H. SET RINGER MELODY When the LCD displays “RING MELODY”, press the SET/BACK button to enter The LCD will display “RING MELODY” and “-01-”, press ▲UP or ▼DOWN to select the desired melody from 01-16. Press the SET/BACK button to confirm I. SET VIP RING MELODY When the LCD displays “VIP RING MELODY”, press the SET/BACK button to enter The LCD will display “VIP RING MELODY” and “-01-”, press ▲UP or ▼DOWN to select the desired VIP melody from 01-16 Press the SET/BACK button to confirm J. SET FLASH TIME When the LCD displays “FLASH TIME”, press the SET/BACK button to enter Press ▲UP or ▼DOWN to select the flash time among 100MS, 120MS,180MS, 270MS, 300MS, 600MS and 1000MS Press the SET/BACK button to confirm K. SET PAUSE TIME When the LCD displays “PAUSE TIME”, press the SET/BACK button to enter Press ▲UP or ▼DOWN to select the pause time among 1S, 2S, 3S and 4S. (S=Seconds) Press the SET/BACK button to confirm -9- www.jWIN.com Vintage Design Telephone with Caller ID V10M10_IM_EN_01282008 OPERATIONAL INSTRUCTIONS Basic Setup-continued L. SET DIALING MODE When the LCD displays “DIAL MODE”, press the SET/BACK button to enter. Press ▲UP or ▼DOWN to select the desired dialing mode. ‘TONE’ for tone dialing and ‘PULSE’ for pulse dialing Press the SET/BACK button to confirm Note: Under the pulse dial state, press the Star button to change to tone dial. M. SET VOICE TARGET NUMBER The voice target number is very useful when you are not at home/office to pick the call. After setting the voice dialing number, the phone will announce “please call XXXXXX (the setting number)” after five (2 ) ringing sounds. When the LCD displays “TARGET NUMBER”, just press the desired number (at most 16 digits) Press the SET/BACK button to confirm N. SET VOICE REPORTING ON/OFF Under off-hook state, press the Star button for three (3) seconds to enter the setting. Press the Star button to choose “VOICE NUMBER/ON” or “VOICE NUMBER/OFF” If you select “VOICE NUMBER/ON”, the phone will announce the incoming number twice. Select “VOICE NUMBER/OFF” to disable the function of voice reporting O. SET CALL FORWARD TO VOICE MAIL Under off-hook state, press “#” for three (3) seconds to enter the setting Press “#” to choose “CALL FORWARD/ON” or “CALL FORWARD/OFF” If select “CALL FORWARD/ON” and there is any incoming call, the phone will announce the voice target number (please refer setting point M) three times after 2 ringing sounds. P. SET CALL FORWARD TO EXTENTION LINE Under off-hook state, press the SET/BACK button for 3 seconds, the LCD will display “OFF” and “- -“ Press ▲UP or ▼DOWN to select “ON” Enter one or two digit(s) from 0-9, Press ▲UP or ▼DOWN to select desired number (Press the SET/BACK button to confirm the first digit and then set the second digit) Note: If you want to set “OFF” from “ON”, under off-hook state, press the SET/BACK button for 3 seconds and the LCD will display “ON” and “- -“. Then press ▲UP or ▼DOWN to select the “OFF” Q. MUSIC ON HOLD FUNCTION Under off hook state (Pick the phone or during speakerphone in use status), press [HOLD] to enter music on hold status The LCD will display “HOLD” and “-01-” , press ▲UP or ▼DOWN to select the music hold melody from 01-04. Press HOLD again to recover the conversation Note: During the incoming call, if press HOLD once, the ringing sound will be turn off immediately. However, it will resume the ringing sound in next incoming call. - 10 - www.jWIN.com Vintage Design Telephone with Caller ID V10M10_IM_EN_01282008 OPERATIONAL INSTRUCTIONS Basic Setup-continued R. RINGER VOLUME CONTROL Under off- hook state, press VOLUME to enter the setting The LCD will display “RING VOLUME” and “-2-”(the volume level). Press VOLUME to select the ringer volume level.“1”is low level, “2”is high level and “OFF” is ringer off. Note: If you choose ringer off, you can still dial out, but cannot hear ringer sound of any incoming calls. (Ringer LED will still flash to remind you there is incoming call.) Don’t forget to set the ringer to ‘ON’ (i.e. select volume level ‘1’ or ‘2’), otherwise, you cannot hear the ringer on next time S. HANDSET VOLUME CONTROL Pick the handset and press VOLUME to enter the setting The LCD will display “HANDSET VOLUME” and “-3-” (the volume level). Press VOLUME to select the handset volume level from 1-4. (‘1’ is the lowest volume and ‘4’ is the highest.) T. SPEAKER VOLUME CONTROL Under the speakerphone in use status, press VOLUME to enter the setting The LCD will display “SPEAKER VOLUME” and “-3-” (the volume level). Press VOLUME to select the speakerphone volume level from 1-4. (‘1’ is the lowest volume and ‘4’ is the highest.) U. KEYPAD SECURITY LOCK Under off-hook state, press “*#0000#” (‘0000’ is default as security code) to set as keypad unlock or all lock. For example, if press “*#0000#” once, the keypad will be locked. No any outgoing call is allowed. Press “*#0000#” again to unlock the keypad. If you want to change the security code, under off-hook state, press “*#xxxx*yyyy#” (xxxx means the old security code, yyyy means the new security code) Note: If you forget the old security code, then use ‘6666’ as old security code - 11 - www.jWIN.com Vintage Design Telephone with Caller ID V10M10_IM_EN_01282008 OPERATIONAL INSTRUCTIONS Recieving Caller ID Information Note: You must make sure your Telephone Company offer caller ID service so that the caller ID function can be activated. A. Incoming Call Display When there is an incoming call, the LCD will display the number, area code, name, time and date of the call. B. Please note the following indicator: “UNAVAILABLE” The call is made through a telephone company, which does not offer Caller ID service or does not transfer calls by long distance net “BLOCKED CALL” Some areas allow the option for callers to prevent the telephone data from being displayed on others’ telephone. If you received such a call, “BLOCKED CALL” will be shown on LCD “Message Icon” If you apply message service to your telephone company, LCD will display Message icon of post box when there is a message left. When you read this message, the message icon will disappear. Reviewing the Caller ID List - Press ▲UP or ▼DOWN to review the incoming calls (at most 80 calls) Erasing Data From the Caller ID List - Under on-hook or off-hook state, press ▲UP or ▼DOWN to select the wanted number, press the DEL button twice to erase the number. Under on-hook or off-hook state, if press the DEL button continuously more than three seconds and the entire Caller ID list will be erased. Calling Back a Number from the Caller ID List - Under on-hook state, press ▲UP or ▼DOWN to select the wanted number Press the SET/BACK button and the LCD will display “PICKUP OR ADJ” (if the incoming number is 10 digits) or “PICKUP PHONE” (if the incoming number is 7 or 11 digits) Press the SET/BACK button to adjust showing 7, 10 or 11 digits Pick the handset or press the SPEAKER button to dial out the number automatically. Under off-hook state, if area code was set, press ▲UP or ▼DOWN to select the desired number Press the SET/BACK button, if the displaying number is 10 digits, the number will be dialed out automatically with adding “1” as first digit. If the displaying number is 7 or 11 digits, the number will be dialed out automatically. - 12 - www.jWIN.com Vintage Design Telephone with Caller ID V10M10_IM_EN_01282008 OPERATIONAL INSTRUCTIONS Phonebook Review - Under on-hook or off-hook state, press the BOOK button to enter the phonebook review When the LCD displays “SEARCH”, press ▲UP or ▼DOWN to review the phonebook number or Enter the letter of the name by using keypad, the wanted telephone number will display on LCD, press ▲UP or ▼DOWN to review one by one Press [FLASH] to exit the phonebook review Phonebook Input - Press [BOOK] twice continuously, the LCD will display “EDIT” Press ▲UP or ▼DOWN and the LCD will display “PLS INPUT NUMBER”. Input the desired directly by using keypad. Press the BOOK button to confirm Then the LCD will display “PLS INPUT NAME”, use the key pad to enter the name (at most 16 letters) and use the DEL button to correct (For example: enter “C”, just continuously press [2] key three times ) Press the BOOK button to confirm Repeat the steps to input another name and number When “MEMEORY FULL” displays on the LCD, it means the phonebook memory is full, no more new name and number can be input Press the DEL button to exit the phonebook input Phonebook Delete or Edit - When reviewing the phonebook record, press the DEL button twice to erase the record. When reviewing the phonebook record, press the BOOK button to enter edit The LCD will display “EDIT”, press ▲UP or ▼DOWN and the LCD will display “PLS INPUT NUMBER”. Input the desired directly by using keypad. Press the BOOK button to confirm Then the LCD will display “PLS INPUT NAME”, use the key pad to enter the name (at most 16 letters) and use the DEL button to correct (For example: enter “C”, just continuously press [2] key three times ) Press the BOOK button to confirm Set Auto IP On/Off - Under off-hook state, press ▲UP for three (3) seconds to set IP On or Off. (IP number must be set in advance). For example, if the IP number is 234567 and the long distance code is 1, press ▲UP for three seconds to set IP ‘On’ and the LCD will display “234567-1” Press ▲UP for three seconds again to set IP ‘Off’ - 13 - www.jWIN.com Vintage Design Telephone with Caller ID V10M10_IM_EN_01282008 OPERATIONAL INSTRUCTIONS Dialing IP Number - When the IP was set as ‘On’, pick the handset and if press the first digit is long distant code, then it will run by IP format automatically or Under off-hook state, when reviewing the incoming and outgoing call, if the first digit of displaying number is long distant code, press the SET/BACK button, then it will run by IP format after hook the phone once. Under on-hook state, when reviewing the incoming and outgoing call, if the first digit of displaying number is long distant code, press the SET/BACK button and it will run by IP format automatically. Storing 2 One-Touch Dialing Memories - Under the on-hook state, press the STORE button. The LCD will display “PLS INPUT NUMBER”. Enter the desired number by using keypad Press M1 or M2. Storing 2 One-Touch Dialing Memories from Incoming Calls - During the incoming call, press the STORE button. The LCD will display “PLS INPUT NUMBER”. Press M1 or M2 to store the incoming number. Dialing From One-Touch Memories - Under off-hook state, press the desired one-touch button (M1/M2) Press the SET/BACK button and the number will be dialed out automatically. Under off-hook state, press the desired one-touch button (M1/M2) and the number will be dialed out automatically. Deleting a One-Touch Memory Number - Under off-hook state, press M1/M2 and it will show the stored number. Press the DEL button twice to erase the number and the LCD will display “NO CODE” Storing 10 Two-Touch Dialing Memories - Under the off-hook state, press the STORE button. The LCD will display “PLS INPUT NUMBER”. Enter the desired number by using keypad Press the STORE button again and the LCD display “INPUT ADDR” Press the desired two-touch location from 0-9. Storing 10 Two-Touch Memories from Incoming Calls - During the incoming call, press the STORE button. The LCD will display “PLS INPUT NUMBER”. Press STORE button again Then the LCD will display “PLS INPUT ADDR”, press the desired twotouch location from 0-9 - 14 - www.jWIN.com Vintage Design Telephone with Caller ID V10M10_IM_EN_01282008 OPERATIONAL INSTRUCTIONS Dialing from Two-Touch Memories - Under off-hook state, press the AUTO/VIP button, the LCD will display “INPUT ADDR” Press the desired two-touch location from 0-9 and the LCD will display the number Press the SET/BACK button and the number will be dialed out automatically. Under on-hook state, press the AUTO/VIP button, the LCD will display “INPUT ADDR” Press the desired two-touch location from 0-9, the LCD will display the number and it will be dialed out automatically. Deleting a Two-Touch Memory Number - Under off-hook state, press the RECALL/VIP button, the LCD will display “INPUT ADDR” Press the desired two-touch memory from 0-9 and the LCD will display the number Press the DEL button twice to erase the number and the LCD will display “NO CODE” Forwarding a Call to an Extension Line When the call forwarding to extension line was set as “ON”, under DTMF mode, if you want to transfer the call to the extension line, press “*” and then press the extension number You will here the ‘beep’ sound and wait for the extension line to receive the call When the extension line is received successfully, you may have conference call with the extension line and the third party or just place back the handset to complete the call. The extension line and the third party can continue the conversation. Note:1. You must forward the call to extension line within one minute after picking the phone, otherwise, the forwarding function will be exit automatically. 2. When entering the extension number, wait one second between the digits. 3. When entering the extension number, if wait more than 10 seconds between the digits, the call forwarding will be cancelled automatically. - VIP Function - When reviewing the incoming call, press the AUTO/VIP button once to save this number as VIP. When there is an incoming call, the VIP ringer melody will indicate this is the caller from VIP. VIP cannot be erased from the caller Id list If you want to cancel the VIP of the number, press the AUTO/VIP button again. - 15 - www.jWIN.com Vintage Design Telephone with Caller ID V10M10_IM_EN_01282008 OPERATIONAL INSTRUCTIONS New Incoming Call Indicator Under on-hook or off-hook state, when there is new incoming call, the new call LED will be lighted for 10 seconds and the new call icon will display on LCD at the same time. The new call icon will disappear after the new call has been reviewed. Last Number Redial The last outgoing number can be redialed automatically just by pressing the REDIAL button under on-hook state. This is useful especially if the line is busy. Flash Function - When in an office equipped with PABX, this telephone makes it easy to transfer calls - Ask caller to wait and press the FLASH button once - Dial the extension number which caller intended - When the party answers, just hang up the handset - When the line is busy or nobody answers, press FLASH button again to re-connect with the caller Conversation Time Indication During the conversation with another party, the LCD will display the conversation time, until to stop the conversation, and put back the handset or turn off the [SPEAKER] button. IMPORTANT NOTE: To operate this unit, you must have “CALLER ID SERVICE” setup with your local telephone company. Some functions such as CALLER NAME INDICATION will only operate if such services are included in the user’s Caller I.D. program with the local telephone company. Basic Instructions for Making a Phone Call 1. 2. 3. Remove the handset from base and listen for dial tone. Listen for a dial tone to indicate that the phone is connected. Dial the number you wish to call using the number pad. Basic Instructions for Receiving a Phone Call Telephone will ring to alert the user of an incoming call. 1. Lift the handset, hold earpiece to your ear and speak into the mouthpiece. 2. To hang up, return the handset to the base at the conclusion of call. - 16 - www.jWIN.com Vintage Design Telephone with Caller ID V10M10_IM_EN_01282008 TROUBLESHOOTING & SPECIFICATIONS Troubleshooting • No Display on LCD Screen o Brightness on display may be turned down. Increase brightness level. o No batteries or batteries are improperly installed. If no batteries, install three (3) AA batteries as directed or Install optional AC Adapter Make sure batteries observe to polarities (+/-) as indicated inside the battery compartment. • No Dial Tone when handset is picked up o Phone may not be connected properly. Make sure the handset jack is connected to the base jack using the colied wire. Make sure the base jack (TEL-LINE) jack is connected to the wall telephone jack using the flat wire. o Telephone service may be interrupted by the telephone company Contact your telephone company to check the status of your service. • Static or interruptions during phone conversation o Bad connection between phones Hang up and dial number again o Harsh weather conditions and/or lightning Hang up and dial number when weather conditions improve • Can only receive incoming calls and cannot make outgoing calls o Telephone service may be limited or suspended by your telephone company Contact your telephone company to check the status of your service. Specifications • • Inputs & Outputs o Telephone line jack o Handset jack o DC Power input jack Power Sources o 9V (AC/DC) Power Adapter o 4.5V DC Battery (AA x 3) (for backup) - 17 - www.jWIN.com Vintage Design Telephone with Caller ID - 18 - V10M10_IM_EN_01282008 www.jWIN.com TEL: 516-626-7188 FAX: 516-626-7105 website: www.jWIN.com © 2008 jWIN Electronics Corp. All rights reserved. No portion of this printed material or product enclosed herewith including design, shape and graphics, may be reproduced or transmitted in any form without the expressed written consent of jWIN Electronics Corp. by any means, electronic or mechanical, including photocopying, recording, or by use of an information storage and retrieval system. Any unauthorized distribution or reproduction of this printed material or product, or any portion thereof, will be prosecuted to the fullest possible extent of the law. Printed in China