1
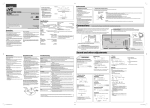
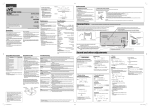
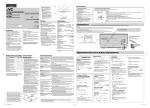
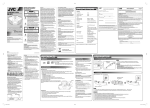
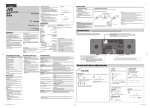
ENGLISH (1/2)
Specifications
LVT2123-029A[US/UX/UG/UW]
MICRO COMPONENT SYSTEM
UX-F4VB
—consists of CA-UXF4VB and SP-UXF4VB
INSTRUCTIONS
Getting started
Main unit—CA-UXF4VB
Output Power:
100 W (50 W + 50 W) at 6 Ω (10% THD)
Audio Input:
AUDIO IN: Stereo mini (ø 3.5 mm)
Microphone Input:
MIC: Monaural mini (ø 3.5 mm)
Audio output: SUBWOOFER OUT:
500 mV/10 kΩ
Digital output: OPTICAL DIGITAL OUT:
–21 dBm to –15 dBm (660 nm ±30 nm)
VIDEO OUT × 1
COMPONENT VIDEO OUT × 1
Speaker impedance:
6 Ω – 16 Ω
Tuner
FM frequency:
AM frequency
For Saudi Arabia:
87.50 MHz – 108.00 MHz
SUPER VIDEO
For other countries/areas:
Thank you for purchasing a JVC product.
For turning off the demonstration display, see
“Canceling the display demonstration” in “Initial
settings.”
0510YOMMDWCDT
©2010 Victor Company of Japan, Limited
531 kHz – 1 602 kHz
(at 9 kHz intervals)
530 kHz – 1 600 kHz
(at 10 kHz intervals)
531 kHz – 1 710 kHz
(at 9 kHz intervals)
530 kHz – 1 710 kHz
(at 10 kHz intervals)
USB
USB specification:
Compatible device:
Compatible system:
Output power:
Compatible with USB 2.0 Full Speed
Mass storage class
FAT16, FAT32
DC 5 V 500 mA
SD
Compatible device:
Compatible system:
SD, SDHC
FAT16, FAT32
General
Power source:
AC 110 V– 127 V/AC 220 V– 240 V
(adjustable with the voltage selector), 50 Hz/60 Hz
Power consumption (at operation):
45 W
Power consumption (on standby):
1.00 W or less
Dimensions (approx.) (W × H × D) (including projecting
parts):
236 mm × 123 mm × 285 mm
Mass (approx.):
2.0 kg
Speaker—SP-UXF4VB
Speaker type: Bass-reflex type (Magnetically-shielded type)
Tweeter:
4 cm
Woofer:
12 cm
Impedance:
6Ω
Dimensions (approx.) (W × H × D) (including projecting
parts):
141 mm × 250 mm × 181 mm
Mass (approx.):
2.2 kg each
❍ Prepare the remote control
After unpacking, check to make sure that you have all
the following items:
• Remote control (× 1)
• Lithium coin battery CR2025 (× 1)
– The battery has been installed in the remote
control when shipped from the factory.
• FM antenna (× 1)
• AM loop antenna (× 1)
• Composite video cord (× 1)
• AC plug adaptor (× 1)
(not supplied for Middle Eastern and Saudi Arabian
models)
If anything is missing, consult your dealer immediately.
When you use the remote control for the first time, pull out the insulation sheet.
Design and specifications are subject to change without
notice.
Connections
CAUTION:
Danger of explosion if battery is incorrectly replaced. Replace only with the same or equivalent type.
Do not connect the AC power cord until all other connections have been made.
After connecting a TV, select the appropriate video signal
output setting according to the connection method. See
“Setting the scanning mode” in “Initial settings” below.
Speaker
Main unit
NOTES:
• Store the battery in a place where children cannot reach. If a child accidentally swallows the battery, consult a doctor
immediately.
• To prevent the battery from overheating, cracking, or starting a fire:
– Do not recharge, short, disassemble or heat the battery or dispose of it in a fire.
– Do not leave the battery with other metallic materials.
– Wrap the battery with tape and insulate when throwing away or saving it.
– Do not poke the battery with tweezers or similar tools.
• Dispose of battery in the proper manner, according to federal, state, and local regulations.
• The battery (battery pack or battery installed) shall not be exposed to excessive heat source such as sunshine, fire or
the like.
In this manual...
• The remote control buttons are used for explaining the
operations unless mentioned otherwise. However, if the
System has the same or similar button names, they can
also be used for the operations.
• The English on-screen displays and terms are used for
explanation though you can change the on-screen
language.
• “SD card” refers to both SD card and SDHC card.
• “File” and “track” are used interchangeably.
Side view
Speaker
To replace the battery in the remote control
Lithium coin battery
(product number: CR2025)
Supplied accessories
See “Supplied accessories” in “Getting started.”
CAUTION: Proper Ventilation
To avoid risk of electric shock and fire, and to prevent damage, locate the apparatus as follows:
1. Front: No obstructions and open spacing.
2. Sides/Top/Back: No obstructions should be placed in the areas indicated by the dimensions in
the illustration.
3. Bottom: Place on the level surface. Maintain an adequate air path for ventilation by placing on a
stand with a height of 10 cm or more.
Front view
❍ Supplied accessories
NOTES:
• Make sure the antenna conductors do not touch any other terminals, connecting cords or the power cord. Also, keep the antennas away from metallic parts of the System,
connecting cords, and the AC power cord. Otherwise, it could cause poor reception.
• When connecting the speaker cords, match the polarities of the speaker terminals: red to (+) and black to (–).
• DO NOT connect more than one speaker to each terminal.
• Use only speakers with the same speaker impedance as indicated by the speaker terminals on the rear of the System.
• DO NOT allow the conductor of the speaker cords to come into contact with the metallic parts of the System.
• The speakers are magnetically shielded to avoid color distortions on TVs. However, if not installed properly, it may cause color distortions. Therefore, pay attention to the following
when installing the speakers.
– When placing the speakers near a TV set, turn off the TV’s main power switch or unplug it before installing the speakers.
Then wait at least 30 minutes before turning on the TV’s main power switch again.
– Some TVs may still be affected even though you have followed the above instructions. If this happens, move the speakers away from the TV.
• Connect your TV directly to the System. Connecting the System to a TV via a VCR or an HDD DVD recorder may interfere with your viewing. Connecting an integrated TV/VCR system
to the System may also interfere with your viewing.
Main unit
FM antenna (supplied): Extend it so that you can obtain the best reception.
For better FM reception
Disconnect the supplied FM antenna, and connect to an outdoor FM antenna
(not supplied) using a 75 Ω wire with coaxial type connector.
Precautions
Notes on the power cord
• When you go away for an extended period of time,
remove the plug from the wall outlet.
• When unplugging the System from the wall outlet,
always pull the plug, not the power cord.
• Do not handle the power cord with wet hands.
• Disconnect the power cord before cleaning the System or
moving the System.
• Do not alter, twist or pull the power cord, or put anything
heavy on it, which may cause fire, electric shock, or other
accidents.
Avoid moisture, water, dust, and high temperatures
• Do not place the System in moist or dusty places.
• If water gets inside the System, turn off the power and
remove the plug from the wall outlet, then consult your
dealer. Using the System in this state may cause a fire or
electrical shock.
• Do not expose the System to direct sunlight or place it
near a heating device.
Notes on installation
• Select a place which is level, dry and neither too hot nor
too cold—between 5˚C and 35˚C.
• Do not install the System in a place subject to vibrations.
• Do not put heavy objects on the System.
To prevent malfunction or damage to the System
• Do not insert any metallic objects, such as wires, hairpins,
coins, etc. into the System.
• Do not block the vents.
There are no user-serviceable parts inside. If anything
goes wrong, unplug the power cord and consult your
dealer.
Maintenance
Playable disc/file types
To get the best performance of the System, keep your discs
and the mechanism clean.
Handling discs
• Remove the disc from its case by holding it at the edge
while pressing the center hole lightly.
• Do not touch the shiny surface of the disc, or bend the
disc.
• Put the disc back in its case after use.
• Be careful not to scratch the surface of the disc when
placing it back in its case.
• Avoid exposure to direct sunlight, temperature extremes,
and moisture.
To clean the disc:
Wipe the disc with a soft cloth in a straight line from center
to edge.
Cleaning the System
• Stains should be wiped off with a soft cloth. If the System
is heavily stained, wipe it with a cloth soaked in waterdiluted neutral detergent and wrung well, then wipe
clean with a dry cloth.
• Since the System may deteriorate in quality, become
damaged or get its paint peeled off, be careful about the
following:
– DO NOT wipe it hard.
– DO NOT wipe it with thinner or benzine.
– DO NOT apply any volatile substances such as
insecticides to it.
– DO NOT allow any rubber or plastic to remain in contact
for a long time.
From the powered
subwoofer
(not supplied)
Before connecting the
System to the power supply,
make sure that the powered
subwoofer is turned off.
DIGITAL VIDEO
COMPACT
SUPER VIDEO
DIGITAL AUDIO
CD-R/-RW: Recorded in the Audio CD, Video CD, and
SVCD formats. MP3, WMA, JPEG, MPEG-1, MPEG-2, and
DivX*1 files written in accordance with the “ISO 9660”
format can also be played.
DVD-R/-RW, +R/+RW: Recorded in the DVD Video format.
MP3, WMA, JPEG, MPEG-1, MPEG-2, and DivX*1 files
written in the UDF-Bridge format can also be played.
DVD-R/-RW: Recorded in the DVD Video Recording (VR)
format.
USB mass storage class device, SD/SDHC card: MP3, WMA,
JPEG, MPEG-1, MPEG-2, and DivX*1 files.
In addition to the above discs/files, this System can play
back audio data recorded on CD-Extra.
• The following discs cannot be played back: DVD-RAM,
CD-I (CD-I Ready) and Photo CD. Playing back these discs
will generate noise and damage the speakers.
• It is possible to play back finalized +R/+RW (DVD Video
format only) discs. The DVD indicator lights up when a
+R/+RW disc is loaded.
• “DVD Logo” is a trademark of DVD Format/Logo Licensing
Corporation.
• The System recognizes up to 999 tracks (files) and 130
groups.
From
right
speaker
• For MP3/WMA playback...
– Some MP3/WMA files may not be played back due to
their recording conditions.
– This System can play only a disc of ISO 9660 Level 1 or
Level 2.
– It is recommended to record each file at a sampling rate
of 44.1 kHz and at a data transfer rate of 128 kbps.
– This System cannot play back files made at a bit rate of
less than 64 kbps.
– This System can show the Tag data (Version 1).
• For playback of files on a USB mass storage class device/
SD card...
– You cannot play back files larger than 2 GB.
– This System may not play back some USB mass storage
class devices/SD cards and does not support DRM
(Digital Rights Management).
• This System can play back files on DVD, CD*2, USB mass
storage class device*2 and SD/SDHC card*2 recorded
by JVC EVERIO camcorders with the extension <.mod>.
These files cannot be played back if HD format is used.
Black
Red
White
L
ICA
OPT AL
IT
DIG T
OU
Optical digital cord
(not supplied)
• When playing multi-channel encoded software,
the System properly converts the multi-channel
signals into 2 channels, and emits the downmixed
sound from the speakers. To enjoy the powerful
sound of the multi-channel encoded software,
connect a proper decoder or an amplifier with
a built-in decoder to the OPTICAL DIGITAL OUT
terminal.
• Set “AUDIO OUT” in the “ ” menu correctly
according to the connected digital audio
equipment (see “Setup menu operations of the
System” on page 4).
• The digital signal is transmitted through the
OPTICAL DIGITAL OUT terminal when “DVD/CD,”
“USB,” or “SD” is selected as the source.
From
left
speaker
Black
AM loop antenna
(supplied)
Turn it until the best reception
is obtained.
Connect your TV to the System using either a composite video cord
or component video cord.
NOTE:
Keep the AM loop antenna cable wrapped around the
AM loop antenna frame, otherwise the effectiveness
and sensitivity of the AM loop antenna may be
reduced.
*2 Only when the maximum bit rate is less than 2 Mbps.
About color system
• Connect a PAL or NTSC TV to this System.
• This System can play back discs recorded in PAL and
NTSC video format.
Voltage selector switch
(on the bottom of the System)
Y
To a wall outlet
• If a wall outlet does not match the AC plug, use the
supplied AC plug adaptor (not supplied for Middle
Eastern and Saudi Arabian models).
PB
PR
Green
When you connect a TV using a component video cord,
you can enjoy a high quality picture by selecting the
progressive scanning mode. To select the scanning
mode, see “Setting the scanning mode” in “Initial
settings” below.
Note on Region Code
DVD players and DVDs have their own Region Codes.
This System can play back only DVDs with an appropriate
Region Code.
Country/area
Black
Red
L
ICA
OPT AL
IT
DIG T
OU
CAUTION for mains (AC) line
BEFORE PLUGGING IN, do check that your mains (AC)
line voltage corresponds with the position of the
voltage selector switch provided on the outside of this
equipment and, if different, reset the voltage selector
switch, to prevent from a damage or risk of fire/electric
shock.
Blue
Component video
cord (not supplied)
Yellow
Composite video cord
(supplied)
Red
Region Code
Middle East and Saudi Arabia
2
Southeast Asia
3
Central and South America
4
Initial settings
Ex.: For Southeast Asia
Canceling the display demonstration
When you plug in and turn on the System, the display
demonstration starts automatically if no operation is done
for about 2 minutes.
*1 Maximum resolution:
720 × 480@30fps / 720 × 576@25fps
Setting the clock
1
To cancel the display demonstration
(On the main unit)
• “RG ERROR” appears if a DVD with an incompatible
Region Code is loaded.
2
Caution for DualDisc playback
The Non-DVD side of a “DualDisc” does not comply with
the “Compact Disc Digital Audio” standard. Therefore, the
use of the Non-DVD side of a DualDisc in this product may
not be recommended.
• If you have already set the clock before, press CLOCK
repeatedly until the clock setting mode is selected.
Adjust the hour and minute.
Setting the scanning mode
Select the video signal output setting according to the
type of your TV.
• You can set the scanning mode only when “DVD/CD,”
“USB,” or “SD” is selected as the source.
On the TV screen
INTERLACE-YUV
(While holding...)
P-SCAN YPBPR
For a progressive TV.
Select to enjoy a progressively
scanned picture through the
P-SCAN YPBPR
COMPONENT VIDEO OUT jacks.
• PRGR. (Progressive) indicator lights
up.
For a conventional TV.
INTERLACESelect when connecting the TV through
YUV
the VIDEO OUT jack.
INTERLACE-YUV
(Hold)
• To go back to the previous step, press CANCEL while
holding SHIFT.
• Select “INTERLACE-YUV” when you have connected your
TV to the System using a composite video cord.
• The clock may gain or lose 1 to 2 minutes per month. You
may need to readjust the clock periodically.
1
EN_UXF4VB[USUXUGUW].indd 1
10.5.10 7:49:02 PM
Selecting the AM tuner interval
Basic operation
Before operating the tuner, select the appropriate AM
tuner interval used in your residential area.
1
TUNER FM
Presetting stations
Searching for stations
You can preset up to 30 FM and 15 AM stations.
While listening to a target station...
1
1
TUNER FM
TUNER AM
3
2
Radio
STANDBY lamp
Select the AM tuner interval.
(On the main unit)
2
Select a source.
TUNER AM
Select a preset number.
Select a preset number.
(Hold)
The station search stops when a station of sufficient
signal strength is found.
• To manually stop the search, press 5 or ∞.
(Hold) 9K --> 10K
10K --> 9K
Each time you press and hold 7, the interval switches
between 9 kHz and 10 kHz alternately.
Remote sensor
2
2
(Hold)
TUNER FM
TUNER AM
2
Adjust the volume.
Tuning in to a preset station
1
• When you press 5 or ∞ repeatedly, the frequency
changes step by step.
• You can use ¢ or 4 on the main unit instead of
5 or ∞ on the remote control.
• When an FM program is broadcast in
stereo, the S (stereo) indicator lights
up.
Preset number
• To select a number, see “How to select a number
using the remote control” on page 3.
• To select a number, see “How to select a number
using the remote control” on page 3.
3
Improving the FM reception
To improve the FM reception
Turn on the power.
1
• When the monaural mode is activated, the reception is
improved. However, the stereo effect is lost.
• To restore the stereo effect, press TUNER MODE again.
Label side
Monaural mini plug cord
(not supplied)
Stereo mini plug cord
(not supplied)
Microphone (not supplied)
Headphones (not supplied)
The MIC indicator lights up when a microphone is connected
to the System.
• Set “MIC VOL” to “0” when connecting or disconnecting the
microphone (see “Singing a song in Karaoke” in “Karaoke
operations” on page 3).
The HP indicator lights up when headphones are connected to the System.
• Be sure to turn down the volume before connecting or putting on the
headphones.
DO NOT turn off the System with the volume set to an extremely high level; otherwise,
the sudden blast of sound may damage your hearing, speakers, and headphones when you
turn on the System or start playback.
Disc/USB/
SD
USB mass storage
class device
1
2
3
SD card
Playback operation
1
2
Notes on USB mass storage class device connection
• Connect a USB mass storage class device when the
System is turned off to prevent malfunction.
• Do not use a USB hub.
• When connecting with a USB cable, use a USB 2.0 cable
whose length is less than 1 m.
• The USB mass storage class device is charged through
the USB MEMORY terminal when the System is turned
on. (Some USB mass storage class devices may be
charged through the USB MEMORY terminal only when
“USB” is selected as the source.)
• You cannot connect a computer to the USB MEMORY
terminal of the System.
• Electrostatic shock at connecting a USB mass storage
class device may cause abnormal playback of the
device. In this case, disconnect the USB mass storage
class device then reset the System and the USB mass
storage class device.
• While playing back or recording a file onto a USB mass
storage class device, do not disconnect the device.
Doing so may cause malfunction on both the System
and the device.
Before playing back a disc/file:
• Turn on the TV and select an appropriate input mode on the TV to view the picture or on-screen display.
• For disc/file playback, you can change the initial setting to your preference. See “Setup menu operations of the
System” on page 4.
Playback operations
To play back/pause a disc
To play back/pause a USB mass
storage class device
To open the disc tray
Press 0 on the main unit.
To select a chapter/track
Press ¢ or 4.
To locate a particular section
Press ¡ or 1 repeatedly during playback.
• Each time you press ¡ or 1, the search speed
changes as follows.
– FORWARD × 2, × 4, × 8, × 20
– BACKWARD × 2, × 4, × 8, × 20
• To return to normal playback, press DVD/CD 6,
USB 6, or SD 6.
Notes on SD card insertion
• DO NOT insert any object other than an SD card into
the insertion slot.
• DO NOT use a cracked or deformed SD card.
• Make sure that SD card playback has stopped before
removing the SD card. Otherwise, the data may be
damaged.
• Never insert an SD card upside down. Otherwise, it will
not be able to be removed.
• When you play a miniSD™ card, be sure to attach the
miniSD™ adaptor to the card before insertion.
• SD cards initialised by computer may not be
compatible.
• You can use an SD card of up to 32 GB.
• Do not remove the SD card while recording. It may
cause malfunction.
To play back/pause an SD card
To locate an item directly
Press a number button.
• To select a number, see “How to select a number using
the remote control” on page 3.
To select a group/title
Press GROUP/TITLE SKIP ¢ or
GROUP/TITLE SKIP 4 while holding SHIFT.
To stop playback
Press 7.
Start playback of the external device.
Recording operations
External
device
Stereo mini plug cord
(not supplied)
Before you start recording
• It may be unlawful to record or play back
copyrighted material without the consent of the
copyright owner.
• The volume and sound adjustments (see “Basic
operation,” pages 3, and 4) do not affect recordings.
• Random Play and Repeat mode are canceled during
recording.
• You can record up to 99 tracks per group onto a USB
mass storage class device or SD card.
• Tracks which are recorded onto a USB mass storage
class device or SD card will be converted into MP3
format.
• Recording does not start while “READING” is shown on
the display.
• You cannot record tracks in the root.
Adjusting the audio input level
You can change the audio input level through the AUDIO
IN jack.
(While holding...)
LEVEL1
LEVEL2
LEVEL3
• The playback sound is the maximum when you select
LEVEL3.
About SCMS (Serial Copy Management System)
The System uses the Serial Copy Management System
which allows only first-generation digital copies to be
made of premastered software such as regular CDs.
If you try to record from a duplicated CD-R or CD-RW to
a USB mass storage class device or SD card, “SCMS VLT”
appears on the display.
1st generation
Recording from a Disc
You can record tracks from a CD to a USB mass storage
class device or SD card.
Before recording....
Connect a recordable USB mass storage class device to
the USB MEMORY (
) terminal or insert a recordable
SD card into the SD CARD (
)slot.
2nd generation
DIGITAL
DIGITAL
ANALOG
1
Start and stop playback of the disc.
2
Start recording.
(On the main unit)
• Do not vibrate the System while recording. It may
damage the recorded tracks.
• The System automatically creates the new group.
• When playback ends, recording automatically stops.
• To stop recording manually, press 7.
• To record a single track, press CD3USB REC or
CD3SD REC on the main unit during playback of the
track.
• To record tracks in the programmed order, turn
on Resume Play before you start Program Play.
(For details of Program Play and Resume Play, see
“Advanced playback operations” on page 3.)
• If “NO REC” appears on the display when you try to
record a track, the System cannot record that track.
or
DIGITAL
The USB REC or SD REC indicator starts flashing.
For advanced operations, see page 3.
2
EN_UXF4VB[USUXUGUW].indd 2
10.5.10 7:49:08 PM