1
E_mJENN-AIR
Use and Care Manual
Gas-Electric Grill-Range
with Convection Oven
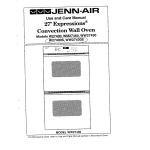
Model SVD48600
WARNING: If the information in this men_;,,._l
is
not followed exactly, a fire or explosion may
result causing propertydamage, personal injury
or death.
- Do not store or use gasoline or other flammable vapors and liquids in the vicinity of
this or any other appliance.
- WHAT TO DO IF YOU SMELL GAS
• Do not try to light any appliance.
• Do nottouch any electrical switch; do not
use any phone in your building.
• Immediately call your gas supplier from a
neighbor's phone.
Follow the gas
supplier's instructions.
• Ifyou cannot reachyour gas supplier,call
the fire department.
• Extinguish any open flame.
- Installation and service must be performed
by a qualified installer,service agency or the
gas supplier.
-SAVE THESE INSTRUCTIONS FOR FUTURE REFERENCE-
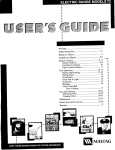
Congratulations on your choice of a Jenn-Air grill-range. The indoor grilling
of meats, fish or fowl is one of the most attractive and succulent methods
of preparing these foods ... a unique flexibility made possible by Jenn-Air's
patented integral ventilation system.
Your Jenn-Air self-cleaning oven combines the best of fourcooking methods,
conventional baking or roasting, convection baking, convection roasting and
broiling.
The Jenn-Air convection oven is actually a conventional oven that circulates
heated air within the oven. As both bake and broil heating elements cycle on
and off with the thermostat, a fan keeps the heated air circulating around the
food. The constantly recirculating heated air in the convection oven strips
away the layer of cooler air that surrounds the food. Consequently, many
foods cook more quickly. Evenly distributed heat makes multiple rack
cooking possible. Convection roasted meats retain their natural flavor and
juiciness with less shrinkage than conventional roasting.
In addition to the many exclusive benefits of convection cooking, your JennAir oven is also a fine full featured conventional bake and broil oven. You can
cook your "old favorite" recipes as you have in the past. The conventional
bake oven also gives you the flexibility of preparing various foods when
convection cooking may not be as beneficial, as when cooking foods in
covered casseroles or clay pots. The broil element is convenient for top
browning and oven broiling of foods.
Before you begin cooking with your new range, please take a few minutes to
read and become familiar with the instructions in this book. On the following
pages you will find a wealth of information regarding all aspects of using your
new range. By following the instructions carefully, you will be able to fully
enjoy and properly maintain you rrange and achieve excellent results with the
food you prepare.
Should you have any questions about using your Jenn-Air range, write to us.
Be sure to provide the model number.
Jenn-Air Customer Assistance
c/o Maytag Customer Service
P.O. Box 2370
Cleveland, TN 37320-2370
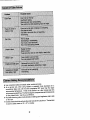
Appliance Usage
BeforeYou Call ForService.................................................................................................. 50-52
CadngForYourRange
AccessPanel ......................................................................................................................48
AdjustOvenTemperature...................................................................................................48
Child ProtectionLock..........................................................................................................47
CleaningOther Partsof YourRange.............................................................................45-46
How to Removethe Range .................................................................................................48
Oven LightBulb...................................................................................................................47
RangeComponents.....................................................................................................................11
SafetyPrecautions................................................................................................................2, 5-8
Using the Cooktop and Grill
Accessories................................................................................................................................49
CookwareSelection ....................................................................................................................14
Ductinginformation .......................................................................................................................9
Grilling
Cleaning........................................................................................................................20-21
GrillingGuide ......................................................................................................................19
GrillingTips .........................................................................................................................20
Installation...........................................................................................................................17
Usingthe Grill......................................................................................................................18
Howa SurfaceBurnerWorks
AirShutterAdjustment.................................................................................................. 12-13
Howto Operateinthe Eventof a PowerFailure..................................................................12
LowFlameAdjustment........................................................................................................13
SurfaceBurnerModule................................................................................................................16
SurfaceControls.........................................................................................................................15
VentilationSystem.......................................................................................................................10
Using the Oven
Baking
BakingCharts .....................................................................................................................31
Causesof Cake Failure ......................................................................................................32
ConvectBaking.............................................................................................................32-33
GeneralRecommendations................................................................................................30
Broiling..................................................................................................................................38-39
ClockControls
ClockControlledBakingandRoasting.......................................................................... 28-29
Time of Day Clock ..............................................................................................................26
Timer...................................................................................................................................27
OvenCleaning
Self-CleaningProcess................................................................................................... 40-44
OvenOperation
Oven ControlPanel....................................................................................................... 22-23
Rack Positions....................................................................................................................25
SettingControls...................................................................................................................24
Roasting
ConvectionRoasting............................................................................................................36
FrozenConvenienceFoods.................................................................................................37
GeneralRoastingRecommendations..................................................................................34
RoastingChart .....................................................................................................................35
Read before operating your range
All appliances - regardless of the manufacturer - have the potential
throughimproperor carelessuseto createsafety problems. Therefore
the followingsafety precautionsshouldbe observed:
1.
Be sure your applianceis properlyinstalledand groundedby a
qualifiedtechnician.
2. Never use your appliancefor warmingor heatingthe room. This
warningis based on safety considerations.
3. Children should not be left alone or unattendedin area where
applianceis in use. They shouldnever be allowedto sit or stand
on any part of the appliance.
4. Wear properapparel. Loose-fitting or hanging garments should
never be wornwhile usingthe appliance.
5. Do notrepairorreplaceanypartof the applianceunlessspecifically
recommendedin this manual. All other servicing should be
referredto an authorizedJenn-AirServiceContractor.
6. Do not store combustiblematerials,gasolineor other flammable
vaporsand liquidnearcooktop.Thisalsoappliestoaerosolsprays
and aerosolspray cans.
7. Do notusewater on greasefires. Smotherfire orflame or usedry
chemicalor foam-type extinguisher.
8. Useonlydry potholders.Moistordamppotholderson hotsurfaces
may resultin burnsfrom steam. Do notuse a towelorother bulky
cloth.
9. Select cookwarelargeenoughto properlycontainfood and avoid
boiloversor spillovers. This will save on cleaningand prevent
hazardous accumulationsof food, since heavy splattering or
spilloversleft on a cooktop can ignite. Pan size is especially
importantin deep fat frying.
10. Never leave rangetop unattended at Hi heat settings. Boilover
causessmokingand greasy spilloversthat may ignite.
11. TYPE OF COOKWARE - Avoidpans that are unstableand easily
tipped. In choosingpans, lookfor easily-graspedhandlesthatwill
stay cool. Pansthat are too heavy whenfilled withfood can also
be a hazard. If pan handlestwistand cannotbe tightened,discard
the pan.
5
12. HANDLES - Always turn pan handles to the side or back of the
rangetop - not out into the room where they are easily hit.
COOKWARE HANDLES SHOULD BE TURNED INWARD AND
NOT EXTEND OVER ADJACENT SURFACE BURNERS to
minimize burns, ignition of flammable materials, and spillage due
to unintentional contact with the cookware.
13. CAUTION - Do not store items of-interest to children in cabinets
above range - children climbing on the range to reach items could
be seriously injured.
14. Do not touch grill and surface burner areas, or perimeter trim
around rangetop or interior surfaces of oven. During and after use,
these areas may be hot enough to cause burns. Avoid contact with
these areas by clothing or other flammable materials until they
have had sufficient time to cool. Other surfaces may become hot
enough to cause burns - among these surfaces are the upper door
frame and door, oven vent opening and surfaces nearthe opening,
and the top edge of the control panel.
15. Do not heat unopened food containers. Buildup of pressure may
cause container to burst and result in injury.
16. Keep all controls "Off" when unit is not in use.
17. Keep oven vent ducts unobstructed. The oven isvented under the
air grille,
18. GREASE - Grease is flammable and should be handled carefully.
Never leave any cooking operation unattended. Let fat cool before
attempting to handle it. Do not allow grease to collect around the
rangetop or in the vents. Wipe up spillovers immediately.
19. If the range is installed near a window, proper precautions should
be taken to prevent curtains from blowing over burners creating a
FIRE HAZARD.
20. Do not use aluminum foil to line aeration tray or burner basin.
Restriction of normal air flow may result in unsafe operation.
21. Do not use cookware on the grill section of this appliance.
22. Before servicing your appliance, disconnect power to the range at
the mainfuse or circuit breaker paneland atthe electrical receptacle.
23. Always allow hot pans to cool in a safe place out of the reach of
small children.
24. A faint gas odor may indicate a gas leak. If a gas odor is detected,
shut off the gas supply to the range. Call your installer or local gas
company to have the possible leak checked. Never use a match
or other flame to locate a gas leak,
6
25. Clean only parts listed in this manual and use procedures
recommended.
26. Flame size shouldbe adjustedso it does not extend beyondthe
edge of the cookware, this instruction is based on safety
consideration.
27. This appliance has been tested for safe performance using
conventional cookware. Do not use any devices or acoessodes
that are notspecificallyrecommendedin this manual. Do notuse
eyelid covers for the surface burners,stovetop grills or add-on
convectionsystems.The useof devicesor accessoriesthatare not
expresslyrecommendedin this manualcan create serioussafety
hazards resultin performanceproblemsand reducethe life of the
componentsof the appliance.
28. Glazed cookware - only certain types of glass, glass-ceramic,
ceramic, earthenware,or other glazed cookpotsare suitablefor
rangetopsurface withoutbreakingdue to the sudden change in
temperature. Use only such cookware as you know has been
approvedfor this purpose.
29. Avoid placingthe range in a main "trafficpath" or in an isolated
locationwithno counterspace nearby. Visualizethe oven in use
beforeselectinga location.Rememberthat openovendoorsmay
blocka passagewayand create a hazard.
30. Use care when openingoven door. Let hot air or steam escape
before removingor replacingfood.
31. Always place oven racks in desiredlocationwhile oven is cool. If
rack must be moved whileoven is hot,do notlet petholdercontact
hotheating element in oven.
32. Do not clean doorgasket. The doorgasket is essentialfor a good
seal. Care shouldbetaken nottorub,damage,ormovethe gasket.
33. Do not use oven cleaners. No commercialoven cleaneror oven
linerprotectivecoatingof anykindshouldbe usedin oraroundany
part of the oven.
34. CAUTION: BEFORE SELF-CLEANING THE OVEN, REMOVE
FOOD, BROILER PAN AND OTHER UTENSILS.
35. Listenfor fan. A fan noise should be heard duringthe broiland
cleaning cycles. If not, call a serviceman before self-cleaning
again.
36. Always remove soiled broiler pan from the broilercompartment
after cookingfor grease left in the pan may become hot enough
to ignite.
37.
38.
39.
40.
Do not use oven for storage space.
Do not allow aluminum foil to contact heating element,
WARNING: To reduce the risk of tipping the appliance, the appliance must be secured by properly installed anti-tip devices. To
check if devices are installed properly, remove the access panel
and verify that the anti-tip devices are engaged.
PREPARED FOOD WARNING: Follow food manufacturer's instructions. If a plastic frozen food container and/or its film cover
distorts, warps or is otherwise damaged during cooking, immediately discard the food and its container.
The food could be
contaminated.
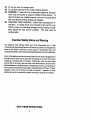
Important Safety Notice and Warning
The California Safe Drinking Water and Toxic Enforcement Act of 1986
(Proposition65) requiresthe Governor of Californiato publish alist of substances
known to the State of California to cause cancer or reproductive harm, and
requiresbusinessestowarncustomersof potentialexposurestosuchsubstances.
Usersof thisappliance are hereby warned that when the range is engaged in the
self-clean cycle, there may be some low level exposure to some of the listed
substances, including carbon monoxide. Additionally, users are also hereby
warned that the burning of gas can result in low-level exposure to some of the
listedsubstances, including benzene, formaldehyde and soot, due primarily to
the incompletecombustion of natural gasor liquidpetroleum (LP) fuels. Properly
adjusted burners will minimize incomplete combustion. Exposure to these
substances can be minimized by properly venting the range to the outdoors.
- SAVE THESE
INSTRUCTIONS
8
-
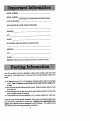
MODEL NUMBER
SERIAL NUMBER
(numbersappear on the sedal plate on the oven front frame)
DATE PURCHASED
JENN-AIR
DEALER FROM WHOM PURCHASED
ADDRESS
CITY
PHONE
AUTHORIZEDJENN-AIR
SERVICE CONTRACTOR
ADDRESS
CITY
PHONE
Impo_ant:Retainpreofofpurchasedocumen_forwarran_
sewice.
Jenn-Air's ventilation system is designed to capture both cooking fumes and smoke
while grilling. If the system does not, these are some ducting installation situations to
check:
•
6" diameter round or 3¼" x 10" rectangular ducting should be used for duct lengths
10'-60'. Note: 5" diameter round ducting must be used if the duct length is 10'
or less.
• No more than three 90 ° elbows should be used. Distance between elbows should
be at least 18".
• Recommended Jenn-Air wall cap should be used. Make sure damper moves freely
when ventilation system is operating.
• There should be a minimum clearance of 6" for cooktop installed near a side wall.
If there is not an obvious improper installation, there may be a concealed problem such
as a pinched joint, obstruction in the pipe, etc. Installation is the resoonsibilitv of the
installer and questions should be addressed first by the installer. The installer should
very carefully check the ducting installation instructions.
9
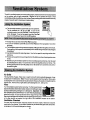
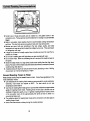
The built-inventilationsystemremovescookingvapors, odorsand smoke fromfoodsprepared
on the eooktop, grill and grill accessories. Regular use of this system will insure a more
comfortableand lesshumidkitchenwhichisfree of heavycookingodorsandfumes that normally
create a frequent need for cleaningand redecorating.
The fan positionsare: Hi, Lo, and Off. To turn on the
ventilation system,touch the Fan Pad. The fan willcome on
at the Hi speed. To set on Lo speed, touch the Fan Pad
• The
downdraft
ventilationsystem
two speed fan.
(once
from Hi setting
or twice fromfeatures
the Off aposition).
• A beep will sound every Umethe Fan Pad is touched.
• To turnthe ventilationsystem Off, touch the Fan Pad (once from Lo speed or twice from
Hispeed).
• TheventilationsystemwilloperateautomaticallyonHispeedwhenthegrillburnerisinuse.
Duringgrilling,the fan speed isautomaticallysetfortheHi settingAN D cannotbechanged
to Lo speed.
• UsetheHifanspeedforcapturingsteam.
Use Lofanspeedforcapturingsmokewhen
pan frying.
• Thefancanbeusedtoremovestrengodorsfromthekitchenaswhenchoppingonionsnear
the fan.
•
Besidesusingtheventilationsystemtoremovecookingvaporsandfumes, itcanbeused
to coolbaked pies or cakes. To cool an item, set iton the air grilleand turnon the fan. The
air being pulled over the item will quicklycool it. Becareful not to cover the oven vent or
the entire air grille.
Air Grille
The air grille lifts offeasily. Wipe clean or wash in sink with mild household detergents. It may
be cleaned in the dishwasher. Note: The oven vent is locatedunder the air grille. When using
or cleaningthe oven, hotand moistair may benoticed inthisarea. Be carefulnottospillanything
intothisvent. Remove the air grille before self-cleaning the oven. (See p. 40.)
Filter
Turn offventilationsystem beforeremoving. The filterisa permanent -typeandshouldbe cleanedwhensoiled. Clean in sinkwithwarm water
and liquiddishwashingdetergent or in dishwasher. Important: DO
NOTOPERATE SYSTEM WITHOUT FILTER. Filtershouldalwaysbe
placed at an angle. As youface the frontof the range, the top of the
filter shoutdrest against the leftside ofthe ventopeningand the bottom
of the filter should rest against the right side of the ventilation chamber at the bottom.
Ventilation Chamber
This area, whichhousesthe filter,shouldbe cleanedin the eventof spillsor wheneverit becomes
coatedwitha filmof grease.Theventilationchambermaybe cleanedwithpapertowel,damp cloth,
or spongeandmildhouseholddetergentorcleanser.
10
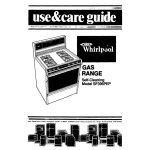
Ventilation System
Oven Vent
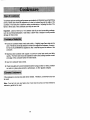
Controls
;urface
Controls
Controls
•
Use to capture smoke and steam. (See p. 10,)
•
Use to provide flexibility in setting selection when using the cooktop burners or grill
burner. (See p, 16.)
•
Use the electronic touch controls to set Clock or Oven functions. (Clock - see pp.
26-29, Oven Operation - see pp. 22-25.)
11
Your new cooktopburnershave been presetfor an "average"set of conditions.Regional
variancesin gas pressureand atmosphericconditionssuch as heightabove sea level
may affect your initialflame performance.
Whenthe controlknob isturned on, gasentem the mixertube and mixeswith air. This
air and gas mixtureflowsto the burnerhead and islightedby a sparkfromthe solidstate
igniter.
A properlyadjustedburner with clean portswill lightwithina few seconds. The coneshapedflame will be clear bluein colorwith a clearlydefinedinnercone. There should
be no trace of yellowin the flame. A yellowflame indicatesan impropermixtureof air
and gas. If yourflame does not resemblethe "correct"flame as describedabove,follow
the air shutteradjustmentinstructionsbelow.
The infinitesurface controlsfor the surface burnersand grillburner provideflexibilityin
settingselection.
Note; The grillcan be replacedwith an optionalsurface burnermodule,Model AG202.
Surface
Burners
In caseof prolongedpowerfailure,you can manuallylightthe sutraceburnerby holding
a lightedmatchnearthe burnerportsandslowlytumingthecontrolknobcounterclockwise
(after depressing)untilthe gasignites. There isno fan so smokeand condensationcan
gather.
Grill
IN CASE OF POWER FAILURE DO NOT USE GRILL. VENTILATION SYSTEM WILL
NOT OPERATE.
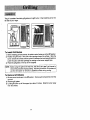
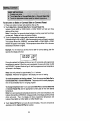
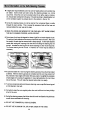
To adjust surface burner air shutter 'some models)
Loosen fastening screw with a phillips
screwdriverand rotate air shutterto increase
or decreasethesize ofthe air opening.As the
shutter is turned observe change in flame
appearance. Adjustmentissatisfactorywhen
a clearly defined,even blue flame resultsat
the Hi flame setting. After adjustment,tighten
screw.
12
SURFACEBURNER
ROTA1"EAIR
A_R
SHUTTERSHU3_ER
ON
MI)QER HEAD TO
SCREW
MAKE
AIR
"_._[_/ "_P'AInAIRSHU_R
A_opE__
CLOSE
AIROPENINGG"----_-_"_llJ TO
OPEN""
To adjust grill burner air shutters and surface burner air shutters
(some models)
The left hand air shuttercontrolsthe rear half of the grill burner, or the rear surface
burner.The righthandshuttercontrolsthe fronthalfofthe grillburneror thefrontsurface
burner.
Slide air shutter backward or forward to
increaseordecreasethesizeoftheairopening.
screwdriverblade may be requiredto make
this adjustment, Observe change in flame
appearance
Air shutters fit
assnugly
the aironshutter
the burner,
is moved.
so a
Adjustment is satisfactorywhen a clearly
defined, even blue flame results at the Hi
flame setting. The snugfit of the air shutter
assures it will remainpositionedcorrectly.
BURNER
AIRSHUTFER
__NGRILL
__E_'_
D_IVERBLADE
INSLOTAND'rWISTWITH
SLIGHT
PRESSURE TO ALLOW
AIRSHUTTERTOSLIDEEASILY.
On any burner,closingthe air shuttertoo far willcause the flame to become soft and
yellowtipped.Openingthe air shuttertoo wide will cause the flame to blowaway from
the burnerports, Proper adjustmentwill producea sharp, clearly defined even, blue
flame.
This appliancehas been shipped from the factory with Lo and Med flame settings
adjustedfor usewith naturalgas and average installations.There is a wide variety of
conditionscausedbyaltitudeand gas mixturescontrolledby utilitycompanieswhichwill
vary and affectthe gas flame and performance.Adjustmentsshouldbe made at time
of installation. If conditionschange, follow the procedures outlined below to adjust the
Lo setting.
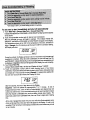
To adjust the Lo setting
1. Light burnerand set controlknob for lowflame.
2. Remove control knob from valve stem.
CAUTION: Never use a metal blade to pry
knob off. If knob cannot be easily removed
tuck the folds of a cloth dishtowelunder the
knob skirt and pull the towel forward with
steady, even pressure.
3. Insert a slender, thin-blade screwdriver into
the recessat centerof valve stemand engage
blade with slot in adjustingscrew.
4. Turn center stem adjustingscrew slightlyto
_
set flame size.Note: Turn clockwiseto reduce
or counterclockwise
to increase flame size.
5. Replacecontrolknob when adjustmentis completed.
CLCCk'W/,S_
_
TOREOUCE
_lr_
COU_RCLOC.W,SE
TO
_NCR_SE
F_ME
SIZE
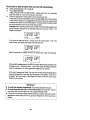
Proper adjustmentwill producea stable,steady blue flame of minimumsize. The final
adjustmentshould be checked by turning knobfrom Hi to Lo several times without
extinguishingthe flame. This adjustment,at the Lo setting,will automaticallyprovide
the proper flame size at Meal setting.
13
To achieveoptimumcookingperformanceusecookpotswithfiat bottomsand tightfitting
covers.F/ame size shou/d be adjusted so it does not extend beyond the edge of the
cookware. This instructionis based on safetyconsiderations.Adjustingthe size of the
flame to fit the size of the cookwarealso helpsto save fuel.
Important: Leave a minimumof 1½" between side of pan and surroundingsurfaces,
such as countertopbacksplashor side walls,to allowheat to escapeto avoid possible
damage to these areas.
• Numinum cookwareheats evenlyand quickly. A slightlylargerflame size can be
used.The flame canbe adjustedso itcornestothe edge ofthe cookware.However,
the flame shouldNEVER be adjustedso that it extends beyondthe bottomof the
cookware.
• Stainless steel cookwarewith copper or aluminum cores heat evenly and fairly
quickly.The flame size should be adjustedto extend onlyhalfway between center
and edge of the cookwarebottom for best results.
• Cast ironcookwareheats slowly.
• Check manufacturer'srecommendationsbeforeusingporcelainon steel, porcelain
on cast iron,glass, glass-ceramic,earthenware,or other glazed cookpots.
If the cookwareis covered,lessfuel willbe needed. Therefore,a lowerflame size can
be used.
Note; Food will not cook any faster when more than the amountof heat needed to
maintaina gentle boil is used.
14
• Sincethe controlsare a push-tumtype,they mustbe pushedin beforeturning.To
set (fromtheOff position),push in on controlknoband immediatelyturn counteroiockwiseto the Lite positionuntilburnerignites. After ignition,turn knobclock,
Mse to
desiredsetting.
• Igniterwillcontinueto sparkuntilknobisturnedclockwisebackto or pastHi position
on knob.
1.
1.
2.
3.
4.
Left rear surface burneror grill
Leftfront surface burneror grill
R{ghtrear surface burner
Rightfront surface burner
2*
S.
4,
Note; When using an AG202 surface burner
assemblywith controllocations#1 and #2, the
controlknob may be turned to a positionlower
thanthe Lo setting. (The Lo settingisset for the
grill burner.)
The controlsofferflexibilityin heat settingselection. An infinitenumber of settingsexist
between Hi and Lo. At the HI setting,a detentmaybe felt. For all settingsotherthan Hi,
simplyadjustyourflame for best results.
The sizeandtypeofcookwareandtheamountandtype offood beingcookedwill influence
the settingneeded for best resuRs.Suggestedsettingsare providedas guidelines.
HI:
A fast heatto startcookingquickly,to bringliquidsto
e boil,to preheatoilfor deep fat frying.
{Meal. High) For fast fryingor browningof foods,to maintainrap_ _'_..__
boil of large amounts of food, to maintain oll
temperaturefor deep fat frying.
Meal:
For most frying, sauteing, and slow boil of large _
amountsof food.
(Meal.Lo) For simmering,maintainingboilof smallamountsof
food.
Lo:
Maintaining serving temperature of foods, melting
butteror chocolate.
15
@
_,_-=._%_,_
The surface burnermoduleconsistsof twosurfaceburnergrates, an aerationtray and
a burnerassembly.
To Install Burner Module
1. Be sure controlknobsare turned Off.
2. If the grill burnerand grill grates are in place, remove before instarlinga surface
burnermodule.Clean burner basinof any grease accumulation.(See page 21 for
cleaning recommendations.)
3. Positiontheburnerassemblywiththemixertubeopeningstowardtheorifices.Slide
the burnerassemblytowardthe orificesuntilopeningfor igniterisover the igniter.
Lowerintoplace untilside openingsare restingon the burnersupportsand igniter
is centeredbetweenthe two flash tubes.
4. Installthe aerationtray byinsertingthe prongat the end of the pan intothe opening
in the end of the burnerbasin. Lowerthe oppositeend intothe rangetop.
Note: Beforefirst use, read the Surface BurnerOrates Care instructionsfoundon
page 46.
To Remove Burner Module
1. Control knobsshouldbe in the Off positionand the rangetopshouldbe cool.
2. Removethe aerationtray by liftingup the frontend on the rightside (backend on
the left side) untilthe top clearsthe openingof the rangetopby about5 inches.
3. Holdaerationtraybythesidesandslideawayto removethe prongfrom theopening
and clear the surface burners.
4. Liftup on the sidesof the surface burnerassemblybracket about2 inches. Slide
away from the orifices.
assembly. ModelAG202 airshuttershavebeen adjustedfor compatibilityon
the left side.
NOTE: Optionalsurfaceburnerassembly,ModelAG202,
can replacethe grillburner
NOTE: Do not disassemblethe surface burnerassembly.
16
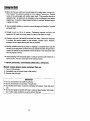
The gfiU consists of two black grill grates and a grill bumer.
left side of your range.
Only instarl the grill on the
To Install Grill Module
1. Before installing grill components, be certain control knobs are in the Off position,
2. Position the grill burner with mixer tube openings toward the orifices. Slide the
burner towards the orifices untilthe igniter is in between front and rear grill sections.
Lower into place until side openings are resting on the burner support pins.
3. Place the grill grates on the top of the rangetop.
NOTE:
remove the protective shipping coating. Heat the grill on Hi for 10 minutes and
use the vent system to remove any additional smoke during cooling.
Before using the grill for the first time, heat the E-ven Heat TM grirl burner to
To Remove Grill Module
1. Be sure control knobs are in the Off position. Remove grill components once they
are cool.
2. Remove grill grates,
3. Lift the griJJburner up off the support pins about 2 inches. Slide the burner away
from the orifices.
17
• Before the first use, wash your new grillgrates in hot soapywater, rinseand dry.
Then "season"the surface by wiping on a thin coating of cookingoil. Remove
excess oil by wipingagain with another paper towel. This procedureshouldbe
repeatedwhen: a) cleaningin the dishwashersince the detergent may remove
seasoning,or b) anytime a sugar-basedmarinade (for example, barbecue sauce)
is going to be used.
• Use nonmetallic spatulas or utensils to prevent damaging the Excalibur ® nonstick
grill grate finish.
• Preheat the grirl on Hi for 5 minutes. Preheating improves the flavor and
appearance of meats and quickly sears the meat to help retain the juices.
• Excessive amounts of fat should be trimmed from meats. Some fat is necessary
to produce the smoke needed for that smoked, "outdoor" flavor. However,
excessive fat can create cleaning and flare-up problems.
• Allowing excessive amounts of grease or drippings to constantly flame voids the
warranty on the grill grates. Excessive flare-ups indicate that either the grill interior
needs to be cleaned or that excessive amounts of fat are in the meat or the meat
was not properly trimmed.
• Grease drippings will occasionally ignite to produce harmless puffs of flame for a
second or two. This is a normal pad of the cooking process.
• NEVER LEAVE GRILL UNATTENDED DURING GRILL OPERATION.
Should excess grease cause sustained flare-up
1. Turn on FAN manually.
2. Immediately turn grill control knobs to Off position.
3. Remove meat from grill.
IMPORTANT
• Do not use aluminumfoil insidethe grillarea.
• Do not use ehamoal or woodchips in the grillarea.
• Do not allowburner basin to become overloadedwith grease. Clean after each
use.
• Do not covergrates completelywith meat. Leave air space betweeneach steak,
etc. to allowproperventilationas well as preventflare-ups.
18
19
With your Jenn-Air grill literallyany food you'veconsidered"at itsbest" when prepared
outdoorscan now be prepared indoorswith less fuss and great flavor.
The followingsuggestionsare good rulesto followand will increaseyourenjoymentof
the equipment.
• Be sure to followdirectionson page 18 for usingthe grill.
• Suggestedcookingtimes and controlsettingsare approximatedue to variations
in meats. Experiencewillquicklyindicatecookingtimesas wellas whichsettings
work best.
• For best results,buytop grade meat. Meat that isat least_ inchwillgrillbetter
than thinnercuts.
• Score fat on edges of steak, but do not cut into meat, to preventcurlingwhile
cooking.
• Forthe attractive"branded"look on steaks,be sure grillis preheated. Allowone
sideofmeattocooktodesireddoneness,or untiljuicesappearonthetop surface,
before turning. Turn steaks and hamburgersjust once. Manipulatingfood
causesloss of juices.
• When basting meats or applying sauces to foods, remember that excessive
amountswind up insideyour grill and do not improvethe food flavor. Apply
sauces duringthe last 15 to 20 minutesof cookingtime unlessrecipespecifies
otherwise. Plus, any time a sugar-basedmarinade, (for example, barbecue
sauce)is goingto be used,the gratesshouldbe "seasoned"priorto preheating.
(See p. 18.)
• There are manymeat marinadeswhichwill helptenderizeless expensivecutsof
meat for cookingon the grill.
• Certainfoods,suchas poultryand non-oilyfish,may need someextra fat. Brush
with oil or melted butter occasionallywhile grilling.
• Use tongswith long handlesor spatulasfor turningmeats. Do not use forksas
thesepiercethe meat, allowingjuices to be lost.
• To helpretainmeat juices,salt after turningmeat or after cookingis completed.
Be sure the grill is cool and controlsare Off.
Grill Grates
These are madefromcastaluminumandare coated withthe Excalibur_ nonstickfinish.
• After the grill grates have cooled, wipe off grates with a paper towel. Wash cool
grates (DO NOT IMMERSE HOT GRILL GRATES IN WATER) with soap or
detergentin hotwater inthesink orwashtheminthe dishwasher.Besureto remove
all food residuebeforecookingon the grillgrates again.
• Removestubbornspotswith a plasticmeshpuff or pad. For best results,use only
thosecleaningproductswhichstatetheyare recommendedfor usewhencleaning
nonstick surfaces.
• If gratesare washed inthe dishwasher,seasonwith oil prior to grilling. (See p. 18.)
• Do not use metal brushes or abrasive scouring pads or other scrubbers intended
to clean outdoor charcoal grills. These willremovethe finish as well as scratchthe
grates.Do not clean in the self-cleaning oven or use oven cleaners on the grates.
20
Grill Burner
Follow instructions on page 17 for removing the grin burner. The ,grill bumer should be
cleaned after each use. it can be cleaned with a soapy S.O.S. pad or in the dishwasher.
Rinse and dry thoroughly before using again. For heavy soil, burner should be cleaned
first with a soapy S.O.S. pad, rinsed and dried. Then it can be cleaned in a self-clean
oven for 2 hours.
NOTE:
J
toothpick
each port.
Check to directly
be sure into
all burner
ports are open. To open clogged ports, insert a ]
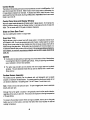
Porcelain Burner Basin
This area located under the grill and surface burners. Clean after each use of the grill.
• To remove light soil, clean with soapy water or with cleansers such as Fantastik or 409.
For easier cleanup: a) spray with a household cleanser; b) cover with paper towels;
c) add small amount of water to keep the paper towels moist; d) cover and wait 15
minutes; and e) wipe clean.
• To remove moderate soit, scrub with Comet, Bon Ami, a soft scrub cleanser or plastic
scrubber.
• To remove stubborn soil, spray with an oven cleaner, let soak overnight, wipe clean,
rinse and dry.
Note: Clean the grease drain after each use. To clean: Pour about _/3cup of very hottap
water mixed with t teaspoon dish detergent down the drain. In the event the drain is clogged,
due to large food particles being trapped, use the nylon string that was packaged with your
range. To use the nylon string, simply insert one end into the drain opening in the basin pan.
Feed the nylon string down until it is visible under the range. Now pull up on the end extending
out from the top while holding e paper towel around the string, to clean the string as it isbeing
pulled. This should free any trapped particles of food. Pour another V3cup of very hot water
mixed with dish detergent to assure the drain is opened and clear.
Grease Container
The container is located on the left side behind the bottom access panel, underneath the
range. (See page 48 for opening access paneL) It collects grease and other liquids created
while grillingor usingsome ofthe accessories. Check eachtime after grillingand emptywhen
grease isnoticeable. To remove, simply grasp the handle, and pull from the bracket holding
the container.
over. If this should happen, the grease witl flow over the
container and onto the floor. The container and screw-on
handle can be washed in hot, soapy water or inthe dishwasher.
The container can be replaced with any heat tempered jar,
such as a canning jar, which has a standard screw neck.
.Checkthent,,inerper,od,,,ytopreventoreasetrom
21
The control panel is designed for ease in programming. The Display Window features
Indicator Words which will flash to prompt you for the next step.
To program
1, Touch the function pad to give command desired.
2. Touch the appropriate number pads to enter time or temperature.
Note: Five seconds after entering the number, the time or temperature will
automatically be entered. If more than five seconds elapse between touching a
function pad and touching a number pad, the control isnot set and Display will return
to previous Display ........
JEN.,,-_,R
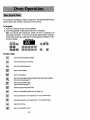
Oven Controls
I_¢h_ Tir_
Function Pads
Usefor conventionalbakingor roasting,
Usefortopbrowningor ovenbroiling,
Useto setself-cleaningprocess,
Useforconvectroasting.
Useforconveclbaking.
Useforclockcontrolledcookingandcleaningwhendelayedstartisdesired.
(Forlockfunctionseepage 47.)
Usefor clockcontrolledcooking.
(Forlockfunctionseepage 47.)
;i;_
CancelsallprogrammingexceptTimer.
Useto turnthe VentilationSystemon or off. (See p. 10.)
Useto signalexpirationof a time periodupto 11 hoursand55 minutes.
Use to signalexpirationof a time periodup to 11 hoursand55 minutes.
Useto settime of day.
_;
Use to turn ovenlighton and off.
22
Number Pads
Use to set time or temperature.
Oven Light Pad (Control Panel)
The oven lightautomatically comeson whenever the ovendooris opened. When doorisclosed,
touch the Oven Light Pad toturn oven light on or off. Note: A beep will sound every time the
Oven Light Pad istouched.
Display Window
Display Numbers:
• Show time of day.
• Countdown of time ramainingwhen usingtime functions.
• Show temperature of oven as it rises to reach programmed temperature and the set
temperature once it is reached.
• Recallpmogrammedtemberature or time when commanded.
• Roundingof DisplayNumbers: Temperature range is 100° to 550°F and can be set in 5°
increments. When settingtemperature, the controlwill round it to the nearest 10°, For
example, if 237° is entered, the controlwill round the temperature to 240°.
Prompts:
• Serve as a reminder to shut oven door, if it is open, for self-cleaningoperation when the
word, door, is displayed.
• "Err" will appear in the Display when an impropertemperature or time has been entered.
"Err" witl flash and a beep wittbe heard three times. Then, the Dispfaywill return to the
previousDisplay before the errorwas entered.
indicator Words:
• Flash to promptnext step.
s Indicate statusof programmed function.
• Show programmedfunctionwhen recelled.
Chimes vs. Beeps
• A chime sound is used to designate the end of a timing or cookingoperation.
• A beep sound willbe heard when any pad is touched. A series of short beeps are used to
designatean incorrect entry, door is open when set for a self-clean and a fault code.
End of Cycle Chimes:
• The end of cycle chimes is four shortchimes followed by"reminder" chimes for a specified
length of time, until you cancel that function. For the Timer function, there are two
"reminder" chimes every thirty seconds for five minutes. For the Timed Cook functions,
there isone "reminder" chime every minute for ten minutes. To cancel these "reminder"
chimes, touchthe appropriate pad again (the Timer Pad or CookTime Pad). You may
also touch the Cancel Off Pad to cancel the "reminder" chimes, but it will also cancel all
other oven functions.
s If you would like tO eliminat_ the "reminder" chimes entirely, touch and hold the
Cancel Off Pad for twelve seconds (this willnot eliminate the initial four short chimes).
• To r?tum the "reminder" chimes, touch andhold the Cancel Off Pad fortwelve seconds.
NOTE: T:chn-a;gr
e_hrVei_:ecn_tn_t_2c4t¢hr_urc_akt_C_si_s
(C) degrees_c_ntacty_ra_th_dzed j
23
To set oven on Bake or Convect Bake or Convect Roast
1. Place oven racks on proper rack positions.(See p. 25.)
2. Touch Bake Pad or Convect Bake Pad or Convect Roast Pad.
IndicatorWords BAKE or CONV BAKE or CONV ROAST will flash and three
dashes willbe shown.
Note: If more than five seconds elapse betweentouchinga pad and touchinga
numberpad, Displaywill returnto previousDisplay.
3. Touch the appropriatenumber pads for desired oven temperature.
(Allowablerangeis 100°to 550°F). Afterfivesecondstheovenwill beginto preheat.
The IndicatorWords ON, PREHEAT, and either BAKEor CONV BAKE or CONV
ROASTwillappearinthe Display.The temperatureshownwillbe 100° or the oven
temperaturewhicheveris higher.
Example: If at 10 o'clockyou set the oven for 350° for convectbaking, after five
secondsthe Displaywillshow:
Duringthe preheat,the Displaywillshowa rise in 5° incrementsuntilprogrammed
temperatureis reached. When the oven is preheated,the oven willchime, the ON
and PREHEAT IndicatorWordswill go off, and the programmedoventemperature
will remainin the Display.
Note: Oven will preheat for approximately7 to 11 minutes.
Important: Whenever ON appears in the Display,the oven is heating.
To recall temperature set during preheat: Touch the appropriateBake Pad or
Convect Bake Pad or Convect Roast Pad. Temperaturewill bebrieflydisplayed,
then will automaticallyreturnto on-goingprogram.
To change temperature set: Touch appropriateBake Pad or Convect Bake Pad
or Convect Roast Pad and the appropriatenumber pads for the new desired
temperature,
Note: If you are loweringthe temperaturebelowthe currentoventemperature,the
IndicatorWordsON and PREHEAT willappearbrieflyintheDisplayandthe preheat
chime will sound. Then, the Display will show programmedtemperature and
IndicatorWord BAKE or CONV BAKEor CONV ROAST only.
4. Touch Cancel Off Pad to turn oven off at end of baking, The oven will continue
operatinguntilthe Cancel Off Pad is touched,
24
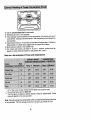
The rackpositionsnotedare generallyrecommendedfor the best browningresultsand
mostefficientcookingtimes. For many food items,excellentresultscan be achieved
when using one ofsevera/ different rack positions. Referto bakingend roastingsections
for recommendationsfor specificfoods.
Different
,
Racks
Two flat racksand one offsetrackare packagedwithyour oven. The use of the offset
rack is denotedin the listbelow and the chartsas an "o" after the rack number,
4 (flat rack)
30 (offset rack)
1 (flat rack)
Rack Uses
Reck Position #40 (offset reck on #4):
Most broiling.
Rack Position #3:
Most baked goods on cookiesheets, cakes (sheet and layer).
Rack Position #3o (offset rack on #3):
Most baked goods on cookiesheets, frozen conveniencefoods, fresh fruit pie,
cream pie, layer cakes, main dish souffle.
Rack Position #2:
Roastingsmallcuts of meat,cakes (tube, bundtor layer),frozen fruitpie, pie shell,
large casseroles,
Reck Position #2o (offset rack on #2):
Roastingsmall cutsof meat, loaves of bread, angel foodcake.
Reck Position #1:
Large cuts of meat and large poultry, angel foodcake, loaves of bread, custard pie,
desseK souffle.
Multiple Rack Cooking:
Two racks, use #2o and #4. Three racks, use #1, #3o, and #4.
25
When electrical power is supplied or after power interruption, the last clock time
displayedbefore powerwas interruptedwill flash. Time wLIIadvance and continueto
flash untilclockis reset.
To set Time of Day
1. Touch Clock Pad.
IndicatorwordTIME will flashand time digitswillappearinthe Display. (If morethan
five secondselapsebetween touchingClock Pad and touchinga numberpad,the
Clock Pad mustbe touchedagain in order to set clock.)
2. Touchtheapproprfatenumberpadsuntilcorrect_meofdayappearsintheDisplay.
Note: Fivesecondsaftertouch)ngthenumberpads,thetimeof daywil)automatica/Iv
be entered.
IMPORTANT
• To recall time of claywhen another time function is showing: Touch Clock
Pad,
• To change time of day set on the clock: Repeat steps 1 and 2 above.
• Clocktimecannot bechangedwhen ovenhas been programmedfor Timed Bake,
Timed ConvectBake,Timed ConvectRoastor Self-clean. Cancelprogrambefore
reprogramrnlngclock.
26
Important: This interval Timer can be used to remind you when a period, up to 11 hours
and 55 minutes, expires. It can be used independently of any other oven activity and
can be set while another oven function is operating. The Timer does not control the oven.
To set Timer
1. Touch a Timer Pad,
The Indicator Word TIMER and either 1 or 2 flashes and "0Hr:00" appears in the
Display.
2. Touch the appropriate number pads until the desired number of minutes or hours
and minutes appear in the Display.
Note: If more than five seconds elapse between touching a Timer Pad and a
number pad, the Timer Pad must be touched again.
Example: To set Timer One for 5 minutes, touch the Timer One Pad and the
number pad "5". After five seconds, the Display will show:
:05
Example: To set Timer Two for 1 hour and 30 minutes, touch the Timer Two Pad
and the number pads "1, 3, 0". After five seconds, the Display will show:
1:90
Countdown will star[ after five seconds. Countdown will have display precedence
over other time functions. If both timers are set, the timer with the least amount of
time remaining will have display precedence.
At the end of time set, the Timer will chime four times and "End" will appear in the
Display. If the Timer is not cancelled (see below), "End" will remain in the Display
and there will be two chimes every thirty seconds for five minutes.
To cancel Timer
1. Touch and hold the Timer Pad for four seconds.
OR
2. A. Touch the Timer Pad
B. Touch "0" number pad. Five seconds later the Timer will be cancelled.
NOTE:
Touching Cancel Off Pad to cancel chimes will cancel ALL selected oven /
programming.
J
27
_
_m_
_T!_......................
*Omitsteps5 & 6 ifyouwant bakingtostart
immediately.
To set oven to start immediately and shut off automatically
1. Touch Bake Pad or Convect Bake Pad or Convect Roast Pad.
indicatorWordsBAKEorCONV BAKEor CONV ROASTwillflashandthree dashes
will be shown.
2. Touch the appropriatenumberpads for desired oven temperature.
After five secondsthe oven will begin to preheat. The IndicatorWords ON,
PREHEAT,and BAKEorCONV BAKE or CONV ROASTwillappearinthe Display,
The temperatureshownwill be 100° or the temperatureof the oven, whicheveris
higher. Example: If at 10 o'clockyou set the ovenfor 350° for convectionbaking,
the Displaywillshow:
I0:00
Duringthe preheat,the Display will show a rise in 5° incrementsuntil programmed
temperatureis reached. Whenthe oven is preheated,the oven will beep, the ON
and PREHEAT IndicatorWordswill go off, and pmgremmed oventemperaturewitl
bedisplayed.Important: WheneverON appearsinthe Display,theoven isheating.
3. Touch Cook Time Pad.
IndicatorWords COOK TIME willflash and Displaywill show "0 HR:00".
4. Touch the appropriate number pads to enter cooking hours in five minute
increments.Hours areto leftof colonandminutesto rightof solon.(Allowablerange
is 5 minutes to 11 hours and 55 minutes.) Example: If cookingtime selectedfor
the oven is 2 hoursand 30 minutes,the Displaywill show:
After five seconds,the time of day returnsto the Display.
Important: Oven will preheat for approximately7 to 11 minutes. At end of
programmedCook Time, oven will shut off automatically and retained heat will
continueto cookthefood, Clockcontrolledcookingis notrecommendedfor baked
items that requirea preheatedoven, such as cakes, cookies, pies, breads. For
these foods,placefood in preheatedoven,then useTimer to signalend of baking
time.
At the end of programmedCook Time, the oven will shut off automaticallyand a
chime will be heardfour times and "End" will appearin the Display. If oven is not
cancelled,"End"will remainin the Display andthere witlbe one chimeeveryminute
for ten minutes,
28
To set oven to start at future time and shut off automatical|y
1.4, FollowprecedingSteps 1-4 on page 28,
5. Touch Stop Time Pad,
Indicator Words STOP and T_MEwill flash. Display will show the calculated
stop time based on current time of day and cook time.
6. Touch the appropriate number pads to enter desired stop time.
A stop time can only be accepted for later inthe day. Note: Since food continues
to cook if left in the oven, it is suggested that the clock controlsbe used primarily
to start the oven when no one is inthe kitchen. Provisions should be made to have
the food removed as soon as the chime has sounded.
Example: If at 10 o'clock you set the oven for 350° convection baking and 2 hours
and 30 minutes cooking time, the calculated stop time would be "12:30". The
Displaywould show:
_oP_
If you want the stop time to be 1 o'clock, touch the number pads "1,0,0". Five
seconds later, the Display will briefly show the start time:
1g:3o o°]
After five seconds, the Display will return to current time of day, thus showing:
I 0:00
0lair
o°
At the end of the delayed period, the DELAY Indicator Word will go off and the oven
will begin to heat. 100° will be shown. As the oven heats, the Display will show
a rise in increments of 5° until programmed temperature is reached.
At the end of programmed Cook Time, the oven will shut off automatically and a
chime will be heard four times and "End" will appear in the Display. If oven is not
cancelled, "End" will remain in the Display and there will be one chime every
minutefor ten minutes.
IMPORTANT
• TO recall time function programmed: Touch the appropriatetime pad,
• To cancel timed function only: HoldCook Time Pad forfour seconds. This will
only cancel cook time and stop time, not programmedbake mode,
• If more than five secondselapse betweentouchinga function pad and touching
appropriatenumberpads,the oven is O_tset and Displaywill returnto previous
Display.
29
• When cookingfoods for the first time in your new oven, use recipe cookingtimes
and temperatures as a guide.
• Use tested recipes from reliable sources.
• Preheat the oven only when necessary. For baked foods that rise and for richer
browning, a preheated oven is better. Casseroles can be started in a cold oven.
Preheatingtakes from 7 to 11 mfnutes; place food in oven after PREHEAT Indicator
Word cycles off.
• Arrange oven racks before turning on oven. Follow suggested rack positions on
pages 25 and 31.
• Allowabout 1 to 1Y_inches of space between the ovenside walls and pans to alJow
proper air circulation.
• When baking foods in more than one pan, place them on opposite corners of the
rack. Stagger pans when baking on two racks so that one pan does not shield
another unless shielding is intended. (See above left,)
• To conserve energy, avoid frequent or prolonged door openings. At the end of
cooking, turn oven off before removing food.
• Always test for doneness (fingertip,toothpick, sides pulling away from pan). Do not
rely on time or brownness as only indicators.
• Use good quality baking pans and the size recommended in the recipe.
• Dull,dark, enameledor glass panswill generallyproduce a brown, crisp crust. Shiny
metal pans produce a light, golden crust.
• Frozen pies in shiny aluminum pans should be baked on a cookie sheet on rack 2
or be removed to a dull or g_asspan.
• If edge of pie crustbrowns too quickly, fold a strip of foil around rim of crust, covering
edge. (See above right.)
3O
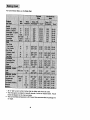
For ConventionalBake use the Bake Pad.
=
_E
=.....
_ _J
.........
...........
; 'r|
42_
icooKSS;,
........ .......
!:
.............
_;i
_1__'_
425
* An "o" after a rack number impliesthat the offset rack should be used.
** The times givenare based on specificbrandsof mixes or recipestested. Actual
times wi_tdepend on the ones you bake.
*** The ConvectBaketemperatureis 25°F lower than recommendedon packagemix
or recipe.
31
• Use convectionbakingfor breads, cakes, cookies and pies.
• As a general rule, when using recipes or prepared mixes developed for a
conventional bake oven, set the oven temperature 25°F lower than the recipe
recommendedtemperature. Times will be similarto or a few minutesless than
recipereoommendedtimes.The chertonpage31 comparestimesandtemperaturas
of many baked foods. Use this as a reference.
• For better browning,place cookie sheets and baking pans lengthwise,side to side
on the rack.
• Cookie sheetsshouldbe withoutsidesand made of shinyaluminum. The bestsize
to use for cookiesheets is 16" x 12" or smaller.
32
Forbestresults, bake foodson one rackat a time as descdbedinthis manual. However,
very good results can be obtained when baking quantities of foods on multiple racks.
Quantity cooking provides both time and energy savings.
Convect Bake is suggested for most multiple rack cooking, especially three rack
cooking, because the oJroulatingheated air results in more even browning. For two rack
cooking,the conventionalbake oven provides very goodbaking results especiallywhen
pans can be staggered, such as with (ayer cakes and fresh pies.
Many foods can be prepared on three racks at the same time. These are just a few
examples: ¢ookies, cupcakes, roils, biscuits, muffins, pies, pizzas, appetizers, and
snack foods.
To obtain the best results in multiple rack cooking, follow these suggestions;
• Use temperature and times in this manual as a guide for best results.
• For two rack baking, rack positions #20 and 4 are best for most baked productsbut
positions #2 and 4 also provide acceptable results.
• For three rack baking use positions#1, 30 and 4. One exception is pizza. (See p.
37.)
• Sincefoods on positions#1 and4willusuallybedonebeforefoodsonpasition#3o,
additional ooeking time will be needed for browning foods on the middle rack. An
additional minute is needed for thin foods such as cookies. For foods such as
biscuits,rolls, or muffins, allow 1 to 2 more minutes. Frozen pies and pizzas, which
should be baked on a cookie sheet, need about 2 to 4 more minutes.
• Stagger small pans, such as layer cake pans, in the oven.
• Frozenpies in shiny aluminum pans shouSdbe placed on cookie sheets and baked
on rack positions #1, 3o and 4.
• Cookie sheets should be placed lengthwise, side to side, in front of the fan for more
even browning.
• Oven meats are recommended for energy conservation. Use rack positions #1 and
30 or #20 and 4 and Convect Roast.
33
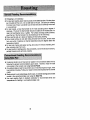
• Preheating is not necessary.
• For openpan roasting,place meat or poultryon the slottedportionof the two-piece
pan includedwith the oven. Do not add waterto the pan. Use open pan roasting
fortendercutsof meat. Lesstender cutsof meat need to be cookedby moistheat
in a coveredpan.
• For best results, a meat thermometer is the most accurate guide to degree of
doneneas. The tip of the thermometershould be located in the thickestpart of a
roast, not touchingfat, bone, or gristle. For turkeys and large poultry products,
insertthe tip of the thermometerintothe thickestpart of the inner thigh.
• Place roastfat side up to allow self bastingof meat during masting.
• Since meats continueto cook after being removedfrom the oven, remove roast
from oven when it reaches an internal temperature about 5 degrees below the
temperature desired.
• For less lossof juicesand easier carving,allowabout 15 minutes"standingtime"
after removingmeat from oven.
• Forbestresultsin roastingpoultry,thawcompletely.Dueto the structureofpoultry,
partiallythawed poultry willcook unevenly.
• If preferred, tender cuts of meat can be roasted in the conventionalbake oven by
following the general recommendations given above. However, meats will roast
more quickly in the convect oven using Convert Roast.
• Conventional bake is best for less tender cuts of meat that require a longer, moist
heat method of cooking. Follow your recipe for times and temperatures for covered
meats.
• Meatscookedinovencookingbags, dutchovens, orcoveredroastingpansarebest
cooked in the conventional bake oven using the Bake Pad.
• Use meat roasting charts in standard cookbooks for recommended times and
temperatures for roasting in a conventional bake oven.
34
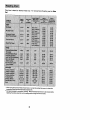
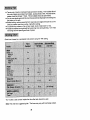
Chart time is based on thawed meats only. For ConventionalRoasting use the Bake
Pad.
ii_il
1
:4
i
_N
e
N_
......
.......
r?g_,:;
°
* WhenusingtheConvectRoastmode,thereisnoneedtopreheattheovenortolowerthe
temperature
fromconventional
roasttemperatures.
** Notrecommended
forconvection
cooking.Mostprecooked
hamshavetobecoveredwhile
roasting,
thustherewouldbenotimesavingswhenusingtheconvectmode.
35
• Tender cuts of meat and poultry can be roasted to a rich golden brown in the
convection oven, Follow general recommendations for roasting and use Convect
Roast.
• Refer to convection meat roasting chart for recommended cooking temperature
and time. The chart can serve as a guide to help plan meal serving time.
• Minutes per pound will vary according to the size, shape, quality, and initial
temperature of meat as well as the electrical voltage in your area. Times are based
on refrigerator cold meat.
• A large cut of meat will usually require fewer minutes per pound to roast than a
smaller cut of meat.
• Do not use a roasting pan with high sides; use pan provided with oven.
• Do not cover meat. Allow the cLrculatinghot air to surround the meat and seal in
the juices.
• Since the breast meat on a large turkey cooks more quickly than the thigh area,
place a "foil cap" over the breast area after desired brownness is reachedto prevent
overbrowning. (See above.)
• A stuffed turkey will require an extra 30 to 60 minutes, depending on size, Stuffing
should reach an internal temperature of 165°F.
Convect Roasting: Frozen to Finish
Meats (except poultry) may be roastedfrozen to finish. Follow these guidelinesfor the
most satisfactory results.
• Use temperatures for roasting fresh meats as recommended by most cookbooks.
Generally, most meats are roasted at 325°F. For best results do not use
temperatures below 300°F.
• Use times for roasting fresh meats given in your favorite cookbooks as approximate
guides for roasting frozen meats. Roasting times will vary due to factors such as
coldness of meat, size, quality, or cut. In general, roasting times for frozen to finish
in the convection oven will be approximately the same as fresh to finish in a
conventional bake oven.
• The guidelines given for roasting fresh meats in the convection oven also apply to
roasting frozen meats.
• Insert meat thermometer midway during the cooking process.
36
i
• Use the Convect Roast Pad for best results.
• Preheating the oven is not necessary.
• Followpackage recommendationsfor oven temperature, foil coveringand use of
cookiesheets. Cooking timeswill be similar, See chartbelowfor someexceptions
and examples.
• Centerfoodsin the oven. If morethan one fooditemis beingcooked or if foodsare
being cookedon multipleracks, staggerfoods for proper air circulation.
• Mostfoods are cookedon rack position#3o.
• For muffiple rack cooking, use racks #1, 3o and 4. However, pizzas should be
placedon cookiesheets and baked on rack position#2o, 3 and 4.
Here are a few examples of times and temperatures
....... 9' _ ,KVE_
_._'_ =t_
i_
'_
N!/
'_i
)
....
...................
....
,s,,_
_J7_¢*
_
_0_ _i__
_
_!_:_
_
...."
.......................
......
_!
O=........;
........
.......
_
i!
_........
.........
,,=
t
....
=
, ,,x,
* An "o" after a rack numberimplies that the offsetrack shouldbe used.
** Conventionalbake uses the Bake Pad.
*** The times givenare based on specificbrands of mixes or recipestested. Actual
times will depend on the ones you bake.
Note" Convectroastingtimes willbe similartothe conventionaltimes becausethe oven
is notpreheated. The time savingscomesfrom not havingto preheatthe oven.
37
1. Place oven rack on the rack position suggestedin the chart on page 39.
Distancefrom broilingelement dependson foodsbeing prepared. Rack position
4o (offsetrackin position#4) is usuallyrecommendedunless otherwisestated.
2. Touch Broil Pad.
IndicatorWord BROIL will flash and Display will show three dashes.
Note; If more than five seconds elapses between touching Broil Pad and
touching a number pad, the oven is not set and Display will return to previous
Display.
3. Touch the appropriate number pad(s).
The first number pad touched will enter "HI" in the Display.
The oven has a variable broil feature which means that a lower temperature can be
selected. After"HI" appears inthe Display,touchthe appropriatenumber padsfor
the desiredtemperature. Temperaturecan be entered in 5° increments. Use "HI"
broilfor mostbroiloperations, Use variablebroilfor delicateand long-termitems.
Five secondsafter entering"HI" or foursecondsafter enteringa temperature,the
broilelementwill come on and the IndicatorWords BROIL and ON will remainin
the Display. If the variable broil feature was selected,the IndicatorWord ON will
cycle with the element,
Example: If at 4 o'clockyou set the oven for broil("HI"), the Displaywill show:
]L/ :00 H. L=
4. Place food on broiler pan provided with oven, Broil element will preheat in 5
minutes. After broil element is red, place food in oven. Oven door MUST be left
open at broilstop I_osition.
S. Touch Cancel Off Pad to turn off oven when food is cooked.
will cycle on and off. If the fan does not operate, contact you r authorized JennAirfan
Service
for BROIL
repair. cycle. If it does not, the oven broil element
NOTE; A
comesContractor
on during the
38
•
•
•
•
•
Tender cuts of meat or marinated meats are best for broiling. This includes rib and
loin cuts of steak, ground beef, ham steaks, poultry pieces or fish. For best results,
steaks should be at least 1" thick. Thinner steaks should be pan-broiled.
Do not cover broiler grid with foil since this prevents fat drippings from draining into
the bottom of the pan.
Before broiling, remove excess fat from meat and score edges of fat (do not cut into
meat) to prevent meat from curling. Salt after cooking.
To prevent dry surface on fish or lean meats, brush melted butter on top.
Foods that require turning should be turned only once during broiling. Turn meat
with tongs to avoid piercing and loss of juices.
Chart time is based on a preheated broil element using the "HI" setting.
*An "o" after a rack number implies that the offset rack should be used.
Note: This chart is a suggested guide,
The times may vary with food being cooked.
39
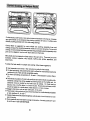
When the oven controls are set to CLEAN, the oven heats to temperatures that are
higher than those used for cooking. The hightemperaturescause food soilto burnoff
and substantlaUydisappear. While this occurs, a device (n the oven vent helps to
consumenormalamountsof smoke. The oven isventedthroughan openingunder the
air grille.
• Removethe broilerpanand any otherutensilsfromtheoven. These utensilscannot
withstandthe high temperaturesof the cleaning process.
• Cleanspattersand spillsfrom thoseareas whichwill notbe cteanadduringthe selfcleaning process:
- center front of oven and door near opening in door gasket.
- pomelain oven door liner (area outside the door gasket).
Note: DO NOT CLEAN serial plate located on the
oven front.
To clean these areas, use hot water and detergent,
nonabrasivecleansers or soap fiUedsteel woolpads.
-
amountof water that would dampen the door gasket.
Soil left in these areas will be more difficult to remove
Rinsethoroughly,
beingcarefulnottousean
excessive
after
the serf-cleaningprocess
since the h/gh
heat will "__
bake on any soil that is present. DO NOT USE COMMERCIAL OVEN CLEANERS
TO CLEAN THESE AREAS.
• DO NOT ATTEMPT TO CLEAN, RUB, OR APPLYWATER TO GASKETON OVEN
DOOR. The gasket is essential for a good door seal. Rubbingor cleaning will
damage the gasket and may affect the seal.
• Wipe up excess grease and food spi#loverswhich have not baked on the bottom of
the oven. Largeaccumulationsof soil can cause heavy smoke or fire in the oven
duringthecleaningprocess.For ease of cleaning,the heatingelementcanbe lifted
slightly.
• Although smoke or fire in the oven is a normal occurrenceand there is no safety
problem,there will beventing of excessivesmokeand odor. Smokeand odorcan
be removedfrom the kitchenby turning on the ventilationsystem.
• Remove the air grille before self-cleaning. Since the oven vent is locatedjust
beneaththe air grille, sootfrom the vent coulddiscolorwhite colored air grilles.
40
• The oven racks can be cleaned in the oven. However, the oven rackswilldiscolor,
lose shininess, and become difficult to slide in and out if left in the oven dudng the
cleaning process. REMOVE RACKS FROM OVEN IF THIS DISCOLORATION
WILL BE OBJECTIONABLE. As a suggestion, do not leave the racks in the oven
duringeach self-cleaningprocessifthey do not need to be cleaned sincetheywill
discolorto a dull sliver after the first cleaning, Moderatelysoiled recks can be
cleaned witha soapy S.O.S. pad or Scotch-Bdtescourpad. Stubbornstainsneed
to be removedin the self-cleaningprocesS. Be sure to read special tips on page
44 if oven recksare cleaned duringthe self-cleaningprocess.
*Omit steps 4 & 5 if you wish cleaningto begin immediately.
To set oven to start cleaning immediately
1. Close the oven door.
2. Touch Clean Pad.
IndicatorWords CLEAN TIME will flash and Display will show "HR
:
".
3. Touch the appropriatenumber pad(s).
The firstnumberpad touchedwill enter "3:00" in the Displayfor an average soiled
oven. The cleaningtime can be varieddependingonthe amountof soil. Set "2:00"
for lightsoil or "4:00" for heavy soil.
Note: if more than five seconds elapse between touchingthe Clean Pad and
touchinga numberpad, the ovenis n._qt
set and time of day willautomatioaUyreturn
to the Display.
Example: If at 9 o'clockyouselectedtoself-cleanyourovenfor 3 hours,the Display
wiltshow:
3
Five secondsafter entering"3:00" or a differenttime, the oven door will startto
automatically]archand the cooling fan willcome on. The LOCK IndicatorWord will
come on when the door is latched.
Note: If ovendoorwas leftopen,the word"door"willflashinthe Displayandasignal
willcontinuouslybeep untilthe door is closedand the Clean Pad is touched.
The IndicatorWordON comeson whenthe door is latchedand will remainuntilthe
clean temperatureis reached. The Indicator Word ON will cycle with the elements
to maintain the clean temperature.
41
Whenthe clean functionhasbeen completed,the IndicatorWordsCLEAN and ON
willgo off. The IndicatorWordLOCKand thecoolingfan willremainon untiltheoven
has cooled downand the door has unlocked.
To set oven to start cleaning at a later time
1-3. Follow Steps 1-3 in previoussectionon page 41.
4. Touch Stop Time Pad.
IndicatorWords STOP TIME willflash inthe Display. The IndicatorWord CLEAN
and the calculatedstop time willalso appear in Display.
5. Touch the appropriatenumber pads to enter stoptime.
A stop timecan onlybe acceptedfor later inthe day. If an unacceptablestoptime
isentered,"Err"willflashbrieflyinthe Displayandthen Displaywill returnto previous
acceptableStop Time.
Example; If at 9 o'clockyou set the oven to clean for three hours,the calculated
stop time wouldbe "12:00". The Displaywould show:
!z;oo
If you want the stop time to be 1 o'clock,touchthe number pads "1,0,0". Five
secondslater, the Display wouldshow starttime:
I0:00
_AAT
11E
eLFiN
After five seconds, the Display will returnto current time of day, thus showing:
9:00
_P=O
CtE_
The LOCK Indicator Word will come on and the coolingfan will go off as soon as
the oven door has latched.
When the ovenbeginstoclean, the IndicatorWordON andthecoolingfan willcome
on and the IndicatorWord DELAY will go off.
When the cleantime hasbeen completed,the IndicatorWordsCLEAN and ON will
go off. The IndicatorWord LOCK and the coolingfan will remainon untilthe oven
has cooled downand the door has unlocked.
42
To cancel self-clean
• Touch Cancel Off Pad.
• The ovendoorwillbe lockedwhilethe LOCKIndicatorWord remainsin the Display
Dependingon the lengthoftimethe oven had been self-cleaning,it may take upto
45 minutesforthe oven to cooldown,the doorto unlockand coolingfan to turnoff
IMPORTANT
• To recall cleaning time or stop time: Touchthe appropriatepad (Clean Pad or
Stop Time Pad).
• To change cleaning time or stop time before cleaning begins: Repeat the
precedingsteps.
• When the Clean Pad is touched,a fan comes on. If this fan is not operating,the
ovenwill gothroughthe cleaningprocessat a reducedoven temperatureandthe
ovenwill notcleaneffectively. Ifthe fan does notoperate, contactyour authorized
Jenn-Air Service Contractorfor service.
43
• A slight odor may be detected, and if an oven is heavilysoiled, some smoke may
be visible. Some smoke and odor during the cleaning process is a normal
occurrence. Since the oven vent is locatedunder the air grille, vapors, moisture,
etc. may be seen comingfromthis area. If the odoris strongor objectionable,turn
on the ventilationsystemto exhaustodors to the outdoors. (See p. 10.)
• Duringthe cleaningprocess,do not be alarmed if an occasionalflame is visible
throughthe oven window. This is caused by excessivefood soil that was not
removedbefore the oven was set to clean.
• SINCE THE DOOR AND WINDOW OF THE OVEN WILL GET WARM DURING
THE SELF-CLEANING PROCESS, AVOID CONTACT.
• Some typesof soil may disintegratebut leavea lightfilm or heavierdepositof ash.
The amountof ash dependsonthe amountofsoilwhichwas inthe oven. After oven
has cooled,thisash may be removedwith a damp sponge. If otherdark deposits
remainafter wipingwith a sponge,the time set for the lengthof cleaningwas not
enough. Increasethe cleaningtime for future cJeaningsor clean morefrequently.
The normarcleaningtime is 3 hours. A maximum of 4 hours may be selected if
necessary.
• If racks havebeen left in oven duringthe cleaningprocess,theyshouldbe treated
as follows. After the cleaningprocess iscompletedand the oven has cooled,buff
the undersideof rack edgeswithScotch-Britescourpad or rublightlythe underside
of rackedges witha coatingof vegetableoil. Usea lightapplicationof oilso itdoes
not soilthe oven. This will make the cleaned racksslide more easily.
• To removeoccasionalspilloversbetweencleanings,usea soap-filledscouringpad
or mild cleanser;rinsewell.
• It isbetterto clean the oven regularlyratherthan wait untilthere is a heavybuildup
of soilin the oven.
• Duringthe cleaningprocess,the kitchenshould bewell ventilatedto help eliminate
normalodorsassociatedwith cleaning.
• DO NOT USE COMMERCIAL OVEN CLEANERS.
• DO NOT USE ALUMINUM FOIL OR OTHER LINERS IN THE OVEN.
44
Stainless
Steel Rangetop
on the white ranges, the top of the range (the trim around the porcelain burner basin
areas), is made of stainless steel.
• To clean light soil, wipe with soapy cloth or nonabrasive cleanser, such as Soft
Scrub. Rinse, buff with soft cloth; polish with glass cleaner if necessary.
• To clean moderate soil or discoloration of the surface (excessive heat will cause a
golden discoloration), clean with Zud, Bar Keepers Fdend, or Luneta (Jenn-Air
Model A912, Part No. 712191), With a sponge or cloth, rub cleanser with the grain
to avoid streaking the surface. Rinse well, buff dry; polish with a glass cleaner if
necessary to remove cleanser residue and smudge marks.
• Heavy soit, such as burned on food soil, can be removed by first cleaning as per the
instructions for moderate soil. Stubborn stains can be removed with a damp
Scotch-Bdte scour pad; rub evenly with the grain to avoid streaking the surface.
Rinse well, buff with dry cloth; polish with glass cleaner if necessary to remove
cleanser residue and smudge marks. Seotch-Brite is also useful in buffing and
removing minor scratches.
• Stubborn food stains may also be removed by spraying with an oven cleaner. Allow
to set overnight, then rinse. If stains remain, clean with recommended cleansers
such as Zud, Luneta (Jenn-Air Model A912, Part No. 712191), or Scotch-Brite
Scour pad.
Textured
Black Rangetops
On the black ranges, the top of the range (the trim around the porcelain burner basin
areas), is made of painted steel.
• To clean light soil, wipe with a soapy cloth or nonabrasive cleanser, such as
Fantastik or 409.
•
To clean moderate to heavy soil spray the area with a household cleaner, such as
Fantastik or 409 and allow to soak. If necessary, spraytheareawithcleanser,
cover
with plastic wrap and allow to soak for a few hours, Do not use any abrasive
cleansers, oven cleaners, or scrub with any abrasive materials, such as S.O.S.
p_.ds, $cotch-Brite oads. etc.
45
Control Knobs
The knobsonthe controlpanelcan be removedwiththecontrolsinthe Off position.Pull
each knobstraightfromthe shaft. Wash knobsin warm soapywater or dishwasher;do
not useabrasivecleansersor materials. To replaceeach knob, matchfiat part of knob
openingwiththeflat of theshaft, returning in Off position. Important: Neveruse a metal
blade to pry knoboff.
Control Panel Area and Display Window
Wipewithpapertowelsdampened withsoapywateror glasscleaner. Do not sprayany
cleaningsolutionsdirectly onto the Display window or use large amounts of soap and
water. Do not scrub with S.O.S pads or abrasive cleansers.
Glass on Oven Door Front
Use any suitableglasscleaner or soapy water.
Oven Door Trim
Slightlydampen a clothor papertowel withsoapy wateror nonabrasivecleanser such
as Fantastikor409. Do notuse excessiveamountsofwater or allowwaterto rundown
throughthe air vents under the door handle since this will cause streaks which will be
visiblethroughthe glass door. White parts may be cleanedwith chlorine bleachor a
nonabrasivecleanserthatcontainschlorinebleach. Do notuseany abrasivecleansers.
ovencleaners, or scrub with any abrasive mater/als,suchas S.O.S. oads.Scotoh-Brite
oads. etc.
Igniters
• Itisimportanttokeepigniterportopeningsonburnersclearandfreeofobstructions
to avoidignitionfailure and possiblegas buildup. If the portopeningsare blocked,
use a toothpick to remove food particles.
• The ignitercap and stern can be cleaned with warm soapy water and a plastic
scrubber. The wire electrode inside the cap can be cleaned with a small brush.
Rinseand dry.
Surface Burner Assembly
The surface burner assembly can be cleaned with mild detergents and a plastic
scrubber,or washedin the dishwasher.To preventscratchingthe burnerheads,do not
use abrasive cleansers or scrubbing pads. Do NOTclean in a self-clean oven.
Note: Check to be sure all ports are open. To openclogged ports,insert a toothpick
directly into each port.
Althoughthe burner grate is durable, it will gradually lose its shine and/or discolor,
regardlessof the care you take of it. This isdue to itsexposureto the hightemperature
of the gas flames.
To preservethe porcelainenamel finishas long as possible,have a pan on the grate
before you turn on the burner, and lowerthe flame when food reaches the desired
cookingtemperature.
46
The oven operation controlscan be locked in the "OFF" positionduring cleaning or to
prevent a child from accidentally turning them on. The oven functions which can be
locked in the "OFF" position are: Bake, Convect Bake, Convect Roast, Broil and Clean.
The control functionswhich can always be used regardless of lockout are: Timer, Clock,
Fan and Oven Light.
To set
Touch and hold the Cook Time Pad and the Stop Time Pad simultaneouslyfor four
seconds, The indicatorWord "OFF" will appear and remain in the temperaturedigits
for fifteen seconds.
Note: If an oven functionis currentlybeing used,the Controlscannot be lockedoff,
Note: If someone touchesan oven functionpad,the IndicatorWord "OFF" willagain
appear in the temperature digitsfor fifteen seconds.
TO cancel
Touch and hold the Cook Time Pad and the Stop Time Pad simultaneouslyfor four
seconds. The indicatorWord"OFF" willappearbriefly inthetemperaturedigitsandthen
go off.
Before replacingbulb, disconnect power to oven at the main fuse or circuit breaker panel
and at the electric receptacle. Be sure that the entire oven cavity including the light bulb
is cool before attempting to remove.
To replace light bulb
1. Carefullyunscrewthe glass lightlens.
2. To obtain firm grasp on the bulb, wear protective
rubber gloves. Remove by turning bulb to the left.
asbulb will break. Note: If the bulb does break and
you wish to remove it, be certain power supply is
disconnected and wear protective gloves. You
may contact your authorized Jenn-Air Service
Contractor for service.
Donot touch a hot oven light bulb with a damp cloth
3. Replace bulb with a 40 watt oven-rated appliance
bulb. A bulb with a brass base is recommended to
prevent fusing of bulb into socket.
4. Replace bulb cover and reconnect power to oven. Reset clock.
47
j
The access panel iseasily opened or removed. To
open panel, grasp upper corners and pull forward
and down. To close panel, lift up and insert prongs
into catches in the range.
_
c.t_,
_rong
To avoid the possibility of accidentally disconnecting any part of the ventilation system, do not use
the area behind the access panel for storage.
/E
To remove, pull forward to the "stop" position; lift
up on the front of the rack and pull out.
The oven temperature can be adjusted if all oven temperatures are too low or too high
and the length of time to cook ALL foods is too long or too short. Do NOT adjust the
temperature if only one or two items ere not baking properly.
To adjust
1.
2.
3.
4.
Touch the Bake Pad.
Enter 500 ° by touching the number pads: "5,0,0."
Touch and hold the Bake Pad for eight seconds until "0g°" appears in the Display.
Touch the appropriate number pads to enter the offset temperature. (Allowable
range is -35 ° to +35°,) Note: Touching the Broil Pad will change the - sign to a
positive number or back to a negative number.
Note: Do not change the temperature setting more than 10° before checking the
oven.
5. Touch the Cancel Off Pad to return to the previous Display.
Important; The oven should be adjusted only 10 ° and the oven should be tested. (We
recommend baking two g" yellow layer cakes using a purchased box mix.) If the oven
temperature is still too low or too high, repeat the procedure described above.
When necessary, follow these procedures to remove appliance for cleaning or servicing:
1. Shut-off gas supply to appliance.
2. Disconnect electrical supply to appliance.
3. Disconnect blower system.
4. Disconnect gas supply tubing to appliance.
5. Remove screws that secure appliance to cabinet or floor. Remove appliance from
cabinet.
6. Reverse procedures to reinstall
7. Test ell joints for gas leaks with soap and water solution.
OR OTHER FLAME TO LOCATE A GAS LEAK.
48
NEVERUSEAMATCH
Griddle - Model AG302
Self-draining griddle makes manyfavorite foods
easier to fix. Family-sized surface lets you
cook several pancakes, hamburgers, or grilled
sandwiches at the same time.
Wok- Model AO142
Ideal for stir-frying, steaming, braising, and
stewing.
Wok has nonstick finish, wood
handles, cover, steaming rack, rice paddles
and cooking tips,
S----rMo,
Includes surface burner assembly, aeration
tray, and two surface burner grates.
_
-
Grill Cover - Model AG341
Attractive grill cover protects grill when not in
use. Textured steel with molded handles.
NOTE:
Only these
NOT
USE Jenn-Air
accessories
e ectric
are gri
approved
-range for
accessor
use with
es your
on your
gas gas
grill-range.
gri -range.
DO
4g
Check the followinglistto be sure a service call is really necessary. A quick reference
of this manual may prevent an unneeded service call.
If grill or surface burner fails to light:
• check 10be sure unitis properlyconnectedto powersupply.
• check for a blowncircuitfuse or a trippedmain circuitbreaker.
• check to be sure burnerportsor ignitionportsare not clogged.
• checkto be sure igniterisclicking. If igniterdoesn'tclick,turncontrolknobOff and
clean iginitor. (See p. 46.)
s check to be sure appliance regulator is set for correct fuel. (See installation
instructions.)
• checkto be sure inletpressureis adequate. (Call gas company.)
if the flame is uneven:
• burner ports may be clogged.
• flame settingmay need to be adjusted. (See p. 13.)
If grill or surface burner flame lifts off the ports:
• shutteronthe mixertube needsto be closeduntilflamesettleson the burnerports.
(See pp. 12-13.)
If grill or surface burner flame is yellow in color:
• shutteron the mixertube needsto be openeduntilyellow disappears. (See pp. 1213)
If nothing on the range operates:
• checkfor a blown circuitfuse or a tripped main circuitbreaker.
• check if range is properlyconnectedto electric circuitin house.
If ventilation fan does not operate but everything else on the range
does:
• check behind lower access panel if power cord to blower assembly has been
disconnected.
If ventilation system is not capturing smoke efficiently:
• check on crossventilation in room or make up air.
• excessive amount of smoke is being created; check instructions for grilling,
trimming meats. (See pp. 18-20.)
s outside wall cap may be trapped shut.
• range may be improperly installed; check ducting information. (See p. 9.)
• air filter may be improperly installed (See p. 10.)
50
If oven doe• not heat:
• the oven controlsmay be set incorrectly.
• clock controlsmay be set for delayedstart of oven.
If the oven light doe• not work:
• the lightbulb is loose or defective.
• oven light does not work duringself-cleaningprocess,
If oven will not go through self.cleaning process:
• controlsmay be improperlyset.
• check the clock controlled settings and the current time of day on the clock.
If oven did not clean properly:
• oven may need longercleaning time.
• excessive spills were not removed prior to self-cleaning process.
If oven door will not unlock:
• oven may not have cooledto safe temperatureafter self-cleaningprocess.
• electriccurrent coming into the oven may be off.
If foods do not broil properly:
• the oven controlsmay not be set properly.
• check rack position,
• voltage into house may be low.
If baked food is burned or too brown on top:
a food may be positionedincorrectlyin oven.
• oven not preheated properly.
If foods bake unevenly:
• the range may be installedimproperly.
• check the oven rackwith a level.
• staggerpans, do not allowpans to touch each other or oven wall.
• check instructionsfor suggestedplacementof pans on oven rack.
If oven baking results are less than expected:
• the pans being used may not be of the size or material recommendedfor best
results.
• there may notbe sufficientroomaroundsidesof the pans for properair circulation
in the oven.
• checkinstructionsfor preheating,rack positionand oven temperature.
• ovenvent may have been blocked or covered.
51
If baking results differ from previous oven:
• oventhermostatcalibrationmay differbetweenold and new ovens. Followrecipe
and use and care directionsbefore callingfor service sincethe calibrationon the
previousovenmay havedriftedto a toohighortoo lowsetting. (See p. 48 - Adjusting
Oven Temperature.)
If F plus a number appears in the Display:
• a fault code is beingshown. When a fault code appears and a continuousbeep
sounds,touch the Cancel Off Pad. If the faultcode reappears,disconnectpower
to the range and call an authorizedJenn-AirService Contractor.
JENN-AIR
3035 SHADELAND
• INDIANAPOLIS,
Printed in U.S.A.
©1996
Jenn-Air Company
IN 46226-0901
Cat. No. RA4860OUC
Part No. 210987A
_96