1
mmmLIENN-AIR
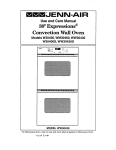
Use and Care Manual
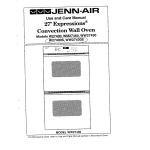
30" Expressions ®
Convection Wall Oven
Models W30_OO, WM30460_WW30430
_OlO_
ww
_
..........
................... 2..2,.:...............
-..,.,.,._._
.................................
.. ........................
... .........
j
===================================
MODEL WW30430
For Microwave Oven, refer to Use and Ca_e Manual packed in Microwave Oven.
Congratulationson your choice of a Jenn-Airwall oven. Your Jenn-Airconvection oven
combinesthe best of four cooking methods:conventionalbaking or roasting,convection
baking, convection roasting, and broiling, in a self-cleaning oven,
The Jenn-Air convection oven is actually a conventionaloven that circulates heated air
within the oven. As both bake and broil heating elements cycle on and off with the
thermostat, a fan keeps the heated air circulating around the food. The constantly
recirculatingheated air in the convection oven strips away the layer of cooler air that
surrounds food. Consequently,many foods cook more quickly. Distributedheat makes
multiplerack cooking possible. Convection roasted meatsretain their naturalflavor and
juiciness with less shrinkage than conventional roasting.
Beforeyou begin cooking with your new oven, please take a few minutes to read and
become familiar with the instructionsin this book. On the following pages you wilt find
a wealth of information regardingall aspects of using your new oven. By following the
instructionscarefully,you will be able to fully enjoy and properly maintainyour oven and
achieve excel/ent results with the food you prepare.
Should you have any questions about using your Jenn-Air oven, write to us. Be sure
to provide the model number.
Jean-Air Customer Assistance
c/o Maytag Customer Service
P.O. Box 2370
Cleveland, TN 37320-2370
Model Number
Serial Number_
(numbersappear on the serial plate on the even front frame)
Date Purchased
JENN-AIR DEALER FROM WHOM PURCHASED
Address
City_
Phone
Baking
Baking Chart ................................................................................................ 15
Causes of Cake Failure ............................................................................... 16
Convect Baking ...................................................................................... 15-17
Convect Cooking on Multiple Racks ............................................................ 17
General Recommendations ......................................................................... 14
Before You Call For Service ....................................................................... 35-36
Broiling
Broiling ......................................................................................................... 26
Broiling Tips ................................................................................................. 27
Broiling Chart ............................................................................................... 27
Caring for Your Oven
Adjust Oven Temperature ...........................................................................
Child Protection Lock ...................................................................................
Cleaning Other Surfaces.............................................................................
Oven Light Bulb Replacement ....................................................................
34
34
32
33
Cleaning
Self-Cleaning Process28-32
Clock Controls
Clock Controlled Baking or Roasting ...................................................... 12-13
Time of Day Clock ........................................................................................ 10
Timer ........................................................................................................... 11
Oven Operation
Oven Control Panel ........................................................................................ 6
Rack Positions ............................................................................................. 9
Setting Controls ............................................................................................. 8
Probe ........................................................................................................... 22-25
Roasting
Conventional Roasting Recommendations18
Convect Roasting ................................................................................... 19-21
Frozen Convenience Foods ......................................................................... 21
General Roasting Recommendations .......................................................... 18
Roasting Chart ............................................................................................ 19
Safety Precautions .......................................................................................... 4-5
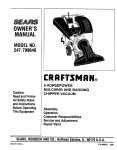
Read before operating your oven
All appliances - regardless of the manufacturer - have the potential through
improper or careless use to create safety problems. Therefore the following
safety precautions should be observed:
1.
2.
3.
4.
5,
6.
7.
8.
9.
10.
11.
12.
13.
14.
15.
16.
Be sure your appliance is properly installed and grounded by a qualified
technician.
Never useyour appliance for warming or heating the room.
Childrenshould not be left alone or unattendedin area where appliance
is in use. Theyshould neverbe allowed to sit or stand on any part of the
appliance.
Wear proper apparel. Loose-fittingor hanginggarmentsshould neverbe
worn while using the appliance.
Do not repair or replace any part of the appliance unless specifically
recommendedinthis manual. Allother servicing shouldbe referredto an
authorizedJenn-Air Service Contractor.
Flammablematerials should not be stored in an oven.
Do not use water on grease fires. Smother fire or flame or use dry
chemical or foam-type extinguisher.
Use only dry potholders. Moist or damppotholders on hot surfaces may
result in burns from steam. Do not let potholder touch hot heating
elements. Do not use a towel or other bulky cloth,
Use care when opening oven door. Let hot air or steam escape before
removingor replacing food.
Do not heat unopenedfood containers. Build-up of pressure may cause
containerto burst and result in injury.
Keep oven vent ducts unobstructed.
Always placeoven racksin desiredlocationwhile oveniscool. If rackmust
be moved while oven is hot, do not let potholder contact hot heating
element in oven.
Do not clean door gasket. The door gasket is essentialfor a good seal.
Care should be taken not to rub, damage, or movethe gasket.
Do not use oven cleaners. No commercial oven cleaner or oven liner
protective coatingof any kind shouldbe used in or aroundanypart ofthe
oven.
Clean only parts listed in this manual.
CAUTION: BEFORESELF-CLEANINGTHE OVEN, REMOVE FOOD,
BROILER PAN AND OTHER UTENSILS.
The control
Indicator
panel is designed
Words
which
for ease in programming.
will flash to prompt
The Display
Window
features
you for the next step.
To program
1. Touch
2. Touch
Note:
the function pad to give command desired.
the appropriate
number pads to enter time or temperature.
Five seconds
after entering
the number, the time or temperature
will
automatically
be entered.
If more than five seconds elapse between touching a
function pad and touching a number pad, the control is not set and Display will return
to previous
Display.
UpperO_n
_henTier
LOWer
Ove_
............
ii_ !__!_!ii i_
••
¸ _!i
_i_il _i_ii_i_!
i!!!_!i_i!_
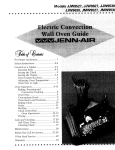
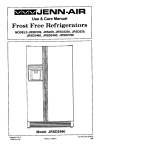
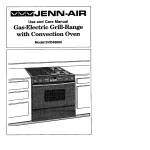
Function Pads
Use for conventional baking or roasting•
Use for to pb rowning or oven broiling.
Use to set self-cleaning process.
c_:
Cancels all programming except Timer.
Use for convect baking,
_
Use for convect roasting.
Use to set desired internal temperature when using Probe.
Use to turn oven light on and off.
Use for clock controlled cooking and cleaning when delayed start is desired.
(For lock function see page 34.)
i
Use for clock controlled cooking.
(For lock function see page 34.)
ii!_ii!i
Use to signal expiration of a time period up to 11 hours and 55 minutes.
Use to signal expiration of a time period up to 11 hours and 55 minutes.
Use to set time of day.
6
Number Pads
Useto settime or temperature.
Oven Light Pad (Control Panel)
Theovenlightautomaticallycomeson wheneverthe ovendoorJeopened.When dooris closed,touch
the Oven Light Pad to turn oven lighton or off. Note: A beep will sound every time the Oven Light
Pad is touched.
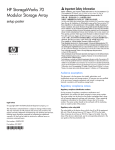
Display Window
Showstimeofday,
andoven
functions. timer,
88_8
8
i888c
° CONV
888:BAKEROAST
CCLilV
BAKEROAST
DELAY
START
CODK
TIMED CLEAN
BRDIL
CLEAN
BROIL
Display Numbers:
STOPTII_ _]_ _I_OVEiVLOCK
PKi_AE
_
LOCI(P61D_dr
_]
• Show time of day.
• Countdownoftime remaining when usingtime functions.
• Show temperature ofoven as it rises to reach programmedtemperature andthe set temperature once it is reached.
• Recallprogrammedtemperature or time when commanded.
• Rounding of Display Numbers: Temperature range is 100° to 550°F and can be set in 5°
increments.Whensettingtemperature,the control will roundittothe nearest 10°. Forexample,
if 237ois entered, the control will round thetemperature to 240°.
Prompts:
• Serveasaremindertoshutovendoor, ifitisopen,forself-cfeaningoperationwhentheword,
door,is displayed.
• "Err"willappearinthe Displaywhenanimpropertemperatureortimehasbeenentered. "Err"
will flash and a beep will be heardthree times. Then, the Displaywill return to the previous
Displaybefore the error was entered.
Indicator Words:
• Flashto prompt next step.
• Indicatestatusofprogrammedfunction.
• Show programmedfunction when recalled.
• Show oven selected. U - is the upperoven; L - is the lower oven. (ModelWW30430)
Chimes vs. Beeps
• A chime sound is usedto designate the end of a timingor cooking operation.
• A beep sound will be heard when any pad is touched. A series of short beeps are used to
designatean incorrectentry,door is openwhen setfor aself-clean,probeneedsto beremoved
and a fauttcode.
End of Cycle Chimes:
• The end of cycle chimes is four short chimesfollowed by "reminder"chimes for a specified
length of time, until you cancel thatfunction. For the Timer function,there are two "reminder"
chimes every 30 seconds for five minutes. For the Timed Cook, functions there is one
"reminder"chime every minuteforten minutes.To cancel these "reminder"chimes, touchthe
appropriate pad again (either the Timer Pad or Cook Time Pad). You may also touch the
Cancel OffPad tocancel the "reminder"chimes,but itwill a/so cancel all otheroven functions.
• Ifyou would like to eliminate all the "reminder"chimes entirely, touch andhold the Caneel Off
Padfor twelve seconds. (This will not eliminate the initialfour short chimes).
• To return the "reminder"chimes, touch and hold the Cancel Off Padfor twelve seconds.
[NOTE: _enn-AirT_chang_the_v_nt_a24h_urc__ck_r_e_s`us(C)degr__s_c_ntacty_urauth___zedService
Contractor or installer,
l
7
To set oven on Bake or Convect Bake or Convect Roast
1. Place oven racks on properrack positions.(See page 9.)
2. Touch Bake Pad or Convect Bake Pad or Convect Roast Pad,
IndicatorWords BAKE or CONV BAKE or CONV ROAST will flash and three
dashes will be shown.
Note: If morethan five secondselapse betweentouchinga pad and touchinga
numberpad, Displaywill returnto previousDisplay.
3. Touch the appropriate number pads for desired oven temperature.
Allowable temperature range is 100° to 550°F. After five seconds the oven will
begin to preheat. The IndicatorWords ON, PREHEAT, and either BAKE or CONV
BAKE or CONV ROAST will appear in the Display. The temperature shown will
be 100° or the oven temperature whichever is higher.
Example: If at 10 o'clock you set the oven for 350° for convect baking, after five
seconds the Display will show:
I0:00
During the preheat, the Displaywill show a rise in 5° increments until programmed
temperature is reached. When the oven is preheated,the oven will chime, the ON
and PREHEAT Indicator Words will go off, and programmed oven temperature
will remain in the Display.
Note: Oven will preheat for approximately 7 to 11 minutes.
Important: Whenever ON appears in the Display, the oven is heating.
To recall temperature sat during preheat: Touch the appropriate Bake Pad or
Conveot Bake Pad or Convect Roast Pad. Temperature will be briefly displayed,
then will automatically return to on-going program.
To change temperatureset: Touch appropriate Bake Pador Convect BakePad
or Convect Roast Pad and the appropriatenumber pads for the new desired
temperature.
Note: If you are loweringthetemperaturebelowthe currentoventemperature,the
indicator Words PREHEAT and ON will appear briefly in the Display and the
preheatchimewillsound. Then, the Displaywillshowprogrammedtemperature
and indicatorword BAKE or CONV BAKE or CONV ROAST only.
4. TouchCancel Off Pad to turn oven off at end of baking. The oven will continue
operatinguntilthe Cancel Off Pad is touched.
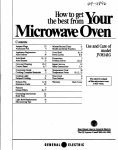
The rack positions noted are generally recommendedfor the best browningresults and
most efficient cooking times. For many food items, excellent results can be achieved
whenusingoneofseveraldifferentrackpositions. Referto bakingand roastingsections
for recommendationsfor specific foods.
Different Racks
Two flat racksand one offset rack were packagedwith your oven. The useof the offset
rack is denoted in the list below and the charts as an "o" after the rack number. Note
WW30430 Owners: An additional offset rack and flat were packaged in your oven.
_'_F
4 (flat rack)
3o (offsetrack)
1 (flat rack)
Rack Uses
Rack Position #4o (offset rack on #4):
Most broiling.
Rack Position #3:
Most baked goods on cookie sheets, cakes (sheet and layer).
Rack Position #30 (offset rack on #3):
Most bakedgoods on cookie sheets, frozen conveniencefoods, fresh fruit pie, cream
pie, layer cakes, main dish souffle.
Rack Position #2:
Roasting small cuts of meat, cakes (tube, bundt or layer), frozen fruit pie, pie shell,
large casseroles.
Rack Position #20 (offset rack on #2):
Roastingsmall cuts of meat, loaves of bread, angel food cake.
Rack Position #1:
Large cuts of meat and large poultry, angel food cake, loaves of bread, custard pie,
dessert souffle.
Multiple Rack Cooking:
Two racks, use #20 and #4. Three racks, use #1,#30, and #4.
When electrical power is supplied or after power interruption, the last clock time
displayed before power was interrupted will flash. Time will advance and continue to
flash until clock is reset.
BASI_ INS_UCTiONS
12;To_haP_PNate::
number PadS:I
To setTime ofDay
I,Touch ClockPad.
Indicatorword TIME will flash and time digits will appear in the Display. (If more
than five seconds elapse between touching Clock Pad and touching a number
pad, the Clock Pad must be touched again in order to set clock.)
2. Touch the appropriate number pads until correct time of day appears in Display.
Note: Five seconds after touching the number pads, the time of day will
automatically be entered.
IMPORTANT
• To recalltime of day when another time function is showing: Touch Clock Pad.
• Clock time cannot be changed when oven has been programmed for Timed
Bake, Timed Convect Bake, Timed Convect Roastor Self-clean. Cancel program
before reprogramming clock.
10
Important: This interval Timer can be used to remind you when a period, up to 11
hours and 55 minutes, expires. It can be used independentlyof any other oven activity
and can be set while another oven function is operating. The Timer does net control
the oven.
TO set Timer
1. Touch Timer Pad.
The Indicator Word Timer and either 1 or 2 flashes and "0Hr:00" appears in the
Display.
2. Touch the appropriate numberpads until the desired numberof minutes or hours
and minutes appear in the Display.
Note: If more than five seconds elapse between touching a Timer Pad and a
number pad, the Timer Pad must be touched again.
Example: To set Timer One for 5 minutes, touch the Timer One Pad and the
number 5 pad. After five seconds, the display will show:
:g5
TIME_
[]
Example: To set Timer Two for 1 hour and 30 minutes, touch the Timer Two Pad
and the numbers "1,3, 0" pads, After five seconds, the Display will show:
Countdown will start after five seconds. Countdownwill have display precedence
over other time functions. If both timers are set, the timer with the least amount
of time remaining will have display precedence.
At the end of time set, the Timer will chime four times and "End"will appear in the
Display. If timer is not cancelled (see below), "End" will remain in the Display and
there will be two chimes every thirty seconds for five minutes.
To cancel Timer
1. Touch and hold the Timer Pad for four seconds.
OR
2. A. Touch the Timer Pad.
B. Touch "0" number pad. Five seconds later the Timer will be cancelled.
NOTE: TouchingCancel Off Pad to cancel chimeswill cancelALLselectedoven1
programming.
/
11
mit steps 5
you want baki gto sta_ immediatl ,lyl......................
To set oven to start immediately and shut off automatically
1. Touch Bake Pad or Convect Bake Pad or Convect Roast Pad.
Indicator Words BAKE or CONV BAKE or CONV ROAST will flash andthree dashes
will be shown.
2. Touch the appropriate number pads for desired oven temperature.
After four seconds the oven will begin to preheat. The Indicator Words ON,
PREHEAT, and SAKE or CONV BAKE or CONV ROAST will appear in the Display.
The temperature shown will be 100° or the temperature of the oven, whichever is
higher. Example: If at 10 o'clock you set the oven for 3500 for convection baking,
the Display will show:
B,o:oo
During the preheat, the Display will show a rise in 5° increments until programmed
temperature is reached, When the oven is preheated, the oven will baep, the ON
and PREHEAT Indicator Words will go off, and programmed oven temperature will
be displayed. Important: Whenever ON appears in the Display, the oven is heating.
3. Touch Cook Time Pad.
indicator Words COOK TIME will flash and Display will show "0 HR:00".
4. Touch the appropriate number pads to enter cooking hours in five minute
increments. Hours are to left of colon and minutes to rightof colon. (Allowable range
is 5 minutes to 11 hours and 55 minutes.) Examp|e: If cooking time selected for
the oven is 2 hours and 30 minutes, the Display will show:
I
_,££°
After fifteen seconds, the time of day returns to the Display.
Important:
Oven will preheat for approximately 7 to 11 minutes. At end of
programmed Cook Time, oven will shut offautomatically; retained heat will continue
tocook food. Clock controlled cooking is not recommended for baked items that
require a preheated oven, such as cakes, cookies, pies, breads. For these foods,
place food in preheated oven, then use Timer to signal end of baking time.
At the end of programmed Cook Time, the oven will shut off automatically and a
"chime" will be heard four times and "End" will appear in the Display. If oven is not
cancelled, "End" will remain in the Display and there will be a chime every minute
for one hour.
12
To set oven to start at future time and shut off automatically
1-4. FollowprecedingSteps1-4, on page 12.
5. TouchStop Time Pad.
IndicatorWords STOP and TIME will flash, Display will show the calculated
stop time basedon current time of day and cook time. Note WW30430Owners:
The appropriateletter (U - upper oven; L - lower oven) and OVEN will also flash.
6. Touch the appropriate number pads to enter desired stop time.
A stop time can only be acceptedfor later in the day. Note; Since food continues
to cook if left in the even, it is suggestedthat the clock controls be used primarily
to startthe oven when no one is in the kitchen. Provisionsshould be madeto have
the food removed as soon as the chime has sounded.
Example: If at 10 o'clockyou set the ovenfor 350° convection bakingand 2 hours
and 30 minutes cooking time, the calculated stop time would be "12:30". The
Display would show:
I,<:3o
8TOp
F_k_AT_
Ifyouwantthestoptimetobe I o'clock,
touchthenumberpads "I,0,0".
Five
seconds later, the Display will briefly show the start time:
lg:a.q o°
After five seconds, the display will return to current time of day, thus showing:
I0:00
oe_¥
lIMEO
°
At the end ofthe delayedperiod,the DELAYIndicatorWordwill go off and the oven
will begin to heat. 100° will be shown. As the oven heats, the Display will show
a rise in increments of 5° until programmed temperature is reached.
At the end of programmed Cook Time, the oven will shut off automaticallyand a
"chime" will be heard four times and "End" will appear in the Display. If oven is
not cancelled, "End"will remain in the Display and there will be one chime every
minute for ten minutes.
IMPORTANT
• Note WW30430Owners: Clockcontrolledbakingcan be usedwith only oneoven
at a time. To program, first set the bakeor eonvectbake or convect roast function
for the desiredoven, then set the cook time. If one oven is set for clock controlled
baking, the other oven cannot be set to self-clean.
• To recall time function programmed: Touch the appropriatetime pad.
• To cancel timed functiononly: Hold CookTime Pad for four seconds. This will
only cancel cook time and stop time, not programmedbake mode.
• If more than five seconds elapse between touching a function pad and touching
appropriatenumber pads, the oven is not set and Display will return to previous
Display.
13
• When cooking foods for the first time in your new oven, use recipe cooking times
and temperatures as a guide.
• Use tested recipes from reliable sources.
• Preheat the oven only when necessary. For baked foods that rise and for richer
browning, a preheated oven is better. Casseroles can be started in a cold oven.
Preheatingtakes from 7 to 11 minutes;placefood in oven after PREHEATIndicator
Word cycles off.
• Arrange oven racks before turning on oven. Follow suggested rack positions on
page 9 and in various baking charts.
• Allow about 1 to 11/2inchesof space between theoven side walls and pans to allow
proper air circulation.
• When baking foods in more than one pan, place them on opposite corners of the
rack. Stagger pans when baking on two racks so that one pan does not shield
another unless shielding is intended. (See above left)
• To conserve energy, avoid frequent or prolonged door openings. At the end of
cooking, turn oven off before removing food.
• Alwaystest for doneness (fingertip,toothpick,sides pulling away from pan). Do not
rely on time or brownness as only indicators.
• Use good quality baking pans and the size recommendedin the recipe.
• Dull,dark, enameledor glass panswillgenerallyproducea brown, crisp crust. Shiny
metal pans produce a light, golden crust.
• Frozen pies in shiny aluminum pans should be bakedon a cookie sheet en rack 2
or be removed to a dull or glass pan.
• If edge of pie crust brownstoo quickly,fold a strip of foilaround rim of crust, covering
edge. (See above right.)
NOTE: A coolingfan willoperateduring all cooking modes. Thefan may alsocontinue
to operate after the oven is turned elf unti the oven has cooled down.
14
t Baking Chart I
Note: For Conventional Bake use the Bake Pad.
, <I:I_i!AA
ii_ii_:_ii?i
_i__i?i_i
i _;i_!_!i_ii i_Z';!ili;2_:
:
:1
.
i'H
_
_._¢._
_-_
..........
_........
* An "o" after a rack number impliesthat the offset rack should be used.
** The times given are based on specific brands of mixes or recipes tested. Actual
times will depend on the ones you bake.
*** The Convect Bake temperatureis 25°F lower than recommendedon package mix
or recipe.
15
•
•
Use convection baking for breads, cakes, cookies, and pies.
As a general rule, when using recipes or prepared mixes developed for a
conventional bake oven, set the oven temperature 25°F }ower than the recipe
recommended temperature. Times will be similar to or a few minutes }ess than
recipe recommended times. The chart on page 15 compares times and temperatures
of many baked foods. Use this as a reference.
• For better browning, place cookie sheets and baking pans lengthwise, side to side
on the rack.
• Cookie sheets should be without sides and made of shiny aluminum. The best size
to use for cookie sheets is 16" x 12" or smaller.
16
Forbest results,bakefoods on onerack at a time as describedin this manual. However,
very good results can be obtained when baking quantities of foods on multiple racks.
Quantity cooking provides both time and energy savings.
Convect Bake is suggested for most multiple rack cooking, especially three rack
cooking, becausethe circulatingheatedair resultsin more evenbrowning. Fortwo rack
cooking, the conventiona_bake ovenprovides very good bakingresults especiallywhen
pans can be staggered, such as with layer cakes and fresh pies.
Many foods can be prepared on three racks at the same time. These are just a few
examples: cookies, cupcakes, rolls, biscuits, muffins, pies, pizzas, appetizers, and
snack foods.
To obtain the best results in multiple rack cooking, follow these suggestions:
• Use temperature and times in this manual as a guide for best results.
• Fortwo rack baking, rack positions#2o and 4 are best for most baked productsbut
positions #2 and 4 also provide acceptable results.
• Forthree rack bakingusepositions#1,30 and 4. One exceptionispizza. (See page
21 .)
• Since foods on positions#1 and 4 will usuallybe done beforefoods on position#3o,
additional cooking time will be needed for browning foods on the middle rack. An
additional minute is needed for thin foods such as cookies. For foods such as
biscuits, rolls, or muffins,allow 1 to 2 moreminutes. Frozen pies and pizzas, which
should be baked on a cookie sheet, need about 2 to 4 more minutes.
• Stagger small pans, such as layer cake pans, in the oven.
• Frozen pies in shiny aluminum pans should be placedon cookie sheets and baked
on rack positions #1, 30 and 4.
• Cookie sheets shouldbe placed lengthwise,side to side, in front of the fan for more
even browning.
• Oven meals are recommendedfor energyconservation. Use rack positions#t and
3o or #2o and 4 and Convect Roast.
17
• Preheating is not necessary.
• For open pan roasting,place meat or poultry on the slotted portionof the two-piece
pan includedwith the oven. Do not add water to the pan. Use open pan roasting
for tender cuts of meat. Less tender cuts of meat need to be cooked by moist heat
in a covered pan.
• For best results,a meat thermometeror probe is the most accurateguide to degree
of doneness. The tip of the thermometeror probe should be located in the thickest
part of a roast, not touching fat, bone, or gristle. For turkeys and large poultry
products, insert thetip of the thermometer or probe into the thickestpart of the inner
thigh.
• Place roast fat side up to allow self basting of meat during roasting.
• Since meats continue to cook after being removed from the oven, remove roast
from oven when it reaches an internal temperature about 5 degrees below the
temperature desired.
• For less loss of juices and easier carving, allow about 15 minutes "standingtime"
after removing meat from oven.
• For best resultsin roastingpoultry,thaw completely. Dueto the structure of poultry,
partially thawed poultry will cook unevenly.
• If preferred,tender cuts of meat can be roasted in the conventional bake oven by
following the general recommendationsgiven above. However, meats will roast
more quickly in the convect oven using Convect Roast.
• Conventionalbake is best for less tender cuts of meat that require a longer, moist
heat method of cooking. Followyour recipe for timesand temperaturesfor covered
meats.
• Meatscooked in ovencooking bags,dutch ovens,or covered roastingpansare best
cooked in the conventional bake oven using the Bake Pad.
• Use meat roasting charts in standard cookbooks for recommended times and
temperatures for roasting in a conventional bake oven.
NOTE: A cooling fan will operate during all cooking modes. The fan may also
continue to operate after the oven is turned off until the oven has cooled
down.
18
Chart time is based on thawed meats only. For Conventional Roasting use the Bake Pad.
4,p,,,.
v_y and
cutofM_l "
W_¢.
(_)
.
•
BEEF
RibRoast
4 to8 :
325°
Rib EyeRoast
4 to6
TendedoinRoast
Eyeof RoundRoast
I
2 to3 _
.4 to5 I
3 to6 {
I
4 to6 1
I
TopLoinRoast
FloundTipRoast
, ,,.
': PORK
ShoulderBladeRoast
I
4 to6
TopLoin,bOneless
Ham, Haft(Fullycooked)
Ham,Half(Cook
3 to4
5to7
5 to7
beforeeating)
Amlpicrdc_oulder
5 to 8 I
; _:_
Hen
1
30-35
325
1450(rare)
_ / 160oimedium)l
4000 _ 145o(rare) I
325 I 145_(rare)
25-30
30-35
:18-23
25-30
/
30-35
35-40
28-28
30-35
325 / 145[(rare)
o I 160o(medium)
325 I 145 (rare)
25-30 •
30-35
_5-30_ :.
325°
170°
3040
325o
170°
25-35
325°
325°
275° .
170°
140°
160°
=..3_..
NA •
8040
325° l
140o
20-25
l
:
_ to6
TU_ey, Unstuffed
Tgd_ey,u_ed
25-30
o {_6Oo(med_um)
3o-35 I
,I ,:/
Boneless
St_ould_r
BladeRoast
o
145_(rare)
I
:
"_2t016
"16t020
_
32_
:_t_:i_
; ;3:'Z5]::|
'
t; 1E_°_'_85°
| i_3_-185_
180°;1o85°
30-,35
13540
30.35 ;
"
i
"
35-45
[
:;1_3_15:'
t43:
=',_';:::!
":
* WhenusingtheConvectRoasfmode, thereisnoneedtopreheattheovenortolowerthe
temperaturefrom conventionalroasttemperatures.
** Not recommendedfor convectioncooking. Mostprecookedhamshave to be coveredwhile
roasting,thus therewould be no time savings from using the convect mode.
19
• Tender cuts of meat and poultry can be roasted to a rich golden brown in the
convectionoven. Follow general recommendationsfor roasting and use Convect
Roast.
• Refer to convection meat roasting chart for recommended cooking temperature
and time. The chart can serve as a guide to help plan meal serving time.
• Minutes per pound will vary according to the size, shape, quality, and initial
temperatureof meat as well as the electricalvoltage in your area. Times are based
on refrigerator cold meat.
• A large cut of meat will usually require fewer minutes per pound to roast than a
smaller cut of meat.
• Do not use a roasting pan with high sides; use pan provided with oven.
• Do not cover meat. Allow the circulating hot air to surroundthe meat and seal in
the juices.
• Since the breast meat on a large turkey cooks more quickly than the thigh area,
place a "foil cap"over the breast area after desiredbrownnessis reachedto prevent
overbrowning. (See above.)
• A stuffed turkey will require an extra 30 to 60 minutes depending on size. Stuffing
should reach an internal temperature of 165°F.
Convect Roasting: Frozen to Finish
Meats (except poultry) may be roastedfrozen to finish, Followthese guidelinesfor the
most satisfactory results.
• Use temperaturesfor roasting fresh meats as recommendedby most cookbooks,
Generally, most meats are roasted at 325°F. For best results do not use
temperatures below 300°F.
• Use timesfor roasting freshmeats givenin your favoritecookbooks as approximate
guides for roasting frozen meats. Roastingtimes will vary due to factors such as
coldnessof meat,size, quality, or cut. In general, roasting times for frozen to finish
in the convection oven will be approximately the same as fresh to finish in a
conventional bake oven.
• The guidelines given for roastingfresh meats in the convection oven also apply to
roasting frozen meats.
• Insert meat thermometer or probe midway during the cooking process.
2O
• Use the Convect Roast Pad for best results.
• Preheating the oven is not necessary.
• Follow package recommendationsfor oven temperature, foil covering and use of
cookie sheets. Cooking times will be similar. See chart belowfor some exceptions
and examples.
• Centerfoods in the oven. If morethan one food item is being cooked or if foods are
being cooked on multiple racks, stagger foods for proper air circulation.
• Most foods are cooked on rack position #3o.
• For multiple rack cooking, use racks #1, 3o and 4. However, pizzas should be
placed on cookie sheets and cooked on rack position #20, 3 and 4.
Here are a few examples
of times and temperatures
, CONVENTIONAL
BAKE** PREHEATED
Temp.° F _linutes***
ii ii_iii i'i _
i_ !
_ ii_
:_ _ii _
* An "o" after a rack number implies that the offset rack should be used.
** Conventional bake uses the Bake Pad.
*** The times given are based on specific brands of mixes or recipes tested.
Actual times will depend on the ones you cook.
Note: Convect roastingtimes will be similar to the conventionaltimes because the oven
is not preheated. The time savings comes from not having to preheat the oven.
21
t steps 6-9 i
sh to start cooking
1. Insert the probe into the food item.
For meats, the probetip should be located
in the center of the thickest part of the
meat and not in fat or touching a bone.
Place the food in the oven using the rack
TO set
probe
featureon page 9.
position
suggested
Insert the probe plug into the receptacle located on the top left of the oven. Be
certain to insert plug into the receptacle all the way.
Note=After the probe is inserted, the IndicatorWord PROBEwill flash and a beep
will sound reminding you to enter the desired probe temperature.
2. Touch Probe Pad.
Indicator Word PROBE will flash and three dashes will be shown in the Display.
3. Touch the appropriate number pads to set the temperature for desired degree of
doneness.
The temperature may be set in 5° increments. (Allowable range is 100° to 200°.)
Example: At 10 o'clock to set the probe for 150°, touch the Probe Pad and the
number pads "1,5,0". After five seconds the Displaywill show probe temperature
or 95°, whichever is higher. Indicator Words CONV, BAKE and ROAST will flash.
195 °
I O:OO ....
22
Fifteen secondslater, the Displaywill return to current time of day and the Indicator
Word TIMED will appear in the Display.
8. Touch Stop Time Pad.
Indicator Words STOP TIME will flash. Display will show the calculated stop time
based on current time of day and cook time.
Note" Probe set temperature will control the actual bake time. Probe temperature,
not stop time, will turn oven off when food is done. Stop time is programmed for
the purpose of computing start time.
9. Touch the appropriate number pads to enter stop time.
A stop time can only be accepted for later in the day. If an unacceptablestop time
is entered, "Err" wi(I flash briefly in the Display and then Display will return to
previous acceptable Stop Time.
Example: If at 10 o'clock you set the oven for a probe temperature, for 325°
convection roasting and 2 hours and 30 minutescooking time, the calculated stop
time would be "12:30". The Display would show:
Iz-3o
L,s ]
8Top
If you want the stop time to be 1 o'clock, touch the number pads "1,0,0". After
five seconds, the Displaywill briefly display the start time. Thus, the Display would
show:
!g:39 Log }
After five seconds, the Display will return to current time of day, thus showing:
I 0:00 1_9s l
When selected temperature has been reached, the oven will shut off and a chime
will sound four times. Plus, the actual probe temperature will flash and the word
"End" will be in the Display. These words will remain in the Display and a chime
will sound every minute for ten minutes or until the Cancel Off Pad is touched. If
the probe is not removed, a beep will sound continuously until the probe is
removed.
I
• To recall e selected temperature ot time: Touch the appropriate function pad./
• To change oven temperature set: Touch appropriate pad and touch thej
appropriate number pads to enter new desired temperature.
/
• if more than five seconds elapse between touching a function pad and touching)
a number pad, the on-going program returns to the Display.
/
24
, PO.TA.T
1
]
1. Place oven rack on the rack position suggested in the chart on page 27.
Distance from broiling element depends on foods being prepared. Rack position
4o (offset rack in position #4) is usually recommendedunless otherwise stated.
2. Touch Broil Pad.
IndicatorWord BROIL will flash and Displaywill show three dashes.
Note: If morethan five secondselapses between touching Broil Pad and touching
a number pad, the oven is not set and Display will return to previous Display.
3. Touch the appropriate number pad(s).
The first number pad touched will enter "HI" in the Display.
The oven has a variablobroil feature which means that a lower temperaturecan be
selected. After "HI" appears in the Display,touch the appropriatenumberpads for
the desiredtemperature. Temperature can be entered in 5° increments. Use "HI"
broil for most broil operations. Use variable broil for delicate and long-term items.
Five seconds after entering "HI" or a temperature, the broil element will come on
and the Indicator Words BROIL and ON will remain in the Display. If the variable
broil feature was selected, the IndicatorWord ON will cycle with the element.
Example: If at 4 o'clock you set the oven for broil ("HI"), the Display will show:
:00
Hl_ROIL
4. Place food on broiler pan provided with oven. Broil element will preheat in five
minutes. After broil element is red, place food in oven. Oven door MUST be left
open at broil stop position.
5. Touch Cancel Off Pad to turn off oven when food is cooked.
NOTE: A fan comeson during the BROILcycle. If it does not,the ovenbroil element
will cycle on and off. If the fan does not operate, contact your authorized
Jenn-Air Service Contractor for repair.
26
• Tender cuts of meat or marinated meats are best for broiling. This includes rib and
loin cuts of steak, ground beef, ham steaks, poultry pieces or fish. For best results,
steaks should be at least 1" thick. Thinner steaks should be pan-broiled.
• Do not cover broiler grid with foil since this prevents fat drippings from draining into
bottom of pan.
• Before broiling, remove excess fat from meat and score edges of fat (do not cut into
meat) to prevent meat from cuding. Salt after cooking.
• To prevent dry surface on fish or lean meats, brush melted butter on top.
• Foods that require turning should be turned only once during broiling. Turn meat
with tongs to avoid piercing and loss of juices.
[Brojfip.gCha_ j
Chart time is based on a preheated broil element using the "HI" setting.
i_?
¸i¸i__!i_!i_j_i
_!iii_i i! !_:!
_ii!i!!iii_!_i!ii_
¸_ili!!i_ii!
ii_!_!ii!!iii!ii,i_!_i_ii_ii_!iii_ilj_ii_!ii
_,_i
¸¸_'I_
_ _/_i_!;
_
ili¸iiiiii!,
i!!i i!iiji
!i '!i
*An "0" after the rack number implies that the offset reck should be used.
Note: This chart is a suggested guide.
The times may vary with food being cooked.
27
Whenthe ovencontrolsare set to CLEAN,the oven heatsto temperaturesthat are higher
than those used for cooking. The high temperatures cause food soil to burn off and
substantiallydisappear. While this occurs, a device in the oven vent helpsto consume
normalamountsefsmoke, The ovenisventedthroughan openingunderthecontrolpanel.
Note WW30430Owners: Both ovens cannot be self-cleanedat the same time.
• Removethe broiler pan and any other utensilsfrom the oven. These utensilscannot
withstandthe high temperaturesof the cleaning process.
• Clean spattersand spills from those areas which will not be cleanedduring the selfcleaning process:
- center front of ovenand door near opening in door
,
_--_... / //_
]
gasket.
- porcelainoven door liner (area outside the door
gasket).
- oven front frame.
•
•
•
•
Note: DO NOT CLEAN serial plate located on the
oven front. To clean these areas, use hot water and
detergent, nonabrasivecleansers or soap filled steel
wool pads.Rinsethoroughly,beingcarefulnottousean
excessiveamountof waterthat woulddampenthe door gasket. Soilleft in theseareas
will be more difficultto remove after theself-cleaningprocesssince the high heat will
bake on any soil that is present.DO NOT USE COMMERCIALOVEN CLEANERS
TO CLEAN THESE AREAS.
DO NOT AI-rEMPT TO CLEAN, RUB,OR APPLYWATERTO GASKETON OVEN
DOOR.ThegasketisessentialforagooddoorseaL Rubbingorcleaningwilldamage
the gasket and may affect the seal.
Wipe up excess greaseand food spilloverswhich have net baked on the bottomof
theoven. Largeaccumulationsofsoilcancauseheavysmokeorfire in theovendudng
the cleaningprocess. For easeof cleaning,the heatingelementcan be liftedslightly.
Although smoke or fire in the oven is a normal occurrenceand there is no safety
problem,there will be venting of excessivesmoke and odor.
The oven racks can be cleanedin the oven. However,the oven rackswill discolor,
lose shininess,and become difficult to slide in and out if left in the oven during the
cleaningprocess. REMOVERACKSFROMOVEN IF THISDISCOLORATIONWILL
BE OBJECTIONABLE.As a suggestion,do not leavethe racksinthe ovenduringthe
self-cleaningprocessif they do not needto be cleanedsincethey will discolorto a dull
silverafterone cleaning. Moderatelysoiledrackscanbe cleanedwith a soapy S.O.S.
pad or Scotch-Britescour pad. Stubborn stains need to be removed in the selfcleaningprocess. Be sureto read specialtips on page 32 if oven racks are cleaned
during the self-cleaningprocess.
28
I The oven rackscan becleaned inthe oven. However,the oven rackswill discolor,
loseshininess,and becomedifficultto slidein and out if leftin the ovenduringthe
cleaningprocess. REMOVE RACKS FROM OVEN IF THIS DISCOLORATION
WILL BE OBJECTIONABLE.As a suggestion,do notleavethe racksin the oven
duringthe self-cleaningprocessif they do not need to be cleanedsincethey will
discolorto a dullsilver after one cleaning.Moderatelysoiledracks can be cleaned
witha soapyS,O,S. pad or Scotch-Britescour-pad. Stubbornstains need to be
removedin theself-cleaning
process.Be suretoreadspecialtipson page32 ifoven
racksare cleaned duringthe self-cleaningprocess.
Steps to Follow for Self-Cleaning Process
*Omit steps4
you wish cleaningto beginimmediately.
To set oven to start cleaning immediately
1. Close the ovendoor.
2. TouchClean Pad of ovento be cleaned.
IndicatorWords Clean Time willflash and Displaywill show" HR : __ __".
Note WW30430Owners; The appropriateletter (U-upperoven; L-loweroven) and
OVEN will also flash.
3. Touch the appropriate number pad(s)•
The first numberpad touchedwill enter "3:00"in the Displayfor an average soiled
oven. The cleaningtime can be varied depending onthe amountof soil. Set "2:00"
for light soil or "4:00" for heavy soil.
Note; If more than fifteen seconds elapses between touching a Clean Pad and
touching a numberpad,the oven is not set and time of day will automaticallyreturn
to the Display.
Example: If at 9 o'clock youselectedto self-cleanyour ovenfor 3 hours,the Display
will show:
13
Fifteensecondsafter entering"3:00"orfour secondsafterenteringa differenttime,
the ovendoorwillstarttoautomaticallylatchand thecoolingfanwillcomeon. The
LOCKIndicatorWordwillcomeon whenthe door is latched.
Note: If oven door was left open, "door"will flash in Displayand a signal will
continuouslybeep untilthe dooris closedand the Clean Pad is touched.
The IndicatorWordON comesonwhenthe dooris latchedandwillremainuntilthe
cleantemperatureis reached.The IndicatorWordON willcyclewiththeelements
to maintainthe clean temperature. 29
To set oven to start cleaning at a later time
1-3. Follow Steps 1-3 in previous section on page 29.
4. Touch Stop Time Pad.
Indicator Words STOP TIME will flash in the Disp;ay. The Indicator Word CLEAN
and the calculated stop time will also appear in Display.
Note WW30430 Owners: The appropriate letter (U-upper oven; L-lower oven)
and OVEN will also flash.
5. Touch the appropriate number pads to enter stop time.
A stop time can only be accepted for later in the day. If an unacceptable stop time
is entered, "Err" will flash briefly in the Display and then Display will return to
previous acceptable Stop Time.
Example: If at 9 o'clock you set the oven to clean for three hours, the calculated
stop time would be "12:00", The Display would show:
12:00
_TOpT_E
CCFJCJ
If you want the stop time to be 1 o'clock, touch the number pads "1,0,0". Five
seconds _ater,the Display would show Start Time:
I 0:00
_ky _TI_T
_IE
CLFJ_
After five seconds, the Display will return to current time of day, thus showing:
The LOCK Indicator Word will come on and the coo(ingfan will go off as soon as
the oven door has latched.
When the oven begins to clean, the Indicator Word ON and the cooling fan will
come on and the Indicator Word DELAY will go off.
When the clean time has been completed, the Indicator Words CLEAN and ON
will go off. The Indicator Word LOCK and the cooling fan will remain on until the
oven has cooled down and the door has unlocked,
30
To cancel self-clean
•
Touch Cancel Off Pad.
•
The oven door will be locked while the LOCK Indicator Word remains in the Display.
Depending on the length of time the oven had been self-cleaning, it may take up
to 45 minutes for the oven to cool down, the door to unlock and cooling fan to turn
off.
•
IMPORTANT
Note WW30430 Owners: Both ovens CANNOT be cleaned at the same time. The
LOCK Indicator Word for the first oven must go off before setting the second oven
for a clean
•
Note WW30430 Owners: If one oven is set to clean, the other oven cannot be
set for clock controlled baking.
•
To recall cleaning time or stop time: Touch the appropriate pad (Clean Pad or
Stop Time Pad).
•
To change cleaning time or stop time before cleaning begins:
preceding steps.
•
When the Clean Pad is touched, a fan comes on. If this fan is not operating, the
oven will go through the cleaning process at a reduced oven temperature and the
oven will not clean effectively. If the fan does not operate, contact your authorized
Jenn-Air Service Contractor for service.
•
A slight odor may be detected, and if an oven is heavily soiled, some smoke may
be visible. Some smoke and odor during the cleaning process is a normal
occurrence. Since the oven is vented under the control panel, vapors, moisture,
etc. may be seen coming from this area.
•
During the cleaning process, do not be alarmed it an occasional flame is visible
through the oven window. This is caused by excessive food soil that was not
removed before the oven was set to clean.
•
SINCE THE DOOR AND WINDOW OF THE OVEN WILL GET WARM DURING
THE SELF-CLEANING PROCESS, AVOID CONTACT.
•
Some types of soil may disintegrate but leave a light film or heavier deposit of ash.
The amount of ash depends on the amount of soil which was in the oven. After oven
has cooled, this ash may be removed with a damp sponge. If other dark deposits
remain after wiping with a sponge, the time set for the length of cleaning was not
enough. Increase the cleaning time for future cleanings or clean more frequently,
The normal cleaning time is 3 hours. A maximum of 4 hours may be selected if
necessary.
31
Repeat the
•
If racks have been left in oven during the cleaning process, they should be treated
as follows. After the cleaning process is completed and the oven has cooled, buff
the underside of rack edges with Scotch-Brite scour pad or rub lightly the
underside of rack edges with a coating of vegetable oil. Use a light application
of oil so it does not soil the oven. This will make the cleaned racks slide more
easily.
•
To remove occasional spillovers between
pad or mild cleanser; rinse well.
•
It is better to clean the even regularly rather than wait until there is a heavy buildup of soil in the oven.
•
During the cleaning process, the kitchen should
eliminate normal odors associated
with cleaning.
•
DO NOT USE COMMERCIAL OVEN CLEANERS.
•
DO NOT USE ALUMINUM FOIL OR OTHER LINERS IN THE OVEN.
cleanings,
use a soap-filled scouring
be wen ventilated
to help
Oven Door Trim
Slightly dampen a cloth or paper towel with soapy water or nonabrasive cleanser such
as Fantastik or 409. Do not use excessive amounts of water or allow water to run down
through the air vents under the door handle since this will cause streaks which will be
visible through the glass door. White parts may be cleaned with chlorine bleach or a
nonabrasive cleanser that contains chlorine bleach. Do not use any abrasive cleansers,
oven cleaners, or scrub with any abrasive materials, such as S.O.S. pads, Scoth-Brite
pads, etc.
Glass Window or Glass Oven Door Front
Use any suitable glass cleaner or soapy water.
32
Control Panel Area and Display Window
Wipe with soft cloth dampened with soapy water or glass cleaner. Do not spray any
cleaning solutionsdirectly onto the display window or use large amounts of soap and
water. Do not scrub with S.O.S.pads or abrasive cleaners.
Stainless Steel (select models)
Do not use any cleaning product containing chlorine bleach.
Always wipe with the grain when cleaning.
Daily Cleaning/LightSoil - Wipewith one ofthe following - soapy water,white vinegar/
water solution,Formula409 Glassand Surface Cleaneror a similar multi-surfacecleaner
- using a sponge or soft cloth. Rinse and dry. To polish and help prevent fingerprints,
follow with Stainless Steel Magic Spray (Jenn-Air ModelA912, Part No. 20000008).
Moderate/Heavy Soil - Wipe with one of the following - Ben Ami or Soft Scrub - using
a damp spongeor soft cloth. Rinseanddry. Stubbornsoilsmay be removed witha damp
Scotch-Britepad; rub evenly with the grain. Rinseand dry. To restorelusterand remove
streaks, follow with Stainless Steel Magic Spray (Jenn-Air Model A912, Part No.
2OOOO0O8).
Discoloration - Using a damp sponge or soft cloth, wipe with Cameo StainlessSteel
Cleaner. Rinse immediately and dry. To remove streaksand restore luster,follow with
StainlessSteel Magic Spray (Jenn-Air Model A912, Part No. 20000008).
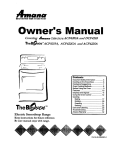
To remove pull forward to the "stop"position; lift up
on the front of the rack and pull out.
_
Beforereplacingbulb, disconnectpower tooven at themain fuse or c/rcuitbreakerpaneL
Be sure that the entire oven cavity includingthe light bulb is cool before attempting to
remove.
To replace light bulb
1. Carefully unscrewthe glass light lens.
2. To obtain firm grasp on the bulb, wear protective rubber
gloves. Removebyturning bulbtotheleft. Do not toucha hot
ovenlight bulb with a damp cloth as bulb will break. Note: If
the bulb does break and you wish to remove it, be certain
power supply is disconnected and wear protective gloves.
You may contactyour authorizedJenn-AirServiceContractor
for service.
3. Replacebulb with a 40 wattoven-ratedappliance bulb. Bulb
with brass baseis recommendedto preventfusing of bulb into
socket.
4. Replace bulb cover and reconnect power to oven. Reset
clock.
33
j
The oven temperature can be adjusted if all oven temperatures are too low or too high
and the length of time to cook ALL foods is too long or too short. De NOT adjust the
temperature if only one or two items are not baking properly.
To adjust
1.
2.
3.
4.
Touch the Bake Pad.
Enter 500° by touching the number pads: "5,0,0".
Touch and hold the Bake Pad for 8 seconds until "00 °" appears in the Display.
Touch the appropriate number pads to enter the offset temperature. (Allowable
range is -35 ° to +35°.) Note: Touching the Broil Pad will change the - sign to a
positive number or back to a negative number.
Note: Do not change the temperature setting more than 10° before checking the
oven.
5. Touch the Cancel Off Pad to return to the previous Display.
Important: The even should be adjusted only 10 ° and the oven should be tested. (We
recommend baking two 9" yellow layer cakes using a purchased box mix.) If the oven
temperature is still too low or too high, repeat the procedure described above.
The oven operation controls can be locked in the "OFF" position during cleaning or to
prevent a child from accidentally turning them on. The oven functions which can be
locked in the "OFF" position are: Bake, Convect Bake, Convect Roast, Probe, Broil and
Clean. The control functions which can always be used regardless of lockout are: Timer,
Clock and Oven Light.
To set
Touch and hold the Cook Time Pad and the Stop Time Pad simultaneously for four
seconds. The Indicator Word "OFF" will appear and remain in the temperature digits
for fifteen seconds.
Note: If an oven function is currently being used, the controls cannot be locked off.
Note: If someone touches an oven function pad, the Indicator Word "OFF" will again
appear in the temperature digits for fifteen seconds.
To cancel
Touch and hold the Cook Time Pad and the Stop Time Pad simultaneously for four
seconds. The Indicator Word "OFF" will appear briefly in the temperature digits and
then go ott.
34
Checkthe following list to be sure a service call is really necessary. A quick reference
of this manual may prevent an unneeded service call.
If nothing on the oven operates:
Q check for a blown circuit fuse or a tripped main circuit breaker.
• check if oven is properlyconnected to electric outlet.
If clock, indicator words, and/or lights operate but oven does not
heat:
• the controls may have been set incorrectly.
• clock controls may be set for delayed start of oven.
• the Child ProtectionLock may have been set.
If the oven light does not work:
• the light bulb is loose or defective.
• oven light does not work during self-cleaning process.
If oven will not go through self-cleaning process:
• controls may be improperly set.
• checkthe "Clean"and "Stop" time settings and the currenttime of day on the clock.
If oven did not clean properly:
• oven may need longer cleaning time.
• excessive spills were not removed prior to self-cleaning process.
If oven door will not unlock:
• oven may not have cooled to safe temperature after self-cleaning process.
• electric current coming into the oven may be off.
If foods do not broil properly:
• the control may not be set properly.
• check rack position.
• voltage into house may be low.
If baked food is burned or too brown on top:
• food may be positioned incorrectly in oven.
• oven not preheated properly.
If foods bake unevenly:
•
•
•
•
the oven may be installed improperly.
check the oven rack with a level.
stagger pans, do not allow pans to touch each other or oven wall.
check instructions for suggested placement of pans on oven rack.
If oven baking results are less than expected:
• the pans being used may not be of the size or material recommended for best
results.
• there may not be sufficient room around sides of the pans for proper air circulation
in the oven.
• check instructionsfor preheating, rack position and oven temperature.
35
If baking results differ from previous oven:
•
oven thermostat calibration may differ between old and new ovens. Follow recipe
and use and care directions before calling for service since the calibration on the
previous oven may have drifted to a too high or too low setting. (See p. 34 - Adjusting
Oven Temperature.)
If the cooling fan continues
turned off:
•
to operate after the oven has been
this is normal and the fan will automatically shut off when the oven is cooled.
If a fan is heard while using the bake mode:
•
this is the cooling fan and is normal. The fan will continue to run after use until the
oven cools.
If probe does not work:
•
•
•
check to be sure probe plug is properly inserted into oven receptacle.
probe may not be positioned in food properly.
probe temperature may have been improperly set.
Fault Codes
•
Fault codes are shown in the Display as "F" and a number. If a fault code appears
in the Display and a continuous beep sounds, touch the Cancel Off Pad. If the fault
code reappears, disconnect power to the oven and call an authorized Jenn-Air
Service Contractor.
mBJENN-AIR
403WESTFOURTH
STREETNORTH
oPOBOX39' NEWTON,
IA50208
Printed in U.S.A.
@1997 Jenn Air
Part No. 8111 P343-60
Cat. No. OU304OOUF
9/97