1
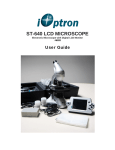
ST-80 MICROSCOPE
With Electronic Eyepiece
#6810
User Guide
The ST-80 Microscope
Thank you for purchasing your student
microscope from iOptron®. The ST-80
Microscope is both versatile and easy to use
with the ability to magnify objects 4x to
1024x. In addition, it comes with an
electronic eyepiece to allow you to directly
view and capture images or videos onto
your computer. The ST-80 Microscope
makes studying plant and insect samples
easy and fun.
Parts Diagram
2. Eyepiece
6.Objective
5.Stage
1. Focus Knob
3. On/Off Switch
Additional Parts:
CD with Driver and Software
Electronic eyepiece
5V Power Adapter
Microscope Cover
Sample Box
Hard Case
Light Pen
4.Aperture
Adjustment
Wheel
Caution: This device includes some sharp objects. Adult supervision is required when children are using device.
Setting Up Your Microscope
Step 1. Setting the monocular.
Loosen the fastening screw (need picture), twist the monocular
attachment to the desired position, and retighten the fastening screw.
Step 2. Setting the objective.
Rotate the revolving nosepiece to select the 4x objective.
Do not rotate the nosepiece by the objectives. Instead, use the ring the
above the objectives
Step 3. Setting the mechanical stage.
Raise the stage with the focusing knob until it cannot go any further.
Focusing knob
Step 4. Setting the illumination unit.
Spin the illumination wheel to the lowest setting.
Step 5. Connecting the power.
Connect the power adapter to the microscope before plugging into the
wall outlet.
Setting Up Your Electronic Eyepiece
Monocular
Step 1. Removing the eyepiece.
Remove the original eyepiece AND eyepiece attachment tube (inside)
the monocular. Insert the electronic eyepiece into the monocular tube (as
shown in picture here).
Electronic
Eyepiece
Step 2. Connecting the electronic eyepiece to the computer via the
USB cable.
USB
cable
Transmission Microscopy
Light is transmitted through the sample. (For transparent or translucent samples)
Step 1. Turning on the illumination unit.
Turn on the illumination unit by pressing the on-off switch.
Step 2. Setting the slide.
Place the desired sample slide on the stage, and push it under the
holding clamps. Alternatively, press down on the back of the holding
clamp (see red arrow).
Step 3. Centering the slide.
Adjust the sample slide, so that the sample is in the light cone from the
illumination unit.
Step 4. Focusing the image.
Look through the eyepiece and focus image by slowly lowering the stage
using the focusing knob.
Focusing knob
Step 5. Increasing the magnification.
Change objective to 10x or 40x, or change the eyepiece to 16x WF
Ocular for a more detailed view. Readjust the focus as necessary.
Step 6. Perfecting the image.
Aperture
diaphragm
After having selected the desired magnification, try to increase or
decrease the illumination intensity and to rotate the aperture adjustment
wheel. Readjust the focus as necessary.
Aperture
Adjustment
wheel
A smaller aperture opening increases the contrast, but reduces resolution. A larger aperture
opening increases the resolution, but reduces contrast.
Reflection Microscopy
Light is reflected off the sample. For opaque samples
Step 1. Setting up light pen.
Open the light pen by unscrewing the cap.
Insert two (2) AAA batteries in the orientation as indicated in the photo.
Place the cap back on the light pen.
+
-
Step 2. Attaching the light pen.
Allen
Wrench
Insert light pen into the opening for light pen, and turn on the light pen.
Adjust the light pen until the beam is over the opening on the stage.
Tighten the fastening screw with a 2mm Allen wrench (not included) until
the light pen is secure.
Step 3. Getting the image you want.
To focus the image -- repeat steps 2 through 6 above in Transmission
microscopy.
User Guide for installing driver and software
1. Installing the Driver (use a. or b.)
In Capture Mode, under Device Menu, select Basic
WebCam.
a. For Windows Vista and Windows 7:
Please plug in the electronic eyepiece into the
computer via its USB cord.
Windows Vista and Windows 7 will automatically
detect the camera and search for appropriate driver to
download and install.
In Capture Mode, under File Menu, select Set
Capture File… and save the file to an easily found
location of your choice. Later, that file will hold the raw
record that you will capture.
If Windows cannot find the correct drive, follow the
procedure for Windows XP users.
b. For Windows XP or earlier versions:
In the CD that came along with the product, please
find IC50C-100006.EXE file.
In Capture Mode, under Capture Menu, select
Capture Video to start recording your experiment.
Double click on the file, and follow the installation
instructions.
2. Installing the software
It is unnecessary for you to install the VirtualDub.exe.
To run the software, you can simply double click
VirtualDub.exe (32 bit users) in VirtualDub-1.9.7
32Bit folder or VirtualDub64.exe in VirtualDub-1.9.7
64Bit folder.
If you do not wish to keep running the software from
the CD, feel free to copy the VirtualDub-1.9.7 32Bit
folder or VirtualDub-1.9.7 64Bit folder to a location of
your preference on your computer. Run the software in
the same way as you would on the CD.
3. How to record your experiment
Open VirtualDub software.
Under File Menu, select Capture AVI… to enter
Capture Mode.
In Capture Mode, under Capture Menu, select Stop
Capture to stop recording your experiment.
In Capture Mode, under File Menu, select Exit
capture mode to return to main window.
4. How to create a video or image
sequence of your experiment
In the main window, under File Menu, select Open
Video File and open the file that you set earlier.
Under File Menu, in Export, select Image
Sequence… to show the selected section of your
experiment in a series of image files. Set the desired
Filename, Directory, and JPEG output format to
select where you want save your images.
You can use the buttons on the bottom and arrow keys
to play and move through your video. Use the
and Mark out
buttons to select the
Mark in
most interesting part of your experiment.
5. Saving and Exporting Files
Under File Menu, select Save as AVI… to save the
selected section of your experiment and make an
individual video.
The enclosed CD includes a free video/image software, VirtualDub for demonstration. You
can also use other software to do video/image capturing. VirtualDub is a video
capture/processing utility for 32-bit and 64-bit Windows platforms, licensed under the GNU
General Public License (GPL). Please visit www.VirtualDub.org for more information.
11/09
IOPTRON ONE YEAR MICROSCOPE AND ACCESSORIES WARRANTY
A. iOptron warrants your microscope and accessories to be free from defects in materials and workmanship for one
year. iOptron will repair or replace such product or part which, upon inspection by iOptron, is found to be defective in
materials or workmanship. As a condition to the obligation of iOptron to repair or replace such product, the product
must be returned to iOptron together with proof-of-purchase satisfactory to iOptron.
B. The Proper Return Authorization Number must be obtained from iOptron in advance of return. Call iOptron at
1.866.399.4587 to receive the number to be displayed on the outside of your shipping container.
All returns must be accompanied by a written statement stating the name, address, and daytime telephone number of
the owner, together with a brief description of any claimed defects. Parts or product for which replacement is made
shall become the property of iOptron.
The customer shall be responsible for all costs of transportation and insurance, both to and from the factory of
iOptron, and shall be required to prepay such costs.
iOptron shall use reasonable efforts to repair or replace any microscope and/or accessories covered by this warranty
within thirty days of receipt. In the event repair or replacement shall require more than thirty days, iOptron shall notify
the customer accordingly. iOptron reserves the right to replace any product which has been discontinued from its
product line with a new product of comparable value and function.
This warranty shall be void and of no force of effect in the event a covered product has been modified in design or
function, or subjected to abuse, misuse, mishandling or unauthorized repair. Further, product malfunction or
deterioration due to normal wear is not covered by this warranty.
IOPTRON DISCLAIMS ANY WARRANTIES, EXPRESS OR IMPLIED, WHETHER OF MERCHANTABILITY OF
FITNESS FOR A PARTICULAR USE, EXCEPT AS EXPRESSLY SET FORTH HERE. THE SOLE OBLIGATION OF
IOPTRON UNDER THIS LIMITED WARRANTY SHALL BE TO REPAIR OR REPLACE THE COVERED PRODUCT,
IN ACCORDANCE WITH THE TERMS SET FORTH HERE. IOPTRON EXPRESSLY DISCLAIMS ANY LOST
PROFITS, GENERAL, SPECIAL, INDIRECT OR CONSEQUENTIAL DAMAGES WHICH MAY RESULT FROM
BREACH OF ANY WARRANTY, OR ARISING OUT OF THE USE OR INABILITY TO USE ANY IOPTRON
PRODUCT. ANY WARRANTIES WHICH ARE IMPLIED AND WHICH CANNOT BE DISCLAIMED SHALL BE
LIMITED IN DURATION TO A TERM OF ONE YEARS FROM THE DATE OF ORIGINAL RETAIL PURCHASE.
Some states do not allow the exclusion or limitation of incidental or consequential damages or limitation on how long
an implied warranty lasts, so the above limitations and exclusions may not apply to you.
This warranty gives you specific legal rights, and you may also have other rights which vary from state to state.
iOptron reserves the right to modify or discontinue, without prior notice to you, any model or style microscope.
If warranty problems arise, or if you need assistance in using your microscope and/or accessories, contact:
iOptron Corporation
Customer Service Department
6E Gill Street
Woburn, MA 01801
www.ioptron.com
Tel. (866) 399-4597 (toll free in US)
Tel. (781) 569-0200
Fax. (781) 935-2860
Monday-Friday 9AM-5PM EST
NOTE: This warranty is valid to U.S.A. and Canadian customers who have purchased this product from an authorized
iOptron dealer in the U.S.A. or Canada or directly from iOptron. Warranty outside the U.S.A. and Canada is valid only
to customers who purchased from an iOptron Distributor or Authorized iOptron Dealer in the specific country. Please
contact them for any warranty service.