1
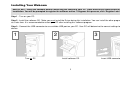
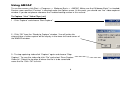
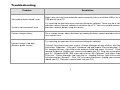
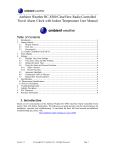
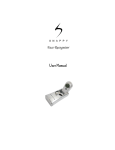
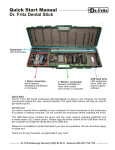
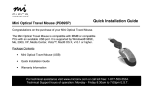
Webcam Basic User’s Manual Model IC50C FCC STATEMENT IC50c This device complies with part 15 of FCC Rules. Operation is subject to the following two conditions: (1) this device may not cause harmful interference, and (2) this device must accept any interference received, including interference that may cause undesired operation. This equipment has been tested and found to comply with the limits for a Class B digital device, pursuant to part 15 of FCC Rules. These limits are designed to provide reasonable protection against harmful interference when the equipment is operated in a residential installation. This equipment generates, uses, and can radiate radio frequency energy and, if not installed and used in accordance with the instruction guide, may cause harmful interference to radio communications. However, there is no guarantee that interference will not occur in a particular installation. If this equipment does cause harmful interference to radio or television reception, which can be determined by turning the equipment off and on, the user is encouraged to try to correct the interference by one or more of the following measures: • Reorient or relocate the receiving antenna. • Increase the separation between the equipment and the receiver. • Connect the equipment into an outlet on a circuit different from that to which the receiver is connected. • Consult a service representative for help. Properly shielded and grounded cables and connectors must be used in order to comply with FCC emission limits. Micro Innovations is not responsible for any radio or television interference caused by using other than recommended cables and connectors or by unauthorized changes or modifications to this equipment. Unauthorized changes or modifications could void the user’s authority to operate the equipment. Responsible party: Micro Innovations 400 Clearview Ave. Edison, NJ 08837 Telephone: 1(877) 550-5534 Tested To Comply With FCC Standards FOR HOME OR OFFICE USE This Class B digital apparatus complies with Canadian ICES-003. Cet appareil numérique de classe B est conforme à la norme NMB-003 du Canada. 2 Table of Contents Welcome…………………………………..…………………………………………………………………………..….…. Page 4 Installing Your Webcam…...………………….……………..………………………………….……...…………….…… Page 5 Using AMCAP……………….………………………………………………..…..……………………………....………… Page 6 Video Capture Settings…...………………….………………………………………………..…..…………….………… Page 7 Troubleshooting…...………………….………………………………………………..…..…………………….………… Page 8 Helpful Hints and Technical Support…...………………….………………………..…..……………………..………… Page 9 3 Welcome Congratulations on the purchase of your new Micro Webcam Basic PC camera. The camera is simple to install and easy-to-use. This manual contains information that will assist you in installing, operating, and caring for your PC camera. Included within the software are fun and exciting programs that will enhance and edit your photos or videos. For instructions on how to use each of the bundled software applications, please refer to the respective Help files within the software. System requirements: • Windows 98SE | ME | 2000 | XP operating system • Universal Serial Bus (USB port) • CD-ROM Drive • Internet connection for video conferencing (Optional) • Microphone for audio capture (Optional) Focus Control LED Indicator Lights when camera is in use Package contents: • Webcam Basic • Quick Installation Guide • User’s Manual • Installation & Application CD • Warranty Information Rotating Base Adjustable for stable camera positioning 4 Adjust the view focus Installing Your Webcam IMPORTANT - Install the software before connecting the camera to your PC. Close and save all work before this installation. You will be prompted to register the software online. To bypass this process, click ‘Register Later”. Step 1 - Turn on your PC. Step 2 - Install the software CD. *Note you must install the Driver during this installation. You can install the other programs now or at a later time. It is recommended to restart your PC after installing this software program. Step 3 - Connect the USB connector to an available USB port on your PC. Your PC will determine the correct settings to operate this device. 1 2 Turn on PC 3 Install software CD 5 Insert USB connector Using AMCAP To use the camera, click Start ⇒ Programs ⇒ Webcam Basic ⇒ AMCAP. Make sure that “Webcam Basic” is checked under the Devices menu and that “Preview” is checked under the Options menu. At this point, you should see “live” video capture in the AMCAP window. If you do not please reference the Troubleshooting section in this manual. To Capture “Live” Video Clips (.avi) 1 - Click ’Capture” and choose ‘Start Capture”. 2 - Click “OK” from the “Ready to Capture” window. You will notice the elapsed time of video capture will be display in the lower left-hand corner of the AMCAP window. 3 - To stop capturing video click “Capture” again and choose “Stop Capture”. To save the video clip click ‘File” and select “Save Capture Video As”. Select the location of where the file is to be saved and name the file. Click ‘OK” to finish. 6 Video Capture Settings To adjust video capture properties click “Options” and choose “ Video Capture Filter’. Here you can modify properties and settings such as Brightness, Hue, Saturation, White Balance, Exposure and Flicker (Light Frequency). *Note by clicking “ Restore” you can return to the original settings. Clicking “Options” and choosing “Video Capture Pin” can modify additional video capture settings. From this window you can modify Frame Rate, Compression, Output Size and Quality To set limits on video capture time, click “Options” and select “ Set Time Limit”. The following window will appear: *Note you can limit the size of the video capture size by clicking “File” and choosing “Allocate File Space”. Enter the amount of disk space to be used in the capture size field. Any video (data) that exceeds the allocated size will be lost. 7 Troubleshooting Problem Resolution “No capture device found” error Make sure you have connected the camera correctly into an available USB or try a different USB port on your PC. “Camera not connected” error Try removing the previous driver and reinstalling the software. There may be a conflict with previous camera/scanner software installed on your PC. You may need to remove the previous software before using this device. Camera image is blurry For a sharper image, adjust the focus by rotating the focus control located on the front of your camera lens. Try removing the previous driver and reinstalling the software. Camera image is too dark (Black or green screen) Uninstall the camera from your system’s Device Manager by right click on “My Computer” and select “Properties”. Click your” Hardware” tab and choose “Device Manager”. From the list “Imaging Devices, right-click on the webcam listing and select “Uninstall”. Click “OK” to remove the device. Unplug your camera and reboot your PC. Plug your camera back into your PC. (Windows 98SE \ ME users right click on “My Computer” and select “Properties”. Click your” “Device Manager” tab From the list “ Imaging Devices, right-click on the webcam listing and select “Remove”. Click “OK” to remove the device. Unplug your camera and reboot your PC. Plug your camera back into your PC.) 8 Helpful Hints The following hints will help you achieve the best results with your Micro Webcam Basic: Camera placement • • Position the camera so that the subject is centered Place the camera on a steady surface Lighting • • • • Use sufficient Lighting Place the light source behind the camera and facing the subject. Maintain a consistent lighting environment, i.e. do not mix fluorescent and other light types. Do not aim the camera directly at the light source. Camera Maintenance • • • • Keep the camera away from moisture and extreme temperature. Clean the outside of the camera with a clean, dry cloth. Never use harsh or abrasive cleaners or organic solvents on the camera or on any of its parts. Never disassemble or touch the inside of the camera. Technical Support For technical assistance call: 1-877-550-5534 or visit www.microinv.com Support hours of operation: Mon. – Fri. 8:30am to 7:00pm, Eastern Standard Time 9