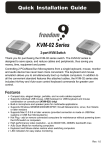
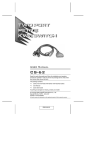
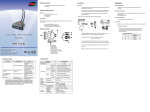
1
MiniView ™ Micro
2-Port KVM Switch with Built-in KVM Cables
Installation Manual (GCS62)
©2002 IOGEAR. All Rights Reserved. PKG-M0020
IOGEAR, the IOGEAR logo, MiniView, VSE are trademarks or registered trademarks of IOGEAR, Inc.
Microsoft and Windows are registered trademarks of Microsoft Corporation. IBM is a registered
trademark of International Business Machines, Inc. Macintosh, G3/G4 and iMac are registered
trademarks of Apple Computer, Inc. IOGEAR makes no warranty of any kind with regards to the
information presented in this document. All information furnished here is for informational purposes
only and is subject to change without notice. IOGEAR, Inc. assumes no responsibility for any
inaccuracies or errors that may appear in this document.
Thank you for purchasing one of the most feature-rich keyboard, video, and mouse
switches on the market. IOGEAR’s MiniView™ Micro switches are first-rate
connectivity accessories designed to help reduce the frustration of managing multiple
computer systems. With the MiniView™ Micro by IOGEAR, you can access two
computers from a single console(keyboard, mouse and monitor). MiniView™ Micro
allows you to change ports easily by entering Hot Key combinations from the keyboard
or OSD (On Screen Display). Setup is fast and easy; plugging cables into their
appropriate ports is all that is entailed.
We hope you enjoy using your MiniView™ Micro, yet another first-rate connectivity
solution from IOGEAR.
Table of Contents
Package Contents
Overview
Features
Requirements
Introduction
Installation
Operation
Appendix (HotKey)
Specification
Troubleshooting
Radio & TV Interference Statement
○
○
○
○
○
○
○
○
○
○
○
○
○
○
○
○
○
○
○
○
○
○
○
○
○
○
○
○
○
○
○
○
○
○
○
○
○
○
○
○
○
○
○
○
○
○
○
○
○
○
○
○
○
○
○
○
○
○
○
○
○
○
○
○
○
○
○
○
○
○
○
○
○
○
○
○
○
○
○
○
○
○
○
○
○
○
○
○
○
○
○
○
○
○
○
○
○
○
○
○
○
○
○
○
○
○
○
○
○
○
○
○
○
○
○
○
○
○
○
○
○
○
○
○
○
○
○
○
○
○
○
○
○
○
○
○
○
○
○
○
○
○
○
○
○
○
○
○
○
○
○
○
○
○
Limited Warranty
○
○
○
○
○
○
○
○
○
○
○
○
○
○
○
○
○
○
○
○
○
○
○
○
○
○
○
○
○
○
○
○
○
○
○
○
1
○
○
○
○
○
○
○
○
○
○
○
○
○
○
○
○
○
○
○
○
○
○
○
○
○
○
○
○
○
○
○
○
○
○
○
○
○
○
○
○
○
○
○
○
○
○
○
○
○
○
○
○
○
○
○
○
○
○
○
○
○
○
○
○
○
○
○
○
○
○
○
○
○
○
○
○
○
○
○
○
○
02
03
04
05
06
07
10
13
14
16
19
20
Package Contents
This package contains:
1 MiniViewTM Micro 2-port KVM
1 User Manual
1 Quick Start Guide
1 Warranty Registration Card
If any items are damaged or missing, please contact your dealer.
2
Overview
The MiniView™ Micro (GCS62) allows access to two computers from a single
console (keyboard, monitor, and mouse). This cost effective way to access two
computers, without extra hardware, is highly efficient and easy to use. By allowing a
single console to manage both computers, the MiniView™ Micro eliminates the
expense of purchasing extra keyboards, monitors, mice, and the MiniView™ Micro
eliminates the extra space they would take up.
The MiniView™ Micro is small, portable, and fits right on or under your desktop. It
also comes with a built-in KVM cable set to simplify the installation. Setup is fast and
easy: plugging cables into the appropriate ports is all that is entailed. There is no
software to configure, and no imcompatibility problems. Since the MiniView™ Micro
intercepts keyboard input directly, it works on any hardware platform and with all
operating system.
The MiniView™ Micro provides a convenient method to access the computers by
simple Hot Key combinations from the keyboard.
3
Features
- Use one keyboard, monitor and mouse to control two computers
- Very compact KVM switch with molded cables for computer connection
- Supports Microsoft IntelliMouse and the scrolling wheel on most mice
- Easy to install – No software required – connecting cables to the computers is all
it takes
- Easy to operate – PC selection via convenient Hot Keys
- AutoScan function to monitor computer operation
- LED display for easy status monitoring
- Caps Lock, Num Lock, and Scroll Lock states are saved and restored when
switching
- Hot pluggable – add or remove computers without powering down the switch
- Keyboard and mouse emulation for error free PC booting
- No need for external power supply
- Superior video quality – up to 1920x1440; DDC, DDC2, DDC2B
4
Requirements
Computers with PS/2 mouse connections, PS/2 or AT keyboard connections, and
HDDB15 VGA connection.
*NOTE: Serial mouse not supported, AT keyboard requires an AT to PS/2 adapter
5
Introduction
1. VGA port for the console monitor
2. PS/2 port for the console keyboard
3. PS/2 port for the console mouse
4. VGA connector goes to the computer
5. PS/2 keyboard connector goes to the computer
6. PS/2 mouse connector goes to the computer
7. Selected LEDs
5
4
6
7
5
4
6
1
2
3
6
Installation
Step. 1
Before you begin, please turn off the computers you are going to connect to the MiniView™ Micro.
NOTE: to prevent damage to your equipment due to static electric discharge, please make sure that all
devices on the installation are properly grounded.
1
1. Connect your monitor VGA cable to the
female VGA port (item# 1) on your
MiniView™ Micro.
2. Connect your PS/2 keyboard directly
into the PS/2 keyboard port (item# 2)
on your MiniView™ Micro.
2
3. Connect your PS/2 mouse directly into
the PS/2 keyboard port (item# 3) on
your MiniView™ Micro.
3
7
3
4
Installation
Step. 2
1.Connect the VGA cable (item# 4) that is built into the KVM cable of your MiniView™
Micro to the VGA port on your computer.
2.Connect the PS/2 keyboard cable (item# 5) that is built into
the KVM cable of your MiniView™ Micro to the PS/2 keyboard port on your computer.
3.Connect the PS/2 mouse cable that is
built into the KVM cable of your
MiniView™ Micro to the PS/2
mouse port on your computer.
2
1
3
8
Installation
Step. 3
Repeat step 2 for your second computer.
Step. 4
Turn the power of your computers on, and refer to operation instruction.
9
Operation
Operations
MiniView™ Micro allows you to access the computers through Hot Key combinations
from the keyboard.
1. Selecting computers
You can toggle between the two computers by pressing and releasing the left or right
Scroll Lock key twice: [Scroll Lock]+[Scroll Lock].
2. AutoScan Mode
The MiniView™ Micro offers AutoScan feature and allows you to monitor the activity
of the connected computers without taking the trouble of switching yourself.
10
Operation
Operations con’d
To initiate the AutoScan mode, press and release the left Shift key, then press and
release the right Shift key: [Left Shift] + [Right Shift].
NOTE: the interval between these two keys should be no more than 0.5 seconds.
Once the scanning begins, it continues until you press the [Space Bar] to exit
AutoScan Mode. The port that was active at the time the scanning stopped would
remain active.
Note: While AutoScan Mode is in effect, none of the keyboard keys except [Space
Bar] will function. You must exit AutoScan Mode by pressing the [Space Bar] in order
to use the keyboard for other purposes.
11
Operation
Operations con’d
You can customize the scan interval time with the following Hot Key combination:
[Left Shift] + [Right Shift] + [S] + [n].
[n] represents a number from 1 to 4 which sets the desired scan interval as shown in
the table below:
n
1
2
3
4
Scan Interval
3 seconds
5 seconds
10 seconds
20 seconds
12
Appendix
LED Display
Activity
Function
Off
Por t is not selected
On (Steady)
Por t is connected to an active computer
Flashing
Por t is connected to an active computer, and is being accessed in
AutoScan Mode
13
Specification
PC Connections (Direct)
2
PC Selection
Hot Key
Keyboard
PC (with plugs at the
end of the cables)
Mouse
Connector
Console
2 x Mini-DIN-6 (M) Purple
2 x Mini-DIN-6 (M) Green
VGA Monitor
2 x HDB-15 (M) Blue
Keyboard
1 x Mini-DIN-6 (F) Purple
Mouse
1 x Mini-DIN-6 (F) Green
VGA Monitor
1 x HDB-15 (F) Blue
14
Specification Con’d
LED (Selected)
2 x Green @ Top
Keyboard/Mouse Emulation
PS/2
Scan Interval
3, 5, 10, 20 seconds
Resolution
1920 x 1440, DDC, DDC2, DDC2B
Operation Temperature
0° - 50° C
Storage Temperature
-20° - 60° C
Humidity
0 - 80% RH, NC
Enclosure
Plastic
Weight
0.75 LBs
Dimensions (LxWxH)
2.5" x 2.25" x 0.875" with 4' cables
15
Troubleshooting
Symptom
Keyboard Not
Responding*
Possible Cause
Action
Loose cables
Check all keyboard cable connections to make sure they are
completely seated in the sockets
Keyboard needs to be
reset.
Unplug the keyboard from the Console Keyboard Por t, then plug it
back in.
MiniView™ Micro
needs to be reset
Turn off computers. Unplug the cables from the unit. Wait five
seconds; then plug the cables back in and turn the computers on.
MiniView™ Micro is in
AutoScan mode
Press the Spacebar to exit AutoScan mode.
Selected por t
connects to a
powered-off computer
Resend the Hot Key command selecting a por t that has a
powered-on computer attached
Pressing Hot Keys
Hot Key sequence
gets no response
input incorrectly
MiniView™ Micro is in
AutoScan mode
Resend the Hot Key command - press and release each key in
the sequence individually
Press the Spacebar to exit AutoScan mode.
16
Troubleshooting Con’d
Symptom
Possible Cause
Action
Loose Cables
Check all mouse cable connections to make sure they are
completely seated in the sockets.
Use of Mouse Por t
Adapters
This unit is designed to only work with PS/2 mice and computers
with PS/2 type mouse por ts. PS/2 mouse signals and serial mouse
signals are different - adapters will not conver t the signals therefore, the computer must be equipped with a PS/2 type mouse
por t. Serial mouse por ts with adapters cannot be used.
Mouse not detected, Mouse needs to be Unplug the mouse from the Console Keyboard Por t, then plug it
or does not respond reset
back in.
correctly**
MiniView™ Micro
Turn off computers. Unplug the cables from the unit. Wait five
needs to be reset
seconds; then plug the cables back in and turn the computers on.
Mouse set to Serial Some mice can be set to act as either a PS/2 or serial mouse.
Mode
Make sure the mouse is set to S/2 mode.
Incorrect Mouse
Driver
Check your Device Manager to be sure that the correct driver for
your mouse (obtained from the manufacturer, or supplied by the
operating system) has been installed.
17
Troubleshooting Con’d
Symptom
Possible Cause
Action
Video Problems
Resolution and/or
bandwidth set too high
Select a lower resolution and/or bandwidth.
* The unit is designed to work with PS/2 and AT keyboards.
** Some notebooks, notably the IBM ThinkPad and Toshiba Tecra, have trouble
when their mouse and keyboard ports are used simultaneously. To avoid this, only
connect the mouse port or the keyboard port. If you connect the mouse port, you will
need to use the notebook’s keyboard when the notebook becomes the active
computer.
18
Radio & TV Interference Statement
WARNING!!! This equipment generates, uses and can radiate radio frequency
energy and, if not installed and used in accordance with the instruction manual,
may cause interference to radio communications. This equipment has been
tested and found to comply with the limits for a Class B computing device
pursuant to Subpart J of Part 15 of FCC Rules, which are designed to provide
reasonable protection against such interference when operated in a commercial
environment. Operation of this equipment in a residential area is likely to cause
interference, in which case the user at his own expense will be required to take
whatever measures may be required to correct the interference.
19
Limited Warranty
IN NO EVENT SHALL THE DIRECT VENDOR’S LIABILITY FOR DIRECT,
INDIRECT, SPECIAL, INCIDENTAL OR CONSEQUENTIAL DAMAGES
RESULTING FROM THE USE OF THE PRODUCT, DISK OR ITS DOCUMENTATION EXCEED THE PRICE PAID FOR THE PRODUCT.
The direct vendor makes no warranty or representation, expressed, implied, or
statutory with respect to the contents or use of this documentation, and
especially disclaims its quality, performance, merchantability, or fitness for any
particular purpose.
The direct vendor also reserves the right to revise or update the device or
documentation without obligation to notify any individual or entity of such
revisions, or updates. For further inquires please contact your direct vendor.
20
Contact info.
23 Hubble • Irvine, CA 92618 • (P)949.453.8782 • (F)949.453.8785 • www.iogear.com