1
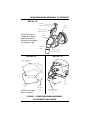
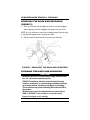
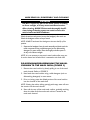
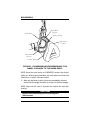
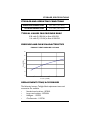
ASSEMBLY, INSTALLATION, AND OPERATING INSTRUCTIONS Invacare® Twilight Nasal Mask and Headgear MODEL NO: ISP2000L LARGE LATEX FREE DEALER: THIS MANUAL MUST BE GIVEN TO THE END USER. USER: BEFORE USING THIS NASAL MASK AND HEADGEAR, READ THIS MANUAL AND SAVE FOR FUTURE REFERENCE. For more information regarding Invacare products, parts, and services, please visit: www.invacare.com 1 SPECIAL NOTES SPECIAL NOTES DANGER/WARNING/CAUTION notices as used in this manual apply to hazards or unsafe practices which could result in personal injury or property damage. NOTICE THE INFORMATION CONTAINED IN THIS DOCUMENT IS SUBJECT TO CHANGE WITHOUT NOTICE. CHECK ALL PARTS FOR SHIPPING DAMAGE. IF SHIPPING DAMAGE IS NOTED, DO NOT USE. CONTACT DEALER/CARRIER FOR FURTHER INSTRUCTION. THE INVACARE TWILIGHT NASAL MASK IS INTENDED TO BE USED WITH POSITIVE AIRWAY PRESSURE DEVICES SUCH AS CPAP, TO PROVIDE 3-20 cmH2O FOR THE TREATMENT OF ADULT OBSTRUCTIVE SLEEP APNEA. THE MASK IS INTENDED FOR SINGLE PATIENT USE. THE MASK IS TO BE USED ON ADULT PATIENTS (> 66 LBS [30 kg]) FOR WHOM POSITIVE AIRWAY PRESSURE THERAPY HAS BEEN PRESCRIBED. WARNING DO NOT INSTALL, MAINTAIN OR OPERATE THIS EQUIPMENT WITHOUT FIRST READING AND UNDERSTANDING THIS MANUAL. IF YOU ARE UNABLE TO UNDERSTAND THE DANGERS/ WARNINGS/CAUTIONS AND INSTRUCTIONS, CONTACT YOUR HOME HEALTHCARE PROVIDER BEFORE ATTEMPTING TO USE THIS EQUIPMENT - OTHERWISE INJURY OR DAMAGE MAY RESULT. 2 SAFETY SUMMARY SAFETY SUMMARY To ensure the safe and proper installation and use of the Invacare Twilight Nasal Mask and Headgear, these instructions MUST be followed: WARNING This Twilight Nasal Mask should be used only with CPAP systems recommended by your physician or respiratory therapist. A mask should not be used unless the CPAP system is turned on and operating properly. NEVER block the vent hole or holes associated with the mask. Explanation of Warning: CPAP systems are intended to be used with special masks with connectors which have vent holes to allow continuous flow of air out of the mask. When the CPAP machine is turned on and functioning properly, new air from the CPAP machine flushes the exhaled air out through the attached mask exhalation port. However, when the CPAP machine is not operating, not enough fresh air is provided through the mask, and exhaled air may be rebreathed. Rebreathing of exhaled air for longer than several minutes can in some circumstances lead to suffocation. This warning applies to most models of CPAP systems. The entire mask system is for single patient use, and must not be reused on another person. This is to avoid risk of cross-infection. 3 HEADGEAR/MASK ASSEMBLY, PLACEMENT HEADGEAR/MASK ASSEMBLY, PLACEMENT AND USAGE (FIGURE 1) NOTE: Wash the headgear before using it for the first time, as dye may run. Refer to CLEANING THE MASK AND HEADGEAR in this manual. NOTE: Invacare recommends washing your face before fitting the mask. This will remove excess facial oil and extend the life of the mask. 1. Check the nasal mask, ensuring that the nasal cushion is attached, the swivels function, and the exhalation ports are clear. 2. Attach the headgear to the nasal mask by sliding the upper headgear straps through the loophole of the forehead support. 3. Adjust each strap by folding it back and attaching it to itself, using the hook and loop fastener straps. 4. Slide the lower headgear strap through the loopholes of the headgear clips. 5. Loosely secure the straps by folding them back and using the hook and loop fastener straps. 6. Connect a standard 22mm bore, 6-foot tube from your flow generator to the tubing swivel by pressing the tube end over the swivel. 7. Turn ON the flow generator BEFORE placing the mask on your face. 8. Place mask on face with headgear straps behind head. 9. Adjust the mask position on the nose. Depress the forehead support adjustment tab and slide the forehead support up or down until it contacts the forehead and the upper portion of the nasal cushion lightly touches the bridge of the nose. The mask should fit comfortably. 10. Place the mask loosely over the nose, with minimal pressure. 11. Attach the headgear clips to the nasal mask. NOTE: If a leak occurs, tighten the headgear straps by readjusting the hook and loop fasteners. WARNING DO NOT pull the straps too tight, this can cause skin irritation and may deform the nasal cushion, causing a leak. If the mask and headgear are adjusted correctly and a problem persists, contact your healthcare professional. 4 HEADGEAR/MASK ASSEMBLY, PLACEMENT DETAIL A Forehead Support Nasal Cushion Forehead Support Adjustment Tab NOTE: The Invacare Twilight Nasal Mask is supplied assembled (except for the headgear and headgear clips). Main Swivel Tubing Swivel Mask Shell with Exhalation Ports DETAIL C DETAIL B Upper Headgear Strap Hook and Loop Fastener Straps Headgear Clips NOTE: Two (2) spare clips are included. Lower Headgear Strap Attach Tube From Flow Generator Here FIGURE 1 - HEADGEAR/MASK ASSEMBLY, PLACEMENT AND USAGE 5 HEADGEAR/MASK REMOVAL, CLEANING REMOVING THE MASK AND HEADGEAR (FIGURE 2) 1. Place your thumb and forefinger around one of the headgear clips and gently pull the headgear clip away from your face. NOTE: It is not necessary to remove the headgear straps from the clips or the forehead support when removing the mask. 2. Pull the mask forward and lift it up and over the head. Headgear Clip Headgear Clip FIGURE 2 - REMOVING THE MASK AND HEADGEAR CLEANING THE MASK AND HEADGEAR CAUTION ALWAYS be sure to remove any foreign material (dirt, lint, etc.) from the exhalation ports. DO NOT use bleach, chlorine, aromatic-based cleaning solutions, scented oils, or moisturizing or antibacterial soaps, to clean the cushion, mask frame, headgear, or air tubing. These solutions may cause hardening and reduce the life of the product. Alcohol may be used to clean the silicone nasal cushion ONLY. DO NOT use alcohol to clean the mask frame, head gear or air tubing. 6 MASK REMOVAL, DISASSEMBLY AND CLEANING WARNING DO NOT expose any part of the mask system or tubing to direct sunlight, as it may cause mask deterioration. After cleaning, ALWAYS rinse mask thoroughly. Insufficient rinsing of cleaning agents can result in severe skin rash, irritation and skin breakdown. Wash the entire mask system (except the headgear) after each use. Wash the headgear at least once per week. NOTE: ALWAYS hand wash the headgear to increase the life of the product. 1. Separate the headgear from the mask assembly and hand wash the mask components using a mild detergent (such as dishwashing detergent) in warm water. Rinse thoroughly and allow parts to air-dry out of direct sunlight. NOTE: It is not necessary to remove the nasal cushion after every use. It can be cleaned and rinsed while it is mounted to the mask shell. DISASSEMBLING/REASSEMBLING THE NASAL CUSHION TO THE MASK SHELL (FIGURE 3) 1. Remove the nasal cushion by slowly pulling it out of the nasal mask channel. Refer to FIGURE 3. 2. Hand wash the nasal cushion using a mild detergent (such as dishwashing detergent) in warm water. 3. Prior to rinsing, press the ribbed portion of the nasal cushion into the channel of the mask shell. NOTE: Wetting the cushion ribbing sparingly with soapy water will ease the insertion into the nasal channel. 4. Start with the top of the nasal mask cushion, gradually working down the sides until the nasal mask cushion is seated in the nasal mask channel. 7 REASSEMBLY Nasal Mask Channel Nasal Mask Cushion Ribbing Nasal Mask Cushion Nasal Mask Channel Cushion Ribbing FIGURE 3 - DISASSEMBLING/REASSEMBLING THE NASAL CUSHION TO THE MASK SHELL NOTE: Ensure the nasal cushion is COMPLETELY seated in the channel before use. When properly assembled, the nasal cushion and mask shell should form a smooth, continuous surface. 5. After the nasal mask cushion is securely reassembled, rinse the entire mask thoroughly and allow to air dry out of direct sunlight. NOTE: Make sure the mask is dry before use. Inspect the mask after cleaning. CAUTION Replace the mask if any parts are damaged or deteriorated. 8 STORAGE, SPECIFICATIONS STORAGE AND OPERATING CONDITIONS OPERATING TEMPERATURE: 50 to 104°F (10 to 40°C) STORAGE TEMPERATURE: -4 to 158°F (-20 to 70°C) TYPICAL VALUES FOR PRESSURE DROP 0.30 cmH2O (.030 kPa) at flow of 50 LPM 1.14 cmH2O (.112 kPa) at flow of 100 LPM PRESSURE AND FLOW CHARACTERISTICS EXHAUST VENT PRESSURE VS. FLOW 60 50 Flow (LPM) 40 30 20 10 0 0 5 10 15 20 25 Pressure (cmH2O) REPLACEMENT ITEMS/ ACCESSORIES The following Invacare Twilight Mask replacement items and accessories are available: Standard nasal cushions - ISP2010 Large nasal cushions - ISP2010L Headgear - 1122733 Chin Restraint - 1122734 9 WARRANTY LIMITED WARRANTY PLEASE NOTE: THE WARRANTY BELOW HAS BEEN DRAFTED TO COMPLY WITH FEDERAL LAW APPLICABLE TO PRODUCTS MANUFACTURED AFTER JULY 4, 1975. This warranty is extended only to the original purchaser/user of our products. This warranty gives you specific legal rights and you may also have other legal rights which vary from state to state. Invacare warrants the Twilight Mask to be free from defects in materials and workmanship for a period of 90 days from date of purchase. If within such warranty period any such product shall be proven to be defective, such product shall be repaired or replaced, at Invacare's option. This warranty does not include any labor or shipping charges incurred in replacement part installation or repair of any such product. Invacare's sole obligation and your exclusive remedy under this warranty shall be limited to such repair and/or replacement. For warranty service, please contact the dealer from whom you purchased your Invacare product. In the event you do not receive satisfactory warranty service, please write directly to Invacare at the address on the back cover, provide dealer's name, address, date of purchase, indicate nature of the defect and, if the product is serialized, indicate the serial number. Do not return products to our factory without our prior consent. LIMITATIONS AND EXCLUSIONS: THE FOREGOING WARRANTY SHALL NOT APPLY TO SERIAL NUMBERED PRODUCTS IF THE SERIAL NUMBER HAS BEEN REMOVED OR DEFACED, PRODUCTS SUBJECTED TO NEGLIGENCE, ACCIDENT, IMPROPER OPERATION, MAINTENANCE OR STORAGE, COMMERCIAL OR INSTITUTIONAL USE, PRODUCTS MODIFIED WITHOUT INVACARE'S EXPRESS WRITTEN CONSENT (INCLUDING, BUT NOT LIMITED TO, MODIFICATION THROUGH THE USE OF UNAUTHORIZED PARTS OR ATTACHMENTS; PRODUCTS DAMAGED BY REASON OF REPAIRS MADE TO ANY COMPONENT WITHOUT THE SPECIFIC CONSENT OF INVACARE, OR TO A PRODUCT DAMAGED BY CIRCUMSTANCES BEYOND INVACARE'S CONTROL, AND SUCH EVALUATION WILL BE SOLELY DETERMINED BY INVACARE. THE WARRANTY SHALL NOT APPLY TO PROBLEMS ARISING FROM NORMAL WEAR OR FAILURE TO ADHERE TO THE FOLLOWING INSTRUCTIONS. 10 WARRANTY THE FOREGOING EXPRESS WARRANTY IS EXCLUSIVE AND IN LIEU OF ANY OTHER WARRANTIES WHATSOEVER, WHETHER EXPRESS OR IMPLIED, INCLUDING THE IMPLIED WARRANTIES OF MERCHANTABILITY AND FITNESS FOR A PARTICULAR PURPOSE, AND THE SOLE REMEDY FOR VIOLATIONS OF ANY WARRANTY WHATSOEVER, SHALL BE LIMITED TO REPAIR OR REPLACEMENT OF THE DEFECTIVE PRODUCT PURSUANT TO THE TERMS CONTAINED HEREIN. THE APPLICATION OF ANY IMPLIED WARRANTY WHATSOEVER SHALL NOT EXTEND BEYOND THE DURATION OF THE EXPRESS WARRANTY PROVIDED HEREIN. THE MANUFACTURER SHALL NOT BE LIABLE FOR ANY CONSEQUENTIAL OR INCIDENTAL DAMAGES WHATSOEVER. THIS WARRANTY SHALL BE EXTENDED TO COMPLY WITH STATE/PROVINCIAL LAWS AND REQUIREMENTS. 11 Invacare Corporation www.invacare.com USA One Invacare Way Elyria, Ohio USA 44036-2125 800-333-6900 2101 E. Lake Mary Blvd. Sanford, Florida USA 32773 Technical Support: Toll Free 800-832-4707 Invacare is a registered trademark of of Invacare Corporation. Yes, you can. and Twilight are trademarks of Invacare Corporation. © 2003 Invacare Corporation Part No. 1118405 Rev B - 10/03