1
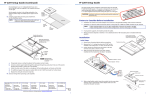
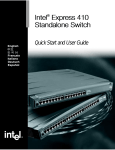
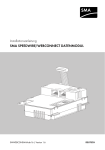
Intel Express
220T Stackable Hub
English
Français
Italiano
Deutsch
Español
Quick Start
Quick Start
English
1
Install the Hub
Rack: Use the four
small screws to attach
the brackets to the hub.
• Remove the hub and parts from the box.
• Use the enclosed brackets if you plan to
mount the hub in a rack.
1
2
3
4
5
6
• Install the Express 220T Stackable Hub in
a rack or on a shelf.
• Plug in the power cord.
2
Connect
the Devices
7
8
9
10
11
Intel Exp
Stackableress 220T
Hub
12
Class I
Colls 10Mb
Left (Orang
Orange e/Green)
=
Green = 10Mbps
100Mbps
Solid =
Link
Blink =
Activity
Right (Yellow
)
Solid =
Disable
d
Blink =
Wrong speed
ps
Colls 100M
RPS
bps
Bridged
Managed
Status
Power
Enable/Disabl
e
Bridging
Shelf: Peel off the protective
backing and attach the rubber
feet to the hub.
From
To
straight-through
• All ports are set to automatically detect the
speed of the device connected to it.
100
Hub
PC/Server
Hub
Print Server
• Connect PCs and print servers to the hub
with a straight-through cable.
100
• Use a crossover cable to connect a hub to a
switch.
crossover
• Use only CAT 5 UTP to connect 100Mbps
devices. To connect 10Mbps devices use
CAT 3, 4, or 5 UTP.
3
Check the
Connections
• Check the port LEDs to confirm the link
status.
• A solid LED (on the left) indicates a valid
link.
1
100
Hub
Left (Orange/Green)
Orange = 10Mbps
Green = 100Mbps
Solid = Link
Blink = Activity
Switch
Right (Yellow)
Solid = Disabled
Blink = Wrong speed
Optional Information
Stack the Hubs
• Unplug the hubs.
Input
100-120VAC/2.5A
200-240VAC/1.5A
47Hz-63Hz
Hub 1
English
4
Redundant Power Supply (RPS)
Input
100-120VAC/2.5A
200-240VAC/1.5A
47Hz-63Hz
Hub 2
Redundant Power Supply (RPS)
• Use an Intel Cascade Cable to connect the
hubs. Hubs can be stacked up to eight
high (mixed 12- or 24-port).
• When properly connected, the entire stack
will act as a single repeater with two
segments (10Mbps and 100Mbps). The
top hub in a stack will be numbered hub 1.
5
Intel Cascade Cable
(Product Code EE200CC)
Never daisy-chain hubs
running at 100Mbps with UTP
cable. Doing so violates the
IEEE 802.3u Fast Ethernet
standard for Class I hubs.
Bridge the 10Mbps and
100Mbps Segments
Intel Express 220T
Stackable Hub
• The hub’s internal bridge is active by
default and bridges the 10Mbps and
100Mbps segments (collision domains).
• If you are bridging the 10Mbps and
100Mbps segments externally (for
example, through a 10/100 switch) be sure
to turn off the hub’s internal bridge.
• If you have a stack of hubs, any bridging
button on any hub in that stack will enable
or disable bridging for the entire stack.
6
Bridged
Colls 100Mbps
Managed
RPS
Status
The Bridged LED
lights when internal
bridging is active for
the hub or stack
Hub Defaults
Segment 1=10Mbps
Segment 2=100Mbps
Bridging=active
Management Module
with RMON
Esc
Management Module for
Express Hubs.
Reset
Ethernet Module
or
Auto-negotiate
Change
duplex
Full-duplex
Half-duplex
Auto-negotiate
Change
duplex
Coll
100 Mbps
10 Mbps
Ethernet Module for
Express Hubs.
MDI-X
MDI
• Use the modules to manage a stack,
connect to devices at full-duplex, or to
extend the network to another building
or beyond 100 meters.
Power
Enable/Disable
Bridging
bridging
button
Add Additional
Modules
• The 12-port 220T can accept additional
modules (refer to the User Guide).
Colls 10Mbps
Fiber Module
Change
duplex
Xmt
Link
Rcv
Coll
Fiber Module for
Express Hubs.
Full-duplex
Half-duplex
TX
RX
2
1
Chinese
2
!
!"
!"#
!"#$%
!"#
• !"#$%&'()
• !"#$%&'()*+,!"#$
• !"#$%&=bñéêÉëë=OOMq
!"#$
• !"#
!"#$%&'()*+,
!"#$%&
!"#$%&'()*+,-
!
• !=iba
• iba=
4
5
6
7
8
9
10
11
Intel Exp
Stackableress 220T
Hub
12
Class I
Colls 10Mb
Left (Orang
Orange e/Green)
=
Green = 10Mbps
100Mbps
Solid =
Link
Blink =
Activity
Right (Yellow
)
Solid =
Disable
d
Blink =
Wrong speed
ps
Colls 100M
RPS
Bridged
Managed
Status
Power
Enable/Disabl
e
Bridging
100
=m`L
=
!"#$%&
100
100
!"L
=Z=NMjÄéë
=Z=NMMjÄéë
!=Z=
=Z=
!"#$%&'()*+
2
!"
3
220QS_CS.pm6
bps
!"#
• =R==rqm= !"#$%
=NMMjÄéë= !"#$%&'
=NMjÄéë= !"#$=PQ
=R==rqm=
3
3
• !"#$%=m`=
!"#$
• 2
!"#$%
!"#$%&'()*
!
• 1
3/31/98, 3:26 PM
!"#
!=Z=
=Z= !"
4
!"
!"
• !"#$%&'(
=N
Input
100-120VAC/2.5A
200-240VAC/1.5A
47Hz-63Hz
Redundant Power Supply (RPS)
=O
Input
100-120VAC/2.5A
200-240VAC/1.5A
47Hz-63Hz
Redundant Power Supply (RPS)
• =fåíÉä= !"#$%&'(
!"#$%&'()*+,NO==OQ=
• !"#$%&'()*+, !"NMjÄéë==NMMjÄéë
!"#$%&'()!'*+
!=N
5
=rqm= !"#$%&
!"#$%=NMMjÄéë=
!"#=f= !"=fbbb
UMOKPì=c~ëí= !"#
=10Mbps==100Mbps
• • Intel Express 220T
Stackable Hub
!"#$% !&'()*+
!"=NMjÄéë==NMMjÄéë=
!"#$
• !"#$=NMjÄéë==NMMjÄéë
!"#$%&=NMLNMM=
!"#$%&'()*+,
6
fåíÉä= !
!"=bbOMM``
!"#$%&'()&'*+,
!"#$%&'()*+,!"#$%&'(
Bridged
Managed
RPS
Status
!"#$%&
!"#$%&
!"#$%&
Management Module
with RMON
!"#
=NZNMjÄéë
=OZNMMjÄéë
Z
=bñéêÉëë=
!"#
Esc
Ethernet Module
Full-duplex
Auto-negotiate
Change
duplex
Coll
100 Mbps
=bñéêÉëë=
!"#
!
10 Mbps
MDI-X
MDI
=bñéêÉëë=
!"#
Fiber Module
Change
duplex
!
Reset
Auto-negotiate
Change
duplex
Half-duplex
• !"#$%&'()*+ *
!"#$%&'()*+, !=NMM= !
Enable/Disable
Bridging
!"
• NO==OOMq= !"#$%&'
!"#$%&'()
Power
Colls 10Mbps
Colls 100Mbps
Xmt
Link
Rcv
Coll
Full-duplex
Half-duplex
TX
RX
4
220QS_CS.pm6
3
3/31/98, 3:28 PM
Chinese
=
1
W===
= !=
= =
!K
=
• != = =
!"K
• == !"=
= !"#K
=
1
2
3
4
5
• = =bñéêÉëë=OOMq
pí~Åâ~ÄäÉ=eìÄ= !"#K
• = =
2
!=
!"K
=
• = != !=m`=
= = = !"#K
• = != != =
= !"#K
• NMMjÄéë== = !"
`^q=R=rqm= !"#K
NMjÄéë= = !"=`^q=PI
QI==R=rqm= !"#K
=
• =iba=
!"#K
7
8
9
10
11
Intel Exp
Stackableress 220T
Hub
12
Class I
Colls 10Mb
Left (Orang
Orange e/Green)
=
Green = 10Mbps
100Mbps
Solid =
Link
Blink =
Activity
Right (Yellow
)
Solid =
Disable
d
Blink =
Wrong speed
ps
Colls 100M
RPS
!==
Power
Enable/Disabl
e
Bridging
100
=========m`L
100
======
=
100
============
=E LF
== =Z=NMjÄéë
===Z=NMMjÄéë
====Z=
== =Z=
5
4
Bridged
Managed
Status
===============
• iba=EF====
== = !"K
220QS_KO.pm6
bps
W= !=
I= !=
= !"#K
• = == = =
= != !"=
= !K
3
6
3/31/98, 3:55 PM
=EF
====Z==
== =Z==
==
=
• = =
Redundant Power Supply (RPS)
!K
• fåíÉä=`~ëÅ~ÇÉ= != !
= !"#K= ==U
= == !=E
NOJ==OQJFK
• = !I== =
!=ENMjÄéë==NMMjÄéë=
F==== = =
= K= === =
N= = !"K
5
Input
100-120VAC/2.5A
200-240VAC/1.5A
47Hz-63Hz
=N
=O
Input
100-120VAC/2.5A
200-240VAC/1.5A
47Hz-63Hz
Redundant Power Supply (RPS)
fåíÉä=`~ëÅ~ÇÉ=
E==bbOMM``F
NMMjÄéë= !=
rqm= != !=
= = != !K
==f= ==fbbb
UMOKPì=c~ëí= ==
= !=
10Mbps !"
100Mbps= !"
!= !"#
Intel Express 220T
Stackable Hub
• = = != !"
!"I=NMjÄéë= !"
NMMjÄéë= !=E=F
!"K
• NMjÄéë= !"=NMMjÄéë=
= = !==E
I=NMLNMM= !=FI=
= = != !K
• = ==I= =
== = ==
= !=== =
!K
6
Bridged
Managed
Status
= =
==
==
==
iba==
K
Management Module
with RMON
Enable/Disable
Bridging
=
!=NZNMjÄéë
!=OZNMMjÄéë
=Z
= =
K
Esc
Reset
Ethernet Module
Auto-negotiate
Change
duplex
Full-duplex
Half-duplex
• =I= = !==
I== !"=NMM= !
= == !=
I= = !"#K
Power
Colls 10Mbps
Colls 100Mbps
RPS
==
• NOJ=OOMq== =
= !=E = =FK
4
Auto-negotiate
Change
duplex
Coll
100 Mbps
10 Mbps
MDI-X
MDI
= =
K
Fiber Module
Change
duplex
= =
K
Xmt
Link
Rcv
Coll
Full-duplex
Half-duplex
TX
RX
6
220QS_KO.pm6
5
3/31/98, 3:58 PM
Guide abrégé
1
Installez le
concentrateur
Châssis : Utilisez les
quatre vis fournies pour
fixer les supports au
concentrateur.
• Retirez le concentrateur et les pièces de
l’emballage.
• Utilisez les supports fournis si vous prévoyez
installer le concentrateur dans un châssis.
1
2
3
4
5
6
7
8
9
• Installez le concentrateur empilable Express
220T dans un châssis ou sur une surface plane.
10
11
Intel Exp
Stackableress 220T
Hub
12
Class I
Colls 10Mb
Left (Orang
Orange e/Gree
ps
n)
=
Green = 10Mbps
100Mbps
Solid =
Link
Blink =
Activity
Right (Yellow
)
Solid =
Disable
d
Blink =
Wrong speed
Colls 100M
Bridged
RPS
Managed
bps
Status
Power
Enable/Disabl
e
Bridging
• Branchez le cordon d’alimentation.
Surface plane : Enlevez la pellicule
protectrice des pieds de caoutchouc et
collez ceux-ci sous le concentrateur.
Français
French
2
Connectez
les appareils
De
A
câble direct
• Tous les ports sont configurés pour détecter
automatiquement la vitesse des unités qui y
sont connectées.
100
Concentrateur
PC/serveur
• Connectez les PC et les serveurs d’impression
au concentrateur à l’aide d’un câble direct.
100
• Pour connecter le concentrateur à un
commutateur, utilisez un câble de croisement.
Concentrateur
Serveur d’impression
câble de croisement
• Pour connecter des unités à 100 Mbit/s, utilisez
un câble à paire torsadée non blindée (UTP) de
catégorie 5 uniquement. Pour connecter des
unités à 10 Mbit/s, utilisez un câble UTP de
catégorie 3, 4 ou 5.
3
Vérifiez les
connexions
• Consultez les voyants à DEL de port pour
confirmer l’état de la liaison.
• Un voyant allumé (à gauche) indique une
liaison valide.
7
100
Concentrateur
Gauche (orange/vert)
Orange = 10 Mbit/s
Vert = 100 Mbit/s
Allumé = liaison
Clignotant = activité
Commutateur
Droite (jaune)
Allumé = désactivé
Clignotant = vitesse non valide
Informations supplémentaires
Concentrateur 1
• Débranchez les hubs concentrateurs.
Concentrateur 2
Input
100-120VAC/2.5A
200-240VAC/1.5A
47Hz-63Hz
Redundant Power Supply (RPS)
Input
100-120VAC/2.5A
200-240VAC/1.5A
47Hz-63Hz
Redundant Power Supply (RPS)
• Utilisez un câble de connexion en cascade
Intel pour relier les concentrateurs. Vous
pouvez empiler jusqu’à huit concentrateurs (à
12 ou 24 ports).
• Une fois les concentrateurs connectés, la pile
se comporte comme un répéteur doté de deux
segments (10 et 100 Mbit/s). Le concentrateur
du dessus de la pile est le concentrateur 1.
5
Câble de connexion
en cascade Intel
(code de produit EE200CC)
Ne reliez jamais des concentrateurs fonctionnant à
100 Mbit/s avec du câble à paire torsadée non
blindée. Une telle connexion n’est pas conforme à
la spécification IEEE 802.3u Fast Ethernet pour
concentrateurs de classe I.
Reliez les segments de
10 et 100 Mbit/s en pont
Intel Express 220T
Stackable Hub
• Le pont interne du concentrateur est actif par
défaut et relie les segments de 10 et
100 Mbit/s (domaines de collision).
• Si vous créez un pont externe entre les
segments de 10 et 100 Mbit/s (par exemple, à
l’aide d’un commutateur 10/100), vous devez
désactiver le pont interne du commutateur.
• Si vous utilisez une pile de concentrateurs, tout
bouton de pontage sur n’importe lequel des
concentrateurs de la pile activera ou désactivera
le pontage pour l’ensemble de la pile.
6
• Les modules permettent de gérer une pile,
d’établir une connexion en duplex intégral avec
des unités et de prolonger le réseau au-delà de
100 mètres ou de relier un autre site.
Colls 10Mbps
Bridged
Colls 100Mbps
Managed
RPS
Status
Power
Enable/Disable
Bridging
bouton de
pontage
Les DEL Bridged
s’allument lorsque le
pontage interne est actif
pour le concentrateur
ou la pile.
Ajoutez des modules
additionnels
• Le modèle 220T à 12 ports peut accepter
des modules additionnels (consultez le Guide de
l’utilisateur).
Français
French
4
Empilez les
concentrateurs
Management Module
with RMON
Valeurs par défaut du
concentrateur
Segment 1=10 Mbit/s
Segment 2=100 Mbit/s
Pontage=actif
Module de gestion pour
concentrateurs Express.
Esc
Reset
Ethernet Module
or
Auto-negotiate
Change
duplex
Full-duplex
Half-duplex
Auto-negotiate
Change
duplex
Coll
100 Mbps
10 Mbps
MDI-X
MDI
Fiber Module
Change
duplex
Module Ethernet pour
concentrateurs Express.
Xmt
Link
Rcv
Coll
Module à fibre optique pour
concentrateurs Express.
Full-duplex
Half-duplex
TX
RX
8
Iniziare subito
1
Installazione dell’hub
Rack: Utilizzare le
quattro piccole viti per
fissare i sostegni all’hub.
• Estrarre l’hub e le varie parti dalla scatola.
• Se si intende montare l’hub su rack, utilizzare
i sostegni inclusi.
1
2
3
4
5
6
• Installare Express 220T Stackable Hub su un
rack o su uno scaffale.
7
8
9
10
11
Intel Exp
Stackableress 220T
Hub
12
Class I
Colls 10Mb
Left (Orang
Orange e/Green)
=
Green = 10Mbps
100Mbps
Solid =
Link
Blink =
Activity
Right (Yellow
)
Solid =
Disable
d
Blink =
Wrong speed
ps
Colls 100M
RPS
bps
Bridged
Managed
Status
Power
Enable/Disabl
e
Bridging
• Collegare il cavo di alimentazione.
Scaffale: Togliere il fondo
protettivo e fissare i piedini
di gomma all’hub.
2
Collegamento
dei dispositivi
Da
A
Italiano
diritto
• Tutte le porte sono impostate per rilevare
automaticamente la velocità del dispositivo ad esse
collegato.
• Collegare i PC e i server di stampa all’hub con un
cavo diritto.
• Controllare i LED della porta per confermare
lo stato di collegamento.
• Il LED acceso a luce fissa (sulla sinistra)
indica un collegamento valido.
9
Server
di stampa
Hub
PC/Server
a incrocio
• Per connettere dispositivi a 100Mbps, utilizzare
solo doppino ritorto non schermato di categoria 5.
Per collegare dispositivi da 10Mbps utilizzare
doppino ritorto non schermato di categoria 3, 4 o 5.
3
Hub
100
• Utilizzare un cavo a incrocio per collegare l’hub a
un commutatore.
Controllo dei
collegamenti
100
100
Hub
Sinistra (Arancio/Verde)
Arancio = 10Mbps
Verde = 100Mbps
Fisso = Collegamento
Lampeggiante = Attività
Commutatore
Destra (Giallo)
Fisso = Disattivato
Lampeggiante =
Velocità sbagliata
Informazioni opzionali
Impilare gli hub
• Scollegare gli hub.
Input
100-120VAC/2.5A
200-240VAC/1.5A
47Hz-63Hz
Hub 1
Redundant Power Supply (RPS)
Input
100-120VAC/2.5A
200-240VAC/1.5A
47Hz-63Hz
Hub 2
Redundant Power Supply (RPS)
• Utilizzare un Cavo Intel Cascade per collegare
gli hub in cascata. Gli hub possono essere
impilati in altezza fino ad otto (misti da 12 o
24 porte).
• Quando sono collegati adeguatamente, l’intera
pila funzionerà come un ripetitore singolo con
due segmenti (10Mbps e 100Mbps). L’hub più
in alto della pila sarà numerato hub 1.
5
Cavo Intel Cascade
(Codice prodotto EE200CC)
Non concatenare mai hub a 100Mbps con cavo
doppino ritorto non schermato (UTP). Tale
procedura violerebbe lo standard IEEE 802.3u
per Fast Ethernet relativo agli hub di Classe I.
Collegamento bridge
dei segmenti da
10Mbps e 100Mbps
Intel Express 220T
Stackable Hub
• Il bridge interno all’hub è attivo per default e
collega i segmenti da 10Mbps e da 100Mbps
(domini di collisione).
• Se si stanno collegando con un bridge i segmenti
da 10Mbps e da100Mbps esternamente (ad
esempio con un commutatore 10/100) accertarsi
di aver spento il bridge interno dell’hub.
• Se si dispone di una pila di hub, un qualsiasi
pulsante di bridging su uno qualsiasi degli hub
di quella pila attiverà o disattiverà il bridging
per tutta la pila.
6
• Utilizzare i moduli per gestire una pila,
collegarsi a dispositivi a full duplex, o per
estendere la rete a un altro edificio oppure
oltre i 100 metri.
Bridged
Colls 100Mbps
Managed
RPS
Status
Power
Enable/Disable
Bridging
Pulsante di
bridging
Il LED Bridged si
accende quando il
bridging interno è
attivo per l’hub o per la
pila
Collegamento di
moduli aggiuntivi
• Il 220T a 12 porte può accettare dei moduli
aggiuntivi (far riferimento al Manuale
dell’utente).
Colls 10Mbps
Management Module
with RMON
Impostazioni di default
dell’hub
Segmento 1=10Mbps
Segmento 2=100Mbps
Bridging=attivo
Modulo di gestione per
gli Express Hub.
Esc
Reset
Ethernet Module
or
Auto-negotiate
Change
duplex
Full-duplex
Half-duplex
Auto-negotiate
Change
duplex
Coll
100 Mbps
Modulo Ethernet per
gli Express Hub.
10 Mbps
MDI-X
MDI
Fiber Module
Change
duplex
Xmt
Link
Rcv
Coll
Modulo Fibra ottica per
gli Express Hub.
Full-duplex
Half-duplex
TX
RX
10
Italiano
Italiano
4
Kurzanleitung
1
Hub Installieren
Rack: Befestigen Sie die
Klammern mit den vier
kleinen Schrauben am Hub.
• Nehmen Sie den Hub und das Zubehör aus
der Verpackung.
• Verwenden Sie die mitgelieferten Klammern,
wenn Sie den Hub an einem Rack befestigen
möchten.
1
2
3
4
5
6
7
8
9
10
11
Intel Exp
Stackableress 220T
Hub
12
Class I
Colls 10Mb
ps
Colls 100M
bps
RPS
Left (Orang
Orange e/Gree
n)
=
Green = 10Mbps
100Mbps
Solid =
Link
Blink =
Activity
Right (Yellow
)
Solid =
Disable
d
Blink =
Wrong speed
Bridged
Managed
Status
Power
Enable/Disabl
e
Bridging
• Stellen Sie den Express 220T Stackable-Hub
auf einem Rack oder in einem Regal auf.
Regal: Entfernen Sie die
Schutzhülle, und befestigen
Sie die Gummifüße am Hub.
• Stecken Sie das Netzkabel ein.
2
Anschließen der
Geräte
Von
Zu
Ungekreuztes Kabel
• Alle Anschlüsse ermitteln die Geschwindigkeit
der an ihnen angeschlossenen Geräte automatisch.
100
Hub
PC/Server
• Schließen Sie PCs und Druckserver mit
einem ungekreuzten Kabel an den Hub an.
Deutsch
• Schließen Sie einen Hub mit einem
gekreuzten Kabel an ein Switch an.
• Verwenden Sie für den Anschluß von 100-Mbit/sGeräten ausschließlich CAT 5 UTP-Kabel.
Schließen Sie 10-Mbit/s-Geräte mit CAT 3, 4,
oder 5 UTP-Kabeln an.
3
Überprüfen der
Verbindungen
• Überprüfen Sie die Anschluß-LEDs, um den
Verbindungsstatus zu bestätigen.
• Wenn die LED-Anzeige (auf der linken Seite)
stetig leuchtet, ist eine intakte Verbindung
gewährleistet.
11
100
Hub
Druckserver
Gekreuztes Kabel
100
Hub
Links (Orange/Grün)
Orange = 10 Mbit/s
Grün = 100 Mbit/s
Stetig = Verbindung
Blinken = Aktivität
Switch
Rechts (Gelb)
Stetig = Deaktiviert
Blinken = Falsche
Geschwindigkeit
Optionale Informationen
Hub 1
• Ziehen Sie die Stecker der Hubs ab.
Hub 2
Input
100-120VAC/2.5A
200-240VAC/1.5A
47Hz-63Hz
Redundant Power Supply (RPS)
Input
100-120VAC/2.5A
200-240VAC/1.5A
47Hz-63Hz
Redundant Power Supply (RPS)
• Verbinden Sie die Hubs mit einem Intel CascadeKabel. Bis zu acht Hubs können gestapelt werden
(gemischter 12- oder 24-Anschluß).
• Bei ordnungsgemäßer Verbindung funktioniert
der gesamte Stapel als ein Einzel-Repeater mit
zwei Segmenten (10 Mbit/s und 100 Mbit/s).
Der oberste Hub in einem Stapel wird als Hub
1 bezeichnet.
5
Intel Cascade-Kabel
(Produkt-Code EE200CC)
Hubs, die mit einer Geschwindigkeit von 100
Mbit/s betrieben werden, dürfen nicht mit einem
UTP-Kabel in Reihe geschaltet werden. Dadurch
wird gegen den IEEE 802.3u Fast EthernetStandard für Hubs der Klasse I verstoßen.
Überbrücken der
10-Mbit/s- und
100-Mbit/s-Segmente
Intel Express 220T
Stackable Hub
• Die interne Überbrückung des Hubs ist
standardmäßig aktiviert und überbrückt die
10-Mbit/s- und 100 Mbit/s-Segmente
(Konfliktdomänen).
• Wenn Sie die 10-Mbit/s- und 100-Mbit/sSegmente extern überbrücken (z.B. mit einem
10/100-Switch), müssen Sie die interne
Überbrückung des Hubs ausschalten.
• Bei einem Hubstapel wird durch jede Taste
für die Überbrückung auf einem beliebigen
Hub die Überbrückung für den gesamten
Stapel aktiviert bzw.- deaktiviert.
6
Managed
RPS
Status
Die LED-Anzeige für die
Überbrückung leuchtet,
wenn die interne Überbrückung des Hubs oder
Stapels aktiv ist.
Management Module
with RMON
Power
Enable/Disable
Bridging
HubStandardeinstellungen
Segment 1 = 10 Mbit/s
Segment 2 = 100 Mbit/s
Überbrückung = Aktiv
Management-Modul für
Express-Hubs.
Esc
Reset
Ethernet Module
or
Auto-negotiate
Change
duplex
Full-duplex
Half-duplex
• Mit Hilfe von Modulen können Sie Stapel
verwalten, eine Verbindung zu Geräten im
Vollduplexbetrieb herstellen oder das Netzwerk
auf ein weiteres Gebäude bzw. auf über 100 m
ausdehnen.
Bridged
Colls 100Mbps
Taste für die
Überbrückung
Zusatzmodule
hinzufügen
• Der 12-Anschluß 220T kann Zusatzmodule
aufnehmen (siehe Benutzerhandbuch).
Colls 10Mbps
Auto-negotiate
Change
duplex
Coll
100 Mbps
Ethernet-Modul für
Express-Hubs.
10 Mbps
MDI-X
MDI
Fiber Module
Change
duplex
Xmt
Link
Rcv
Coll
Glasfaser-Modul für
Express-Hubs.
Full-duplex
Half-duplex
TX
RX
12
Deutsch
4
Stapeln von
mehreren Hubs
Inicio rápido
1
Instale la central
Consola: Utilice los cuatro
tornillos pequeños para montar
los soportes a la central.
• Extraiga la central y las piezas de la caja.
• Utilice los soportes incluidos si piensa montar
la central en una consola.
• Instale la Central apilable Express 220T en una
consola o sobre un estante.
1
2
3
4
5
6
7
8
9
10
11
Intel Exp
Stackableress 220T
Hub
12
Class I
Colls 10Mb
Left (Orang
Orange e/Gree
ps
n)
=
Green = 10Mbps
100Mbps
Solid =
Link
Blink =
Activity
Right (Yellow
)
Solid =
Disable
d
Blink =
Wrong speed
Colls 100M
Bridged
RPS
Managed
Status
bps
Power
Enable/Disabl
e
Bridging
• Conecte el cable de alimentación.
Estante: Quite el revestimiento
protector y monte las patitas de
goma a la central.
2
Conecte los
dispositivos
De
A
conexión recta
• Todos los puertos se configuran para detectar
automáticamente la velocidad del dispositivo
conectado al mismo.
100
Central
PC/Servidor
• Conecte las PCs y servidores de impresión a la
central con un cable de conexión recta.
100
• Utilice un cable de cruce para conectar una
central a un interruptor.
Español
• Solamente utilice CAT 5 UTP para conectar
dispositivos 100Mbps. Para conectar
dispositivos 10Mbps utilice CAT 3, 4 ó 5 UTP.
Central
cruce
100
Central
3
Verifique las
conexiones
• Verifique los indicadores luminosos LED del
puerto para confirmar el estado de enlace.
• Un LED sólido (a la izquierda) indica un
enlace válido.
13
Servidor de impresión
Izquierda
(Anaranjado/Verde)
Anaranjado = 10Mbps
Verde = 100Mbps
Sólido = Enlace
Parpadeo = Actividad
Interruptor
Derecha (Amarillo)
Sólido = Inhabilitado
Parpadeo = Velocidad
equivocada
Información opcional
Central 1
• Desenchufe las centrales.
Central 2
Input
100-120VAC/2.5A
200-240VAC/1.5A
47Hz-63Hz
Redundant Power Supply (RPS)
Input
100-120VAC/2.5A
200-240VAC/1.5A
47Hz-63Hz
Redundant Power Supply (RPS)
• Utilice un Cable Intel Cascade para conectar las
centrales. Puede apilar hasta ocho centrales como
máximo (combinación de 12 ó 24 puertos).
• Cuando se conecta correctamente, el apilamiento
entero funciona como un repetidor individual con
dos segmentos (10Mbps y 100Mbps). La central
superior en un apilamiento se indicará como la
central 1.
5
Cable Intel Cascade
(Código de producto EE200CC)
Nunca encadene las centrales que funcionan a
100Mbps con el cable UTP. Dicho
procedimiento infringe la norma IEEE 802.3u
Fast Ethernet para centrales de Clase I.
Conecte en puente
los segmentos de
10Mbps y 100Mbps
Intel Express 220T
Stackable Hub
• El puente interno de la central se activa según el
valor predeterminado y conecta en puente los
segmentos de 10Mbps y 100Mbps (dominios de
colisión).
• Si está conectando en puente los segmentos de
10Mbps y 100Mbps externamente (por ejemplo,
mediante un interruptor 10/100), asegúrese de
apagar el puente interno de la central.
• Si tiene un apilamiento de centrales, cualquiera
de los botones de “bridging” en cualquiera de
las centrales en ese apilamiento, activará o
desactivará la conexión en puente para todo el
apilamiento.
6
• Utilice los módulos para administrar un
apilamiento, conéctelos a los dispositivos con
enlace dúplex completo o para extender la red
a otro edificio o más allá de los 100 metros.
Bridged
Colls 100Mbps
Managed
RPS
Status
Power
Enable/Disable
Bridging
botón
“bridging”
El LED “Bridged” se
ilumina cuando está
activa la conexión en
puente para la central o
apilamiento
Agregue módulos
adicionales
• La central 220T de 12 puertos puede aceptar
módulos adicionales (consulte la Guía del
usuario).
Colls 10Mbps
Valores predeterminados
para la central
Segmento 1=10Mbps
Segmento 2=100Mbps
Bridging=activo
Management Module
with RMON
Esc
Módulo de administración
para centrales Express.
Reset
Ethernet Module
or
Auto-negotiate
Change
duplex
Full-duplex
Half-duplex
Auto-negotiate
Change
duplex
Coll
100 Mbps
Módulo Ethernet para
centrales Express.
10 Mbps
MDI-X
MDI
Fiber Module
Change
duplex
Xmt
Link
Rcv
Coll
Módulo de fibra para
centrales Express.
Full-duplex
Half-duplex
TX
RX
14
Español
4
Apile las centrales
Copyright © 1998,
Intel Corporation.
All rights reserved.
*Other product and corporate names
may be trademarks of other companies
and are used only for explanation and to
the owners’ benefit, without intent to
infringe.
Intel Corporation assumes no
responsibility for errors or omissions in
this manual. Nor does Intel make any
commitment to update the information
contained herein.
Intel Corporation
5200 NE Elam Young Parkway
Hillsboro OR 97124-6497
Customer Support:
http://support.intel.com
First Edition
May 1998
694479-001