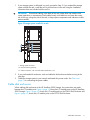
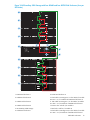
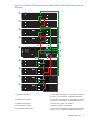
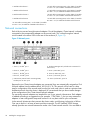
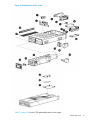
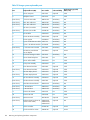
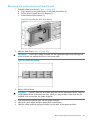
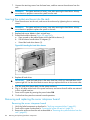
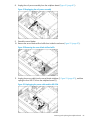
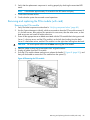
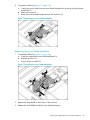
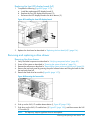
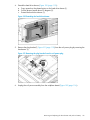
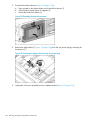
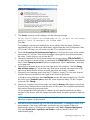
1
HP StoreEasy 5000 Storage Administrator
Guide
Abstract
This document explains how to install, configure, and maintain all models of the HP StoreEasy 5000 Storage and is intended
for system administrators. For the latest version of this guide, go to www.hp.com/support/manuals. Under Storage, select File
and Object Storage > Flexible File and Application Storage > HP StoreEasy 5000/X5000 Storage.
HP Part Number: B7E02-96053
Published: October 2013
Edition: 3
© Copyright 2012, 2013 Hewlett-Packard Development Company, L.P.
Confidential computer software. Valid license from HP required for possession, use or copying. Consistent with FAR 12.211 and 12.212, Commercial
Computer Software, Computer Software Documentation, and Technical Data for Commercial Items are licensed to the U.S. Government under
vendor's standard commercial license.
The information contained herein is subject to change without notice. The only warranties for HP products and services are set forth in the express
warranty statements accompanying such products and services. Nothing herein should be construed as constituting an additional warranty. HP shall
not be liable for technical or editorial errors or omissions contained herein.
Acknowledgments
Microsoft®, Windows®, and Windows Server® are registered trademarks of Microsoft Corporation in the United States and other countries.
Warranty
WARRANTY STATEMENT: To obtain a copy of the warranty for this product, see the warranty information website:
http://www.hp.com/go/storagewarranty
Revision History
Edition
Date
Software
Description
Version
First
December 2012
3.00.0a
First release
Second
June 2013
3.02.0a
Introduction of HP StoreEasy Tools, HP StoreEasy Pool Manager and Firmware
Maintenance Tool (FMT).
Contents
1 HP StoreEasy 5000 Storage.........................................................................6
Features..................................................................................................................................6
Hardware components..............................................................................................................6
Software components................................................................................................................7
2 Installing the storage system.........................................................................8
Verify the kit contents................................................................................................................8
Locate and record the product number, serial number, and SAID number.........................................8
Unpack and rack the storage system hardware.............................................................................8
Cable disk enclosures...............................................................................................................9
Network connections..............................................................................................................18
Power on the storage system.....................................................................................................20
Configure the EMU and iLO management processors..................................................................20
3 Configuring the storage system...................................................................24
Accessing the storage system...................................................................................................24
Set up Windows and discover the second node..........................................................................24
Completing initial configuration................................................................................................25
Networking options................................................................................................................26
Network teaming...............................................................................................................26
Multi-home........................................................................................................................26
Dedicated networks...........................................................................................................26
10 GbE versus 1 GbE........................................................................................................26
Unused network interfaces..................................................................................................26
Using Server Core..................................................................................................................26
Configuring failover properties for multi-site environments.............................................................27
4 Monitoring and troubleshooting the storage system.......................................29
Using notification alerts...........................................................................................................29
Configuring Alerts and Email...................................................................................................29
HP System Management Homepage.........................................................................................33
Starting the System Management Homepage application........................................................33
System Management Homepage main page.........................................................................33
Component LEDs....................................................................................................................37
EMU CLI SHOW commands....................................................................................................45
Known issues.........................................................................................................................46
Verifying services are running...................................................................................................52
Error codes............................................................................................................................53
Storage Management Provider error codes............................................................................53
Pool Manager Provider error codes......................................................................................59
Management Web Service error codes.................................................................................60
CSP WBEM Providers error codes........................................................................................60
Firmware Management Tool (FMT) error codes......................................................................62
Using the View Storage Configuration tool.................................................................................64
HP Support websites...............................................................................................................65
Autonomy LiveVault.................................................................................................................66
Microsoft Systems Center Operations Manager...........................................................................66
Windows Recovery Environment ..............................................................................................66
Startup Repair...................................................................................................................66
Memory Diagnostic............................................................................................................67
HP 1210m Volume Online Tool.................................................................................................68
Obtaining the Service Agreement ID.........................................................................................69
Locating the storage system warranty entitlement label.................................................................69
Contents
3
5 Upgrading the storage system....................................................................70
Maintaining your storage system...............................................................................................70
Determining the current storage system software version...............................................................70
Upgrading HP StoreEasy 5000 Storage software........................................................................71
Upgrading a component's firmware..........................................................................................72
Resolving errors after the HP 1210m controller upgrade...........................................................74
Resolving errors after a disk drive firmware upgrade...............................................................74
Resolving an EMU upgrade issue.........................................................................................75
Performing a coordinated reboot..............................................................................................75
Upgrading hardware components.............................................................................................75
Powering the system off and on................................................................................................76
6 Removing and replacing hardware components............................................77
Customer self repair................................................................................................................77
Best practices for replacing components....................................................................................77
During replacement of the failed component..........................................................................77
Accessing component replacement videos.............................................................................77
Identifying the spare part....................................................................................................78
Replaceable parts...................................................................................................................78
Hot, warm, and cold swap components.....................................................................................81
Preventing electrostatic discharge..............................................................................................81
Verifying component failure......................................................................................................82
Verifying proper operation.......................................................................................................82
Wait times for hard disks.........................................................................................................82
Removing the system enclosure from the rack..............................................................................83
Inserting the system enclosure into the rack.................................................................................84
Removing and replacing the server interposer board...................................................................84
Removing and replacing the midplane board.............................................................................86
Removing and replacing a SAS cable .......................................................................................89
Removing and replacing the SAS I/O module............................................................................89
Removing and replacing the fan module....................................................................................91
Removing and replacing the power UID button assembly.............................................................92
Removing and replacing the power supply.................................................................................93
Removing and replacing the HP Ethernet I/O module..................................................................94
Removing and replacing the PCIe module (with card)..................................................................95
Removing and replacing the EMU module.................................................................................97
Removing and replacing the server blade backplane...................................................................98
Removing and replacing the server airflow baffle......................................................................100
Removing and replacing the front bezel (standard)....................................................................101
Removing and replacing the front bezel (full)............................................................................103
Removing and replacing the front LED display board in the rack (standard)..................................104
Removing and replacing the front LED display board (full)..........................................................105
Removing and replacing a drive drawer..................................................................................107
Removing and replacing the drive drawer hard drive.................................................................112
Removing and replacing the drive drawer rails (side or bottom)..................................................114
Removing and replacing the enclosure rails..............................................................................119
Removing and replacing the rack rails.....................................................................................124
Removing and replacing server blades....................................................................................124
Removing and replacing the server blade hard drive.................................................................125
Removing and replacing the 1210m controller board components...............................................127
Removing and replacing the 1210m cache module...............................................................129
Removing and replacing the capacitor pack........................................................................132
Removing and replacing the Mezzanine NIC...........................................................................134
7 Storage system recovery..........................................................................136
System Recovery DVD...........................................................................................................136
4
Contents
Using a downloaded version of the System Recovery DVD.....................................................136
Drive letters are not assigned after a restore........................................................................136
Restoring the factory image with a DVD or USB flash device.......................................................137
Using a USB flash drive for storage system recovery..................................................................137
Recovering both servers.........................................................................................................138
Recovering a single server.....................................................................................................138
Restoring the system with Windows Recovery Environment..........................................................140
8 Support and other resources....................................................................143
Contacting HP......................................................................................................................143
HP technical support........................................................................................................143
Subscription service..........................................................................................................143
Related information...............................................................................................................143
HP websites....................................................................................................................143
Rack stability........................................................................................................................144
9 Documentation feedback.........................................................................145
A Managing the EMU................................................................................146
CLI reference........................................................................................................................146
Command line conventions....................................................................................................146
Operational groups..............................................................................................................146
Authentication......................................................................................................................147
Time functions......................................................................................................................150
Inventory and status..............................................................................................................153
Internet control.....................................................................................................................159
Server management..............................................................................................................161
Enclosure control..................................................................................................................165
Forensic...............................................................................................................................168
Session...............................................................................................................................170
Using the Enclosure Manager physical interface.......................................................................173
Activate Button Menu............................................................................................................173
Reboot EM (bE)....................................................................................................................174
Restore Factory Defaults (Fd)..................................................................................................174
Recover Lost Password (Fp).....................................................................................................174
Set DHCP IP Address (dH).....................................................................................................174
Set Link Local IP Address (LL)..................................................................................................175
Display Current IP Address (IP)...............................................................................................175
Exit Button Menu..................................................................................................................175
B Regulatory information............................................................................176
Belarus Kazakhstan Russia marking.........................................................................................176
Turkey RoHS material content declaration.................................................................................176
Ukraine RoHS material content declaration..............................................................................176
Warranty information............................................................................................................176
Glossary..................................................................................................178
Index.......................................................................................................179
Contents
5
1 HP StoreEasy 5000 Storage
The HP StoreEasy 5000 Storage (“storage system”) is an integrated hardware-software solution
that provides highly available file and block storage on a Windows failover cluster. Each storage
system features HP server blades and dense disk storage in a single 3U enclosure (Figure 1
(page 6)).
Features
The HP StoreEasy 5000 Storage provides the following advantages:
•
Each system ships from the factory with preintegrated hardware and preloaded software, to
significantly reduce the time and complexity of deploying clusters.
•
Built on the HP converged application platform, which combines two server blades and dense
storage drawer into a single enclosure
•
Lower overall TCO with reduced footprint and lower energy consumption
•
Specially developed setup tools (setup wizards) provide guided setup assistance, performing
many of the complex and time-consuming tasks needed to configure and deploy a high
availability storage system. The setup tools make it easy to get both Windows and a two-node
cluster configured and running quickly.
•
HP and Microsoft management integration, including Microsoft Server Manager and System
Center and HP Systems Insight Manager and Integrated Lights Out (iLO)
For more information about HP StoreEasy 5000 Storage features, go to:
http://www.hp.com/go/StoreEasy5000
Hardware components
Figure 1 (page 6) and Figure 2 (page 7) show front and rear views of the storage system.
Figure 1 Front view
6
1. Disk drawer
4. Server blade 2, Bay 2
2. Server blade 1, OS drives
5. Server blade 2, OS drives
3. Server blade 1, Bay 1
6. Chassis fault LED
HP StoreEasy 5000 Storage
Figure 2 Rear view
1. System fans (redundant)
2. HP 2-port 10 Gb I/O module (2). These modules connect to the integrated NIC located on the server blade
motherboard.
3. Intraconnect (internal switch connecting servers and EMU)
4. Drive fans (redundant)
5. SAS I/O module (2)
6. Power button
7. Power supply (2)
8. HP 4-port, 1 Gb Ethernet I/O PCIe module (2)
9. HP 2-port, 1 Gb Ethernet I/O module (connects to the mezzanine NIC in each server blade)
10. Management port for iLO (servers 1 and 2), and Enclosure Manager Unit (EMU)
Software components
Windows Storage Server 2012 Standard Edition comes preinstalled and activated on the HP
StoreEasy 5000 Storage. The operating system software contains the Microsoft iSCSI Software
Target and Failover Clustering. The storage system configuration also includes the HP Initial
Configuration Tasks window, Windows Server Manager, and HP StoreEasy tools, which are used
to set up and manage your storage system.
NOTE: Windows Storage Server 2012 Standard Edition is installed in Server with a GUI mode
by default. Server Core is supported, however some operations require the use of the GUI. For
more information about installation options, see the “Windows Server Installation Options” article
on Microsoft TechNet at:
http://technet.microsoft.com/library/hh831786.aspx
To switch to Server Core mode, see “Using Server Core” (page 26) for more information.
The Initial Configuration Tasks window assists during the initial out of box setup by configuring
the network, configuring two nodes from a single node, and deploying the cluster. The HP StoreEasy
Pool Manager is used to create storage pools and assign spare drives. Select Windows Server
Manager→File and Storage Services to create virtual disks in the pools, and place volumes on the
virtual disks. Also, the Windows Server Manager→Tools→HP StoreEasy menu provides a collection
of HP and Microsoft utilities that are useful for managing the storage system. These menu items
are also accessible from the HP StoreEasy folder on the desktop.
Software components
7
2 Installing the storage system
This chapter explains how to install the storage system hardware.
Verify the kit contents
Remove the contents, ensuring that you have all of the following components. If components are
missing, contact HP technical support.
Hardware
•
HP StoreEasy 5000 Storage
NOTE: External disk enclosures are not included with the storage system, but up to eight
D2600 or four D2700 Disk Enclosures may be connected to the storage system. A mix of HP
D2600 and HP D2700 Disk Enclosures (maximum of eight total; maximum of four D2700s)
is also supported.
•
Rail kit
•
Power cords
Media and documentation
•
HP StoreEasy 5000 Storage Quick Start Guide
•
HP ProLiant Essentials Integrated Lights-Out Advanced Pack
•
End User License Agreement
•
HP System Recovery DVD
•
Certificate of Authenticity Card
•
Safety and Disposal Documentation CD
Locate and record the product number, serial number, and SAID number
Before you begin installation, locate and record the product number of the storage system, serial
number, and support contract service agreement ID (SAID) number.
The product number of the storage system and serial number are located in three places:
•
Top of the storage system
•
Back of the storage system on a pull-out tab
•
On the storage system shipping box
The SAID number is listed on your service contract agreement (see “Obtaining the Service Agreement
ID” (page 69)).
Unpack and rack the storage system hardware
WARNING! The storage system enclosure is heavy. Always use at least two people to move the
storage system into the rack.
8
Installing the storage system
1.
If your storage system is delivered in a rack, proceed to Step 2. If you ordered the storage
system without the rack, install the rail kit and enclosure in the rack using the installation
instructions that are included with the rail kit.
IMPORTANT: Ensure that cabling in the back of the rack system does not interfere with
system operation or maintenance. Bind cables loosely with cable ties and route the excess
out of the way, along the side of the rack, to keep system components and indicators visible
and accessible.
Figure 3 Storage system installed in a rack
1
2
6
3
4
7
5
1. Storage system enclosure
2-5. Disk enclosures (optional)
6-7. Cable connection, with no bend radius smaller than 5 cm
2.
3.
If you purchased disk enclosures, rack and cable the disk enclosures before moving to the
next step.
Cable the storage system to your network and attach the power cords. See “Rear view”
(page 7) for connecting the power cables.
Cable disk enclosures
When cabling disk enclosures to the HP StoreEasy 5000 Storage, the connections are made
between the I/O module ports. Figure 4 (page 10) shows the I/O module ports on the HP StoreEasy
5000 Storage. Figure 5 (page 10) shows the I/O module ports on the D2600 Disk Enclosure and
Figure 6 (page 10) shows the I/O module ports on the D2700 Disk Enclosure.
Cable disk enclosures
9
Figure 4 HP StoreEasy 5000 Storage I/O module ports
1
2
3
4
5
6
1. Port 3
4. Port 2
2. Port 1
5. I/O module A
3. Port 4
6. I/O module B
Figure 5 HP D2600 Disk Enclosure I/O module ports
1. Port 1
2. Port 2
3. I/O module A
4. I/O module B
Figure 6 HP D2700 Disk Enclosure I/O module ports
1
2
3
4
1. Port 1
2. Port 2
3. I/O module A
4. I/O module B
A disk enclosure is connected to the HP StoreEasy 5000 Storage in a SAS chain. A SAS chain is
a complete, end-to-end connection from the HP StoreEasy 5000 Storage I/O modules to a group
of disk enclosure I/O modules. The chain begins with a connection from I/O module A on the HP
StoreEasy 5000 Storage to I/O module A on the first disk enclosure in the group. The chain ends
10
Installing the storage system
with a connection from I/O module B on the HP StoreEasy 5000 Storage to I/O module B on the
last disk enclosure in the group. In between, the disk enclosures are connected together.
Figure 7 (page 12) shows an example of a single SAS chain; Figure 9 (page 14) shows an example
of two SAS chains. When the disk enclosures are connected to each other, this is a called a SAS
daisy chain. In a SAS daisy chain, I/O module A of each disk enclosure is connected together
and I/O module B of each disk enclosure is connected together. See Figure 7 (page 12) and
Figure 8 (page 13) for examples of SAS daisy chain connections.
The following figures show the correct cabling of disk enclosures to the storage system chassis.
Consider the following guidelines when cabling disk enclosures:
•
On the HP StoreEasy 5000 Storage, always connect the same port from I/O module A and
I/O module B to create a SAS chain. For example, port 1 from I/O module A and port 1
from I/O module B creates a chain. Port 1 from I/O module A and port 2 from I/O module
B does not create a SAS chain. The port from I/O module A is the beginning of the chain and
the port from I/O module B is the end of the chain.
•
A maximum of eight HP D2600 or HP 2700 Disk Enclosures is supported.
•
A maximum of four disk enclosures (either D2600 or D2700) are allowed on one SAS chain.
•
A mix of HP D2600 and HP D2700 Disk Enclosures (maximum of eight total) is also supported.
•
When connecting disk enclosures together, ensure that the disk enclosures are the same type
(for example, D2600 to D2600 and not D2600 to D2700).
•
Connect I/O modules A together in a “top to bottom” order.
•
Connect I/O modules B together in a “bottom to top” order.
•
On the HP StoreEasy 5000 Storage, do not connect both ports from one I/O module (either
A or B) to the same disk enclosure. For example, port 1 of I/O module A connects to one disk
enclosure and port 2 of I/O module A connects to a different disk enclosure.
•
The HP StoreEasy 5000 Storage does not currently support connection to a D6000.
Figure 7 (page 12) shows an HP StoreEasy 5000 Storage with two D2600 Disk Enclosures.
NOTE: In the cabling diagrams that show only the D2600 Disk Enclosure, be aware that the
cabling is exactly the same for the D2700 Disk Enclosure.
Cable disk enclosures
11
Figure 7 HP StoreEasy 5000 Storage with two D2600 Disk Enclosures
5
6
1
7
4
2
3
1. HP StoreEasy 5000 Storage
2–3. D2600 Disk Enclosures
4. SAS cable connecting disk enclosure 1 (green cable)
5. Green color code for I/O module A
6. Red color code for I/O module B
7. SAS cable connecting disk enclosure 2 (red cable)
Figure 8 (page 13) shows an HP StoreEasy 5000 Storage with four D2600 Disk Enclosures.
12
Installing the storage system
Figure 8 HP StoreEasy 5000 Storage with four D2600 Disk Enclosures
7
8
1
9
6
2
3
4
5
1. HP StoreEasy 5000 Storage
2–5. D2600 Disk Enclosures
6. SAS cable connecting disk enclosure 1 (green cable)
7. Green color code for I/O module A
8. Red color code for I/O module B
9. SAS cable connecting disk enclosure 2 (red cable)
Figure 9 (page 14) shows an HP StoreEasy 5000 Storage connected to two D2600 Disk Enclosures
and two D2700 Disk Enclosures.
Cable disk enclosures
13
Figure 9 HP StoreEasy 5000 Storage with two D2600 and two D2700 Disk Enclosures
1
8
9
6
7
2
3
4
5
1. HP StoreEasy 5000 Storage
6. SAS cable connecting Port 1 on the 5000 I/O module
A to Port 1 on I/O module A of Disk enclosure 1
2. Disk enclosure 1 (D2600)
7. SAS cable connecting Port 2 on the 5000 I/O module
A to Port 1 on I/O module A of Disk enclosure 3
3. Disk enclosure 2 (D2600)
8. SAS cable connecting Port 2 on the 5000 I/O module
B to Port 1 on I/O module B of Disk enclosure 4
4. Disk enclosure 3 (D2700)
9. SAS cable connecting Port 1 on the 5000 I/O module
B to Port 1on I/O module B of Disk enclosure 2
5. Disk enclosure 4 (D2700)
Figure 10 (page 15) shows an HP StoreEasy 5000 Storage connected to four D2600 Disk Enclosures
and four D2700 Disk Enclosures. There are four disk enclosures per SAS chain.
14
Installing the storage system
Figure 10 HP StoreEasy 5000 Storage with four D2600 and four D2700 Disk Enclosures (four per
SAS chain)
1
2
3
4
5
10
11
12
14
13
15
6
7
8
9
1. D2600 Disk Enclosure 1
9. D2700 Disk Enclosure 4
2. D2600 Disk Enclosure 2
10. SAS cable connecting Port 1 on the 5000 I/O module
B to Port 1 on I/O module B of D2600 Disk Enclosure 4
3. D2600 Disk Enclosure 3
11. SAS cable connecting Port 1 on the 5000 I/O module
A to Port 1 on I/O module A of D2600 Disk Enclosure 1
4. D2600 Disk Enclosure 4
12. Green color code for I/O module A
5. HP StoreEasy 5000 Storage
13. Red color code for I/O module B
6. D2700 Disk Enclosure 1
14. SAS cable connecting Port 2 on the 5000 I/O module
A to Port 1 on I/O module A of D2700 Disk Enclosure 1
Cable disk enclosures
15
7. D2700 Disk Enclosure 2
15. SAS cable connecting Port 2 on the 5000 I/O module
B to Port 1 on I/O module B of D2700 Disk Enclosure 4
8. D2700 Disk Enclosure 3
Figure 11 (page 17) shows an HP StoreEasy 5000 Storage connected to four D2600 Disk Enclosures
and four D2700 Disk Enclosures. There are two disk enclosures per SAS chain. This configuration
provides the best performance.
16
Installing the storage system
Figure 11 HP StoreEasy 5000 Storage with four D2600 and four D2700 Disk Enclosures (two per
SAS chain)
1
2
3
16
4
17
10
5
12
13
18
14
11
19
15
6
7
8
9
1. D2600 Disk Enclosure 1
11. SAS cable connecting Port 3 on the 5000 I/O module
A to Port 1 on I/O module A of D2700 Disk Enclosure 1
2. D2600 Disk Enclosure 2
12. SAS cable connecting Port 1 on the 5000 I/O module
A to Port 1 on I/O module A of D2600 Disk Enclosure 3
3. D2600 Disk Enclosure 3
13. Green color code for I/O module A
4. D2600 Disk Enclosure 4
14. Red color code for I/O module B
5. HP StoreEasy 5000 Storage
15. SAS cable connecting Port 3 on the 5000 I/O module
B to Port 1 on I/O module B of D2700 Disk Enclosure 2
Cable disk enclosures
17
6. D2700 Disk Enclosure 1
16. SAS cable connecting Port 2 on the 5000 I/O module
A to Port 1 on I/O module A of D2600 Disk Enclosure 1
7. D2700 Disk Enclosure 2
17. SAS cable connecting Port 2 on the 5000 I/O module
B to Port 1 on I/O module B of D2600 Disk Enclosure 2
8. D2700 Disk Enclosure 3
18. SAS cable connecting Port 4 on the 5000 I/O module
A to Port 1 on I/O module A of D2700 Disk Enclosure 3
9. D2700 Disk Enclosure 4
19. SAS cable connecting Port 4 on the 5000 I/O module
B to Port 1 on I/O module B of D2700 Disk Enclosure 4
10. SAS cable connecting Port 1 on the 5000 I/O module
B to Port 1 on I/O module B of D2600 Disk Enclosure 4
Network connections
Each of the two servers has eight network adapters. One of the adapters, Cluster Internal, is already
connected to the corresponding adapter on the second node. This is done through an internal
switch located in the Mezz B slot in the rear of the enclosure (5, Figure 12).
Figure 12 Network ports
1. Server 1, 10 GbE1 port 1
6. Enclosure Manager NIC (includes iLO connections for
both servers)
2. Server 2, 10 GbE1 port 1
7. Server 1, Mezz NIC, port 1
3. Server 1, 10 GbE1 port 2
8. Server 2, Mezz NIC, port 1
1
4. Server 2, 10 GbE port 2
9. Server 1, PCI-e NIC, ports 1-4
5. Intraconnect (internal switch connecting EMU)
10. Server 2, PCI-e NIC, ports 1-4
1
10 GbE ports are SFP+ ports.
Because the two Cluster Internal adapters are connected, they are automatically assigned an IPv4
link-local address from the address block 169.254.0.0/16. This network will be used in a later
step for configuration of the second node from the first node, and it also is used as a private cluster
heartbeat network when the cluster is deployed. HP recommends that you do not make changes
to the configuration of the Cluster Internal network adapter.
The remaining network adapters are intended for use in your network infrastructure. Each adapter
is labeled according to a suggested use (for example, 1 GbE Public 1), but you may rename the
adapters in later configuration steps and use them in a way best suited to your environment.
In the network infrastructure that connects the cluster nodes, avoid having single points of failure.
One way to do this is to have at least two distinct networks. The HP StoreEasy 5000 Storage
already provides one network between the nodes—the Cluster Internal network. You must add at
18
Installing the storage system
least one more network. As you connect the HP StoreEasy 5000 Storage to your network
infrastructure, consider the following requirements:
•
Since deploying the cluster requires that both servers be joined to an Active Directory domain,
you must have a route to the domain controller from each server on the storage system.
•
Servers in a cluster must use DNS for name resolution, so you must have a route to a DNS
server from each server on the storage system.
•
If you are adding more than one adapter per server to your network infrastructure, each
adapter should be on a different subnet.
Figure 13 (page 19) shows two possibilities for adding network cables for an additional network.
Figure 13 Cabling an additional network
1.
Connect 10 GbE Public 1 (Blade 1) and 10 GbE Public 2 (Blade 2) to the same subnet in
your network infrastructure. Note that adapters were chosen on different pass-through modules.
This prevents the pass-through module from becoming a single point of failure for the connection
between the two nodes.
or
2.
Connect 1 GbE Public 4 (Blade 1) and 1 GbE Public 4 (Blade 2) to the same subnet in your
network infrastructure.
In later configuration steps you can configure the adapters you have connected to your network.
If you have connected to a DHCP-enabled network, no further configuration is necessary. Otherwise,
you must assign static addresses to the adapters. You may also want to rename the adapters to
reflect their use in your environment. Also note that these are only two examples out of many
networking possibilities. NIC teaming may also be used. It is not necessary to make all these
decisions now, because you can always add more networks after the system has been deployed.
NOTE:
Disable network interfaces that are disconnected when configuring the network settings.
The Enclosure Manager and iLO port (6, Figure 12 (page 18)) provides for a connection from your
network infrastructure to the Enclosure Manager Unit (EMU) and to the iLO on each blade. For
ease of setup, the EMU and each iLO processor have been assigned static IP addresses in the
factory. You use these addresses to make an initial connection, and then configure each to connect
to your network. The factory configured addresses are as follows:
Table 1 Factory configured EMU and iLO addresses
Component
IP address
Subnet mask
EMU
10.0.0.10
255.255.255.0
Server 1 iLO
10.0.0.11
255.255.255.0
Server 2 iLO
10.0.0.12
255.255.255.0
Network connections
19
“Configure the EMU and iLO management processors” (page 20) describes how you can directly
connect a laptop or other local system to reconfigure these addresses.
Power on the storage system
1.
2.
Power on disk enclosures, if any.
Power on the storage system by pushing the power button on the back of the chassis.
Once the storage system power is on, power on the server blades if they do not automatically
power on.
NOTE: The disk enclosures will complete the startup process before the server blades will
automatically power on. The boot process may take 60 seconds or more. The blades can be
manually powered on after 60 seconds if they do not turn on automatically.
Configure the EMU and iLO management processors
Before configuring the management processors, verify the following:
•
You have determined whether the network ports on the server are to use DHCP or static
addresses. If the network ports are to use static addresses, you must provide the addresses.
•
For this step, the EMU port should not be connected to a switch. You can connect the EMU
port to a switch after the EMU and iLO NICs are configured.
Configure the EMU and iLO management processors for both servers as follows:
1. Connect a system (the configuration system) in the environment or a laptop to the EMU port
(Figure 14 (page 20)). You can use either a crossover or a regular Ethernet cable.
Figure 14 EMU NIC port connection
2.
20
Configure the networking properties for the local system:
a. Open Control Panel, select Network Sharing Center or Network Connections, and navigate
to Local Area Connections.
b. Select Properties→Internet Protocol, and then select Properties.
c. If Use the following IP address: is selected, record values for the following items and
restore them after completing the EMU and iLO setup:
•
IP address
•
Subnet mask
•
Default gateway
Installing the storage system
d.
e.
3.
Enter the following values:
•
IP address: 10.0.0.20
•
Subnet mask: 255.255.255.0
•
Do not set a default gateway
Before continuing, ping the following IP addresses to test connectivity to the EMU and
the iLO located in each of the servers: 10.0.0.10, 10.0.0.11, and 10.0.0.12. The EMU
and iLO interfaces have been assigned IP addresses during factory setup. You must either
update the factory values with site-specific static IP addresses, including a default gateway
if needed, or configure the management processors to use DHCP IP addressing.
Configure iLO on the server blades:
a. Open a web browser and log in to iLO using the address: http://10.0.0.11. You
are prompted to enter the user name and password. The password for the iLO
Administrator is located on a pull-out tab on the front of the server blade.
NOTE: After you have logged into iLO, HP recommends that you change the
administrator password. To do so, select Administration→User Administration in the iLO
management interface.
b.
Configure the network as required for your environment. Select Administration→Network
in the iLO management interface. You can either enable DHCP or edit the IP address
details and enter site-specific network settings.
When you configure the iLO IP addressing to use DHCP, ensure that you select the
appropriate DHCP addressing options for IPV4. Available options are:
•
Use DHCPV4 Supplied Gateway
•
Use DHCPv4 Supplied Static Routes
•
Use DHCPv4 Supplied Domain name
•
Use DHCPv4 DNS Servers
•
Use DHCPv4 Supplied WINS Servers
For more information about iLO and network settings, see the iLO documentation. Go to
http://www.hp.com/go/iLOand select HP iLO 3 Documentation.
c.
d.
Click Apply to save your settings.
Repeat the process on the other server blade. Open a web browser and log in to iLO
using the address: http://10.0.0.12.
Configure the EMU and iLO management processors
21
4.
Configure the EMU:
a. Connect to the Enclosure Manager software using an ssh compatible tool like PuTTY. In
the PuTTY session basic options, enter the EMU IP address (10.0.0.10) and port (22),
and select SSH for the connection type (Figure 15 (page 22)).
NOTE:
See “Managing the EMU” (page 146) for information on using CLI commands.
Figure 15 Connecting to the Enclosure Manager software
b.
After you have connected to the EMU port, set the following attributes:
•
EMU (DNS) name
•
Rack name
•
EMU password (located on the tear-away label on the back of the server blade; see
Figure 16 (page 22))
•
IP addressing method
◦
To change the static IP address, type the command set ipconfig static
at the command line prompt and follow the instructions.
◦
To change the EMU addressing to DHCP, type set ipconfig dhcp at the
command line prompt.
Figure 16 Tear-away label location
Example 1 Setting attributes
CustomerEMU-dnsName> set em name CustomerEMU-dnsName
CSP Enclosure Manager name changed to CustomerEMU-dnsName.
CustomerEMU-dnsName> set rack name CustomerRackName
Changed rack name to "CustomerRackName".
22
Installing the storage system
CustomerEMU-dnsName> set password
New Password: ********
Confirm
: ********
Changed password for the "Administrator" user account.
CustomerEMU-dnsName>
NOTE: You will not be able to connect to iLO or the EMU from the configuration system until
you change the network settings on the configuration system.
5.
Complete the configuration:
a. Connect the EMU port to the appropriate switch/VLAN/subnet.
b. Log in to the EMU using ssh and the newly assigned EMU name and validate connectivity.
It is assumed that the EMU name is in the DNS.
Example 2 Verifying connectivity
CustomerEMU-dnsName> show server list all
Bay iLO Name
iLO IP Address
--- ----------------------------- --------------1 ILOMXQ0110FJ9
16.78.90.51
2 ILOMXQ0110FHU
16.78.90.113
Totals: 2 server blades installed, 2 powered on.
Status
-------OK
OK
Power
------On
On
UID
--Off
Off
Configure the EMU and iLO management processors
23
3 Configuring the storage system
This chapter explains the out of box experience that occurs when you first power on the storage
system. This includes setup tasks, such as the selection of language and regional settings for the
OS, network configuration, time zone, provisioning storage required for the cluster, and deploying
the two-node cluster. All configuration may be done from a single server. There is no need to log
on to the second server.
NOTE:
Microsoft Storage Spaces are not supported on the HP StoreEasy 5000 Storage.
Accessing the storage system
For initial configuration of the storage system, you must have console access to one of the server
blades. You can use either a local I/O diagnostic (SUV) cable or an iLO connection. The iLO
connection is the preferred method because it allows for remote access. If you are using the direct
connect method, connect the supplied SUV cable to the front of the storage system server blades
in the following sequence: keyboard, mouse, monitor cable, and monitor power cable. Regardless
of which access method you use, perform the configuration from only one of the server blades.
The server blade you choose for configuration will be designated the first node, and the other
server blade will be designated the second node.
Figure 17 Keyboard, mouse, and monitor
1. Storage system enclosure
2. Monitor
3. Keyboard (USB)
4. Mouse (USB)
NOTE:
The keyboard, mouse, and monitor are not provided with the storage system.
For remote access, open a web browser and enter the iLO name or IP address for a server blade
located in either bay. Log in using the iLO administrator name and newly created password for
that blade.
For instructions on using iLO, see the Integrated Lights Out user guide available from http://
www.hp.com/go/ilo. On the iLO web page, select More iLO Documentation.
Set up Windows and discover the second node
When the storage system starts, the servers will begin a first time setup procedure that takes
approximately 10 to 15 minutes, including the Set Up Windows wizard.
24
Configuring the storage system
IMPORTANT:
Use only one node to complete the setup procedure.
In the Set Up Windows wizard, you are asked to choose a language, regional settings, and
keyboard layout. After you accept the EULA, the server you are connected to attempts to discover
the second server. This is done over the internal switch (5, Figure 12 (page 18)). If the second
node is not ready, you may see a message stating Cannot establish communication with
the second node. Click Retry to attempt discovery, and repeat the retry until the second node
is discovered. After the second node is discovered, there will be a few more installation steps that
occur automatically on each server, and then both servers will reboot.
NOTE: If you click Cancel instead of Retry, you must access the second node from iLO or a direct
(SUV) connection and manually perform the Set Up Windows wizard on the second node. Because
the discovery process has not completed, there will also be an extra step later to establish a
connection between the two nodes. You will find instructions for this, if needed, in the online help
of the Initial Configuration Tasks (ICT).
Completing initial configuration
After the servers reboot, continue the configuration using the first node. A default administrator
password (HPinvent!) has been set and this is used to log on automatically.
NOTE: Leave this administrator password unchanged until you are prompted for a new password
in a later configuration step.
IMPORTANT: HP strongly recommends that you validate your configuration when using clusters.
Whether you create a cluster through the ICT or the Failover Cluster Manager, one of the first steps
is validating your configuration using the Microsoft cluster validation tool. If you choose to skip
the validation step, you can still validate the cluster after it is created.
After logon, the HP ICT window is launched automatically.
Use the HP ICT to perform setup tasks in the order they appear. See the provided online help for
each group of tasks for more information about the task. After completing the “Provide cluster name
and domain” task, both nodes will reboot. After allowing time for a reboot, log on once again to
the first node. This time, rather than logging on as local Administrator, log on using the domain
account that was specified in the “Provide cluster name and domain” task. You may now complete
the remaining tasks, which includes creation of the two-node cluster. You may also wait and create
file servers later using Microsoft Failover Cluster Manager, which can be launched from Server
Manager→Tools.
NOTE: If you change the network settings on the second node, it is possible that you will be
changing the network connection used to communicate with the second node. Refer to “Known
issues” (page 46) for more information.
The ICT is intended for initial setup, so once it is complete, you may select the Do not show this
window at the next logon box. If you want to launch the ICT at a later time, you may do so from
the HP StoreEasy folder on the desktop. When the ICT window closes, Windows Server Manager
opens automatically. Use Windows Server Manager to further customize the storage system, such as
adding roles and features and configuring share and storage management.
After completing the initial configuration, you can provision and manage your storage. For more
information about provisioning storage, see the HP StoreEasy 5000 Storage Online Help. To
access the online help, open the ICT from the task bar on the desktop, or from the HP StoreEasy
folder on the desktop.
Completing initial configuration
25
NOTE: You must register for Subscriber's Choice to receive customer advisories and notices. See
“Subscription service” (page 143) for more information.
NOTE: Windows Storage Server 2012 supports the use of BitLocker on clustered volumes. For
more information, see the “BitLocker Overview” article on Microsoft TechNet at:
http://technet.microsoft.com/library/hh831713.aspx
If encryption is required, the Encrypting File System (EFS) is supported on clustered volumes. For
more information on EFS, see the following Microsoft article:
http://support.microsoft.com/kb/223316
Networking options
The large number of network adapters on each server in the HP StoreEasy 5000 Storage provides
a number of different options for networking. The network adapter named "Cluster Internal" is
pre-configured as a private cluster heartbeat and should be left as is, but all other adapters are
available for use. Use the guidelines below as an aid in making configuration choices.
Network teaming
Network teaming is a common use of multiple network adapters. Teaming is used to increase
available network bandwidth and provide fault tolerance. Teaming can be across multiple ports
in the same network adapter or across network adapters.
Multi-home
Distributing network workload across multiple network adapters is also commonly used. Placing
each network interface on a different subnet allows the workload on each subnet to be serviced
in parallel rather than through a single interface.
Dedicated networks
Implementing a unified storage solution requires that different protocols be used to access a storage
system. In one instance, a block protocol like iSCSI is used to present storage to a virtual machine
host. At the same time, a file protocol like SMB is used for sharing files for department or user
home directories. A dedicated storage network for each protocol allows the network traffic to be
kept separate to maximize performance. Similarly, one network interface can be used for system
management and monitoring while another interface can be used for data traffic.
10 GbE versus 1 GbE
Other than the obvious difference in speed, 10 GbE provides an order of magnitude difference
in lower latency. Lower latency is ideal for transactional database applications and virtualization.
Combining a 10 GbE dedicated storage network for a virtual machine infrastructure, and a 1 GbE
network for shared folder, takes the most advantage of the network offerings. A classic example
is thin clients whose resources are hosted on virtual machines (for example, the Citrix model).
Unused network interfaces
Disable network interfaces that are disconnected or will not be used to prevent configuration issues
and extra health monitoring alerts.
Using Server Core
The Server Core interface is a command prompt with PowerShell support. In Windows Server
2012, you can transition between Server with a GUI mode and Server Core mode without
reinstalling the operating system.
26
Configuring the storage system
Transition to Server Core mode
1.
Open PowerShell and execute the following command:
PS C:\Users\Administrator> Remove-WindowsFeature Server-Gui-Shell,
Server-Gui-Mgmt-Infra
2.
When prompted, restart the server by executing the following command:
PS C:\Users\Administrator> shutdown –r –t 0
After the server restart, only the command prompt will be available, indicating the server is
now in Server Core mode.
NOTE: If you close all command prompts, there will be no way to manage the server in Server
Core mode. To resolve this issue, complete the following steps:
1. Press CTRL+ALT+DELETE.
2. Select Start Task Manager.
3. Select File→Start New Task, which opens a command prompt.
4. Enter cmd.exe.
Alternatively, you can log off and log back on again. For more information, see the Microsoft
TechNet article “Configure a Server Core Server” at:
http://technet.microsoft.com/en-us/library/jj592692.aspx
Transition to Server with a GUI mode
1.
Open PowerShell and execute the following command:
PS C:\Users\Administrator> Add-WindowsFeature Server-Gui-Shell,
Server-Gui-Mgmt-Infra
2.
Reboot the server manually by entering one of the following commands:
PS C:\Users\Administrator> shutdown –r –t 0
or
PS C:\Users\Administrator> Install-WindowsFeature
Server-Gui-Mgmt-Infra,Server-Gui-Shell –Restart
NOTE: Transitioning to Server Core mode disables the OEM-Appliance-OOBE feature. After
transitioning back to Server with a GUI mode, you must manually enable this feature by executing
the following command:
PS C:\Users\Administrator>dism /online /enable-feature
/featurename:OEM-Appliance-OOBE
Then, install HP ICT from C:\hpnas\Components\ManagementTools.
Configuring failover properties for multi-site environments
You can configure failover properties for multi-site environments using DFS Management, which
is available from the Tools menu in Windows Server Manager (Tools→DFS Management).
For detailed instructions, see the Microsoft TechNet article, DFS Step-by-Step Guide for Windows
Server 2008, which is available at:
http://technet.microsoft.com/en-us/library/cc732863(v=ws.10).aspx
Configuring failover properties for multi-site environments
27
NOTE:
28
•
The information in the article applies to Windows Server 2012 as well.
•
The article provides instructions to configure both DFS Namespace and DFS Replication.
•
The prerequisites listed in the article are already installed with the StoreEasy software.
•
You can start at the section entitled, “Overivew of the DFS Management Snap-in”.
Configuring the storage system
4 Monitoring and troubleshooting the storage system
The storage system provides several monitoring and troubleshooting options. You can access the
following troubleshooting alerts and solutions to maintain the system health:
•
Notification alerts
•
System Management Homepage (SMH)
•
Hardware component LEDs
•
EMU CLI SHOW commands
•
HP and Microsoft support websites
•
Microsoft Systems Center Operations Manager (SCOM) and Microsoft websites
•
HP SIM 6.3 or later, which is required for proper storage system/HP SIM integration.
NOTE: Integration with HP SIM is only supported using the WBEM/WMI interfaces. Do not
attempt to configure HP SIM to use the ProLiant SNMP agents, because the configuration is
untested and unsupported. The ProLiant SNMP agents are enabled on the storage system by
default and should not be disabled as they are used for internal management functions. If they
are enabled for external client consumption, HP SIM must be configured so it does not attempt
to communicate with these agents.
NOTE: WBEM events for storage are logged into Windows Application logs and WBEM events
for Server and Enclosure are logged into Windows System logs.
If you are unable to resolve a storage system operation issue after using the various options, contact
HP Support. You must provide your SAID and your warranty and entitlement labels. See “Obtaining
the Service Agreement ID” (page 69) and “Locating the storage system warranty entitlement label”
(page 69).
Using notification alerts
When you receive an alert, open the System Management Homepage or HP SIM to obtain more
detailed information.
IMPORTANT: While the notification alerts report issues as they arise, it is still important to monitor
the storage system regularly to ensure optimal operation.
Configuring Alerts and Email
Configure Alerts and Email in ICT to send email notification of system events.
IMPORTANT: HP recommends that you configure Alerts and Email (and also install HP Insight
Remote Support) to ensure that you are proactively alerted to issues. Proactive notification enables
you to address issues before they become serious problems.
To create an alert for a recipient:
Using notification alerts
29
1.
Do one of the following:
•
Open the HP StoreEasy desktop folder and select Configure Email Alerts.
•
Open Windows Server Manager and from the Tools menu, select HP StoreEasy →
Configure Email Alerts.
•
Launch Configure Email Alerts from ICT.
Figure 18 Configuring Alerts and Email
2.
Do one of the following:
•
Select New to create a profile.
•
Select Copy or Edit to modify an existing profile.
The Alert Settings window appears.
30
Monitoring and troubleshooting the storage system
Figure 19 Alert and Email settings
3.
4.
Complete the following fields:
•
Name—Enter the name of a recipient (for example, John Doe).
•
Recipient address—Enter the email address of the recipient (for example,
[email protected]).
•
From address—Enter an email address that will display to the recipient indicating where
the message originated. It can be the same as the recipient address, if desired.
•
SMTP address—Enter a valid SMTP address (for example, SMTP.company.com).
•
Alerts Severity—Select the severity for which you want to receive alerts. You will also
receive alerts for any severity higher than the one you select. Select All to receive alerts
for all severities.
•
Components Alerts—Select the components for which you want to receive alerts, or select
All to receive alerts for all components.
To test the ability for the recipient to receive email alerts, click Send Test Email. If the recipient
receives the test email, no further action is required. If the test email is not received, check
that the information entered for the recipient is correct.
Configuring Alerts and Email
31
Figure 20 Send test email
5.
6.
Click Save. The name of the recipient is displayed on the main Alerts and Email window.
Click Sync to apply the email alert configuration to the other server blade.
NOTE:
If you delete an email recipient from any server blade, you cannot use the Sync button to make
the deletion apply on the other server blade. You must log in to the other server blade and
manually delete the email recipient.
To configure the SNMP settings:
1. Open Server Manager.
2. From the Server Manager Tools menu, select Computer Management.
3. In the Computer Management console, select Services and Applications→Services-.
4. Right-click SNMP Service and select Properties.
5. Select the Agent tab and provide the contact and location information for the System
Administrator, and then click OK.
6. To make SNMP visible externally, select the Security tab and specify the following items:
•
The external hosts that may use the SNMP protocol.
•
The SNMP Community string. HP recommends that you use something other than the
typical ‘Public’ string.
IMPORTANT: Configure HP SIM security to prevent the SIM management server from gaining
access to SNMP.
The SNMP trap function in the storage system is enabled by default. Any SNMP client (on
localhost) listening on default port number 171 can receive traps. You can configure the
destination IP address using the snmp.xml configuration file in the directory \Program Files\
HPWBEM\Tools\snmp.xml.
32
Monitoring and troubleshooting the storage system
HP System Management Homepage
The HP System Management Homepage (SMH) is a web-based interface that consolidates and
simplifies single system management for HP servers. The SMH is the primary tool for identifying
and troubleshooting hardware issues in the storage system. You may choose this option to diagnose
a suspected hardware problem. Go to the SMH main page and open the Overall System Health
Status and the Component Status Summary sections to review the status of the storage system
hardware.
By aggregating the data from HP web-based agents and management utilities, the SMH provides
a common, easy-to-use interface for displaying the following information:
•
Hardware fault and status monitoring
•
System thresholds
•
Diagnostics
•
Software and firmware version control for an individual server
•
HP Storage 1210m firmware information
The SMH Help menu provides documentation for using, maintaining, and troubleshooting the
application. For more information about the SMH software, go to www.hp.com/support/manuals
and enter System Management Homepage in the Search box. Select HP System Management
Homepage Software. A list of documents and advisories is displayed. To view SMH user guides,
select User Guide.
Starting the System Management Homepage application
To start the application, double-click the HP System Management Homepage desktop shortcut or
enter https://hostname:2381/ in Internet Explorer. The hostname can be localhost or
the IP address of the server you want to monitor. To log into SMH, enter the same username and
password you use to log in to the server. Users who have administrative privileges on the server
have the same privileges in the SMH application.
To view the SMH of one server from another server, you must modify the Windows firewall settings
as follows:
1. Open the Control Panel and select System Security→Windows Firewall→Allowed Programs.
2. Select Allow another program and click Browse in the Add a Program dialog box.
3. Navigate to C:\hp\hpsmh\bin and select hpsmhd. Click Open and then click Add. HP
System Management Homepage displays in the Allowed Programs and Features window.
4. Select Home/work (Private) and Public and click OK.
5. To access the SMH on another server, enter the following URL:
https://<server IP address>:2381
NOTE:
Port 2381 may need to be opened in the system’s firewall, if applicable.
System Management Homepage main page
Figure 21 (page 34) shows the SMH main page.
HP System Management Homepage
33
Figure 21 System Management Homepage main page
The page provides system, subsystem, and status views of the server and displays groupings of
systems and their status.
NOTE:
•
NICs will display with a failed status (red icon) if they are unplugged. To remove unused NICs
from the system status, you can disable them by selecting Control Panel→Hardware→Device
Manager, right-click on the specific NIC, and then select Disable.
•
When you remove a disk or disconnect a cable, the SMH interface might not display alerts
when you click the Refresh button. You can force a hard refresh by clicking the Home button
or by navigating to the problem area. The default refresh interval is two minutes. To change
the interval in the Settings menu, select Autorefresh, and then Configure Page refresh settings.
The minimum interval is five seconds and the maximum is 30 minutes.
Overall System Health Status
A webapp sets the value of the Overall System Health Status icon by using a predefined heuristic.
If no webapp can determine the status, the worst possible status is displayed in the Component
Status Summary section.
Component Status summary
The Component Status Summary section displays links to all subsystems that have a critical, major,
minor, or warning status. If there are no critical, major, minor or warning items, the Component
Status Summary section displays no items.
Enclosure
This section provides information about the enclosure cooling, IDs, power, Unit Identification LED,
PCIe devices, and I/O modules.
NOTE: A large number of disk errors may indicate that an I/O module has failed. Inspect the
I/O module LEDs on the storage system and any disk enclosures, and replace any failed component.
•
34
Because both a system and drive fan are required, the maximum and minimum number of
fans required is two. If either fan becomes degraded, the system could shut down quickly.
Because the fans are not mutually redundant, even if the status of a single fan has changed,
Monitoring and troubleshooting the storage system
the new status is reported immediately in the Components Status Summary section on the SMH
main page.
•
When the Enclosure Manager IP address is set incorrectly, the enclosure status displayed is
Lost communication. Because the Enclosure Manager has lost communication with the external
network, none of the other items in the Enclosure Information section can be displayed.
The enclosure I/O ports are numbered from 1 to 8 in the SMH.
Figure 22 I/O module
These numbers correspond to the I/O modules in the enclosure bays.
Figure 23 I/O module bays
1. LOM module
5. PCIe module
2. LOM module
6. PCIe module
3. MEZZ module
7. SAS I/O module
4. Interconnect (internal switch)
8. SAS I/O module
Network
This section shows the status of the network connections.
HP System Management Homepage
35
Storage
This section displays information about the following components:
•
Storage System—Links to the page that displays information about storage in the drive drawer
and any external disk enclosures. This storage is managed by the 1210m controller.
•
Smart array subsystem—Links to the page that displays information about operating system
drives and smart array controllers.
NOTE: The SMH will display a total of four power supplies for each External Storage Enclosure.
If there is more than one External Storage Enclosure connected, the SMH may not show the correct
number of power supplies for each of these enclosures.
The Storage System page is organized as a left panel and a main page:
Figure 24 Storage system
The left panel provides links to information about the following items:
•
Controller
Select a storage controller to view its type, status, firmware version, and serial number.
•
Logical Volumes
A list of logical volumes associated with the controller appears in the left panel tree view.
Select one of the logical volume entries to display the status of the volume, fault tolerance
(RAID level), and capacity (volume size). A link to the logical volume storage pool is also
displayed.
•
Storage Pools
A list of storage pools associated with the controller displays in the left panel tree view. Select
one of the pool entries to display its status, capacity, communication status with the controller,
primordial state, and cache properties.
NOTE:
If read or write cache is enabled the value displayed is 2; otherwise, the value is 3.
The Storage Pools page also displays a list of disk drives and storage volumes present in the
pool.
Under the Physical Drives tree, the list of disk enclosures is displayed. Under each enclosure,
the list of disk drives present in each disk enclosures is displayed. When there is no drive in
36
Monitoring and troubleshooting the storage system
the enclosure, the display shows Bay Bay number – Empty. Select one of the disk enclosures
or disk drives to see information for that enclosure or drive.
•
Physical Drives
This section provides an overview of all disk drives attached to the controller. Drives are
identified and grouped as assigned, unassigned, and spare drives. Each physical drive is
listed as a separate entry in the Storage System submenu. Select any of the physical drives to
display more information about the drive.
NOTE: Spare drives are only used when a disk drive fails. Until a spare drive is used, it
remains offline and its LEDs will remain off.
System
This section displays status for various system components.
Version Control
This section provides information about the Version Control Agent.
Software
This section provides information about system firmware and software.
Component LEDs
LEDs indicate the status of hardware components. This section provides images of the component
LED locations and describes the status of LED behaviors. To obtain additional information on some
status indicators, you can use the EMU CLI SHOW commands described in “Managing the EMU”
(page 146).
Figure 25 Server blade LEDs
Table 2 Server blade LEDs status
Item
Description
Status
1
UID LED
Blue = Needs service check
Blue flashing = remote management (remote console in use via iLO)
OFF = No remote management
2
Health LED
Green = Normal
Flashing = Booting
Amber = Degraded condition
Red = Critical condition
Component LEDs
37
Table 2 Server blade LEDs status (continued)
Item
Description
Status
3
NIC 1 LED*
Green = Network linked
Green flashing = Network activity
OFF = No link or activity
4
Flex-10 NIC 2 LED*
Green = Network linked
Green flashing = Network activity
OFF = No link or activity
5
Reserved
—
6
System power LED
Green = On
Amber = Standby (auxiliary power available)
OFF = OFF
*Actual NIC numbers depend on several factors, including the operating system installed on the server blade.
Figure 26 Front LED display board
Table 3 Front LED status
Item
Description
Status
1
Hard drive LEDs
Green = The drive is online, but is not currently active.
Normal mode (UID LED is
solid)
Flashing irregularly green = The drive is online and it is operating normally.
Flashing green (1 Hz) = Do not remove the drive. Removing the drive may
terminate the current operation and cause data loss. The drive is rebuilding,
or it is part of an array that is undergoing expansion, logical drive extension,
a stripe size migration, or RAID migration.
Flashing amber/green = Drive is configured and indicating a predictive
failure. The drive may also be undergoing a rebuild, expansion, extension,
or migration.
Flashing amber (1 Hz) = A predictive failure alert has been received for
this drive. Replace the drive as soon as possible.
Amber = Drive failure, link failure, or mismatched configuration.
OFF = The drive is offline, a spare, or not configured as part of an array.
1
38
Hard drive LEDs
Green = The drive has been selected by a management application and it
is operating normally.
Monitoring and troubleshooting the storage system
Table 3 Front LED status (continued)
Item
Description
Status
Drive locate mode (UID LED is Flashing amber (1 Hz) = The drive is not selected and is indicating a
flashing)
predictive failure.
Flashing amber/green = The drive has been selected by a management
application and is indicating a predictive failure.
Amber = The drive might or might not be selected and is indicating drive
failure, link failure, or mismatched configuration.
OFF = The drive is not selected.
2
Chassis fault LED
Flashing amber if there is a failed component in the system.
NOTE: The amber chassis fault LED flashes if any component fault is
detected by the System Management Homepage. A fault can be as minor
as a cable unplugged from a NIC port, and therefore may not be cause
for concern.
OFF if the system is in good health.
3
Chassis health LED
Solid green if the system is in good health.
OFF if there is a failed component in the system.
4
Chassis UID LED
This is either blue or off. When on it can be steady or blinking. Used only
for unit identification. To set the LED, use the following CLI command: SET
ENCLOSURE UID { ON | OFF | SLOW | FAST }
OFF = Enclosure is functioning normally.
NOTE: All these LEDs are off if the enclosure has power but is turned off (see Table 11 (page 43)).
Then only the equivalent Chassis LEDs (2,3,4) on the rear Power Pod show status.
Figure 27 Hard drive LEDs
1. Fault/UID LED (amber/blue)
2. Online LED (green)
Table 4 SAS hard drive LED combinations
Item
Description
Status
1
Activity/Online LED
OFF = Override drive activity output. Drive is not a member of any RAID
volumes <or> Drive is configured but in a replacement or failed state for
at least one volume that is a member of a RAID volume <or> Drive is a
spare drive that is or has been activated but has not been
rebuilt.<and>Drive is not rebuilding<and>Drive is not a member of a
volume undergoing capacity expansion or RAID migration.
Solid green = Drive is a member of a RAID volume <and> Drive is not a
spare drive <and> Drive is not in a replacement or failed state for any
volume that is a member of a RAID volume <and> Drive is not currently
performing I/O activity.
Blinking green (@ 4 Hz 50% of duty cycle) = Drive is currently performing
I/O activity <and> Drive is a member of a RAID volume <and> Drive is
Component LEDs
39
Table 4 SAS hard drive LED combinations (continued)
Item
Description
Status
not in a replacement or failed state for any volumes that is a member of
a RAID volume (drive is online) <and> Drive is not rebuilding <and>
Drive is not a member of a volume undergoing capacity expansion or
RAID migration.
Blinking green (@1 Hz 50% duty cycle — override drive activity output)
= Drive rebuilding <or> member of volume undergoing Capacity
Expansion/RAID Migration.
2
Fault/Identification LED
– Bicolor amber/blue
OFF = Drive is not failed <and> Drive is not selected (unit identification).
Solid blue = Drive is not failed <and> Drive is selected (unit identification).
Solid amber = Drive is failed <and> Drive is not selected.
Blinking amber (@ 1Hz 50% duty cycle) = Drive is in a predictive failure
state <and> Drive is not failed <and> Drive is not selected.
Blinking alternate amber/blue (@ 1Hz 50% duty cycle) = Drive Failed
<or> Drive is in a predictive failure state<and>Drive is selected.
NOTE: Spare drives are only used when a disk drive fails. Until a spare drive is used, it remains
offline and its LEDs will remain off.
Figure 28 1210m Cache module controller LEDs
Table 5 1210m Cache module controller LED status
Item
Description
Green LED upper left; Controller LEDs
Amber LED lower right
Status
Green off, amber on = A backup is in progress.
Green flashing (1 Hz), amber on = A restore is in progress.
Green flashing (1 Hz), amber off = The capacitor pack is
charging.
Green on, amber off = The capacitor pack has completed
charging.
Green flashing (2 Hz) alternating with amber; amber flashing
(2 Hz) alternating with green LED = One of the following
condition exists:
– The charging process has timed out.
– The capacitor pack is not connected.
Green on, amber on = The flash code image failed to load.
Green off, amber off = The flash code is corrupt.
40
Monitoring and troubleshooting the storage system
Figure 29 Enclosure Manager unit LEDs
Table 6 Enclosure manager unit LEDs status
Item
Description
Status
1
EM display
The LED blinks during power-up, but then the display changes only in
response to commands from the Enclosure Manager Display.
2
EM fault LED
Amber flashing/green LED off = issue. Use the CLI commands SHOW
ENCLOSURE STATUS and SHOW SYSLOG EM to determine possible
fault causes.
3
EM health LED
The health LED is only green and is either on (Healthy) or off (Power
off or Faulted).
LEDs are off when the enclosure is powered off.
Figure 30 HP 2-port 1 GB Ethernet I/O modules LEDs
Table 7 HP 2-port 1 GB Ethernet I/O modules LEDs status
Item
Description
Status
1
Module health LED
Solid green when module health is good
OFF* when module has failed
2
Module fault LED
Solid amber when module has failed
OFF* when module health is good
*LEDs are off when enclosure is powered off.
Component LEDs
41
Figure 31 HP 2-port 1 GB Ethernet, Mezz A and B I/O modules LEDs
Table 8 HP 2-port 1 GB Ethernet, Mezz A and B I/O modules LEDs status
Item
Description
Status
1
Module health LED
Solid green when module health is good
OFF* when module has failed
2
Module fault LED
Solid amber when module has failed
OFF* when module health is good
*LEDs are off when enclosure is powered off.
Figure 32 HP 1 GB Interconnect module LEDs
Table 9 HP 1 GB Interconnect module LEDs status
Item
Description
Status
1
Module health LED
Solid green when module health is good
OFF* when module has failed
2
Module fault LED
Solid amber when module has failed
OFF* when module health is good
*LEDs are off when enclosure is powered off.
42
Monitoring and troubleshooting the storage system
Figure 33 Power supply LEDs
Table 10 Power supply LED status
Item
Description
Status
1
Power supply
Green = Power on and power supply functioning properly.
OFF = One or more of the following conditions exists:
System powered off, AC power unavailable, Power supply
failed, Power supply exceeded current limit. Use the CLI
command SHOW ENCLOSURE POWERSUPLY STATUS
ALL for more details.
Figure 34 Chassis switches and indicator LEDs
Table 11 Chassis switches and indicator LEDs status
Item
Description
Status
1
UID
Solid blue = Requires service check.
2
Chassis health
Solid green when system health is good.
OFF if a module or component in the system has failed
3
Chassis fault
Flashing amber if a module or component in the system has
failed.
NOTE: The amber chassis fault LED flashes if any
component fault is detected by the System Management
Homepage. A fault can be as minor as a cable unplugged
from a NIC port, and therefore may not be cause for
concern.
Component LEDs
43
Table 11 Chassis switches and indicator LEDs status (continued)
Item
Description
Status
OFF if system health is good.
4
Power button/LED
Green when enclosure power is ON.
Amber when enclosure has AC power but is turned off.
Figure 35 SAS I/O modules LEDs
Table 12 SAS I/O module LEDs status
Item
Description
Status
1, 2
SAS Port 1
Green* = Healthy
Amber = Issue
3, 4
SAS Port 2
Green* = Healthy
Amber = Issue
5, 6
Overall I/O module status
Green = Healthy
Amber = Issue
7, 8
SAS Port 3
Green* = Healthy
Amber = Issue
9, 10
SAS Port 4
Green* = Healthy
Amber = Issue
*If there is anything connected to a connector, the corresponding green LED is on and blinks off with activity. If there
is nothing connected to a connector, both LEDs are off.
44
Monitoring and troubleshooting the storage system
Figure 36 Fan LEDs
The two fan modules are physically identical, but their control is not. The Fault/health LED on FAN
1 is a single bi-color LED controlled by the EMU via the Health Monitor – it is either off, steady
green, or flashing amber. The lens of the fan LED is colorless and looks grayish-white when off.
System Fan — Fan 1
Fan 1 LED is driven by the EMU firmware. The fan microprocessor inside the Fan module cannot
sense or control this LED. If the EMU fails, or if the connection between the EMU and the fan fails,
the LED cannot be controlled and thus may not reflect actual state. Also, because Fan 1 LED has
no power unless enclosure power is on, the EMU cannot indicate Fan status in standby mode.
There is no autonomic hardware circuit controlling the FAN Fault LED. Assuming the LED is working,
it flashes Amber by the EMU if one or two of the 3 fan rotors is not functioning, or if the
microprocessor on the fan module is unresponsive, or if code on the module is unreadable.
Drive Fan — Fan 2
The Fault/health LED on FAN 2 is not controlled at all by the EMU – but is controlled by one of
the management processors inside the SAS I/O Module. This LED cannot be lit unless enclosure
power is on, and its state depends upon signals from one of the SAS I/O modules.
To troubleshoot a degraded fan, you can use the EMU CLI commands SHOW ENCLOSURE STATUS
and SHOW ENCLOSURE FAN ALL described in “Managing the EMU” (page 146).
EMU CLI SHOW commands
Use the EMU CLI SHOW commands described in “Managing the EMU” (page 146) to obtain additional
information about component status as indicated by the hardware LEDs described in “Component
LEDs” (page 37). To access the CLI, log in to the EMU as Administrator.
The system is shipped with a single enabled user account: Administrator. The password of the
Administrator account is unique, programmed at the factory, and printed on the tear-away label
on the back of the unit and the label on top of the EMU. Logging in to the system requires the
Secure Shell protocol (SSH). Windows systems can use ssh clients such as PuTTy, which can be
freely downloaded.
To log in to the EMU:
1. Note the IP address of the EMU.
2. ssh to the EMU.
3. Log in as Administrator.
The following is a sample login session:
login as: Administrator
----------------------------------------------------------------------------WARNING: This is a private system. Do not attempt to login unless you are an
authorized user. Any authorized or unauthorized access and use may be monitored and can result in criminal or civil prosecution under applicable law.
EMU CLI SHOW commands
45
----------------------------------------------------------------------------User: /src/bin/build@msaonyx
Script: ./parbuild Directory: /src/quire/QUIRE-CSP-1-20/daily/2011102701/bld/QUIRE-CSP-1-20
FileTag: 102720111904
Date: 2011-10-27T19:04:57
Firmware Output: jsbach
Firmware Version: 0x0120
SVN Version: 3414
[email protected]'s password:
HP CSP System Enclosure Manager
(C) Copyright 2006-2010 Hewlett-Packard Development Company, L.P.
Type 'HELP' to display a list of valid commands.
Type 'HELP ' to display detailed information about a specific command.
Type 'HELP HELP' to display more detailed information about the help system.
EM-78E7D1C140F2>
After logging in, you can set the Administrator password using the Enclosure Manager Settings
window. Go to the C:\Program Files\HP\HP Configuration Wizard directory and
double-click HPEMConfig.exe.
Known issues
Table 13 identifies known issues with the storage system and provides workarounds to mitigate
them.
Table 13 Known issues
Issue
Resolution
HP Systems Insight Manager is not able This occurs if the domain user or group does not have the proper security
to retrieve the OS and product name for access to the WMI namespace. Access to the WMI namespace is not given
the network storage system.
by default. To permit access:
1. Select Server Manager+Configuration.
2. Right-click WMI Control and select Properties.
3. On the Security tab, select Root and the HPQ namespace.
4. Click Security, and give permission to the user or group.
5. Restart WMI.
The cluster IP address on a cluster
network resource cannot resolve the DNS
name or update the DNS name correctly,
causing the network resource to appear
offline or with a warning message.
This occurs when a previous identifier is listed in the DNS entries and the
DNS server has not been set up to allow for updates from external clients.
To fix this issue:
1. Log in to the Active Directory Domain Services with your Domain Admins,
Administrator, or Security Group access.
2. Go to the DNS server, select the computer name, and then click Forward
Lookup Tables.
3. Select the domain to add the file server.
4. Locate the DNS entries for the file server name. You can either update
the information manually by double-clicking on the entry and entering the
correct file server information, or by deleting the existing DNS entry.
NOTE: Entering the correct file server information or deleting the DNS entry
requires that you manually enable the network resource on the cluster. You
can do this by manually right-clicking on the network resource on the file
server and selecting the Bring this resource online option. When deleting the
DNS entry, this option creates and updates a new DNS entry on the DNS
server.
After joining a domain, the "Microsoft
iSCSI Software Target" service may fail
with the error message: Windows
could not start the Microsoft
46
During startup of the Microsoft iSCSI Software Target service, WinTarget
makes a synchronous call to the Active Directory. If the Active Directory server
does not respond in a timely manner, the service fails to start after 30
seconds. To resolve this issue, type the following on the command line:
reg add HKLM\System\CurrentControlSet\Control /v
ServicesPipeTimeout /t REG_DWORD /d 60000 /f shutdown
/r /t 0
Monitoring and troubleshooting the storage system
Table 13 Known issues (continued)
Issue
Resolution
iSCSI Software Target service The use of this registry key is documented at http://support.microsoft.com/
on MACHINE_NAME. Error 1053: kb/824344.
The service did not respond
to the start or control
request in a timely manner.
The Enclosure UID page that is part of
The UID LED cannot be enabled or disabled in the System Management
the HP System Management Homepage Home page until the Enclosure Manager key has been generated. The
cannot be used to enable or disable the Enclosure Manager key can be generated using the System Manager snap-in.
UID status LED.
Length of network storage system reboot The reboot time for the network storage system is approximately six to seven
time
minutes.
A cluster network interface reports status
(from cluster net or cluster
netint command or Failover Cluster
Manager) as “network partitioned” when
a cluster node is rebooted and rejoins
the cluster. The network interface is still
usable for communications to other
nodes; it is only the communications
between the cluster nodes that is
affected. The cluster interface status will
change after 12–24 hours. This issue is
intermittent and takes approximately
30–50 reboots of a node to reproduce.
This issue can be resolved by doing one of the following:
• Allow 12–24 hours to pass for the Microsoft Failover Cluster Manager to
resolve the issue automatically.
• Manually restart the node that was restarted or affected.
• Manually disable or enable the NIC on the affected cluster node that is
causing the issue, under Network Connections.
One of the following occurs:
FSRM only configures its config store in the cluster database when the FSRM
• File Server Resource Manager (FSRM) service starts. To resolve this issue, reboot one node in the cluster, or you
can start/stop the FSRM services by issuing the following commands on the
displays the error message:
command line using elevated privileges:
File Server Resource
net stop srmsvc
Manager global
net stop srmreports
configuration cannot be
accessed since it is not
net start srmreports
installed yet.
net start srmsvc
• A corrupted FSRM file causes the
This issue is documented by Microsoft at:
following error message to display
on the Quota window of the
http://technet.microsoft.com/en-us/library/gg214171(WS.10).aspx
Windows New Share wizard:
No quota templates are
available on this server.
The Diskraid utility does not operate with The HP StoreEasy 5000 Storage does not have a VDS Hardware Provider,
the HP StoreEasy 5000 Storage.
so the Diskraid utility does not work.
The NFS user mapping should not use
ADLDS.
HP strongly recommends using Active Directory or other RFC2307 compliant
LDAP stores for NFS user name mapping. Using Active Directory Lightweight
Data Services (ADLDS) is not recommended. Configuring ADLDS in a clustered
environment is beyond the scope of this document.
The Onboard Administrator GUI cannot The Onboard Administrator GUI Launch button only applies to systems with
be launched from the Integrated
the c3000/c7000 chassis. You are not able to use this button with the HP
Lights-Out 3 page. The Launch button is StoreEasy 5000 Storage .
in the Active Onboard Administration
section under the BL c-Class node in the
Integrated Lights-Out 3 navigation tree.
On rare occasions, an update to the SAS Update the SAS I/O module firmware again. If the second update is
I/O module firmware may result in the unsuccessful, review the log file for more information.
following message: Flash failed
for xxxx half of SAS I/O
Module. Check log file yyyy
Known issues
47
Table 13 Known issues (continued)
Issue
Resolution
for more information (where xxxx
is internal or external and yyyy is the
path and name of the log file).
If the System Management Homepage Identify and reseat the SAS I/O module that is causing the issue. An I/O
lists a fan module as unknown or
module may need to be replaced if there is less information available for
dormant, it might not be a fan issue. It
one I/O module than the other.
may mean that a SAS I/O module needs
to be reseated.
48
If the cache on the 1210m controller in
either server blade of the HP StoreEasy
5000 Storage becomes disabled, it will
greatly affect performance. As a
protective measure to ensure the safety
of data, if either 1210m controller
experiences an issue requiring the cache
to be disabled, the cache is disabled on
both controllers. This results in the
reduction of performance for both
controllers until the degraded part is
repaired or replaced.
An alert is generated for cache and supercapacitor (cache backup) issues,
but you can also run the following command from a command prompt or
PowerShell to determine the issue:
ccu show controller all details
When configuring iLO settings, changing
iLO settings on the second node may
result in an error that the user has
insufficient permissions. This can happen
even if the user is a domain administrator
and belongs to the administrator group
on each node. The User Access Control
system prevents the application from
running on the second node. No prompt
is displayed to the user to allow
execution on the second node.
• Log on to the second node using the local administrator account and
configure the iLO settings using the iLO Configuration Utility in the HP
System Tools program group.
You have installed the System Recovery
image on a storage system that has an
Delete existing LUNs by selecting Windows Server Manager→ File and
Storage Services after installing the System Recovery image. In Windows
If the output is similar to the following, replace the cache module or
supercapacitor:
controller 0: 500143800442D690
Manufacturer: HP
Model: 1210m
Part Number: 607190-001
SKU: None
Serial Number: PBGJR0XTAZ40FK
Firmware Version: 0156
Firmware Build: 2011061702
Peer Controller: 500143800442E600
Operational Status: Degraded, Cache disabled: redundant
controller battery issue
Health Status: Degraded/Warning
Cache Size: 1073741824
Read Cache Default: Enabled
Write Cache Default: Enabled
Battery 0 Status: fully charged
Battery 0 Estimated Charge Remaining: 100%
controller 1: 500143800442E600
Manufacturer: HP
Model: 1210m
Part Number: 607190-001
SKU: None
Serial Number: PBGJR0XTAZ407Z
Firmware Version: 0156
Firmware Build: 2011061702
Peer Controller: 500143800442D690
Operational Status: Degraded, Cache flash backup
hardware failure, Cache disabled: low battery charge
Health Status: Degraded/Warning
Cache Size: 1073741824
Read Cache Default: Enabled
Write Cache Default: Enabled
Battery 0 Status: charging
Battery 0 Estimated Charge Remaining: 0%
• Connect to iLO and change the settings using the iLO user interface.
NOTE: Changing the iLO network settings may cause your iLO sessions to
disconnect.
Monitoring and troubleshooting the storage system
Table 13 Known issues (continued)
Issue
Resolution
external disk enclosure connected to the Server Manager, LUNs are referred to as virtual disks, and are deleted by
storage system and the disk enclosure
first selecting the storage pool in which they are located.
either has existing LUNs or a degraded
disk. After installing the image the
System Management Homepage indicate
the disk drives are degraded and, if you
use the Create a Volume wizard, the disk
drives are only displayed for one node.
The Test WBEM Events tool displays an 1. Add the specific user name to the following namespaces:
error when the tool is launched by a user
• root\HPQ
other than Administrator.
• root\HPQ\default
• root\HPQ\TestEvent
• root\Interop
• root\CIMv2
2. For each namespace, complete the following namespace security steps:
a. On the Start screen on the desktop, type Run and press Enter (or press
Windows logo key+R to open the Run dialog box).
b. Enter wmimgmt.msc and click OK.
c. Right-click WMI Control and click Properties.
d. Select the Security tab.
e. Select the namespace.
f. Click the Security button and enable the following permissions for the
user:
• Execute Methods
• Full Write
• Partial Write
• Provider Write
• Enable Account
• Remote Enable
• Read Security
• Edit Security
3. Click Apply, and then click OK twice.
When attempting to create a highly
available file server, the following error
message is displayed:
1. Identify the network resource that is indicating the network status is
partitioned.
2. From either clustered node, open Network connections and select the NIC
that is causing the partitioning issue. Disable the network connection for
“Failed to create a file
3-5 seconds.
server. The clustered node is
3. Re-enable the network connection.
offline. “
4. Run the Create a File Server wizard again. The file server should be
created successfully.
When starting the System Management You can safely continue and log in. Once logged in, see the Local Server
Homepage, you may see a message that Certificate topic in the System Management Homepage online help to set
there is an error with the security
up a trusted certificate.
certificate.
Be aware that non-clustered volumes are If you choose to remove a volume from a cluster, be sure not to use the
at risk of data corruption. When using standalone volume to store data.
the New Volume wizard, the volume is
automatically added to the cluster.
You can remove the volume from the
cluster using the Cluster Manager and
Known issues
49
Table 13 Known issues (continued)
Issue
Resolution
make it a standalone volume but this can
lead to data loss.
The message "Display will be complete
when the storage inventory has
finished..." appears in Server Manager
and pool data does not display.
This issue occurs if the server has been added to the domain and a cluster
has been created. Local administrators cannot view this information. Once
a server is added to a domain and a cluster is created, you must log in to
Server Manager as a domain user.
The New Volume option is not enabled
after extending a virtual disk.
After extending a virtual disk, the New Volume option (visible when you
right-click the virtual disk) is disabled in Windows Server Manager. This can
occur if the space on the virtual disk was fully utilized (the Capacity and
Allocated Space columns display the same value) before extending the virtual
disk. To enable the New Volume option, do one of the following:
• In Disk Management, select Rescan Disks.
• Open a Windows PowerShell command prompt and execute the
Update-StorageProviderCache command.
Status column on Storage Pools window When viewing details about storage pools on the Storage Pools window in
in Windows Server Manager is blank. the Windows Server Manager, the Status column is always blank. However,
you can view the health status and operational status. Health status is
indicated by the icon to the left of the Name column. Operational status is
a separate column. You can hide the Status column by right-clicking the
column name and selecting Status, which removes Status from the list of
column headings that display.
When performing a system recovery, the This issue occurs when all drive letters have been assigned to LUNs (more
following error message is displayed:
than 23 volumes). To resolve this issue, you must disable (and then re-enable)
Unable to get an unused drive the HP 1210m controller in the server blade:
letter to map a network path 1. Reboot the server and, when prompted, press F9 to access the ROM-based
setup utility.
to so aborting attempt to use
2. On the menu that displays, navigate to PCI Device Enable/Disable and
a network share
press Enter to select it.
3. Navigate to PCI Slot 2 and press Enter to select it.
4. Navigate to Disabled and press Enter to select it.
5. Exit from the utility by pressing Esc three times and then press F10 to reboot
the server. Ensure the system recovery media is connected to the server.
6. When the server reboots, continue with the system recovery process
described in “Storage system recovery” (page 136).
7. When the initial image deployment completes, the server reboots. During
the reboot, press F9 to access the utility again.
8. Repeat steps 2-5 (this time selecting Enabled instead of Disabled). When
the server reboots, the system recovery process will continue and complete.
9. If you are performing a recovery of both servers, repeat these steps on
the other server.
Windows Server Manager indicates
This issue can be caused by one of the following actions:
there are zero (0) storage pools but does • The cache is out of date.
not display any kind of error message
• The discovery operation times out.
about it.
• An operation fails because it requires a service restart or cache update.
• The HP Storage Management Service has stopped running.
To resolve the issue, restart the HP Storage Management Service using one
of the following methods:
• From the desktop, navigate to the Services window (services.msc) and
locate HP Storage Management Service. Right-click the service and select
Start.
• Open a Windows PowerShell prompt and enter the following cmdlet:
net start hpstormsvc
50
Monitoring and troubleshooting the storage system
Table 13 Known issues (continued)
Issue
Resolution
Network teaming cannot be configured Do not create network teams until after the initial configuration tasks have
during initial system configuration.
been completed. If a system is to be connected to a network where specific
VLANs with VLAN tagging enabled (for example, for connecting to a domain
controller), it is recommended that the network switch be temporarily
configured to pass untagged network packets on the specific VLAN or to
configure the network interface properties to operate using the specific VLAN
ID. Configuring VLAN settings is accomplished by opening the properties
dialog for the network interface and then configuring the network adapter
by clicking on the Configure button.
During initial system configuration, the
Initial Configuration Tasks window may
display the following message:
Connecting to remote server
169.254.2.111 failed with the
following error message: The
WinRM client cannot process
the request. If the
authentication scheme is
different from Kerberos, or
if the client computer is not
joined to a domain, then
HTTPS transport must be used
or the destination machine
must be added to the
TrustedHosts configuration
setting. Use winrm.cmd to
configure TrustedHosts. Note
that computers in the
TrustedHosts list might not
be authenticated.
This may be cause by having multiple interfaces on the same network subnet
as that used by the network interface names “Cluster Internal”. By default,
the Cluster Internal network uses an APIPA address (169.254.0.0/16). This
is the default subnet used by other network interfaces that are connected and
there is no DHCP server. This results in multiple network routes between
nodes.
Disable or disconnect network interfaces that are connected to networks
where no DHCP server is available. During the initial configuration you will
be given the opportunity to assign network addresses to other network
interfaces. After addresses are assigned the network interfaces can be
reconnected or enabled.
If the HP 1210m controller in the HP
You must upgrade the HP 1210m controller first and reboot the server. Then,
StoreEasy 5000 Storage is running an
upgrade the disk enclosure firmware and it will succeed.
older version (1.56 or earlier) when you
perform a firmware upgrade, the
upgrade to the disk enclosure I/O
module will fail. The Firmware Update
Tool (FMT) will display the following
message: "Version not updated after
flash and reset of SEPxxxxxxxxxxxxxxx".
When attempting to use Failover Cluster
Manager to add a File Share to an HA
File Server on the cluster, the Add Share
wizard will not start.
Also, attempting to use Failover Cluster
Manager to view any existing shares on
file servers in the cluster, just results in a
perpetual “Loading” message. This
happens when a system level HTTP proxy
server is set. Some users will require a
system level proxy to make Cluster
Aware Updating work, but if one is set,
it is important to explicitly prevent access
to your HA file servers from using the
proxy.
Set the system level proxy to explicitly bypass the HA file servers. For example,
instead of using the following command:
netsh winhttp set proxy myproxy.fabrikam.com:80
"<local>"
set the proxy using a command like the following:
netsh winhttp set proxy myproxy.fabrikam.com:80
"<local>;*.fabrikam.com"
In this example, “*.fabrikam.com” is the client access point used on the
HA file servers.
The Storage Management Provider
1. Open Add/Remove Programs and verify that HP Insight Management
displays the following error message:
Agents is installed.
0x26005054 The service failed 2. If it is installed, open the Run dialog box and enter WBEMTEST and click
to subscribe for events
Connect.
3. Enter root\hpq as the namespace. Wait to see if the namespace
connects. If it does not connect, the WBEM installation is corrupt.
Known issues
51
Table 13 Known issues (continued)
Issue
Resolution
4. Navigate to the C:\hpnas\components\ directory, which contains
the WBEM installer.
5. 5. Locate and run the HPIDPWBEMPROVIDERS_X64.MSI file to re-install
the agents.
During initial system configuration, the
Initial Configuration Tasks window may
indicate that there was a failure to
connect to the second node after network
settings have been changed.
The IP address for the second node that is stored in the registry no longer
matches the second node's IP address. Change the registry key
HKEY_LOCAL_MACHINE\Software\Microsoft\OEMOOBE\
RemoteNodeIpAddress to contain an IP address that the first node can
reach, preferably on the same subnet. Do not change any other values.
Verifying services are running
If an issue occurs and other troubleshooting efforts do not resolve it, verify that the following services
are always running:
•
HP Alert E-Mail Startup Script
•
HP Insight Event Notifier
•
HP Insight Foundation Agents
•
HP Insight NIC Agents
•
HP Insight Server Agents
•
HP Insight Storage Agents
•
HP ProLiant Health Monitor Service
•
HP ProLiant System Shutdown Service
•
HP Remote Synchronization Service
•
HP Smart Array SAS/SATA Event Notification Service
•
HP Storage Management Service
•
HP System Management Homepage
•
HP Version Control Agent
•
HP Storage Management Service
Additionally, use the following procedure to verify that the user interfaces for REST and Pool
Manager are installed and running:
1. Open IIS using one of the following methods:
2.
52
•
In Windows Server Manager, select IIS in the left navigation pane. In the list of servers
that display in the main content pane, right-click the applicable server and select Internet
Information Services (IIS) Manager.
•
Select Internet Information Services (IIS) Manager from the Tools menu in Windows Server
Manager.
•
Press Windows + R to open the Run window. Enter inetmgr and click OK.
Verify that the HP StoreEasy Management website contains the following entries:
•
aspnet_client
•
help
•
rest
•
webui
Monitoring and troubleshooting the storage system
3.
Right-click the HP StoreEasy Management website and select Manage Website. If it is running,
the Start option will be disabled.
If these steps do not resolve the issue, contact HP Technical Support.
Error codes
This section contains the error codes that may occur.
Storage Management Provider error codes
The Storage Management Provider error codes are listed in Table 14 (page 53).
Table 14 Storage Management Provider errors
Error code
Error message
Recommended action
0x24005001
Error during discovery.
Please restart HP Storage Management Service.
0x24005003
Error while parsing CLI output.
Please restart HP Storage Management Service.
0x20005003
Error while parsing CLI output.
0x25005008
The controller specified was not found.
0x20005009
The specified RAID level is invalid.
0x25005009
The specified RAID level is invalid.
0x2300500B
The operation is not supported because the storage Please retry the operation.
pool is unhealthy.
0x2300500C
The operation is not supported because the storage Please retry the operation.
pool is transforming.
0x2300500D
The physical drive specified is already in use.
Please retry the operation.
0x2300500E
Less than the minimum number of physical drives
was specified.
Please retry the operation.
0x2300500F
The specified physical drives are unsupported for
this operation. They may either be in use or are a
mismatch.
Please retry the operation.
0x24005011
The physical disk was not found in the provider
cache.
Please restart HP Storage Management Service.
0x25005011
The physical disk was not found in the provider
cache.
Please update the storage management provider cache by
invoking Windows PowerShell command
Update-StorageProviderCache.
0x24005012
No physical disks were found in the logical drive. Please restart HP Storage Management Service.
0x25005013
Failed to update pool in cache.
Please update the storage management provider cache by
invoking Windows PowerShell command
Update-StorageProviderCache.
0x25005014
Failed to get the pool from the controller.
Please update the storage management provider cache by
invoking Windows PowerShell command
Update-StorageProviderCache.
0x25005015
Failed to delete the pool from cache.
Please update the storage management provider cache by
invoking Windows PowerShell command
Update-StorageProviderCache.
Please update the storage management provider cache by
invoking Windows PowerShell command
Update-StorageProviderCache.
Please update the storage management provider cache by
invoking Windows PowerShell command
Update-StorageProviderCache.
Error codes
53
Table 14 Storage Management Provider errors (continued)
Error code
Error message
Recommended action
0x25005016
Failed to get the pool IDs for the subsystem from
the controller.
Please update the storage management provider cache by
invoking Windows PowerShell command
Update-StorageProviderCache.
0x25005017
Failed to get the associated pool for the LUN from Please update the storage management provider cache by
cache.
invoking Windows PowerShell command
Update-StorageProviderCache.
0x25005018
Failed to update disk in cache.
Please update the storage management provider cache by
invoking Windows PowerShell command
Update-StorageProviderCache.
0x25005019
Failed to get the disk from the controller.
Please update the storage management provider cache by
invoking Windows PowerShell command
Update-StorageProviderCache.
0x2500501A
Failed to get associated disks for the LUN from
cache.
Please update the storage management provider cache by
invoking Windows PowerShell command
Update-StorageProviderCache.
0x2500501B
Failed to get associated disks for the pool from
cache.
Please update the storage management provider cache by
invoking Windows PowerShell command
Update-StorageProviderCache.
0x2000501C
Unknown type of storage object.
0x2500501C
Unknown type of storage object.
Please update the storage management provider cache by
invoking Windows PowerShell command
Update-StorageProviderCache.
0x2400501D
Failed to get the associated subsystem for the
storage object from cache.
Please restart HP Storage Management Service.
0x2500501D
Failed to get the associated subsystem for the
storage object from cache.
Please update the storage management provider cache by
invoking Windows PowerShell command
Update-StorageProviderCache.
0x2500501E
Failed to get the storage object from cache.
Please update the storage management provider cache by
invoking Windows PowerShell command
Update-StorageProviderCache.
0x2500501F
Failed to update the storage object in cache.
Please update the storage management provider cache by
invoking Windows PowerShell command
Update-StorageProviderCache.
0x25005020
Failed to get the storage object from the controller. Please update the storage management provider cache by
invoking Windows PowerShell command
Update-StorageProviderCache.
0x25005021
Failed to copy storage objects.
0x20005022
Error creating Pool.
0x20005023
Error deleting LUN.
0x20005024
The storage pool contains virtual disks.
0x20005025
Failed to delete the reserved LUN.
0x25005026
Failed to get the logical drive from the controller.
54
Monitoring and troubleshooting the storage system
Please update the storage management provider cache by
invoking Windows PowerShell command
Update-StorageProviderCache.
Please update the storage management provider cache by
invoking Windows PowerShell command
Update-StorageProviderCache.
Table 14 Storage Management Provider errors (continued)
Error code
Error message
Recommended action
0x25005027
Failed to convert from WCS to MBS.
Please update the storage management provider cache by
invoking Windows PowerShell command
Update-StorageProviderCache.
0x24005028
Failed to get proxy.
Please restart HP Storage Management Service.
0x2500502A
Failed to update the logical drive in cache.
Please update the storage management provider cache by
invoking Windows PowerShell command
Update-StorageProviderCache.
0x2500502B
Failed to get volumes for the pool.
Please update the storage management provider cache by
invoking Windows PowerShell command
Update-StorageProviderCache.
0x2500502C
Failed to get the pool for the physical drive.
Please update the storage management provider cache by
invoking Windows PowerShell command
Update-StorageProviderCache.
0x2500502F
Failed to acquire the lock.
Please update the storage management provider cache by
invoking Windows PowerShell command
Update-StorageProviderCache.
0x25005030
Failed to add physical disk(s) to one of the LUNs
in the pool.
Please update the storage management provider cache by
invoking Windows PowerShell command
Update-StorageProviderCache.
0x25005031
Failed to add physical disk(s) as data drive(s) to
the pool.
Please update the storage management provider cache by
invoking Windows PowerShell command
Update-StorageProviderCache.
0x25005032
Failed to add physical disk(s) as spare drive(s) to
the pool.
Please update the storage management provider cache by
invoking Windows PowerShell command
Update-StorageProviderCache.
0x25005033
The usage parameter is invalid.
Please update the storage management provider cache by
invoking Windows PowerShell command
Update-StorageProviderCache.
0x20005037
Access denied.
0x25005037
Access denied.
Please update the storage management provider cache by
invoking Windows PowerShell command
Update-StorageProviderCache.
0x24005038
The cache is out of date.
Please restart HP Storage Management Service.
0x25005038
The cache is out of date.
Please update the storage management provider cache by
invoking Windows PowerShell command
Update-StorageProviderCache.
0x24005039
The logical drive was not found in cache.
Please restart HP Storage Management Service.
0x25005039
The logical drive was not found in cache.
Please update the storage management provider cache by
invoking Windows PowerShell command
Update-StorageProviderCache.
0x2400503A
The storage pool was not found in cache.
Please restart HP Storage Management Service.
0x2500503A
The storage pool was not found in cache.
Please update the storage management provider cache by
invoking Windows PowerShell command
Update-StorageProviderCache.
0x2400503B
The subsystem was not found in cache.
Please restart HP Storage Management Service.
0x2500503B
The subsystem was not found in cache.
Please update the storage management provider cache by
invoking Windows PowerShell command
Update-StorageProviderCache.
Error codes
55
Table 14 Storage Management Provider errors (continued)
Error code
Error message
Recommended action
0x2300503D
Incompatible ResiliencySetting for this
operation.
Please retry the operation.
0x23005040
Some of the parameter values supplied were
invalid.
Please retry the operation.
0x20005040
Some of the parameter values supplied were
invalid.
0x25005040
Some of the parameter values supplied were
invalid.
Please update the storage management provider cache by
invoking Windows PowerShell command
Update-StorageProviderCache.
0x24005041
Failed to get the logical drives in the pool.
Please restart HP Storage Management Service.
0x25005041
Failed to get the logical drives in the pool.
Please update the storage management provider cache by
invoking Windows PowerShell command
Update-StorageProviderCache.
0x24005043
Failed to get physical disk in the pool.
Please restart HP Storage Management Service.
0x25005045
Failed to get physical disk in the subsystem.
Please update the storage management provider cache by
invoking Windows PowerShell command
Update-StorageProviderCache.
0x24005046
Failed to get the pool for the physical drive.
Please restart HP Storage Management Service.
0x24005047
Failed to get the physical disks in the enclosure.
Please restart HP Storage Management Service.
0x20005048
Physical disks not supported as arguments to the
method.
0x25005049
The operation was successful, but it has resulted in Please update the storage management provider cache by
the storage pools being renamed.
invoking Windows PowerShell command
Update-StorageProviderCache.
0x2500504A
Failed to get all pools from cache.
0x2500504B
Failed to get the controller for the pool from cache. Please update the storage management provider cache by
invoking Windows PowerShell command
Update-StorageProviderCache.
0x2500504C
Failed to get the disk(s) for the pool from the
controller.
Please update the storage management provider cache by
invoking Windows PowerShell command
Update-StorageProviderCache.
0x2500504D
Failed to add an association to cache.
Please update the storage management provider cache by
invoking Windows PowerShell command
Update-StorageProviderCache.
0x2500504E
The physical disk is in use. It cannot be deleted
from cache.
Please update the storage management provider cache by
invoking Windows PowerShell command
Update-StorageProviderCache.
0x2500504F
Invalid relation type.
Please update the storage management provider cache by
invoking Windows PowerShell command
Update-StorageProviderCache.
0x21005051
Failed to find the MI Main module.
Please re-install HP Storage Management Provider.
0x21005052
Failed to initialize the MI Application.
Please re-install HP Storage Management Provider.
0x21005053
The Storage Management Service is not able to
host the SMP.
Please re-install HP Storage Management Provider.
0x26005054
The service failed to subscribe for events.
Please refer to the troubleshooting guide.
56
Monitoring and troubleshooting the storage system
Please update the storage management provider cache by
invoking Windows PowerShell command
Update-StorageProviderCache.
Table 14 Storage Management Provider errors (continued)
Error code
Error message
Recommended action
0x24005055
Failed to get the proxy object.
Please restart HP Storage Management Service.
0x21005056
Failed to load the SMProvider DLL. Either it is not
registered or is unable to load its dependencies.
Please re-install HP Storage Management Provider.
0x25005059
Failed to get all LUNs for the disk from the
controller.
Please update the storage management provider cache by
invoking Windows PowerShell command
Update-StorageProviderCache.
0x2500505A
Failed to remove association from the provider
cache.
Please update the storage management provider cache by
invoking Windows PowerShell command
Update-StorageProviderCache.
0x2500505B
The operation was successful, but it has resulted in Please update the storage management provider cache by
the storage pools being renamed.
invoking Windows PowerShell command
Update-StorageProviderCache.
0x2500505C
The operation was successful, but it has resulted in Please update the storage management provider cache by
the storage pools being renamed.
invoking Windows PowerShell command
Update-StorageProviderCache.
0x2000505D
The operation was successful, but it has resulted in Please update the storage management provider cache by
the storage pools being renamed.
invoking Windows PowerShell command
Update-StorageProviderCache.
0x2500505E
Failed to get all logical drives from cache.
0x2500505F
Failed to get the controller for the logical drive from Please update the storage management provider cache by
cache.
invoking Windows PowerShell command
Update-StorageProviderCache.
0x25005060
The disk(s) cannot be added to this pool because
it contains at least one LUN requiring RAID level
migration.
Please update the storage management provider cache by
invoking Windows PowerShell command
Update-StorageProviderCache.
0x21005061
Failed to remove partition data from the logical
drive. You must manually clear the disk or delete
the partition. Otherwise, subsequent volume
creation requests might fail.
Please re-install HP Storage Management Provider.
0x20005062
The format of the specified RAID level is invalid.
Valid RAID levels are RAID 0, RAID 1, RAID 10,
RAID 5, RAID 6, RAID 50, RAID 60, RAID 10
(ADM), RAID 50 (2), RAID 50 (3), RAID 50 (4),
RAID 50 (5), RAID 1 (ADM), RAID 60 (2), RAID
60 (3), RAID 60 (4), RAID 60 (5).
0x20005063
The format of the specified RAID level is invalid.
Valid RAID levels are RAID 0, RAID 1, RAID 10,
RAID 5, RAID 6.
0x23005064
The length of the virtual disk friendly name exceeds Please retry the operation.
the maximum supported length.
0x24005065
Failed to get the pool from the logical drive.
Please restart HP Storage Management Service.
0x25005068
The virtual disk could not complete the operation
because its health or operational status does not
permit it.
Please update the storage management provider cache by
invoking Windows PowerShell command
Update-StorageProviderCache.
0x24005069
Enclosure not found in cache.
Please restart HP Storage Management Service.
0x2500506A
Failed to update enclosure in cache.
Please update the storage management provider cache by
invoking Windows PowerShell command
Update-StorageProviderCache.
Please update the storage management provider cache by
invoking Windows PowerShell command
Update-StorageProviderCache.
Error codes
57
Table 14 Storage Management Provider errors (continued)
Error code
Error message
Recommended action
0x2400506B
Failed to get the enclosure for the physical disk.
Please restart HP Storage Management Service.
0x2400506C
Failed to get WMI class names to subscribe.
Please restart HP Storage Management Service.
0x2100506D
SMP assembly file not found.
Please re-install HP Storage Management Provider.
0x2700506E
The registry key
The system is in an invalid state. Please contact HP Support.
HKLM\HARDWARE\Description\System\BIOS
was not found.
0x2700506F
The registry key
The system is in an invalid state. Please contact HP Support.
HKLM\HARDWARE\Description\System\BIOS\
SystemProductName
was not found.
0x21005070
SmartArray.dll file not found.
Please re-install HP Storage Management Provider.
0x21005071
Raptor.dll file not found.
Please re-install HP Storage Management Provider.
0x21005072
Failed to get the library name to load.
Please re-install HP Storage Management Provider.
0x25005073
Failed to release the lock.
Please update the storage management provider cache by
invoking Windows PowerShell command
Update-StorageProviderCache.
0x24005074
Failed to create the mutex.
Please restart HP Storage Management Service.
0x24005075
Failed to get the proxy to the contoller library.
Please restart HP Storage Management Service.
0x25005076
The resiliency setting does not match the pool's
resiliency setting.
Please update the storage management provider cache by
invoking Windows PowerShell command
Update-StorageProviderCache.
0x25005077
The operation was successful but the storage
Please update the storage management provider cache by
provider cache is out of date. You must update the invoking Windows PowerShell command
storage provider cache before proceeding further. Update-StorageProviderCache.
0x25005078
The specified friendly name already exists.
0x20005079
The Storage Pool could not complete the operation
because its health or operational status does not
permit it.
0x2500507A
One of the physical disks specified is assigned to
other storage pool.
Please update the storage management provider cache by
invoking Windows PowerShell command
Update-StorageProviderCache.
0x2300507B
This operation is supported only for spare drives.
Please retry the operation.
0x2000507C
The physical drive could not complete the operation
because its health or operational status does not
permit it.
0x2000507D
One of the physical disks specified can not be
configured by the subsystem.
0x2300507E
The specified pool does not contain witness lun
and hence cannot be shrunk.
Please retry the operation.
0x2300507F
This operation is not supported on primordial
storage pools.
Please retry the operation.
58
Monitoring and troubleshooting the storage system
Please update the storage management provider cache by
invoking Windows PowerShell command
Update-StorageProviderCache.
Pool Manager Provider error codes
The Pool Manager Provider error codes are listed in Table 15 (page 59).
Table 15 Pool Manager Provider errors
Error code
Error message
0x20006001
Pool Manager Provider has been unloaded from memory.
0x20006002
The Pool Manager Rule XML file is invalid.
0x20006003
Pool configuration is not supported for this enclosure.
0x20006004
Failed to initialize logger.
0x20006005
Could not find ROM Check Library (pssver.dll), this is required to find pool
template for any enclosure.
0x20006006
Failed to use WMI to call the SMP Provider.
0x20006007
Failed to connect to the SMP Provider.
0x20006008
General WMI error in the Pool Manager Provider.
0x20006009
The first healthy disk size within the virtual enclosure exceeded the maximum drive
capacity allowed for a pool by the virtual enclosure.
0x2000600A
The proposed spare disk slot is empty.
0x2000600B
The first healthy disk type within the virtual enclosure does not match the disk type
supported by the virtual enclosure.
0x2000600C
An empty disk slot was found.
0x2000600D
The OS pool was not found in the expected location.
0x2000600E
The proposed spare disk is unhealthy.
0x2000600F
The proposed spare disk in already in use.
0x20006010
The existing pool type does not match the virtual enclosure type.
0x20006011
The proposed pool cannot be created or grown because one of the concrete
pools within the pool set cannot be grown.
0x20006012
The existing pool contains disks of different sizes or types.
0x20006013
The existing pool has a RAID level that is not supported for the proposed pool.
0x20006014
The global spare used by this existing pool is not in the current virtual enclosure.
0x20006015
Some of the disks within the proposed pool are already part of another pool,
which spans the current virtual enclosure.
0x20006016
Some of the disks within the proposed pool are unhealthy.
0x20006017
Some of the disks within the proposed pool are offline.
0x20006018
Some of the disks in the proposed pool are marked by the storage subsystem as
cannot pool.
0x20006019
The number of existing pools exceeds the count specified in the rule file.
0x2000601A
The pool is unhealthy.
0x2000601B
Some of the disks in the proposed pool are a different type than the first disk of
the virtual enclosure.
0x2000601C
Some of the disks in the proposed pool are a different size than the first disk of
the virtual enclosure.
0x2000601D
Some of the disks in the proposed pool are a different spindle speed than the first
disk of the virtual enclosure.
Error codes
59
Table 15 Pool Manager Provider errors (continued)
Error code
Error message
0x2000601E
Information on some of the disks in the proposed pool could not be read.
0x2000601F
The proposed spare disk is a different type than the first disk of the virtual
enclosure.
0x20006020
The proposed spare disk is a different size than the first disk of the virtual
enclosure.
0x20006021
The proposed spare disk is a different spindle speed than the first disk of the
virtual enclosure.
0x20006022
Pool will be grown by adding spare disks only. No data disks will be added.
0x20006023
Some of the disks in the proposed pool are already used as spare(s).
Management Web Service error codes
The Management Web Service error codes are listed in Table 16 (page 60).
Table 16 Management Web Service errors
Error code
Error message
Recommended action
0x2000A001
You are not authorized to access the resource.
0x2000A002
Received invalid input.
0x2000A003
Failed to access WMI.
0x2000A004
File not found.
0x2000A005
Registry value not found.
0x2000A006
The web service encountered an exception while performing
the request. Check the web service log for more detail.
0x2000A007
The storage pool was created, but spare drives could not be
added. Edit the pool to add spare drives.
0x2000A008
The operation on the storage pool failed because the storage
provider cache was out of date. Please retry the operation.
0x2000A009
The operation cannot be performed because a storage
provider discovery is in progress. Please try the operation
later.
0x2000A00A
Failed to get the discovery status of the storage provider.
0x2300A00B
The storage subsystem has indicated that one or more of the Check the health and operational status of the
physical disks cannot be used in a storage pool.
physical drives. Please retry the operation.
0x2300A00C
One or more of the physical disks provided in the request
was not found or cannot be used in a storage pool.
Check the health and operational status of the
physical drives. Please retry the operation.
CSP WBEM Providers error codes
The CSP WBEM Providers error codes are listed in Table 17 (page 61).
60
Monitoring and troubleshooting the storage system
Table 17 CSP WBEM Providers errors
Error
code
Description
Source
Event Log Entry
Type
Resolution
0x910
The CSP Enclosure Provider is
initializing.
HP CSP WBEM
Providers
Informational
Retry query to provider after 3 minutes.
0x911
CSP Enclosure Provider
initialization successful.
HP CSP WBEM
Providers
Success
0x912
Enclosure Provider lost connection
with EM.
Fan, Power supply and IO/PCIe
Modules classes will not work.
HP CSP WBEM
Providers
Warning
Check EM connections and retry query to
provider after 3 minutes.
0x913
Enclosure Provider is unable to
parse the input data provided by
EM.
Fan, Power supply and IO/PCIe
Module classes will not work.
HP CSP WBEM
Providers
Warning
Check the provider logs for details. Retry
query to provider after 3 minutes.
Blade classes may give only partial
data.
0x914
Enclosure Provider is unable to
build internal lists using data
provided by EM.
HP CSP WBEM
Providers
Warning
Check the provider logs for details.
0x915
Enclosure provider is not
recongising this blade server.
Many or all the classes may fail.
HP CSP WBEM
Providers
Error
Check the provider logs for details.
0x916
Enclosure provider is unable to
build internal lists. Blade classes
may fail.
HP CSP WBEM
Providers
Error
Check the provider logs for details.
0x917
Enclosure provider is unable to
connect to health driver. Many or
all classes may fail.
HP CSP WBEM
Providers
Error
Check the provider logs for details. Also
report to the Support Team.
0x920
The CSP Storage Provider is
initializing.
HP CSP WBEM
Providers
Informational
Retry query to provider after 3 minutes.
0x921
CSP Storage Provider initialization HP CSP WBEM
successful.
Providers
Success
0x922
CSP Storage provider does not
give instances for top level class
HP_CCStorageSystem.
HP CSP WBEM
Providers
Warning
Retry query to provider after 3 minutes.
0x923
Unable to find the Default
Namespace for Storage Provider.
HP CSP WBEM
Providers
Warning
Retry query to provider after 3 minutes. If
retry fails report to the Support Team.
0x924
Querying the top level class
HP CSP WBEM
HP_CCStorageSystem failed in CSP Providers
Storage Provider.
Error
Retry query to provider after 3 minutes. If
retry fails, report to the Support Team.
0x930
The CSP Server Provider is
initializing.
HP CSP WBEM
Providers
Informational
0x931
CSP Server Provider initialization
successful.
HP CSP WBEM
Providers
Success
0x932
CSP Server provider does not give HP CSP WBEM
instances for top level class
Providers
HP_WinComputerSystem.
Warning
Check the provider logs for details.
0x934
Querying the top level class
HP_WinComputerSystem failed in
CSP Server Provider.
Error
Check the provider logs for details.
HP CSP WBEM
Providers
Error codes
61
Firmware Management Tool (FMT) error codes
The FMT error codes are listed in Table 18 (page 62).
Table 18 Firmware Management Tool (FMT) errors
Error code
Message format
0X1A01
Firmware recipe file %s does not exist. Repository.xml file is either
missing from folder C:\
Firmware recipe file %s is not
ProgramData\
readable.
Hewlett-Packard\CMP\
Firmware or no proper permissions
on this file.
0X1A02
Root cause
0X1A03
Error processing Firmware recipe please check that this file is
well-formed XML.
Repository.xml is corrupted.
0X1A04
Smart Component file does not exist
or is not readable: %s
One or more Smart Component(SC)
is missing from folder C:\
ProgramData\
Hewlett-Packard\CMP\
Firmware.
0X1A0D
Smart Component file does not exist
or is not readable: %s
Version tag of the Repository.xml
is not compatible. This occurs when
Repository.xml is corrupted.
0X1A05
Discovery failed for %s using %s:
unable to create temp directory %s
0X1A06
Discovery failed for %s using %s:
error reading the discovery file: %s.
Check the log (%s in %s) for more
information.
There might be a problem in creating
or reading a temporary file/directory
that is used for few components
discovery/flash.
0X1A0F
Discovery failed for %s using %s:
discovery file not created: %s. Check
log file %s for more information
0x1027
Flash not attempted for %s using %s:
unable to create temporary directory
%s.
0X1A07
Internal error - see the log file (%s in
%s) for more information.
0X1A08
0x1020
Reinstall the FW bundle by following
these steps:
1. Uninstall the FW bundle from
Control Panel/Uninstall Programs
wizard.
2. Install the HP_CMP_FW EXE which
is located under C:\hpnas\
Components\CMP
1. Check the logs for more
information.
2. Freeup space or set the correct
permissions on temporary directory
mentioned in error message.
3. Retry the discovery/flash.
Internal error occurred during
Check the logs for more information
discovery/flash due to smart
and act accordingly.
component execution failures,
Internal error - see log file (%s) for
unexpected response from Smart
more information.
Components. Tool itself might have
hit a error condition that aborted the
Flash not attempted using %s: Internal operation.
error - see log file (%s) for more
information.
0x1A10
Discovery failed for %s using %s:
invalid response from Smart
Component. Check the log file (%s in
%s) for more information.
0X1A0B
Error inspecting firmware for %s:
Internal error - see log file (%s in %s)
for more information.
0X1A09
Discovery failed for %s using %s:
System too busy to respond or
device discovery timed out. Check log Component not responding to
files: %s and %s.
discovery call in specified timeout
period.
0X1A0C
Internal error - Missing file/directory
(%s).
62
Troubleshooting tips
Error in discovering the active FW
version.
Retry the Discovery operation.
Necessary directory or file(s) missing Reinstall the CMP installer (HP_CMP)
from system.
which is presented under C:\hpnas\
Monitoring and troubleshooting the storage system
Table 18 Firmware Management Tool (FMT) errors (continued)
Error code
Message format
Root cause
Troubleshooting tips
Components\CMP folder along with
FW bundle if needed (Follow the
same steps mentioned in first four
error scenarios).
0X1A0E
Discovery failed for %s using %s.
Check log file %s for more
information.
0x1A11
Failure communicating with Enclosure Failed to communicate to EM because Make sure that EM is up and
Manager (EM) - check that EM is up of connectivity issue.
reachable from server and then retry
and can be reached from server: see
the operation.
the log file (%s) for more information.
0x1A12
Discovery failed for %s using %s:
EM authentication failure.
Authentication failed while connecting
to Enclosure Manager (EM).
0x1034
Flash not attempted for %s using %s:
Authentication failed while connecting
to Enclosure Manager (EM).
0x1011
Flash failed for %s using %s. Check
log files (%s and %s) for further
information.
0x1012
Flash failed for %s using %s. Check
log file (%s) for further information.
0x1015
Smart Component flash failed for %s
using %s. Check log files: %s, %s and
%s.
0x1013
Flash failed for %s using %s: the
device hung on reset.
0x1014
SC failed to discover the active
version.
Check the logs for more information
and act accordingly.
Make sure that EM keys are
generated properly.
1. Open Enclosure Manager Settings
utility and enter correct EM password
.
2. Retry the operation.
Flash failed.
Check the logs for more info and act
accordingly.
Devices which require (like SEPs) reset Wait for sometime, check whether
post flash hung during the reset
newer version is reflected by
process.
discovering the affected components.
If not retry the operation.
Smart Component flash failed for %s System too busy to respond or
using %s: wait for flash status timed component not responding to flash
out. Check log files: %s, %s and %s. call in specified timeout period
0x106C
Enclosure Manager Firmware Update EM is not reachable from server.
Failed (EMU can't access server's IP
Address). Check log files: %s and %s.
Make sure the connectivity between
EM and server is proper and then
retry the flash operation.
0x1031
Failed to retrieve HDD information
before flashing %s using %s , Please
check the log file (%s) for further
details.
Could not retrieve information about
HDDs prior to flashing the storage.
Need to diagnose Storage Enclosure
and P1210m controller to get details
of all attached HDD available in
enclosure is in OK state.
0x1036
Flash not attempted for %s using %s:
Drive model(s) not supported. Check
log file (%s) for further information.
HDD present on server or enclosure
are not supported for appliance.
Ensure to have supported
configuration hardware is present on
appliance.
0x1037
Flash not attempted for %s using %s:
P410i Smart Array Controller Cache
Board is not present. Cache board is
needed to flash the internal server
HDD.
Flash not attempted for internal server Ensure to have Cache board on
HDDs as P410i Smart Array
servers.
Controller Cache Board is not present.
Cache board is needed to flash the
internal server HDD.
0x1A13
Operation failed for device: %s :
Operation timed out for device
operation timed out; check log file %s <device name>.
for more information.
Retry the operation.
0x1A23
Internal error - Either %s is missing or Dan library not found or no proper
not readable. Check log file (%s) for permissions.
more information.
Reinstall dan library as local admin.
Dan lib can be found at c:\hpnas\
components\ccu.
Error codes
63
Table 18 Firmware Management Tool (FMT) errors (continued)
Error code
Message format
Root cause
0x103A
Flash not attempted: current bay
Error occurred while determining
cannot be determined. Check log file current server bay during flash
(%s) for further details.
operation.
0x103B
Flash not attempted: Internal error see log file (%s) for more information.
0x1040
Flash failed for device: %s : operation Flash operation timed out.
timed out; check log file %s for more
information.
Troubleshooting tips
1. "--ignorerole" option can be used
which avoids bay check.
2. Reinstall CMP installer as suggested
below to resolve the issue.
Navigate to C:\hpnas\
Components\CMP folder along with
FW bundle if needed (Follow the
same steps mentioned in first four
error scenarios).
Wait approximately up to 15 minutes
and execute flash recommendation
operation to check whether firmware
is updated. If not retry the flash
operation.
Using the View Storage Configuration tool
You can access View Storage Configuration tool/Storage Viewer from the HP StoreEasy tools
(either the desktop folder or from the Tools menu in Windows Server Manager). This tool enables
you to view details about each LUN – name, size RAID level, pool assignment, spare drive
indication, and cluster disk name (if applicable). In the lower part of the tool, select one of the
following tabs to view additional information:
•
Volumes: Displays any Windows volumes on the LUN, the volume label, and mount paths.
•
Drives: Displays details about the physical drives that comprise the LUN (drive bay, size, RPM,
disk name, and serial number).
•
Spares: Displays details about any spares that are assigned to the LUN (drive bay, size, RPM,
disk name, and serial number). If more information is available, when you hover over any
part of the row, a tool tip opens with details.
•
Jobs: Displays the status of any jobs running on the LUN (checking volume data integrity and
rebuilding).
Figure 37 Viewing LUNs
You can also view details about each drive – bay location, ID, serial number, size, health, and
model number. In the lower part of the tool, you can view volume information related to the drive.
64
Monitoring and troubleshooting the storage system
Figure 38 Viewing drives
HP Support websites
Use the “Support and troubleshooting” task at the HP Support & Drivers website (http://
www.hp.com/go/support) to troubleshoot problems with the storage system. After entering the
storage system name and designation (for example, HP StoreEasy 5000 Storage) or component
information (for example, SAS I/O module), use the following links for troubleshooting information:
•
Download drivers and software—Provides drivers and software for your operating system.
•
Troubleshoot a problem—Provides a listing of customer notices, advisories, and bulletins
applicable for the product or component.
•
Manuals—Provides the latest user documentation applicable to the product or component.
User guides can be a useful source for troubleshooting information. For most storage system
hardware platforms, the following ProLiant server manuals may be useful for troubleshooting
assistance:
◦
HP ProLiant Server User Guide or HP ProLiant Server Maintenance and Service Guide
These guides contain specific troubleshooting information for the server.
◦
HP ProLiant Servers Troubleshooting Guide
IMPORTANT: Some troubleshooting procedures found in ProLiant server guides may not
apply to the storage system. If necessary, check with your HP Support representative for further
assistance.
For HP StoreEasy 5000 Storage guides, go to www.hp.com/support/manuals, select NAS
Systems under storage, and select an HP StoreEasy 5000 Storage product.
For software-related components and issues, online help or user guide documentation may
offer troubleshooting assistance. Known issues, workarounds and service releases are addressed
in this guide or the release notes.
•
Customer notices—Address informational topics about the HP StoreEasy 5000 Storage.
•
Customer advisories—Address know issues and solutions or workarounds.
NOTE: You must register for Subscriber's Choice to receive customer advisories and notices. See
“Subscription service” (page 143) for more information.
HP Support websites
65
Autonomy LiveVault
To use Autonmony LiveVault, which enables data protection in the cloud, see the following website:
http://www.autonomy.com/storeeasy
Microsoft Systems Center Operations Manager
Microsoft Systems Center Operations Manager (SCOM) provides comprehensive monitoring,
performance management, and analysis tools to maintain Windows OS and application platforms.
This solution allows you to monitor Microsoft Windows environments and HP storage products
through a common OpsMgr console. To download HP management packs for Microsoft System
Center Operations Manager, including installation, configuration, and usage documentation, visit
the HP Management Packs for Microsoft Systems Center site at:
https://h20392.www2.hp.com/portal/swdepot/displayProductInfo.do?productNumber=SCOM
Windows Recovery Environment
You can use Windows Recovery Environment to help diagnose and recover from operating system
errors which may prevent Windows from booting. To use Windows Recovery Environment to
perform a system recovery, see “Restoring the system with Windows Recovery Environment”
(page 140).
Startup Repair
1.
Do one of the following:
a. For direct access, attach the SUV cable (supplied with the HP StoreEasy 5000 Storage)
to the port on the front of the server blade you want to recover. Connect a monitor and
USB mouse to the SUV cable. Using the remaining USB connector on the SUV cable,
connect either a USB DVD drive (and insert the System Recovery DVD) or a bootable USB
flash device (prepared with a System Recovery image).
b. For remote management access, connect to the server using iLO from a client PC. Insert
the System Recovery DVD in the client PC or attach a bootable USB flash device that has
been prepared with a System Recovery image.
2.
Reboot the server blade to either the USB flash device or USB DVD drive.
The system BIOS attempts to boot to the USB device first by default. Watch the monitor output
during the boot as you may need to press a key to boot to the USB media
NOTE: If directly connected, you may have to change the BIOS settings to ensure proper
boot sequence. If connected remotely, you may have to change some iLO settings to ensure
proper boot sequence.
3.
Select Windows Recovery Environment.
The recovery environment is loaded.
4.
5.
6.
66
Once the recovery environment is loaded, the System Recovery Options wizard opens. On
the first window, select the keyboard input method, which is based on your location (for
example, select US for United States) and click Next.
Select either of the following options (it does not matter which option is selected) and click
Next:
•
Use recovery tools that can help fix problems starting Windows. Select an operating
system to repair.
•
Restore your computer using a system image that you created earlier.
Click Cancel until the Choose a recovery tool window opens.
Monitoring and troubleshooting the storage system
Figure 39 System recovery options
7.
Click Startup Repair.
The utility automatically attempts to repair the system image startup process. It also attempts
to repair the errors. If the errors cannot be repaired, an alert window is displayed:
Figure 40 Startup repair alerts
8.
9.
Select Don’t send.
When the utility has finished running, click Restart when prompted to restart the system.
Memory Diagnostic
1.
Do one of the following:
a. For direct access, attach the SUV cable (supplied with the HP StoreEasy 5000 Storage)
to the port on the front of the server blade you want to recover. Connect a monitor and
USB mouse to the SUV cable. Using the remaining USB connector on the SUV cable,
connect either a USB DVD drive (and insert the System Recovery DVD) or a bootable USB
flash device (prepared with a System Recovery image).
b. For remote management access, connect to the server using iLO from a client PC. Insert
the System Recovery DVD in the client PC or attach a bootable USB flash device that has
been prepared with a System Recovery image.
Windows Recovery Environment
67
2.
Reboot the server blade to either the USB flash device or USB DVD drive.
The system BIOS attempts to boot to the USB device first by default. Watch the monitor output
during the boot as you may need to press a key to boot to the USB media
NOTE: If directly connected, you may have to change the BIOS settings to ensure proper
boot sequence. If connected remotely, you may have to change some iLO settings to ensure
proper boot sequence.
3.
Select Windows Recovery Environment.
The recovery environment is loaded.
4.
5.
6.
7.
8.
Once the recovery environment is loaded, the System Recovery Options wizard opens. On
the first window, select the keyboard input method, which is based on your location (for
example, select US for United States) and click Next.
Select either of the following options (it does not matter which option is selected) and click
Next:
•
Use recovery tools that can help fix problems starting Windows. Select an operating
system to repair.
•
Restore your computer using a system image that you created earlier.
Click Cancel until the Choose a recovery tool window opens.
Click Windows Memory Diagnostic.
Select one of the following options:
•
Restart now and check for problems. Select this option to restart the system and scan for
memory issues. Do not remove the attached USB DVD or USB flash drive.
•
Check for problems the next time I start my computer. Select this option to schedule a
memory diagnostic after you restart the system. Do not remove the attached USB DVD or
USB flash drive.
HP 1210m Volume Online Tool
Use the HP 1210m Volume Tool to manually set all volumes online. Manually setting volumes online
may be necessary if a disk enclosure is powered down before the server blades are powered
down and the enclosure contains disks with LUNs on them.
IMPORTANT:
data loss.
You should only use this tool under the guidance of HP Support to avoid potential
The tool is included (but not installed) with the HP StoreEasy 5000 Storage software.
To install the tool:
1. Navigate to the C:\hpnas\Components\support directory on the server blade.
2. Double click Volume_Manager_Install.msi.
To use the tool:
1. Navigate to C:\Program Files (x86)\Hewlett-Packard\HP 1210m Volume
Online Tool.
2. Double-click HPVolumeOnlineTool.exe to start the tool.
NOTE: Before the tool opens, a disclaimer about potential data loss is displayed. Read the
disclaimer and accept the terms to continue. If you decline, the tool closes.
3.
4.
68
When the HP 1210m Volume Online Tool opens, the LUNs that are in an Enabled but Offline
state are displayed.
Click Force Online.
Monitoring and troubleshooting the storage system
When the operation is complete, the tool indicates that the LUNs are now in the Enabled state.
Obtaining the Service Agreement ID
Obtain the SAID from your service contract agreement and keep it in a secure location. You must
provide it when you contact HP Support.
Locating the storage system warranty entitlement label
You must locate and identify the serial number and product number for the storage system
components to obtain service under the warranty. The numbers are listed on the warranty entitlement
label located on the pull-out tab below the Enclosure Management module on the back of the
enclosure (Figure 41 (page 69)).
Figure 41 Warranty entitlement label location
Obtaining the Service Agreement ID
69
5 Upgrading the storage system
The HP StoreEasy 5000 Storage is comprised of a common hardware platform containing two
server blades. Each server runs Windows Storage Server 2012.
When HP determines that it is desirable to upgrade one or more of these components, a notification
is posted to the HP support website for the HP StoreEasy 5000 Storage with the release notes and
the updated code. HP recommends that you upgrade the storage system software as part of normal
system maintenance for increased reliability and a better customer experience. Upgrades might
also be necessary when replacing a server blade or other component.
Maintaining your storage system
HP recommends the following maintenance guidelines for upgrading your system components
(operating system, software, firmware, and drivers), depending on your environment:
•
If your storage system is working properly, you are not required to install any updates.
•
If security updates are important for your operating environment, you can:
◦
Use Microsoft Windows Update to download updates.
◦
Use Windows Update Server to update the server blades in the storage system.
◦
Download and install specific security updates as needed from the Microsoft Security
TechCenter website:
http://technet.microsoft.com/security/default.aspx
•
If your maintenance policy is to only update servers to the most current and tested versions of
the system components, you can install the latest HP service release. To find the latest service
release, go to http://www.hp.com/go/support and search for your specific product. You
can also register your product on the HP support and drivers page to receive notification of
new service releases for your product. See “Subscription service” (page 143) for more
information.
NOTE: When installing a service release on the HP StoreEasy 5000 Storage system, do not
select and install any component from a ProLiant Support Pack (PSP). The service release image
contains the necessary files for your storage system.
•
If your maintenance policy allows you to update servers to the most current versions of the
system components for which HP has not completed testing and bundled as a service release,
go to http://www.hp.com. Search for your specific product or the underlying server platform
(for example, BL460 G7) to find specific updates.
•
HP recommends updating the operating system, software, firmware, and NIC drivers
simultaneously (in the same update window) to ensure proper operation of the storage system.
Determining the current storage system software version
You can find the version using the HP StoreEasy tools or the registry.
From the HP StoreEasy tools:
1. Open the HP StoreEasy tools (either from the desktop folder or from the Tools menu in Windows
Server Manager).
2. Select Manage Storage Pools.
70
Upgrading the storage system
3.
On the Overview tab, locate the version listed in the HP Quick Restore box.
NOTE: The versions shown in Figure 42 (page 71) may differ from the version you are
currently running.
Figure 42 Pool Manager Overview
From the registry:
1. Log in to the server blade.
2. Open a command window.
3. Enter the reg query command as shown in the following example:
C:\> reg query HKLM\Software\Wow6432Node\Hewlett-Packard\StorageWorks /s
The following information appears:
HKEY_LOCAL_MACHINE\Software\Wow6432Node\Hewlett-Packard\StorageWorks\QuickRestore
BASE
REG_SZ
3.02.0.08
QRVersion
REG_SZ
3.02.0a.123
The QRVersion field lists the version.
Upgrading HP StoreEasy 5000 Storage software
Software upgrades are typically distributed as service releases.
Download the service release file:
1. Go to http://www.hp.com/go/support.
2. Select Drivers and Software.
3. Enter HP StoreEasy 5000 Storage in the Enter a product name/number box and click Search.
4. Select your product, select the operating system, and then select the service release.
5. Follow the instructions included with the service release for installation.
Upgrading HP StoreEasy 5000 Storage software
71
Upgrading a component's firmware
The Firmware Management Tool (FMT) is a CLI based tool that is used to display active firmware
versions, show recommended firmware updates, and perform firmware updates for the currently
selected server blade. You must log in to each server blade to display its firmware information.
NOTE: Some firmware applies to the system enclosure or storage and is not specific to either
server blade. Firmware updates of this type can only be flashed from server blade1 of the storage
system by default when the Check and Update Firmware script is executed. If you attempt to flash
firmware that is not specific to the server blade from server blade 2, it will not work unless you use
the -ignorerole option with the flash command.
Firmware updates are typically required after installing a software patch that includes firmware
updates for the hardware. When the patch is downloaded and installed, new firmware components
are copied to the system but are not installed automatically.
Before performing a firmware upgrade, remember the following:
•
You must complete these steps on each server blade.
•
You must run the Check and Update Firmware script to determine which system components
require an upgrade. The script checks for recommended firmware updates and will either
indicate if an update is required or if the firmware is current.
•
Consider performing an upgrade during a scheduled maintenance period or during periods
of low user activity.
•
Some hardware components cannot be upgraded until a particular component is upgraded
first. For example, if the disk enclosure I/O module component requires an upgrade, the
HP1210m controller must be upgraded first. In this case you would have to reboot the server
blade.
•
The script updates the components in the sequential order of server, storage, and chassis. If
the upgrade for a component fails, the script continues with the next component upgrade.
•
The script only performs upgrades on the components that require one. It does not perform
downgrades, even if a downgrade is listed as the required action. If a firmware downgrade
is necessary, contact HP Support for assistance to ensure system integrity is maintained.
IMPORTANT: Always check the firmware flash recommendation output before beginning an
update. It provides important information on how the update may impact system operation (for
example, reboot required or coordinated reboot). If a coordinated reboot is required, see
“Performing a coordinated reboot” (page 75) for more information.
To update firmware:
1. On server blade 1, select Check and Update Firmware and follow the prompts that display.
2. If the system requires an update, the following prompt is displayed:
Press Y to flash firmware now, or any other key to skip.
Enter y or Y to proceed with upgrading the firmware, or select any other key to skip the
upgrade and exit.
When you proceed with the upgrade, the following components on server blade 1 will be
upgraded:
NOTE:
72
The component names listed match the device names that display in the FMT.
•
Enclosure Management Unit (EMU)
•
Expander IO Module
•
Enclosure IO Module
Upgrading the storage system
3.
•
Enclosure HDD
•
ILO3
•
BIOS
•
Power Management Ctrl
•
Embedded NIC – NC553i
•
NC382m
•
Embedded Smart Array Ctrl – P410i
•
P1210m controller
•
Server HDD
Reboot server blade 1 if required.
If the system is in a cluster, perform the following steps before rebooting. This ensures the file
system is not affected.
a. Select Windows Server Manager→Tools→Failover Cluster Manager.
b. Select the cluster. Expand the navigation tree for the cluster if it is not already expanded.
c. Expand Services and applications and select the clustered file server service.
d. Under Action, select Move this service or application to other node.
e. Click Yes to confirm the selection.
f. Repeat these steps for each file server.
g. Reboot server blade1.
4.
5.
Wait for server blade 1 to finish booting and ensure it is operating.
Repeat steps 1 and 2 on server blade 2. The following components are upgraded on server
blade 2:
NOTE:
6.
The component names listed match the device names that display in the FMT.
•
ILO3
•
BIOS
•
Power Management Ctrl
•
Embedded NIC – NC553i
•
NC382m
•
Embedded Smart Array Ctrl – P410i
•
P1210m controller
•
Server HDD
Reboot server blade 2 if required.
If the system is in a cluster, perform the following steps before rebooting. This ensures the file
system is not affected.
a. Select Windows Server Manager→Tools→Failover Cluster Manager.
b. Select the cluster. Expand the navigation tree for the cluster if it is not already expanded.
c. Expand Services and applications and select the clustered file server service.
d. Under Action, select Move this service or application to other node.
e. Click Yes to confirm the selection.
f. Repeat these steps for each file server.
g. Reboot server blade 2.
7.
Wait for server blade 2 to finish booting and ensure it is operating.
Upgrading a component's firmware
73
8.
Complete any necessary cluster maintenance tasks.
Resolving errors after the HP 1210m controller upgrade
If the firmware upgrade for the HP 1210m controller does not complete successfully, the controllers
could stop responding. As a result, the Controller Properties dialog box in Windows Device
Manager displays “This device cannot start” and the storage system Configuration Wizard fails
to detect storage.
To resolve this issue, first try the Simple method. If the issue persists, try the Advanced method.
Simple method:
1. Upgrade the HP 1210m controller firmware on one server blade.
2. Upgrade the HP 1210m controller firmware on the other server blade.
3. Shut down both server blades.
4. Power on both server blades.
Advanced method:
1. Shut down both server blades and power off the entire HP StoreEasy 5000 Storage enclosure.
2. Power off and disconnect all disk enclosures.
3. Pull one of the server blades a quarter of the way out of the enclosure.
4. Power on the HP StoreEasy 5000 Storage enclosure.
5. If not already powered on, power on the server blade that remained in the enclosure.
6. To launch the FMT tool, select Firmware Maintenance from the HP StoreEasy desktop folder
icon and click the Check and Update Firmware link. Follow the prompts to update the firmware.
You can also access the FMT tool from Windows Server Manager by selecting Tools→HP
StoreEasy→Firmware Maintenance.
7.
8.
9.
10.
11.
12.
Shut down the server blade that was powered on in Step 5.
Power off the HP StoreEasy 5000 Storage enclosure.
Push the other server blade back into the enclosure.
Reconnect the disk enclosures.
Power on the HP StoreEasy 5000 Storage enclosure and both server blades.
Verify that the 1210m controller firmware in both server blades is current.
Resolving errors after a disk drive firmware upgrade
If, after upgrading disk drive firmware on the storage system and rebooting the storage system,
FMT indicates an upgrade is needed, complete the following procedure:
1. Log in to the server in Bay 2.
2. Shut down the server in Bay 2 from the Windows Start menu.
3. Log in to the server in Bay 1.
4. To launch the FMT tool, select Firmware Maintenance from the HP StoreEasy desktop folder
icon and click the Check and Update Firmware link. Follow the prompts to update the firmware.
You can also access the FMT tool from Windows Server Manager by selecting Tools→HP
StoreEasy→Firmware Maintenance.
5.
6.
7.
Shut down the server in Bay 1 from the Windows Start menu.
Power off any connected disk enclosures.
Power down the storage system chassis by pressing and holding the power button on the back
of the enclosure.
8. Disconnect the power cables from the storage system and any connected disk enclosures.
9. Reconnect the power cables.
10. Power on any disk enclosures.
11. Power on the storage system chassis by pressing the power button on the back of the enclosure.
74
Upgrading the storage system
12. If necessary, manually power on the servers.
Resolving an EMU upgrade issue
When upgrading the EMU firmware, if the EMU and the server blade initiating the upgrade are
not on the same subnet, the upgrade fails. The following message (an example) displays on the
Firmware tab of the System Monitoring and Maintenance tool:
Flash failed for Enclosure Management Unit (EMU) using cpXXXXXX.exe.
Check log files (C:\ProgramData\Hewlett-Packard\CMP\logs\firmware.log
and C:\CPQSYSTEM\log\cpqsetup.log) for further information.
The C:\CPQSYSTEM\log\EmuFlash.log displays the following information (an example only):
Enclosure Manager information:Product Name : HP CSP EMUPart Number :
620022-001Serial Number : PBCYU0G9V0C01XUUID :
99PBCYU0G9V0C01XManufacturer
: HPFirmware Ver. : EM: 1.10 Jul 12 2011; HM: 1.3EMU Type : 1Hw Version
: Rev. BAux Info : SVN: 3221 branches/QUIRE-CSP-1-10
1.10 Jul 12 2011
Starting Flash Routine
Launching Http Server
Host IP Address:
Host IP not found
If this issue occurs, configure the EMU and server blade networking to be on the same subnet and
retry the firmware upgrade.
Performing a coordinated reboot
A coordinated reboot requires that both server blades in the StoreEasy 5000 be shut down as part
of the firmware update process. Therefore, HP recommends that you perform this during a
maintenance window. While the system services will become available during this process,
maintenance is not complete until all the steps below have been completed. Using iLO, follow these
steps to complete the procedure:
1. Run the FMT on the server in slot 2 (lower slot). Once it has finished, power down the server
in slot 2.
2. Run the FMT on the server in slot 1 (upper slot). Once it has finished, power down the server
in slot 1.
NOTE:
Firmware updates for the P1210m controller and any storage hard drives may take
some time to complete.
3.
4.
Wait approximately 30 seconds.
Press the power button on the blade in slot 1.
IMPORTANT: If the system is powered by less than 200 volts (for example, 110), you must
wait for blade 1 to complete its boot process before turning on the second blade.
5.
6.
7.
Power on the blade in slot 2.
Run the FMT again to verify that the firmware updates have completed on the server in slot 1.
Run the FMT again to verify that the firmware updates have completed on the server in slot 2.
Upgrading hardware components
To replace a hardware component with an upgrade, follow the component removal and replacement
instructions in “Removing and replacing hardware components” (page 77). For example, to replace
Performing a coordinated reboot
75
the HP 10 GB Ethernet I/O module with a 1 GB module, follow the instructions in “Removing and
replacing the HP Ethernet I/O module” (page 94). If you need to shut down a server blade or the
storage system to replace a component, follow the instructions in “Powering the system off and
on” (page 76).
Powering the system off and on
Follow these steps to shut down a single server blade or to perform a system shutdown:
1. From the Windows desktop, shut down the server blades as follows:
a. While you are connected to blade 2, shut down blade 2 by clicking Start and then
selecting Settings→Power→Shut down.
b. Start and then selecting Settings→Power→Shut down.
NOTE:
2.
3.
4.
5.
76
Let the Windows shutdown run to completion, which will power the blade off.
Power off any disks in disk enclosures by pressing and holding down the power button located
on the back of each disk enclosure.
Power off the storage system enclosure by pressing and holding down the power button located
on the back of the enclosure.
Disconnect the power cables (optional).
To power on the server blades and system, reconnect the power cables and power on the
components in the following order:
•
System enclosure
•
Server blades, if necessary (typically they start up when the enclosure is powered on)
Upgrading the storage system
6 Removing and replacing hardware components
This chapter describes procedures for removing and replacing hardware components.
Customer self repair
HP customer self repair (CSR) programs allow you to repair your HP product. If a CSR part needs
replacing, HP ships the part directly to you so that you can install it at your convenience. Some
parts do not qualify for CSR. Your HP-authorized service provider determines whether a repair can
be accomplished by CSR.
For more information about CSR, contact your local service provider, or see the CSR website:
http://www.hp.com/go/selfrepair
Best practices for replacing components
The following sections provide information to help you successfully replace the hardware components
on your system.
WARNING!
To reduce the risk of personal injury or damage to the equipment:
•
Be sure that only one component is extended from a rack at a time. A rack may become
unstable if more than one component is extended at the same time.
•
Do not extend the hard drive drawers beyond the supporting surface when the unit is not
installed in a rack.
CAUTION: Removing a component significantly changes the air flow within the enclosure. All
components must be installed for the enclosure to cool properly. If a component fails, leave it in
place in the enclosure until a new component is available for installation.
IMPORTANT:
Be sure to unpack the replacement part before you remove the existing component.
During replacement of the failed component
•
HP recommends waiting until periods of low system activity to replace a component.
•
For all hot/warm swappable components (SAS I/O module, fan module, Ethernet I/O module,
PCIe module, server airflow baffle, server blades, and hard drives), be sure to unpack the
replacement part before removing the existing part.
•
When replacing components at the rear of the rack, cabling may obstruct access to the
component. Carefully move any cables out of the way to avoid loosening any connections.
In particular, avoid cable damage that may be caused by:
◦
Kinking or bending
◦
Disconnecting cables without capping. If uncapped, cable performance may be impaired
by contact with dust, metal, or other surfaces.
◦
Placing removed cables on the floor or other surfaces where they may be walked on or
otherwise compressed.
Accessing component replacement videos
HP produced videos of the procedures to assist you in replacing components. To view the videos,
go to the HP Customer Self Repair Services Media Library website and navigate to your product:
http://www.hp.com/go/sml
Customer self repair
77
Identifying the spare part
Parts have a nine-character spare part number on their label. For some spare parts, the part number
is available in the system. Alternatively, the HP call center can assist in identifying the correct spare
part number.
Replaceable parts
This product contains replaceable parts. To identify the replaceable parts, see the individual
component guides listed in Table 20 (page 81).
Parts that are available for CSR are indicated as follows:
•
Mandatory CSR — You order the part directly from HP and repair the product yourself. On-site
or return-to-depot repair is not provided under warranty.
•
Optional CSR — You can order the part directly from HP and repair the product yourself, or
you can request that HP repair the product. If you request repair from HP, you may be charged
for the repair depending on the product warranty.
•
No CSR — The replaceable part is not available for self repair. For assistance, contact an
HP-authorized service provider.
For more information about CSR — contact your local service provider. For North America, see
the CSR website:
http://www.hp.com/go/selfrepair
To order a replacement part, contact an HP-authorized service provider or see the HP Parts Store
online:
http://www.hp.com/buy/parts
Figure 43 (page 79) shows an exploded view of the system.
78
Removing and replacing hardware components
Figure 43 Exploded view of the system
Table 19 (page 80) lists the CSR replaceable parts for the system.
Replaceable parts
79
Table 19 Storage system replaceable parts
80
Item
Replaceable unit (RU)
Part number
CSR availability
Replacement type (Cold,
Warm, Hot)
1
Server interposer
631117-001
Optional
Cold
2
Midplane board
631115-001
No
Cold
(Not shown)
.5 M mini SAS cable
408765-001
Mandatory
Hot
(Not shown)
Mini SAS cable 2 M
408767-001
Mandatory
Hot
(Not shown)
Mini SAS cable 4 M
408768-001
Mandatory
Hot
3
LFF SAS I/O module
631941-001
Mandatory
Hot
(Not shown)
SFF SAS I/O module
631940-001
Mandatory
Hot
4
Fan modules
631109-001
Mandatory
Hot
5
Power UID button assembly
399054-001
Optional
Cold
6
Power supplies
631942-001
Mandatory
Hot
7
2-port 10 Gb Ethernet module 631111-001
Mandatory
Hot
8
2-port 1 Gb Ethernet module 611378-001
Mandatory
Hot
(Not shown)
1 Gb intraconnect module
631114-001
Mandatory
Hot
9
NC365T 4–port Ethernet
server adapter
593721-B21
Optional
Warm
10
Enclosure Manager module
631112-001
Mandatory
Hot
11
Server blade backplane
631116-001
No
Cold
12
Server airflow baffle
631129-001
No
Cold
13
Coil power assembly
631130-001
No
Cold
14
Drive drawer bezel LFF
631118-001
Optional
Cold
(Not shown)
Drive drawer bezel SFF
631124-001
Optional
Cold
15
LFF LED display board
631126-001
Optional
Cold
(Not shown)
SFF LED display board
631125-001
Optional
Cold
16
LFF drive drawer assembly
631128-001
Optional
Cold
(Not shown)
SFF drive drawer assembly
631127-001
Optional
Cold
(Not shown)
Hard drive drawer blanks
389015-001
Mandatory
Hot
(Not shown)
1 TB Hard drive
508011-001
Mandatory
Hot
(Not shown)
2 TB Hard drive
508010-001
Mandatory
Hot
17
Drawer rails bottom
631131-001
No
Cold
18
Drawer rails left
631132-001
No
Cold
(Not shown)
Mezzanine NIC
462748-001
Optional
Warm
(Not shown)
Right ear bezel on chassis (3, 629960-001,
one for each model)
629960-002,
629960-003
Optional
Hot
19
1210m controller
615360-001
Optional
Warm
20
Cache module for 1210m
598414-001
Optional
Warm
Removing and replacing hardware components
Table 19 Storage system replaceable parts (continued)
Item
Replaceable unit (RU)
Part number
CSR availability
Replacement type (Cold,
Warm, Hot)
21
Supercapacitor for 1210m
Cache
587225-001
Mandatory
Warm
(Not shown)
Rail kit assembly
631133-001
Optional
Cold
(Not shown)
HP 82B HBA (Brocade) PCI
fibre HBA
AP770A
Optional1
Cold
(Not shown)
HP 82E HBA (Emulex)
AJ763A
Optional1
Warm
(Not shown)
HP 82Q HBA (Q-Logic)
AJ764A
Optional1
Warm
1
Used only for backup. See www.hp.com/go/ebs for information about tested backup applications.
For more information on removing and replacing components, see Table 20 (page 81) for a list
of individual component documents.
Table 20 Related component documents
Component
Description
Guide
Server blade
The server blade in the HP StoreEasy 5000
Storage is a ProLiant BL460c G7 server.
HP ProLiant BL460c G7 Server Blade Maintenance
and Service Guide
Disks in disk
enclosures
The large form factor (LFF) supports 12 3.5-inch
HP D2600/D2700 Disk Enclosure User Guide
disk drives and the small form factor (SFF) supports
25 2.5-inch disk drives.
Hot, warm, and cold swap components
Hot or warm swapping a component means removing and replacing it while the main power is
still on. Cold swapping means removing and replacing the component while the main power is
off. Port (purple) colored handles on components like the fan module indicate the component is
hot-swappable.
IMPORTANT:
Remove and replace components quickly without interrupting the process.
Preventing electrostatic discharge
CAUTION:
protection.
Components can be damaged by electrostatic discharge (ESD). Use proper antistatic
•
Always transport and store CSR replaceable parts in an ESD-protective enclosure.
•
Do not remove CSR replaceable parts from the ESD-protective enclosure until you are ready
to install it.
•
Always use ESD precautions, such as a wrist strap, heel straps on conductive flooring, and
an ESD-protective smock when handling ESD-sensitive equipment.
•
Avoid touching all connector pins, leads, or circuitry.
•
Do not place ESD-generating material such as paper or non-antistatic (pink) plastic in an
ESD-protective with ESD-sensitive equipment.
Hot, warm, and cold swap components
81
Verifying component failure
Use the following methods to verify component failure:
•
Analyze any failure messages received. Fault monitoring software from HP provides a
recommended action.
•
You can also use the System Management Homepage to identify hardware problems. For
example, to identify the affected enclosure, select Unit Identification Device in the Enclosure
pane and then on the Unit Identification Device window, click On. The blue UID indicator on
the controller enclosure blinks. See “HP System Management Homepage” (page 33) for more
information.
•
Look for a blinking amber LED on the component. See “Component LEDs” (page 37) for LED
information.
Verifying proper operation
After replacing a system component, verify that the green LED is lit continuously or blinking (if
applicable). If not, try reseating the component.
Wait times for hard disks
If the hard drive is part of a volume, the following wait times apply:
Removal: Less than three seconds for the LED to turn off
Insert:
•
Less than one second for first disk activity
•
Less than 15 seconds for the disk to be ready for REBUILD. The LED blinks at 1 Hz.
NOTE: The transition to solid green depends on how long the REBUILD takes (the LEDs
indicate REBUILD).
If the hard drive is not part of a volume, the following wait times apply:
Removal: No indication appears because the LED is already off
Insert:
82
•
Less than one second for the first disk activity to appear
•
Less than 15 seconds for the disk to be ready to use
Removing and replacing hardware components
Removing the system enclosure from the rack
1.
Extend the hard drive drawer (Figure 44 (page 83)):
a. Press upward on the release button on the hard drive drawer (1).
b. Pull the drawer handle down 90 degrees (2).
c. Extend the hard drive drawer (3).
Figure 44 Extending the hard drive drawer
2.
Label the hard drives (Figure 45 (page 83)).
IMPORTANT: Use the drive labels provided with the replacement part when removing the
drives to ensure you replace the drives in the correct order.
Figure 45 Hard drive labeling
3.
Remove all hard drives.
WARNING! Carefully check the drive labels provided with the replacement board, and then
install the hard drives in the same slots from which you removed them. If the drives are not
installed in the correct slots, the system might fail.
4.
5.
6.
Push the hard drive drawer back into the system enclosure.
Label each server blade and then remove both server blades.
Label the cables and then unplug all cables from the back of the system enclosure.
Removing the system enclosure from the rack
83
7.
Unscrew the retaining screws from the bezel ears, and then remove the enclosure from the
rack.
WARNING! The system enclosure is heavy, even after removing the hard drives. Always
use at least two people to remove the system from the rack.
Inserting the system enclosure into the rack
1.
Place the enclosure into the rack, and secure the enclosure by tightening the two retaining
screws.
WARNING! The system enclosure is heavy, even after removing the hard drives. Always
use at least two people to replace the system in the rack.
2.
3.
Replace both server blades in their original bays.
Extend the hard drive drawer (Figure 46 (page 84)):
a. Press upward on the release button on the hard drive drawer (1).
b. Pull the drawer handle down 90 degrees (2).
c. Extend the hard drive drawer (3).
Figure 46 Extending the hard drive drawer
4.
Replace all hard drives.
IMPORTANT: Install the hard drives in the same slots from which you removed them or the
system might fail. Use the drive labels to ensure that you replace the drives in the correct order.
5.
6.
7.
8.
Push the hard drive drawer back into the system enclosure.
Plug in all cables at the back of the system enclosure, and ensure that all cables are returned
to their original locations.
Power on the system by pressing the power button ON.
Confirm that the system has resumed normal operations.
Removing and replacing the server interposer board
Removing the server interposer board
1.
2.
3.
84
Verify the failed component as described in “Verifying component failure” (page 82).
Power off the system as described in “Powering the system off and on” (page 76).
Remove the enclosure from the rack as described in “Removing the system enclosure from the
rack” (page 83).
Removing and replacing hardware components
4.
5.
Remove the top back panel by pressing the panel release button and lifting the latch to slide
the top back panel off.
Open the release handle (1, Figure 47 (page 85)), and pull up to remove the server interposer
board (2, Figure 47 (page 85)).
NOTE:
You may need to use significant force to accomplish this task.
Figure 47 Removing the server interposer board
Replacing the server interposer board
1.
With the release handle open, align the server interposer board with the alignment pins (1,
Figure 48 (page 85)), and then close the server interposer release mechanism (2, Figure 48
(page 85)).
NOTE:
pins.
Remember to move the server backplane power cable out of the way of the alignment
Figure 48 Replacing the server interposer board
2.
3.
Reinstall the top back panel.
Replace the enclosure in the rack as described in “Inserting the system enclosure into the rack”
(page 84).
Removing and replacing the server interposer board
85
Removing and replacing the midplane board
Removing the midplane board
1.
2.
3.
4.
5.
Verify the failed component as described in “Verifying component failure” (page 82).
Power off the system as described in “Powering the system off and on” (page 76).
Remove the enclosure from the rack as described in “Removing the system enclosure from the
rack” (page 83).
Remove the top back panel by pressing the panel release button and lifting the latch to slide
the top back panel off.
Remove all modules from the back of the enclosure.
NOTE: Make a note of all module locations so they can be placed back into their original
locations.
6.
Open the release handle (1, Figure 49 (page 86)), and pull up to remove the server interposer
board (2, Figure 49 (page 86)).
NOTE:
This step may require significant force to accomplish.
Figure 49 Removing the server interposer board
7.
Remove the plug bracket (2, Figure 50 (page 86)) from the coil power plug by removing the
thumbscrew (1).
Figure 50 Removing the plug bracket from the coil power plug
86
Removing and replacing hardware components
8.
Unplug the coil power assembly from the midplane board (Figure 51 (page 87)).
Figure 51 Unplugging the coil power assembly
9. Extend the server blades.
10. Remove the server blade airflow baffle from inside the enclosure (Figure 52 (page 87)).
Figure 52 Removing the server blade airflow baffle
11. Unplug the power cable from the server blade midplane (1, Figure 53 (page 87)), and then
unplug the rear UID PCA from the midplane board (2).
Figure 53 Unplugging the power cable and the UID PCA
Removing and replacing the midplane board
87
12. Complete the following (Figure 54 (page 88)):
a. Loosen the two thumbscrews holding midplane board in place (1).
b. Pull the captive locking pin out of the midplane board (2).
c. Lift the midplane board out of the enclosure (3).
Figure 54 Removing the midplane board
Replacing the midplane board
1.
2.
On the replacement midplane board, pull out the captive locking pin as you lower the board
into the enclosure (1, Figure 55 (page 88)).
To complete the installation of the replacement midplane board:
a. Push the captive locking pin into the midplane board (2).
b. Tighten the two thumbscrews holding the midplane board in place (3).
Figure 55 Installing the midplane board
3.
4.
5.
6.
7.
8.
9.
10.
88
Plug the rear UID PCA into the midplane board.
Plug the power cable into the server blade midplane.
Partially insert the drive drawer.
Plug the coil power plug into the midplane board.
Reattach the coil power plug bracket.
Reinsert the server blade airflow baffles.
Reinstall the server interposer board, see “Replacing the server interposer board” (page 85).
Push the hard drive drawer back into the enclosure.
Removing and replacing hardware components
11. Replace the top back panel.
12. Reinsert all rear components in the enclosure.
13. Replace the enclosure in the rack as described in “Inserting the system enclosure into the rack”
(page 84).
Removing and replacing a SAS cable
CAUTION:
Remove only one cable at a time to prevent downtime.
IMPORTANT: Check the QuickSpecs for the device before you purchase and connect SAS cables
to ensure that the cables do not exceed the maximum supported length. Only specific cable lengths
were tested and approved for use with external disk enclosures.
Ensure that cabling in the back of the rack system does not interfere with system operation or
maintenance. Bind cables loosely with cable ties and route the excess out of the way, along the
side of the rack. When cables are tied together and routed down the side of the rack, system
components and indicators are easily visible and accessible.
Removing a SAS cable
Remove the SAS cable that connects the system SAS I/O module to the disk enclosure.
Replacing a SAS cable
1.
2.
3.
Connect the SAS cable between the system SAS I/O module and the disk enclosure.
Verify that the replacement SAS cable is working properly by checking the associated LED
status on the SAS I/O module.
Confirm that the system has resumed normal operations.
Removing and replacing the SAS I/O module
Removing the SAS I/O module
1.
2.
3.
Verify the failed component as described in “Verifying component failure” (page 82).
Label the cables so they can be returned to their original locations.
Unplug all cables from the SAS I/O module.
IMPORTANT: The SAS I/O cables must be installed in the same slots from which they are
removed or the system might fail.
4.
Pull up on the SAS I/O module release button (1, Figure 56 (page 90)).
Removing and replacing a SAS cable
89
5.
Push down on the SAS I/O module lever (2, Figure 56 (page 90)), and then remove the failed
SAS I/O module (3, Figure 56 (page 90)).
NOTE:
You may need to use significant force to accomplish this task.
Figure 56 Removing the SAS I/O module
Replacing the SAS I/O module
1.
To install the replacement SAS I/O module (Figure 57 (page 90)):
a. Insert the SAS I/O module into the enclosure (1).
b. Push up on the SAS I/O module lever (2) until it locks into place.
NOTE:
You may need to use significant force to accomplish this task.
Figure 57 Replacing the SAS I/O module
2.
Plug in all cables to the SAS I/O module.
IMPORTANT: You must install the SAS I/O cables in the same slots from which they were
removed or the system might fail.
3.
Verify that the replacement SAS I/O module is working properly by checking the overall
module status LED (“SAS I/O module LEDs status” (page 44)).
NOTE: The green overall module status LED should turn on within five seconds after the new
module is inserted in the system, which reflects the necessary time to boot the firmware.
90
Removing and replacing hardware components
4.
5.
Confirm the firmware version.
Confirm that the system has resumed normal operations.
Removing and replacing the fan module
There are two fan modules: one server fan module, which cools the server half of the enclosure,
and one hard drive fan module, which cools the drive half of the enclosure. The two fan modules
are not redundant for each other.
CAUTION: You must replace the server fan module within three minutes or a thermal shutdown
of the system may occur. The total time allowance is three minutes for replacing the fan module,
which includes the removal of the original server fan module and installation of the replacement
fan.
Removing a fan module significantly changes the air flow within the enclosure. Both fan modules
must be installed for the enclosure to cool properly. The fan modules are not redundant to each
other, and each module cools a different half of the enclosure. If a single fan module fails, leave
it in place in the enclosure until a new fan is available to install. The fan modules have some built-in
redundancy to keep operating until a replacement can be made. The remaining fan module speeds
up and allows operation for a limited time, based on operating and environmental conditions. If
a temperature threshold is exceeded, the enclosure automatically shuts down.
Removing the fan module
1.
2.
Verify the failed component as described in “Verifying component failure” (page 82).
Press up on the drive fan module release lever (1, Figure 58 (page 91)) and remove the fan
module (2).
Figure 58 Removing the fan module
Removing and replacing the fan module
91
Replacing the fan module
1.
Insert the replacement fan module (Figure 59 (page 92)).
Figure 59 Replacing the fan module
2.
Verify that the replacement component is working properly by checking the associated LED
status.
NOTE:
3.
It should take approximately 15 seconds for the LED status to appear.
Confirm that the system has resumed normal operations.
Removing and replacing the power UID button assembly
Removing the power UID button assembly
1.
2.
3.
4.
Power off the system as described in “Powering the system off and on” (page 76).
Remove the enclosure from the rack as described in “Removing the system enclosure from the
rack” (page 83).
Remove the top back panel by pressing the panel release button and lifting the latch to slide
the top back panel off.
Remove the hard drive fan module (Figure 60 (page 92)).
Figure 60 Removing the fan module
92
Removing and replacing hardware components
5.
Complete the following (Figure 61 (page 93)):
a. Unplug the cable from the power UID button assembly (1).
b. Remove the screw from the power UID button assembly (2).
c. Remove the faulty power UID button assembly (3).
Figure 61 Removing the power UID button assembly
Replacing the power UID button assembly
1.
Complete the following (Figure 62 (page 93)):
a. Insert the replacement power UID button assembly (1).
b. Replace the screw in the power UID button assembly (2).
c. Plug the cable into the power UID button assembly (3).
Figure 62 Replacing the power UID button assembly
2.
3.
4.
5.
Push the hard drive drawer back in the system enclosure.
Replace the hard drive fan module.
Replace the top back panel.
Replace the enclosure as described in “Inserting the system enclosure into the rack” (page 84).
Removing and replacing the power supply
Removing the power supply
1.
2.
3.
4.
Verify the failed component as described in “Verifying component failure” (page 82).
Remove the power cord from the power supply.
Press the power supply release lever to the left.
Remove the failed power supply.
Removing and replacing the power supply
93
Replacing the power supply
1.
2.
3.
4.
Insert the replacement power supply.
Plug the power cord into the power supply.
Verify that the replacement component is working properly by checking the associated LED
status.
Confirm that the system has resumed normal operations.
Removing and replacing the HP Ethernet I/O module
Removing the HP Ethernet I/O module
1.
2.
3.
Verify the failed component as described in “Verifying component failure” (page 82).
Label the cables, and then unplug all cables from the HP Ethernet I/O module.
Press the module release mechanism to the right (1, Figure 63 (page 94)), and then remove
the failed module (2).
Figure 63 Removing the HP Ethernet I/O module
Replacing the HP Ethernet I/O module
1.
Insert the replacement HP Ethernet I/O module (Figure 64 (page 94)).
Figure 64 Replacing the HP Ethernet I/O module
2.
94
Plug in all cables to the replacement module to their original locations.
Removing and replacing hardware components
3.
Verify that the replacement component is working properly by checking the associated LED
status.
NOTE:
4.
5.
It should take approximately 15 seconds for the LED status to display.
Confirm the firmware version.
Confirm that the system has resumed normal operations.
Removing and replacing the PCIe module (with card)
Removing the PCIe module
1.
2.
3.
Verify the failed component as described in “Verifying component failure” (page 82).
Use the System Manager to identify which server needs to have the PCIe module removed. If
it is for both servers, then perform this operation for one server, then the other server, so that
both servers are not turned off at the same time.
Power off the appropriate server blade associated with the PCIe module that is being removed.
Server 1 is the top server, and the PCIe module is on the left when looking from the back.
Server 2 is the bottom server, and the PCIe module is on the right when looking from the back.
CAUTION:
4.
5.
6.
Be sure to power off the server before removing the PCIe module.
Label the cables so they can be returned to their original locations.
Unplug all cables from the PCIe module.
Press the PCIe module release mechanism to release the handle (1, Figure 65 (page 95)), and
then pull the handle to remove the PCIe module from the system (2).
Figure 65 Removing the PCIe module
Removing and replacing the PCIe module (with card)
95
7.
Complete the following (Figure 66 (page 96)):
a. Remove the two screws from the bracket of the failed PCIe module (1).
b. Remove the bracket (2).
c. Remove the PCIe card from the failed module (3).
Figure 66 Removing the PCIe card
Replacing the PCIe module
1.
Install the PCIe card in the replacement module (1, Figure 67 (page 96)), replace the bracket
(2), and then reinsert the two screws into the bracket of the replacement module (3).
Figure 67 Installing the PCIe card
2.
Insert the replacement PCIe module into the system (1, Figure 68 (page 97)), and lock the
release lever (2).
NOTE:
96
The PCIe module should be inserted with the lever in the open position.
Removing and replacing hardware components
Figure 68 Installing the PCIe module
3.
4.
5.
6.
Plug in all cables to the PCIe module in their original locations.
Power on the server blade by pressing the power button ON.
Verify that the replacement component is working properly by checking the associated LED
status.
Confirm that the system has resumed normal operations.
Removing and replacing the EMU module
Removing the EMU module
1.
2.
3.
Verify the failed component as described in “Verifying component failure” (page 82).
Unplug any cables from the EMU module.
Press the EMU module release lever to the right (1, Figure 69 (page 97)), and then remove
the EMU module (2).
Figure 69 Removing the EMU
Removing and replacing the EMU module
97
Replacing the EMU module
1.
Insert the replacement EMU module and ensure the release lever locks in place (Figure 70
(page 98)).
Figure 70 Installing the EMU
2.
3.
4.
5.
Plug the cables back into the EMU module.
Verify that the new component is working properly by checking the associated LED status.
Confirm the firmware version.
Obtain an IP address.
IMPORTANT: Some of the configuration information is automatically repopulated, but you
must reconfigure the network settings and password.
6.
Confirm that the system has resumed normal operations.
NOTE: This may take approximately one minute, or the time it takes for the Enclosure Manager
to boot.
Removing and replacing the server blade backplane
Removing the server blade backplane
1.
2.
3.
4.
5.
6.
7.
98
Verify the failed component as described in “Verifying component failure” (page 82).
Power off the system as described in “Powering the system off and on” (page 76).
Remove the enclosure from the rack as described in “Removing the system enclosure from the
rack” (page 83).
Remove the top back panel by pressing the panel release button and lifting the latch to slide
the top back panel off.
Remove the midplane board as described in “Removing the midplane board” (page 86).
Remove the small baffle from beside the server blade backplane by pinching the tabs and
lifting the small baffle out of the enclosure.
Remove the large baffle from the bottom of the enclosure.
Removing and replacing hardware components
8.
Complete the following (Figure 71 (page 99)):
a. Unplug the power cable from the server blade backplane by pinching the plug release
mechanism (1).
b. Remove the screw (2).
c. Remove the server blade backplane from the enclosure (3).
Figure 71 Removing the server blade backplane
Replacing the server blade backplane
1.
Complete the following (Figure 72 (page 99)):
a. Install the replacement server blade backplane (1).
b. Replace the screw (2).
c. Plug in the power cable (3).
Figure 72 Installing the server blade backplane
2.
3.
Replace the large baffle on the bottom of the enclosure.
Replace the small baffle beside the server blade backplane.
Removing and replacing the server blade backplane
99
4.
Replace the midplane board (Figure 73 (page 100)):
a. Pull out the captive locking pin as you lower the board into the enclosure (1).
b. Push the captive locking pin into the midplane board (2).
c. Tighten the two thumbscrews holding the midplane board in place (3).
Figure 73 Installing the midplane board
5.
6.
Plug the rear UID PCA into the midplane board.
Replace the midplane board as described in “Replacing the midplane board” (page 88).
Removing and replacing the server airflow baffle
Removing the server airflow baffle
1.
2.
3.
4.
Power off the system as described in “Powering the system off and on” (page 76).
Remove the enclosure from the rack as described in “Removing the system enclosure from the
rack” (page 83).
Remove the top back panel by pressing the release button and lifting the latch to slide the top
back panel off.
Remove the server blade airflow baffle from inside the enclosure (Figure 74 (page 100)).
Figure 74 Removing the server blade airflow baffle
100 Removing and replacing hardware components
Replacing the server airflow baffle
1.
Install the replacement server blade airflow baffle (Figure 75 (page 101)).
Figure 75 Installing the server blade airflow baffle
2.
3.
Reinstall the top back panel.
Replace the enclosure as described in “Inserting the system enclosure into the rack” (page 84).
Removing and replacing the front bezel (standard)
NOTE: Use “Removing and replacing the front bezel (full)” (page 103) if you are not able to reach
all of the screws due to the position of the system in the rack.
Removing the front bezel
1.
2.
Power off the system as described in “Powering the system off and on” (page 76).
Extend the hard drive drawer (Figure 76 (page 101)):
a. Press upward on the release button on the hard drive drawer (1).
b. Pull the drawer handle down 90 degrees (2).
c. Extend the hard drive drawer (3).
Figure 76 Extending the hard drive drawer
Removing and replacing the front bezel (standard)
101
3.
Remove all eight screws from the front bezel (1, Figure 77 (page 102)), and then lift the front
bezel up and out to remove the front bezel (2).
NOTE: There are two screws on the bottom, four screws on the sides (two on each side),
and two screws hidden behind the handle.
Figure 77 Removing the front bezel
Replacing the front bezel
1.
Install the replacement front bezel with the handle at a 90 degree angle making sure the
bottom pins are aligned with the bottom holes (1, Figure 78 (page 102)), and replace the
screws into the front bezel (2).
NOTE: There are two screws on the bottom, four screws on the sides (two on each side),
and two screws hidden behind the handle.
Figure 78 Replacing the front bezel
2.
3.
4.
5.
Push the drive drawer back into the system enclosure.
Power on the system by pressing the power button ON.
Verify that the replacement component is working properly by checking the associated LED
status.
Confirm that the system has resumed normal operations.
102 Removing and replacing hardware components
Removing and replacing the front bezel (full)
NOTE: This full procedure is only required if all screws are not accessible due to the position of
the system in the rack.
Removing the front bezel (full)
1.
2.
3.
4.
Power off the system as described in “Powering the system off and on” (page 76).
Remove the enclosure from the rack as described in “Removing the system enclosure from the
rack” (page 83).
Pull the hard drive handle down 90 degrees, and slide out the hard drive drawer.
Remove all eight screws from the front bezel and pull the handle down 90 degrees (1, Figure 79
(page 103)). Then lift the front bezel up and out to remove the front bezel (2).
NOTE: There are two screws on the bottom, four screws on the sides (two on each side),
and two screws hidden behind the handle.
Figure 79 Removing the front bezel
Removing and replacing the front bezel (full) 103
Replacing the front bezel (full)
1.
Install the replacement front bezel with the handle at a 90 degree angle, making sure the
bottom pins are aligned with the bottom holes (1, Figure 80 (page 104)), and replace the
screws in the front bezel (2).
NOTE: There are two screws on the bottom, four screws on the sides (two on each side),
and two screws hidden behind the handle.
Figure 80 Replacing the front bezel
2.
3.
4.
Close the drive handle.
Push the drive drawer back into the system enclosure.
Replace the enclosure as described in “Inserting the system enclosure into the rack” (page 84).
Removing and replacing the front LED display board in the rack (standard)
NOTE: If you are not able to access all of the screws due to the enclosure position in the rack,
use the full procedure instructions.
Removing the front LED display board in the rack
1.
2.
3.
Verify the failed component as described in “Verifying component failure” (page 82).
Power off the system as described in “Powering the system off and on” (page 76).
Remove the front bezel as described in “Replacing the front bezel” (page 102).
104 Removing and replacing hardware components
4.
Complete the following (Figure 81 (page 105)):
a. Disconnect the LED display board from the drive backplane by pinching the ends of the
LED display board cable together (1).
b. Remove the four screws from the LED display board (2).
c. Remove the LED display board from the drive drawer (3).
Figure 81 Removing the front LED display board
Replacing the front LED display board in the rack
1.
Complete the following (Figure 82 (page 105)):
a. Install the replacement LED display board (1).
b. Replace the four LED display board screws (2).
c. Reconnect the LED display board to the drive drawer (3).
Figure 82 Installing the front LED display board
2.
Replace the front bezel as described in “Replacing the front bezel” (page 102).
Removing and replacing the front LED display board (full)
Removing the front LED display board (full)
1.
2.
3.
Verify the failed component as described in “Verifying component failure” (page 82).
Power off the system as described in “Powering the system off and on” (page 76).
Remove the enclosure as described in “Removing the system enclosure from the rack” (page 83).
Removing and replacing the front LED display board (full) 105
4.
5.
Pull the hard drive drawer handle down 90 degrees, and slide out the hard drive drawer.
Remove all eight screws from front bezel (1, Figure 83 (page 106)). Then, lift the front bezel
up and out to remove the front bezel (2).
NOTE: There are two screws on the bottom, four screws on the sides (two on each side),
and two screws hidden behind the handle.
Figure 83 Removing the front bezel
6.
Complete the following (Figure 84 (page 106)):
a. Disconnect the LED display board from the drive backplane by pinching the ends of the
LED display board cable together (1).
b. Remove the four screws from the LED display board (2).
c. Remove the LED display board from the drive drawer (3).
Figure 84 Removing the front LED display board
106 Removing and replacing hardware components
Replacing the front LED display board (full)
1.
Complete the following (Figure 85 (page 107)):
a. Install the replacement LED display board (1).
b. Replace the four LED display board screws (2).
c. Reconnect the LED display board to the drive drawer (3).
Figure 85 Installing the front LED display board
2.
Replace the front bezel as described in “Replacing the front bezel (full)” (page 104).
Removing and replacing a drive drawer
Removing the drive drawer
1.
2.
3.
4.
5.
Verify the failed component as described in “Verifying component failure” (page 82).
Power off the system as described in “Powering the system off and on” (page 76).
Remove the enclosure as described in “Removing the system enclosure from the rack” (page 83).
Remove the top back panel by pressing the panel release button and lifting the latch to slide
the top back panel off.
Remove the hard drive fan module (Figure 86 (page 107)).
Figure 86 Removing the fan module
6.
7.
Push up on the SAS I/O module release button (1, Figure 87 (page 108)).
Push down on the SAS I/O module lever (2, Figure 87 (page 108)), and then remove the SAS
I/O module (3).
NOTE:
This step may require significant force to accomplish.
Removing and replacing a drive drawer 107
Figure 87 Removing the SAS I/O module
8.
Extend the drive drawer (Figure 44 (page 83)):
a. Press upward on the release button on the hard drive drawer (1).
b. Pull the drawer handle down 90 degrees (2).
c. Extend the hard drive drawer (3).
Figure 88 Extending the hard drive drawer
NOTE:
9.
You must repeat Step 8 for the remaining SAS I/O module.
Remove the plug bracket (2, Figure 89 (page 109)) from the coil power plug by removing the
thumbscrew (1).
108 Removing and replacing hardware components
Figure 89 Removing the plug bracket from the coil power plug
10. Unplug the coil power assembly from the midplane board (Figure 90 (page 109)).
Figure 90 Unplugging the coil power assembly
11. Press the release mechanism on the side rail (1, Figure 91 (page 109)), and then pull the hard
drive drawer fully out of the enclosure (2).
WARNING! The hard drive drawer is heavy, even after removing the hard drives. Make
sure the drawer is fully supported as you remove it from the enclosure.
Figure 91 Removing the drive drawer
Removing and replacing a drive drawer 109
Replacing the drive drawer
1.
2.
Unlock the side enclosure rail and push it into the back enclosure (Figure 92 (page 110)).
Align the bottom replacement drive drawer rails with the bottom enclosure rails.
Figure 92 Unlocking the enclosure rails
3.
Align the side rails and then push the replacement drive drawer partially back into the system
enclosure until approximately two inches of the drawer is still out of the enclosure (Figure 93
(page 110)).
CAUTION: Do not push the drive drawer completely into the enclosure. You must first connect
the power coil assembly to prevent damaging the power coil assembly.
Figure 93 Partially installing the drive drawer
4.
110
Pull the cable slightly out of the coil power plug and connect it to the midplane board (Figure 94
(page 111)).
Removing and replacing hardware components
Figure 94 Connecting the coil power assembly to the midplane board
5.
Reattach the plug bracket (1, Figure 95 (page 111)) to the coil power plug and tighten the
thumbscrew (2).
Figure 95 Reattaching the plug bracket to the coil power plug
6.
Push the drive drawer fully back into the system enclosure (1, Figure 96 (page 112)) and the
handle back into place (2).
Removing and replacing a drive drawer
111
Figure 96 Pushing the drive drawer into the system enclosure
7.
8.
9.
10.
Replace the top back panel.
Replace the drive fan module.
Replace both SAS I/O modules.
Replace the enclosure as described in “Inserting the system enclosure into the rack” (page 84).
Removing and replacing the drive drawer hard drive
CAUTION:
•
Do not replace the hard drive with a SATA drive. Be sure to replace the hard drive only with
an approved SAS drive.
•
Do not replace the drive drawer hard drive during peak data transfer times. Make sure the
hard drive LED is off before you remove the hard drive.
•
Ensure that the capacity of the replacement drive is at least equal to the capacity of the original
drive. The capacity of the replacement drive should not be smaller.
NOTE:
vary.
After replacing the hard drives, the approximate wait times for viewable disk LED activity
Removing the drive drawer hard drive
1.
112
Verify the failed component as described in “Verifying component failure” (page 82).
Removing and replacing hardware components
2.
Extend the hard drive drawer (Figure 97 (page 113)):
a. Press upward on the release button on the hard drive drawer (1).
b. Pull the drawer handle down 90 degrees (2).
c. Extend the hard drive drawer (3).
Figure 97 Extending the hard drive drawer
3.
Locate the failed hard drive.
NOTE: Use the hard drive bay labels and the drive LED status (an amber LED or no LEDs)
to help identify the failed drive.
4.
To remove the failed hard drive (Figure 98 (page 113)):
a. Press the release button (1).
b. Pull the release lever (2).
c. Remove the hard drive (3).
Figure 98 Remove the failed hard drive
Removing and replacing the drive drawer hard drive
113
Replacing the drive drawer hard drive
1.
Install the hard drive (Figure 99 (page 114)):
a. Insert the replacement hard drive with the lever in the open position (1).
b. Push the release lever into place (2).
Figure 99 Installing the hard drive
2.
3.
Push the drive drawer back into the system enclosure.
Verify that the replacement component is working properly by checking the associated LED
status.
NOTE:
4.
5.
This may require a wait time of less than 15 seconds for the LED status to appear.
Confirm that the system has resumed normal operations.
Confirm the hard drive firmware version.
IMPORTANT: You must reboot the storage solution after updating the drive drawer hard
drive firmware.
Removing and replacing the drive drawer rails (side or bottom)
NOTE: Spare rail kits consist of rail pairs, one side rail, and two bottom drive drawer rails. See
“Removing and replacing the enclosure rails” (page 119) for enclosure rail instructions.
Removing the drive drawer rails
1.
2.
3.
114
Power off the system as described in “Powering the system off and on” (page 76).
Remove the enclosure as described in “Removing the system enclosure from the rack” (page 83).
Remove the top back panel by pressing the panel release button and lifting the latch to slide
the top back off.
Removing and replacing hardware components
4.
Extend the hard drive drawer (Figure 100 (page 115)):
a. Press upward on the release button on the hard drive drawer (1).
b. Pull the drawer handle down 90 degrees (2).
c. Extend the hard drive drawer (3).
Figure 100 Extending the hard drive drawer
5.
Remove the plug bracket (2, Figure 101 (page 115)) from the coil power plug by removing the
thumbscrew (1).
Figure 101 Removing the plug bracket from the coil power plug
6.
Unplug the coil power assembly from the midplane board (Figure 102 (page 116)).
Removing and replacing the drive drawer rails (side or bottom)
115
Figure 102 Unplugging the coil power assembly
7.
Press the release mechanism on the side rail (1, Figure 103 (page 116)), and then pull the hard
drive drawer fully out of the enclosure (2).
WARNING! The hard drive drawer is heavy, even after removing the hard drives. Make
sure the drawer is fully supported as you remove it from the enclosure.
Figure 103 Removing the drive drawer
116
Removing and replacing hardware components
8.
Lift the release tab on the side or bottom rail (1, Figure 104 (page 117)), and then slide the
rail toward the front of the drive drawer to remove the rail (2).
NOTE:
Repeat this step for all rails.
Figure 104 Removing the drive drawer rails
Replacing the drive drawer rails
1.
Align the replacement rail with the tabs, and slide it toward the back of the drive drawer until
the rail locks into place (Figure 105 (page 117)).
Figure 105 Installing the drive drawer rails
2.
Align the replacement drive drawer rail with the three enclosure rails and then push the drive
drawer partially back into the system enclosure so that approximately two inches of the drawer
is still out of the enclosure (Figure 106 (page 118)).
CAUTION: Do not push the drive drawer completely into the enclosure. You must first connect
the power coil assembly to prevent damaging the power coil assembly.
Removing and replacing the drive drawer rails (side or bottom)
117
Figure 106 Partially installing the drive drawer
3.
Pull the cable slightly out of the coil power plug and connect it to the midplane board
(Figure 107 (page 118)).
Figure 107 Connecting the coil power assembly to the midplane board
4.
118
Reattach the plug bracket (1, Figure 108 (page 119)) to the coil power plug and tighten the
thumbscrew (2).
Removing and replacing hardware components
Figure 108 Reattaching the plug bracket to the coil power plug
5.
Push the drive drawer fully back into the system enclosure (1, Figure 109 (page 119)) and the
handle back into place (2).
Figure 109 Pushing the drive drawer into the system enclosure
6.
7.
Replace the top back panel.
Replace the enclosure as described in “Inserting the system enclosure into the rack” (page 84).
Removing and replacing the enclosure rails
Removing the enclosure rails
1.
2.
Power off the system as described in “Powering the system off and on” (page 76).
Remove the enclosure as described in “Removing the system enclosure from the rack” (page 83).
Removing and replacing the enclosure rails
119
3.
Extend the hard drive drawer (Figure 110 (page 120)):
a. Press upward on the release button on the hard drive drawer (1).
b. Pull the drawer handle down 90 degrees (2).
c. Extend the hard drive drawer (3).
Figure 110 Extending the hard drive drawer
4.
Remove the plug bracket (2, Figure 111 (page 120)) from the coil power plug by removing the
thumbscrew (1).
Figure 111 Removing the plug bracket from the coil power plug
5.
Unplug the coil power assembly from the midplane board (Figure 112 (page 121)).
120 Removing and replacing hardware components
Figure 112 Unplugging the coil power assembly
6.
Press the release mechanism on the side rail (1, Figure 113 (page 121)), and then pull the hard
drive drawer fully out of the enclosure (2).
Figure 113 Removing the drive drawer
7.
Lift the release mechanism on the rail (side or bottom) (1, Figure 114 (page 121)), and then
push the rail back and up to release and remove the rail (2).
Figure 114 Removing the enclosure rails
Removing and replacing the enclosure rails
121
Replacing the enclosure rails
1.
Align the replacement rail, and then attach it by sliding the rail toward the front of the enclosure
(Figure 115 (page 122)).
Figure 115 Installing the enclosure rails
2.
Align the replacement drive drawer rail with the three enclosure rails and then push the drive
drawer partially back into the system enclosure so that approximately two inches of the drawer
is still out of the enclosure (Figure 116 (page 122)).
CAUTION: Do not push the drive drawer completely into the enclosure. You must first connect
the power coil assembly to prevent damaging the power coil assembly.
Figure 116 Partially installing the drive drawer
3.
122
Pull the cable slightly out of the coil power plug and connect it to the midplane board
(Figure 117 (page 123)).
Removing and replacing hardware components
Figure 117 Connecting the coil power assembly to the midplane board
4.
Reattach the plug bracket (1, Figure 118 (page 123)) to the coil power plug and tighten the
thumbscrew (2).
Figure 118 Reattaching the plug bracket to the coil power plug
5.
Push the drive drawer fully back into the system enclosure (1, Figure 119 (page 124)) and the
handle back into place (2).
Removing and replacing the enclosure rails
123
Figure 119 Pushing the drive drawer into the system enclosure
6.
Replace the enclosure as described in “Inserting the system enclosure into the rack” (page 84).
Removing and replacing the rack rails
For detailed instructions on installing the rack rails, see the HP 3U Storage System Rail Kit Installation
Instructions.
Removing and replacing server blades
Removing the server blade
CAUTION: Do not use the server blade release lever to lift or carry the server blade. Always
support the weight of the server blade by handling the chassis directly. Improper use can damage
the release lever and the server blade.
1.
2.
3.
Verify the failed component as described in “Verifying component failure” (page 82).
Power off the appropriate server blade by clicking Start and then select Shut Down.
Remove the server blade (Figure 120 (page 124)):
a. Push the button to release the handle (1).
b. Pull the handle toward you (2).
c. Remove the server blade (3).
Figure 120 Removing the server blade
124
Removing and replacing hardware components
4.
Place the server blade on a flat, level work surface.
WARNING! To reduce the risk of personal injury from hot surfaces, allow the drives and
the internal system components to cool before touching them.
CAUTION: To prevent damage to electrical components, properly ground the server blade
before beginning any installation procedure. Improper grounding can cause ESD damage.
Replacing the server blade
1.
Install the server blade (1, Figure 121 (page 125)), and then push the handle into place with
the handle open (2).
Figure 121 Replacing the server blade
2.
3.
Power on the server blade.
Confirm that the system has resumed normal operations.
NOTE: After replacing the server blade, you must ensure that the correct product name is installed
on the replacement part. The correct product name is important for applications such as System
Insight Manager and Insight Remote Support. To install the correct product name, browse to the
C:\hpnas\components\support\naming folder. Locate and run the Smart Component that
applies to your system. After running the Smart Component, you must shut down and then restart
your system for the changes to take effect. On multi-node clusters such as the HP StoreEasy 5000
Storage systems, HP recommends that you move cluster resources to another node before shutting
down the node that is being renamed. If you run the incorrect Smart Component, the product name
will be set incorrectly, but it will not affect your system in any other way.
Removing and replacing the server blade hard drive
Removing the server blade hard drive
1.
2.
Verify the failed component as described in “Verifying component failure” (page 82).
Back up all data on the hard drive.
Removing and replacing the server blade hard drive
125
3.
Remove the server blade hard drive (Figure 122 (page 126)):
a. Press the release button (1).
b. Pull the release lever (2).
c. Remove the hard drive (3).
CAUTION: To prevent improper cooling and thermal damage, replace the drive quickly. Do
not operate the server unless all bays are populated.
Figure 122 Removing the server blade hard drive
Replacing the server blade hard drive
1.
Install the hard drive (Figure 123 (page 126)):
a. Insert the replacement hard drive with the lever in the open position (1).
b. Push the release lever into place (2).
Figure 123 Installing the hard drive
2.
Verify that the server blade hard drive is working properly by checking the associated LED
status.
NOTE:
3.
4.
Confirm that the system has resumed normal operations.
Confirm the firmware version.
NOTE:
126
This may require a wait time of less than 15 seconds for the LED status to appear.
You must reboot the system after updating a server blade hard drive.
Removing and replacing hardware components
Removing and replacing the 1210m controller board components
Removing the 1210m controller card
WARNING!
1.
2.
3.
4.
5.
Wear gloves or use care when removing the capacitor pack to avoid physical injury.
Verify the failed component as described in “Verifying component failure” (page 82).
Back up all data.
Close all applications.
To power off the server blade, click Start, and then select Shut down.
Remove the server blade (Figure 124 (page 127)):
a. Push the button to release the handle (1).
b. Pull the handle toward you (2).
c. Remove the server blade from the enclosure (3).
Figure 124 Removing the server blade
6.
7.
8.
Press the release button on the access panel and slide the access panel to the left to remove
it.
The original cache module is connected to a capacitor pack, so observe the cache module
LEDs:
•
If the amber LED is solid, data transfer to the flash device on the cache module is in
progress. Do not remove the cache module until the amber LED is off, and then continue
with the next step.
•
If the amber LED is not lit, proceed to the next step.
Open the ejector latches (1, Figure 125 (page 127)) on each side of the cache module slot.
Typically, opening the ejector latches ejects the cache module automatically. If the module
does not eject automatically after you open the ejector latches, remove the cache module (2)
by grasping only the edges.
Figure 125 Removing the cache module
Removing and replacing the 1210m controller board components
127
9.
Remove the capacitor pack (2, Figure 126 (page 128)).
The 1210m cache module (1) and the 1210m controller card (3) are also shown.
Figure 126 Removing the capacitor pack
NOTE:
Be sure to first remove the capacitor pack bracket.
10. Loosen the two captive screws and remove the 1210m controller card (Figure 127 (page 128)).
Figure 127 Removing the controller card
128
Removing and replacing hardware components
Replacing the 1210m controller card
1.
2.
3.
Install the cache module and capacitor in the cache module slot of the replacement controller.
Close the ejector latches on the cache module slot.
Install the replacement controller card (1, Figure 128 (page 129)). Press down on the connector
to seat the card (2).
CAUTION: Be sure not to press on the cache module when replacing the controller card. It
could damage the controller card and result in errors.
Figure 128 Replacing the 1210m controller card
4.
5.
6.
7.
8.
Tighten the captive screws.
Replace the capacitor in its cradle.
Install the access panel.
Install the server blade in the enclosure.
Confirm that the replacement 1210m controller is running current firmware (see???).
NOTE: You must reboot the storage solution after updating firmware on the 1210m controller
because both controllers must be updated at the same time.
Removing and replacing the 1210m cache module
Removing the 1210m cache module
WARNING!
Wear gloves or use care when removing the capacitor pack to avoid physical injury.
CAUTION:
•
When replacing the cache module, ensure that the replacement is compatible with the 1210m
controller. Otherwise, the controller could malfunction and you could lose data.
•
ESD can damage electronic components. Be sure you are properly grounded before performing
this procedure.
1.
2.
3.
Back up all data.
Close all applications.
Power off the server blade.
Removing and replacing the 1210m controller board components
129
4.
Remove the server blade (Figure 129 (page 130)):
a. Push the button to release the handle (1).
b. Pull the handle toward you (2).
c. Remove the server blade (3).
Figure 129 Removing the server blade
5.
6.
7.
Press the release button on the access panel and slide the access panel to the left to remove
it.
The original 1210m cache module is connected to a capacitor pack, so observe the cache
module LEDs:
•
If the amber 1210m cache LED is solid, data transfer to the flash device on the cache is
in progress. Do not remove the 1210m cache until the amber LED is off, and then continue
with the next step.
•
If the amber 1210m cache LED is not lit, proceed to the next step.
Open the ejector latches (1, Figure 130 (page 130)) on each side of the 1210m cache module
slot.
Typically, opening the ejector latches ejects the cache module automatically. If the module
does not eject automatically after you open the ejector latches, remove the cache module (2)
by grasping only the edges.
Figure 130 Removing the cache module
8.
Remove the capacitor pack (2, Figure 131 (page 131)).
The 1210m cache module (1), and the 1210m controller card (3) are also shown.
130 Removing and replacing hardware components
Figure 131 Removing the cache module and the capacitor pack
NOTE:
9.
Be sure to first remove the capacitor pack bracket.
Disconnect the capacitor pack cable from the connector on the top of the cache module
(Figure 132 (page 131)).
Figure 132 Disconnecting the capacitor pack cable
Replacing the cache module
1.
Connect the capacitor pack cable to the replacement cache module.
Removing and replacing the 1210m controller board components
131
2.
Complete the following (Figure 133 (page 132)):
a. Install the replacement cache module in the cache module slot (1).
b. Close the ejector latches on the cache module slot (2).
Figure 133 Replacing the cache module
3.
4.
5.
Install the capacitor pack bracket and insert the capacitor pack on the chassis wall.
Install the access panel.
Install the server blade into the enclosure.
Removing and replacing the capacitor pack
Removing the capacitor pack
WARNING!
Wear gloves or use care when removing the capacitor pack to avoid physical injury.
CAUTION: ESD can damage electronic components. Be sure you are properly grounded before
performing this procedure.
1.
2.
3.
4.
Back up all data.
Close all applications.
Power off the server blade.
Remove the server blade (Figure 134 (page 132)):
a. Push the button to release the handle (1).
b. Pull the handle toward you (2).
c. Remove the server blade (3).
Figure 134 Removing the server blade
5.
132
Press the release button on the access panel and slide the access panel to the left to remove
it.
Removing and replacing hardware components
6.
7.
The original capacitor pack is connected to a cache module, so observe the cache module
LEDs:
•
If the amber cache LED is solid, data transfer to the flash device on the cache is in progress.
Do not remove the cache until the amber LED is off, and then continue with the next step.
•
If the amber cache LED is not lit, proceed to the next step.
Open the ejector latches (1, Figure 135 (page 133)) on each side of the cache module slot.
Typically, opening the ejector latches ejects the cache module automatically. If the module
does not eject automatically after you open the ejector latches, remove the cache module (2)
by grasping only the edges.
Figure 135 Removing the cache module
8.
Remove the cache module (1, Figure 136 (page 133)) from the controller card (3) and the
capacitor pack (2) from the server blade.
Figure 136 Removing the cache module and the capacitor pack
Removing and replacing the 1210m controller board components
133
NOTE:
9.
Be sure to first remove the capacitor pack bracket.
Disconnect the capacitor pack cable on the top of the cache module (Figure 137 (page 134)).
Figure 137 Disconnecting the capacitor cable from the module
Replacing the capacitor pack
1.
2.
3.
4.
5.
6.
Connect the replacement capacitor pack to the cache module.
Install the cache module in the cache module slot.
Install the cache module on the controller, and then close the ejector latches on the cache
module slot.
Install the capacitor pack bracket and insert the replacement capacitor pack on the chassis
wall.
Install the access panel.
Install the server blade in the enclosure.
IMPORTANT: After installing a capacitor pack, you might see a POST message during reboot
indicating that the array accelerator (cache) is disabled temporarily. This behavior is normal
because the new capacitor pack is likely to have a low charge.
The controller operates properly while the capacitor pack is recharging, although the performance
advantage of the array accelerator is absent. You do not need to take any action because the
recharge process begins automatically when you install the capacitor pack. When the capacitor
pack has been charged to a predetermined level, the array accelerator is enabled automatically.
Removing and replacing the Mezzanine NIC
Removing the Mezzanine NIC
1.
2.
3.
134
Back up all data.
Close all applications.
To power off the server blade, click Start and then select Shut down. Verify the server blade
is shut down before continuing.
Removing and replacing hardware components
4.
Remove the server blade (Figure 138 (page 135)):
a. Push the button to release the handle (1).
b. Pull the handle toward you (2).
c. Remove the server blade (3).
Figure 138 Removing the server blade
5.
6.
7.
Press the release button on the access panel and slide the access panel to the left to it. The
Mezzanine NIC is under the controller card.
The 1210m cache module is connected to a capacitor pack, so observe the cache module
LEDs (Figure 28 (page 40)):
•
If the amber LED is solid, data transfer to the flash device on the cache module is in
progress. Do not remove the controller card until the amber LED is off, and then continue
with the next step.
•
If the amber LED is not lit, proceed to the next step.
Loosen the three captive screws and remove the Mezzanine NIC.
Replacing the Mezzanine NIC
To replace the Mezzanine NIC:
1. Install the Mezzanine NIC, press down on the connector to seat the board (1, Figure 139
(page 135)), and then tighten the captive screws (2).
Figure 139 Installing the Mezzanine NIC
2.
3.
4.
Reinstall the controller card, and then install the access panel.
Install the server blade in the enclosure. If necessary, power on the blade by pressing the
power button on the front of the server blade.
Confirm the firmware version.
NOTE: You must reboot the storage solution after updating the Mezzanine NIC and server
blade firmware.
Removing and replacing the Mezzanine NIC
135
7 Storage system recovery
This chapter describes how to perform a system recovery. To restore the HP StoreEasy 5000 Storage
to the factory defaults, see “Restoring the factory image with a DVD or USB flash device” (page 137).
To restore the HP StoreEasy 5000 Storage using Windows Recovery Environment, see “Restoring
the system with Windows Recovery Environment” (page 140).
System Recovery DVD
The System Recovery DVD enables you to install an image or recover from a catastrophic failure.
At any time, you may boot from the DVD and restore the server to the factory condition. This enables
you to recover the system if all other means to boot the server fail.
While the recovery process makes every attempt to preserve the existing data volumes, you should
have a backup of your data before recovering the system.
IMPORTANT: All data on the original OS logical drive is erased during the recovery process.
This includes share and quota settings, iSCSI target configuration, local user accounts, and other
configuration options.
During system recovery, you can replace the existing drives with drives of the same size or larger.
HP recommends that the replacement drives be the same type as the original drives, but it is not
required. However, drives in the same RAID group must all be the same type (you cannot mix drive
types in a RAID group).
If you replace any disk drives and then perform a system recovery, you must ensure that the
replacement drives do not contain a logical drive. Use the Option ROM Configuration for Arrays
(ORCA) utility to delete logical drives. For more information about ORCA, see the Configuring
Arrays on HP Smart Array Controllers Reference Guide, which is available at:
http://www.hp.com/go/proliantgen8/docs
Using a downloaded version of the System Recovery DVD
If you have downloaded the System Recovery DVD image from the HP website and the version is
newer than the DVD shipped with the product, you must verify that the firmware versions of all
hardware components are current after completing the system recovery. The firmware for each
hardware component is not automatically updated to the latest version after a system recovery.
IMPORTANT: Do not complete any tasks in the Initial Configuration Tasks window until you verify
the firmware versions.
To verify the firmware versions, complete the following steps on each node:
1. Open HP StoreEasy tools by selecting the HP StoreEasy tools shortcut on the desktop.
2. Using HP StoreEasy tools, launch the Firmware Maintenance Tools command prompt and run
the commands.
3. Once the firmware upgrades are complete, open the Initial Configuration Tasks window to
set up the cluster.
Drive letters are not assigned after a restore
When a system that has existing data volumes (non-operating system volumes) is restored using
the System Recovery DVD, the data volumes will not have drive letters assigned to them. This is by
design. The volume labels are retained and can be used to identify the data volumes.
You can assign drive letters to volumes using diskpart.exe or Disk Management.
To use Disk Management:
136
Storage system recovery
1.
Click Start→Run.
The Run dialog box opens.
2.
Enter diskmgmt.msc and click OK.
The Disk Management window opens.
3.
Right-click the disk and partition the one for which you want to assign a drive letter and select
Change Drive Letter and Paths.
Restoring the factory image with a DVD or USB flash device
1.
Do one of the following:
a. For direct access, attach the SUV cable (supplied with the System) to the port on the front
of the server blade you want to recover. Connect a monitor and USB mouse to the SUV
cable. Using the remaining USB connector on the SUV cable, connect either a USB DVD
drive (and insert the System Recovery DVD) or a bootable USB flash device (prepared
with a System Recovery image).
b. For remote management access, connect to the server using iLO from a client PC. Insert
the System Recovery DVD in the client PC or attach a bootable USB flash device that has
been prepared with a System Recovery image.
2.
Reboot the server blade to either the USB flash device or USB DVD drive.
The system BIOS attempts to boot to the USB device first by default. Watch the monitor output
during the boot as you may need to press a key to boot to the USB media.
NOTE: If directly connected, you may have to change the BIOS settings to ensure proper
boot sequence. If connected remotely, you may have to change some iLO settings to ensure
proper boot sequence.
3.
Click Restore Factory Image.
The recovery process completes with minimal user intervention required. The server automatically
reboots more than once.
IMPORTANT:
4.
Do not interrupt the recovery process.
Remove the directly connected DVD or flash device (or remotely connected iLO virtual DVD
or flash device) from the server.
Using a USB flash drive for storage system recovery
If you create a backup copy of the System Recovery DVD using a USB flash drive, you can also
use it to restore the system.
To create a system recovery USB flash drive:
1. Obtain a blank 4 GB or larger USB flash drive.
2. Insert the USB flash device into your workstation or laptop.
3. Open an elevated command prompt with Administrator privileges.
4. At the command prompt, enter diskpart.
5. At the diskpart prompt, enter list disk.
6. Identify the disk number that corresponds to the flash drive. This is typically the last disk listed.
7. Enter sel disk <USB drive number> (for example, sel disk 4).
8. Enter clean. This deletes everything from the USB flash device, so ensure that you have the
proper disk selected.
9. Enter create par primary.
10. Enter sel par 1.
11. Enter format fs=fat32 quick.
Restoring the factory image with a DVD or USB flash device
137
NOTE: If your USB flash drive does not support the FAT32 file system, format the drive as
NTFS instead. Omitting the quick parameter lengthens the format time considerably.
12. Enter active to mark the partition as active.
13. Enter assign letter=<drive letter> to assign a drive letter to the USB drive (for
example, assign letter=U).
14. Enter exit to quit diskpart context commands.
15. Insert the System Recovery DVD into the computer.
16. Using Windows Explorer or a comparable utility, open the DVD so that all contents are visible,
including hidden and system files.
17. Select all of the files (including bootmgr) on the DVD.
18. Copy all of the selected files to the root of the USB flash drive.
Recovering both servers
If both server blades are being recovered, the process is similar to configuring a new HP StoreEasy
5000 Storage delivered from the factory.
NOTE: Although the recovery process restores the HP StoreEasy 5000 Storage to the factory
version, it does not restore the EMU and iLO address configuration to the factory defaults. The
EMU and iLO address configuration will be the same as it was prior to system recovery.
For each server, follow the steps in “Restoring the factory image with a DVD or USB flash device”
(page 137). Stop when the server is displaying the Set Up Windows wizard. Once both servers are
displaying the Set Up Windows wizard, see “Set up Windows and discover the second node”
(page 24), and follow the steps provided. When you run the Create Witness Disk wizard as part
of the Initial Configuration Tasks, the wizard may indicate that a witness disk already exists. The
existing witness disk can be used. The wizard may also discover other LUNs on the shared storage
as well. These LUNs will likely be from a previous cluster on the HP StoreEasy 5000 Storage.
Decide if you want to keep these LUNs and add them to the new cluster later. If you do not want
to keep the existing LUNs, you may select them for deletion in the Create Witness Disk wizard.
Recovering a single server
If only one of the two server blades is being recovered, the process is slightly more involved because
you want to join the recovered server to an existing Windows failover cluster. If you do not have
a functional (containing at least one node) Windows failover cluster, follow the procedure for
“Recovering both servers” (page 138).
The following procedure describes how to re-image one of the server blades of the HP StoreEasy
5000 Storage, and then rejoin the server to the Windows failover cluster:
1. Follow the steps in “Restoring the factory image with a DVD or USB flash device” (page 137).
2. When the Set Up Windows wizard appears, select your desired language, regional settings,
keyboard layout, and accept the EULA. After completing the wizard, an attempt is made to
discover the second node. The attempt fails and the following error message displays.
138
Storage system recovery
Figure 140 Error message during second node discovery
3.
Click Cancel. A pop-up window displays with the following message:
Do you want to ignore the second node? If so, you must run the wizard
manually later to configure the second node.
Click Yes.
The installation continues and eventually the server reboots. After the reboot, Windows
automatically logs on as the local Administrator, and launches the Initial Configuration Tasks
(ICT) window. However, you will not be using the ICT to configure the node.
4.
5.
6.
7.
Check the Do not show this window at next logon box in the lower left corner of the window,
and close the ICT window. There will be messages warning about inconsistencies between
the nodes. Confirm that you wish to close the ICT.
Change the password for the local administrator account by pressing CTRL+ALT+DELETE. (If
you are using an iLO remote console, you must select the CTRL-ALT-DEL item from the Keyboard
menu.) Select Change a password. Enter the old password, which is HPinvent!, then enter
a new password.
Select the time and date shown in the lower right corner of the task bar. Click the Change
date and time settings link. Set the time zone of the server to be the same time zone as the
other server blade and the domain controller. Adjust the time of day, if needed.
Windows Server Manager opens when the ICT window is closed. If it is not open, launch it
from the shortcut on the task bar to the right of the Windows Start button.
In Windows Server Manager, select Local System from the left hand navigation tree. Click the
link to the right of Computer name to open the System Properties dialog. On the Computer
Name tab, click Change.
8.
Enter a new Computer name for the node, and select the Domain radio button to provide the
Active Directory domain name to which the server will be joined. This must be the same domain
that contains the existing one node cluster.
You are prompted for the credentials of a domain account that has permissions to add a
computer to the domain. After the changes have been made, accept the prompt to restart the
server.
NOTE: It may be necessary to remove the existing (old) computer account in Active Directory
before the computer can be renamed.
9.
After the server has rebooted, log on as the local administrator. To manage the server as a
cluster member in the future, add at least one domain user as a member of the local
administrators group. In Windows Server Manager, select Tools→Computer Management.
Then select System Tools→Local Users and Groups to add any domain users to the
Administrators group.
Recovering a single server
139
10. From the HP StoreEasy tools, select Base System Enclosure Settings. When prompted, enter
the Administrator password for the Enclosure Manager. As shown in Figure 141 (page 140),
click Generate Keys on the HP StoreEasy Enclosure Settings window to generate a key pair
that will allow software on the server blade to communicate with the Enclosure Manager. After
generating the key, close the window.
Figure 141 Generating keys
11. Remove the failed node from the cluster (also called evicting the node) before you add the
newly recovered node to the cluster. See the following Microsoft article for more information:
http://technet.microsoft.com/en-us/library/cc784955(v=WS.10).aspx
12. To add the recovered server blade to the cluster, log on to the other server (the server that is
part of the existing one node cluster) as a domain user. Do not use the Initial Configuration
Tasks (ICT) window. Follow the instructions at the following website to add the recovered
server to the cluster:
http://technet.microsoft.com/en-us/library/cc730998.aspx
Restoring the system with Windows Recovery Environment
NOTE: To use Windows Recovery Environment, you must have created a system backup with
the Windows Server Backup utility.
140 Storage system recovery
1.
Do one of the following:
a. For direct access, attach the SUV cable (supplied with the HP StoreEasy 5000 Storage)
to the port on the front of the server blade you want to recover. Connect a monitor and
USB mouse to the SUV cable. Using the remaining USB connector on the SUV cable,
connect either a USB DVD drive (and insert the System Recovery DVD) or a bootable USB
flash device (prepared with a System Recovery image).
b. For remote management access, connect to the server using iLO from a client PC. Insert
the System Recovery DVD in the client PC or attach a bootable USB flash device that has
been prepared with a System Recovery image.
2.
Reboot the server blade to either the USB flash device or USB DVD drive.
The system BIOS attempts to boot to the USB device first by default. Watch the monitor output
during the boot as you may need to press a key to boot to the USB media.
NOTE: If directly connected, you may have to change the BIOS settings to ensure proper
boot sequence. If connected remotely, you may have to change some iLO settings to ensure
proper boot sequence.
3.
Select Windows Recovery Environment.
The recovery environment is loaded.
4.
5.
6.
Once the recovery environment is loaded, the System Recovery Options wizard opens. On
the first window, select the keyboard input method, which is based on your location (for
example, select US for United States) and click Next.
Select one of the following options and click Next:
•
Use recovery tools that can help fix problems starting Windows. Select an operating
system to repair. If you select this option, then select the active partition from which to
perform a scan and complete the recovery. Continue with step 8.
•
Restore your computer using a system image that you created earlier. Select this option
to completely delete the operating system drives from the RAID controller, reconfigure the
storage, and recover using a backup image. Continue with step 6.
The System Recovery Options wizard scans the computer for a system image. If it is unable
to locate a system image, the following message is displayed:
Figure 142 System image not found
Either attach an external drive or insert a DVD that contains the backup files and click Retry.
If you want to recover from the network, click Cancel.
7.
Select one of the following options and click Next:
•
Use the latest available image. Select this option to use the backup image that was recently
created. If you are restoring from the network, this option is grayed out.
•
Select a system image. Select this option to choose a different image to restore from or
will allow you to restore from the network.
Restoring the system with Windows Recovery Environment
141
8.
9.
Select the backup image from which you want to restore the system and click Next.
If you are restoring from the network, click Advanced and then select Search for a system
image on the network:
a. The utility automatically connects to an existing network (DHCP enabled).
b. Once connected to the network, enter the directory where the system image is located
on the network and click Next.
10. Select the disks to which you want to restore data and click Next.
11. The summary window opens. Verify the information is correct and click Next to start the
recovery process.
IMPORTANT:
Do not interrupt the recovery process.
12. Remove the directly connected DVD or flash device (or remotely connected iLO virtual DVD
or flash device) from the server.
142
Storage system recovery
8 Support and other resources
Contacting HP
HP technical support
For worldwide technical support information, see the HP support website:
http://www.hp.com/support
Before contacting HP, collect the following information:
•
Product model names and numbers
•
Technical support registration number (if applicable)
•
Product serial numbers
•
Error messages
•
Operating system type and revision level
•
Detailed questions
Subscription service
HP recommends that you register your product at the Subscriber's Choice for Business website:
http://www.hp.com/go/e-updates
After registering, you receive email notification of product enhancements, new driver versions,
firmware updates, and other product resources.
Related information
You can find related documentation at:
http://www.hp.com/support/manuals
HP websites
For additional HP information, see the following HP websites:
•
http://www.hp.com
•
http://www.hp.com/go/storage
•
http://www.hp.com/go/hpsim
•
http://www.hp.com/service_locator
•
http://www.hp.com/support/manuals
•
http://www.hp.com/support/downloads
•
http://www.hp.com/storage/whitepapers
Contacting HP
143
Rack stability
Rack stability protects personnel and equipment.
WARNING!
To reduce the risk of personal injury or damage to equipment:
•
Extend leveling jacks to the floor.
•
Ensure that the full weight of the rack rests on the leveling jacks.
•
Install stabilizing feet on the rack.
•
In multiple-rack installations, fasten racks together securely.
•
Extend only one rack component at a time. Racks can become unstable if more than one
component is extended.
144 Support and other resources
9 Documentation feedback
HP is committed to providing documentation that meets your needs. To help us improve the
documentation, send any errors, suggestions, or comments to Documentation Feedback
([email protected]). Include the document title and part number, version number, or the URL
when submitting your feedback.
145
A Managing the EMU
This chapter describes how to manage the EMU using the CLI or the Enclosure Manager physical
interface.
CLI reference
The CLI is the primary interface for managing the Enclosure Manager and is accessed via secure
shell protocol over the LAN. Using the CLI is necessary for functions not possible through any other
mechanism or interface. For example, creating and setting Enclosure Manager user accounts and
passwords and remotely powering the enclosure ON or OFF can be done only with the CLI.
Command line conventions
CLI input is case-insensitive except when otherwise noted. Commands are organized into a tree,
with approximately 30 base commands. Each of these commands can have any number of
subcommands. Subcommands can also have further subcommands. Each command used in this
appendix follows the conventions listed in Table 21 (page 146).
Table 21 Command line conventions
Symbol
Description
<>
Denotes a variable must be substituted with a value, such
as a user name. Do not include the < > symbols when
entering the variable.
|
Used to separate input options.
{}
Denotes a list of mandatory choices that must be made.
For example, SET ENCLOSURE UID {ON | OFF} must
be in one of the following forms:
SET ENCLOSURE UID ON
SET ENCLOSURE UID OFF
[]
Denotes an optional argument or set of characters.
”“
Used to enclose command arguments that contain spaces.
NOTE: All users logged into the CLI have administrator privilege. When a user account is created,
the account has administrator privilege.
Operational groups
Descriptions of the CLI commands are organized by operational group instead of the parser
implementation which is a tree of commands, subcommands, and sub-subcommands. The operational
groups are:
146
•
Authentication—user identity and authentication
•
Time functions—Real Time Clock/Calendar control
•
Role definition—access control
•
Inventory and status—self explanatory
•
Internet control—internal and external LAN management
•
Server management—iLO dependent control of server
•
Enclosure control—global control of enclosure, excluding JBOD management zone
•
Forensic—global diagnostic context functions (not directed validation tests)
•
Session—CLI session control
Managing the EMU
Authentication
This section defines EM authentication CLI functions.
ADD SSHKEY
Syntax
ADD SSHKEY <end marker><newline><certificate><newline><end marker>
Description
Adds an SSH key on the command line. Start with a string that does not appear within the certificate
(end marker). Next, paste in the certificate. Terminate the command with the end marker. Failure
to give a proper end marker before and after the certificate may cause the interface to wait for
the appropriate end marker indefinitely.
Restrictions
This command is only available in script mode.
ADD USER
Syntax
ADD USER "<user name>"["<password>"]
Description
Adds a user to the system. If you do not provide a password, you are prompted for one. If script
mode is enabled and the password is not provided, the password is assigned an unmatched string.
This unmatched string requires an enclosure administrator to change the password to allow the
new user to access the system.
Restrictions
•
You can add a maximum of 30 users, including the reserved accounts.
•
The <user name> is case-sensitive and must be unique to all other user names and group
names. The user name must be 1 to 40 characters long and can include all alphanumeric
characters, the hyphen, and the underscore.
•
The <user name> must begin with a letter.
•
The <password> must be 3 to 40 characters long. The character set includes all printable
characters. If you do not enter a password, you are prompted to enter one.
•
Reserved user names are: ALL (case insensitive), ADMINISTRATOR (case insensitive), switch1,
switch2, switch3, switch4, switch5, switch6, switch7, switch8, daemon, ldapuser, nobody,
tbmuser_, vcmuser_, root, and quire.
CLEAR SSHKEY
Syntax
CLEAR SSHKEY
Description
Disables a user account. The system immediately logs out the user and prevents the user from
logging in until the account is enabled.
This command is used in the factory to disable the ‘root’ user account. The root user account is
required to perform certain factory-only configuration and diagnostic operations when logged into
the Linux shell.
Authentication
147
Restrictions
None
DOWNLOAD SSHKEY
Syntax
DOWNLOAD SSHKEY <url>
Description
Downloads an authorized key file to use with Secure Shell 2, which can contain the public keys
for the built-in Administrator user. Supported protocols are http, ftp, and tftp. The url should be
formatted as protocol://host/path/file. If your ftp server does not support anonymous
connections, then you can specify a username and password by replacing the host part in the
above format with username:password@host. The authorized keys file must contain only
protocol version 2 public keys. Each line of the file represents one key (empty lines and lines starting
with # represent comments). Each protocol version 2 key consists of the following fields, separated
by spaces: keytype, base64 encoded key, comment. Keytype is either ssh-rsa or ssh-dss.
Downloading an SSH key file replaces all currently installed SSH keys.
Restrictions
None
ENABLE USER
Syntax
ENABLE USER <user name>
Description
Enables a user account that was previously disabled by the DISABLE USER command.
Restrictions
<user name> is case-sensitive.
REMOVE USER
Syntax
REMOVE USER {ALL | "<user name>"| CERTIFICATE "<user name>"}
Description
Removes the existing user specified by <user name> and/or any certificate mapped to this user.
If the user is currently logged on, their sessions are terminated. Specifying ALL removes all users
from the system except the default Administrator account. The user is prompted for confirmation
except in script mode.
Restrictions
148
•
The <user name> is case-sensitive.
•
You cannot remove the Administrator user.
Managing the EMU
SET PASSWORD
Syntax
SET PASSWORD ["<password>"]
Description
Sets the password of the user who entered the command. The <password> parameter is optional,
but failure to enter a password results in the system prompting you for a password.
•
Passwords must be between 3 and 40 characters in length.
•
Acceptable characters include any printable character.
•
This command is not valid in script mode.
Restrictions
None
SET USER PASSWORD
Syntax
SET USER PASSWORD "<user name>"["<new password>"]
Description
Sets a user’s password. If you do not supply a password on the command line, you are prompted
to enter it.
Restrictions
•
Only the Administrator account can modify the password of the Administrator account.
•
The <user name> is case-sensitive.
•
The <new password> must be 3 to 40 characters long.
•
The character set includes all printable characters.
•
This command is not valid in script mode.
SHOW USER
Syntax
SHOW USER [ [LIST | "<user name>"] ]
Description
Displays general user information and user rights (which is always “Admin”) for this firmware
version.
Restrictions
•
Does not show information for restricted user accounts—only shows information for
Administrator and other end-user-created accounts.
•
Since there are no bay or device access restrictions, no information about bays being assigned
is given.
Authentication
149
SHOW SSHFINGERPRINT
Syntax
SHOW SSHFINGERPRINT
Description
Displays the key fingerprint of the host public key of the Enclosure Manager.
Restrictions
None
SHOW SSHKEY
Syntax
SHOW SSKEY
Description
Displays the contents of the existing ssh authorized key files (stored in NAND Flash).
Restrictions
None
SHOW PASSWORD SETTINGS
Syntax
SHOW PASSWORD SETTINGS
Description
Displays the current minimum password length and strong password settings.
Restrictions
Time functions
Because this small group of functions is used in conjunction with other groups, it is separated as
its own group.
CLEAR NTP
Syntax
CLEAR NTP {PRIMARY | SECONDARY }
Description
Clears the Primary or Secondary NTP server IP address.
Restrictions
Clearing the Primary NTP address disables NTP.
150
Managing the EMU
DISABLE NTP
Syntax
DISABLE NTP
Description
Disables the synchronizing of time and date with a remote server using the NTP protocol. Does
not clear any NTP servers that have been configured with SET NTP.
Restrictions
None
ENABLE NTP
Syntax
ENABLE NTP
Description
Enables NTP support for the Enclosure Manager.
Restrictions
None
SET DATE
Syntax
SET DATE MMDDhhmm
Description
Sets the enclosure date and time and, optionally, year and time zone. Time is in a 24-hour format.
If the year or time zone parameters are omitted, the current values remain in effect. The definitions
of the date parameters are:
MM: Month
DD: Day
hh: Hour (24–hour format)
mm: Minute
CC: Century
YY: Year
TZ: Time Zone (chosen from strings in Table 22 (page 151))
Table 22 Universal time zone settings
CET
Etc/GMT-2
Etc/GMT+7
Etc/GMT-13
MST
CST6CDT
Etc/GMT+2
Etc/GMT+8
Etc/GMT-14
MST7MDT
EET
Etc/GMT-3
Etc/GMT+8
Etc/Greenwich
Navajo
EST
Etc/GMT+3
Etc/GMT-9
Etc/UCT
PST8PDT
EST5EDT
Etc/GMT-4
Etc/GMT+9
Etc/Universal
UCT
Etc/GMT
Etc/GMT+4
Etc/GMT-10
Etc/UTC
Universal
Etc/GMT0
Etc/GMT-5
Etc/GMT+10
Etc/Zulu
UTC
Etc/GMT-0
Etc/GMT+5
Etc/GMT-11
GMT
WET
Time functions
151
Table 22 Universal time zone settings (continued)
Etc/GMT+0
Etc/GMT-6
Etc/GMT+11
Greenwich
WSU
Etc/GMT-1
Etc/GMT+6
Etc/GMT-12
HST
Zulu
Etc/GMT+1
Etc/GMT-7
Etc/GMT+12
MET
If you leave the time zone, century, or year blank, the current setting is reused.
Restrictions
•
Date and time can only be set if NTP is disabled.
•
MM is an integer from 01 to 12.
•
DD is an integer from 01 to 31.
•
hh is an integer from 00 to 23.
•
mm is an integer from 00 to 59.
•
CC is an integer from 00 to 99.
•
YY is an integer from 00 to 99.
SET TIMEZONE
Syntax
SET TIMEZONE <timezone>
Description
Sets the time zone.
Restrictions
Only the choices listed in Table 22 (page 151) can be used.
SET NTP POLL
Syntax
SET NTP POLL <seconds>
Description
Sets the polling interval for NTP servers. The factory default polling interval is 720 seconds (12
minutes).
Restrictions
The polling range is 60 – 86400 seconds (1 minute to 1 day).
NOTE:
EM 1.10 or later does not support this command.
SET NTP PRIMARY
Syntax
SET NTP PRIMARY <host>
Description
Sets the primary server used for synchronizing time/date using the Network Time Protocol (NTP).
<host> can be either an IPv4 address, an IPv6 address, or a DNS name.
152
Managing the EMU
Restrictions
•
IPv4 addresses must be in the form ###.###.###.###, where each ### ranges from 0 to
255.
•
IPv6 addresses must be formed without the network prefix length.
SET NTP SECONDARY
Syntax
SET NTP SECONDARY <host>
Description
Sets the secondary server used for synchronizing time/date using the Network Time Protocol (NTP).
<host> can be either an IPv4 address, and IPv6 address or a DNS name.
Restrictions
•
IPv4 addresses must be in the form ###.###.###.###, where each ### ranges from 0 to
255.
•
IPv6 addresses must be formed without the network prefix length.
Inventory and status
These commands display various inventory and global state data.
SET DISPLAY EVENTS
Syntax
SET DISPLAY EVENTS { ON | OFF }
Description
Turns on or off the displaying of events that are triggered by status changes in the system.
Restrictions
•
This command is specific to the current CLI session and must be issued for each CLI session
to display events in that session. (The setting is not persistent.)
•
Upon boot of the EM, the event display is OFF.
SHOW ALL
Syntax
SHOW ALL
Description
Executes all SHOW commands in succession.
Restrictions
To save the output, you must configure your SSH software to log the session to a file or increase
the history buffer size so that the output can be copied and pasted into another file.
Inventory and status
153
SHOW CONFIG
Syntax
SHOW CONFIG
Description
Displays the script required to recreate the settings of the enclosure. Passwords are not included
for any user.
Restrictions
None
SHOW CSR CSR-ID
Syntax
SHOW CSR CSR-<ID#>
Description
Displays the CSR event messages captured in the Enclosure Manager system log (syslog) for the
specified CSR ID. The output includes the cause and action for each event message.
Restrictions
A valid ID for CSR-<ID#> must be used.
SHOW CSR ALL
Syntax
SHOW CSR ALL
Description
Displays all possible CSR events that can be captured in the Enclosure Manager system log (syslog)
and includes the cause and action for each event.
Restrictions
None
SHOW CSR FAST
Syntax
SHOW CSR FAST
Description
Displays all possible CSR events that can be captured in the Enclosure Manager system log (syslog).
The output does not include the cause and action for each event like SHOW CSR ALL.
Restrictions
None
154 Managing the EMU
SHOW DATE
Syntax
SHOW DATE
Description
Displays the current date, time, and time zone settings of the internal Real Time Clock of the
Enclosure Manager.
Restrictions
None
SHOW DEVICE SERIAL_NUMBER BLADE
Syntax
SHOW DEVICE SERIAL_NUMBER BLADE <bay#>
Description
Displays the serial number of the blade specified by the bay <bay#>.
Restrictions
Can be used only when the enclosure power is on, the blade is present, and iLO is communicating
with the EMU properly. If the enclosure power is off, the EMU has no signal from the blade to
determine whether it is present, and iLO in the blade has no power to report its serial number. The
EM reports “[Unknown]” if this command is used with the enclosure power off.
SHOW DISPLAY EVENTS
Syntax
SHOW DISPLAY EVENTS
Description
Displays the current status of the display event setting.
Restrictions
None
SHOW EM
Syntax
SHOW EM INFO
Description
Displays information about the Enclosure Manager.
NOTE: Hardware versions are A, B, C, and so forth. Aux info includes the change management
SVN number and the health monitor PSoC firmware version number. Both are needed occasionally
in lab testing environments. In production environments, the HM version may sometimes be needed,
and this command is the only way to find it in EM firmware 1.0 or later.
Inventory and status
155
Restrictions
None
SHOW ENCLOSURE DRIVE DRAWER
Syntax
SHOW ENCLOSURE DRIVE DRAWER
Description
Displays the state of the enclosure drive drawer. State values are Open, Closed, or Unknown.
SHOW ENCLOSURE FAN
Syntax
SHOW ENCLOSURE FAN { ALL | <fan number> }
Description
Displays information about and current status of the specified enclosure fan.
Restrictions
•
The <fan number> must be 1 or 2.
•
Fan information is not available if fan status is Dormant (meaning not powered).
•
The EM is only directly controlling FAN 1. The JBOD IE expanders control FAN 2 so information
on FAN 2 can only be reported if the enclosure power is on AND at least one SAS IO module
is present and functioning normally.
•
Not all information (for example, part number and serial number) of FAN 2 are reported to
the EM by the SAS IO module so it cannot be reported as with FAN 1.
•
When the enclosure power is first turned on, FAN 2 status changes from Dormant to Absent
and then to the actual status when this information is given to the EM.
SHOW ENCLOSURE INFO
Syntax
SHOW ENCLOSURE INFO
Description
Displays information about the enclosure and included options.
NOTE: Some information, such as Enclosure Name, is user supplied, and if never programmed,
has a default value. The Solution part number, serial number and name string are programmed in
the factory depending on the software SKU that is pre-installed. These numbers and strings are not
customer programmable but vary by solution SKU even if the hardware is the same type. The
solution numbers, not the chassis numbers, are used for warranty obligation tracking.
Restrictions
None
SHOW ENCLOSURE POWERSUPPLY
Syntax
SHOW ENCLOSURE POWERSUPPLY { ALL | <bay> { , | - } <bay>}
156
Managing the EMU
Description
Displays the following general information and current status for the specified power supply or
range of power supplies:
•
Status (OK, Degraded, Dormant, Failed, Unnown)
•
AC Input status
•
Capacity: (watts)
•
Current power output (watts)
•
Serial Number
•
Product name
•
Part number
•
Spare part number
•
Product version. Integer value, 01, 02, and so forth.
Restrictions
None
SHOW ENCLOSURE STATUS
Syntax
SHOW ENCLOSURE STATUS
Description
Displays the basic health and status of the enclosure and its subsystems. If the enclosure shows
degraded, the subsystems causing the state change are detailed (for example, failed or missing
redundant module).
Restrictions
None
SHOW ENCLOSURE TEMP
Syntax
SHOW ENCLOSURE TEMP
Description
Displays current status and reading of some of the thermal sensors in the enclosure. If the sensor
is unreadable due to absence of power or failure, ? is displayed.
Restrictions
•
Only integral measurements in Celsius are displayed (fraction, if any, is truncated).
•
Not every sensor that is present in the enclosure is reported.
•
For blades a virtual ambient (not a physical) sensor temperature is displayed that is computed
by iLO based on its thermal model and measurements from several sensors. This model is
transparent to the EM. Until this calculation normalizes, 0 is shown as the temperature for the
blade, so that right after power on of the enclosure, it takes several seconds before a nonzero
value is shown for the blades while other sensors are reported immediately.
Inventory and status
157
SHOW FRU
Syntax
SHOW FRU
Description
Displays summary information on field replaceable units (FRUs) within the enclosure. Information
provided in this section can quickly aid the administrator in contacting HP Customer Service for
troubleshooting, repair, and ordering replacements.
Restrictions
•
Only displays known/live data.
•
Some FRU devices are not accessible by the EM when the enclosure power is off so their
information is unavailable.
SHOW IOMODULES
Syntax
SHOW IOMODULES
Description
Shows information for the IO modules within the enclosure: SAS, LOM, MEZZ, and PCIe.
Restrictions
•
Should be used only when enclosure power is on.
•
If enclosure power has never been turned on, no information is available. If it was on but is
now off, only the firmware version of the IO modules that have firmware is shown.
SHOW RACK
Syntax
SHOW RACK { NAME | ID }
Description
Displays user-defined rack name (string) or id (0...255) that is part of the persistent EMU
configuration.
Restrictions
•
If rack name has not been set, it is UnnamedRack.
•
If rack id has not been set, it is 0.
SHOW SERVER TEMP
Syntax
SHOW SERVER TEMP { ALL | <bay#>[ { , | - } <bay#>] }
Description
Displays temperature sensor information for the specified server or range of servers. This data is
provided by iLO to the EM, which has no direct sensor access.
158
Managing the EMU
Restrictions
The enclosure must be powered on, otherwise, iLO has no power and cannot sense temperature
or send data to the EM.
Internet control
The following commands define the CLI functions for Internet control.
ADD EBIPA
Syntax
ADD EBIPA { SERVER } DNS <ip address>
Description
Adds an EBIPA DNS server IP address to the list of DNS servers for server bays.
Restrictions
•
A maximum of three DNS servers can be added for EBIPA.
•
<ip address> must be in the form ###.###.###.###, where each ### ranges from 0 to
255.
REMOVE EBIPA
Syntax
REMOVE EBIPA { SERVER } DNS <ip address>
Description
Removes an EBIPA (Enclosure Bay IP Addressing) DNS server IP address from the list of DNS servers
for server bays.
Restrictions
<ip address> must be in the form ###.###.###.###, where each ### ranges from 0 to 255.
SAS
Syntax
SAS <A or B>
Description
Enables Telnet support from the SAS I/O modules within the storage system to the Enclosure
Manager. When enabled, all diagnostic commands (typically only available through a serial
connection) are accessible.
Restrictions
If Telnet support is not enabled on the SAS I/O module, the SAS command fails with a "Connection
refused" message.
Internet control
159
SET EBIPA
Syntax
SET EBIPA { SERVER } { NETMASK <netmask> | GATEWAY <gateway> | DOMAIN
"<domain name>"| <ip address> {<netmask> | [netmask] { ALL | <bay#> [{
, | - } <bay#>]} }
Description
Sets EBIPA settings, including starting IP address, net mask, default gateway, and domain name
for the specified bay. If a bay number is not specified when setting an IP address, then both server
bays are assigned an IP address in the range starting from the number entered for <ip address>.
The keyword NONE can be used in place of <ip address>, <netmask>, or <gateway> to
clear the IP address.
Restrictions
•
<ip address> and <netmask> must be in the form ###.###.###.###, where each ###
ranges from 0 to 255.
•
<domain name> is a string containing letters (a–z, A–Z), digits (0–9), or a hyphen (-).
•
<bay#> must be 1 or 2.
SET EM GATEWAY
Syntax
SET EM GATEWAY <ip address>
Description
Sets the network default gateway.
Restrictions
•
This gateway is used only if the system is currently configured to use a static IP address rather
than the DHCP protocol.
•
<ip address> must be in the form ###.###.###.###, where each ### ranges from 0 to
255.
PING
Syntax
PING IPV6 [<NUMBER>] {<ipv6 address> | "<server name>"}
Description
Sends ICMP echo messages to a remote IPv6 device. If you omit <NUMBER>, or use a number
larger than 9999 or one that is negative, then only four packets are sent. Packets are sent at
one-second intervals to prevent congestion.
Restrictions
•
<NUMBER> must be between 1 and 9999.
•
IPv6 must be enabled.
•
<ipv6 address> must be in the format ####:####:####::##.
160 Managing the EMU
SET IPCONFIG
Syntax
SET IPCONFIG { DHCP | STATIC | LOCAL }
Description
Configures EM addressing mode to be DHCP, static, or link local. The setting takes effect
immediately. If mode chosen is static, other parameters are required (see below).
Restrictions
None
SET IPCONFIG STATIC
Syntax
SET IPCONFIG STATIC <ip address> <netmask> [<gateway>]
Description
Configures the IP settings for the EM to static mode. In selecting this mode, the IP address and
netmask are be set to <ip address> and <netmask>, respectively. These settings take effect
immediately. The gateway address will be cleared if it is omitted. Note that you can also set the
gateway address using the SET EM GATEWAY command.
Restrictions
None
SHOW NETWORK
Syntax
SHOW NETWORK
Description
Displays the network settings of the Enclosure Manager.
Restrictions
None
SHOW EBIPA
Syntax
SHOW EBIPA
Description
Displays EBIPA configuration information.
Restrictions
EM EBIPA control only functions for the two iLO processors in the server blades.
Server management
Use the commands in this section to perform server management operations.
Server management
161
POWEROFF SERVER
Syntax
POWEROFF SERVER { ALL | <bay#>[{ , | - } <bay#>]} [FORCE]
Description
Sends an asynchronous request for a graceful shutdown to the server. This command returns the
user to the CLI immediately but the shutdown command can take up to five minutes to complete. If
the FORCE option is specified, the server blade OS is not given the opportunity to perform a
graceful shutdown before power is removed. This option can cause a server blade to lose data
and possibly to become unstable.
Restrictions
•
<bay#> must be 1 or 2.
•
Use of the FORCE option can cause a server blade to lose data and possibly to become
unstable.
POWERON SERVER
Syntax
POWERON SERVER { ALL | <bay#>[{ , | - } <bay#>]} [{NORMAL | PXE | HDD
| RBSU }]
Description
Power on the specified server. Adding an optional boot argument forces the blade to ignore the
regular boot order and forces a boot using the specified method. If no blade is in the specified
bay, you are notified that the bay is empty.
Restrictions
This command functions only if the enclosure power is already on.
NOTE: Because the EMU hardware cannot determine if a blade is physically present unless
enclosure power is on, the EM reports the warning that the blade is not present if this command
is used when enclosure power is off.
REBOOT SERVER
Syntax
REBOOT SERVER { ALL | <bay#> [{ , | - } <bay#>]} [FORCE] [{NORMAL | PXE
| HDD | RBSU }]
Description
Sends an asynchronous request to the server to do a graceful shutdown of the OS. After the OS
has had sufficient time to perform a graceful shutdown, the server blade is power cycled. If the
FORCE option is specified, the server blade OS is not given the opportunity to perform a graceful
shutdown before power is removed but is cleanly powered off and then immediately powered
back on. The FORCE option can cause a server blade to lose data and possibly to become unstable.
Restrictions
This command functions only if the enclosure power is already on. Because the EMU hardware
cannot determine if a blade is physically present unless enclosure power is on, the EM reports the
warning that the blade is not present if this command is used when enclosure power is off.
162
Managing the EMU
SET SERVER UID
Syntax
SET SERVER UID { ALL | <bay#> [{ , | - } <bay#>]} { ON | OFF }
Description
Turns on or off the UID LED on the specified servers.
Restrictions
This command functions only if the enclosure power is already on.
NOTE: Because the EMU hardware cannot determine if a blade is physically present unless
enclosure power is on, the EM reports the warning that the blade is not present if this command
is used when enclosure power is off.
SET SERVER BOOT
Syntax
SET SERVER BOOT { FIRST | ONCE } { NORMAL | HDD | PXE | RBSU } { ALL |
<bay#> [{ , | - } <bay#>]}
Description
Persistently stores a setting for the IPL to be passed to the specified servers at the next reboot.
SET SERVER BOOT FIRST sets the boot order of the blade.
SET SERVER BOOT ONCE sets the boot device to be used on the next boot of the specified bay;
The RBSU option is only available for SET SERVER BOOT ONCE.
Restrictions
•
This setting is only valid on present blades and is cleared if the blade is removed.
•
This command functions only if the enclosure power is already on. Because the EMU hardware
cannot determine if a blade is physically present unless enclosure power is on, the EM reports
the warning that the blade is not present if this command is used when enclosure power is
off.
SHOW SERVER BOOT
Syntax
SHOW SERVER BOOT { ALL | <bay#> [{ - | , } <bay#>]}
Description
Displays the boot order and one-time boot device for the specified server or range of servers. These
settings correspond to the server boot settings in the ROM-Based Setup Utility.
Restrictions
This command functions only if the enclosure power is already on. Because the EMU hardware
cannot determine if a blade is physically present unless enclosure power is on, the EM reports the
warning that the blade is not present if this command is used when enclosure power is off.
Server management
163
SHOW SERVER INFO
Syntax
SHOW SERVER INFO { ALL | <bay#>[{ , | - } <bay#>]}
Description
Displays a description of the server blade hardware, including the embedded NICs, the Mezz
HBAs, and the management processor, in the specified bays.
Restrictions
This command functions only if the enclosure power is already on.
SHOW SERVER LIST
Syntax
SHOW SERVER LIST
Description
Displays a brief iLO and status description of all server blades. For a longer description, use SHOW
SERVER INFO.
Restrictions
This command functions only if the enclosure power is already on. Because the EMU hardware
cannot determine if a blade is physically present unless enclosure power is on, the EM reports the
warning “enclosure power is off” if this command is issued when power is off.
SHOW SERVER NAMES
Syntax
SHOW SERVER NAMES
Description
Displays a brief description of all server blades.
Restrictions
This command functions only if the enclosure power is already on. If power is not on, the command
responds with the message: “enclosure power is off”. If power is coming on but state exchange
between iLO and EM have not normalized, some displayed information might display [Unknown]
or ?.
SHOW SERVER STATUS
Syntax
SHOW SERVER STATUS { ALL | <bay#>[ { , | - } <bay#>] }
Description
Displays current status of the server blade in the specified bay or both bays.
164 Managing the EMU
Restrictions
This command functions only if the enclosure power is already on. Because the EMU hardware
cannot determine if a blade is physically present unless enclosure power is on, the EM reports the
warning “enclosure power is off” if this command is issued when power is off.
Enclosure control
The commands in the section provide various enclosure control functions.
DOWNLOAD CONFIG
Syntax
DOWNLOAD CONFIG <URL>
Description
Downloads a previously saved configuration script file from a specific IP host then executes it. This
command should be used to recover configuration after replacement of a failed EMU.
Supported protocols are HTTP, FTP, and TFTP. The URL should be formatted asprotocol://host/
path/file. If your FTP server does not support anonymous connections, you can specify a
username and password by replacing the host part in the above format with
username:password@host.
Restrictions
Only IPv4 is supported in EM 1.0 or later.
POWEROFF ENCLOSURE
Syntax
POWEROFF ENCLOSURE
Description
The EM removes main DC power from the enclosure (just as if the user had pressed the enclosure
power-button. Servers are NOT automatically sent a graceful shutdown command; that should be
done prior to issuing this command using POWEROFF SERVER. Except when in script mode, the
user is prompted for an explicit confirmation, which must be given, or the command is terminated.
Restrictions
None
POWERON ENCLOSURE
Syntax
POWERON ENCLOSURE
Description
The EM sends a command to the health monitor to enable main DC power (just as if the user had
pressed the enclosure power button).
Restrictions
None
Enclosure control
165
RESTART EM
Syntax
RESTART EM
Description
This reboots the Linux OS and restarts the EM software. It is necessary to do this command following
a firmware downgrade using UPGRADE IMAGE FORCE. Except when in script mode, the user is
prompted for an explicit confirmation, which must be given or the command is terminated.
Restrictions
None
SET EM NAME
Syntax
SET EM NAME "<EM name>"
Description
Sets the user defined string reported with SHOW EM STATUS. The system responds with confirmation
of the change. The default EM name is “EM-<mac address>” where <mac-address> is the
hardware Ethernet address for the iLO port on the EMU. For example, EM-78E7D1C12074.
Restrictions
<EM name> must be 1 to 32 characters long and includes all alphanumeric, underscore (_) , and
hyphen (-) characters.
SET ENCLOSURE ASSET
Syntax
SET ENCLOSURE ASSET [TAG] "<asset tag>"
Description
Sets the enclosure asset tag that is stored persistently in the EM, displayed with SHOW ENCLOSURE
INFO command.
Restrictions
<asset tag> must be 1 to 32 characters long and includes all alphanumeric, underscore (_)
and hyphen (-) characters.
Restrictions
<id> is a decimal integer from 0 to 99.
SET ENCLOSURE NAME
Syntax
SET ENCLOSURE NAME "<enclosure name>"
Description
Sets the persistent enclosure name stored in the EM. This name is displayed with SHOW ENCLOSURE
INFO command. The default (unset by user) value is ‘UnnamedEnclosure’.
166 Managing the EMU
Restrictions
<enclosure name> must be 1 to 32 characters long and includes all alphanumeric, underscore
(_), and hyphen (-) characters.
SET ENCLOSURE UID
Syntax
SET ENCLOSURE UID { ON | OFF | SLOW | FAST }
Description
Sets the blue enclosure UID. The enclosure has a UID on both the front and rear of the enclosure.
However, the front UID is only lit when enclosure power is on, while the rear UID is only lit when
standby power is on. The Unit Identification LED displays as steady on, off, or one of two blinking
speeds. The system confirms the operation. There is no particular meaning to SLOW or FAST.
Restrictions
Blinking rates are not user definable. SLOW is 1 Hz; FAST is 2 Hz.
SET FACTORY
Syntax
SET FACTORY
Description
Restores configuration settings back to the factory defaults, including deleting any created user
accounts, except for the Administrator password, which remains unmodified. The EM restarts after
restoring the configuration settings. If the enclosure power is on, the iLOs are reset (to force a
refresh of the enclosure information passed to iLO).
Restrictions
None
SET RACK NAME
Syntax
SET RACK NAME "<rack name>"
Description
Sets the user-defined string reported with SHOW RACK NAME command. The system responds with
confirmation of the change. The default (unset by user) rack name is ‘UnnamedRack’.
Restrictions
<rack name> must be 1 to 32 characters long and includes all alphanumeric, underscore (_),
and hyphen (-) characters.
UPDATE IMAGE
Syntax
UPDATE IMAGE { [ FORCE ] <URL> }
Enclosure control
167
Description
Downloads a new EM firmware image from the network and uses it to update the Enclosure
Manager’s firmware. Supported protocols are HTTP, FTP, and TFTP. The EM validates the image
before performing the update. Unless the session is in script mode, the EM requests confirmation
before performing the update.
After update, the EM is restarted unless the FORCE operation was used in which case a manual
invocation of RESTART EM is necessary to reboot the new firmware.
Restrictions
•
<URL>should be formatted as: protocol://host/path/filename.
•
Host is a fully qualified domain name or an IPv4 address.
•
path/filename is the pathname of the file to download.
•
Use FORCE to allow downgrading firmware even if settings/passwords may be lost.
UPLOAD CONFIG
Syntax
UPLOAD CONFIG {<URL>}
Description
Uploads a script to the specified URL, which duplicates the current runtime configuration. Supported
protocols are FTP and TFTP. The URL should be formatted as: protocol://host/path/
filename. If your FTP server does not support anonymous logins, you can specify a username
and password within the URL formatted as: ftp://username:password@host/path/
filename
Restrictions
Only IPv4 is supported in EM version 1.0 or later.
Forensic
The following set of forensically useful functions is supported by the EM CLI.
CLEAR SYSLOG
Syntax
CLEAR SYSLOG [ EM | ENCLOSURE ]
Description
Completely erases the local syslog of the Enclosure Manager. The EM prompts the user for
confirmation because once deleted, this information cannot be recovered.
Restrictions
Only deletes the syslog stored inside the EM itself; it does not delete the remote syslog, if remote
logging is enabled.
DISABLE SYSLOG REMOTE
Syntax
DISABLE SYSLOG REMOTE
168 Managing the EMU
Description
Disables remote system logging.
Restrictions
None
ENABLE SYSLOG REMOTE
Syntax
ENABLE SYSLOG REMOTE
Description
Enables remote system logging.
Restrictions
The remote system log server address must be configured before enabling remote system logging.
SET REMOTE SYSLOG PORT
Syntax
SET REMOTE SYSLOG PORT <port>
Description
Sets the UDP destination port for remote system logging.
Restrictions
•
The default remote system logging port is 514.
•
<port> must be a number between 1 and 65535.
•
Settings are not used unless remote system logging is enabled.
SET REMOTE SYSLOG SERVER
Syntax
SET REMOTE SYSLOG SERVER { <IPv4> | <dns name>}
Description
Sets the IP address of a remote system log server.
Restrictions
•
EM 1.0 only supports IPv4.
•
Settings are not used unless remote system logging is enabled.
SHOW SYSLOG EM
Syntax
SHOW SYSLOG EM
Description
Displays the local syslog for the Enclosure Manager.
Forensic
169
Restrictions
None
SHOW SYSLOG SERVER
Syntax
SHOW SYSLOG SERVER <bay#>
Description
Displays the syslog for the specified server. If the session is not in script mode, the EM paged the
display of the output to throttle output and give the user time to view the data. iLO syslog data is
formatted in XML.
Restrictions
•
<bay#> must be 1 or 2.
•
This command can only function if enclosure power is on. Because the EMU hardware cannot
determine if a blade is physically present unless enclosure power is on, the EM reports the
warning “Could not determine the IP address of the management processor for blade” if this
command is issued when power is off.
SHOW SYSLOG SETTINGS
Syntax
SHOW SYSLOG SETTINGS
Description
Displays the remote syslog settings (enabled/disabled status, IP address, Port#) for the Enclosure
Manager.
Restrictions
None
TEST SYSLOG
Syntax
TEST SYSLOG
Description
Tests the remote system log settings by logging a test message to the remote syslog. The test message
also appears in the local EM system log.
Restrictions
Only functions if remote syslog is enabled.
Session
Interacting with the EM via the CLI requires a login-initiated session. A session represents a transient
context which has a state that can be explicitly controlled by the user. This section describes
commands for managing session state and behavior.
170
Managing the EMU
CLEAR SCREEN
Syntax
CLEAR SCREEN
Description
Clears the terminal screen.
Restrictions
None
CONNECT SERVER
Syntax
CONNECT SERVER <bay#>
Description
Opens a Text Console session to the iLO specified by the server bay number. Exit from the session
with ‘exit’.
Restrictions
This command can function only if enclosure power is on and a blade server is present. Because
the EMU hardware cannot determine if a blade is physically present unless enclosure power is on,
the EM reports the warning “The blade is not present.” if this command is issued when enclosure
power is off.
EXIT
Syntax
EXIT | LOGOUT | QUIT
Description
Exit the Command Line Interpreter.
Restrictions
None
HELP
Syntax
HELP [<command>]
Description
Show Help messages for or list the top-level commands if no arguments are provided. Arguments
listed in braces ( { } ) and separated by the pipe symbol ( | ) are mutually exclusive choices.
Arguments listed in square brackets ( [ ] ) are optional arguments and can be omitted. Fields listed
in angle brackets ( < > ) should be replaced with the value indicated.
Restrictions
None
Session
171
HISTORY
Syntax
HISTORY
Description
Shows the history of commands for the current session.
Restrictions
None
SET SCRIPT
Syntax
SET SCRIPT [MODE] { ON | OFF }
Description
Sets script mode on or off. script mode prevents commands from prompting for input or confirmation.
All actions are performed without confirmation. Default values are used for any parameters that
normally require user interaction. This setting is only effective for the current CLI session.
Restrictions
The ADD USER command must have a password argument if executed in script mode.
SET SESSION TIMEOUT
Syntax
SET SESSION TIMEOUT <timeout>
Description
Sets the number of minutes before insessions are removed. Valid session timeout. Please note: If
the session timeout value is lowered, currently insessions may be removed. The default timeout is
1,440 minutes.
Restrictions
<timeout> must be in the range from 10 to 1,440 minutes (24 hours). The session timeout can
be disabled by setting it to zero.
SHOW SESSION TIMEOUT
Syntax
SHOW SESSION TIMEOUT
Description
Displays the current Enclosure Manager user session timeout. The session timeout is the number of
minutes before insessions are removed.
Restrictions
None
172
Managing the EMU
SLEEP
Syntax
SLEEP <seconds>
Description
Pauses the session for a fixed period of time. Useful for adding delays to scripts. The <seconds>
parameter can be any whole number from 1 to 86400.
NOTE: Once the pause begins, there is no way to continue the session before time runs out, but
you can always terminate the session (from the client end) and start another one.
Restrictions
The <seconds> parameter can be any whole number from 1 to 86400.
Using the Enclosure Manager physical interface
The primary interface to the Enclosure Manager is the Ethernet LAN port, which is intended for
remote management of the enclosure. AC power is applied to the enclosure so that auxiliary power
is available to the EMU. The enclosure may or may not be powered on. Solution software may or
may not be installed.
Manual button functions
IMPORTANT:
Support.
Use the following manual button functions only with the assistance of HP Technical
The two manual buttons and a two-digit LED display on the EM provide basic management functions
when the EM is not connected to the network. Figure 143 (page 173) illustrates the physical
(touch/visual) interaction elements.
Figure 143 EM Physical Interface
Activate Button Menu
You cannot manage the EM using a remote management interface because the system is not
connected to the LAN, the LAN interface is not functioning properly, or management software is
not installed or available.
To activate the button menu:
1. Press and hold the UP (right) button until the two digits display “- -“.
2. Release the UP button. System displays two underscores “_ _”:
This display indicates context is at the bottom of the menu range and is awaiting menu selection,
which requires pressing the UP button one or more times.
Using the Enclosure Manager physical interface
173
Reboot EM (bE)
The EM LAN interface is not responding to the remote management software but is configured to
do so, or the EM has just been reconfigured and needs to be rebooted for the configuration to
take effect.
To reboot the EM:
1. Enter the menu mode using the “Activate Button Menu” (page 173).
2. Press the UP button one time.
The EM changes the display from “_ _“ to “bE” to indicate that menu choice 0 (Reboot) is
selected.
3.
Press and hold the UP button for three seconds.
The system blinks (or flashes) the two “bE” for one second to acknowledge the selection.
4.
Release the UP button.
The system then reboots the EM. This event is logged in the system log. The display shows “-” during the reboot. The module fault LED flashes. When the reboot is complete, the EM green
health LED is lit steady, and the enclosure ID is displayed on the two digits.
Restore Factory Defaults (Fd)
You might be replacing an EM or reconfiguring a storage system. The action resets the EMU
address to a link local IP address (not the factory default).
To restore factory defaults:
1. Enter the menu mode using the “Activate Button Menu” (page 173).
2. Press the UP button until the display changes from “_ _“ to “Fd”.
3. Press and hold the UP button for three seconds.
The EM blinks (or flashes) “Fd” three times to acknowledge the selection.
4.
Release the UP button.
The system stops flashing the pattern, internally restores all configurations to factory defaults,
and reboots the EM.
Recover Lost Password (Fp)
You changed the Administrator password from the default password set by the factory, and then
lost or forgot the new password.
To recover a lost password:
1. Enter the menu mode using the “Activate Button Menu” (page 173).
2. Press the UP button until the display changes from “_ _“ to “Fp”.
3. Press and hold the UP button for three seconds.
The EM blinks (or flashes) “Fp” to acknowledge the selection.
4.
Release the UP button.
The system stops flashing “Fp”. The system restores the Administrator password from hardware
and logs the event in the syslog. The system displays the Enclosure ID to indicate that the
operation is complete.
Set DHCP IP Address (dH)
Reconfigure the storage system for a different network where IP address assignment is handled
dynamically.
To set a DHCP IP address:
1. Enter the menu mode using the “Activate Button Menu” (page 173).
2. Press the UP button until the display changes from “_ _“ to “dH”.
174
Managing the EMU
3.
Press and hold the UP button for three seconds.
The EM flashes “dH” to acknowledge the selection.
4.
Release the UP button.
The system sets the EM to DHCP and exits the menu mode. This event is also logged in the
EM syslog and takes effect immediately. The system displays the Enclosure ID to indicate that
the operation is complete.
Set Link Local IP Address (LL)
Reconfigure the storage system for a network where IP address assignment is static.
To set a static IP address:
1. Enter the menu mode using the “Activate Button Menu” (page 173).
2. Press the UP button until the display changes from “_ _“ to “LL”.
3. Press and hold the UP button for three seconds.
The EM flashes “LL” to acknowledge the selection.
4.
Release the UP button.
The system sets the EM to Link local mode and exits the menu mode. This event is also logged
in the EM syslog and takes effect immediately. The system displays the Enclosure ID to indicate
that the operation is complete.
Display Current IP Address (IP)
Learn the IP address of the EM.
To find the current IP address:
1. Enter the menu mode using the “Activate Button Menu” (page 173).
2. Press the UP button until the display changes from “_ _“ to “IP”.
3. Press and hold the UP button for three seconds.
The EM displays “IP” to acknowledge the selection.
4.
Release the UP button.
The system enters the ‘Display IP’ subfunction and displays the first octet of the IPv4 address
being used by the EM.
5.
Press the UP button three times to scroll through the other three octets of the EM IP address.
You can back up using the DOWN button.
Press and hold the DOWN button for three seconds.
The EM flashes “IP” to acknowledge the selection, and then exits the operation. The system
displays the Enclosure ID to indicate that the operation is complete.
6.
Exit Button Menu
Exit the main menu (or any subfunction).
To exit the button menu:
Press and hold the DOWN button for three seconds.
The system displays and flashes the two hyphens (“- -“) three times to indicate the menu was exited.
The system then returns the LEDs to the original display state showing the Enclosure ID.
Set Link Local IP Address (LL)
175
B Regulatory information
For important safety, environmental, and regulatory information, see Safety and Compliance
Information for Server, Storage, Power, Networking, and Rack Products, available at http://
www.hp.com/support/Safety-Compliance-EnterpriseProducts.
Belarus Kazakhstan Russia marking
Manufacturer and Local Representative Information
Manufacturer’s information:
•
Hewlett-Packard Company, 3000 Hanover Street, Palo Alto, California 94304, U.S.
Local Representative information Russian:
•
HP Russia: ЗАО “Хьюлетт-Паккард А.О.”, 125171, Россия, г. Москва, Ленинградское
шоссе, 16А, стр.3, тел/факс: +7 (495) 797 35 00, +7 (495) 287 89 05
•
HP Belarus: ИООО «Хьюлетт-Паккард Бел», 220030, Беларусь, г. Минск, ул.
Интернациональная, 36-1, офис 722-723, тел.: +375 (17) 392 28 18, факс: +375 (17)
392 28 21
•
HP Kazakhstan: ТОО «Хьюлетт-Паккард (К), 050040, Казахстан, г. Алматы, Бостандыкский
район, ул. Тимирязева, 28В, 1 этаж, тел./факс: +7 (727) 355 35 50, +7 (727) 355 35
51
Local Representative information Kazakh:
•
HP Kazakhstan: ЖШС «Хьюлетт-Паккард (К)», Қазақстан, Алматы қ., Бостандық ауданы,
Тимирязев к-сі, 28В, тел./факс: +7 (727) 355 35 50, +7 (727) 355 35 51
Manufacturing date:
The manufacturing date is defined by the serial number.
CCSYWWZZZZ (HP serial number format for this product)
Valid date formats include:
•
YWW, where Y indicates the year counting from within each new decade, with 2000 as the
starting point; for example, 238: 2 for 2002 and 38 for the week of September 9. In addition,
2010 is indicated by 0, 2011 by 1, 2012 by 2, 2013 by 3, and so forth.
•
YYWW, where YY indicates the year, using a base year of 2000; for example, 0238: 02
for 2002 and 38 for the week of September 9.
Turkey RoHS material content declaration
Türkiye Cumhuriyeti: EEE Yönetmeliğine Uygundur
Ukraine RoHS material content declaration
Обладнання відповідає вимогам Технічного регламенту щодо обмеження використання деяких
небезпечних речовин в електричному та електронному обладнанні, затвердженого постановою
Кабінету Міністрів України від 3 грудня 2008 № 1057
Warranty information
HP ProLiant and X86 Servers and Options
http://www.hp.com/support/ProLiantServers-Warranties
176
Regulatory information
HP Enterprise Servers
http://www.hp.com/support/EnterpriseServers-Warranties
HP Storage Products
http://www.hp.com/support/Storage-Warranties
HP Networking Products
http://www.hp.com/support/Networking-Warranties
Warranty information 177
Glossary
CSR
Customer self repair.
EBIPA
Enclosure Bay IP Addressing
EM
Enclosure Manager
EMU
Enclosure Manager Unit
ESD
Electrostatic discharge. The emission of a potentially harmful static electric voltage as a result of
improper grounding.
FRU
Field replaceable unit. An assembly component that is designed to be replaced on site, without
the system having to be returned to the manufacturer for repair.
PSoC
Programmable System-on-Chip
RBSU
ROM-Based Setup Utility
SAID
Service Agreement Identifier.
SCOM
Systems Center Operations Manager
SIM
Systems Insight Manager
SKU
Stock-keeping unit
SMH
System Management Homepage
TCO
Total cost of ownership. A financial estimate for determining economic value of an investment.
UID
Unit identification
WBEM
Web-Based Enterprise Management
Witness Server
A server used for high availability in conjunction with database availability groups. For more
information, see the Microsoft Technet article, Create a Database Availability Group at http://
technet.microsoft.com/en-us/library/dd351172.aspx.
WMI
Windows Management Instrumentation
178
Glossary
Index
Symbols
1210m cache module
removing and replacing, 129
2-port 1GB Ethernet I/O module
LED behavior, 41
2-port 1GB Mezz A and B I/O module
LED behavior, 41
B
Belarus Kazakhstan Russia EAC marking, 176
best practices
for removing and replacing hardware components, 77
C
cache module controller
LED behavior, 40
capacitor pack
removing and replacing, 132
chassis switches
LED behavior, 43
completing initial configuration, 25
component replacement videos
accessing, 77
contacting HP, 143
controller and controller server blade components
removing and replacing, 127
customer self repair see removing and replacing hardware
components
D
documentation
providing feedback on, 145
drive drawer
removing and replacing, 107
drive drawer hard drive
removing and replacing, 112
drive drawer rails (side or bottom)
removing and replacing, 114
drive fan
LED behavior, 44
removing and replacing, 91
E
EAC marking
Belarus Kazakhstan Russia, 176
electrostatic discharge
avoiding, 81
EMU
CLI reference, 146
configuring management processor, 20
LED behavior, 40
logging in, 45
removing and replacing, 97
using CLI SHOW commands for troubleshooting, 45
enclosure rails
removing and replacing, 119
Ethernet I/O module
removing and replacing, 94
Event Notifier
configuring for proemail (SMTP) event notification, 29
F
factory image
restoring the system, 137
failure of component
verifying, 82
firmware
upgrading, 70
front bezel (full)
removing and replacing, 103
front bezel (standard)
removing and replacing, 101
front LED display board
LED behavior, 38
front LED display board (full)
removing and replacing, 105
front LED display board in the rack (standard)
removing and replacing, 104
H
hard drive
LED behavior, 39
wait time after replacement, 82
hardware
upgrading, 70
hardware components
removing and replacing, 77
upgrading, 75
HP StoreEasy 5000 Storage
accessing, 24
Configuration Wizard, 24
configuring system, 24
exploded view, 78
locating product number, 8
locating SAID number, 8
locating serial number, 8
network connections, 18
powering off, 76
powering on, 20, 76
recovery, 136, 137
troubleshooting tools, 29
unpacking, 8
updating system software and firmware, 70
upgradng system software and firmware, 70
HP StoreEasy 5000 Storage System
monitoring tools, 29
I
I/O module
LED behavior, 44
iLO
179
configuring management processor, 20
installing StoreEasy 5000 Storage hardware, 8
K
kit contents
StoreEasy 5000 Storage, 8
L
LED
2-port 1 GB Ethernet I/O module, 41
2-port 1 GB Ethernet, Mezz A and B I/O module, 41
cache module controller, 40
chassis switches and indicator, 43
EMU, 40
fan, 44
front LED display board, 38
hard drive, 39
I/O module, 44
power supply, 42
server blade, 37
M
maintenance
SAID, 69
warranty entitlement labels, 69
management processor
configuring EMU, 20
configuring iLO, 20
Mezzanine NIC
removing and replacing, 134
Microsoft Systems Center Operations Manager (SCOM)
using for monitoring and troubleshooting, 66
midplane board
removing and replacing, 86
monitoring tools, 29
component LEDs, 37
EMU CLI SHOW commands, 45
Event Notifer, 29
Microsoft Systems Center Operations Manager (SCOM),
66
notification alerts, 29
System Management Homepage, 33
N
network connections, 18
notification alerts, 29
sample error messages, 29
O
OpsMgr see Microsoft Systems Center Operations
Manager (SCOM)
P
PCIe module
removing and replacing, 95
power off procedure, 76
power on procedure, 20, 76
power supply
LED behavior, 42
180 Index
removing and replacing, 93
power UID button assembly
removing and replacing, 92
product number
locating , 8
R
rack rails
removing and replacing, 124
Rack stability
HP, 144
recovering the system, 136
system recovery DVD, 136
USB flash drive, 137
regulatory information, 176
Turkey RoHS material content declaration, 176
Ukraine RoHS material content declaration, 176
removing and replacing hardware components, 77
1210m cache module, 129
best practices, 77
capacitor pack, 132
controller and controller server blade components, 127
drive drawer, 107
drive drawer hard drive, 112
drive drawer rails (side or bottom), 114
drive fan, 91
EMU, 97
enclosure rails, 119
Ethernet I/O module, 94
front bezel (full), 103
front bezel (standard), 101
front LED display board (full), 105
front LED display board in the rack (standard), 104
Mezzanine NIC, 134
midplane board, 86
PCIe module, 95
power supply, 93
power UID button assembly, 92
rack rails, 124
SAS cable, 89
SAS I/O module, 89
server airflow baffle, 100
server blade, 124
server blade backplane, 98
server blade hard drive, 125
server interposter board, 84
replaceable part
identifying, 78
restoring the system
factory image, 137
S
SAID
locating number, 8
obtaining, 69
SAS cable
removing and replacing, 89
SAS I/O module
removing and replacing, 89
serial number
locating, 8
server airflow baffle
removing and replacing, 100
server blade
LED behavior, 37
removing and replacing, 124
server blade backplane
removing and replacing, 98
server blade hard drive
removing and replacing, 125
server core, 26
server interposter board
removing and replacing, 84
Service Agreement ID see SAID
spare part
hot, warm, cold swap, 81
identifying, 78
verifying proper operation after replacement, 82
StoreEasy 5000 Storage
features, 6
front view, 6
hardware models, 6
installing hardware, 8
kit contents, 8
preparing to install, 6
rear view, 6
software components, 7
Subscriber's Choice for Business, 143
Support websites
contacting HP, 143
HP, 65, 143
Subscribers's Choice for Business, 143
Subscription service, 143
system fan
LED behavior, 44
System Management Homepage
description, 33
Help menu, 33
main page, 33
starting, 33
Storage System page, 36
system recovery
DVD, 136
USB flash drive, 137
system software
upgrading, 70
U
Ukraine RoHS material content declaration, 176
unpacking the HP StoreEasy 5000 Storage, 8
updating
system software and firmware, 70
upgrading
system software and firmware, 70
upgrading hardware components, 75
USB flash drive
system recovery, 137
W
warranty entitlement labels
locations, 69
warranty information
HP Enterprise servers, 176
HP Networking products, 176
HP ProLiant and X86 Servers and Options, 176
HP Storage products, 176
T
technical support see Support websites
troubleshooting tools, 29
component LEDs, 37
EMU CLI SHOW commands, 45
Event Notifer, 29
Microsoft Systems Center Operations Manager (SCOM),
66
notification alerts, 29
System Management Homepage, 33
Turkey RoHS material content declaration, 176
181