1
i
n
v
e
n
_
Tabme of Contents
Chapter
1:
Getting started ............................
Camera parts .............................
Status LCD ...........................
Setup ...................................
Attaching the wrist strap ..................
Installingthe batteries ...................
Installing a memory card (optional) ..........
Turning on power ......................
Restoring previous settings .............
Choosing the language ..................
Setting the date and time .................
installing the software ...................
Windows .........................
Macintosh ........................
Chapter 2:
Taking pictures and recording
video clips
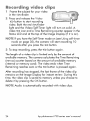
Taking still pictures .........................
Recording video clips .......................
Using live view ............................
Using the focus Brackets ..................
Status screen ..........................
Using zoom ..............................
Optical zoom .........................
Digital zoom ..........................
Using the flash ............................
Changing the image quality ..................
Recording audio ...........................
Changing capture modes ....................
Using self-timer mode ...................
Using Burst mode ......................
g
10
14
16
16
16
17
18
18
18
19
20
20
21
....
23
23
24
25
26
27
28
28
28
30
31
32
33
35
36
Using
macro
mode......................
Advanced
capture
settings
....................
EVcompensation
.......................
Whitebalance
.........................
ISO speed ............................
AE metering ...........................
Saturation ............................
Sharpness ............................
Setup ................................
Chapter 3:
Reviewing
images and video clips ..........
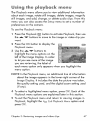
Using playback ............................
Using the playback menu .....................
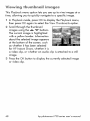
Viewing thumbnail images ................
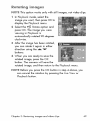
Rotating images ........................
Deleting images ........................
Recording and deleting audio clips ..........
Magnifying images ......................
Setup ................................
Chapter 4:
Using hp instant share
...................
Using the share menu .......................
Using hp instant share to
print pictures ..........................
Using hp instant share to send images
to destinations .........................
36
37
38
39
40
41
43
44
44
45
45
47
48
49
50
51
52
52
53
54
55
56
Adding destinations to the share menu
on the camera ......................
56
Selecting hp instant share destinations
for images ........................
How hp instant share e-mails images .....
59
60
hp photosmart 730 series user's manual
Chapter 5:
Unloading,
printing, and displaying
images
Unloading to a computer ....................
Printing images ...........................
Displaying images on a TV ...................
Chapter 6:
Using the setup menu .....................
Camera sounds ...........................
Date & time ..............................
USB configuration
.........................
TV configuration ...........................
Language ...............................
Move images to card .......................
Chapter 7:
Troubleshooting
and support ...............
Problems and solutions ......................
Error messages on the camera .................
Error messages on the computer ...............
Getting assistance .........................
HP accessibility website ..................
HP photosmart website ...................
Support process ........................
Phone support in the United States ..........
Phone support in Europe, the Middle East,
and Africa ...........................
Appendix
Batteries
Other phone support worldwide
A:
and camera accessories
...61
61
63
65
67
68
68
69
70
70
71
73
73
82
90
92
92
92
92
94
95
............
97
...........
99
Managing batteries ........................
Extending battery life ...................
Rechargeabb batteries ..................
Power conservation ....................
99
1O0
101
101
Purchasing camera accessories ...............
102
Appendix B:
Specifications
..........................
105
hp photosmart 730 series user's manual
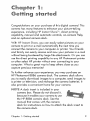
Chapter ] :
Getting started
Congratulations on your purchase of this digital camera! This
camera has many features to enhance your picture-taking
experience, including HP b_an_ SharaTM, direct printing
capability, manual and automatic controls, on-camera Help,
and an optional camera dock.
With H? ln_an_ Share, you can easily select pictures on your
camera to print or e-mail automatically the next time you
connect the camera to your computer or printer. Your friends
and family can easily receive and view your pictures in e-mail
without Being burdened by large file attachments. Or you can
use the direct printing capability to any HP Photosmart printer
or other select HP printer without ever connecting to your
computer. What a great way to keep others close as you
capture precious memories!
To further enhance your experience, you may purchase an
HP Photosmart 8886 camera dock. The camera dock allows
you to easily download images to a computer, send images to
a printer or television, and recharge the camera batteries. It
also provides a convenient home for your camera.
NOTE A dock insert is included in your
camera box. Pleasedo not discard it,
because it enables your camera to use
the HP 8886 camera dock. See the
manual that comes with the camera
dock for instructions on how to attach the dock insert to
the camera dock.
Chapter 1: Getting started
9
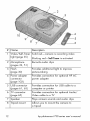
Camera
NOTE
parts
Refer to the pages in parentheses
for more information
1
2
after the part names
about those parts.
3
4
5
6
1
1
10
Description
I Name
1
Allows you to frame the subjectof the
_icture or video clip
Optical
Viewfinder
I(page 25)
2
Solid--camera
_E]3_Video
viewfinder
light
(red)
3
Blinking--Self-Timer
is activated or there
is an error (see Image Display for
message)
AF Auto Focus
viewfinder
is recording video
light
Solid--camera
is ready to take a picture
(focus and exposure are locked)
Blinking--camera
is unable to focus, long
exposure (hold steady), or there is an
4
(green)
error (see Image Display for message)
i_ ON/OFF
Turns the camera power on and off
switch (page 18)
10
hp photosmart 730 series user's manual
#
Name
Description
5
Zoom lever:
Zooms out the lens to the wide angle
Zoom Out
4_Zoom _n
position, and zooms in the lens to the
telephoto position
(page 28)
6
Memory/USB
Solid or_nge--USB
light (page 18)
Blinking orange--camera
is connected
starting up, charging
is either:
the battery,
sending/receiving
USB, or reading from
or writing to the memory card
7
Memory card
door (page 17)
Allows access to insert or remove the
memory card
8
Wrist strap mount
Allows you to attach a wrist strap
(page 16)
9
_
v
arrow
A
"vW'--allows
you to move through
buttons and
OK button
menus and images on the Image Display
(page 37, 47)
OK--allows
you to display the Capture
and Playback menus and to select menu
options
10 Image Display
11
Allows you to frame pictures and video
(page 25)
clips using Live View and review them
afterward in Playback, and to view all the
menus
_i_/E_
HP Instant Share
Turns the Share menu on and off on the
Image Display
button (page 54)
12 _
Playback
button (page 45)
13 _
Live View
button (page 25)
Turns PJayback on and off on the Image
Display
Turns Live View on and off on the Image
Display
Chapter 1: Getting started
11
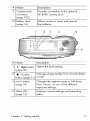
10
# I Name
Description
1
Video/Self-Timer
Solid red--camera
light (page 35)
Blinking r_J--Self-Timer
Microphone
Records audio clips
2
is recording video
is activated
(pages 32, 51)
3
4
Flash
Provides additional
(page 30)
)icture-taking
light to improve
Power adapter
connector
Provides connection for optional
power adapter
HP AC
I(page 102)
5
USB connector
I(pages 61, 63)
6
7
8
12
TV connector
Provides connection for USB cable to a
computer or printer
Provides connection for optional Audio/
I(page 65)
Video cable to a TV
ISpeaker
Plays camera sounds and audio clips
Tripod mount
AllOWSa
tripodY°U to mount the camera to
hp photosmart 730 series user's manual
#
Name
Description
9
Camera dock
connector
Provides connection to the optional
HP 8886 camera dock
(page 102)
10 Battery door
(page 16)
Allows access to insert and remove
the batteries
1
# Name
2
3
4
5
Description
1
f Flashbutton Selectsthe flash setting
(page 30)
2
_ Quality
Changes image quality from Good to Belier
button (page 31) to Best
3 MODEbutton
(page 33)
Changes the capture mode to Self-Time_,
Burst,Macro, or one of five different
exposure settings.
4 Status LCD
(page 14)
Displayscamera settingsand operating
status
Chapter 1: Getting started
13
....
#'_!
Name
5 Shu_'erbutton
(page 23)
Description
Takesa picture. Pushhalfway down to lock
focus and exposure, then all the way down
to take picture. Hold down after picture is
taken to record audio.
Recordsa video clip; pressonce to startand
6 _
Video
press again to stop
button (page 24)
1
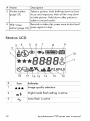
14
17 16 15
13
hp photosmart 730 series user's manual
# Icon
Indicates
or
::
6
8
_
or
Flash Off is active
r__-_t_':__i;;Number of still images remaining or time
O##Ci
remaining (for video and audio clips)
i
_iBattery condition
.......
9..........................
m.......................
10 i
_0
Audio is recording
13 iI
_
Portrait mode is active
.................
Landscape
mode
isaciive
15
_
Action
mode
is
16 i
_
Macro setting is active
17 i
I_1
Burst setting is active
......
i8 .............
_ ...................
geifimer_;i_
Chapter 1: Getting started
active
............................
15
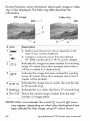
A#achin
9 th÷ wrist
strap
Attach the wrist strap to the
wrist strap mount on the side
of the camera as shown.
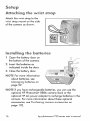
#_staHing
the
ba#÷ries
Open the battery door on
the bottom of the camera.
2 Insert the batteries as
indicated inside the door.
3 Close the battery door.
NOTE For more information
about batteries, see
Managing ba#eries on
page 99.
NOTE If you have rechargeable batteries, you can use the
optional HP Photosmart 8886 camera dock or the
optional HP AC power adapter to recharge batteries in the
camera. For more information about these optional
accessories, see Purchasing camera accessories on
page 102.
16
hp photosmart 730 series user's manual
mnstaHing a
÷ ory
card (optional)
Your camera contains 16 MB of internal memory that allows
you to store images and video clips in your camera. However,
you can use an optional memory card (purchased separately)
instead to store images and video clips. For information on the
memory cards that are supported with your camera, see
Purchasing camera accessories on page 102.
NOTE If a memory card is installed in the camera, all new
images and video clips will be stored only on the memory
card. The internal memory and its file system are not
available when a memory card is installed in the camera.
With the camera turned off and the
back of the camera facing you,
open the memory card door by
sliding the door to the right.
2 Insert the memory card, making
sure that it clicks into place.
3 Close the memory card door.
To remove a memory card, turn the
camera off and open the memory card
door, then push the memory card in, and it will spring outward
from the slot.
Chapter 1: Getting started
17
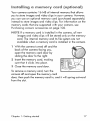
Turning
on power
Turn the camera on by sliding the
• ON/OFFswitch to the right and then
releasing it. The Memory/USB light will
blink and then turn off when the camera
is ready.
R÷storlng
previous
settings
Some of the camera settings do not remain set when the
camera is turned off. To restore all camera settings that were in
effect when the camera was last turned off, hold down the OK
button when you turn on the camera.
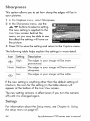
Choosing
the
anguag÷
The first time you turn the camera on, the following screen
appears and prompts you to choose a language.
]
Scroll to the language that you
want by using the ,_ _T' buttons.
2 Pressthe OK Button to select the
highlighted language.
NOTE If you need to go back and
change this setting later, you can do this in the Setup
menu. See Chapter 6: U_ing the _efup menu on page 67.
18
hp photosmart 730 series user's manual
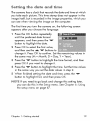
Selling
_h÷ da_÷
aed
ti_÷
The camera has a clock that records the date and time at which
you take each picture. This time stamp does not appear in the
image itself, but is recorded in the image properties, which you
can see when viewing the image on the computer.
The first time you turn the camera on, the following screen
appears after you choose the language.
] Pressthe OK button repeatedly
until the preferred date format
appears, and then press the "_
Button to highlight the date.
2 PressOK to select the first value,
and then use the ,_ v
Buttons to
change it. PressOK to confirm. Set the remaining values in
the same way (M = Month, D = Day, Y = Year).
3 Pressthe "_ button to highlight the time format, and then
press OK if you want to change it.
4 Pressthe _w' Button to highlight the time. Set the time values
in the same way you set the date values in step 2.
5 When finished setting the date and time, press the _"
button to highlight E×i_,and then press OK.
NOTE If you need to go back and change this setting later,
you can do this in the Se'_upmenu. See Chap_r 6: Using
_he_tup menu on page 67.
Chapter 1: Getting started
19
Installing
_h÷ software
The camera software allows you to unload images from the
camera, view them, print them, and e-mail them. It also allows
you to configure the Share menu on the camera.
See ChGpbr 4: Using hp ins_n_ share on page 53 for
information about configuring the Sh_re menu on the camera,
and Chapter 5: Unloading, printing, and displaying images on
page 61 for information about connecting the camera to a
computer or printer.
NOTE A copy of this User's Manual is located on the
HP Photo & Imaging software CD. Look in the
\docs\Readme file on the CD to see where the manual in
your language is located.
Wlndows
N©TE For the H? Ins_ar_Share component of the HP Photo &
Imaging software to function properly on your Windows
computer, you must have installed at least Internet Explorer
5.01 on Windows 2000 or XP,or Intemet Explorer 5.01
Service Pack 2 on Windows 98, 98 SE, or Me.
]
Close all programs and temporarily disable any virus
protection software running on your computer.
2 Insert the HP Photo & Imaging software CD into the CD
drive of your computer. The installation window
automatically appears.
N©TE If the installation window does not appear, click S_rarL
and then click Run. Type X:\Sefup_e×e, where X is the
letter of your CD drive.
3 ClickNexh and thenfollow the on-screeninstructionsto
install thesoftware.
20
hp photosmart 730 series user's manual
Your Windows CD may also include bonus software from other
manufacturers. To install any Bonus software:
Click S_ar_,click Run, and in the Own box, type
X:\Bonus\se_up.exe (where X is the letter of your CD drive).
2 Click OK, and then follow the on-screen instructions to
install the bonus software.
M_cln_osh
] Close all programs and temporarily disable any virus
protection software running on your computer.
2 Insert the HP Photo & Imaging software CD into the CD
drive of your computer.
3 Double-dick the CD icon on the computer desktop.
4 Double-click the installer icon, and then follow the on-screen
instructions to install the software.
NOTE Before you can unload images from the camera to a
Macintosh computer, you must first change the USB
Configuration setting to Disk Drive in the Setup menu on
the camera. See Chapter 6: Using _hesetup menu on
page 67, and then see USB cor_figura_ion on page 69.
Your Macintosh CD may also include bonus software from
other manufacturers. To install any Bonus software:
Double-click the Bor_usfolder icon.
2 Double-click the installer icon for the bonus software.
3 Follow the on-screen instructions to install the software.
Chapter 1: Getting started
21
22
hpphotosmart
730series
user's
manual
Chapter 2:
Taking pictures and
recording video dips
Taking
s))((
p(¢)ure$
You can take a picture almost any time the camera is on,
regardless of what is being shown on the Image Display.
I Frame the subject for your picture
in the viewfinder.
2 Hold the camera steady and press
the Shu_,_r Button halfway down.
The camera measures and then
locks the focus and exposure. This Focus _k feature allows
you to focus on a subject that is not in the center of the
picture, or to capture action shots more quickly by prefocusing in the area where the action will occur.
3 Pressthe Shuffer Button all the way down to take the picture.
The image appears for several seconds on the Image
Display for instant review. During this time, the image is
saved to memory, unless you choose to delete it by pressing
the OK button.
In Step 2 above, one (or both) of the Viewfinder lights may
start blinking. For an explanation of this, see the description for
Viewfinder lights on page 10.
NOTE To achieve best focus in low light conditions, secure the
camera to a tripod and make sure the focus area has
sufficient contrast.
Chapter 2: Taking pictures and recording video dips
23
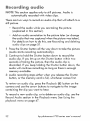
Recording
]
video dips
Frame thesubject
foryourvideo
inthe viewfinder.
2 Pressand release the Vid_
_Epbutton to start recording
video. Both the red viewfinder
light and the Video/Self-Timer light will turn on solid. A
video _ icon and a Time Remaining counter appear in the
Status LCD and at the top of the Image Display (if it is on).
NOTE If you have the Self-Timer mode on (see Using _l{-_imer
mode on page 35), the camera will start recording 10
seconds after you press the _ button.
3 To stop recording, press the _
button again.
The length of a video clip is limited only by the amount of
available memory. The camera calculates the Time Remaining
(mm:ss) counter based on the amount of available memory
(internal or memory card). The video ends when Time
Remaining reaches zero or the _ button is pressed again.
After recording has stopped, the last frame of the video clip
remains on the Image Display for instant review. During this
time, the video clip is saved to memory unless you choose to
delete it by pressing the OK button.
NOTE Audio is automatically recorded with video clips.
24
hp photosmart 730 series user's manual
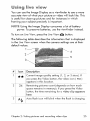
Usin 9 ive view
You can use the Image Display as a viewfinder to see a more
accurate view of what your picture or video will look like. This
is useful for close-up pictures and for instances in which
framing your subject precisely is important.
NOTE Using the Image Display consumes a lot of battery
power. To preserve batteries, use the viewfinder instead.
To turn on Live Vie% press the LiveViM, _
button.
The following table describes the informationthat is displayed
in the Li_ View screen when the camera settings are at their
default values.
......
¸r ent m gequ j et ngi
........
you pressthe Vid_ button, the video icon ( _3_)
i_appearsin thislocation.
.............+...........................
2
24
iRemaining pictures count (dependson how much
ispace remains in memory). If you pressthe Video
i button, the time remaining for a video clip appears
i here.
Auto flash icon will blink when the flash is charging.
Chapter 2: Taking pictures and recording video dips
25
4
!
:Battery level (actual icon shown depends on the
i stateof your camera batteries; seeManaging
Focusbrackets(seethe next section, Using the focus
N©TE If you change other camera settings, icons for those
settings will also be displayed across the top and bottom
of the Live View screen. For more information, see
Advanc_ captur_ se#ings on page 37.
Using the focus brackets
The two brackets in the middle of the LiveVirtu screen show the
focus region for the picture you are taking. When you press the
Shutter button halfway down, the camera uses this focus region
to measure and then lock the focus using this region. This is
called F_us L_L
The focus brackets turn green in the Live View screen and the
AF viewfinder light turns on solid green when the image is in
focus and the camera can lock the focus. However, the focus
brackets turn red and the AF viewfinder light blinks green when
the camera is unable to focus.
If the focus brackets turn red and the AF viewfinder light blinks,
release the Shutter button, re-frame the subject for your picture,
and then press the Shut_r button halfway down again. If the
camera still cannot focus after several tries, the lighting may be
too low, or there may not be enough contrast in the focus
region. Try using Focus Lock to focus on an object about the
same distance away but in a higher-contrast region, then point
the camera at the object you were originally trying to
photograph.
26
hp photosmart 730 series user's manual
If the focus brackets turn red, the AF viewfinder light blinks,
and the Macro _ icon is blinking on the Image Display, either
the camera is set to Mac_ focus but detects the focus is further
away than the macro (close-up) range, or the camera is set to
NormaE focus but detects the focus is closer than the normal
range. For more information on the focus settings and their
respective distance ranges, see Using macro m_e on
page 36.
NOTE When set to Macro _ focus, the camera will not take a
picture if it cannot find focus. However, when set to
Normal focus (the default), the camera will still take a
picture if it cannot find focus.
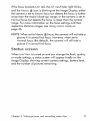
S_a_u5
$¢F@@n
When LiveView is turned on and you change the flash, quality,
or mode settings, a status screen will appear briefly on the
Image Display, showing current camera settings, Battery level,
and the number of pictures remaining.
Chapter 2: Taking pictures and recording video clips
27
Using zoo
NOTE
Zoom does notwork whilerecording
videoclips.
Op_ica_
zoom
Optical zoom works like the zoom on a traditional film camera,
with physical lens elements moving inside the camera to make
the object of your picture appear closer.
Pressthe Zoom Ou_ _ and Zoom
In f buttons to move the lens
Between wide angle and telephoto
positions (lx to 3x).
Digi_am zoom
Unlike optical zoom, digital zoom uses no moving lens parts.
The camera essentially crops the image, then uses interpolation
to enlarge the image to give the appearance of the object in
the picture Being from 1x to 5x closer.
]
Pressthe Z_m in _ button to optically zoom in to the
maximum level, then release the Button.
2
PresstheZ_m in _ button again
and hold it until you reach the
desired size in the Image Display.
The picture enlarges in the Image
Display (as do the focus brackets).
The amount of digital zoom
appears at the bottom of the
Image Display.
3 Pressthe ShuHer button to take the picture.
28
hp photosmart 730 series user's manual
To turn digital zoom off and return to optical zoom, press the
Zoom Out _ button until digital zooming stops. Releasethe
button, and then press the button again.
NOTE Digital zoom reduces the resolution of an image, so
your picture will tend to be more pixilated than the same
image taken with an optical zoom. If you just intend to
e-mail an image or post it to a website, this loss of
resolution will not be noticeable, but in situations where
the highest quality counts (such as printing), skip the
digital zoom and use the cropping tools in your image
editing software to zero in on your subject.
Chapter 2: Taking pictures and recording video dips
29
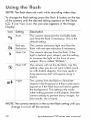
Using the flash
NOTE The flash does not work while recording video clips.
To change the flash setting, press the Flash _. button on the top
of the camera until the desired setting appears on the Status
LCD. tf LiveView is on, the icon also appears in the Image
Display.
iThe camera measures the available light
and fires the flash if necessary.This is the
_idefault setting.
FIGshOn
.............._
ii
iI
m _
i_tcamera
always
fires the use
flash.
the
is behind
your subject,
thisIf setting
ito increase the light on the front of your
subject. This is called "fill-flash".
_mer_;
wiii i_o_fi_hefic;s sei_i_.............
i setting when you do not want a flash (such
as with distant objects).This may resultin
long exposuresthat will require using a
iThe camera fires the flash to illuminate
i objects in the foreground. Itthen continuesto
i expose as if the flash had not fired to gather
i the background. This setting only works
iwhen taking pictures of still objects. Hold the
i camera steady to preventblurry images. For
NOTE The camera remains in the current flash setting until you
change it or turn off the camera.
30
hp photosmart 730 series user's manual
Changing
the i age
quality
Image quality
controls
theresolution
and compressionsettings
thatwillbe usedtocaptureimages.At highersettings,
there
will
be greater
detail
visible
intheimages,butthefiJe
sizeof
an image will be larger, and thus fewer pictures will fit in the
internal memory or on the memory card.
To change the image quality setting, press the Quali_y
button until the desired setting appears on the Status LCD. If
LiveView is on, the icon also appears in the Image Display.
Se_ing I icon i Description and capacity
.....
_;_o__
......
j images you want to e-mail or post to the Internet.
iAt this setting, internal camera memory holds
iabout 125 images, and a 16 MB memory card
iholds about 117 images.
Better _
iThis setting produces high-quality images and
j requires lessmemory than Bestsetting. This is
j recommended for printing images up to 20 by 25
icm (8 by 10 inches). This is the default quality
isetting. At this setting, internal camera memory
holds about 19 images, and a 16 MB memory
card holds about 18 images.
Best i***jThis
setting produces the highest-quality images
iand usesthe most memory. This is recommended
i if you plan to enlarge images, or print images to
ia size larger than 20 by 25 cm (8 by 10 inches).
jAt this setting, internal camera memory and a 16
MB memory card holds about 12 images.
Chapter 2: Taking pictures and recording video clips
31
Recording
audio
NOTE This section applies only to still pictures. Audio is
automatically recorded with video clips.
Thereare two ways to recordan audio clip that will attachto a
still picture.
° Record the audio while you are taking the picture
(explained in this section).
° Add an audio annotation to the picture later (or change
the audio that was captured when the picture was taken).
For details on how to do this, see Recording and delefin9
audio clips on page 51.
]
Pressthe Shu_r button all the way down to take the picture
(audio starts recording automatically).
2 Continue to hold the Shuffer button down to record the
audio clip. If you let up on the Shutter button within two
seconds of taking the picture, then the audio clip is
discarded, tf you keep holding the Shu_er button down, the
audio will continue recording as long as there is enough
memory available.
3 Audio recording stops either when you release the Shuffer
button, or the memory card is full, whichever comes first.
To review an audio clip, press the Playback El button on the
camera and use the arrow buttons to navigate to the image
containing the clip you want to hear.
To record a new audio clip, or to delete an audio clip, use the
R_a_d Audio section in the ?_ayback menu See U_ing the
playback me_u on page 47.
32
hp photosmart 730 series user's manual
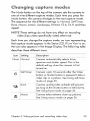
Changing
capture
modes
The Male button on the top of the camera sets the camera to
one of nine different capture modes. Each time you press the
M_de button, the camera changes to the next capture mode.
The sequence for the different settings is: Normal, Sdf_Timer,
Bur#, Macro, Adion, Landscapo, ?orfra#, F2_6,F4_9,and then
repeat.
NOTE Thesesettings do not have any effect on recording
video clips unless specifically noted otherwise.
Each time you change the capture mode, an icon representing
that capture mode appears in the Status LCD. If Livo Viow is on,
the icon also appears in the Image Display. The following table
describes these different icons.
Camera automatically sdects focus,
aperture and shutter speed. This is the
default settingwhen the camera is first
turned on.
Stir:Timer
Camera waits 10 secondsafter the Video
button or Shunt button is pressedto take a
video clip or a picture. SeeUsin9 stir-timer
mode on page 35.
::Burst
Camera quickly takes multiple still pictures
(as long as the Shu_lerbutton is hen down).
See Using burst mode on page 36.
iMacro
Camera takes extreme close-up pictures.
Chapter 2: Taking pictures and recording video clips
33
Action
Camera
biases
toward
faster
shutter
speeds
..............................................
i°ndh!g
her!
SO
speed
i Landscape
...............
iCamera biases toward smaller apertures
and lower ISO speeds for better depth of
_:focusand quality.
Podrait
:i
iCamera biases toward wider apertures to
blur the background and uses lower
Aperture
Priority
ii
iSets the camera aperture to F2.6 for a
ishallow depth of field (background is
i blurred). All other camera settings are
_:
automatic.
F4.9 Apedure
iSets the camera aperture to F4.9 for a
i medium depth of field (background is
F26
islightly blurred). All other camera settings
34
hp photosmart 730 series user's manual
Usin 9 s÷ff4i ÷r
od÷
Securethe camera to a tripod or set it on o stable surface.
2 Pressthe Mode button until the SeffTimer _ icon appears
in the Status LCD. If LiveView is on, the icon also appears in
the Image Display.
3 Frame the subject in the viewfinder.
4 The next steps depend on whether you are capturing a still
picture or a video clip:
Still
picture
] Pressthe ShuN'erbutton halfway down for Focus
Lock.The camera measuresand then locksthe
focus and exposure. The camera will hold these
settingsuntil it takes the picture.
i 2 Pressthe Shul_erbutton all the way down. A 1Osecond countdown appears on the StatusLCD.
If you immediately pressthe ShuHerbutton all the way
down without using FocusLock, the camera will lock
focus and exposure just before the end of the 10::secondcountdown. This is usefulwhen one or more
subjects will be entering the picture during the
0-second countdown period.
ilYoucannot record audio when using the Self-Timer,
but you can add an audio clip later (seepage 51).
Vid_ clip] To start recording, pressthe Video _ button and
then release it. A lO-second countdown appears
on the StatusLCD.
2 To stop recording the video clip, pressthe
.......................................
ut!on
ago!
n:.............................
NOTE The Video/Self-Timer light on the front of the camera
blinks before the camera takes the picture or video clip.
Chapter 2: Taking pictures and recording video clips
35
Using burst od÷
Burst is used to take multiple pictures in a row as quickly as the
camera can.
]
Pressthe Mode button until the Burst _ icon appears on
the Status LCD. If LiveView is on, the icon also appears in
the Image Display.
2 Frame the subject and press the Shut_r Button all the way
down and hold it.
3 Flash is disabled and the camera takes pictures as quickly
as possible until the memory is full or the ShuHer button is
released.
Using
acro
od÷
You can use the Macro focus setting for taking close-up pictures
(from 0.1 m (4 inches) to 0.5 m (19.7 inches).
Pressthe Mode button until the Macro _ icon appears on
the Status LCD. If LiveView is on, the icon also appears in
the Image Display.
2 Use the Image Display to frame the subject of the picture
(the optical viewfinder will not give you an accurate
representation of a picture taken in macro mode).
3 Pressthe Sh_br button all the way down to take the picture.
36
hp photosmart 730 series user's manual
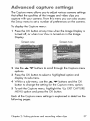
Advanced
capture
settings
The Capture menu allows you to adjust various camera settings
that affect the qualities of the images and video clips you
capture with your camera. From this menu you can also access
the Setup menu to set a number of preferences on the camera.
To display the @p_ure menu:
Pressthe QK button at any time when the Image Display is
turned off, or when LiveView is turned on in the Image
Display.
Scr&@n one
ScF_
_'wo
2 Use the A _" buttons to scroll through the Capture menu
options.
3 Pressthe OK button to select a highlighted option and
display its sub-menu.
4 Within a sub-menu, use the A "_v buttons and the OK
button to change the setting for the Capture menu option.
5 To exit the Capture menu, highlight the _
MENU option and press the OK button.
EXiT _PTURE
Each of the Capture menu settings is explained in detail on the
following pages.
Chapter 2: Taking pictures and recording video clips
37
EV compensation
In difficult lighting conditions, you can use the EV (Exposure
Value) Com_nsa_ion setting to override the automatic
exposure setting that the camera makes.
EV C_mpensafion is useful in backlit scenes involving a person,
or in scenesthat contain many light objects (like a white house
in the snow) or many dark objects (like a black cat on a dark
Background). Scenes containing many light objects or many
dark objects could turn out gray without the use of EV
Compensation. For a scene with many light objects, increase
the EV Compensation to a positive number to produce a
Brighter result. For a scene with many dark objects, decrease
the EV Compensation to darken the scene to be closer to Black.
]
In the Capture menu, select P,! Compensation.
2 In the EV Compe_afion menu,
use the ,_ v
buttons to change
the EV setting in 0.5 steps from
-2.0 to +2.0. The new setting is
applied to the Live View screen
behind the menu, so you should
be able to see the effect the
setting will have on the picture.
3 PressOKto save the setting and return to the Cap_ur_ menu.
If the setting is anything other than the default setting of 0
(zero),
the number
vaJue
will appear
at the fop of the Live View
screen.
The new setting remains in effect until it is changed again or
until the camera is turned off.
38
hp photosmart 730 series user's manual
Whi_e
bamance
Different kinds of lighting conditions cast different colors. For
example, sunlight is more blue, while indoor tungsten light is
more yellow. Scenes dominated by a single color may require
an adjustment of the white balance setting to help the camera
reproduce colors more accurately and ensure that whites
appear white in the final picture. You can also adjust the white
balance to produce creative effects. Using the Sun or Tungsten
settings can produce a warmer look to the picture, and the
Shade setting can make a sunset picture look more orange.
I In the CQp_uremenu, select White Balance.
2 In the Wh[_e Balance menu, use
the ,_ v
Buttons to select a
setting. The new setting is applied
to the Live View screen Behind the
menu, so you should be able to
see the effect the setting will have
on the picture.
3 PressOK to save the setting and return to the Capture menu.
The following table helps explain the settings in more detail.
None Auto
.:_:. Sun
•
iCamera automatically identifies and
icorrects for scene illuminance. This is the
idefault setting, and the white balance is
i reset to Aufe when you turn the camera
off.
iCamera balances color assuming it is
i outdoors under sun or bright cloudy
conditions.
Chapter 2: Taking pictures and recording video clips
39
Shade
Camera balances color assuming it is
outdoors in shade, twilight, or dark cloudy
conditions.
Tungsbn
Camera balances color assuming
incandescent or halogen lighting (typically
....................................................................
f°und
!nh°mes!:
.................................
,",
Fluorescent Camera balances color assuming
If the setting is anything other than the default setting of Auto,
the icon for the setting (in the table above) will appear at the
top of the Live View screen.
The new setting remains in effect until it is changed again or
until the camera is turned off.
spe÷d
The ISO Spe_ setting adjusts the sensitivity of the camera to
light. The Auto setting works the best.
NOTE If the camera is in Action, _and_ape, Portrait, F26 or
F4._9mode, the ISO speed will always be set to Auto and
the ISO option in the Capture menu will be grayed out.
Lower ISO speeds will capture the best quality pictures with the
least amount of noise or grain. If taking a picture in low light
conditions without a flash at ISO 100, you may want to use a
tripod.
Higher ISO speeds allow higher shutter speeds and thus can
be used when taking pictures in dark areas without a flash, or
when taking pictures of fast moving objects and you want to
stop action. Higher ISO speeds produce pictures with more
grain and thus lower quality.
40
hp photosmart 730 series user's manual
IntheCapture
menu,
select
ISOS_.
2 IntheISOSp_dmenu,
usethe
_ buttons
foselect
asetting.
3 Press
OKtosave
thesetting
and
return
totheCapture
menu.
If the setting is anything other than
the default setting of Auto, the
number value for the setting will
appear at the top of the LiveVi÷¢,_screen.
The new setting remains in effect until it is changed again or
until the camera is turned off.
A£ _etering
This setting allows you to specify which region of a scene the
camera will use to calculate the exposure.
'] Inthe Capture menu, select
2 tn the _ Metering menu, use the
_
buttons to select a seffing.
3 PressOK to save the setting and
return to the Capture menu.
Chapter 2: Taking pictures and recording video clips
41
The following table helps explain the settings in more detail.
Icon Setting
Average
Description
Camera usesthe entire sceneregion to
measure and calculate exposure. Usethis
setting when you want everything in the
picture to be used equally when calculating
exposure.
None Center- Camera usesthe centerof the sceneregion to
W÷ight_J measure and calculate exposure. Thissetting is
good to use when the subject is in the centerof
the frame. Exposurewill be based more on the
subject than on its surroundings. This is the
default setting.
Spot
Camera usesa small area in the center of the
scene region to measure and calculate
exposure. This can be useful in backlit scenes
or when the subject is very dark or light
compared to the restof the scene.When using
this setting, pressthe ShuHerbutton halfway
down to lock the exposure on the spot in the
center, then recomposethe sceneas desired.
If the new setting is anything other than the default setting of
Center-Weighted, the icon for the setting (in the table above)
will appear at the top of the LiveVi_ screen.
The new setting remains in effect until it is changed again or
until the camera is turned off.
42
hp photosmart 730 series user's manual
This setting allows you to determine how saturated the colors
will be in your pictures.
I tn the Capture menu, select Saturation.
2 In the Saturation menu, use the
v
buttons to select a setting.
The new setting is applied to the
Live View screen behind the
menu, so you should be able to
see the effect the setting will have
on the picture.
3 PressOK to save the setting and return to the Capture menu.
Thefollowing table helpsexplain thesettingsin moredetail.
.......
!
I)escr!P!i°n
High
........................
.......................
iEmphasizesmore vivid colors in a scene.
iOutdoor landscape photography can use
high saturation to create skiesthat are more
blue, or sunsetsthat are more orange.
Non÷ M_Jium
Colors will be normally saturated. This is the
default setting.
[]
Mutes colors to achievea faded photographic
look. When taking portrait pictures,low
saturation can give a softer,more "natural"
look to the subject.
Low
If the new setting is anything other than the default setting of
Medium, the icon for the setting (in the table above) will
appear at the bottom of the Live View screen.
The new setting remains in effect (even if you turn the camera
off) until it is changed again.
Chapter 2: Taking pictures and recording video clips
43
This option allows you to set how sharp the edges will be in
your pictures.
]
In the Cap_'u_'_ menu, seled Sharpness
2
In the Sharpness
A
v
menu, use the
buttons to select a setting.
The new setting is applied to the
Live View screen behind the
able to
will have
menu, so you may be
see
the effect the setting
on
the picture.
3 PressOK to save the setting and return to the Capture menu.
The following table helps explain the settings in more detail.
Icon]Setting
Description
The edges in your image will be more
pronounced.
<_
Low
The edges in your image will be softer.
If the new setting is anything other than the default setting of
Medium, the icon for the setting (in the table above) will
appear at the bottom of the Live View screen.
The newsettingremainsin effect (evenif you turn the camera
off) until it is changedagain.
Setup
For information about the Setup menu, see Chapter 6: Usin9
the setup menu on page 67.
44
hp photosmart 730 series user's manual
Chapter
3:
Reviewing
i ages
and
video clips
You can use the ?_ay_ck feature to review the images and
video clips in your camera. In addition, the Playback menu
allows you to delete images or video clips, rotate or magnify
still images, and add, change, or delete audio clips.
Using p ayback
Pressthe Playback [] button to activate ?_aybackmode.
The most recently taken or viewed image or video clip
appears on the Image Display.
2 Use the A v
buttons to scroll through your images and
video clips. Pressand hold the A v
buttons to scroll
automatically.
Still images that have audio clips attached to them will
automatically play the audio clip. To replay the audio
clip, press the A button. Pressing the _ button before,
during, or after audio playback skips to the next image.
Video clips wil] play automatically after a few seconds.
To replay the video clip, press the _
button. Pressing
the _ button before, during, or after video playback
skips to the next image.
3 To turn the Image Display off after reviewing your images
and video clips, press the Playback [] button again.
Chapter 3: Reviewing images and video clips
45
During Playback, some information about each image or video
clip is also displayed. The following table describes the
information.
Still image
Video clip
2
3
or
2
EE_3
stateof your camera batteries).
e Camerais using AC power from the optional
HP 8886 cameradock or HP AC power adapter.
Indicates this image has been marked for e-mailing
using HP Instant Shar,e(this example showsthat it
will be e-mailed to 3 destinations).
3 _2
i lndicates this image has been marked for printing
i using HP Instant Share (this example showsthat 2
copies will be printed).
4 0:29 _
Indicates this image has an audio clip and the clip
5 0:37@
6 30 0f43
Indicates this is a video clip that is 37 secondslong.
iShows the current image number from the total
NOTE Other icons besides the e-mail E_ or print _
icons
may appear, depending on what other destinations have
been selected for that image using H? _nstantS_are_
46
hp photosmart 730 series user's manual
Using the playback
menu
The ?layback menu allows you to view additional information
about each image, rotate still images, delete images, magnify
still images, and add, change, or delete audio clips. From this
menu you can also access the Setup menu to set a number of
preferences on the camera.
To use the Playback menu:
Pressthe Play'ok _ button to activate PJay_ck, then use
the A v
buttons to move to the image or video clip you
want.
2 Pressthe OK button to display the
_f_
3 Use the A v
buttons to
highlight the menu options on the
left of the Image Display. In order
to let you see more of the image
you are reviewing, the label of
each menu option only appears when you highlight the
menu option.
NOTE In the Play'ok menu, an additional line of information
about the image appears in the lower-right corner of the
_mage Display. It includes the date the picture was taken,
the quality setting used, and the digital zoom setting used
(if any).
4 To select a highlighted menu option, press OK. Each of the
Playback menu options are explained later in this section.
5 To exit the Playback menu and return to viewing images in
Playback, highlight the _ Exit Hayback Menu option and
press OK.
Chapter 3: Reviewing images and video clips
47
Viewing
_humbnai_
imag÷s
This Playback menu option lets you see up to nine images at a
time, allowing you to quickly navigate to a specific image.
In Playback mode, press OK to display the Playback menu,
then press OK again to select the View Thumbnails option.
2 Scroll through the thumbnail
images using the A _v buttons.
The current image is highlighted
with a yellow border. Information
about the selected image appears
at the bottom of the screen, such
as whether it has been selected
for HP hs_an_Sha_, whether it is
a video clip, or whether an audio clip is attached to a still
image.
3 Pressthe OK button to display the currently selected image
or video clip.
48
hp photosmart 730 series user's manual
Rotating i_ages
NOTE This option works only with still images, not video clips.
In Playback mode, select the
image you want, then press OK to
display the ?layback menu.
2 Selectthe _3 Ro_Q_e
option and
press OK. The image you were
viewing in Playback is
automatically rotated 90 degrees
clockwise.
3 After the image has been rotated,
you can rotate it again in either
direction using the A v
Buttons.
4 When you are ready to save the
rotated image, press the OK
Button. The camera wiJ] save the
rotated image, and then return to the Playback menu.
NOTE Before you press the OK button in step 4 above, you
can cancel the rotation by pressing the Live View or
Playback button.
Chapter 3: Reviewing images and video dips
49
De_e_in
]
9 images
In Play'ok mode, select the image you want, then press OK
to display the Playback menu.
2 Select the _1Delete option and
press OK.
3 In the Dde_ sub-menu, use the
A v
buttons to highlight the
option you want, and then press
OK. These options include:
° Caned--Returns
to the
Playback menu without deleting anything.
° This Image--Deletes the currently displayed image or
video clip, then returns to the Playback menu.
° All Images in Memory (on _rd)--Deletes
all d the
images and video clips from internal memory or the
memory card, then displays a screen verifying that there
are no images left in memory.
o Format Memory (Oa_)--Deletes all of the images, video
clips, and files from internal memory or the memory
card, and then formats the internal memory or memory
card. A screen appears verifying that there are no
images Idt in memory.
NOTE Periodic formatting of the internal memory or memory
card will keep it clean of file remnants that may cause the
camera to lock up, save images slowly, or corrupt images.
50
hp photosmart 730 series user's manual
R÷¢arding
and d÷l÷ting
audio
dips
NOTE This option works only with still images, not video clips.
After taking a still picture,you can go back laterand add an
audio clip to it. If an imagealready containsan audio clip, you
can record a new clip or deletethecurrentaudio clip.
I In Playbackmode,selectthe imageyou want, thenpressOK
to display the Playbackmenu.
2 Selectthe _ RecordAudio option.
3 If the image doesnot already
havean audio clip, recording
startsimmediately.Recordingwill
continueuntil you pressOK again
or the memoryfills up (whichever
comesfirst). A microphoneicon
(@) and an elapsedtime counter
appear in the middleof the Image
Displayduring recording.
If the currentimage already hasan
audio clip, the @ RecordAudio
menuoption will take you to a submenuthat allows you to keepthe
currentaudio clip, recorda new clip,
or deletethe currentclip.
Chapter 3: Reviewing images and video clips
51
Magnifying
i ag÷s
NOTE This option works only with still images, not video clips.
You can use this option to see a close-up of the image that is
Being shown in Play'ok mode. This option does not
permanently alter the image in the camera.
]
In Playback mode, select the image you want, then press OK
to display the PlaybQek menu.
2 Select the Magnify option. This magnifies the current image
to three times its size.
3 Scroll up or down in the image by using the A
buttons.
v
4 To scroll left and right, press OK to
display the Magni_ menu.
Highlight the menu option called
Scroll LefliRighh then press OK.
Now you can use the A
buttons to scroll left and right in
the image.
5 To magnify the image to six times its size, press OK to
display the Magnify menu, then select o_ Magnifi;z Mo_'e.
6 To return to Playback mode, select the _Exit
option, or press the Playback [E] button.
Magnify
Selecting this Playback menu option displays the Setup menu.
For information about the Setup menu, see Chapter 6: Using
the _tup menu on page 67.
52
hp photosmart 730 series user's manual
Chapter 4:
Using hp instant
share
This camera has an exciting feature called H? Ins_an_ShQre.
This feature lets you select images in the camera to be
automatically sent to a variety of destinations the next time you
connect the camera to your computer or to certain HP printers.
For example, right from the back of the camera you can select
images that you want to have printed, then connect the camera
to the computer or printer, and the selected images will be
printed automatically.
As another example, you can select images in the camera to
be automatically sent to e-mail addresses (including group
lists), online albums, and a photo finishing service the next
time you connect the camera to your computer.
When you press the H? lnsk_n_Share (Share) _/_
button on
the camera, the most recently taken or viewed image appears
on the Image Display, along with any print or other
destinations that have been selected for the image. You can use
the A v
Buttons to scroll through the images to see
destinations for the other images in the camera.
Visit www hp comigoiins_sh_r_
action.
Chapter 4: Using hp instant share
to seeH? lns_n_Sharein
53
Using the sh_re
menu
Pressing the Share _/_
button causes the Share menu to
appear in the Image Display. The following table describes
each of the Share menu options.
4
\
....
!i_ii!
if!
i°_i!!
k_ici!_!
!o_iiilli!/i
iii
ii!!Z!II
i! !ZIilZ!
ilii!i
i iii!iiii!
i !ii!i!iii!iii
i!!
if!
IZi!Zi!_ii!i
1
_
Print 1 Copy of current image when connected to
a computer or printer. By default, the picture is
printed 10 by 15 cm (4 by 6 inches).
2
_
Print 2 Copies of current image when connected
to a computer or printer.
3
_
Customize this Menu_ lets you add e-mail
addresses and other destinations (such as Order
Prints and Upl_d to HP Photo website) to the
Sha_ menu. SeeAdding de4inafions to the share
menu on the car_era on page 56.
4
v"
Check mark indicates the destination has been
selected for the currently displayed image. (You
can select more than one destination per image.)
54
hp photosmart 730 series user's manual
Using
prin_
hp
instant
share
_o
pictur÷s
Y Pressthe Playback [] button to display the images in your
camera, then use the A v
buttons to scroll to an image
you want to print.
NOTE You cannot stied video clips for printing.
2 Pressthe Share _/_
and then use the A
you want.
v
button to activate the Share menu,
buttons to scroll to the print option
3 PressOK to select the print option, and a _/ appears over
that print option. To un-select a print option, simply press
OK again.
NOTE You can select both the Prin_"1Copy, and the Print 2
Copies print options for an image so that 3 copies of the
image will be printed when connected to a computer or
printer.
4 To select another image for printing, go back to step 1.
When you are finished selecting all the images you want to
print, simply press the Playback [] button or select
EXF SHARE MENU.
5 The next time you connect the camera to your computer or a
compatible printer, the images you selected will be
automatically printed. See Chapter 5: Unloading, printing,
and displaying imag_ on page 61 for information about
connecting the camera to a computer or printer.
NOTE TheSharemenucreatesa standard Digital PrintOrder
Format(DPOF)file for print options.
Chapter 4: Using hp instant share
55
Using hp instant
share to send
i_ag÷s _o destinations
Using HP In,rant
Sha_ to send images in your camera to
various destinations involves three steps:
] Adding destinations (e-mail addresses, online albums, a
photo finishing service, etc.) to the camera's Share menu
(using your computer and the camera together).
2 Selecting HP _ns_ntShare destinations for images (using
the Share menu on the camera).
3 Connecting the camera to your computer to send the images
you selected. Your computer must have access to the Internet
to complete this step.
Adding destln_t_ons
the ¢_me_a
to the sh_r÷
_÷nu
on
NOTE You will need an Internet connection to complete this
procedure on a Windows computer.
Turn on the camera, and then press the Share _/_
button.
2 Highlight the Cus_'omizethis Menu_ _ optionand press
the OK button. A message on the Image Display appears
asking you to connect the camera to your computen
NOTE If your computeris runningWindows XP,whenyou
connectthe camerato your computerin the next step,a
dialog box will display that requestsyou to Sel_ the
prog_r_ _o launchbr" this action. Simplyclick on Cancel
to closethis dialog box.
3 Connect the camera to your computer by using the USB
cable or the optional HP 8886 camera dock. This activates
the Camera Share Menu Setup Wizard.
56
hp photosmart 730 series user's manual
4 From the first window of the Wizard on the computer, click
on Retrievefr,om Camera.
S In the screen called Modi@ Share Menu:
On Macintosh, click on the Add_
button.
On Windows, check to see that HP Instant Share E_mail
is visible above the Ad& button, then click on the Add
button.
6 If you are using a:
Macintosh computer, add the e-mail addresses you want.
Then skip to step 8.
Windows computer, you will be asked to sign in to HP's
Passport program. HP Passport allows you to create a
secure account for the photos you share using HP _n@Jnt
Share services. The first time you see this screen, you will
need to register as a new user. Follow the instructions on
the screen to registen
7 Qnce you have successfully registered, sign in to
HP Passport, and then the HP Instant Share Eomail Setup
screen will appear. Here, you can either enter individual
e-mail addresses or create group distribution lists, and
specify how you want them to appear in the camera's Share
menu. You can also enter a subject and message to go with
all e-mails that will be sent to each e-mail address or
distribution list. After completing the form, click Next. In the
confirmation screen that appears, click Finish.
Chapter 4: Using hp instant share
57
8 The names you specified for your newly added e-mail
destinations or group distribution lists should now appear in
the Modify Share Menu screen (in the Current Share Menu
section). To add additional e-mail addresses or distribution
lists to the camera Share menu, repeat steps 5-7 on
Windows, or steps 5-6 on Macintosh. If you are using a
Windows computer, you will not need to sign in to the HP
Passport program again.
NOTE You can havea maximumof 32 Share destinations
(suchas individuale-mail addressesor group distribution
lists)in the Sharemenuon your camera in addition to
Print 1 Copy and Print2 Copies.
9 When you have finished adding Share destinations, click on
either Save to Camera on a Windows computer or Next on
a Macintosh computer to add the new addresses or
distribution lists to the camera's Share menu. When the
computer confirms that the addresses or lists were saved to
your camera, disconnect the camera from the computer, and
press the Share _/z_ button to view the new destinations in
the Share menu.
]O You are now ready to select images on the camera to be
e-mailed. See the next section for how to do this.
58
hp photosmart 730 series user's manual
S÷_÷_t_ 9 hp _nst_nt
sh_÷
d÷st_n_t_ons
_o_
You can select any number of HP Instant Share destinations for
each still image in your camera. For example, you can select a
specific image to go to 10 e-mail destinations (including group
lists), an online album, and to a professional-quality photo
finisher. However, you cannot select HP In4ant Sha_
destinations for video clips.
Pressthe P[ay_ck [:_ button to display the images in your
camera, then use the A _v buttons to scroll to an image
you want.
2 Pressthe Share _/_
button to activate the Share menu,
and then use the A v
buttons to scroll to the HP k_stant
Share destination that you want to select.
3 PressOK to select the destination, and a ,./appears next to
that destination. (You can select more than one destination
or print option for an image.) To un-select a destination,
simply press OK again.
4 To select one or more destinations for another image, go
back to step 1. When you are finished selecting HP _nsfant
Share destinations, press the P_ay_ck [] button or select
EXiTSHARE MENU.
5 The next time you connect the camera to your computer, the
images you selected for e-mail will be sent to their respective
destinations. See Chapter 5: Unloading, printing, and
displaying images on page 61 for information about
connecting the camera to a computer.
Chapter 4: Using hp instant share
59
How
hp _ns_n_ sb_r÷
÷o_Hs
_9÷s
The way images are e-mailed via HP Instant Share works
differently on Windows and Macintosh computers.
Windows
Images are not e-mailed as attachments. Rather,a
i messageis sent to each e-mail address that you
iiselectedin the Shar_ menu. The messagecontains
thumbnail images of the picturesyou selectedfor that
address, as well as a link to a web page where the
recipient can view the images. Fromthat web page,
ilthe recipientcan do things like reply to you, print the
images, save images to their computer,forward
images, and more. This makes it easy for people who
use different e-mail programs to be able to see your
images without the difficulty of dealing with e-mail
.................................
€_ttad_ment
s ................................................................................
Macintosh Images are e-mailed directly to recipientsusing the
default e-mail program on your computer.
60
hp photosmart 730 series user's manual
Chapter 5:
Unmoading printing
and
@
Once you have taken pictures, you can unload them from your
camera to a computer, print them directly to a printer, or
display them on a television.
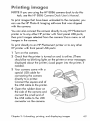
Unmoading
to a computer
NOTE If you are using the HP 8886 camera dock to do this
task, see the HP 8886 Camera Dock User's Mar_ual.
NOTE If you are using a Macintosh computer, you must first
change the USB configuration setting to Disk Dri_ in the
Setup menu. See USB configuration on page 69.
'] Your camera came with a
special USB cable for
connecting the camera to a
computer. Connect the
larger end of that USB
cable to the computer.
2 Open the rubber door on
the side of the camera and
connect the small end of
the USBcable to the USB
connector on the camera.
Chapter 5: Unloading, printing, and displaying images
61
NOTE If your computer is running Windows XP, when you
turn on the camera in the next step, a dialog Box may
appear that requests you to Sebct the program to launch
for' _his action. Simply click on Caned to close this dialog
box.
3 Turn on the camera. The HP Image Unload software will
launch on your computer. If you have set the software to
automatically unload the images in the camera, the images
will automatically unload to the computen Otherwise, in the
Welcome screen, click Sbrt Unbad. If there were any
images in the camera that were selected in the Share menu
for printing or HP _nstantShare destinations, those actions
are started after the images have been unloaded to the
computen
4 When the unload screen on the computer says Finished,
your images have been saved and shared. You can now
disconnect the camera from the computer.
NOTE To unload images to a computer that does not have the
HP Photo & Imaging software installed on it, change the
USBConfiguration setting to Disk Drive in the Setup menu.
See USB configuration on page 69. This allows the
camera to appear as another disk drive on the computer
so that you can easily copy the image files from the
camera to the hard drive of your computen
NOTE If you used a memory card in your camera, another
way to unload images from the card to a computer is to
use a memory card reader or one of the memory card
slots available in HP Photosmart printers. See the manual
for your HP Photosmart printer for instructions on how to
do this.
62
hp photosmart 730 series user's manual
Printing
images
NOTE If you are using the HP 8886 camera dock to do this
task, see the HP 8886 Camer_ Dock User's Manual
To print images that have been unloaded to the computer, you
can use the HP Photo & Imaging software that was shipped
with the camera.
You can also connect the camera directly to any HP Photosmart
printer or to any other HP printer with front panel USB ports,
then print images selected from the camera Share menu or all
images in the camera.
To print directly to an HP Photosmart printer or to any other
HP printer with front panel USB ports:
Turn on the camera.
2 Check that the printer is turned on and is online. (There
should be no blinking lights on the printer or error messages
displayed about the printer.) Load paper into the printer, if
needed.
3 Your camera came with a
special USB cable for
connecting the camera
directly to a printer.
Connect the square end of
the USB cable to the printer.
4 Open the rubber door on
the side of the camera and
connect the small end of
the USBcable to the USB
connector on the camera.
Chapter 5: Unloading, printing, and displaying images
63
The ?rinf Setvp menu displays on
the camera. If you already
selected images to print from the
camera Share menu, the number
of images selected will be shown,
as in this example. Otherwise,
Images: ALL will be displayed.
5 Adjust the settings in the ?tint S_up menu by using the
_. v
buttons to highlight a menu option and the OK
button to change the setting for each option.
NOTE There is a print preview in the Print Setup screen
showing the page layout that will be used for printing
images. This print preview updates as you change the
settings for the Print Size and Pa_r Size.
6 Pressthe OK button to begin printing.
NOTE If you used a memory card in your camera, another
way to print images directly from the card is to insert the
card into the appropriate memory card slot available in
HP Photosmart printers. See the manual for your HP
Photosmart printer for instructions on how to do this.
64
hp photosmart 730 series user's manual
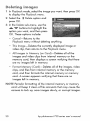
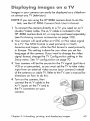
Displaying i ages on a TV
Imagesinyourcamera can easily
be displayed
as a slideshow
on almostany TV (tdevision).
NOTE If you are using the HP 8886 camera dock to do this
task, see the HP 8886 C_mero Dock User's Manual.
To connect the camera directly to a TV, you need an A/V
(Audio/Video) cable. The A/V cable is included in the
HP 8886 camera dock kit, or may be purchased separately
(see Purchasing
camera accessories on page 102).
2 Your camera will send either an NTSC or PAL video signal
to a TV. The NTSC format is used primarily in North
America and Japan, while the PALformat is used primarily
in Europe. This setting is done for you when you set the
language of the camera. If you want to change the video
signal format, change the TV Configuration setting inthe
Setup menu. SeeTV configuration on page 70.
3 Your camera will be the source for the TV signal (just like a
VCR or a camcorder), so you must set the TV to take video
input from an external video source (your camera) instead
of the antenna or cable TV. Referto the TV user's manual for
directions on how to do this.
4 Turn on the camera, then
connect the A/V cable to the
A/V inputs on the TV and to
the TV connector on your
camera.
Chapter 5: Unloading, printing, and displaying images
65
The camera starts a slideshow of each image, playing any
attached audio clip or video clip, and then fading to the next
image. You can also manually scroll through the images by
pressing the A v
buttons.
NOTE The Image DispJay on the camera turns off when the
camera is connected to a TV. However, you can still use
the ?[ayback and Sha_ menus while connected to the TV,
since the menus will display on the TV screen.
66
hp photosmart 730 series user's manual
Chapter 6:
Using the setup
enu
] To display the Se_:upmenu, open either the Ptay_ck or
Capture menu and use the _ v
Buttons to highlight the
Setup _ menu option. Then press the OK Button. (For
information about these other menus, see Using the
p_ayback menu on page 47 and Advanced capture seHings
on page 37.)
Playback Menu
2 Use the _
v
Capture Menu
buttons to scroll
through the Setup menu options.
3 Pressthe QK button to select a
highlighted option and display its
sub-menu.
4 Within a sub-menu, use the
_
buttons and the OK
button to change the setting for the Setup menu option.
5 To exit the Setup menu, highlight the _
option and press the OK button.
Chapter 6: Using the setup menu
EXiTSETUPMENU
67
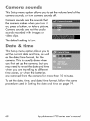
This Setup menu option allows you to set the volume level of the
camera sounds, or turn camera sounds off.
Camerasoundsare thesoundsthat
thecamera makeswhen you turn it
on, pressa button,or take a picture.
Camerasoundsare not theaudio
soundsrecordedwith imagesor
video clips.
The default setting is Low.
Oate
& time
This Setup menu option allows you to
set the current date and time, as well
as the date/time format, for the
camera. This is usually done when
you first set up the camera, but you
may need to re-set the date and time
when you are travelling to different
time zones, or when the batteries
are removed from the camera for more than 10 minutes.
To set the date, time, and date/time format, follow the same
procedure used in Setting the date and time on page 19.
68
hp photosmart 730 series user's manual
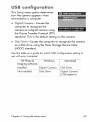
USB configuration
This Setup menu option determines
how the camera appears when
connected to a computer.
÷ Digital Camera--Causes the
computer to recognize the
camera as a digital camera using
the Picture Transfer Protocol (PTP)
standard. This is the default setting an the camera.
÷ Disk Drive--Causes the computer ta recognize the camera
as a disk drive using the Mass Storage Device Class
(MSDC) standard.
Usethis table as a guide for which USBConfiguration setting to
usewith your computer:
........
Imaging software:
Not installed
WJnd_:
_ows
Disk Drive
Chapter 6: Using the setup menu
Mac!ntosh
i Digital Camera
(OSX systems)
69
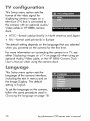
TV configuration
This Setup menu option sets the
format of the video signal for
displaying camera images an a
television (TV) that is connected to
the camera with an optional Audio/
Video cable or HP 8886 camera
dock.
NTSC--format used primarily in North America and Japan
PAL--format used primarily in Europe
The default setting depends on the language that you selected
when you powered on the camera for the first time.
For more information on connecting the camera to a TV, see
either Displaying images o_ a TV on page 65 when using an
optional Audio/Video cable, or the HP 8886 Camora Dock
U_r_ Manual when using the camera dock.
This Setup menu option sets the
language of the camera interface,
including the text in menus and on
the Image Display. The default
setting is English.
To set the language on the camera,
follow the same procedure used in
Choo_ir_g _helanguage on page 18.
70
hp photosmart 730 series user's manual
Move
images
to card
This Setup menu option Jetsyou move images from the
camera's internal memory to a memory card. It appears in the
Setup menu only if a memory card is installed and internal
memory contains at bast one image.
If there is room to move all the
internal fibs to the memory card,
then this confirmation screen
appears. If you select Yesto move
images, they are moved to the card,
and aH moved images are deleted
from internal memory.
If only some of the images will fit on
the memory card, this screen
appears which allows you to move
as many images as the card will
hold. The moved images will be
deleted from internal memory, and
the images that could not be moved
will be retained in internal memory.
NOTE When a memory card is inserted, only the images on
the card can be viewed on the Image Display. To view the
images stored in internal memory, remove the memory
card.
Chapter 6: Using the setup menu
71
72
hp photosmart 730 series user's manual
Chapter 7:
Troubmeshooting
Problems
and
and
solutions
NOTE If you still cannot solve your problem after reviewing the
troubleshooting information provided in the following
table, you can run diagnostic tests on your camera to try
to isolate and solve the problem yourself. The diagnostic
tests for this digital camera are provided on the following
website:
Pr°b!emR°ss!b!ecaU
S°!U!!°n
............. .........
are
Oil
r_
are functioning
incorrectly,
dead, are
installed
_
The batteries
@x_s no
_
}le cemer_
incorrectly,
are missing.
or
iThe charge in the batteries can be
ilow or completely drained. Try
installing new or recharged
ibatteries.
i
iEnsure that the batteries are
i inserted correctly.
iDo not use ordinary
alkaline
ibatteries. For best results, use
iphoto-lithium batteries or
irechargeable NiMH batteries. If
iyou must use alkaline batteries, use
high-grade
varieties.
Chapter 7: Troubleshooting and support
"ultra" or "premium"
73
Prob em
Poss_be cause So ut_on
do_s not t;_n _:adapteris not adapter is:
on
connected to
® connectedto the power adapter
ilthe camera, or
connectorof the camera
is not plugged _ plugged intoa working electrical
into a power
outlet
i outlet.
power adapter not damaged or defective and is
is not
plugged into a working electrical
functioning
outlet.
iIcorrectly.
The memory
Remove the memory card.
i card is
defective or
i contains
corrupt images.
_pac_ the The NiMH
camera
iIbatteries you
batte i_ts
are using were
recharged
incorrectly, or
have drained
ion their own
because they
have not been
i used lately.
74
When NiMH batteries are brand
new or have not been used in
several months, they should be
charged and fully drained 3-4
times to reach optimum capacity.
Also, NiMH batteries discharge
on their own when not in use and
when not installed in the camera.
So if you have not usedthem in a
week or more, they may benefit
from being charged.
hp photosmart 730 series user's manual
l Extended
came[a
Iba er es
Image Display
use for iw_
recording,
excessive flash
i use, and
excess
ive
izoommg
consume a lot
of battery
power•
Minimize the use of Lice Viiew and
video, especially if using ordinary
alkaline batteries• Also use the
flash and zoom only when
: necessary.
Use an HP AC power adapter to
iIpower the camera when you are
i using the Image Display for an
ilextended period of time, or use
the viewfinder instead of the
i linage Display whenever possible.
i Do not use ordinary
alkaline
i batteries. For best results, use
i photo-lithium batteries or
i rechargeabb NiMH batteries. If
iyou must use alkaline batteries,
i use high-grade "ultra" or
i'premium"
i page 99)
varieties. (See
he c_smera
Rechargeable
Ibatt_Me wi/
batteries are
ii not inserted,
i lnstdl NiMH batteries• Lithium
iand alkaline batteries cannot be
i recharged•
already
charged,
ithe batteries were recently
icharged. Try charging them
iagain after they have drained
Chapter 7: Troubleshooting and support
75
Problem
i Possiblecause Solution
ba_e_es _e_ is too low for
charging to
start.
charge batteries that may be
damaged or over-discharged.
Remove the batteries from the
camera and charge them in an
external battery charger, then try
them in the camera again. If this
does not work, it is likely that one
or moreof the batteries are bad.
Purchasenew NiMH batteries
and try again.
iThe wrong AC Use only the HP AC power
power adapter adapter approved for usewith
is being used. this camera. See Purchosing
The batteries
i are damaged
or bad.
LSB igf_
does not
b k os i
::recognize that
the bott_ _} there are no
o,e bring
batteries
installed.
b_ t_e_ea_ i
no
bq_te_'ies
iestd ed
76
NiMH batteries degrade over
time and can fail. If the camera
detects a problem with the
batteries, it will not start charging
or will stop charging prematurely.
Purchasenew batteries.
harmlessand should stop after
5-30 minutes.
i
_
hp photosmart 730 series user's manual
ThewHol_g
date and/or
ne s
_own
liThebatteries
died or were
removed from
the camera for
too long.
The date and time will be
_maintainedfor about 10 minutes
without batteries installed. Reset
ithe date and time by using the
_iDa_,_
& /im_ option in the S_ _lp
::menu. (Seepage 68, 68)
}_ c:am_r_ The camera is ::Turnon the camera, or turn it off
do_s no
turned off or
and then on again.
_has shut down.
a bullock,
connected to a iexcept for the • ON/OFFswitch,
computer,
ido not respond when the camera
i is connected to a computer.If they
i respond, it is only to turn the
i lmage Display on if it is off, or, in
some cases, turn the Image
The batteries
are drained.
::lmagesin the
iImemory card
may be
corrupted.
The camera
_has stopped
operating,
Replaceor recharge the batteries.
Removethe memory card.
Resetthe camera by holding the
• ON/O_Fswitch in the ON
oosition until the Image Display
turns on.
Chapter 7: Troubleshooting and support
77
Problem Possible
causeSolution
occ_
us
ineeds
timeto
beh,_,eeuilockfocus
and
p_ssir_g
he iexposure.
arid he
taking a long
cGme_
pete e_
The camera is it will take longer to take a picture
iset to I_edeye with Red eye Red _ciot setto On.
Reducta .
The shutter is delayed becauseof
the additional flash. In turn, make
sure your subjectswait for the
second flash.
/he c_smera You did not
Pressthe Shutter button all the
do_s not take÷ pressthe
way down.
o pictu_
Sh_te, button
who,/I! pg_;s_;::hard enough.
the Sh;fie,
b_ton
The memory
Unload images from the camera
storage is full to your computer,then delete all
if(either internal images from internal memory or
j or card),
the memory card. Move images
from internal memory to a
memory card to free up internal
memory, or replace the card with
a new one.
The memory
Switch the locking tab on the
card is locked, memory card to the unlocked
position.
The flash is
Wait until the flash has recharged
.............................................................
rechc_[g!ng:
.......................
be!€_[e!ak!ng €_nc_!l_e[
P!cture:....................
78
hp photosmart 730 series user's manual
does not !ako still saving the
last picture you
we
p_oss took.
th@Sh_tt@
im ge
buttol
memory
(internal or
My imag_ s
camera to finish processing the
image, and then pressthe Shutter
button.
..............
page 50)
i
Your subject
Use Macro mode for close-up
was too closeto shots. Do not try to get closerthan
ilthe camera
the camera's minimum focus
You moved the i Hold the camera steady as you
camera while iipressthe ShJtt_l!button or use a
you took the
tripod.
.................................
i The light is low iiln dim light, the camera requires
and the flash is a longer exposure. Usea tripod
set to Fash Off. to hold the camera steady,
i improve lighting conditions, or
jthe flash To Fash Oil (see
::page 30).
Thecamera
i UseFoc;s Lock. (See page 23.)
focused on the i
wrong thing, or i
was unable to
focus.
Chapter 7: Troubleshooting and support
79
Problem
_sil_i_use
Solution
My mage i
tao L_right
Theflash
provided too
Use the Fk_shOf_ setting (see
Using the Hashon page 30).
You were too
close to the
subject to use
::theflash.
Move back from the subjector set
the flash to HashOff and take the
picture again.
artificial source
ilother than the
flash provided
too much light,
different angle. Avoid pointing
the camera directly toward a
bright light or reflectivesurface on
a sunny day. Usethe Fbsh ('M
setting (seepage 30) or adjust
the ExposureCompensation (see
page 38).
The scenehad Decrease the Zxposure
;many dark
Comy_e satien (see page 38) so
objects, such as the dark objects in the scenewill
j a black dog on not look "washed-out".
a black couch.
80
hp photosmart 730 series user's manual
_oodark
enough light,
iconditions to improve, add
_ ndirect lighting, or adjust the
i page 38).
on, but the
subjectwas too
ifar away.
iI
your subjeci is withit]
the flash working distance (see
i Append x B: Specifications on
i page 105) or try turning flash off
i!(will require a longer exposure).
]_tiingi]ee.............
iibehind the
subject.
page 30) to brighten the subject.
!Or adjust the Expos_,_
jCor_!_el'rsatk_n(seepage 38).
j Your finger
blocked the
flash,
j Be sure to move your fingers
;;away from the flash when you
take a picture.
i
i
i The scenehad Increasethe Exposul!e:
many light(ompensa oil (see page 38) so
coored objects, the ght-colored objects in the
i_suchas a white Jscenewill not look "muddy."
Chapter 7: Troubleshooting and support
81
Error
essages
D P_lIED
Ca_era s
on the
too low b
continue
Bakeries ar_> Battery power is
too ow f_'_ too low to use
_ve V _v,_
_ve V _v,_on the
Image Display.
camera
i batteries, or usean
ioptional HP AC adapter.
ilTakepictures with the
optical viewfinder instead
of the Image Display.
Replace or recharge
batteries, or usean
iioptional HP AC adapter.
k_wt_,_ill,cord _ too low and the ;;thebatteries.
camera will shut
down soon.
occurred during
charging, an AC
power disruption
occurred during
charging, the
wrong AC power
adapter is being
used, batteries
are defective,or
no batteries are
installed in the
camera.
82
batteriesa couple of times.
If that fails, purchase new
batteries and try again.
iI
hp photosmart 730 series user's manual
Unsupported cad The card in the
iImemory slot is
not a memory
card or is not a
supported
Ensure that the memory
card is the proper type for
iyour camera. (See
iAppondix B Specifications
on page 105.)
Cal!d is wral_g The card is an
fo _mat
unsupported
ilformat, such as
FAT32.
Press OK (this should
display the _:armatCal!d
iscreen) or format the
i memory card by using the
i _'_ormatCard option in the
j Ddete menu. This will
_!delete all data on the card.
j
'_e card ,eq_ _s The memory card j PressOK (this should
iIneeds to be
i display the FormatCa,d
formatted,
i screen)or format the
j memory card by using the
i _:omat Cad option in the
i Ddete menu. This will
ildelete all data on the card.
unl!eda :_e
is not a
supported card
or the card is
corrupted,
i card is the proper type for
iyourcamera.(SeeStorage
i on page 105.) If it is the
i proper type, it is probably
i corrupted. Replacethe
imem°ry
card:
...................
Unak:*e to format !iThememory card Replacethe memory card.
is damaged or i
................................................................
uns,pptr,td
.......................
..............................
Chapter 7: Troubleshooting and support
83
on the side of the
memory card is
in the locked
position,
nsu fi ::i_n
Not enough
nemory on He room tocopy any
c_,d
files from internal
memory to the
card.
ithe unlocked position or
i insert a new card.
i
i
Unload images from the
camera to your computer,
then delete all images on
ithe memory card. Or
i replace the card with a
new
one.
was removed
before the
camera was
finished writing
to the card.
Memoly/USB light stops
ilblinking before removing
ithe card from the camera.
1stscreen:
Memory card
No ca,d in
was removed
_amc,'_
before the
2ndscreen:
camera was
Fr_orsavng
finished writing
image
to the card.
H_._ase
,eins_ he
Reinsert the memory card.
Always wait until the
iiMemo_y/U!:_Blight stops
iblinking before removing
ithe card from the camera.
ccglid
nvdid date
84
An attempt was iIPressOK to clear the
made to enter an message, and then entera
invalid date (such ivalid date.
as 2/31/2003).
hp photosmart 730 series user's manual
Youtriedto
Press
C)K
toclear
the
ilmagnify,
rotate,message.
You
cannot
do
toprintanimage
those
operations
onflies
thatwastaken thatwere
notcreated
by
:_with
another yourcamera.
icamera.
_ m_mo
y ilininternal iibydeleting
some
images,
(oncG_t) imemory
oron or perform
therotation
C®l_m_n_f_
on Camera
_r_
received
on errorcode
ifrom the HP
software on the
Disconnect the USB cable
(or lift the camera out of
ithe HP camera dock), then
ire-connect
and try again.
i computer.
recharging
iflash,
the
i the flash when the
i batteries are low. If you
i see this message a lot, you
i may need to replace or
i recharge [he ba!!er!es ...................
C_d
or
Memory ul
Insufficient room
in internal
memory or on
Unload images from the
:camera to your computer,
then delete all images
ilthe memory card from
to save more
images,
_
Chapter 7: Troubleshooting and support
the memory card or
i internal memory. Or put a
i new memory card in the
camera.
85
Message
No I_gc _
memo_'y
or
No _agesor_
c_nd
image
PossibleCause
Solution
There are no
Takesome pictures or
images or video ::videoclips.
clips in the
camera and you
are trying to
review them.
from copying
images to the
memory card
from a computer,
or a corrupted
image caused by
the camera not
shutting down
properly.
Ul_ak,leto focus The subjectdid
not provide
enough contrast
for the camera to
the images copied on the
iimemory card. Also, do not
remove batteriesor the
ilmemory card when the
icamera is turned on.
iI
UseFocusoc before
iltaking the picture (see
page 23).
i
Shddr_g_al_d Camera is
_iCameramust be held very
icon
preparing to take still due to long exposure.
Focustoo fa_
Thefocus
distance is
beyond where
the camera can
Make sure the camera is
focus.
86
hp photosmart 730 series user's manual
Focus
becose Thefocus
Setthecamera
toMac_o
ildistance
iscloser
focus,
orifsettoMecro
thanthecamera
ifocus,
move
further
away
canfocus. ifromthesubject.
See
iUsing
mac_o
mode
on
page36.
device
L _alde to
col_mun cetewt
p,i_ter
connected to a is connected to a
USBdevice that it !isupported printer or
does not
:_computer.
_:recognize.
_:
There is no
connection
between the
camera and
_rinter.
i Make sure the cable is
ic°nnected between the
icamera or HP 8886
i camera dock and the
i printer. If that does not
iwork, turn off the camera
iand disconnect it. Turnthe
i printer off and then on
i again. Re-connectthe
camera and turn it on.
....................
......
printer is either :;connectedto a supported
j turned off or not i printer and that the printer
j connected to the j is turned on.
camera.
Printsizeis larger Change either print sizeor
i than paper size i paper size in the Print
seected pepe_ i in the P,int Setup i Setup menu.
Chapter 7: Troubleshooting and support
87
Message
Possibte
Cause I£oJu_i_n
unsupported
device,
supported printer, such as
an HP Photosmart printer
ior another HP printer with
ifront panel USB ports. Or
iconned the camera to a
i computer and print from
there instead.
i
D seuf_ogc_ photo The selected
r%< o_ e_.ct
paper size
smal_rpaF_
size cannot be used
with the printer
photo tray.
Privateertolp _ove
i open
m ssing print
camid%_
iDisengage the printer
i photo tray, or change the
ipaper size.
The printer is
Close the top cover of the
open.
printer.
cartridge
is the
incorrect model
cartridge,
turn the printer
off, then turn it back on.
or is missing.
P_te_ has a
pape, _m
Print_:_rsoul
p_@el!
of
There is a paper
jam.
Turn off the printer. Clear
;;the paper jam, and then
turn on the printer.
Your printer is out Load paper into the
of paper,
i printer, and then press the
iOK or Co t hue button on
ithe printer. To cancel the
print job, press the OK
88
hp photosmart 730 series user's manual
Printing
cal_ce
edTheprintjobhasiPress
theQKbutton
onthe
::been
canceled,
icamera.
Complete
the
printrequest
again.
At_ly
er_'o_
_cedeThecamera
mayjTurn
thecamera
offand
_umf_
sthat have
a hardware
ithen
onagain.
Ifthe
appear or firmware problem
persists,
callHP
...........................................................................
J£r_oblem:
......................................
.........
Chapter
7:Troubleshooting
andsupport
89
Error
messages
on the
computer
Connect on
The camera
i Try connecting the camera
Ibewcen hc
might be
ilconnected to a
i direcfly to the computer,
i or disconnect other
_d computer
_ed
icomputer
ilthrough a USB
i devices attached to the
iUSB hub.
hub.
/he so_,_._
_'ar_l_ot_ i_
;;The computer
needs to write
iiMake room on the internal
memory or memory card.
he Share M_nu
n_orma_on _om
files to memory
duringHP st_l_
If you are using an SD
memory card, unlock it by
you camer_
Shae setup, but switching the locking tab
the memory is
on the card to the
either full, or the unlocked position.
iimemory card is i
locked.
Compu _r c_n c_t The camera is
ind he
turned off.
iTurn on the camera.
con_l_ct_d
The camera is
Try connecting
c_ I_er_
not working
icorrectly.
camera directly to an
HP Photosmart printer or
an HP printer with front
panel
the
USB ports, and
print an image. This will
ver fy that the image,
memory card, USB
connection, and the USB
cable are functioning
correctly,
or not.
ThecaBieisnot Makesu_e
ihaithecabieis
90
connected
ifirmly connected to the
correctly,
computer
and camera.
hp photosmart 730 series user's manual
Message
PossibteCause
/Solution
set to the Di!4 QI Con_i{_ur<stion setting to
Com_sh_asetting
psik/}ri_
In the U[_B
menu. (See USB
in the _h_up
sub-menu of the
Setup menu. But
the computer
cannot
recognize the
camera as a
page 69.) This allows the
camera to appear as
ilanother disk drive on the
computer so that you can
easily copy the image files
from
the camera to the
i
digital camera,
ilhard drive of your
computer.
The camera is
Connect the camera
connected to the directly to a USBport on
computer
the computer.
through a USB
hub, and your
USB hub is not
compatible with
the camera.
_
You are using
the HP 8886
camera dock
and forgot to
press the Save/
Print button.
iPressthe _b_sw_/l%
r_t
i _/_
button on the
idock.
i
9_ m_mo_y
......................
card is locked
(SD cards only)
The USB
connection
failed.
Chapter 7: Troubleshooting and support
6L;oi_.........
the memory card to the
unlocked position.
iReboot the computer.
91
Getting
assistance
This section contains support information for your digital
camera, including support website information, an explanation
of the support process, and support phone numbers.
HP accessibility
website
Customers with disabilities can get help by visiting
www_hp_comihpinbicommur_i_yiaccessibili_yiprodserv.
HP photosmart
website
Visit www pho_osmarLhp_comor www.hp_comiphotosmart
the following information:
for
® Tips on using your camera more effectively and creatively
HP digital camera driver updates and software
Register your product
® Subscribe to newsletters, driver and software updates, and
support alerts
Support
process
The HP support process works most effectively if you perform
the following steps in the order specified:
]
Reviewthe troubleshooting section of this User's Manual,
which starts on page 73.
2 Access the HP Consumer Support Website for support, tf
you have access to the Internet, you can obtain a wide
range of information about your digital camera. Visit the HP
website for product help, drivers, and software updates at
92
hp photosmart 730 series user's manual
Support is available in the following languages: Dutch,
English, French, German, Italian, Portuguese, Spanish,
Swedish, Traditional Chinese, Simplified Chinese, Japanese,
Korean. (Danish, Finnish, and Norwegian support
information is available in English only.)
3 Access HP e-support. If you have access to the Internet,
connect with HP via e-mail by going to: www..hp corn/
support. You will receive a personal reply from an HP
Consumer Support technician. E-mail support is available in
the languages listed at that website.
4 Contact your local HP dealer. If your digital camera has a
hardware failure, take it to your local HP dealer for a
solution. Service is free during your digital camera's limited
warranty period. After the warranty period, the dealer will
quote a service charge.
5 Contact HP Consumer Support for support by phone. Please
consult the following website to check the details and
conditions of phone support in your country/region:
www hp.com/supporL As a part of HP's continuing efforts
to improve phone support information services, we advise
you to check the HP website on a regular basis for new
information regarding service features and delivery. If you
cannot solve the problem using the above options, call HP
while you are in front of your computer and digital camera.
For faster service, please be prepared to provide the
following information:
The digital camera's model number (located on the front
of the camera)
The digital camera's serial number (located on the
bottom of the camera)
° The computer's operating system
Chapter 7: Troubbshooting and support
93
° The version of the digital camera software (located on the
camera's CD label)
° Messages displayed at the time the situation occurred
The applicable conditions for HP phone support are subject to
change without notice.
Telephone support is free from the date of purchase for the
period specified unless otherwise noted.
....
..........................................
Free Phone
Locations
Support Period
Africa
Phone
30 days
Asia Pacific
1 year
Canada
1 year
Europe
1 year
Latin America
1 year
Middle East
30 days
United States
1 year
support
in the
Uni_÷d
States
Support is available both during and after the warranty period.
Within the period of your warranty, telephonesupport is
providedfreeof charge. Call (208) 323-2551. If this is a long
distancecall for you, long distancechargeswill apply. US
phone support is available in both Englishand Spanish24
hoursa day, 7 days a week (days and hoursof supportmay
changewithoutnotice).
After the warranty period, call (208) 323-2551. Charges are
$25.00 per issue, and are charged to your credit card. If you
think your HP product needs service, call HP Consumer
Support, which can help determine if service is required.
94
hp photosmart 730 series user's manual
Phone support in £urope
and Africa
Middme
HP Consumer Support phone numbers and policies may
change. Visit the following website to check the details and
conditions of phone support in your country/region:
Algeria +213 (0)61 56 45 43
Austria +43 (0)820 87 4417
Ba}_in
+973 800 728
Belgium 070 300 005 (Dutch)
070 300 004 (French)
Czech Republic +42 (0) 2 6130 7310
Denmark +45 70202845
Egypf +20 02 532 5222
Finland +358 (0)203 66 767
France +33 (0) 892 6960 22 (Euro 0.34/min)
Germany +49 (0) 180 5652 180 (Euro 0.12/rain)
Gr_e
+30 10 60 73 603
Hungary +36 (0) 1 382 1111
kelar_d 1890 923902
_rael +972 (0) 9 830 4848
l_aly 848 800 871
Luxemburg
900 40 006 (French)
900 40 007 (German)
Moracco +212 224 04747
Chapter7: Troubleshootingand support
95
NetheHands 0900 2020 165 (Euro 0.10/minute)
Norway +47 815 62 070
Roland +48 22 865 98 O0
Po4ugaJ 808 201 492
Romania +40 I 315 44 42
Russian Federation +7 095 797 3520 (Moscow)
+7 812 346 7997 (St Petersburg)
Saudi Arabia +966 800 897 14440
Slovakia +421 2 6820 8080
South Akica 086 000 1030 (inside RSA)
+27-'J "J258 930"_ (outside RSA)
Spain 902 010 059
Sw_der_+46 (0) 77 120 4765
Switzerland
0848 672 672 (German, French, Italian-Peaktime 0.08 CHF/Outside peak 0.04 CHF)
Tunisia +216 1 891 222
Turkey +90 216 579 71 71
Uk_ine +7 (380 44) 490-3520
Unibd Arab Emira_'es800 4910
United Kingdom +44 (0)870 010 4320
96
hp photosmart 730 series user's manual
Other
phone
suppor
wor dwid÷
HP Consumer Support phone numbers and policies may
change. Visit the following website to check the details and
conditions of phone support in your country/region:
Arger_fina +54 0 810 555 5520
AusfraEia +61 (3) 8877 8000 (or local (03) 8877 8000)
Brazil +55 (11) 3747 7799 (Grande Sao PauJo)
+55 0800 157751 (outside Grande Sao PauJo)
Canada +1 905 206 4663 (during the warranty period)
+1 877 621 4722 (after the warranty period)
Central America and the Carib_an
+1 800 711 2884
Chib +56 800 22 5547 (Post-sabs BusinessComputing
+56 800 360 999 (Post-salesHome Computing)
China +86 (1 O) 6564 5959
CoJ®mbia +57 9 800 114 726
Gua_r_ala +502 1 800 999 5105
Hong Kong SAR +852 3002 8555
_ndia 1 600 112267 or +91 11 682 6035 (Hindi & English)
_ndo_e_ia +62 (21) 350 3408
Japan 0570 000 511 (inside Japan)
+81 3 3335 9800 (outside Japan)
Kor_; Republic of +82 (2) 3270 0700 (Seoul)
0 80-999-0700 (outside Seoul)
Malaysia +60 1 800 805 405
Chapter 7: Troubleshooting and support
97
Me×ico +52 58 9922 (Mexico City)
+52 O1 800 472 6684 (outside Mexico City)
New Zealand +64 (9) 356 6640
Peru +51 0800
10111
?hilippines +63 (2) 867 3551
?uerfa Rico +1 877 2320 589
Singapore +65 6272 5300
Taiwan +886 0 800 O10055
Thailand +66 (2) 661 4000
United Sfa_es+1 (208) 323-2551
Venezuela +58 0 800 4746 8368
Vietnam +84 (0) 8 823 4530
98
hp phofosmart 730 series user's manual
Appendix
A:
Bafferies
and
Managing
batteries
camera
When the batteries are removed from the camera, the date and
time settings are preserved for approximately 10 minutes. If the
camera is without batteries for longer than 10 minutes, the
clock is set to the last date and time at which the camera was
used. You may be prompted to update the date and time.
The following battery levels may be displayed on the Status
LCD and Image Display.
Icon
i
Batteries have 30-100 percent battery life remaining.
Batteries have 10-30 percent battery life remaining.
Batteries have lessthan 10 percent remaining.
Camera will power down soon. Live View is disabled.
iCamera is operating on AC power
The camera uses two AA batteries. Do not use ordinary
alkaline Batteries. For best results, use photodithium or
rechargeable NiMH Batteries. If you must use alkaline
batteries, use high-grade "ultra" or "premium" varieties.
NOTE If you do not intend to use your camera for extended
periods of time (more than a month), we strongly
recommend that you remove the batteries.
Appendix A: Batteries and camera accessories
99
Extending
baHery
_if÷
® Minimize the use of Live View and video, especially when
using alkaline batteries.
Use the viewfinder to frame pictures instead of the Image
Display. Leave the Image Display off whenever possible.
® Use zoom only when necessary.
® Use the Auto flash setting rather than FJashOn.
® Minimize power cycling. If you expect to average more than
one picture every five minutes, leave the camera on rather
than turning it off after each shot. This minimizes the
number of times the lens has to extend and retract.
Use an optional HP AC adapter or HP 8886 camera dock
when the camera will be on for extended periods of time, or
when unloading pictures to your computer, printing, or
connecting to the TV.
100
hp photosmart 730 series user's manual
Rechargeab_÷
batteries
Nickel Metal Hydride (NiMH) batteries can be recharged by
using a battery charger. NiMH batteries can also be recharged
in the camera when the camera is connected to an optional
HP AC adapter or HP 8886 camera dock. Batteries are fully
recharged via the optional HP AC adapter or camera dock in
15 hours.
Some things to keep in mind when using NiMH batteries are:
÷ Always recharge both NiMH batteries at the same time.
One low-charged battery will reduce the battery life for both
Batteries in the camera.
÷ For NiMH batteries to reach optimal capacity and
performance, they should first be discharged completely
and recharged four separate times.
÷ NiMH batteries discharge when not in use, whether they are
installed in a device (such as in the camera) or not. If they
have not been used for more than two weeks, recharge
them before using them again.
P@W@_
¢OnS@FVa_iOn
To conserve battery power, the Image Display turns off
automatically if there is no button activity for 60 seconds. If no
buttons are pressed for 6 minutes, the camera turns off (unless
it is printing or connected to a computer or TV).
Appendix A: Batteries and camera accessories
101
Put€has(rig
You can purchase
accessories
camera
additional
accessories
for your camera from
your local retailer or online at www.J'_pshoppir_g com. Some
accessories for this digital camera are listed below:
® HP Phofosmart
dock,
audio/video
*
8886
camera
remote control,
cable,
dock (includes a camera
two rechargeable
USB cable,
NiMH
batteries,
and an AC power adapter):
United States and Canada--C8886A
#A2L
° Mexico, Brazil, Chile, Argentina, and Uruguay-C8886A #ABM
°
Korea, Australia, and New Zealand--C8886A
#UUF
Europe (except for the United Kingdom, see the next option
be!ow)--C8886A #AC2
°
United Kingdom and South Africa--C8886A
HP Photosmart
(C8889A
Digital
Camera
for North America,
Europe, and C8884B
Contents include:
°
Padded camera case
°
Battery recharger
#ABU
Deluxe Starter Kit
C8884B
#UUS for continental
#ABU for the United Kingdom).
° 4 rechargeable NiMH batteries
°
DC car adapter for battery recharger
*
32 MB SD memory card
® HP Photosmart
(Y1789B,
Digital
Camera
Starter Kit
option #A2L for North America,
#UUS for
continental Europe, and #ABU for the United Kingdom).
Contents include:
°
°
Padded camera case
Battery recharger
4 rechargeable NiMH batteries
102
hp photosmart 730 series user's manual
÷ HP Photosmart 3.3V AC power adapter (HP supports only
HP AC power adapters and other accessories expressly
approved by HP):
United Statesand Canada-C8912 #A2L
Korea,Australia,and New Zealand--C8912 #UUF
Europe--C8912 #UUS
÷ Memory card--Secure digital (SD) or MultiMediaCard TM
(MMC) 128 MB is the largest memory card tested by HP.
Larger sizes of cards have not been tested, but they should
work - use at your own risk. This product only supports the
use of MMC memory cards that have been verified
compliant to the MultiMediaCard TM specification as of
January 2000. Compliant MMC memory cards have the
MultiMediaCard TM logo on the card. The following memory
cards are available from HP:
32 MB SD card--C8895A
64 MB SD card--C8896A
128 MB SD card--C8897A
÷ HP Photosmart padded camera case (C8905A)
÷ HP audio/video accessory cable
to connect to a television (TV).
NOTE You can also use any Yadapter audio cable with dual
RCA plugs on one end and a 1/8 inch (3.175 ram)
mini-stereo jack on the other end. You will also need an
adapter plug that accepts a 1/8 inch (3.175 ram)jack
and fits into a 3/32 inch (2.38 mm) jack.
Appendix A: Batteries and camera accessories
103
104
hpphotosmart
730series user's manual
Appendix
R_olution
B:
Still Pictures:
3.34 MP (2140 by 1560 total pixel count)
::÷ 3.24 MP (2088 by 1550 effective pixel count)
_Video clips:
320 x 240 total pixel count
.....................................
........
;iCCD
_30-bit(10 bits by 3 colors)
::g
Slot for memory card; Secure Digital (SD) or
MultiMediaCard TM (MMC) memory card
supported (see page 103)
Number of images that can be saved in memory
(internal
Lens
or card) depends on the image quality
iIFocal length:
Wide-5.8
mm-17.4
::_ Telephoto--17.4
mm
mm
÷ 35 mm equivalent approximately 38 mm- 114
mm)
_F-Number:
Wide--f/2.6
to f/4.9
ie Telephoto--f/5.0 to f/9.0
Viewfinder
Zooming
Appendix B: Specifications
optical viewfinder
105
F_us
ie Wide--38mm
ie Telephoto--]
14mm
IITTL
auto
focus.
Focus settings:
e
Normal (default)--auto
focus range of
0.4 m (15.75 in) to infinity
Macro--auto focus range of 0.1 to 0.5 m (4 to
19.7 in), zoom range of lx to 5x
e
Shufler speed
1/1500
Trip_xJ mount
Yes
to 1/3
seconds
Builtdn flash
!i1 to 6 second recharge
Ftash working
distance
i3.0 m (9.8 ft) (guide number 7.8) at wide zoom
_!setting
External fk'_sh
i:No
Flash On, Night with Red-eye Reduction, Flash
Off
_mage DispkJy
il .5-inch LED backlit, TFT LCD with 61,380
pixels
quality
setting, remaining
image count, video
timer, video capture, audio capture, Self-Timer,
Burst, Macro, Action, Landscape, Portrait,
.....................................................................
" r'erturesttt!'
.........................................
g
106
hp photosmart 730 series user's manual
Feature IDescription
Image
o:_pture
¢ Stili(default)
m_@s
@
ie
Self-Timer-- 10 second delay standard (both sti!l
and video)
Burst--0.9 frames per second, maximum of 6
images
e Video-- 19 frames per second streaming to
memory, maximum length limited only by
available memory
e
Still pictures--Audio can be captured with each
still picture by holding down ShuHer button or
added later (in the Playback menu), maximum
length limited only by available memory
ie Video-Audio
captured automatically with
...................................................
vide_
Exf_sureMode
Auto (default), Action, Landscape, Portrait,
......................... 4F: and
!d4:9!
................
iCan be set manually from -2.0 to +2.0 EV
Compensation
(Exposure
White
iAuto (default), Sun, Shade, Tungsten,
Balartce
sefings
FIuorescent
settings
iz
Value) in 0.5 EV increments
iAuto (default), manually selectable100,
_ttings
200,
400
::Full Color (default)
**
-- Better (default)
i _ -- Good
Saturation
_iLow, Medium
(default), High
Sharpness
Low, Medium
(default), High
Cont_ast
Not
adjustable
Appendix B: Specifications
107
Yes,approximately
3xand6x
i®JPEG
(EXIF)
forstill
format
nterfaces
_:e
images
AVI for video clips
e USB to a computer or HP Photosmart, some HP
DeskJet, and some HP All-in-One multi-function
printers
ile Audio/Video out to TV
e DC IN 3.3Vdc @ 2500mAs
e
Standards
Dimensions
range
HP 8886 camera dock
::e PTP(15740)
e MSDC transfer
e
NTSC/PAL
_ie
e
JeEG
AVl
e
DPOF 1.1
ie
EXIF2.2
e
DCF 1.0
4.1 in (L) by 1.8 in (W) by 2.8 in (H)
Operational:
e 5°Cto45
e
°C
(41 °Fto113
°F)
15% to 85% relative humidity
_iStorage:
e
e
108
-30 ° C to 65 ° C (-22° F to 149 ° F)
15% to 90% relative humidity
hp photosmart 730 series user's manual
Power
Thecamera
hasa maximum
steady
state
power
consumption
of2.64Watts
(800mA
@3.3Vdc).
Power
sources
include:
2AAbatteries
(2non-rechargeable
AA
batteries
included).
Acceptable
bakeries
include
photo-lithium,
'uJtra'
or'premium'
grade
high
energy
alkaline,
orrechargeable
NiMH.
NiMH
batteries
canberecharged
inthecamera
using
theoptional
HPACadapter
orHP8886
camera
dock.
Optional HP AC adapter (Input: 100-240Vac;
Output: 3.3-3.7Vdc @ 2500mA).
United States and Canada--C8912
Europe--C8912
#A2L
#UUS
Korea, Australia, and New Zealand-C8912 #UUF
e
Optional HP 8886 camera dock (different
product numbers for each area - see Percha_ ng
e_me_l aeces_orie_ on page 102).
÷ DC car adapter
Slow trickle recharging in camera with optional
iHP AC adapter or HP 8886 camera dock (100%
in 15 hours).
i
Automatic
advanced power management.
............................
Appendix B: Specifications
.....................
109
110
hpphotosmart
730series user's manual
A
AAbatteries
99
ACpower
adapter
connector
oncamera
12
HPpartnumber
109
purchasing
103
accessories
forcamera
102
action
exposure mode 34
AE Metering, setting 41
AF viewfinder light 10
alkaline batteries 99
description 31
blinking lights
Memory/USB 11
Self-Timer 12
viewfinder 10
bonus software 21
brackets on display screen 26
brightening an image 38
burst mode 36
buttons on camera 10
Aperture Priority (Av) setting 34
Arrow buttons 11
C
audio clips
record 12, 32, 51
Camera Sounds setting 68
camera specifications 105
camera, turn on/off 18
audio/video (TV)
cable 103
connector 65
connector on camera 12
automatic exposure, override 33
Av Aperture Priority setting 34
B
batteries
door on camera 13
extend life of 100
icons 99
install 16
levels 99
rechargeable 101
types to use 99
Best quality setting
description 31
Better quality setting
Index
camera accessories 102
Capture menu 37
capture modes 33
close-up pictures 36
compression format 108
computer
connect camera to 61
connections
as a USB Mass Storage Device
Class (MSDC) 69
to computer 61
to printer 63
to TV 65
connectors
AC power adapter on camera
12
audio/video (TV) 12, 65
camera dock 13
USB 12
111
consumer
support
92
DPOF 55
size versus quality 31
flash
Button 13
D
darkening an image 38
Date & Time setting 19, 68
delete
audio clips 51
from memory card 50
images during instant review
23
video clips during instant
review 24
diagnostic tests for camera 73
Digital Print Order Format 55
digital zoom 28
disk drive, camera as 69
display images and video clips
on TV 66
range 106
settings 30
using 30
fOCUS
lock 23, 26
range 106
setting 36
focus Brackets, using 26
format memory card 50
full batteries icon 99
G
Good quality setting
description 31
display, using 25
DPOF 55
H
E
e-mail
help from consumer support 92
HP AC power adapter
connector on camera 12
addresses, customizing the
Share menu 56
purchasing 103
HP camera dock
connect to 13
images from computer 62
empty Batteries icon 99
enlarge image 52
description 9
clock insert 9
error
purchasing 102
HP Instant Share
on computer 90
Exposure Compensation setting
38
description 9, 53
Share button 11, 53
Share menu 54
turn on/off 53
HP web sites 92
messages
on camera 82
Exposure Mode setting 33
F
flies
delete from memory card 50
112
hp photosmart 730 series user's manual
I
icons
AEmetering
42
settings
battery Jevels99
capture mode settings
EV compensation
33
38
flash settings 30
image quality settings 31
in Live View screen 25
iSO
speed
seffJngs
41
on Status LCD 14
saturation
Share
seffings
menu
sharpness
43
54
seffings
White Balance setting 39
install
batteries 16
HP camera clock 9
memory card 17
software 20, 21
wrist strap 16
instant review 23, 24
internal memory
moving images to memory
card 71
pictures remaining 25
ISO Speed, setting 40
44
white balance settings 39
image Display
description 1]
status screen 27
using 25
images
AE Metering setting 41
brightening 38
darkening 38
delete 50
Exposure Mode setting 33
ISO Speed setting 40
magnify 52
moving from internai memory
to memory card 71
number remaining 25
Red-eye Reduction setting 30
rotate 49
L
landscape exposure mode 34
Language setting
change 70
choose at first startup 18
LEDs (Jights) on camera
Memory/USB 11
Self-Timer 12
viewfinder 10
lights
on camera 11, 12
Live View
button 11
using 25
lock focus 23, 26
M
Saturation setting 43
Sharpness setting 44
thumbnaiJs 48
Macintosh computer
bonus software 21
connect to 61
install software 21
too dark/light 38
unloading camera to
computer 61
USB setting on camera 69
Macro focus setting 36
magnify image 52
index
113
memory card
delete files 50
door 11
install 17
fake close-up pictures 36
take multiple (burst) 36
take self-timer 35
take stills 23
moving images from internal
memory 71
pictures remaining 25
purchasing 103
Memory/USB light 11
menus
Capture 37
Playback 47
Share 54
messages
on camera 82
on computer 90
microphone 12
MODE button 13
Playback
turn on/off
]]
using 45
Playback button 11
Playback menu 47
portrait exposure mode 34
power
battery level icons 99
restoring previous settings 18
specifications 109
switch 10
turn on/off 18
power adapter, HP AC
connector on camera 12
purchasing 103
N
NiMH batteries 99
O
OK button 11
previous settings, restoring 18
print images
directly from camera 63
from computer 63
using HP Instant Share 53
printer
connect to camera 63
online manual, location 20
optical viewfinder 10
optical zoom 28
problems, troubleshooting
product support 92
PTP69
over-exposing an image 38
override automatic exposure 33
Q
number of pictures remaining in
memory 25
P
photo-lithium batteries 99
Picture Transfer Protocol 69
73
qudih/
button for selecting 13
quality settings
effect on image file size 31
pictures
instant review 23
share 53
114
hp photosmart 730 series user's manual
R
range
Exposure
Compensation
] 07
flash 106
F-number 105
focus 106
rechargeaMe Batteries 101
record
audio clips 12, 32, 51
video clips 24
Red-eye Reduction, setting 30
remaining pictures count 25
restoring previous seffings] 8
review, instant 23, 24
reviewing images and video
dips 45
rotate images 49
S
Saturation setting 43
Self-Timer light 12
Self-Timer mode 35
settings, restoring previous 18
Setup menu, using 67
Share button 11
Share menu
customize 56
description 54
e-mail service 56
printing options 55
using 54
share pictures 53
Sharpness setting 44
Shutter Button
description 14
lock exposure and focus 26
shutter speed
range 106
index
slideshow, display on TV 66
software, install 20, 21
sounds of camera 68
space remaining in memory 25
specifications 105
Status LCD, description 14
status screen 27
still pictures, take 23
support for consumers 92
T
technical support 92
thumbnail images, view 48
Time & Date setting 19, 68
tripod mount 12
troubleshoot problems 73
turn on/off
camera power ] 8
camera sounds 68
HP Instant Share 53
Image Display 11, 25
Playback 45
TV (television)
cable to connect camera 103
configuration setting 70
connect camera to 65
connector on camera 12
U
under-exposing an image 38
unloading images
camera to computer 61
USB
configuration setting 69
connector on camera 12
115
V
Video
button
14
video
clips
instant
review
24
record
24
Video
mode
use24
Video
viewfinder
Iight]0
viewfinder
10
viewfinder
lights
10
viewing
images
andvideo
clips
45
W
websites
forHP92
White Balance, setting 39
Windows computer
bonus soflware 21
connect to 61
install sof_are 20
wrist strap
attaching to camera 16
mount on camera ] 1
Z
zoom
specifications ] 06
use optical or digital 28
Zoom Out/In buttons 11
116
hp photosmart 730 series user's manual
(c._
Copyright
2003Hewlett-Packard
Company
AJlrights
arereserved.
Nopartofthisdocument
may
bephotocopied,
reproduced,
ortranslated
toanother
language
without
theprior
written
consent
ofHewJett-Packard
Company.
Theinformation
contained
inthisdocument
issubject
tochange
without
notice.
Hewlett-Packard
shall
notbeliable
forerrors
contained
herein
orforconsequential
damages
inconnection
withthefurnishing,
performance,
oruse
ofthismaterial
MicrosofK_)
andWindows(_)
areU.S.
registered
trademarks
of
Microsoft
Corporation.
AppJe(R),
Macintosh(R),
andMac_)
areregistered
trademarks
ofApple
Computer,
Inc.
MuhiMediaCard
is a trademark of Infineon Technologies AG.
TM
SD Iogo is a trademark.