1
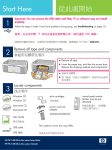
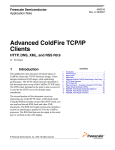
Ԫۖ 1 Start Here ૹΚޡڇᨏ!16!հছլຑ൷!USB!ᨱᒵΔܡঞຌ᧯ױ౨ྤऄإᒔڜ ᇘΖ Important: Do not connect the USB cable until Step 16 or software may not install properly. ࠉᅃޡᨏႉݧၞ۩Ζ࣠ڕ൞ڜڇᇘழ࿇سٚ۶ംᠲΔᓮᔹ࿑৵ຝ։ऱψ!ᅸᜲ௶၌!ωΖ Follow the steps in order. If you have problems during setup, see Troubleshooting in the last section. 2 ࣈൾ࿏ࣨࡉᓄ Remove cardboard and tape ᒔࡳࣈൾᇘᆜփຝࢬڶᓄࡉ࿏ࣨΖ Make sure to remove all tape and cardboard on the inside of the device. 3 נބሿٙ Locate components 1 6 2 7 HP Photosmart 2600/2700 series all-in-one User Guide 3 8 4 9 1 2 3 4 5 6 7 8 9 ! ! Windows CD Macintosh CD ࠌृشਐত ሽᄭᒵࡉ᠏൷ᕴ ሽᇩᒵ ࢍຝܚ ືຝΰᙁנαܚ ٨ٱᕠܚ USB!ᨱᒵ+! +!Ꮑ؆၇Ζ ץᇘฏփ୲ױ౨ࢬڶฆΖ 5 HP Officejet 5600 All-in-One series!Ԋ၆ࡾࠒ HP Officejet 5600 All-in-One series Setup Guide 1 2 3 4 5 6 7 8 9 Windows CD Macintosh CD User Guide power cord and adapter phone cord bottom paper tray top (output) tray print cartridges USB cable* *Purchased separately The contents of your box may differ. 4 ᛀ൳ࠫࣨ૿ਢڶܡᇘړ ? Verify that the control panel faceplate is attached Attach the control panel faceplate (if not attached) a a b 1 2 3 ?b b ?c a Align the control panel faceplate with the device. b Moving from left to right, press down each of the areas shown in graphic b until you securely attach the faceplate. c Make sure that all buttons are visible and that the edges of the faceplate are even with the device. HP All-in-One!ؘႊᇘՂ൳ࠫࣨ૿թ౨ሎ܂Μ The control panel faceplate must be attached for the HP All-in-One to work! 2 • HP All-in-One 5 a ᇘՂ࣋ࠀܚԵ് Attach trays and load paper b d a!! ലࢍຝܚऱᓳᖞׂ༺ԵᇘᆜΔྥ৵࣋ܚ܅ ऴࠩؓ᧢ܚΖ b! ല്ᓳᖞᕴᄶ೯ࠩؐೡΖ c! ᇘԵཏຏػΖ d! ᇘՂືຝΰᙁנαܚΖᒔࡳലືܚຝᢰᒴ ራԵۥۊዐΔྥ৵࣋܅Ζ e! ᠏ۼܚਮΖ c e a Insert the tabs of the bottom tray into the device, and then lower until the tray is flat. b Slide the paper adjuster over to the left. c Insert plain white paper. d Attach the top (output) tray. Make sure you hook the top of the edge tray into the light gray latches, and then lower. e Flip the paper tray extender. HP All-in-One • 3 6 ຑ൷ሽᄭᒵፖ᠏൷ᕴ Connect the power cord and adapter ! ौȈ!ޡڇᨏ!16!հছψլωຑ൷!USB! १ ᨱᒵΔܡঞຌ᧯ױ౨ྤऄإᒔڜᇘΖ Important: Do NOT connect the USB cable until Step 16 or software may not install properly. 7 ຑ൷༼ࠎऱሽᇩᒵ Connect the supplied phone cord ല༼ࠎऱሽᇩᒵԫᙰຑ൷ࠩؐೡ!(1-LINE)!!ऱሽᇩകΔԫ ᙰຑ൷ࠩᛥՂऱ༺ஆΖ ૉຑ൷ᙕᖲࢨࠌش൞۞աऱሽᇩᒵΔᓮᔹπࠌ֫ृش םρΖ Connect one end of the supplied phone cord to the phone port on the left (1-LINE) and the other to a wall jack. To connect an answering machine or use your own phone cord, see the User Guide. 4 • HP All-in-One 8 ਊՀψၲඔωਊၨࠀࡳ Press the On button and configure ! ం! / On a! ൞ਊՀψ!ం!ωਊၨհ৵ΔጸᗉᄎೂᡩΔྥ৵᧢ګᥛॽጸᗉΖ b! ᤉᥛհছᓮଢߢ༼قΖࠌٻֱشᙇᖗ൞ऱߢΔਊՀψ!OK!ωΔྥ৵ᒔᎁΖࠌٻֱشᙇᖗ൞ऱ ഏ୮0چΔਊՀψ!OK!ωΔྥ৵ᒔᎁΖ a After you press the On button, the green light flashes, and then becomes solid. b Wait for the language prompt before continuing. Use the arrow keys to select your language, press OK, and then confirm. Use the arrow keys to select your country/region, press OK, and then confirm. 9 ၲඔᚾ॰ Open the access door ࣋܅ᚾ॰Ζ٨ٱᄶ೯ਮᄎฝ೯ࠩ׳ೡΖ࣠ڕᄶ೯ਮ۰Δᓮᔹ່৵ԫ ऱψ!ᅸᜲ௶၌!ωΖ Lower the access door. The print carriage moves to the right side. If you have a carriage jam, see Troubleshooting on the last page. 10 ᐺൾࠟଡᕠܚՂऱᓄ Remove tape from both cartridges ࢮ೯ృદۥᑑ᧘אᐺൾ!ڍএ!٨ٱᕠܚऱᓄΖ ᓮ֎൷ᤛᎭۥऱ൷រࢨૹᄅലᓄ၀ڃᕠܚΖ Pull the pink tab to remove the tape from both print cartridges. Do not touch the copper-colored contacts or retape the cartridges. HP All-in-One • 5 11 ༺ԵԿۥ٨ٱᕠܚ Insert the tri-color print cartridge a ༺ڇԵ٨ٱᕠܚհছΔᇘᆜؘႊ!ڇం!णኪΖ a! ല!έՓ!٨ٱᕠܚᄶԵ!Ѿ!༺ᑒΔڕቹࢬقΖ b! ലᕠܚऱືጤຝ։ࡐ!چөΰ!ං!Σ!༺ᑒΔऴࠩ!!ۡھַΖ b The device must be On before you can insert the print cartridges. a Slide the tri-color print cartridge into the left slot as shown. b Push the top part of the cartridge firmly up and into the slot until it snaps into place. 12 ༺Ե႕ۥ٨ٱᕠܚ Insert the black print cartridge a b 6 • HP All-in-One a! ല!༃Փ!٨ٱᕠܚᄶԵ!ѡ!༺ᑒΖ b! ലᕠܚऱືጤຝ։ࡐ!چөΰ!ං!Σ!༺ᑒΔऴࠩ!!ۡھַΖ c! ᒔࡳࠟଡᕠܚຟբᇘړΖᣂຨᚾ॰Ζ a Slide the black print cartridge into the right slot. b Push the top part of the cartridge firmly up and into the slot until it snaps into place. c Make sure both cartridges are secure. Close the access door. 13 ீإ٨ٱᕠܚ Align the print cartridges a !༺Եᕠܚհ৵Δᄎנԫଡಛஒ᧩قᇘᆜբᄷໂீإΖ! a! ਊՀψ!OKω٨إீٱΖ b! ீإᄎנٱΖΰຍױ౨ᄎक़༓։ᤪऱழၴαΖ c! ඊದ።Ζലீإ૿ཛՀ࣋ᆜڇൿጒᕴੲᑿࣨऱ! Ѿ!ছֱߡ ᆵΖᣂՂ።Ζ d! ٦ڻਊՀψOKωਊၨၲࡨீإΖ b !ం!ਐقᗉೖַೂᡩհ৵Δ᧩قᕴᄎנԫଡಛஒ।إீقբګݙΖ إீڇ࣠ڕཚၴ࿇سംᠲΔᓮᒔࡳ൞բ࣋ԵཏຏػΖ هࢨگڃඵᇠீإΖ! c After you insert the cartridges, a message appears that the device is ready for alignment. a Press OK to print the alignment page. b The alignment page prints. (This may take a few minutes.) c Lift the lid. Place the top of the alignment page face down in the left front corner of the scanner glass. Close the lid. d Press the OK button again to begin alignment. After the On light stops blinking, a message appears on the display to indicate alignment is complete. If you have problems during alignment, make sure you loaded plain white paper. Recycle or discard the alignment page. 14 ؚၲሽᆰऱሽᄭ Turn on your computer a! ؚၲሽᆰऱሽᄭΔؘழᓮ࿆ԵΔ൷ထଢோ૿נΖ b! ᣂຨٚ۶ၲඔऱ࿓ڤΖ a Turn on your computer, login if necessary, and then wait for the desktop to appear. b Close any open programs. HP All-in-One • 7 ༺Եإᒔऱ!CD 15 Insert the correct CD Windows!ٺҢޱȈ Macintosh!ٺҢޱȈ a! ༺Եጸۥऱ!HP All-in-One!!Windows!CDΖ b! ࠉᅃᘛኟՂऱਐڜقᇘຌ᧯Ζ c! ڇψ!ጣ!ω૿Δᓮᒔࡳᙇ࠷ψ!ޢ ՍႫသ!ωΖᤉᥛࠩՀԫΖ a! ༺Եۥۊऱ!HP All-in-One!!Macintosh!!CDΖ b! ᤉᥛࠩՀԫΖ Macintosh Users: a Insert the gray HP All-in-One Macintosh CD. b Continue to the next page. Windows Users: a Insert the green HP All-in-One Windows CD. b Follow the onscreen instructions to install the software. c On the Connection Type screen, make sure to select directly to this computer. Continue to the next page. ! ཎ!Ȉ ༺࣠ڕԵ!CD! ݧ ৵ق᧩ڶඔ೯ ૿ΔᓮຑਊࠟՀψ!ר ޟႫသ! ω ΕຑਊࠟՀ! !C D-ROM!! ቹقΔྥ৵ ຑਊࠟՀ! setup.exe!Ζ 8 • HP All-in-One Note: If the startup screen does not appear after you insert the CD, double-click My Computer, double-click the CD-ROM icon, and then double-click setup. exe. 16 ຑ൷!USB!ᨱᒵ Connect the USB cable Macintosh!ٺҢޱȈ a! ല!USB!ᨱᒵԫᙰຑ൷ࠩ!HP All-in-One!৵ֱऱ ຑ൷കՂΔྥ৵ലԫᙰຑ൷ࠩ൞ሽᆰՂऱ!ӈ դΙএ!USB!ஃ!Ζ Macintosh Users: a Connect the USB cable to the port on the back of the HP All-in-One, and then to any USB port on your computer. Windows!ٺҢޱȈ a! ࠉᅃᘛኟՂऱਐقၞ۩Δऴࠩ൞ࠩ༼ق ຑ൷!USB!ᨱᒵΖΰຍױ౨ᄎक़༓։ᤪऱழ ၴαΖ ! נ༼قழΔല!USB!ᨱᒵԫᙰຑ൷ࠩ! HP All-in-One!৵ֱऱຑ൷കՂΔྥ৵ലԫ ᙰຑ൷ࠩ൞ሽᆰՂऱ!ӈդΙএ!USB!ஃ!Ζ Windows Users: a Follow the onscreen instructions until you see the prompt to connect the USB cable. (This may take several minutes.) Once the prompt appears, connect the USB cable to the port on the back of the HP All-in-One, and then to any USB port on your computer. HP All-in-One • 9 16 ຑ൷!USB!ᨱᒵΰᥛՂα Connect the USB cable (continued) ڶ࣠ڕߠڼ૿Δᓮᔹ່৵ຝ։ऱψ!ᅸᜲ௶ ၌!ωΖ If you do not see this screen, see Troubleshooting in the last section. b! ຑਊࠟՀ!!HP All-in-One Installer!ቹقΖ c! ᒔࡳ൞ڶࢬګݙ૿ΔץਔψSetup Assistantΰࡳ࠰ܗαωΖګݙຌ᧯ڜᇘհ ৵Δ༉ጩګݙΖ Windows!ٺҢޱȈ b! ࠉᅃᘛኟՂऱਐقၞ۩Ζګݙψ!༈ઍ೩ۡᆠ !ωፖψ!ҳ։ຝы!ω!૿Ζګݙຌ᧯ڜᇘհ ৵Δ༉ጩګݙΖ Windows Users: b Follow the onscreen instructions. Complete the Fax Setup Wizard and the Sign up now screens. After you complete software installation, you are finished. 10 • HP All-in-One b Double-click the HP All-in-One Installer icon. c Make sure you complete all screens, including the Setup Assistant. After you complete software installation, you are finished. ጊᣄඈᇞ ! ᚠ!Κ᧩قᕴנψ!ྤଢ଼࢜њ՞!ωಛஒΖ ୰ !ଢ଼հ!ΚᣂຨᇘᆜऱሽᄭΖᛀܚਢڶܡ࿏ࣨࡉᓄΖᒔࡳ٨ٱᄶ೯ਮط۞ױฝ ೯Ζࣈൾࢬץڶᇘޗற৵ਊՀψ!ం!ωਊၨΖ ! ᚠ!Κ༺Ե٨ٱᕠܚ৵נψ!ಋଶٮᔮࢥӖӟᏎֈ!ωಛஒΖ ୰ !ଢ଼հ!Κ࠷נ٨ٱᕠܚΖᒔࡳ൞բᐺൾᎭۥ൷រऱࢬڶᓄΖૹᄅ༺ԵᕠܚΔྥ৵ᣂຨᚾ ॰Ζ ! ᚠ!Κΰႛᔞ!شWindowsα൞ڶߠᘛኟ༼ق൞ຑ൷!USB!ᨱᒵΖ ୰ !ଢ଼հ!Κஞ!נHP All-in-One!!Windows!!CDΔ٦ૹᄅ༺ԵΖޡەᨏ!15Ζ ! ᚠ!Κΰႛᔞ!شWindowsαנψ!᠍ߔٺҢཱིቨᡝᆠ!ω૿Ζ ୰ !ଢ଼հ!ΚਊԫՀψ!ڥੑ!ωΖࢸൾ!USB!ᨱᒵΔ٦༺Ե!HP All-in-One!!Windows!!CDΖޡە ᨏ!15!ࡉ!16Ζ ! ᚠ!Κΰႛᔞ!شWindowsαנψ!၆ညԊ၆ฒݲցׇԙ! ୰ ω૿Ζ !ଢ଼հ!Κᛀ൳ࠫࣨ૿ਢڶܡࡐᇘړΖࢸൾ ᇘᆜ༺ᙰ٦ૹᄅ༺ՂΖᛀࢬڶຑᒵΖᒔࡳ!USB!ᨱᒵբ༺ࠩሽᆰΖᓮ֎ല!USB!ᨱᒵ༺ࠩ ᒌࢨਢሽᄭآၲඔऱႃᒵᕴΖޡەᨏ!4!ࡉ!16Ζ ! ᚠ!ΚנٱऱઌׂದࠐլإൄΖ ୰ !ଢ଼հ!Κᒔࡳ൞ലઌׂ࣋ڇੲᑿࣨՂإᒔऱۯᆜΖઌׂؘႊ࣋ᆜڇੲᑿࣨऱؐছֱߡᆵΖઌ ׂለ९ऱԫᢰؘႊऎထᇘᆜऱছֱᢰᒴΖ ڕᏁᇡาᇷಛΔᓮەπࠌृشਐতρࢨោᥦ!www.hp.com/supportΖ ࠌ!֟۟ش50%!ऱݙ٤!֟۟֗گڃ10%!ऱ٦ࠧٱسΖ © Copyright 2005 Hewlett-Packard Development Company, L.P. Printed in []. Troubleshooting *Q5610-90150* *Q5610-90150* Q5610-90150 Problem: The Carriage jam message appears on the display. Action: Turn the device off. Check the tray area for cardboard and tape. Make sure the print carriage can move freely. Press the ON button after you have removed all packing materials. Problem: The Remove and check print cartridges message appears after you insert print cartridges. Action: Remove print cartridges. Make sure you remove all tape from the copper contacts. Re-insert the cartridges, and then close the access door. Problem: (Windows only) You did not see the screen telling you when to connect the USB cable. Action: Remove, and then re-insert the HP All-in-One Windows CD. Refer to Step 15. Problem: (Windows only) The Microsoft Add Hardware screen appears. Action: Click Cancel. Unplug the USB cable, and then insert the HP All-in-One Windows CD. Refer to Steps 15 and 16. Problem: (Windows only) The Device Setup Has Failed To Complete screen appears. Action: Verify that the control panel faceplate is firmly attached. Unplug the device and plug it in again. Check all connections. Make sure the USB cable is plugged into the computer. Do not plug the USB cable into a keyboard or non-powered hub. Refer to Steps 4 and 16. Problem: A copy of a photo does not look right. Action: Make sure that you place the photo in the correct position on the glass. The photo must be in the front left corner of the glass. The longer side of the photo must be against the front edge of the device. Refer to the User Guide for more information or go to www.hp.com/support. Printed on at least 50% total recycled fiber with at least 10% post-consumer paper. © Copyright 2005 Hewlett-Packard Development Company, L.P. Printed in [].