1
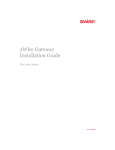
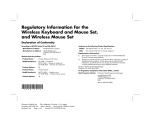
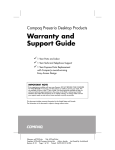
hp digital
home networking
Ethernet gateway
hn200e
quick start guide
Filename: QS Ether GW.doc
Title: HP-Print2k.dot
Template: HP Quick Start.dot
Author: Rob Heiret
Last Saved By: Elizabeth Stoneburg
Revision #: 49
Page: 1 of 11
Printed: 08/14/01 03:29 PM
The Hewlett-Packard® Company makes no warranty of any
kind with regard to this material, including, but not limited
to, the implied warranties of merchantability and fitness for
a particular purpose.
Hewlett-Packard Company
Home Networking Solutions Organization
3000 Hanover St
Palo Alto, Ca 94304
The information in this document is subject to change
without notice.
© Hewlett-Packard Company, 2001. All rights reserved.
HP shall not be liable for errors contained herein or for
incidental or consequential damages in connection with the
furnishing, performance, or use of this material.
This document contains proprietary information that is
protected by copyright. All rights are reserved. No part of
this document may be photocopied, reproduced, or
translated to another language without the prior written
consent of HP.
Hewlett-Packard is a registered trademark of HewlettPackard Company in the United States of America and
other countries.
Microsoft, MS, MS-DOS, and Windows are registered
trademarks of Microsoft Corporation.
Other brand or product names are trademarks of their
respective holders.
Filename: QS Ether GW.doc
Title: HP-Print2k.dot
Template: HP Quick Start.dot
Author: Rob Heiret
Last Saved By: Elizabeth Stoneburg
Revision #: 49
Page: 1 of 11
Printed: 08/14/01 03:29 PM
Ethernet gateway
hn200e
Thank you for choosing the Hewlett-Packard
Digital Home Networking Ethernet Gateway.
This quick start guide provides easy set-up
instructions. For additional information, see
the user’s guide included on the
CD-ROM.
LAN
POWER
1
2
3
4
box contents
■
One Ethernet Gateway
■
One installation and documentation CD-ROM
■
One AC Power Adapter
■
One Ethernet cable (blue)
■
One quick start guide
■
One warranty sheet
WAN
RESET
Ethernet gateway
Filename: QS Ether GW.doc
Title: HP-Print2k.dot
Template: HP Quick Start.dot
Author: Rob Heiret
Last Saved By: Elizabeth Stoneburg
Revision #: 49
Page: 1 of 11
Printed: 08/14/01 03:29 PM
1
before you begin
1 Verify that all of the box contents are
included.
2 Confirm that:
■
The computers you intend to connect to the
Gateway are running either Windows 98,
98SE, Me, 2000, or XP (Windows 2000
and XP Professional require administrative
privileges to install this software— see your
user documentation for details).
■
Each computer has a CD-ROM drive.
■
Each computer has an Ethernet network
adapter (internal or external) installed.
■
A broadband (DSL or cable) modem has
been installed and is connected to one of
the computers via an Ethernet cable.
3 To avoid conflicts, uninstall or disable any
connection-sharing software, such as 3COM
HomeClick, Microsoft Internet Connection
Sharing (ICS), Intel Anypoint ISS, or proxy
software such as WinGate, Sygate, or other
similar applications. You no longer need this
type of application when you install the
Ethernet Gateway.
To uninstall a program:
a) Select Start > Settings > Control
Panel.
b) Double-click Add/Remove
Programs.
c) Select the connection-sharing or proxy
software application to be removed.
d) Click Add/Remove, then click Yes.
2
Filename: QS Ether GW.doc
Title: HP-Print2k.dot
Template: HP Quick Start.dot
Author: Rob Heiret
Last Saved By: Elizabeth Stoneburg
Revision #: 49
Page: 2 of 11
Printed: 08/14/01 03:29 PM
installing the Ethernet gateway
and connecting the first
computer
4 The HP welcome screen appears:
1 Remove the CD-ROM from the box.
2 If the computer is off, turn it on.
3 Insert the CD-ROM into the CD-ROM drive of
the computer that is connected to your
broadband (DSL or cable) modem.
Note: This screen appears only if Autorun is
enabled. If you don’t see this screen,
double-click My Computer. Right-click
Compact Disc. Then click AutoPlay to
launch the installed program.
Ethernet gateway
Filename: QS Ether GW.doc
Title: HP-Print2k.dot
Template: HP Quick Start.dot
Author: Rob Heiret
Last Saved By: Elizabeth Stoneburg
Revision #: 49
Page: 3 of 11
Printed: 08/14/01 03:29 PM
3
5 Select installation. The installation wizard
screen appears.
6 Follow the onscreen instructions to set up and
configure the Ethernet Gateway, and to
connect the cables. Select First PC when
you are prompted to set up either a first PC
or an additional PC.
7 You will be asked to make cable connections
with all equipment powered on. This is
necessary to interactively detect that each
connection has been properly made. There is
no danger to you or to your equipment.
4
Filename: QS Ether GW.doc
Title: HP-Print2k.dot
Template: HP Quick Start.dot
Author: Rob Heiret
Last Saved By: Elizabeth Stoneburg
Revision #: 49
Page: 4 of 11
Printed: 08/14/01 03:29 PM
8 Use this diagram to help you connect the cables:
broadband
modem
power adapter
Ethernet
cable
4
WAN
3
2
LAN
1
UPLINK
POWER
to AC wall
outlet
Ethernet
cable
Ethernet
cable
to an additional PC
first PC
Ethernet gateway
Filename: QS Ether GW.doc
Title: HP-Print2k.dot
Template: HP Quick Start.dot
Author: Rob Heiret
Last Saved By: Elizabeth Stoneburg
Revision #: 49
Page: 5 of 11
Printed: 08/14/01 03:29 PM
5
registering the Ethernet
gateway
installing additional network
computers
Make sure you register your product with HP
after the installation process is complete. The
registration option has been pre-selected for you.
HP registration provides you with automatic
notification of updates to the firmware installed
on the Gateway and to the software installed on
the PC.
1 Turn on the computer to be connected and
insert the CD-ROM in the CD-ROM drive.
If you choose to register your product at a later
date, enter the following into the address
window of your Web browser (such as Internet
Explorer or Netscape):
http://register.hp.com
Then press Enter.
2 When the welcome screen appears, click
installation.
3 Follow the onscreen instructions. Select Add
additional computer when you are
prompted to install either a first PC or an
additional PC.
4 When the installation is completed, click
Finish.
5 Repeat Steps 1 to 4 for each additional
computer on your home network.
Note: Keep the CD-ROM in a safe place for
future use.
6
Filename: QS Ether GW.doc
Title: HP-Print2k.dot
Template: HP Quick Start.dot
Author: Rob Heiret
Last Saved By: Elizabeth Stoneburg
Revision #: 49
Page: 6 of 11
Printed: 08/14/01 03:29 PM
accessing additional
documentation
1 Insert the CD-ROM into the CD-ROM drive of
the computer.
2 Click documentation on the HP welcome
screen.
Note: Keep the CD-ROM in a safe place for
future use.
product and support
information
■
HP Customer Care: (208) 323-2551;
http://www.hp.com/cposupport
■
Online product information and technical
support: http://www.hp.com/go/
homenetworking
(includes a home networking tutorial, FAQs,
and other information)
3 Click user’s guide or any other option you
want to review.
Ethernet gateway
Filename: QS Ether GW.doc
Title: HP-Print2k.dot
Template: HP Quick Start.dot
Author: Rob Heiret
Last Saved By: Elizabeth Stoneburg
Revision #: 49
Page: 7 of 11
Printed: 08/14/01 03:29 PM
7