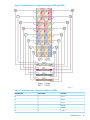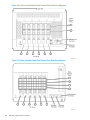
1
HP 3PAR S-Class/T-Class Storage System
Physical Planning Manual
Abstract
This manual provides information that is useful for planning and preparing for the installation of HP 3PAR S-Class and T-Class
Storage systems. Use this document in conjunction with theHP 3PAR Systems Assurance and Pre-Installation Site Planning Guide
that details specific system configuration and installation information for your storage system and operating site. The information
in this manual is intended for use by HP customers, in conjunction with the advice and assistance of an HP Sales Representative
or Systems Engineer, for the purpose of planning an HP 3PAR Storage system installation. The installation of HP 3PAR Storage
systems and hardware components is to be completed by qualified technicians who are authorized by HP. Authorized technicians
include HP Field Engineers, Value Added Resellers (VARs), and authorized third-party field technicians.
HP Part Number: QL226-97055
Published: September 2013
Edition: 1
© Copyright 2013 Hewlett-Packard Development Company, L.P.
The information contained herein is subject to change without notice. The only warranties for HP products and services are set forth in the express
warranty statements accompanying such products and services. Nothing herein should be construed as constituting an additional warranty. HP shall
not be liable for technical or editorial errors or omissions contained herein.
Acknowledgments
Microsoft® and Windows ®are U.S. registered trademarks of Microsoft Corporation.
Adobe® and Acrobat® are trademarks of Adobe Systems Incorporated.
All other trademarks and registered trademarks are owned by their respective owners.
Federal Communications Commission Radio Frequency Interference Statement
WARNING: Changes or modifications to this unit not expressly approved by the party responsible for compliance could void the user’s authority
to operate the equipment.
This device complies with Part 15 of FCC Rules. Operation is subjected to the following two conditions (1) this device may not cause harmful
interference, and (2) this device must accept any interference received, including interference that may cause undesired operation.
This equipment has been tested and found to comply with the limits for a Class A digital device, pursuant to Part 15 of the FCC rules. These limits
are designed to provide reasonable protection against harmful interference when the equipment is operated in a commercial environment. This
equipment generates, uses, and can radiate radio frequency energy and, if not installed and used in accordance with the instruction manual, may
cause harmful interference to radio communications. Operation of this equipment in a residential area is likely to cause harmful interference in which
case the user will be required to correct the interference at his own expense.
Canadian Compliance Statement
This ClassA digital apparatus meets all requirements of the Canadian Interference-Causing Equipment Regulations.
Cet appareil numérique de la classe A respecte toutes les exigences du Règlement sur le matérial brouilleur du Canada.
Warranty
WARRANTY STATEMENT: To obtain a copy of the warranty for this product, see the warranty information website:
http://www.hp.com/go/storagewarranty
Contents
1 System Components and Specifications.........................................................5
HP 3PAR Storage System Components.........................................................................................5
S400/S800 HP 3PAR Storage System Specifications.....................................................................7
Physical Specifications..........................................................................................................7
Capacity Specifications........................................................................................................8
T400/T800 HP 3PAR Storage System Specifications.....................................................................9
Physical Specifications..........................................................................................................9
Capacity Specifications........................................................................................................9
Power and Heat Specifications.................................................................................................10
Environmental Specifications....................................................................................................11
Cable Specifications...............................................................................................................12
2 General Site Planning...............................................................................13
General Planning...................................................................................................................13
Customer Responsibilities....................................................................................................13
Planning for Installation......................................................................................................13
Preparing a Pre-Installation Site Planning Guide.....................................................................14
Common Criteria Evaluated Configurations................................................................................14
Shipping and Acclimatization Requirements...............................................................................14
Shipping Requirements.......................................................................................................14
Cabinet Shipping Container...........................................................................................15
Acclimatization..................................................................................................................17
3 Structural/Environmental Considerations......................................................18
Establishing the Proper Foundation............................................................................................18
Benefits of Raised Floors.....................................................................................................18
Raised Floor Requirements...................................................................................................18
Weight and Pressure Loads.................................................................................................20
Tile Cutout Specifications....................................................................................................20
Anchoring Dimensions for HP 3PAR Storage Systems..............................................................21
Additional Flooring Recommendations..................................................................................23
Hot-Aisle/Cold-Aisle Cooling Layout.....................................................................................23
Providing for Service Access.....................................................................................................24
Meeting Environmental Conditions............................................................................................25
Maintaining the Optimal Temperature..................................................................................25
Air Supply and Flow...........................................................................................................26
Air Cleanliness..................................................................................................................27
4 Power Requirements..................................................................................28
Powering HP 3PAR Storage Systems..........................................................................................28
Power Distribution Units (PDUs)............................................................................................29
Power Cord Connections.....................................................................................................30
Electrical Requirements and Limitations......................................................................................31
Power Quality........................................................................................................................31
Voltage and Frequency Tolerance.............................................................................................31
Voltage Spikes.......................................................................................................................31
Electrostatic Discharge.............................................................................................................32
Branch Circuits.......................................................................................................................32
Emergency Power Control........................................................................................................32
Redundant Power....................................................................................................................32
5 Network, Cabling and Connectivity............................................................37
Planning Network Access........................................................................................................37
Contents
3
Supported Network Topologies............................................................................................37
Shared Network...........................................................................................................37
Private Network............................................................................................................38
TCP/IP Port Assignments..........................................................................................................39
Fibre Channel Connections......................................................................................................41
Required Cables.....................................................................................................................43
External Cable Connections.....................................................................................................43
Internal Cable Connections......................................................................................................44
Cable Routing Options............................................................................................................45
Service Processor Connections..................................................................................................45
Connecting the Service Processor..............................................................................................45
6 Support and Other Resources.....................................................................47
Contacting HP........................................................................................................................47
HP 3PAR documentation..........................................................................................................47
Typographic conventions.........................................................................................................51
HP 3PAR branding information.................................................................................................51
7 Documentation feedback...........................................................................52
A Regulatory information..............................................................................53
Turkey RoHS material content declaration...................................................................................53
Ukraine RoHS material content declaration................................................................................53
Warranty information..............................................................................................................53
4
Contents
1 System Components and Specifications
This chapter provides detailed system specifications for the HP 3PAR S-Class and T-Class Storage
systems and serves as a quick reference for other relevant specifications that are described in more
detail in other chapters of this manual.
HP 3PAR Storage System Components
HP 3PAR Storage systems are based on the HP 3PAR architecture, a cluster-based approach that
incorporates sophisticated data management and fault tolerance technologies that can meet the
storage needs of smaller sites and can easily be scaled for global organizations.
The HP 3PAR S-Class and T-Class Storage systems are housed in a 2 meter cabinet and are
comprised of the following components:
•
Controller Nodes are high-performance, data movement engines that provide the caching
capabilities and manage the flow of data in a storage system. HP 3PAR Storage systems
contain two, four, six, or eight controller nodes depending on the backplane model and current
system configuration.
•
HP 3PAR Storage System Backplane works in conjunction with the controller nodes to route
data. This passive, full-mesh backplane enables high-bandwidth and low-latency internal
pathing that supersedes bus-, switch-, and even InfiniBand-based architectures.
•
Drive Chassis houses the drive cages that, in turn, contain the drive bays. Each drive bay can
accommodate a single drive magazine that holds an array of four hard disk drives. These are
intelligent, compact, extremely dense storage units, where each is capable of holding a large
numbers of disk drives in a small rack space (EIA-standard rack units).
•
Fibre Channel Adapters and FC-AL modules provide high speed routing of data and enable
granular and potentially massive connectivity to hosts and to the drive chassis.
•
Storage System Service Processor (SP) provides the remote error detection and reporting
capabilities that support diagnostic and maintenance activities involving HP 3PAR Storage
systems. In general, one SP is required per storage system.
Figure 1 (page 6) and Figure 2 (page 7) show the front and rear views of a fully populated 2M
(40U) 3PAR cabinet with the various components installed:
HP 3PAR Storage System Components
5
Figure 1 The Front of an S-Class or T-Class HP 3PAR Storage System
6
System Components and Specifications
Figure 2 The Rear View of an S-Class or T-Class HP 3PAR Storage System
S400/S800 HP 3PAR Storage System Specifications
HP 3PAR S400 and S800 Storage systems accommodate up to four or eight controller nodes,
respectively. The maximum number of supported drive chassis varies according to the number of
controller nodes utilized by the system, the number and type of Fibre Channel adapters that are
installed, and the drive chassis connection method being used.
Physical Specifications
The following table lists system specifications for the S-Class HP 3PAR Storage systems. These
specifications are subject to change without notice.
Table 1 S400/S800 Storage System Physical Specifications
S400/S800 Storage System Physical Specifications
2-Meter Cabinet
Dimensions (width x height x depth)
23.8 x 76.4 x 36 in.
60.5 x 194.1 x 91.4 cm
Service Clearance
30 in. (76.2 cm), front and back
Weight (not populated)
485 lbs.
220 kg
Maximum Weight (fully populated)
1,970 lbs.
893.6 kg
S400/S800 HP 3PAR Storage System Specifications
7
Table 1 S400/S800 Storage System Physical Specifications (continued)
S400/S800 Storage System Physical Specifications
Maximum Weight per leveling foot
492.5 lbs.
223.4 kg
Maximum Load per leveling Foot
157 lbs/sq. in.
11.0 kg/sq. cm
S400 Base Configuration
731 lbs.
331.6 kg
S800 Base Configuration
792 lbs.
359.2 kg
2 Controller Nodes (fully populated)
160 lbs.
72.5 kg
Drive Chassis (fully populated)
175 lbs.
79.4 kg
Service Processor
28 lbs.
12.7 kg
Component Weights
Capacity Specifications
The following table lists system capacity and configuration details for the S-Class Storage systems.
Table 2 S400/S800 Storage System Capacity Specifications
Feature
S400
S800
Number of controller nodes
2 or 4
2, 4, 6, or 8
Control Cache
4-16 GBs
4-32 GBs
Data Cache
24-32 GBs
24-64 GBs
Fibre Channel host ports (four-port
adapters) *
0-64 (direct connect) 0-48 (fabric
connect)
0-128 (direct connect) 0-96 (fabric
connect)
16-640
16-1,280
2.3-300 TB
2.3-600 TB
Architectural maximum number of
drives
3,200
6,400
RAID levels
RAID 0, 6, 10, 50
RAID 0, 6, 10, 50
RAID 5 data to parity ratios
2:1, 8:1
2:1, 8:1
Drive capacities (GB approximate)1
146 15K FC, 300 15K FC, 400 FC,
450 15K FC, 1 TB NL
146 15K FC, 300 15K FC, 400 FC,
450 15K, 1 TB NL
• DC1
1–32
1–64
• DC2
1–16
1–32
Energy consumption efficiency3
not available.
0.148 (Based on a host-maximized
system configuration using 450 GB
drives.)
Number of drives
1
Raw capacity (approximate)
1
Number of drive chassis2
8
1
Levels, ratios, and capacities all mixable within the same storage system. 1 GB=1,000,000,000 bytes.
2
A single drive chassis holds up to 40 drives in 4U of space within an EIA-standard rack.
3
Japan Green Law statement of compliance: The energy consumption efficiency value has been calculated per requirements
for Category-G Magnetic Disk Drive Units by dividing the power consumption, measured according to the definition in
the Law Concerning the Rational Use of Energy, by the storage capacity defined in the Energy Conservation Law. The
efficiency value is based on a host-maximized S800 configuration using 147GB drives.
System Components and Specifications
T400/T800 HP 3PAR Storage System Specifications
HP 3PAR T400 and T800 Storage systems accommodate up to four or eight controller nodes,
respectively. The maximum number of supported drive chassis varies according to the number of
controller nodes utilized by the system, the number and type of Fibre Channel adapters that are
installed, and the drive chassis connection method being used.
Physical Specifications
The following table lists system specifications for the T-Class Storage systems. These specifications
are subject to change without notice.
Table 3 T400/T800 Storage System Physical Specifications
T400/T800 Storage System Physical Specifications
2-Meter Cabinet
Dimensions (width x height x depth)
23.8 x 76.4 x 36 in.
60.5 x 194.1 x 91.4 cm
Service Clearance
30 in. (76.2 cm), front and back
Weight (not populated)
485 lbs.
220 kg
Maximum Weight (fully populated)
1,970 lbs.
893.6 kg
Maximum Weight per leveling foot
492.5 lbs.
223.4 kg
Maximum Load per leveling Foot
157 lbs/sq. in.
11.0 kg/sq. cm
T400 Base Configuration
731 lbs.
331.6 kg
T800 Base Configuration
792 lbs.
359.2 kg
2 Controller Nodes (fully populated)
160 lbs.
72.5 kg
Drive Chassis (fully populated)
175 lbs.
79.4 kg
Service Processor (SuperMicro)
10 lbs.
4.5 kg
Service Processor (SuperMicro II)
28 lbs.
12.7 kg
Component Weights
Capacity Specifications
The following table lists system capacity and configuration details for the T-Class Storage systems.
Table 4 T400/T800 Storage System Capacity Specifications
Feature
T400
T800
Number of controller nodes
2 or 4
2, 4, 6, or 8
Control Cache
8 - 16 GBs
8-32 GBs
Data Cache
24-48 GBs
24-96 GBs
Fibre Channel host ports (four-port
adapters)1
0-64
0-128
Number of drives1
16-640
16-1,280
2.3-400 TB
2.3-800 TB
Architectural maximum number of
drives
3,200
6,400
RAID levels
RAID 0, 6, 10, 50
RAID 0, 6, 10, 50
RAID 5 data to parity ratios
2:1, 8:1
2:1, 8:1
Raw capacity (approximate)
1
T400/T800 HP 3PAR Storage System Specifications
9
Table 4 T400/T800 Storage System Capacity Specifications (continued)
Feature
RAID 6 data to parity ratios
1
Drive capacities (GB approximate)
T400
T800
6:2, 14:2
6:2, 14:2
50 GB SSD, 146 GB 15K FC, 300
GB 15K FC, 400 GB FC, 400 GB
SSD, 450 GB 15K FC, 600 GB FC,
1 TB NL, 2 TB NL
50 GB SSD, 146 GB 15K FC, 300 GB
15K FC, 400 GB FC, 400 GB SSD,
450 GB 15K FC, 600 GB FC, 1 TB NL,
2 TB NL
2–16
2–32
not available
0.452
Number of drive chassis2
DC4
3
Energy consumption efficiency
Power and Heat Specifications
The following table lists the electrical power requirements for the T-Class Storage systems.
Table 5 T-Class Storage System Power Requirements
2 Meter Cabinet
Max. Watts per Cabinet (fully populated)
9,9841
Max. BTUs/hour per cabinet (fully populated)
34,066.82
Input Voltage (VAC)
200 - 240
Frequency (Hz)
50 - 60
Circuit Breaker Max
30A per PDU (de-rated to 24A)
Drive Chassis (no magazines)
200
Power Connectors
(4) L6-30P (North America and Japan)
(4) IEC-60309 Plug (EU and Korea)
Transactional2
Idle
Watts
705
630
BTUs/hour (fully
populated)
2,406
2,150
200
200
Transactional
Idle
Node Pair (fully populated)
Drive Chassis (no magazines)
Drive Magazine
3
4 x 50 GB SSD Drive Magazines
Watts
14
12
BTUs/hour
48
41
4 x 146 GB FC Drive Magazines
Watts
76
57
BTUs/hour
259
195
4 x 300 GB FC Drive Magazines
Watts
60
52
BTUs/hour
205
177
4 x 400 GB FC Drive Magazines
Watts
10
61
System Components and Specifications
47
Table 5 T-Class Storage System Power Requirements (continued)
BTUs/hour
208
160
4 x 450 GB FC Drive Magazines
Watts
88
57
BTUs/hour
300
194
4 x 600 GB FC Drive Magazines
Watts
73
65
BTUs/hour
249
222
4 x 1 TB NL Drive Magazines
Watts
47
32
BTUs/hour
160
109
4 x 2 TB NL SATA Drive Magazines
Watts
42
32
BTUs/hour
143
111
Service Processor
SuperMicro Watts
260
SuperMicro
BTUs/hour (fully
populated)
1370 BTUs/hr.
SuperMicro II Watts
280
Supermicro II
BTUs/hour (fully
populated)
955 BTUs/hr.
1
Theoretical maximum based on branch circuit capacity.
2
Under maximum load.
3
Up to 10 drive magazines (40 drives) per drive chassis.
NOTE:
All calculations in Table 5 (page 10) are based on fully populated components; for
example, a fully populated drive chassis contains 40 disks. Specifications are not provided for
partially populated drive chassis because different drives and magazine types have varying current
requirements and can be installed in a variety of different combinations. Therefore, only the
maximum, fully loaded configuration is cited.
NOTE:
The total system peak inrush current on system startup can vary depending on the system
configuration but is mitigated through a staggered (sequenced) drive spin-up and by distributing
the load equally unless there is a failure on a given line.
Environmental Specifications
The following table lists the environmental specifications for the T-Class Storage systems.
Table 6 Environmental Specifications for HP 3PAR Storage systems
Specification
Value
Altitude Operating Non-operating
0 –10,000 ft (3,048 m) 0 –40,000 ft (12,192 m)
Ambient temperature
Operating
50 –104° F (10–40° C)
Environmental Specifications
11
Table 6 Environmental Specifications for HP 3PAR Storage systems (continued)
Specification
Value
0–3,000 ft (914.4 m)
50 –95° F (10 –35° C)
3,000–10,000 ft (914–3,048 m)
Non-operating
–40 –203° F (–40– 95° C)
0–40,000 ft (0–12,192 m)
Temperature gradient
Operating
Non-operating
18° F/hr (10° C/hr)
18° F/hr (10° C/hr)
Relative humidity
NOTE:
20 – 80 percent non-condensing, maximum gradient 10
percent per hour
Refer to “Structural/Environmental Considerations” (page 18) for complete details.
Cable Specifications
The following table lists the types of cables commonly required for storage system installation.
Table 7 Required Cables
Cable Type
Connector Type
Ethernet (Category 5) 3 cables minimum with 2 static IPs
RJ-45
Multi-mode Fibre Channel
LC-LC
The following table shows the typical Fibre Channel cable lengths required for a given type of
connection:
Table 8 Fibre Channel Cable Usage Guidelines
Cable Length
Used for...
2m
Drive chassis to controller node connections in the same side of the same cabinet (for
example, an even-numbered drive cage to an even-numbered node).
4m
Drive chassis to controller node connections across the same cabinet (for example, an
even-numbered drive cage to an odd-numbered node).
10 m 50 m 100 m
Cabling between cabinets. Always round up to the nearest size.
The following table shows the maximum supported Fibre Channel cable length based on the cable
size and port speed.
Table 9 Cable Limitations for Fibre Channel Host Connectivity
Cable Size
Speed
Cable Length Limit
62.5 micron
2 Gbps
100 meters
62.5 micron
4 Gbps
70 meters
50 micron
2 Gbps
300 meters
50 micron
4 Gbps
150 meters
NOTE:
Refer to “Network, Cabling and Connectivity” (page 37) for more details on cable
requirements and configurations.
12
System Components and Specifications
2 General Site Planning
This chapter provides general recommendations for physical planning and site preparation for
installation and operation of the HP 3PAR S-Class and T-Class Storage systems.
General Planning
Successful installation of HP 3PAR Storage systems requires careful planning and supervision in
collaboration with authorized HP representatives. Proper planning will help provide for a more
efficient installation and greater reliability, availability, and serviceability.
Customer Responsibilities
When planning and preparing for the installation of HP 3PAR Storage systems at a customer site,
the customer assumes the following responsibilities:
•
Providing suitable space for unpacking, installing and operating the servers
•
Maintaining the proper environmental conditions for the servers
•
Providing adequate power facilities for the servers
•
Supplying the network connections and external cabling required by the servers
•
Enabling the appropriate HP remote support strategy
The customer is responsible for providing a suitable space and environment for the installation of
the HP 3PAR Storage systems. All pre installation activities should be scheduled and completed
before the equipment is delivered.
Electronic equipment has special packing for shipping and receives special handling during
transportation; the manufacturing environment and packing for shipping are the responsibilities of
3PAR. It is the customer's responsibility to ensure that space is available for unpacking and installing
the new equipment upon delivery.
For optimal performance at a specific location, HP 3PAR Storage systems require controlled
environmental conditions that can best be facilitated through raised flooring and under-floor air
conditioning. It is the customer's responsibility to monitor this environment to ensure continued
conformance with the recommended environmental specifications. Refer to “Structural/Environmental
Considerations” (page 18) for specific information concerning server room environments.
Adequate power is necessary for the reliable functioning of electronic equipment and for the safety
of the customer's installation. The customer is responsible for procuring, installing, and maintaining
adequate power to the equipment. Refer to “Power Requirements” (page 28) for input electrical
power and grounding requirements.
Planning for Installation
The following are suggested site planning considerations to be completed prior to the delivery and
installation of the selected HP 3PAR Storage system.
•
Prepare a preliminary layout of the subsystem installation.
•
Review the power and the heating, ventilation, and air-conditioning (HVAC) requirements.
•
Order any additional support equipment indicated by the power and HVAC review.
•
Work with the appropriate HP representative to ensure that all system units in the specified
configuration and all cables of the required length have been ordered.
•
Make a final layout of the installation and review the layout with your HP representative.
•
Select key personnel and arrange for training with your HP representative.
General Planning
13
•
Verify that electrical service wiring has been installed at the server’s predetermined location.
Refer to the respective product specifications for detailed requirements.
•
Verify of any additional support equipment is properly installed and operational.
At installation time, the HP representative will supervise the delivery and unpacking of the equipment.
The representative must also review the crate with the customer to check that the shipping crates
have not been tampered with. When unpacking the equipment, verify the shipment is correct and
all equipment was delivered. Refer to the packing slip and the SKUs with the shipment.
NOTE:
No part of the installation, from unloading the crated server from the delivery vehicle to
unpacking and placement, should be performed without the supervision of a HP representative.
This is a fundamental requirement for the safety of both the equipment and personnel.
Preparing a Pre-Installation Site Planning Guide
Prior to installation, the customer will complete a systems planning document such as the HP 3PAR
Systems Assurance and Pre-Site Planning Guide in cooperation with the local HP Sales Representative
or HP Systems Engineer.
The systems planning guide is a working document that contains the following information:
•
Contact information for customer personnel and for HP technical sales, support, and service
personnel
•
Implementation project plan
•
Configuration information for the HP 3PAR Storage system to be installed, including system
configuration diagrams
•
Shipping and delivery details and requirements
•
Management workstation, SP, and network information
•
Description of the customer environment
•
Volume and RAID level planning information
•
Customer training project plan
•
Additional notes and comments regarding installation
•
Current support matrix
•
System technical specifications
•
Systems Acceptance Certificate
•
Customer Services installation checklist
Common Criteria Evaluated Configurations
The HP 3PAR StoreServ 10000 Storage systems using HP 3PAR OS 3.1.2.MU1 have been evaluated
to conform to Common Criteria Evaluation Assurance Level 2 when configured accordingly. For
more information about the Common Criteria and the specific of the evaluated configuration see
the HP 3PAR OS Common Criteria Administrator’s Reference.
Shipping and Acclimatization Requirements
Safe transport of HP 3PAR Storage systems requires the appropriate shipping containers. A separate
crate holds each storage system cabinet while drive magazine shipping containers hold a maximum
of thirty drive magazines each.
Shipping Requirements
A separate shipping container holds each storage system cabinet while drive magazine shipping
containers hold a maximum of 16 drive magazines each. Customers should examine the delivered
14
General Site Planning
package for obvious damage or signs of tampering and notify both HP and the carrier of any
issues.
Shipping container measurements are as follows:
•
Cabinet crate (one per 2M rack cabinet): Height: 83 inches (210.8 cm) x Width: 42 in.
(106.7 cm) x Depth: 51 in. (129.5 cm)
Approximate shipping weight: 1172 lb (531.6 kg)
•
Drive magazine container (one per 16 drive magazines): 38 in. (96.5 cm) x 34 in. (86.4
cm) x 28 inc. (71 cm)1, 1
Approximate shipping weight: 78 lb (35 kg)
When the equipment arrives, you must make sure that there is enough room to unload and unpack
the server. The specific amount of space you will need to unpack the server is based on the
dimensions of the container, the ramp and the room required to access the server so that it can be
moved to its placement destination. You will need to reserve enough space to accommodate the
crate, the ramp and the Storage System as depicted in the following illustration:
Figure 3 Total Area Required for Unpacking a storage system
The specific amount of space you will need to unpack the server is based on the dimensions of the
container, the ramp and the room required to access the server so that it can be moved to its
placement destination. See and “Cabinet Shipping Container” (page 15) for calculating the specific
dimensions of the shipping crate.
NOTE:
See “Structural/Environmental Considerations” (page 18)“Providing for Service Access”
(page 24) for more information on placing the storage systems and reserving room for service
access.
Cabinet Shipping Container
Measurements for the shipping container are as follows:
•
Cabinet crate (one per cabinet): Height: 83 inches (210.8 cm) x Width: 42 in. (106.7 cm)
x Depth: 51 in. (129.5 cm)
•
Open ramp length: 76 inches (193 cm)
•
Approximate shipping weight: 2000 lb. (907 kg)
The following illustration shows the front view of the shipping container:
1. For systems shipped internationally and for systems with fewer than sixteen drive magazines. The magazines are shipped
in boxes and each box contains three magazines.
Shipping and Acclimatization Requirements
15
Figure 4 Front View of the Cabinet Shipping Container
The equipment is removed from the front of the container by pulling on two straps that wrap around
the cabinet. The following illustration shows the front view of the container with the ramp down
and the straps exposed:
16
General Site Planning
Figure 5 Front View of the Container with Ramp Down
Acclimatization
HP 3PAR Storage systems shipped or stored at extreme temperatures may require time to adjust
to operating temperatures before starting up. The maximum acceptable rate of temperature change
for a non-operating system is 18° F/hr (10° C/hr). The storage system requires time to acclimatize
to new environmental conditions before being powered on. During that time, it is possible to
proceed with the physical installation of the storage system; however, the storage system may need
at least 24 hours to acclimatize to a new environment prior to completing the full system installation.
If condensation is present even after the 24 hour acclimatization period, it is necessary to wait
until all condensation has evaporated before completing the power-on sequence.
Shipping and Acclimatization Requirements
17
3 Structural/Environmental Considerations
You should consider the following when choosing or designing your facilities for HP 3PAR Storage
systems:
•
Equipment location and layout that allows efficient use, easy maintenance, and future
expansion.
•
Facility construction that provides a suitable operating environment, sufficient power and
adequate protection from fire, contamination, or other hazards.
•
Suitable temperatures and appropriate air quality that is free from environmental contaminants.
The customer is responsible for maintaining the room environment according to the recommended
specifications. Environmental conditions for the room and under the floor must be maintained within
the acceptable limits to prevent any adverse impact on performance and reliability. The installation
environment should be monitored on a regular basis to ensure continued conformance to
recommended environmental specifications. The customer may request assistance from a HP
representative to help in analyzing the site location and environment to make appropriate
recommendations.
Establishing the Proper Foundation
As with any electronic equipment that generates heat, the HP 3PAR Storage systems must be housed
in a cool environment. Common techniques for maintaining an optimal operating environment
generally incorporate the use of raised flooring and alternating hot and cold aisle layouts.
Benefits of Raised Floors
While not required, HP 3PAR Storage systems can be installed on raised floors with under the floor
air cooling. Raised floors will allow cables to be located safely beneath the floor. If the facility
does not have raised floors and under the floor air cooling, temperature and airflow must be in
compliance with the recommended specifications.
The raised floor system should consist of removable panels or panels on a stringer grid system,
supported by adjustable steel pedestal assemblies. The raised floor can be constructed of steel,
aluminum, or fire-retardant wood. The purpose of the raised floor system is to:
•
Permit space between floors to supply cooled air to the equipment.
•
Support the total weight of the system and service area loading.
•
Protect interconnecting cables and power receptacles.
•
Allow for future layout changes with minimum cost.
•
Provide safety for personnel.
Raised Floor Requirements
There are additional structural considerations when installing HP 3PAR Storage systems in
environments with raised flooring.
NOTE:
This section considers a standard raised floor construction that consists of the following:
24 in. (61 cm) square or 24 in. (61 cm) X 36 in. (91.5 cm) panels, steel or aluminum stringers,
and pedestal supports attached to an underlying concrete slab or steel deck.
Prior to installation, verify the raised floor at the operating site meets the specifications described
in Table 10 (page 19).
18
Structural/Environmental Considerations
Table 10 Raised Floor Specifications
Specification
Value
Flatness tolerance
Per 10 ft (3 m) span
Overall
Less than 0.06 in. (1.5 mm)
Less than 0 .10 in. (2.5 mm)
Deflection
Dynamic
Permanent
Less than 0.15 in. (3.8 mm)
Less than 0.02 in. (0.5 mm)
Pedestal assembly load
Axial
Side
At least 5,000 lb (2,268 kg)
At least 30 ft-lb (40.7 N-m)
Placing each storage system cabinet across two floor tiles is strongly recommended. It is also
strongly recommended that a vented floor tile be placed in front of each cabinet. Figure 6 (page 19)
shows two storage systems side-by-side, each resting across two floor tiles.
Figure 6 Adjacent Cabinets Placed Across Two Floor Panels Each (Recommended)
When necessary, a storage system can also rest across four floor tiles, with two adjacent storage
systems resting partially on the same tiles so that they use a total of six tiles, as shown in Figure 7
(page 19). Again, it is strongly recommended to have vented tiles in the front.
Figure 7 Storage Systems Resting Partially on the Same Floor Panels
Establishing the Proper Foundation
19
However, before placing a cabinet on floor tiles shared with other cabinets or equipment, first
verify that the floor panels can tolerate the weight and pressure loads. Maximum weight and
pressure loads for storage systems are provided in Table 11 (page 20).
When placing cabinets with their weight shared by the same panels as shown in Figure 7 (page 19),
verify that each panel can tolerate the maximum weight per panel, calculated as follows:
where cabinet x and cabinet y are cabinets or equipment resting partially on the same floor
panel.
Weight and Pressure Loads
Depending on the configuration, an HP 3PAR Storage system can weigh up to 2,000 lb (907 kg).
Table 11 (page 20) provides maximum weights and pressure loads per leveling foot for HP cabinets.
Use these values to approximate the structural support required by a storage system cabinet.
Table 11 Maximum Weights and Pressure Loads
Cabinet Size
Maximum Weight
Maximum Weight Per
Leveling Foot
Maximum Load Per Leveling
Foot
2M (40U)
2,000 lb
(907.2 kg)
500 lb
(226.8 kg)
157 lb/sq in.
(11.0 kg/sq cm)
NOTE:
The table uses nominal numbers to simplify calculations.
Tile Cutout Specifications
Figure 8 (page 21) shows the recommended tile cutout specifications for storage system cabinets.
20
Structural/Environmental Considerations
Figure 8 Tile Cutout Specifications
WARNING!
To prevent potential collapse, loaded floor panels that have cutouts to facilitate
cable routing may require additional reinforcement.
Anchoring Dimensions for HP 3PAR Storage Systems
For some installations, you may want to anchor HP 3PAR Storage systems to the floor for better
stability, especially in active seismic locations. While HP does not supply, or specifically recommend
any particular anchoring solution, there are several third-party anchoring kits that can be procured
for this purpose. Figure 9 (page 22), Figure 10 (page 22) and Figure 11 (page 22) provide the
required dimensions for the base of the HP 3PAR Storage system cabinet:
Establishing the Proper Foundation
21
Figure 9 Front View Dimensions for the HP 3PAR Storage System
Figure 10 Side View Dimensions for the HP 3PAR Storage System
Figure 11 Bottom View Dimensions for the HP 3PAR Storage System
22
Structural/Environmental Considerations
Additional Flooring Recommendations
Consider the following recommendations for raised floor installations:
•
The flooring should be high enough to allow under the floor routing of cables and specified
airflow to system air intakes. The recommended minimum floor clearance is 30.5 cm (12 in).
An additional 7.6 cm (3 in) should be allowed for cables and connectors. A floor clearance
of 46 cm (18 in) is recommended for new construction.
Additional panel support may be required to restore the structural integrity of a raised floor
panel that has been cut for air opening, cable entry, and so on. Raised floors without stringers
may also require lateral support to prevent floor tile movement.
The finished floor-to-ceiling height should be a minimum of 2.44 meters (8 feet).
•
The sub-floor must have adequate drainage to prevent flooding and trapping of water beneath
the raised floor. Cement should be sealed to prevent the formation of particulates.
•
To avoid an electrical hazard when using a metallic floor, no metal or conductive material
should be exposed to the walking surface.
•
Sharp edges must be eliminated on all floor cutouts where cables pass. For wood or similar
core material, all cut edges must be covered with metal or plastic clips or grommets so that
none of the core is exposed (see NFPA 75 requirements).
•
Asphalt tiles are not recommended because they produce dust that may cause equipment
malfunction.
•
Carpeting is not recommended because it produces and holds dust, and can contribute to the
buildup of electrostatic charges on people and equipment.
•
Most raised floors are composed of 60 cm (International/Metric) or 24 in. (Domestic/American
Standard) square floor tiles. The maximum panel size should not exceed 60 by 90 cm
(International/Metric) or 24 by 36 in. (Domestic/American Standard). The panels should have
a flame spread rating of 15 or better when tested according to the American Society for
Testing and Materials (ASTM) Standard E 84.
•
Provide a conductive path to ground from the metallic raised floor structure through the metallic
supporting structure or separately from each tile.
•
Ensure the maximum resistance for floor surface material is 20 gigohms, measured between
the floor surface and building ground.
•
The resistance between adjacent tiles should not be less than 150 kilohms when measured
between any points on the floor, spaced 91.5 cm (36 in) apart.
•
Maintenance of antistatic floor covering should be performed according to supplier's
recommendations.
•
The floor covering can contribute to a buildup of high static electrical charge. To minimize
static charge:
Hot-Aisle/Cold-Aisle Cooling Layout
Air flows through the HP 3PAR Storage systems from the front to the rear, so when installing multiple
servers in the same room, consider facing each pair of servers in a front to rear configuration. This
allows cool air to be circulated through the rows in the front of the servers and exhausted through
rows in back. This is referred to as a hot-aisle/cold-aisle layout and eliminates the direct transfer
of hot exhaust air from one server into the intake air of another as shown in Figure 12 (page 24).
Establishing the Proper Foundation
23
Figure 12 Hot-Aisle/Cold-Aisle Layout
Form rows of racks or cabinets perpendicular to air conditioners. This formation facilitates an
unobstructed flow of heated air down the aisles to the air conditioner return ducts. Heated air must
not be forced to travel over or between the cabinets to get to the air conditioner return ducts. Doing
so could heat the air in the cold aisles. Ensure that any free-standing equipment does not allow air
to flow between the hot and cold aisles.
A cold aisle has perforated floor tiles or grates that enable cold air to rise from the raised floor
whereas the hot aisle has no tiles or grates so that hot air and cold air do not mix. Seal cable
cutouts in both hot aisles and cold aisles to increase under the floor pressure and to eliminate cold
or hot air redirection. To further optimize the airflow in hot and cold aisles, install blanking panels
at the front of all unused cabinet spaces so that hot air does not recirculate to the system’s cold air
inlet.
Providing for Service Access
HP 3PAR Storage systems are housed in 2M (40U) cabinets that measure 76.4 in. (194 cm) x
23.8 in. (60.5 cm) x 36 in. (91.4 cm). Cabinets feature locking rear doors and removable side
panels and fascias to improve access while installing, cabling, and servicing components.
When establishing an operating site for an HP 3PAR Storage system, provide for adequate access
to cabinets by following the access area recommendations in Table 12 (page 25).
24
Structural/Environmental Considerations
NOTE:
The S800 and T800 Storage systems have circuit breakers located at both the front and
rear of the system. It is necessary to maintain access to both the front and rear circuit breakers.
Table 12 Recommended Access Areas for 3PAR Cabinets
Cabinet Surface
Access Area During Operation
Front
36 in (91.4 cm)
Rear
30 in (76.2 cm)
Left and right sides
None
NOTE:
HP cabinets do not require side access during operation. However, during installation,
it is a good practice to allow 3 ft (91.4 cm) on one side of the cabinet in case it becomes necessary
to remove a side panel. For instance, access through a side panel may be required for overhead
power cable routing.
Meeting Environmental Conditions
For the HP 3PAR Storage systems, it is recommended that you maintain a controlled environment
requiring a high degree of cleanliness, close control of temperature and humidity, and infrequent
personnel access.
HP also recommends the installation site meet the specifications detailed in GR-63-CORE for office
vibration.
CAUTION: The storage system operating environment must be free from continuous vibration
and from dust and other environmental contaminants.
In addition, the operating site must comply with the following environmental specifications (Table 6
(page 11)):
Table 13 Environmental Specifications for HP 3PAR Storage systems
Specification
Value
Altitude
Operating
Non-operating
0 –10,000 ft (3,048 m)
0 –40,000 ft (12,192 m)
Ambient temperature
Operating
Non-operating
Temperature gradient
Operating
Non-operating
Relative humidity
50 –104° F (10–40° C)
0–3,000 ft (914.4 m)
50 –95° F (10 –35° C)
3,000–10,000 ft (914–3,048 m)
–40 –203° F (–40– 95° C)
0–40,000 ft (0–12,192 m)
18° F/hr (10° C/hr)
18° F/hr (10° C/hr)
20 – 80 percent non-condensing, maximum gradient
10 percent per hours
Maintaining the Optimal Temperature
The level of cooling required for the HP 3PAR Storage systems is quite different from the
air-conditioning used in offices. Comfort air-conditioning systems are designed for the lower heat
and higher moisture generated by the human body. In contrast, equipment has high heat output
that is moisture-free (sensible heat). In comfort systems, sensible heat normally produces 60 to 70
Meeting Environmental Conditions
25
percent of the load, whereas the dry heat of electronic equipment produces a sensible heat ratio
of over 95 percent.
Prior to installation, verify that the operating site is equipped with a cooling system that can support
all thermal emissions. Use the average and maximum thermal emissions of storage system
components listed in Table 14 (page 26) to estimate the cooling requirements for an HP 3PAR
Storage system based on a specific system configuration.
Proper site layout is critical to ensure the ambient temperature near the intake of the system does
not rise beyond the system specifications. Exceeding the maximum ambient temperature for any
period negatively affects the system’s reliability and performance, and continued operation for
extended periods under such conditions might actually cause the system to shut down.
CAUTION:
Heated air from nearby equipment should not exhaust into the front of the HP 3PAR
Storage system.
Table 14 Thermal Emissions of Storage System Components
Component (Fully Populated)
Average Thermal Emissions
Maximum Thermal Emissions
Controller node (pair)1
2,164 BTU/hr
(545.3 Kcal/hr)
3,004 BTU/hr
(757 Kcal/hr)
Drive chassis (single)
3,657 BTU/hr
(921.6 Kcal/hr)
4,973 BTU/hr
(1,253.2 Kcal/hr)
Drive chassis (pair)2
7,314 BTU/hr
(1,843.2 Kcal/hr)
9,946 BTU/hr
(2,506.4 Kcal/hr)
1
Controller nodes can only be installed in pairs.
2
HP 3PAR Storage systems require a minimum of two drive chassis; however, additional drive chassis can be installed
individually.
HP 3PAR Storage systems can tolerate temperature and humidity fluctuations if the specified
guidelines are understood and followed. Exposure to conditions outside the specified ranges may
damage the system or its components.
Before a system is powered on, the air entering the subsystem must be clean and within the ranges
specified for temperatures and humidity. The room humidity must be kept sufficiently low to prevent
condensation on or within the subsystem, and must never exceed the limit specified in the subsystem
environmental requirements tables, including transients. The server must never be exposed to
conditions that could cause internal condensation to occur within the subsystem.
The air-conditioning units should have controls monitoring under the floor output that respond to
1° C (2° F) and 5 percent relative humidity. Humidification is normally required to replace moisture
removed during the cooling process. The relative humidity for a subsystem equipment room should
be set at 40 percent. This level is sufficient to suppress electromagnetic charge buildup, and low
enough to avoid the risk of corrosion and condensation. To avoid air contamination from the
humidifier, water treatment may be necessary in areas with high mineral content.
Air Supply and Flow
The air flow capacity of the facility where the HP 3PAR Storage systems are installed needs to be
sufficient to remove the heat generated by the equipment. In addition, the air handlers must provide
the airflow volume required by the units being cooled. To ensure this airflow, the facility must have
a positive under the floor air pressure (if the facility has raised floors). When conditions within the
computer room are changed (new units are added, the computer system is moved) airflow checks
should be made.
The amount of outside (composition) air should be kept to the minimum needed to create a slight
positive pressure within the room, and should not exceed industry recommendations of 0.3 cubic
meter/minute (10 cubic feet/minute) per person stationed in the equipment room. While
26
Structural/Environmental Considerations
recommendations for outside air in comfort air-conditioning are 10 to 15 percent of the airflow,
the computer room environment is cleaner and operates more efficiently if outside air is kept below
1 percent of the airflow. Cooling/heating and humidification needs are reduced, and a minimum
of contaminated building air is introduced into the installation area.
Air Cleanliness
Air contaminants can cause equipment malfunction and can damage HP 3PAR Storage systems.
It is essential that steps be taken to prevent air contaminants, such as metal particles, solvent vapors,
corrosive gases, soot, airborne fibers, or salt, from entering or being generated within the server
room environment.
A high-efficiency air filter should be employed on each air inlet for outside air to stop dust at the
point of entry to the installation site. Special additional filtering is necessary where the environment
is exposed to salt air, corrosive gases, or unusual dust/dirt conditions. Electronic equipment is
sensitive to air contaminants such as:
•
Excessive amounts of soot particles
•
Condensate particulates such as carbonates
•
Concrete particulates from unsealed concrete
•
Metal flakes or filings, such as those produced by sawing, filing, or drilling
•
Floor-cleaning solutions with high ammonia content . Deteriorating/decomposing building
materials, including floor tiles, fabrics, sheetrock, insulation, and acoustical tiles
•
Pollutants generated by any servicing performed in and around the computer room
•
Paper chaff, dust, and toners from printers within the computer room
•
Processing chemicals from reproduction equipment such as microfiche processors.
In electronic equipment, contaminants cause connector contact and motor-bearing degradation.
They also cause electrical leakage, shorting paths between integrated circuit leads and between
printed wiring traces on printed circuit boards.
Air supplied to and circulated within the server room and under the floor plenums should ideally
pass through mechanical or electrostatic filters. HVAC ducts and plenums and sub-floor areas,
including cable raceway openings where used, should be kept clean. All unused cables, hardware,
and debris should be removed from the under the floor area to avoid becoming dust/dirt traps or
potential sources of rust.
During major changes in the server room environment, special considerations must be taken into
account whenever any drilling, sawing, welding, brazing, etc., is performed.
Precautions must be taken to prevent material particles (concrete or metal particles, etc.) from
becoming airborne. HP 3PAR Storage systems should be powered down during construction that
requires any drilling, sawing, welding, brazing, etc. In addition, all debris must be removed before
powering up the server(s). Maximum concentrations of corrosive gases and solvent vapors must
also be considered.
Meeting Environmental Conditions
27
4 Power Requirements
This chapter describes the general power requirements for the HP 3PAR Storage systems.
Powering HP 3PAR Storage Systems
The cabinets used to house the HP 3PAR Storage system components are divided into power
domains where each contains a drive cage or controller node and two dedicated power supplies.
Drive cages and controller nodes depend on these two power supplies, located at the rear of the
system, to supply power from the Power Distribution Units (PDUs) that are located at the bottom of
the cabinet.
Figure 13 Power Supplies Within the Power Domains
HP cabinets contain four PDUs and each requires service from a dedicated single-phase 200-240
VAC (200-250 VAC International), 30-A (32-A International) grounded electrical circuit. However,
for optimal reliability and data accessibility, HP recommends a redundant AC configuration that
uses independent sources to provide a dedicated, grounded electrical circuit to each PDU as shown
in the following configuration:
28
Power Requirements
NOTE:
If a storage system cabinet does not have components installed in the top four bays (bays
0–3, or the highest 16U of the cabinet), the two upper PDUs (PDU 0 and PDU 1) are not used to
power the system and need not be connected. Redundant power is still supplied to the lower bays
in the cabinet through PDU 2 and PDU 3.
Storage server PDUs are equipped with NEMA® L6–30 or IEC 60309 connectors, depending on
the region. International PDUs are equipped with IEC 60309, 2P+E (3 wire, 2 Pole + Earth Ground)
connectors. The appropriate receptacles or adapters are necessary at the operating site to
accommodate these connectors.
Power Distribution Units (PDUs)
For each cabinet, the four Power Distribution Units (PDUs) occupy the lowest chassis bay in the
cabinet.
Figure Figure 14 (page 29) illustrates the four PDUs at the bottom of a 3PAR cabinet.
Figure 14 Power Distribution Units
Each PDU has two power banks, each with a separate circuit breaker, to be used exclusively for
storage system components (Figure 15 (page 30)).
Powering HP 3PAR Storage Systems
29
Figure 15 Power Banks in the PDU
WARNING!
To avoid possible injury, damage to storage system equipment, and potential loss
of data, do not use the surplus power outlets in the storage system PDUs. Never use outlets in the
PDUs to power components that do not belong to the storage system or to power storage system
components that reside in other cabinets.
Power Cord Connections
Storage systems arrive with all internal power cords configured and connected. The AC cords
connect two power supplies at the rear of the controller nodes and drive chassis to the PDUs at
the bottom of the cabinet. The length of the power cord is 10 feet. The power cords can be routed
through the lower access opening at the bottom of the cabinet or the upper access opening at the
top of the cabinet (Figure 16 (page 30)). The side panels are removable for easier cabling access.
Figure 16 Power Cord Routing Options
30
Power Requirements
NOTE:
When routing the power cords through the bottom of the 2 meter cabinet, the usable
cord length extends 9.5 to 10 feet away from the cabinet. If routing from the top, approximately
4 feet of the power cord is usable.
Electrical Requirements and Limitations
Before physically installing an HP 3PAR Storage system, verify that the operating site has the
necessary electrical circuitry. Each HP 3PAR Storage system will require 4 (200 - 240) Volt, 30
Amp outlets or 2 outlets if only the bottom half of the cabinet is occupied. For proper redundant
power protection, power should be supplied from two or more power sources.
HP recommends the installation site conform to the electrical specifications detailed in
ANSI/TIA-942-2005 Annex G5, specifically:
•
Use of K-rated isolation transformers, typically 480:208V/120 volt step-down transformers,
will minimize any common mode noise between electrical ground and neutral. The voltage
delta between power ground and signal ground will also be reduced. Isolation transformers
should be located as close to the load as possible.
•
Appropriate capacity Transient Voltage Surge Suppression (TVSS) devices should be installed
at each level of the facility electrical distribution system. Each distribution panel should have
its own dedicated TVSS. This multi-tiered approach has proven to be effective at reducing
electrical transients.
•
The installation site should have a comprehensive building ground system. A properly grounded
building perimeter loop should be provided and the building steel should be bonded to the
system at every other column. This building ground system should be directly bonded to all
major power distribution equipment, including all switchgear, generators, UPS systems,
transformers, etc., as well as to the telecommunications systems and lightning protection system.
•
Installation of a UL Master-Labeled lightning protection system is recommended.
Use the approximate current requirements for storage system components listed in Table 5 (page 10)
to estimate the current requirements for a specific system configurations.
Power Quality
The quality of the input power is critical to the performance and reliability of HP 3PAR Storage
systems. Variations in the input power can cause a power failure or malfunction. Many of the
causes of transient signals and noise on commercial power lines are difficult to locate or are beyond
the customer’s control. To reduce the impact of the irregularities, some form of power conditioning
may be needed. Please consult your electrician for assistance.
Voltage and Frequency Tolerance
Steady state voltage must be maintained within 10 percent of the normal rated voltage, measured
(under load) at the power input terminal of the specified server. The frequency must be maintained
at (50-60 HZ), 1 phase 50/60 +2 percent, -4 percent.
When there is a possibility of brownouts or other marginal voltage conditions, installing a voltage
monitor may be advisable.
Voltage Spikes
HP 3PAR Storage systems are tested to comply with the EN 61000-45 standard.
Electrical Requirements and Limitations
31
Installing a lightning protection device on the server room power source is recommended when
the following conditions exist:
•
The primary power is supplied by an overhead power service.
•
The utility company installs lightning protectors on the primary power source.
•
The area is subject to electrical storms or an equivalent type of power surge.
Electrostatic Discharge
HP 3PAR Storage systems are susceptible to failure due to electrostatic discharge (ESD). Electrostatic
charges can accumulate on people and furniture because of direct contact with floor coverings or
movement while in contact with furniture coverings. Discharge of static electricity to a metal surface
on server cabinets can interfere with the system’s operation and cause discomfort to anyone who
comes in contact with it.
Some factors that contribute to electrostatic discharge are:
•
High-resistance floor covering
•
Carpeting without anti-static properties
•
Low humidity (less than 20%)
HP 3PAR Storage systems are tested to comply with the EN 61000-45 standard.
Branch Circuits
The individual panel branch circuits should be protected by suitable circuit breakers properly rated
according to manufacturer specifications and applicable codes. Each circuit breaker should be
labeled to identify the branch circuit it is controlling. The receptacle should also be labeled. Plan
on a circuit breaker maximum of 30 A per PDU (de-rated to 24 A).
Emergency Power Control
As a safety precaution, you might consider providing emergency power-off controls for disconnecting
the main service wiring that supplies the HP 3PAR Storage systems. Install these controls at a
convenient place for the operators and next to the main exit doors of the room after checking local
electrical codes for further guidelines.
Redundant Power
HP 3PAR Storage systems with HP cabinets support redundant power within the system through
the use of redundant PDUs and redundant power supplies.
As shown in Figure 17 (page 33) and Figure 18 (page 34), power domains within the storage
system are distributed between the upper and lower halves of the cabinet.
32
Power Requirements
Figure 17 Front View of the Power Domains Within the Controller Nodes and Drive Chassis
Redundant Power
33
Figure 18 Rear View of the Power Domains Within the Controller Nodes and Drive Chassis
WARNING!
To avoid possible injury, damage to storage system equipment, and potential loss
of data, do not use the surplus power outlets in the storage system PDUs. Never use outlets in the
PDUs to power components that do not belong to the storage system or to power storage system
components that reside in other cabinets.
To support redundant power:
•
The power supplies in each power domain must connect to separate PDUs.
•
Each PDU in the system must connect to an independent AC circuit.
Figure 19 (page 35) and Table 15 (page 35) contain information about power cord connections
for S800 and T800 storage systems with PDUs placed back-to-back to take up only 2U of cabinet
space rather than the standard 4U of space.
NOTE: “ Redundant Power Configuration Diagram (S800 and T800)” (page 35) applies only
to the S800 and T800 configurations with front and rear PDUs.
34
Power Requirements
Figure 19 Redundant Power Configuration Diagram (S800 and T800)
Table 15 Redundant Power Configuration (S800 and T800)
PDU Number
Power Bank
AC Cord
0
1
0-L,1-L
0
2
2-R,3-R
1
1
2-L,3-L
1
2
0-R,1-R
2
1
5-R,6-R
2
2
7-L,8-L
Redundant Power
35
Table 15 Redundant Power Configuration (S800 and T800) (continued)
36
PDU Number
Power Bank
AC Cord
3
1
7-R,8-R
3
2
5-L,6-L
Power Requirements
5 Network, Cabling and Connectivity
This chapter provides information about determining the best network configuration for the HP
3PAR Storage systems being installed at your site, necessary connections and cable routing options.
NOTE:
The information that follows assumes an established network and discusses how to
connect an HP 3PAR Storage system to that network.
Planning Network Access
External Ethernet, Fibre Channel (FC), iSCSI, and Remote Copy cable connections are completed
at the time of installation.
These external connections are necessary to:
•
Connect the storage system to the network, enabling storage system management through the
InForm Management Console and CLI.
•
Allow communication with the storage system from the Service Processor (SP) when in use.
•
Enable HP Customer Service personnel to monitor and service the storage system via the SP.
Refer to the Secure Service Architecture white paper for additional information.
NOTE:
All networking equipment, including all necessary switches, hubs, and cables, are to be
provided by the customer unless otherwise indicated.
Supported Network Topologies
Several different network topologies can be used to connect the storage system to the local area
network, depending on operating site policies and requirements. Currently, the three major
supported topologies are shared , split , and private . However, other possible network
configurations might be available. To learn more, ask your sales and support representative.
NOTE:
To provide redundancy and to permit online software upgrades, both controller nodes
in a single horizontal node pair (for example, nodes 0 and 1, nodes 2 and 3, and so on) must
maintain connections to the internal customer network.
NOTE: The SP is often unused or powered off in the CC mode configuration. In some instances,
the SP is only active for maintenance operations and software updates.
Shared Network
With a shared network topology, the storage system and SP share the internal customer network
(Figure 20 (page 38)).
Planning Network Access
37
Figure 20 Storage System and SP on the Customer Network (Shared Topology)
A shared topology requires:
•
A static IP address and system name for the storage system.
•
Two Ethernet connections from a switch or hub to the storage system controller nodes.
•
A static IP address for the SP.
•
One Ethernet connection from a switch or hub to the SP.
•
At least one management station on the network segment.
Private Network
With a private network topology, the storage system and the SP sit on the same private network
segment on the customer local area network. All management workstations used to administer the
system must also sit on the same private network segment (Figure 21 (page 38)).
Figure 21 Storage System and SP on a Private Segment (Private Topology)
A private topology requires:
38
•
A static IP address for the storage system.
•
Two Ethernet connections from the storage system to a private network segment.
•
One Ethernet connection from the SP to the private network segment.
•
At least one management station on the private network segment.
Network, Cabling and Connectivity
NOTE:
It is strongly recommended that the private network segment also have a management
station to communicate with the SP.
NOTE:
This configuration does not permit the SP to communicate with the remote support center.
TCP/IP Port Assignments
Table 16 (page 39) describes the TCP/IP port assignments for communication between various
components:
Table 16 TCP/IP Port Usage Table
Port
Usage
22: The Secure Shell
(SSH) Protocol
Used for storage system monitoring
and configuration through SSH
connections by the following
components:
Flow of Traffic
HP 3PAR Service Processor SSH Client
--> HP 3PAR Storage System
HP 3PAR Service Processor
3rd Party SSH Client <--> HP 3PAR
Service Processor
HP 3PAR InForm CLI Client
3rd Party SSH Client <--> HP 3PAR CLI
Client
80: World Wide Web
HTTP
Used by the following component to
communicate using the HTTP protocol:
HP 3PAR Service Processor
HP 3PAR Service Processor -->
WWW
Not part of an evaluated configuration
for Common Criteria
161: SNMP
Used for storage system monitoring
and configuration by third-party SNMP
Manager applications by the following
component:
• HP 3PAR SNMP Agent
3rd Party SNMP Manager <-> HP 3PAR SNMP agent
Not part of an evaluated configuration
for Common Criteria
162: SNMPTRAP
Used by the HP 3PAR SNMP agent to
send unsolicited alerts as SNMPv2c
traps for 3rd party SNMP Manager
applications by the following
components:
• HP 3PAR SNMP Agent
3rd Party SNMP Manager <-- HP
HP 3PAR SNMP agent
Not part of an evaluated configuration
for Common Criteria
427: Service Location Protocol (SLP)
Used by the HP 3PAR CIM API to
provide CIM Server location
information by the following
component:
• HP 3PAR CIM Server
3rd Party CIM Client <-->
HP 3PAR CIM Server
Not part of an evaluated configuration
for Common Criteria
TCP/IP Port Assignments
39
Table 16 TCP/IP Port Usage Table (continued)
Port
Usage
5781: HP 3PAR Event Reporting
Service
Passes unsolicited events from the
storage system and is used by the
following component:
• HP 3PAR Service Processor
Flow of Traffic
Service Processor <--> storage system
Event Service
(This port was used for IMC events
prior to OS version 2.3.1.)
Not part of an evaluated configuration
for Common Criteria
5782: HP 3PAR
Management
Service (unsecured)
Used for storage system monitoring
and configuration over an unsecured
channel by the following components:
• HP 3PAR InForm Management
Console
HP 3PAR IMC <--> HP 3PAR CLI
Server
• HP 3PAR InForm CLI
HP 3PAR CLI <--> HP 3PAR CLI Server
• HP 3PAR Recovery Manager
• HP 3PAR System Reporter
Recovery Manager <--> HP 3PAR CLI
Server
HP 3PAR System Reporter <--> HP
(Port 2540 used prior to 2.2.4.)
3PAR CLI Server
Not part of an evaluated configuration HP 3PAR Service Processor --> HP
for Common Criteria
3PAR CLI Server
• HP 3PAR Service Processor
5783: HP 3PAR
Management
Service with SSL
(secured)
Used for storage system monitoring
and configuration over a secured
channel by the following components:
• HP 3PAR InForm Management
Console
HP 3PAR IMC <--> HP 3PAR CLI
Server
• HP 3PAR InForm CLI
HP 3PAR CLI <--> HP 3PAR CLI Server
• HP 3PAR Recovery Manager
• HP 3PAR System Reporter
(Port 2550 was used prior to 2.2.4)
5785: HP 3PAR InForm
Remote Copy
Recovery Manager <--> HP 3PAR CLI
Server
HP 3PAR System Reporter <--> HP
3PAR CLI Server
HP 3PAR Service Processor --> HP
3PAR CLI Server
Used by the Remote Copy service to
receive remote replication storage
data sent by the Remote Copy service
from another storage system Storage
Array.
HP 3PAR Remote Copy on storage
system
<-- HP 3PAR Remote Copy on
Not part of evaluated configuration in
storage
system
CC mode.
Remote Copy
(A dynamic port is allocated for
(Ports 3490/3491 used for 2.2.2 and sending data from the RC Service on
the storage system.)
prior -- ports 3491/3492 used for
2.2.3 and 2.2.4).
Unsecured port used by the Remote
Copy application to transport data (it
does not exist on the management
LAN and is only visible/active on RCIP
network segments)
5988: WBEM CIM-XML (HTTP)
(unsecured)
40
Network, Cabling and Connectivity
Used for storage system monitoring
and configuration over an unsecured
channel by the following component:
Table 16 TCP/IP Port Usage Table (continued)
Port
Usage
Flow of Traffic
HP 3PAR CIM Server
3rd Party CIM Client <--> HP 3PAR
Not part of an evaluated configuration CIM Server
for Common Criteria
5989: WBEMCIM-XML (HTTPS)
(secured)
Used for storage system monitoring
and configuration over a secured
channel by the following component:
HP 3PAR CIM Server
Not part of an evaluated configuration
for Common Criteria
3rd Party CIM Client <-->HP 3PAR CIM
Server
NOTE: If configured to do so, the storage system is capable of communication with a customer
defined host via UDP port 514 (syslog). Not part of an evaluated configuration for Common Criteria
Fibre Channel Connections
Fibre Channel adapters are used to connect to the customer FC switch and/or hosts and connect
controller nodes to drive chassis within the system. The number of ports available for the host
connection will vary based on the configuration. Depending on the number of controller nodes in
the system, the type of Fibre Channel adapters installed, and the method of drive chassis connection
being used, a storage system can support a maximum of 32 drive chassis. Controller nodes can
hold a maximum of six PCI adapters (Figure 22 (page 42) for the S-Class and Figure 23 (page 42)
for the T-Class).
NOTE:
Ethernet Port (E0) is also used for the management interface connection.
Fibre Channel Connections
41
Figure 22 S-Class Controller Node Fibre Channel Ports (Dual-Port Adapters)
Figure 23 T-Class Controller Node Fibre Channel Ports (Dual-Port Adapters)
42
Network, Cabling and Connectivity
Fibre Channel adapters can have either two ports (dual-port adapters ) or four ports (quad-port
adapters).
Required Cables
The quantities and lengths of the cables required for storage system installation vary according to
the specific storage system and network configuration. Fibre Channel cables are used externally
to connect the controller node to the customer switch or host (in the case of a directly connected
host). Fibre Channel cables are used internally to connect the controller node to the drive chassis
(inter-cabinet or cabinet to cabinet).
The Fibre Channel cables provided by HP have a custom strain relief feature to help maintain the
proper bend radius of the cables. For this reason, 3PAR requires that you use only Fibre Channel
cables provided by HP. However, HP does not provide any networking cables or equipment such
as Ethernet and modem cables. Table 7 (page 12) identifies the types of cables commonly required
for storage system installation.
Table 17 Required Cables
Cable Type
Outside Diameter
Connector Type
Ethernet (Category 5) 3 cables
minimum with 2 static IPs
Standard
RJ-45
Multi-mode Fibre Channel
1.6 mm
LC-LC or LC-SC
iSCSI
Standard
Cat-5, Cat-5e, Cat-6 copper
(1–Gb/sec)
NOTE:
For Ethernet and Fibre Channel cables that connect the storage system to the network
and hosts, reserve approximately 7 feet (2 meters) of each cable for internal routing within the
storage system cabinet. Measure the distance between the two cabinets and add 14 feet (4 meters)
to determine the total length of cable required.
External Cable Connections
Table 18 (page 43) includes specific guidelines for connecting the controller nodes to the network
and to host computers. Refer to “Supported Network Topologies” (page 37) for descriptions of the
supported network topologies.
Table 18 External Controller Node Connections
Connection Type
Minimum Configuration
Recommended Configuration
Ethernet
Connection from the
Ethernet switch or hub to
two controller nodes
See “Supported Network Topologies” (page 37)
Fibre Channel
Connection from a host
computer to one controller
node
Separate connections from host computers to each node, via a switch,
with connections distributed evenly across all nodes1
iSCSI
Connection from a host
computer to one controller
node
Separate connections from host computers to each node, via a switch,
with connections distributed evenly across all nodes2
Maintenance
None
Varies according to system and network configuration
Required Cables
43
1
2
To provide redundancy and to permit online software
(for example, nodes 0 and 1, nodes 2 and 3, and so
To provide redundancy and to permit online software
(for example, nodes 0 and 1, nodes 2 and 3, and so
•
upgrades, both controller nodes in a single horizontal node pair
on) must maintain connections to each host server.
upgrades, both controller nodes in a single horizontal node pair
on) must maintain connections to each host server.
Each controller node supports one Ethernet connection to a switch or hub. Separate connections
from the Ethernet switch or hub to at least two controller nodes are required to support
redundancy.
With redundancy, one IP address is shared between the two connections and only one network
connection is active at a time. If the active network connection fails, the IP address is
automatically moved to the surviving network connection.
•
At a minimum, the storage system requires one Fibre Channel (or iSCSI) connection from a
host computer to a controller node. However, separate connections from each host computer
to each of the controller nodes in the storage system, with connections distributed evenly across
all nodes, are recommended.
•
Establish direct connections from the controller nodes to the host computer or computers.
(Table 9 (page 12)) shows the maximum supported Fibre Channel cable length based on the cable
size and port speed.
Table 19 Cable Limitations for Fibre Channel Host Connectivity
Cable Size
Speed
Cable Length Limit
62.5 micron
2 Gbps
100 meters
62.5 micron
4 Gbps
70 meters
50 micron
2 Gbps
300 meters
50 micron
4 Gbps
150 meters
Internal Cable Connections
For storage systems housed in single cabinets, internal system Fibre Channel cabling is complete
upon arrival. For multiple-cabinet configurations, the installation technician completes connections
between the controller node cabinet and the drive chassis cabinet or cabinets.
NOTE:
For important exceptions to the cabling rules and guidelines described in this section,
see the HP 3PAR InForm OS Administrator’s Guide .
The following table (Table 8 (page 12)) shows the typical HP Fibre Channel cable lengths required
for a given type of connection:
Table 20 Fibre Channel Cable Usage Guidelines
Cable Length
Used for...
2m
drive chassis to controller node connections in the same side of the same cabinet
(for example, an even-numbered drive cage to an even-numbered node).
4m
drive chassis to controller node connections across the same cabinet (for example,
an even-numbered drive cage to an odd-numbered node).
10m
cabling between cabinets. Always round up to the nearest size.
50m
100m
44
Network, Cabling and Connectivity
Cable Routing Options
Storage system cabinets have both upper and lower access openings available for Fibre Channel
cable routing (Figure 24 (page 45)). It is also possible to route network cables and main power
cords through specially designated upper and lower openings in the cabinet.
Figure 24 Bringing Cables Into the Cabinets Through Access Openings
NOTE:
For GbE, iSCSI and Fibre Channel cables that connect the storage system to the customer
network or hosts, approximately 7 feet (2 meters) of each cable must be reserved for internal
routing within the storage system cabinet.
Service Processor Connections
The SP provides support for on-site diagnostic and maintenance activities for HP 3PAR Storage
systems (hardware and software maintenance). It can also be used to provide remote monitoring
and support. The SP is not a part of the evaluated Common Criteria configuration. Refer to the HP
3PAR InForm OS Common Criteria Administrator’s Reference for additional information.
Connecting the Service Processor
The SP uses customer-supplied connections, as outlined in “Supported Network Topologies”
(page 37). Table 21 (page 46) provides general guidelines for completing these external
connections.
Cable Routing Options
45
Table 21 SP Connections
46
Connection type
Configuration
Ethernet
For SP: connection from the RJ-45 connector in the ETH 0 port at the rear of the SP to an Ethernet
hub or switch ( Figure 24 (page 45) or ???).
Modem (optional)
Connection from the line serial port at the rear of the SP to an RJ-11 modular telephone outlet.
Network, Cabling and Connectivity
6 Support and Other Resources
Contacting HP
For worldwide technical support information, see the HP support website:
http://www.hp.com/support
Before contacting HP, collect the following information:
•
Product model names and numbers
•
Technical support registration number or Service Agreement ID (if applicable)
•
Product serial numbers
•
Error messages
•
Operating system type and revision level
•
Detailed questions
Specify the type of support you are requesting:
HP 3PAR storage system
Support request
HP 3PAR StoreServ 7200, 7400, and 7450 Storage
systems
StoreServ 7000 Storage
HP 3PAR StoreServ 10000 Storage systems
3PAR or 3PAR Storage
HP 3PAR T-Class storage systems
HP 3PAR F-Class storage systems
HP 3PAR documentation
For information about:
See:
Supported hardware and software platforms
The Single Point of Connectivity Knowledge for HP
Storage Products (SPOCK) website:
http://www.hp.com/storage/spock
Locating HP 3PAR documents
The HP 3PAR StoreServ Storage site:
http://www.hp.com/go/3par
To access HP 3PAR documents, click the Support link for
your product.
HP 3PAR storage system software
Storage concepts and terminology
HP 3PAR StoreServ Storage Concepts Guide
Using the HP 3PAR Management Console (GUI) to configure HP 3PAR Management Console User's Guide
and administer HP 3PAR storage systems
Using the HP 3PAR CLI to configure and administer storage
systems
HP 3PAR Command Line Interface Administrator’s
Manual
CLI commands
HP 3PAR Command Line Interface Reference
Analyzing system performance
HP 3PAR System Reporter Software User's Guide
Installing and maintaining the Host Explorer agent in order
to manage host configuration and connectivity information
HP 3PAR Host Explorer User’s Guide
Creating applications compliant with the Common Information HP 3PAR CIM API Programming Reference
Model (CIM) to manage HP 3PAR storage systems
Contacting HP
47
For information about:
See:
Migrating data from one HP 3PAR storage system to another HP 3PAR-to-3PAR Storage Peer Motion Guide
48
Configuring the Secure Service Custodian server in order to
monitor and control HP 3PAR storage systems
HP 3PAR Secure Service Custodian Configuration Utility
Reference
Using the CLI to configure and manage HP 3PAR Remote
Copy
HP 3PAR Remote Copy Software User’s Guide
Updating HP 3PAR operating systems
HP 3PAR Upgrade Pre-Planning Guide
Identifying storage system components, troubleshooting
information, and detailed alert information
HP 3PAR F-Class, T-Class, and StoreServ 10000 Storage
Troubleshooting Guide
Installing, configuring, and maintaining the HP 3PAR Policy
Server
HP 3PAR Policy Server Installation and Setup Guide
Support and Other Resources
HP 3PAR Policy Server Administration Guide
For information about:
See:
Planning for HP 3PAR storage system setup
Hardware specifications, installation considerations, power requirements, networking options, and cabling information
for HP 3PAR storage systems
HP 3PAR 7200, 7400, and 7450 storage systems
HP 3PAR StoreServ 7000 Storage Site Planning Manual
HP 3PAR StoreServ 7450 Storage Site Planning Manual
HP 3PAR 10000 storage systems
HP 3PAR StoreServ 10000 Storage Physical Planning
Manual
HP 3PAR StoreServ 10000 Storage Third-Party Rack
Physical Planning Manual
Installing and maintaining HP 3PAR 7200, 7400, and 7450 storage systems
Installing 7200, 7400, and 7450 storage systems and
initializing the Service Processor
HP 3PAR StoreServ 7000 Storage Installation Guide
HP 3PAR StoreServ 7450 Storage Installation Guide
HP 3PAR StoreServ 7000 Storage SmartStart Software
User’s Guide
Maintaining, servicing, and upgrading 7200, 7400, and
7450 storage systems
HP 3PAR StoreServ 7000 Storage Service Guide
Troubleshooting 7200, 7400, and 7450 storage systems
HP 3PAR StoreServ 7000 Storage Troubleshooting Guide
HP 3PAR StoreServ 7450 Storage Service Guide
HP 3PAR StoreServ 7450 Storage Troubleshooting Guide
Maintaining the Service Processor
HP 3PAR Service Processor Software User Guide
HP 3PAR Service Processor Onsite Customer Care
(SPOCC) User's Guide
HP 3PAR host application solutions
Backing up Oracle databases and using backups for disaster HP 3PAR Recovery Manager Software for Oracle User's
recovery
Guide
Backing up Exchange databases and using backups for
disaster recovery
HP 3PAR Recovery Manager Software for Microsoft
Exchange 2007 and 2010 User's Guide
Backing up SQL databases and using backups for disaster
recovery
HP 3PAR Recovery Manager Software for Microsoft SQL
Server User’s Guide
Backing up VMware databases and using backups for
disaster recovery
HP 3PAR Management Plug-in and Recovery Manager
Software for VMware vSphere User's Guide
Installing and using the HP 3PAR VSS (Volume Shadow Copy HP 3PAR VSS Provider Software for Microsoft Windows
Service) Provider software for Microsoft Windows
User's Guide
Best practices for setting up the Storage Replication Adapter HP 3PAR Storage Replication Adapter for VMware
for VMware vCenter
vCenter Site Recovery Manager Implementation Guide
Troubleshooting the Storage Replication Adapter for VMware HP 3PAR Storage Replication Adapter for VMware
vCenter Site Recovery Manager
vCenter Site Recovery Manager Troubleshooting Guide
Installing and using vSphere Storage APIs for Array
Integration (VAAI) plug-in software for VMware vSphere
HP 3PAR VAAI Plug-in Software for VMware vSphere
User's Guide
Servicing HP 3PAR storage systems
For information about:
See:
Maintaining the HP 3PAR Service Processor
HP 3PAR documentation
49
Initializing and using the Service Processor
HP 3PAR Service Processor Software User Guide: Service
Edition
Upgrading the Service Processor
HP 3PAR Service Processor Software Upgrade
Instructions: Service Edition
Troubleshooting the Service Processor
HP 3PAR Service Processor Troubleshooting Guide:
Service Edition
Remotely servicing all storage systems
Remotely servicing HP 3PAR storage systems
HP 3PAR Secure Service Collector Remote Operations
Guide
Servicing 7200 and 7400 storage systems
Maintaining, servicing, and upgrading 7200 and 7400
storage systems
HP 3PAR StoreServ 7000 Storage Service Guide: Service
Edition
Troubleshooting 7200 and 7400 storage systems
HP 3PAR StoreServ 7000 Storage Troubleshooting
Guide: Service Edition
Servicing 10000 storage systems
Using the Installation Checklist
HP 3PAR StoreServ 10000 Storage Installation Checklist
(for HP 3PAR Cabinets): Service Edition
Upgrading 10000 storage systems
HP 3PAR StoreServ 10000 Storage Upgrade Guide:
Service Edition
Maintaining 10000 storage systems
HP 3PAR StoreServ 10000 Storage Maintenance
Manual: Service Edition
Installing and uninstalling 10000 storage systems
HP 3PAR StoreServ 10000 Storage Installation and
Deinstallation Guide: Service Edition
Servicing T-Class storage systems
Using the Installation Checklist
HP 3PAR T-Class Storage System Installation Checklist
(for HP 3PAR Cabinets): Service Edition
Upgrading T-Class storage systems
HP 3PAR T-Class Storage System Upgrade Guide:
Service Edition
Maintaining T-Class storage systems
HP 3PAR T-Class Storage System Maintenance Manual:
Service Edition
Installing and uninstalling the T-Class storage system
HP 3PAR T-Class Installation and Deinstallation Guide:
Service Edition
Servicing F-Class storage systems
50
Using the Installation Checklist
HP 3PAR F-Class Storage System Installation Checklist
(for HP 3PAR Cabinets): Service Edition
Upgrading F-Class storage systems
HP 3PAR F-Class Storage System Upgrades Guide:
Service Edition
Maintaining F-Class storage systems
HP 3PAR F-Class Storage System Maintenance Manual:
Service Edition
Installing and uninstalling the F-Class storage system
HP 3PAR F-Class Storage System Installation and
Deinstallation Guide: Service Edition
Support and Other Resources
Typographic conventions
Table 22 Document conventions
Convention
Element
Bold text
• Keys that you press
• Text you typed into a GUI element, such as a text box
• GUI elements that you click or select, such as menu items, buttons,
and so on
Monospace text
• File and directory names
• System output
• Code
• Commands, their arguments, and argument values
<Monospace text in angle brackets> • Code variables
• Command variables
Bold monospace text
• Commands you enter into a command line interface
• System output emphasized for scannability
WARNING! Indicates that failure to follow directions could result in bodily harm or death, or in
irreversible damage to data or to the operating system.
CAUTION:
NOTE:
Indicates that failure to follow directions could result in damage to equipment or data.
Provides additional information.
Required
Indicates that a procedure must be followed as directed in order to achieve a functional and
supported implementation based on testing at HP.
HP 3PAR branding information
•
The server previously referred to as the "InServ" is now referred to as the "HP 3PAR StoreServ
Storage system."
•
The operating system previously referred to as the "InForm OS" is now referred to as the "HP
3PAR OS."
•
The user interface previously referred to as the "InForm Management Console (IMC)" is now
referred to as the "HP 3PAR Management Console."
•
All products previously referred to as “3PAR” products are now referred to as "HP 3PAR"
products.
Typographic conventions
51
7 Documentation feedback
HP is committed to providing documentation that meets your needs. To help us improve the
documentation, send any errors, suggestions, or comments to Documentation Feedback
([email protected]). Include the document title and part number, version number, or the URL
when submitting your feedback.
52
Documentation feedback
A Regulatory information
For important safety, environmental, and regulatory information, see Safety and Compliance
Information for Server, Storage, Power, Networking, and Rack Products, available at http://
www.hp.com/support/Safety-Compliance-EnterpriseProducts.
Turkey RoHS material content declaration
Türkiye Cumhuriyeti: EEE Yönetmeliğine Uygundur
Ukraine RoHS material content declaration
Обладнання відповідає вимогам Технічного регламенту щодо обмеження використання деяких
небезпечних речовин в електричному та електронному обладнанні, затвердженого постановою
Кабінету Міністрів України від 3 грудня 2008 № 1057
Warranty information
HP ProLiant and X86 Servers and Options
http://www.hp.com/support/ProLiantServers-Warranties
HP Enterprise Servers
http://www.hp.com/support/EnterpriseServers-Warranties
HP Storage Products
http://www.hp.com/support/Storage-Warranties
HP Networking Products
http://www.hp.com/support/Networking-Warranties
Turkey RoHS material content declaration
53