1
HP 3PAR StoreServ 7000 Storage SmartStart
1.2 Software User's Guide
Abstract
This document provides the information needed to use HP 3PAR SmartStart to install and configure HP 3PAR StoreServ 7000
Storage systems.
HP Part Number: QL226-96854
Published: June 2013
© Copyright 2012–2013 Hewlett-Packard Development Company, L.P.
Confidential computer software. Valid license from HP required for possession, use or copying. Consistent with FAR 12.211 and 12.212, Commercial
Computer Software, Computer Software Documentation, and Technical Data for Commercial Items are licensed to the U.S. Government under
vendor's standard commercial license.
The information contained herein is subject to change without notice. The only warranties for HP products and services are set forth in the express
warranty statements accompanying such products and services. Nothing herein should be construed as constituting an additional warranty. HP shall
not be liable for technical or editorial errors or omissions contained herein.
Acknowledgements
Microsoft, Windows, Windows Server 2008 R2, and Windows Server 2012 are either registered trademarks or trademarks of Microsoft Corporation.
Java and Oracle are registered trademarks of Oracle and/or its affiliates.
All other trademarks and registered trademarks are owned by their respective owners.
Contents
I Using SmartStart to Configure Storage............................................................6
Welcome..................................................................................................7
1 Prepare to Configure...............................................................................9
FAQ.................................................................................................................................11
2 Setting Up the Service Processor.............................................................13
Accessing the Service Processor Setup Wizard.......................................................................13
Configuring Service Processor Networking............................................................................14
Configuring Remote Support................................................................................................14
Configuring System Support Information................................................................................15
Configuring Your Time Zone................................................................................................15
Changing Passwords..........................................................................................................15
Troubleshooting.................................................................................................................16
Troubleshooting the Connection to the Service Processor.....................................................16
Troubleshooting Duplicate IP Address Issues......................................................................16
Troubleshooting “Page Not Found” IP Address Issues.........................................................16
3 Setting Up the HP 3PAR StoreServ Storage System.....................................17
Locating the Serial Number.................................................................................................17
Configuring Networking.....................................................................................................18
Configuring Your Time Zone................................................................................................18
Changing the HP 3PAR StoreServ Storage System Password.....................................................18
Monitoring Setup Progress..................................................................................................18
Continuing SmartStart Setup................................................................................................19
Troubleshooting: Adding the Storage System to the Service Processor...................................19
Setting Up Local Notification..........................................................................................19
Validating Remote Support..................................................................................................19
Troubleshooting System Setup..............................................................................................20
Collecting SmartStart Log Files........................................................................................20
Collecting Service Processor Log Files..............................................................................20
Contacting HP Support about System Setup......................................................................21
Verifying the HP 3PAR OS on the Service Processor...........................................................21
4 Connect to the HP 3PAR StoreServ 7000 Storage System...........................22
5 Configure the Hosts...............................................................................23
Configure the Fibre Channel Host.........................................................................................25
Introduction to Configuring the Fibre Channel Host............................................................25
Connect to the Fibre Channel Host System........................................................................26
Validate the Fibre Channel HBA Setup on the Host............................................................26
Validate the Fibre Channel Connection............................................................................26
Configure Multipath I/O (MPIO).....................................................................................27
Install and Start Host Explorer.........................................................................................27
Summary: Fibre Channel Host Configuration.....................................................................28
Configure the iSCSI Host.....................................................................................................28
Introduction to Configuring the iSCSI Host........................................................................28
Connect to the iSCSI Host System....................................................................................28
Configure Multipath I/O (MPIO).....................................................................................29
Start the iSCSI Initiator...................................................................................................29
Configure the iSCSI Port.................................................................................................29
Configure the iSCSI Target..............................................................................................30
Install and Start Host Explorer.........................................................................................30
Contents
3
Summary: iSCSI Host Configuration.................................................................................30
6 Configure Storage................................................................................31
Create Hosts.....................................................................................................................32
Welcome to the Create Host Wizard...............................................................................32
Host Settings................................................................................................................33
Fibre Channel Settings...................................................................................................33
iSCSI Settings...............................................................................................................33
Summary.....................................................................................................................34
Create Virtual Volumes.......................................................................................................34
Welcome to the Create Virtual Volumes Wizard................................................................34
Configure Virtual Volume...............................................................................................34
Policies and Geometry...................................................................................................35
Summary.....................................................................................................................36
Export Virtual Volumes........................................................................................................36
Welcome to the Export Virtual Volumes Wizard................................................................36
Export.........................................................................................................................36
Summary.....................................................................................................................37
Add Virtual Volumes to Windows.........................................................................................37
Introduction to Adding Virtual Volumes to Windows...........................................................37
Connect to the Host.......................................................................................................37
Add Virtual Volumes to Windows....................................................................................38
Summary: Add Virtual Volumes to Windows Wizard.........................................................38
7 Install the HP 3PAR Management Console................................................39
II Understanding Storage..............................................................................40
8 Storage Software Components...............................................................41
9 Hosts..................................................................................................44
Creating and Removing Hosts..............................................................................................44
Host Personas....................................................................................................................44
The Host Explorer Software Agent........................................................................................44
10 Common Provisioning Groups...............................................................46
11 Virtual Volumes...................................................................................47
Virtual Volume Types..........................................................................................................47
Physical Copies.................................................................................................................48
Virtual Copies...................................................................................................................48
12 Exporting Virtual Volumes....................................................................50
VLUN Templates and Active VLUNs......................................................................................50
13 RAID.................................................................................................51
RAID Types.......................................................................................................................51
14 User Roles and Rights..........................................................................52
15 Managing Storage..............................................................................53
III Additional Resources................................................................................54
16 Additional Resources...........................................................................55
17 Support and Other Resources...............................................................57
Contacting HP...................................................................................................................57
HP 3PAR documentation.....................................................................................................57
Typographic conventions.....................................................................................................60
HP 3PAR branding information............................................................................................60
4
Contents
18 Documentation feedback......................................................................61
Glossary....................................................................................................62
Contents
5
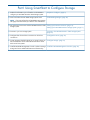
Part I Using SmartStart to Configure Storage
1. Gather the information you will need to use SmartStart to
configure your HP 3PAR StoreServ 7000 Storage system.
“Prepare to Configure” (page 9)
2. Learn more about how HP 3PAR storage systems work.
“Understanding Storage” (page 40)
NOTE: If you are not familiar with HP 3PAR storage systems,
HP highly recommends that you read this short introduction.
3. Set up the Service Processor and the HP 3PAR StoreServ 7000 “Setting Up the Service Processor” (page 13)
Storage system.
“Setting Up the HP 3PAR StoreServ Storage System” (page 17)
4. Connect to your new storage system.
“Connect to the HP 3PAR StoreServ 7000 Storage System”
(page 22)
5. Configure Fibre Channel host connections or iSCSI host
connections.
“Configure the Hosts” (page 23)
6. Create storage and add the ability to use virtual volumes on “Configure Storage” (page 31)
Microsoft Windows Server 2008 R2 and Windows Server
2012 server host systems.
7. Install the HP 3PAR Management Console in order to manage “Install the HP 3PAR Management Console” (page 39)
storage and access additional features and functionality.
Welcome
Welcome to HP 3PAR SmartStart for HP 3PAR StoreServ 7000 Storage systems.
SmartStart helps you configure:
•
HP 3PAR StoreServ 7200 Storage system
•
HP 3PAR StoreServ 7400 Storage system
•
HP 3PAR StoreServ 7450 Storage system
NOTE: If you are setting up multiple HP 3PAR StoreServ 7000 Storage systems, be sure to set
up each storage system completely before starting to set up the next storage system.
SmartStart can take up to one minute to open.
Navigating SmartStart
Use the links in the SmartStart navigation pane to access each configuration step in the order
presented.
Each configuration step displays in the information pane the substeps or options necessary to
complete that step of the configuration.
NOTE: SmartStart might at times display a progress bar for up to 10 minutes while completing
operations. The progress bar dialog box does not allow you to cancel the operation because doing
so can lead to unpredictable results and interrupt normal functionality.
7
Accessing Online Help
To view online help, do one of the following:
8
•
Press F1.
•
Select Help→Online Help.
1 Prepare to Configure
Prerequisites
IMPORTANT: Before using SmartStart to configure your system, you must complete the setup tasks
detailed in the HP 3PAR StoreServ 7000 Storage Installation Guide.
To access the HP 3PAR StoreServ 7000 Storage Installation Guide, go to the HP 3PAR StoreServ
Storage site and click the Support link for your product:
http://www.hp.com/go/3par
A DHCP network is no longer required to set up a virtual Service Processor (VSP). For more
information about how to manually set the VSP IP address when DHCP is not available, see the
HP 3PAR StoreServ 7000 Storage Installation Guide.
NOTE:
The Service Processor and StoreServ storage system must be on the same subnet.
Before you configure your new HP 3PAR StoreServ 7000 Storage system:
•
Verify that the following setup tasks are complete, as described in the HP 3PAR StoreServ
7000 Storage Installation Guide:
◦
All components are installed.
◦
If you are using a VSP, the system time is set to the correct time of day on the ESXi host.
9
•
◦
The HP 3PAR storage system setup is verified, the storage system is powered on, and the
LEDs are functioning correctly.
◦
Either the physical Service Processor is installed and powered on and you have assigned
it an IP address, or the virtual Service Processor is installed and connected and you have
determined the temporary IP address.
Make sure you have the following:
◦
Administrative access to the Windows host systems you are configuring
If you are planning to configure a remote host system (a machine other than the machine
into which you inserted the SmartStart media), you must be able to use the same ID and
password to gain administrator access to both the system running SmartStart (the local
host) and the remote host.
◦
Rights to configure storage
To configure storage, your user account on the HP 3PAR storage system must either be
assigned a Super user or Edit role or be granted the following rights:
◦
–
host_create
–
vv_create
–
vlun_create
The necessary Service Processor and HP 3PAR storage system information for initialization
and configuration
For more information, see your completed Storage System Software Installation Checklist
from the HP 3PAR StoreServ 7000 Site Planning Manual.
–
Service Processor information
–
The Service Processor IP address, subnet mask, and gateway IP address
For more information about determining the temporary IP address and assigning
the permanent IP address, see the HP 3PAR StoreServ 7000 Storage Installation
Guide.
–
Host name to assign
–
DNS settings (if applicable)
–
Proxy server settings (if applicable)
–
New password to assign to the user account for the two Storage System Setup
wizards (setupusr)
–
New password to assign to the user account for the Service Processor (3parcust)
NOTE: Passwords for the setupusr and 3parcust user accounts must be between
7 and 32 characters in length and can consist of alphanumeric characters and
the following special characters: period (.), plus sign (+), dash (-), equals sign
(=), and forward slash (/).
–
HP 3PAR StoreServ Storage system information
–
Storage system serial number
This seven-digit number is located on the back of your HP 3PAR StoreServ Storage
system next to the power switch for the node enclosure power cooling module
(PCM1). It begins with “16” (for example, 1624635). For more information,
see “Locating the Serial Number” (page 17).
–
10
Prepare to Configure
Storage system name
–
IP address (IPv4 only)
–
Subnet mask
–
Gateway IP address
–
New password to assign to the user account for the storage system (3paradm)
NOTE: Passwords for the 3paradm user account are between six and eight
characters in length and can include all printable characters.
CAUTION: Do not run more than one instance of SmartStart on the same host system. Running
multiple instances of SmartStart can cause resource conflicts and operating errors.
About Storage
Before you begin to use SmartStart to install and set up your HP 3PAR StoreServ 7000 Storage
system, see the following section to learn more about how storage works on your new HP 3PAR
storage system:
“Understanding Storage” (page 40)
FAQ
1 What is HP 3PAR SmartStart?
HP 3PAR SmartStart is an installation wizard for your HP 3PAR StoreServ 7000 Storage systems.
SmartStart enables you to:
•
Initialize the HP 3PAR Service Processor
•
Initialize the HP 3PAR StoreServ 7000 Storage system
•
Configure FC and iSCSI host connections
•
Configure and begin data storage
•
Install the HP 3PAR Management Console, which you can use to manage storage and
create new storage after installation is complete
2 Can I use HP 3PAR SmartStart with Windows?
Yes. You can use HP 3PAR SmartStart with Windows Server 2008 R2 and Windows Server
2012.
3 Can I use HP 3PAR SmartStart with servers running other operating systems?
Not in this release. Refer to the HP 3PAR StoreServ 7000 Storage Installation Guide.
4 Can I use HP 3PAR SmartStart to configure other HP 3PAR StoreServ Storage systems?
Not in this release.
5 Can I use HP 3PAR SmartStart with Windows Server 2008 R2 and Windows Server 2012
servers connected by Fibre Channel?
Yes. You can use HP 3PAR SmartStart to set up Fibre Channel connections.
6 Can I use HP 3PAR SmartStart with Windows Server 2008 R2 and Windows Server 2012
servers connected by iSCSI?
Yes. You can use HP 3PAR SmartStart to set up iSCSI connections.
7 Do I need to configure the hosts by inserting the SmartStart media into each and every one of
the Windows Server 2008 R2 or Windows Server 2012 hosts?
No. You can insert the SmartStart media into a Windows Server 2008 R2 or Windows Server
2012 server and use SmartStart to remotely configure other Windows Server 2008 R2 or
Windows Server 2012 servers as hosts.
8 Where can I find help and support for HP 3PAR SmartStart?
FAQ
11
HP 3PAR SmartStart includes online help. To access online help, do one of the following:
•
Press F1.
•
Select Help > Online Help.
You can also find storage-related information at:
http://www.hp.com/storage
12
Prepare to Configure
2 Setting Up the Service Processor
Use SmartStart wizard step 2, Set up systems, to set up the Service Processor and the HP 3PAR
StoreServ Storage system. You need to set up the Service Processor and the storage system only
once for each new HP 3PAR storage system.
NOTE: After you have completed Service Processor setup, the Service Processor Setup wizard
does not allow you to re-enter the wizard. To modify Service Processor settings, use Service Processor
Onsite Customer Care (SPOCC).
You must set up the Service Processor before you can set up the HP 3PAR StoreServ Storage system.
The Service Processor enables you to perform administrative and diagnostic tasks.
To set up and configure the Service Processor:
1. Verify that the Service Processor is on.
2. Click the Set up the Service Processor link in SmartStart wizard step 2, Set up systems.
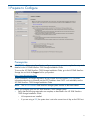
Accessing the Service Processor Setup Wizard
1.
In the IP Address field, do one of the following:
•
If you are setting up a virtual Service Processor (VSP), enter the temporary IP address for
this VSP.
•
If you are setting up a physical Service Processor, enter the permanent IP address you
assigned in the Service Processor IP Setup wizard.
Accessing the Service Processor Setup Wizard
13
For more information about determining the temporary IP address or assigning the Service
Processor IP address, see the HP 3PAR StoreServ 7000 Storage Installation Guide.
2.
In the User name field, enter setupusr.
You do not need to enter a password for setupusr to access this wizard for the first time.
3.
Click OK.
Troubleshooting Access
If you cannot access the Service Processor Setup wizard, collect the relevant log files and contact
HP support. For more information, see “Troubleshooting System Setup” (page 20).
Configuring Service Processor Networking
If you are setting up a new Service Processor, generate the Service Processor ID (SP ID). To do
this:
1. Enter the seven-digit HP 3PAR StoreServ Storage system serial number in the StoreServ Serial
Number field.
NOTE: The serial number is located on the back of the storage system next to the power
switch for the node enclosure power cooling module (PCM1). The serial number on HP 3PAR
StoreServ 7000 Storage systems begins with “16” (for example, 1612345).
2.
Click Generate SP ID. The SP ID is automatically generated.
If you are replacing a Service Processor, use the following procedure to generate the SP ID:
1. Click to select the Replacing a previous Service Processor (SP) check box, and then enter the
following information in the appropriate fields:
2.
•
Previous SP ID
•
StoreServ Storage system IP address
•
Login name
•
Password
Click Generate SP ID.
The resulting SP ID will be a 12–digit string that consists of SP000 (“SP” followed by three zeros)
followed by the storage system serial number. For example, if the storage system serial number is
1612345, the SP ID will be SP0001612345.
IMPORTANT: To generate the SP ID, the storage system must be connected and available on the
same subnet that the SP is on. This is because the storage system serial number that you enter is
verified by the Service Processor Setup Wizard by connecting to the factory-set IP address of the
storage system that has that serial number.
To complete the SP Networking step, enter the relevant information in your completed Storage
System Software Installation Checklist from the HP 3PAR StoreServ 7000 Site Planning Manual.
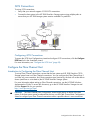
Configuring Remote Support
Remote Support enables HP to proactively provide you the best possible support for your HP 3PAR
StoreServ Storage system, including:
•
Timely remote service
•
Remote online software updates
•
Accelerated troubleshooting and issue resolution
Remote Support securely sends diagnostic information such as system health statistics, configuration
data, performance data, and system events to HP 3PAR Central. These diagnostics are required
14
Setting Up the Service Processor
for HP to perform fault detection and analysis on your HP 3PAR StoreServ Storage system that help
maximize your storage availability.
All remote communications are encrypted and transferred securely to HP 3PAR Central, and no
customer application data is ever transferred. No other business information is collected, and the
data is managed according to the HP Data Privacy policy. For more information, see:
http://www8.hp.com/us/en/privacy/privacy.html
To configure Remote Support:
1. Enter proxy server settings, if applicable.
2. To mask identifying information in all Service Processor log files, select the Make contents of
Service Processor log files anonymous check box in the Advanced group box.
When you anonymize log files, the Remote Support process replaces object names in log files
(such as “TopSecretVirtualVolume”) with meaningless sequential labels (such as “VVnnn”).
3.
Click Next to continue the Service Processor configuration. This wizard will enable Remote
Support upon completion.
Configuring System Support Information
To enable you to receive Remote Support for your storage system, you must provide the following
system support information:
•
Company name
•
Technical contact name
•
Telephone number
•
FAX number (optional)
•
E-mail address
•
Mailing address of the installation site
•
Order type
Configuring Your Time Zone
To configure the time zone, select your continental region (Africa, America, Antarctica, Arctic,
Asia, Atlantic, Australia, Europe, India, Pacific) and the city or country closest to you from the
drop-down lists.
NOTE: The time zones used in this wizard are based on the time zones listed in the tz database,
also known as the zoneinfo database or IANA Time Zone Database.
Changing Passwords
•
Enter a new, secure password for the setupusr user account.
You will use the setupusr user account and your new password to access the Storage System
Setup wizard and set up your HP 3PAR StoreServ Storage system. The setupusr account is
used only for the initial system setup to access the SP from the setup wizards.
•
Enter a new, secure password for the 3parcust user account, which you will use for Service
Processor Onsite Customer Care (SPOCC).
NOTE: Passwords for the setupusr and 3parcust user accounts must be between 7 and 32
characters in length and consist of alphanumeric characters and the following special characters:
period (.), plus sign (+), dash (-), equals sign (=), and forward slash (/).
NOTE: To reset a password for the Service Processor, log in to SPOCC. If you have lost all
Service Processor passwords and cannot log in to SPOCC, you must reimage the Service Processor.
Configuring System Support Information
15
Troubleshooting
Troubleshooting the Connection to the Service Processor
If the Check Your Connection dialog box appears during the setup process in Service Processor
Setup wizard step 7, Apply Settings, the Service Processor Setup wizard might be unable to connect
to the Service Processor.
Verify the following:
•
Your browser is still connected to the network.
•
The Service Processor is powered on.
•
The Service Processor is connected to the network.
When the Service Processor Setup wizard reconnects to the Service Processor, the Check Your
Connection dialog box automatically disappears and the setup process automatically resumes.
Troubleshooting Duplicate IP Address Issues
If the wizard cannot configure the permanent IP address you entered because it is already in use:
1. Click Stop to stop the Apply Settings process and return to the Service Processor Setup wizard.
2. Click Prev until you reach step 2, SP Networking.
3. Determine an available IPv4 address to use for the Service Processor, and then enter that IP
address in the IP Address field.
4. Click Next until you return to step 7, Apply Settings. (You do not need to re-enter any other
Service Processor settings.)
The wizard will automatically begin to apply the settings again.
Troubleshooting “Page Not Found” IP Address Issues
If the Service Processor displays a Page Not Found error message or similar message, the permanent
Service Processor IP address you entered is not a valid address. You must set up the Service
Processor again.
•
If you are using a physical Service Processor:
1. Return to the Set IP Address wizard and set up a new, valid IP address. For more
information, see the HP 3PAR StoreServ 7000 Storage Installation Guide.
To access the HP 3PAR StoreServ 7000 Storage Installation Guide, go to the HP 3PAR
StoreServ Storage site and click the Support link for your product:
http://www.hp.com/go/3par
2.
3.
•
16
Use the new permanent IP address to restart the Service Processor Setup wizard. For more
information, see “Setting Up the Service Processor” (page 13).
Proceed through the Service Processor Setup wizard, re-entering your Service Processor
settings. (The Service Processor ID is already set; you do not need to reset the ID.)
If you are using a virtual Service Processor:
1. Use the temporary SP IP address to restart the Service Processor Setup wizard. For more
information, see “Setting Up the Service Processor” (page 13).
2. Proceed through the Service Processor Setup wizard, re-entering your Service Processor
settings. (The Service Processor ID is already set; you do not need to reset the ID.)
Setting Up the Service Processor
3 Setting Up the HP 3PAR StoreServ Storage System
Before you can configure the HP 3PAR StoreServ Storage system, you must initialize it. The Storage
System Setup wizard verifies your HP 3PAR storage system configuration, initializes the storage
system, and runs initialization tests on the storage system.
To set up and configure the HP 3PAR storage system:
1. Verify that the Service Processor is on the same subnet of the network as the HP 3PAR StoreServ
7000 Storage system you are setting up.
2. Click the Set up the Storage System link in SmartStart wizard step 2, Set up systems.
3. Enter the permanent Service Processor IP address. For more information about Service Processor
IP addresses, see the HP 3PAR StoreServ 7000 Storage Installation Guide.
4. Enter the user name setupusr.
5. Enter the password for setupusr that you created in the Service Processor Setup wizard.
Troubleshooting Access
If you cannot access the Storage System Setup wizard, collect the relevant log files and contact
HP support. For more information, see “Troubleshooting System Setup” (page 20).
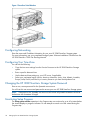
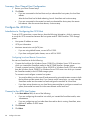
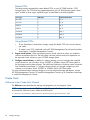
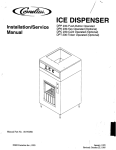
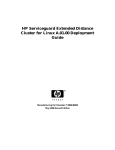
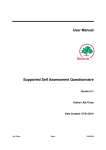
Locating the Serial Number
The serial number on your HP 3PAR StoreServ Storage system is the seven-digit number located
on the back of the storage system next to the power switch for the node enclosure power cooling
module (PCM1). It begins with “16” (for example, 1612345).
Locating the Serial Number
17
Figure 1 StoreServ Serial Number
Configuring Networking
Enter the name and IP address information for your new HP 3PAR StoreServ Storage system.
For more information, see your completed Storage System Software Installation Checklist from the
HP 3PAR StoreServ 7000 Site Planning Manual.
Configuring Your Time Zone
You can do the following:
•
Copy the time zone settings from the Service Processor to the HP 3PAR StoreServ Storage
system.
•
Enter a specific date and time.
•
Use the date and time settings on your NTP server, if applicable.
•
Select your continental region (Africa, America, Antarctica, Arctic, Asia, Atlantic, Australia,
Europe, India, Pacific) and the city or country closest to you from the drop-down lists.
Changing the HP 3PAR StoreServ Storage System Password
Enter a new, secure password for the 3paradm user account.
You will use this user account and password to access your new HP 3PAR StoreServ Storage system.
NOTE: Passwords for the 3paradm user account can include all printable characters and must
be between 6-8 characters in length.
Monitoring Setup Progress
The Setup system volumes operation in the Progress step can continue for up to 40 minutes before
the wizard displays a progress indicator. Do not attempt to cancel out of the wizard during the
Progress step.
18
Setting Up the HP 3PAR StoreServ Storage System
Continuing SmartStart Setup
After the Storage System Setup wizard initializes the HP 3PAR StoreServ Storage system, do the
following:
1. Click Finish in the Setup Progress and Results step to exit the Storage System Setup wizard.
NOTE: The wizard continues to run tests in the background after you have exited the Storage
System Setup wizard. If these tests discover any issues, the HP 3PAR Management Console
will display details in the Alert tab that is relevant to the issue.
2.
3.
4.
•
To install the Management Console, go to SmartStart wizard step 6, Install the
Management Console.
•
For more information about alerts, start the Management Console and open the HP 3PAR
Management Console Online Help.
Set up Local Notification. For more information, see “Setting Up Local Notification” (page 19).
Validate Remote Support setup. For more information, see “Validating Remote Support”
(page 19).
Continue to SmartStart wizard step 3, Connect to the storage system.
Troubleshooting: Adding the Storage System to the Service Processor
If the wizard cannot successfully add your HP 3PAR StoreServ 7000 Storage system to the Service
Processor, use the “Add New InServ” option in the SPmaint module in SPOCC to add the storage
system.
For more information, see the HP 3PAR Service Processor Onsite Customer Care (SPOCC) User’s
Guide. To access this document, go to the HP 3PAR StoreServ Storage site and click the Support
link for your product:
http://www.hp.com/go/3par
Setting Up Local Notification
Local Notification configures your HP 3PAR StoreServ Storage system to email you alerts as issues
occur (for example, if a CPG becomes low on space, a disk drive fails, and so on). To set up Local
Notification:
1. Enter your Service Processor network address.
2. Click Setup.
3. Click Enable Local Notification.
NOTE:
A mail host must also be configured in order to completely enable Local Notification.
For more information about Local Notification setup, see the HP 3PAR Service Processor Onsite
Customer Care (SPOCC) Online Help. For more information about alerts, see the HP 3PAR
Management Console Online Help.
Validating Remote Support
Remote Support validation is done as a part of the Service Processor setup. If you need to re-run
the Remote Support validation, you can use the SPmaint module in HP 3PAR Service Processor
Onsite Customer Care (SPOCC).
1. Log in to SPOCC (https://<SP IP>) using the 3parcust user account.
2. Click SPmaint→Network Configuration→Test 3PAR Secure Service Collector Server.
3. Verify that SPOCC displays Connectivity test to HP 3PAR Secure Service Collector Server
successful.
4. Verify that the Service Processor is transferring files successfully:
Continuing SmartStart Setup
19
a.
Click Home to return to the SPOCC home page.
The Transfer Status entry indicates the overall status of SP file transfer.
b.
c.
To access the SP File Transfer Monitor, click Transfer Status.
Verify that SP file transfer is successful:
•
The Last transfer status entry should include information about the last SP transfer,
including the date and time and a status of OK.
•
The Number of files on transfer queue and retry queue values should be 0 (zero),
which indicates the SP is currently able to pass files to the transport layer.
•
The Service Processor upload queue and SSAgent upload queue items show the
number of files in the queue and should display the date, time, and file name of the
most recent file to start uploading.
If this queue becomes long, the Service Processor is encountering transfer issues. To
remedy the situation, contact HP support. For more information, see “Troubleshooting
System Setup” (page 20).
The SP File Transfer Monitor refreshes every 15 seconds.
For more information, see the HP 3PAR Service Processor Onsite Customer Care (SPOCC) User’s
Guide.
For more information about Remote Support, see “Configuring Remote Support” (page 14).
Troubleshooting System Setup
If you cannot access the Service Processor Setup wizard, the Service Processor, or the Storage
System Setup wizard:
1. Collect the SmartStart log files.
2. Collect the Service Processor log files.
3. Contact HP support and request support for your StoreServ 7000 Storage product.
Collecting SmartStart Log Files
To collect the SmartStart log files for HP support, zip all the files in the following folder:
C:\Users\<username>\SmartStart\log
NOTE: You can continue to access the SmartStart log files in the Users folder after you have
removed SmartStart from your system.
Collecting Service Processor Log Files
To collect the Service Processor log files for HP support:
1. Connect to Service Processor Onsite Customer Care (SPOCC). To do this, enter the SP IP
address in a browser.
2. From the navigation pane, click Files.
3. Click the folder icons for files > syslog > apilogs.
4. In the Action column, click Download for each log file:
20
File name
Description
SPSETLOG.log
Service Processor setup log
ARSETLOG.system_serial_number.log
HP 3PAR StoreServ Storage system setup log
errorLog.log
General errors
Setting Up the HP 3PAR StoreServ Storage System
5.
Zip the downloaded log files.
Contacting HP Support about System Setup
For worldwide technical support information, see the HP support website:
http://www.hp.com/support
Before contacting HP about accessing the Service Processor Setup wizard or the Storage System
Setup wizard, collect the following information:
•
SmartStart log files
•
Service Processor log files
•
Product model names and numbers
•
Technical support registration number (if applicable)
•
Product serial numbers
•
Error messages
•
Operating system type and revision level
•
Detailed questions
When you contact HP, specify that you are requesting support for your StoreServ 7000 Storage
product.
Verifying the HP 3PAR OS on the Service Processor
To check the version of the HP 3PAR OS that is installed on your Service Processor, use the SPmaint
module in SPOCC to display the SP version.
1. Log in to SPOCC (https://<SP IP>) using the 3parcust account.
2. Click SPmaint→SP Control/Status.
3. Click Display SP Version.
4. Click Finish to exit the Service Processor Setup wizard.
5. Return to the SmartStart wizard.
For more information, see the HP 3PAR Service Processor Onsite Customer Care (SPOCC) User’s
Guide. To access this document, go to the HP 3PAR StoreServ Storage site, and then click the
Support link for your product:
http://www.hp.com/go/3par
Troubleshooting System Setup
21
4 Connect to the HP 3PAR StoreServ 7000 Storage System
1.
2.
3.
Click the Connect to the storage system link.
In the IP Address or Name field, do one of the following:
•
If this is the first time you are connecting to the HP 3PAR storage system, enter the name
or IP address of the HP 3PAR StoreServ 7000 Storage system.
•
If you have already connected to the HP 3PAR storage system one or more times, select
the storage system from the list.
Enter the user name and password.
To access your new HP 3PAR StoreServ 7000 Storage system for the first time, enter 3paradm
and the new password for 3paradm that you created in the Storage System Setup wizard.
CAUTION: You must configure hosts and storage for only one HP 3PAR storage system at a time.
Configuring multiple storage systems can lead to inconsistencies and operating errors.
22
Connect to the HP 3PAR StoreServ 7000 Storage System
5 Configure the Hosts
To export (or present) virtual volumes to hosts—which enables the host system to write data to and
read data from the HP 3PAR StoreServ Storage system—you must configure either Fibre Channel
host connections or iSCSI host connections. For more information about exporting volumes, see
“Exporting Virtual Volumes” (page 50).
Fibre Channel Connections
You can set up Fibre Channel using direct connections or via switches in a SAN.
23
To ensure that your HP 3PAR StoreServ Storage system remains available if a path fails, connect
the host system to the HP 3PAR storage system using multiple paths.
Before using SmartStart to configure Fibre Channel connections, do one of the following:
•
If you are connecting the host and HP 3PAR StoreServ Storage systems directly, verify that the
appropriate cabling is in place between the host system and the HP 3PAR storage system.
•
If you are using a SAN:
◦
Verify that the appropriate cabling is in place between the host system and the fabric
and between the HP 3PAR storage system and the fabric.
◦
Verify that the fabric zones comply with the zoning guidelines in the HP 3PAR Windows
Server 2012 and Windows Server 2008 Implementation Guide (see Setting Up and
Zoning the Fabric).
To access this document, go to the HP 3PAR StoreServ Storage site and click the Support
link for your product:
http://www.hp.com/go/3par
NOTE: SmartStart will configure the port mode depending on the type of connectivity that you
configured.
Configuring Fibre Channel Connections
To access the Fibre Channel Host Configuration wizard and configure Fibre Channel connections,
click the Configure FC host link in the SmartStart wizard.
For more information, see “Configure the Fibre Channel Host” (page 25).
24
Configure the Hosts
iSCSI Connections
To set up iSCSI connections:
•
Verify that your network supports 10-GB iSCSI connections.
•
Connect the host system to the HP 3PAR StoreServ Storage system using multiple paths to
ensure that your HP 3PAR storage system remains available if a path fails.
Configuring iSCSI Connections
To access the iSCSI Host Configuration wizard and configure iSCSI connections, click the Configure
iSCSI host link in the SmartStart wizard.
For more information, see “Configure the iSCSI Host” (page 28).
Configure the Fibre Channel Host
Introduction to Configuring the Fibre Channel Host
To set up Fibre Channel connections, ensure that the host system and HP 3PAR StoreServ 7000
Storage system have two Fibre Channel connections. You can configure the Fibre Channel host if
you have only one connection, but if that connection stops functioning, the host will not be able to
access (read from or write data to) the HP 3PAR StoreServ Storage system.
For more information about setting up Fibre Channel connections, see the HP 3PAR Windows
Implementation Guide. To access this document, go to the HP 3PAR StoreServ Storage site and
click the Support link for your product:
http://www.hp.com/go/3par
CAUTION: The Fibre Channel Host Configuration wizard might require a reboot of the host
system. If the host system cannot be rebooted at this time, use the Fibre Channel Host Configuration
wizard to configure your Fibre Channel connections when a possible reboot is more convenient.
Configure the Fibre Channel Host
25
Configuring Local and Remote Connections
You can use SmartStart to do the following:
•
Connect the local host (the Windows Server 2008 R2 or Windows Server 2012 server into
which you inserted the SmartStart media) to the HP 3PAR StoreServ Storage system
•
Connect a remote host (any Windows Server 2008 R2 or Windows Server 2012 server other
than the Windows Server 2008 R2 or Windows Server 2012 server into which you inserted
the SmartStart media) to the HP 3PAR storage system
To connect to and configure a remote host system:
◦
You must be able to use the same ID and password to gain administrator access to both
the local host and the remote host. If you cannot use the same login credentials, you must
insert the SmartStart media into the remote host and configure the machine as a local
host.
◦
If you have set up domains on your local host system and plan to configure a remote host
system, that remote host must be in the same domain as the local host.
Connect to the Fibre Channel Host System
1.
2.
3.
In the Host address field, do one of the following:
•
If you are configuring the machine into which you inserted the SmartStart media, enter
localhost.
•
If you are configuring any host other than the machine that is running SmartStart, enter
that host IP address or DNS name.
Click Connect.
Click Next.
Validate the Fibre Channel HBA Setup on the Host
1.
Click Validate.
SmartStart automatically detects and lists the HBAs that are installed on the host system.
2.
Verify that at least two of the listed HBAs are supported by your HP 3PAR StoreServ Storage
system.
To verify your system’s HBAs, go to the Single Point of Connectivity Knowledge for HP Storage
Products (SPOCK) and navigate to the list of HBAs supported by your host system:
http://www.hp.com/storage/spock
Use your HP Passport account to log onto SPOCK. If you do not have an HP Passport account,
you can register for a free account on SPOCK.
3.
Click Next.
Validate the Fibre Channel Connection
1.
2.
Select the HP 3PAR StoreServ Storage system for which you want to validate the Fibre Channel
connection.
Click Validate.
If SmartStart cannot find a Fibre Channel connection, or can only find one Fibre Channel
connection, SmartStart enables you to configure ports on the HP 3PAR storage system.
26
Configure the Hosts
Even if you can configure and validate only one Fibre Channel connection, you can still
configure the Fibre Channel host.
CAUTION: If you are using only one supported Fibre Channel connection and that connection
fails, the host will not be able to access (read from or write data to) the HP 3PAR storage
system.
The redundancy of two Fibre Channel connections, each connected to a different HP 3PAR
StoreServ Storage system node, creates connection stability and allows for future rolling
upgrades to the HP 3PAR storage system.
NOTE: To configure more than two Fibre Channel connections, use the HP 3PAR Management
Console. To install the Management Console, go to SmartStart wizard step 6, Install the
Management Console.
3.
Click Next.
Configure Multipath I/O (MPIO)
Multipath I/O (MPIO) helps ensure the stability of the connection between the host and HP 3PAR
StoreServ Storage systems. To configure MPIO:
1. Click Configure.
2. If the wizard displays the Reboot when finished check box, click to select it. In order to complete
this MPIO configuration, the wizard will reboot the host system at the end of the iSCSI host
configuration process.
NOTE: If the MPIO device ID is already configured on the host system, the wizard does not
display the Reboot when finished check box.
3.
Click Next.
Troubleshooting Task Completion
If SmartStart displays the Failed to validate whether the current Windows task is complete message,
click Configure again.
If the problem persists, contact HP support. For more information, see “Support and Other Resources”
(page 57).
Install and Start Host Explorer
Host Explorer helps you discover and manage host system paths. Installation is optional. If you do
not install Host Explorer, you must manually manage host paths. For more information, see “The
Host Explorer Software Agent” (page 44).
NOTE:
Host Explorer is not available for Windows Server 2012 systems at this time.
To install HP 3PAR Host Explorer:
1. Click Install.
2. Click Next.
Configure the Fibre Channel Host
27
Summary: Fibre Channel Host Configuration
1.
2.
Review your Fibre Channel setup.
Click Finish.
•
If you are connected to the local host and you rebooted the host system, the local host
reboots.
After the local host has finished rebooting, launch SmartStart and continue setup.
•
If you are connected to the remote host and you rebooted the host system, the remote
host reboots. After the remote host reboots, continue setup.
Configure the iSCSI Host
Introduction to Configuring the iSCSI Host
To set up iSCSI connections, ensure that you have the following information, which is necessary
to set up the iSCSI connections between the host system and HP 3PAR StoreServ 7000 Storage
system:
•
Host system IP address or name
•
iSCSI port information
•
Maximum transmission unit (MTU) size:
◦
If you are using default frames, use an MTU of 1500.
◦
If you have configured jumbo frames, use an MTU of 9000.
Configuring Local and Remote Connections
You can use SmartStart to do the following:
•
Connect the local host (the Windows Server 2008 R2 or Windows Server 2012 server into
which you inserted the SmartStart media) to the HP 3PAR StoreServ Storage system.
•
Connect a remote host (any Windows Server 2008 R2 or Windows Server 2012 server other
than the Windows Server 2008 R2 or Windows Server 2012 server into which you inserted
the SmartStart media) to the HP 3PAR storage system.
To connect to and configure a remote host system:
◦
You must be able to use the same ID and password to gain administrator access to both
the local host and the remote host. If you cannot use the same login, you must insert the
SmartStart media into the remote host and configure the machine as a local host.
◦
If you have set up domains on your local host system and plan to configure a remote host
system, that remote host must be in the same domain as the local host.
Connect to the iSCSI Host System
1.
2.
3.
28
In the Host address field, do one of the following:
•
If you are configuring the machine into which you inserted the SmartStart media, enter
localhost.
•
If you are configuring any host other than the machine that is running SmartStart, enter
that host IP address or DNS name.
Click Connect.
Click Next.
Configure the Hosts
Configure Multipath I/O (MPIO)
Multipath I/O (MPIO) helps ensure the stability of the connection between the host and HP 3PAR
StoreServ Storage systems. To configure MPIO:
1. Click Configure.
2. If the wizard displays the Reboot when finished check box, select it. In order to complete this
MPIO configuration, the wizard will reboot the host system at the end of the iSCSI host
configuration process.
NOTE: If the MPIO device ID is already configured on the host system, the wizard does not
display the Reboot when finished check box.
3.
Click Next.
Troubleshooting Task Completion
If SmartStart displays the Failed to validate whether the current Windows task is complete message,
click Configure again.
If the problem persists, contact HP support. For more information, see “Support and Other Resources”
(page 57).
Start the iSCSI Initiator
NOTE:
1.
2.
SmartStart supports only the Microsoft iSCSI initiator.
Click Start.
Click Next.
Configure the iSCSI Port
1.
2.
From the System list in the General group box, select the HP 3PAR StoreServ 7000 Storage
system on which you want to configure an iSCSI port.
From the Port list, select the port to configure.
NOTE:
HP 3PAR storage system ports are designated by the following format:
node:slot:port
The wizard displays the connected device type and the connected device. For example:
Connected Device Type: Host
Connected Device: Storage7200–DataCenter2
3.
In the IP Settings group box, select whether to obtain the address automatically or enter it
manually.
To enter the IP address manually, enter the IP address, subnet mask address, and gateway
address of the target iSCSI port on your HP 3PAR StoreServ 7000 Storage system.
4.
5.
From the MTU list, select the MTU size. The MTU size limits the size of data packets transmitted
over the connection to ensure an appropriate load and steady flow.
•
If you are using default frames, use an MTU of 1500.
•
If you have configured jumbo frames, use an MTU of 9000.
Click Next.
The system configures the port. When the state of the port is Ready, the wizard displays the
next step (Configure the iSCSI target).
Configure the iSCSI Host
29
Configure the iSCSI Target
1.
2.
3.
Select the IP address of the iSCSI initiator on the host system.
Click Configure.
Click Next.
Troubleshooting the iSCSI Connection
If the iSCSI initiator on the host system cannot connect to the HP 3PAR StoreServ Storage system,
verify your configuration:
1. Verify your IP settings:
2.
•
IP address
•
Subnet mask
•
Gateway
Check your iSCSI connection. To do this, ping the HP 3PAR StoreServ Storage system from
the host.
Troubleshooting Task Completion
If SmartStart displays the Failed to validate whether the current Windows task is complete message,
click Configure again.
If the problem persists, contact HP support. For more information, see “Support and Other Resources”
(page 57).
Install and Start Host Explorer
Host Explorer helps you discover and manage host system paths. Installation is optional. If you do
not install Host Explorer, you must manually manage host paths. For more information, see “The
Host Explorer Software Agent” (page 44).
To install HP 3PAR Host Explorer:
1. Click Install.
2. Click Next.
Summary: iSCSI Host Configuration
1.
2.
Review your iSCSI setup.
Click Finish.
Configuring Multiple iSCSI Ports
To configure another iSCSI port:
1. Go to SmartStart wizard step 4, Configure hosts.
2. Click Configure iSCSI hosts.
3. In steps 1 through 4 of the iSCSI Host Configuration wizard, configure the same iSCSI host
system.
4. At iSCSI Host Configuration wizard step 5, Configure the iSCSI port, select an additional port
and configure it.
5. In the final steps of the iSCSI Host Configuration wizard, complete the iSCSI configuration for
this host.
30
Configure the Hosts
6 Configure Storage
The steps in SmartStart wizard step 5, Configure storage, guide you through creating basic storage
on your HP 3PAR StoreServ 7000 Storage system.
NOTE: You can use the HP 3PAR Management Console to delete any hosts, virtual volumes, or
exports you create using SmartStart. To do this, install and use the HP 3PAR Management Console
(see SmartStart wizard step 6, Install the Management Console).
To create basic storage, you create hosts, create virtual volumes, export the virtual volumes, and
configure the virtual volumes on a host system. These operations are described in the following
list:
1. Create hosts. Hosts are defined paths between the host system and the HP 3PAR StoreServ
Storage system. For more information, see “Hosts” (page 44).
2. Create virtual volumes. Virtual volumes are the storage containers for data. For more
information, see “Virtual Volumes” (page 47).
Virtual Volumes and CPGs
When you create virtual volumes, you will assign common provisioning groups (CPGs) to
those volumes. CPGs are pools of storage space. CPGs allocate storage space to virtual
volumes, and volumes use this space to store data.
31
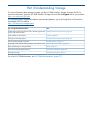
Default CPGs
The setup process automatically creates default CPGs on your HP 3PAR StoreServ 7000
Storage system. The CPGs that are created depend on your HP 3PAR storage system’s drive
types, number of drive cages, and RAID types, as described in the following table.
Drive Type
RAID Type
Default CPG Created
Fast Class
1
FC_r1
Fast Class
6
FC_r6
Nearline
1
NL_r1
Nearline
6
NL_r6
Solid State
1
SSD_r1
Solid State
5
SSD_r5
Solid State
6
SSD_r6
Using Default CPGs
3.
4.
•
To use SmartStart to create basic storage, assign the default CPG to the virtual volumes
you create.
•
To create a new CPG, install and use the HP 3PAR Management Console (see SmartStart
wizard step 6, Install the Management Console).
Export virtual volumes. When you export (present) virtual volumes to a host, you make the
volumes accessible to the host. The host system can then perform read/write operations on
the exported virtual volumes on your HP 3PAR storage system.
Configure virtual volumes. In addition to creating storage, you must configure the exported
virtual volumes on your Windows Server 2008 R2 or Windows Server 2012 host system so
the host system can use these volumes. The Add Virtual Volumes to Windows wizard, accessed
from SmartStart wizard step 5, Configure storage, guides you through configuring virtual
volumes on a Windows Server 2008 R2 or Windows Server 2012 host system.
For more information about creating storage or to set up advanced storage parameters, use the
HP 3PAR Management Console. To install the Management Console, go to SmartStart wizard step
6, Install the Management Console.
Create Hosts
Welcome to the Create Host Wizard
The Welcome screen describes the settings and properties you can assign to a host.
NOTE: If you click to select the Click here to skip this step in the future check box and later want
to reinstate the Welcome screen, delete the following file:
C:\Users\<username>\SmartStart\preferences\preferences.xml
32
Configure Storage
Host Settings
1.
2.
3.
In the General group box:
a. System - Select the system to create the new host.
b. Domain - Select the domain in which to create the new host. Select <none> if not
applicable.
c. Name - Enter the host name. Names are case-sensitive.
d. Set Name - Select the host set in which to create the new host. Select <none> if not
applicable.
e. Host OS - Select the operating system running on the host.
f. Persona - The host persona is visible and disabled. When you select Host OS, the
corresponding persona is selected for the user, and the Operating System descriptor field
is automatically populated with the host OS.
•
1 = Generic (Unit Attention Report LUNs, Enable SES device)
•
2 = Generic-ALUA (Unit Attention Report LUNs, Report Target Port Groups, Enable
SES device)
•
6 = Generic-legacy
•
7 = HPUX-legacy (Volume Set Addressing)
•
8 = AIX-legacy (Normal Auto Contingent Allegiance)
•
9 = Egenera (Soft Inquiry Data)
•
10 = ONTAP–legacy (Soft Inquiry Data)
•
11 = VMware (Enable Sub-LUN Addressing, Asymmetric Logical Unit Access)
(Optional) In the Descriptors group box, enter the description information as desired in the
Location, IP Address, Operating System, Model, Contact, and Comments fields.
Click Next or Finish to close the wizard and create the host with the information that you
entered.
Fibre Channel Settings
1.
To assign available WWNs:
a. Select one or more WWNs from the Available WWNs list. This list displays WWNs for
all physically connected host paths not already assigned to hosts.
b. Click the left arrow to add the selected WWNs to the Assigned WWNs list.
2.
To assign new WWNs, enter the WWNs for the host in the New WWN field, and then click
Assign.
Click Next or Finish to close the wizard and create the host with the information entered.
3.
iSCSI Settings
1.
In the iSCSI Host Paths group box:
a. Select one or more iSCSI names from the Available iSCSI Names list. This list displays
iSCSI names for all physically connected host paths not already assigned to hosts.
b. Click the left arrow to add the selected iSCSI names to the Assigned iSCSI Names list.
c. To assign new iSCSI names, enter the iSCSI names in the New iSCSI Name field, and
then click Assign.
2.
In the CHAP group box:
a. Click to select the Initiator CHAP check box. The CHAP Name field displays the host name.
b. Enter a secret/password in the CHAP Secret field for Initiator CHAP.
If the secret/password is hexadecimal, click to select the Hex check box.
Create Hosts
33
c.
d.
If required, click the Target CHAP check box. The CHAP Name field displays the system
name.
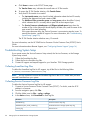
Enter a secret/password in the CHAP Secret field for Target CHAP.
NOTE:
3.
Rules for the CHAP group box in the following step are as follows:
•
When the Initiator CHAP check box is selected, CHAP Name is initialized with the host
name (default).
•
The Target CHAP check box is enabled when the Initiator CHAP check box is selected.
•
The CHAP Secret field is required if a CHAP Name is entered.
•
Target CHAP is optional.
•
Target CHAP can be populated only if Initiator CHAP is populated.
Click Next to view summary information, or click Finish to close the wizard and configure the
host with the information gathered.
Summary
Review the summary information, and then click Finish.
Create Virtual Volumes
Welcome to the Create Virtual Volumes Wizard
The Welcome screen describes the settings and properties you can assign to a virtual volume.
NOTE: If you click to select the Click here to skip this step in the future check box and later want
to reinstate the Welcome screen, delete the following file:
C:\Users\<username>\SmartStart\preferences\preferences.xml
Configure Virtual Volume
1.
34
In the General group box:
a. System - Select the system where the volume will be created.
b. Domain - Select the domain in which the volume will reside. Select <none> if not
applicable.
c. Name - Enter a name for the new volume. Names are case-sensitive.
d. ID - Enter an ID for the new volume if you click to clear the auto box (this option is shown
only if Show advanced options is selected).
e. Use Template - Select the volume template to apply to the new volume. If this is not
required, select <none>.
f. Comments - Enter any notes about the volume.
Configure Storage
2.
In the Allocation group box:
a. Select how the volume will be provisioned. Selecting Thinly Provisioned results in the
creation of a Thinly Provisioned Virtual Volume (TPVV). Selecting Fully Provisioned results
in the creation of a base volume.
NOTE:
b.
To create TPVVs, the HP 3PAR Thin Provisioning Software license is required.
Size - Enter the size of the volume. Change the Size list value to MB or TB as applicable.
The default is GB.
NOTE: The minimum permitted volume size is 256 MB and the maximum is 16 TB. The
minimum chunklet size for a V-Class system is 1 GB. If 256 MB virtual volumes are created,
the remaining space of the volume will be unused.
c.
Configure CPG as appropriate for your situation.
•
If you selected Thinly Provisioned:
a. User CPG - Select a user CPG from the CPG list.
b. Copy CPG - Select a copy CPG or <none>.
c. In the Allocation Warning and Allocation Limit fields for User CPG and Copy
CPG, enter the appropriate information. If you do not want these options used,
click to clear the Enabled check box. (The Allocation Limit field appears only if
Show advanced options is checked.)
•
If you selected Fully Provisioned:
a. User CPG - Select a user CPG from the CPG list.
b. Copy CPG - Select a copy CPG or <none> from the CPG list.
c. In the Allocation Warning and Allocation Limit fields for Copy CPG, enter the
appropriate information. If you do not want these options used, click to clear
the Enabled check box. (The Allocation Limit field appears only if Show advanced
options is checked.)
3.
In the Grouping group box:
a. Number of Volume(s) - Enter the number of volumes to create. (If you enter 2 or higher,
you have the option of selecting Attempt to share LDs.)
b. Set Name - Select a virtual volume set name or, if not required, select <none>.
4.
If you want to export the volumes after creation, click to select Export Volume(s) after creation.
Otherwise, click Next to configure the virtual volumes policies and geometry (if Show advanced
options is selected) or click Finish.
5.
In the Grouping group box:
a. Count - Enter the number of volumes to create.
b. Set Name - Select a virtual volume set name or, if not required, select <none>.
6.
Click Next to configure Copy Space Settings, or click Finish.
Policies and Geometry
This page is displayed only if Show advanced options was selected on the Configure Virtual Volume
page.
Create Virtual Volumes
35
1.
In the Policies group box, enable any of the following, as needed:
•
Allow stale snapshots
•
Restrict export to one host
•
Enable zero detect (default)
•
Retention Time — If you enable this, enter a value in the corresponding field, and then
select either days or hours.
•
Expiration Time — If you enable this, enter a value in the corresponding field, and then
select either days or hours.
2.
In the Geometry group box:
a. Enter the number of sectors per track or accept the default value.
b. Enter the number of heads per cylinder or accept the default value.
3.
Click Next to view summary information, or click Finish.
Summary
Review the summary information, and then click Finish.
Export Virtual Volumes
Welcome to the Export Virtual Volumes Wizard
The Welcome screen describes the virtual volume export possibilities.
NOTE: If you click to select the Click here to skip this step in the future check box and later want
to reinstate the Welcome screen, delete this file:
C:\Users\<username>\SmartStart\preferences\preferences.xml
Export
36
1.
In the General group box:
a. System - Select a system from the list.
b. Domain - Select a domain from the list. If not applicable, select <none>.
2.
In the Virtual Volume group box:
a. Select either Virtual Volume or Virtual Volume Set.
b. From the virtual volume or virtual volume set list, select the volumes to export.
Configure Storage
3.
In the Export To group box:
a. Select either Host (Host Sees) or Host Set (Host in Set).
b. From the host or host set list, select the hosts that you want to export the virtual volumes
to.
CAUTION:
•
If you make any changes in the advanced options and then click to clear the Show
advanced options check box, a warning dialog is displayed to warn you that the selected
advanced options will be lost.
If you click Yes, Basic mode is reinstated, and all advanced options are set back to default.
If port (Port Present) or Host and Port (Matched Set) was selected, that setting is changed
back to the default Host (Host Sees).
If you click No, Advanced mode is retained.
•
4.
If you select the Override lower priority templates check box and then click Finish, a
warning dialog is displayed. This operation can result in data loss.
Click Next to go to the Summary page, or click Finish to complete the wizard.
Summary
Review the summary information, and then click Finish.
Add Virtual Volumes to Windows
Introduction to Adding Virtual Volumes to Windows
To use virtual volumes on a Windows Server 2008 R2 or Windows Server 2012 host system, you
must first configure the volumes as Windows disks.
The following rules apply when configuring virtual volumes on your Windows Server 2008 R2 or
Windows Server 2012 server:
•
You do not have to be connected to the HP 3PAR StoreServ Storage system to add volumes
to Windows.
•
To use SmartStart to format volumes as Windows disks, you must use Microsoft NTFS.
•
If you have started a new SmartStart session, you must be able to supply the IP address or
name of the Windows Server 2008 R2 or Windows Server 2012 host system.
•
You can either assign the virtual volumes to an available drive or mount an empty NTFS folder.
Connect to the Host
1.
2.
3.
In the Host address field, do one of the following:
•
If you are configuring the machine into which you inserted the SmartStart media, enter
localhost.
•
If you are configuring any host other than the machine running SmartStart, enter that
host’s IP address or DNS name.
Click Connect.
Click Next.
Add Virtual Volumes to Windows
37
Add Virtual Volumes to Windows
1.
2.
Select the virtual volume that you want to configure as a Windows disk. The virtual volume is
displayed as a virtual volume device.
•
If the volume is less than 2 TB, SmartStart initializes the Windows disk as Master Boot
Record (MBR).
•
If the volume is greater than 2 TB, SmartStart initializes the Windows disk as a Globally
Unique Identifier Partition Table (GPT).
In the Disk label for this virtual volume field, enter the Windows disk name to assign to this
virtual volume.
The disk label enables you to identify this virtual volume on the Windows server.
NOTE: Do not use special characters in the disk label. Certain special characters, such as
an apostrophe (') or quotation mark (“), can prevent the wizard from adding the virtual volume
to Windows successfully.
3.
Select a drive to assign to the virtual volume, or select an empty NTFS folder to mount.
To mount a volume to an empty folder on a remote system, enter the drive and a folder name
that references the remote system (for example, C:\<remote_folder>). The network path
is not supported.
NOTE: Verify that the folder you mount is empty. If the folder does not exist, is not empty,
or is read-only, the folder might not mount successfully.
4.
Click Next.
NOTE:
Adding virtual volumes to Windows might take up to 10 minutes.
Troubleshooting Task Completion
If SmartStart displays the Failed to validate whether the current Windows task is complete message,
try the task again by using one of the following methods:
•
Click the Prev button, and then click Next.
•
Cancel and then restart the wizard.
If the problem persists, contact HP support. For more information, see “Support and Other Resources”
(page 57).
Summary: Add Virtual Volumes to Windows Wizard
Review your virtual volume disk device setup, and then click Finish.
Troubleshooting Task Completion
If SmartStart displays the Failed to validate whether the current Windows task is complete message,
click Finish again.
If the problem persists, contact HP support. For more information, see “Support and Other Resources”
(page 57).
38
Configure Storage
7 Install the HP 3PAR Management Console
To manage your HP 3PAR StoreServ Storage systems and access advanced features and
functionality, use the HP 3PAR Management Console.
To install the Management Console, click the Install the HP 3PAR Management Console link.
Accessing the Management Console
To access the HP 3PAR Management Console do one of the following:
•
If you are an administrator, launch the Management Console from the Management Console
icon. (The installation adds the HP 3PAR Management Console icon only to administrator
desktops.)
•
If you are not an administrator, launch the Management Console from the Management
Console folder.
For more information about how to use the HP 3PAR Management Console to manage your HP
3PAR storage systems, see the HP 3PAR Management Console Online Help.
39
Part II Understanding Storage
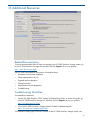
For more information about storage concepts, see the HP 3PAR StoreServ Storage Concepts Guide. To
access this document, go to the HP 3PAR StoreServ Storage site and click the Support link for your product:
http://www.hp.com/go/3par
For information about supported hardware and software platforms, go to the Single Point of Connectivity
Knowledge (SPOCK) website:
http://www.hp.com/storage/spock
For conceptual information about:
See:
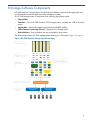
Data storage components (physical disks, chunklets, logical disks, “Storage Software Components” (page 41)
CPGs, and virtual volumes)
Hosts (WWN or iSCSI paths)
“Hosts” (page 44)
CPGs (pool of storage space)
“Common Provisioning Groups” (page 46)
Virtual volumes (storage containers)
“Virtual Volumes” (page 47)
Exporting virtual volumes (making volumes accessible to hosts)
“Exporting Virtual Volumes” (page 50)
RAID (redundancy for storage stability)
“RAID” (page 51)
User roles and rights (authorizations)
“User Roles and Rights” (page 52)
Managing storage
“Managing Storage” (page 53)
For a list of HP 3PAR documents, see “HP 3PAR documentation” (page 57).
8 Storage Software Components
HP 3PAR StoreServ Storage systems include both the hardware components that physically store
your data and the software applications that manage your data.
An HP 3PAR storage system is composed of the following logical data layers:
•
Physical disks
•
Chunklets—On an HP 3PAR StoreServ 7000 Storage system, chunklets are 1-GB units of disk
space
•
Logical disks—Advanced storage components that add RAID stability
•
CPGs (Common Provisioning Groups)—Shared pools of storage space
•
Virtual Volumes—Data containers that are accessible by host systems
The relationship between HP 3PAR storage system data layers is illustrated in Figure 2 (page 41).
Figure 2 HP 3PAR StoreServ Storage System Data Layers
41
Each layer is created from elements of the layer above, as follows:
•
Chunklets are drawn from physical disks.
•
Logical disks are created from groups of chunklets.
•
Common Provisioning Groups (CPGs) are groups of logical disks.
•
Virtual volumes use storage space provided by CPGs.
Physical Disks
A physical disk is a disk drive mounted on a drive magazine located in drive cages (or drive
enclosures) in an HP 3PAR storage system.
Chunklets
Physical disks are divided into chunklets. Each chunklet occupies contiguous space on a physical
disk. On HP 3PAR StoreServ 7000 Storage systems, all chunklets are 1 GB. Chunklets are
automatically created by the HP 3PAR Operating System, and they are used to create logical disks.
A chunklet is assigned to only one logical disk.
RAID and Logical Disks
A logical disk is a collection of physical disk chunklets arranged as rows of RAID sets. Each RAID
set is made up of chunklets from different physical disks.
Logical disks are pooled together in common provisioning groups (CPGs), which allocate space
to virtual volumes. The underlying logical disks are automatically created by the HP 3PAR OS when
you create CPGs.
NOTE: Logical disks are an advanced storage component. For more information, see the HP
3PAR Management Console User Guide or the HP 3PAR StoreServ Storage Concepts Guide. To
access these documents, go to the HP 3PAR StoreServ Storage site and click the Support link for
your product:
http://www.hp.com/go/3par
Common Provisioning Groups
A common provisioning group (CPG) is a shared pool of storage space (specifically, a virtual pool
of logical disks) that allocates space to virtual volumes on demand. A CPG allows up to 4,095
virtual volumes to share the CPG's resources. You can create fully provisioned virtual volumes and
Thinly Provisioned Virtual Volumes (TPVVs or Thin volumes) that draw space from a CPG's storage
pool.
Virtual Volumes
Virtual volumes draw their resources from CPGs. In order to make storage available to hosts,
volumes are exported as LUNs to hosts. Virtual volumes are the only data layer that is visible to
the hosts.
You can create physical copies or virtual copy snapshots of virtual volumes; both types of copies
remain available if the original base volume becomes unavailable.
When you create virtual volumes, you must assign CPGs in order to allocate space to the virtual
volumes. Therefore, to create virtual volumes, you must either use the default CPG created during
the process of initializing the HP 3PAR StoreServ Storage system or create custom CPGs.
42
Storage Software Components
You can create the following types of virtual volumes:
•
Fully provisioned virtual volumes—Volume size is fixed. No separate license is required to
create fully provisioned virtual volumes.
•
Thinly provisioned virtual volumes—Also known as Thin volumes, these volumes allocate space
on demand in small increments. To create Thin volumes, the HP 3PAR Thin Provisioning Software
license is required.
•
Physical copies—A full copy of a volume. No separate license is required to create physical
copies.
•
Virtual copies—A snapshot of a base volume that only records changes to the base volume.
To create virtual copies, the HP 3PAR Virtual Copy license is required.
43
9 Hosts
The HP 3PAR StoreServ Storage system sees a host as a set of Fibre Channel World Wide Names
(WWNs) or iSCSI names, or in other words, a set of host I/O paths. The host system uses these
I/O paths to perform read/write operations on exported virtual volumes on the storage system.
The HP 3PAR storage system automatically detects hosts that are physically connected to ports on
the storage system. You can also add new WWNs or iSCSI names for unestablished host paths
and assign these WWNs or iSCSI names to a host before hosts are physically connected. These
WWNs or iSCSI names do not need to be associated with target ports on the HP 3PAR storage
system controller nodes. Therefore, you do not need to manually reconfigure a host path after
connecting new hosts.
A virtual volume can be exported (presented or made accessible) to one or more hosts. The host
sees the exported virtual volume as a logical unit number (LUN) connected to one or more ports.
After the virtual volume is exported to a host, the host can send requests (reads/writes) to the LUN.
To modify system ports and host configurations, use the HP 3PAR Management Console. For more
information, see the HP 3PAR Management Console Online Help.
NOTE: For recommended practices and detailed configuration information about how to use
your host devices with your HP 3PAR storage system, see the relevant HP 3PAR Implementation
Guide.
Creating and Removing Hosts
You can create, modify, and remove Fibre Channel and iSCSI hosts and their properties.
•
When you create a new host, you can either assign WWNs or iSCSI names right away or
add those paths later.
•
A virtual volume that is exported to a host is exported to all the WWNs or iSCSI names that
make up the host.
To export virtual volumes to specific WWNs or iSCSI names on a host system, you can create
separate hosts (host paths) on the host system and assign each WWN or iSCSI name to its
own host.
•
If you have multiple hosts that require the same administrative procedures, you can group
those hosts into a host set and manage them together, as one host.
To manage hosts, use the HP 3PAR Management Console. For more information, see the HP 3PAR
Management Console Online Help.
Host Personas
Host personas are settings that enable hosts connected to Fibre Channel or iSCSI ports on the HP
3PAR StoreServ Storage system to deviate from the default host behavior. The system automatically
assigns a host persona based on your operating system.
For more information about managing host personas, see the HP 3PAR Management Console
Online Help.
The Host Explorer Software Agent
The HP 3PAR Host Explorer Software agent is a program that runs on a host connected to an HP
3PAR StoreServ Storage system. On Windows, the Host Explorer agent runs as a service.
A separate license is not required to use the HP 3PAR Host Explorer Software agent.
The Host Explorer agent communicates with the HP 3PAR StoreServ Storage system over a Fibre
Channel or iSCSI connection and enables the host to send detailed host-configuration information
44
Hosts
to the storage system. The information gathered from the Host Explorer agent is visible to uncreated
hosts and assists with creating hosts and diagnosing host-connectivity issues.
How Host Explorer Helps You Create Hosts
When you create a host, the system displays the unassigned WWNs or iSCSI names as follows:
•
When the Host Explorer agent is running on the attached hosts, the system automatically
groups the WWNs or iSCSI names for the host together, which helps you create the host.
•
If the Host Explorer agent is not running on the attached hosts, the system cannot determine
which host each WWN or iSCSI name belongs to, and you must manually assign each WWN
or iSCSI name to a host.
How Host Explorer Helps You Diagnose Host-Connectivity Issues
The Host Explorer agent collects the following information and sends it to the system:
•
Host operating system and version
•
Fibre Channel and iSCSI HBA details
•
Multipath driver and current multipath configuration
•
Cluster configuration information
For more information about how to install and use the Host Explorer agent, see the HP 3PAR Host
Explorer User’s Guide. To access this document, go to the HP 3PAR StoreServ Storage site and
click the Support link for your product:
http://www.hp.com/go/3par
For a list of supported host operating systems, go to the Single Point of Connectivity Knowledge
(SPOCK) website:
http://www.hp.com/storage/spock
The Host Explorer Software Agent
45
10 Common Provisioning Groups
A common provisioning group (CPG) creates a virtual pool of storage space that allows up to
4,095 virtual volumes to share the CPG's resources. When you create virtual volumes (fully
provisioned virtual volumes or Thin volumes), the volumes draw storage space from the CPG's
storage space pool.
•
CPGs dynamically allocate storage space to Thin volumes. Therefore, when a Thin volume is
running low on user space, the HP 3PAR StoreServ Storage system automatically assigns more
storage capacity to the Thin volume (specifically, the storage system maps new regions—from
the logical disks in the CPG associated with the Thin volume—to the Thin volume). Because
space is allocated dynamically to Thin volumes, the storage system does not contain large
pockets of unused but allocated space.
•
CPGs allocate a fixed amount of storage space to fully provisioned virtual volumes upon
creation. Therefore, the storage system could contain large pockets of unused but allocated
space.
By default, CPGs are configured to automatically grow over time, as required by application writes,
when the amount of available space falls below a configured threshold.
Monitoring CPG Growth
CPGs require careful planning and monitoring to prevent them from becoming so large that they
set off the HP 3PAR StoreServ Storage system's built-in safety mechanisms. These safety mechanisms
prevent a CPG from consuming all free space on the system, but they work properly only on systems
that are planned carefully and monitored closely. To restrict a CPG's growth and maximum size,
configure the following monitoring aids when you create the CPG:
•
Growth increment
•
Growth warning
•
Growth limit
The maximum number of CPGs per system is 2,048.
To create and manage CPGs, use the HP 3PAR Management Console. For more information, see
the HP 3PAR Management Console Online Help.
46
Common Provisioning Groups
11 Virtual Volumes
Virtual volumes are the only data layer visible to host systems.
•
Virtual volumes draw storage space from CPGs.
•
Virtual volumes become visible to host systems when you export (present) them to hosts.
•
Virtual volumes are exported as LUNs to hosts.
•
You can create physical copies or virtual copies (snapshots) of virtual volumes. These copies
serve as backups in case the original base volume becomes unavailable.
•
If you have multiple volumes that require the same administrative procedures, you can group
those volumes into an autonomic group and manage them together, as one volume.
To create and manage virtual volumes, use the HP 3PAR Management Console. For more
information, see the HP 3PAR Management Console Online Help.
Virtual Volume Types
There are three types of virtual volumes used directly for data storage:
•
Fully provisioned virtual volumes have a set amount of allocated user space. Fully provisioned
virtual volumes require the HP 3PAR StoreServ Storage system to reserve the entire amount of
storage space configured for the volumes, whether or not the space is actually used. The size
of each fully provisioned virtual volume size is fixed (and not dynamic, like a Thin volume),
and the size limit is 16 TB.
•
Thinly Provisioned Virtual Volumes (TPVVs or Thin volumes) draw space from the associated
CPG pools as needed. CPGs allocate space on demand to Thin volumes in small increments
for each controller node, but can adjust the size of these increments based on the rate of
consumption (allocating more space during periods of high consumption and less space during
periods of low consumption). As the volumes that draw space from the CPG require additional
storage, the HP 3PAR OS automatically adds more storage space to the CPG until the CPG
reaches its growth limit. The Thin volume size limit is 16 TB.
Monitoring Thin Volume Growth
Thin volumes require careful planning and monitoring to prevent them from becoming so large
that they set off the HP 3PAR StoreServ Storage system's built-in safety mechanisms or that
writes to the volumes fail. To restrict a Thin volume’s growth:
◦
Set an allocation warning.
◦
Set an allocation limit and ensure that this limit does not exceed the associated CPG’s
growth limit.
◦
Continue to monitor Thin volume growth.
Creating Thin volumes requires the HP 3PAR Thin Provisioning Software license.
•
Administrative volumes are created by the system and are for system usage only.
Virtual Volume Types
47
Fully provisioned virtual volumes and Thin volumes have three separate data components:
•
User space contains the user data. The user space is the area of the volume that corresponds
to the regions in the CPG that are available to the host. Thus, the user space is the part of the
virtual volume you export to the host as a LUN.
•
Copy space, also known as snapshot space, contains the copy data. The copy space is the
area of the volume that corresponds to the regions in the CPG that contain copies of user data
that have changed since the previous virtual copy (snapshot) of the volume was created.
•
Administration space, also known as admin space, contains pointers to copies of user data
in the copy space. The administration space is the area of the volume that corresponds to
regions in the CPG that track changes to the volume that occurred after the previous snapshot
was created. Administration space is managed by the system; it cannot be exported and
cannot be removed from the system.
You can provision a virtual volume’s user space and copy space from the same or from different
CPGs. If a virtual volume’s user space and copy space are on different CPGs and if the CPG
containing the copy space becomes full, the user space still remains available to the host.
To save time, you can create multiple identical virtual volumes at one time.
Physical Copies
A physical copy is a full copy of a volume. A physical copy duplicates all the data from one original
base volume to another volume called the destination volume. The data in a physical copy is static;
it is not updated with subsequent changes to the parent volume. Therefore, any changes to either
volume causes them to lose synchronization with each other; however, you can resynchronize the
volumes. For more information about how to resynchronize a base and destination volume, see
the HP 3PAR Management Console Online Help.
To reduce the number of management tasks that involve physical copies, you can:
•
Create a consistent group of physical copies from a list of virtual volumes.
•
Group physical copies into autonomic groups that are managed as one physical copy.
A physical copy can be made only from a base volume that has enough free space to accommodate
writes to that volume during the physical copy operation. In addition, the destination volume must
meet the following conditions:
•
It must have snapshot space associated with it.
•
It must have at least as much user space as the volume being copied.
•
It must not be exported to a host.
Virtual Copies
A virtual copy is a snapshot of a base volume, which is an original volume that is copied. Unlike
a physical copy, which is a duplicate of an entire volume, a virtual copy records only changes to
the base volume. This functionality allows an earlier state of the original virtual volume to be
re-created by starting with its current state and rolling back all the changes that were made after
the virtual copy was created.
To create virtual copies, the HP 3PAR Virtual Copy license is required.
You can make virtual copies of the following items:
48
•
Fully provisioned virtual volumes
•
Thin volumes
•
Physical copies
•
Other virtual copies (snapshots)
Virtual Volumes
Virtual copies are created using copy-on-write techniques, which are available only with the HP
3PAR Virtual Copy Software license. Thousands of snapshots of each virtual volume can be created,
up to the amount of storage space available. Depending on your system configuration, you can
make up to 500 virtual copies of a base volume.
To reduce the number of management tasks around physical copies, you can:
•
Create a consistent group of virtual copies from a list of virtual volumes.
•
Group virtual copies into autonomic groups that are managed as one virtual copy.
NOTE: Virtual copies are consistent at the virtual volume level, but not at the host filesystem or
application level. In other words, virtual copies preserve only the data that was written on the
source virtual volume before the virtual copy is created. Virtual copies do not preserve the data
that is resident within the application or files ystem buffers and is not flushed to disk before the
virtual copy is created.
Virtual Copies
49
12 Exporting Virtual Volumes
Virtual volumes are the only data layer you can make visible to hosts. In order to make virtual
volumes visible to hosts, you must export (present) the virtual volume to the host.
The export process creates an association between the volume and a LUN. You configure the
characteristics of this association when you create the Virtual Volume-LUN pairing (VLUN).
To export virtual volumes, use the HP 3PAR Management Console. For more information, see the
HP 3PAR Management Console Online Help.
For more information about the maximum number of VLUNs that are supported for each host that
has your specific system configuration, see the Single Point of Connectivity Knowledge (SPOCK)
website:
http://www.hp.com/storage/spock
VLUN Templates and Active VLUNs
When you create VLUNs, the system produces both VLUN templates that establish export rules,
and active VLUNs that the host sees as a LUN or attached disk device expressed as a logical unit
number.
A VLUN template is an export rule that sets up an association between a virtual volume and a
LUN-host, LUN-port, or LUN-host-port combination that governs how the host can access the virtual
volume. A VLUN template can use one of the following export rules:
•
A host-sees VLUN template allows only a specified host to see a volume.
•
Host set allows any host that is a member of the specified host set to see a volume.
•
A port-presents VLUN template allows any host on a specified port to see the volume.
•
A matched-set VLUN template allows only a specified host on a specified port to see the
volume.
When you export volumes, and when the virtual volumes and host paths meet the parameters set
in the specified VLUN template, the system creates active VLUNs. The host system uses those active
VLUNs to access the virtual volumes in order to perform read/write operations.
50
Exporting Virtual Volumes
13 RAID
RAID is a storage functionality that distributes data in units called chunklets across physical disks
in order to create redundancy and therefore increase the stability of your stored data. On the HP
3PAR StoreServ 7000 Storage system, a chunklet is 1 GB.
RAID is one of the parameters of a CPG, the storage pool from which volumes allocate storage
space. You can set the RAID type, along with other parameters, when you create a CPG, and you
can also modify an existing CPG’s RAID.
RAID Types
HP 3PAR storage systems support the following types of RAID:
•
RAID 0: Data is striped across rows of chunklets on different physical disks.
RAID 0 improves performance but provides no fault-tolerance.
•
RAID 10 (RAID 1): Data is striped across RAID 1 (or mirrored) sets. A RAID 1 set is made up
of two or more chunklets that contain the same data. The chunklets in each set are distributed
across different physical disks, which could be located in different drive magazines or different
drive cages.
A RAID 1 set can function with the loss of all but one of the chunklets in the set.
•
RAID 50 (RAID 5): Data is striped across rows of RAID 5 sets. A RAID 5 set, or parity set, is
made up of at least three chunklets. Each RAID 5 set contains a total of two chunklets of space
for data and one chunklet of space for parity. The chunklets in each RAID 5 set are distributed
across different physical disks, which could be located in different drive magazines or different
drive cages.
A RAID 5 set can function with the loss of any one of the chunklets in the set.
•
RAID Multi-parity (MP) (RAID 6): Data is striped across rows of RAID MP sets. A RAID MP set,
or double-parity set, is made up of at least 8 chunklets. Each RAID MP set contains a total of
6 chunklets of space for data and 2 chunklets of space for parity. The chunklets in each RAID
MP set are distributed across different physical disks, which could be located in different drive
magazines or different drive cages.
A RAID MP set can function with the loss of any two of the chunklets in the set.
For more information about the implementation of RAID in HP 3PAR storage systems, see the HP
3PAR StoreServ Storage Concepts Guide. To access this document, go to the HP 3PAR StoreServ
Storage site and click the Support link for your product:
http://www.hp.com/go/3par
RAID Types
51
14 User Roles and Rights
To access an HP 3PAR StoreServ Storage system, you must have a user account. Each HP 3PAR
OS user is assigned a role, and each role is assigned a set of rights. The roles and rights assigned
to the user determine the tasks the user is allowed to perform on a system. To maintain greater
control over your system, assign your users a role that has the minimum set of rights that they need
to perform their tasks.
Eight roles are defined in the HP 3PAR OS. There are four standard roles and four extended roles.
Table 1 Standard HP 3PAR OS User Roles
User roles
Rights assigned to roles
Browse
Rights are limited to read-only access.
Edit
Rights are granted to most operations, such as creating,
editing, and removing virtual volumes and other objects.
Super
Rights are granted to all operations.
Service
Rights are limited to operations required to service the
system. Allows limited access to user information and user
group resources.
Table 2 Extended HP 3PAR OS User Roles
User roles
Rights assigned to roles
Create
Rights are limited to creating objects, such as virtual
volumes, CPGs, hosts, and schedules.
Basic Edit
Rights are similar to the Edit role. For example, the Basic
Edit role can create and edit virtual volumes and other
objects. However, the rights to remove objects are more
restricted for the Basic Edit role than the Edit role.
3PAR AO
Rights are limited to internal use by HP for Adaptive
Optimization operations.
3PAR RM
Rights are limited to internal use by HP for Recovery
Manager operations.
There is no functional difference between standard and extended roles. The extended roles define
sets of rights that are optimized for users with specialized or restricted tasks. For example, assigning
a user the Create role allows the user to create virtual volumes and other objects, but does not
allow the user to remove virtual volumes.
To view a list of roles and all of the rights assigned to each role, see the HP 3PAR Command Line
Interface Administrator’s Manual. For instructions about performing user-management tasks, see
the HP 3PAR Management Console User Guide. To access these documents, go to the HP 3PAR
StoreServ Storage site and click the Support link for your product:
http://www.hp.com/go/3par
52
User Roles and Rights
15 Managing Storage
To manage your HP 3PAR StoreServ Storage system, use the HP 3PAR Management Console.
•
To install the Management Console, go to SmartStart wizard step 6, Install the Management
Console.
•
For more information about using the Management Console, do one of the following:
◦
Start the Management Console and open the HP 3PAR Management Console Online
Help.
◦
Download the HP 3PAR Management Console User’s Guide.
To access this document, go to the HP 3PAR StoreServ Storage site and click the Support
link for your product:
http://www.hp.com/go/3par
Setting Up Alert Emails
To configure your HP 3PAR storage system to email you alerts as issues occur (for example, if a
CPG becomes low on space, a disk drive fails, and so on), set up Local Notification.
•
To set up Local Notification, use the Setup module in SPOCC.
For more information about Local Notification setup, see the HP 3PAR Service Processor Onsite
Customer Care (SPOCC) Online Help.
•
For more information about alerts, see the HP 3PAR Management Console Online Help.
53
Part III Additional Resources
For information about:
See:
Accessing related HP 3PAR documentation
“Additional Resources” (page 55)
Troubleshooting SmartStart
Troubleshooting SmartStart
The HP 3PAR StoreServ Storage Systems Guided Troubleshooting
site:
http://www.hp.com/support/hpgt/3par
Definitions for HP 3PAR terms
“Glossary” (page 62)
16 Additional Resources
Related Documentation
To access documentation that will help you manage your HP 3PAR StoreServ Storage system, go
to the HP 3PAR StoreServ Storage site, and then click the Support link for your product:
http://www.hp.com/go/3par
The HP 3PAR Documentation site contains information about:
•
Hardware and software installation
•
Setup implementation by OS
•
Upgrade and maintenance
•
Storage concepts
•
Administration and management
•
Troubleshooting
Troubleshooting SmartStart
To troubleshoot SmartStart:
•
See the HP 3PAR StoreServ 7000 Storage Troubleshooting Guide. To access this guide, go
to the HP 3PAR StoreServ Storage site, and then click the Support link for your product:
http://www.hp.com/go/3par
•
Go to the HP 3PAR StoreServ Storage Systems Guided Troubleshooting site:
http://www.hp.com/support/hpgt/3par
To troubleshoot setting up the Service Processor or the HP 3PAR StoreServ Storage system, see:
55
“Troubleshooting System Setup” (page 20)
56
Additional Resources
17 Support and Other Resources
Contacting HP
For worldwide technical support information, see the HP support website:
http://www.hp.com/support
Before contacting HP, collect the following information:
•
Product model names and numbers
•
Technical support registration number (if applicable)
•
Product serial numbers
•
Error messages
•
Operating system type and revision level
•
Detailed questions
Specify the type of support you are requesting:
HP 3PAR storage system
Support request
HP 3PAR StoreServ 7200, 7400, and 7450 Storage
systems
StoreServ 7000 Storage
HP 3PAR StoreServ 10000 Storage systems
3PAR or 3PAR Storage
HP 3PAR T-Class storage systems
HP 3PAR F-Class storage systems
HP 3PAR documentation
For information about:
See:
Supported hardware and software platforms
The Single Point of Connectivity Knowledge for HP
Storage Products (SPOCK) website:
http://www.hp.com/storage/spock
Locating HP 3PAR documents
The HP 3PAR StoreServ Storage site:
http://www.hp.com/go/3par
To access HP 3PAR documents, click the Support link for
your product.
HP 3PAR storage system software
Storage concepts and terminology
HP 3PAR StoreServ Storage Concepts Guide
Using the HP 3PAR Management Console (GUI) to configure HP 3PAR Management Console User's Guide
and administer HP 3PAR storage systems
Using the HP 3PAR CLI to configure and administer storage
systems
HP 3PAR Command Line Interface Administrator’s
Manual
CLI commands
HP 3PAR Command Line Interface Reference
Analyzing system performance
HP 3PAR System Reporter Software User's Guide
Installing and maintaining the Host Explorer agent in order
to manage host configuration and connectivity information
HP 3PAR Host Explorer User’s Guide
Creating applications compliant with the Common Information HP 3PAR CIM API Programming Reference
Model (CIM) to manage HP 3PAR storage systems
Contacting HP
57
For information about:
See:
Migrating data from one HP 3PAR storage system to another HP 3PAR-to-3PAR Storage Peer Motion Guide
58
Configuring the Secure Service Custodian server in order to
monitor and control HP 3PAR storage systems
HP 3PAR Secure Service Custodian Configuration Utility
Reference
Using the CLI to configure and manage HP 3PAR Remote
Copy
HP 3PAR Remote Copy Software User’s Guide
Updating HP 3PAR operating systems
HP 3PAR Upgrade Pre-Planning Guide
Identifying storage system components, troubleshooting
information, and detailed alert information
HP 3PAR F-Class, T-Class, and StoreServ 10000 Storage
Troubleshooting Guide
Installing, configuring, and maintaining the HP 3PAR Policy
Server
HP 3PAR Policy Server Installation and Setup Guide
Support and Other Resources
HP 3PAR Policy Server Administration Guide
For information about:
See:
Planning for HP 3PAR storage system setup
Hardware specifications, installation considerations, power requirements, networking options, and cabling information
for HP 3PAR storage systems
HP 3PAR 7200, 7400, and 7450 storage systems
HP 3PAR StoreServ 7000 Storage Site Planning Manual
HP 3PAR StoreServ 7450 Storage Site Planning Manual
HP 3PAR 10000 storage systems
HP 3PAR StoreServ 10000 Storage Physical Planning
Manual
HP 3PAR StoreServ 10000 Storage Third-Party Rack
Physical Planning Manual
Installing and maintaining HP 3PAR 7200, 7400, and 7450 storage systems
Installing 7200, 7400, and 7450 storage systems and
initializing the Service Processor
HP 3PAR StoreServ 7000 Storage Installation Guide
HP 3PAR StoreServ 7450 Storage Installation Guide
HP 3PAR StoreServ 7000 Storage SmartStart Software
User’s Guide
Maintaining, servicing, and upgrading 7200, 7400, and
7450 storage systems
HP 3PAR StoreServ 7000 Storage Service Guide
Troubleshooting 7200, 7400, and 7450 storage systems
HP 3PAR StoreServ 7000 Storage Troubleshooting Guide
HP 3PAR StoreServ 7450 Storage Service Guide
HP 3PAR StoreServ 7450 Storage Troubleshooting Guide
Maintaining the Service Processor
HP 3PAR Service Processor Software User Guide
HP 3PAR Service Processor Onsite Customer Care
(SPOCC) User's Guide
HP 3PAR host application solutions
Backing up Oracle databases and using backups for disaster HP 3PAR Recovery Manager Software for Oracle User's
recovery
Guide
Backing up Exchange databases and using backups for
disaster recovery
HP 3PAR Recovery Manager Software for Microsoft
Exchange 2007 and 2010 User's Guide
Backing up SQL databases and using backups for disaster
recovery
HP 3PAR Recovery Manager Software for Microsoft SQL
Server User’s Guide
Backing up VMware databases and using backups for
disaster recovery
HP 3PAR Management Plug-in and Recovery Manager
Software for VMware vSphere User's Guide
Installing and using the HP 3PAR VSS (Volume Shadow Copy HP 3PAR VSS Provider Software for Microsoft Windows
Service) Provider software for Microsoft Windows
User's Guide
Best practices for setting up the Storage Replication Adapter HP 3PAR Storage Replication Adapter for VMware
for VMware vCenter
vCenter Site Recovery Manager Implementation Guide
Troubleshooting the Storage Replication Adapter for VMware HP 3PAR Storage Replication Adapter for VMware
vCenter Site Recovery Manager
vCenter Site Recovery Manager Troubleshooting Guide
Installing and using vSphere Storage APIs for Array
Integration (VAAI) plug-in software for VMware vSphere
HP 3PAR VAAI Plug-in Software for VMware vSphere
User's Guide
HP 3PAR documentation
59
Typographic conventions
Table 3 Document conventions
Convention
Element
Bold text
• Keys that you press
• Text you typed into a GUI element, such as a text box
• GUI elements that you click or select, such as menu items, buttons,
and so on
Monospace text
• File and directory names
• System output
• Code
• Commands, their arguments, and argument values
<Monospace text in angle brackets> • Code variables
• Command variables
Bold monospace text
• Commands you enter into a command line interface
• System output emphasized for scannability
WARNING! Indicates that failure to follow directions could result in bodily harm or death, or in
irreversible damage to data or to the operating system.
CAUTION:
NOTE:
Indicates that failure to follow directions could result in damage to equipment or data.
Provides additional information.
Required
Indicates that a procedure must be followed as directed in order to achieve a functional and
supported implementation based on testing at HP.
HP 3PAR branding information
60
•
The server previously referred to as the "InServ" is now referred to as the "HP 3PAR StoreServ
Storage system."
•
The operating system previously referred to as the "InForm OS" is now referred to as the "HP
3PAR OS."
•
The user interface previously referred to as the "InForm Management Console (IMC)" is now
referred to as the "HP 3PAR Management Console."
•
All products previously referred to as “3PAR” products are now referred to as "HP 3PAR"
products.
Support and Other Resources
18 Documentation feedback
HP is committed to providing documentation that meets your needs. To help us improve the
documentation, send any errors, suggestions, or comments to Documentation Feedback
([email protected]). Include the document title and part number, version number, or the URL
when submitting your feedback.
61
Glossary
active VLUN
The pairing of a virtual volume and a LUN so the host can access its virtual volume and I/O
writes can be saved to the virtual volume. The VLUN parameters determine whether a virtual
volume is expressed as an active VLUN. VLUNs that are not active will not communicate with the
HP 3PAR StoreServ Storage system.
allocation limit
User-defined threshold that can be set for Thinly-Provisioned Virtual Volumes and fully-provisioned
virtual volumes to cap their potential size.
allocation warning
User-defined threshold that can be set for Thinly-Provisioned Virtual Volumes and fully-provisioned
virtual volumes to alert users when the volumes reach a certain size.
chunklet
A block of contiguous storage space on a physical disk. On F-Class and T-Class systems, all
chunklets are 256 MB. On HP 3PAR 10000 systems, all chunklets are 1 GB.
CPG
Common Provisioning Group (also known as a storage pool or logical disk pool). A set of logical
disks from which you can create virtual volumes and virtual copies that are capable of allocating
storage on demand.
CPG template
Common Provisioning Group template. A CPG template contains a set of common provisioning
group and logical disk parameters that HP 3PAR Management Console users can apply in order
to create a new Common Provisioning Group.
created host
A host that is defined on the system but does not necessarily have any physically connected host
paths or WWNs assigned to it.
drive cage
A component in a rack or chassis that contains a drive. Drive cages connect to nodes for
communication with hosts. Drives may be Fibre Channel or iSCSI.
drive magazine
An electronic circuit board mounted on a mechanical structure that is inserted into a drive bay
in a drive cage. A drive magazine holds up to four physical disks.
export
To present a virtual volume to a host. Exporting makes a volume available to a host by creating
an association between the volume's name and a LUN (logical unit number) for the specified host
and port.
Fast Class
Drive type: either Fibre Channel or Serial Attached SCSI (SAS). With regard to drive types and
drive capacities, the abbreviation FC applies to Fast Class. With regard to ports, the abbreviation
FC applies to Fibre Channel only.
Fibre Channel
adapter
A Fibre Channel PCI host bus adapter (HBA) located in a controller node. The Fibre Channel
adapter connects a controller node to a host or to a drive chassis.
fully provisioned
virtual volume
A virtual volume (snapshot) with a set amount of user space and for which snapshot administration
space and snapshot data space draw resources from a Common Provisioning Group (CPG).
growth increment
The unit of storage space by which the system creates and allocates additional logical disks to
a Common Provisioning Group (CPG) when the volumes in that CPG require additional resources.
The minimum growth increment varies according to the number of controller nodes in the system
(from 8 GB for a two-node system to 32 GB for a eight-node system).
growth limit
An optional setting that enables you to specify the maximum size to which a CPG can grow.
growth warning
An optional setting that enables you to specify the size at which the system alerts you to the
amount of CPG growth.
host
A path or set of paths, defined as either WWN or iSCSI names, to one or more ports on a system.
host definition
The name of the host and the list of the paths (WWN or iSCSI) assigned to the host, if any. If
you remove all the paths assigned to the host, the host name becomes the host definition.
host-sees VLUN
template
A VLUN template that allows a specified host connected to any port to see a virtual volume as a
specified LUN (logical unit number).
iSCSI adapter
An iSCSI PCI host bus adapter (HBA) located in a controller node. An iSCSI adapter connects a
controller node on an iSCSI port to a host.
iSCSI name
The name of an iSCSI path. You use an iSCSI name to identify that iSCSI path to a host.
62
Glossary
LD
Logical disk. A collection of chunklets that reside on different physical disks and that are arranged
as rows of RAID sets. When you create a CPG, the system creates and groups logical disks and
assigns those logical disks to the CPG.
LUN
Logical Unit Number. A number used to access a virtual volume that has been assigned to a
particular host on a particular port.
matched-set VLUN
template
A rule that allows a particular host connected to a particular port to see a virtual volume as a
specified LUN.
parity
A data redundancy technique used by some RAID levels (in particular RAID 5) to provide data
protection on a storage array.
PCM
Power Cooling Module. A hardware component that includes the battery, fan, and power supply.
physical disk
A dual-ported Fibre Channel disk mounted onto a drive magazine.
port-presents
VLUN template
A VLUN template that allows any host connected to a particular port to see a virtual volume as
a specified LUN.
roles and rights
The roles and rights assigned to a user determine which tasks the user can perform with a system.
Service Processor
A device inserted into a rack or virtual software that enables you to locally and remotely monitor
and service systems.
TPVV
Thinly-Provisioned Virtual Volume. A virtual volume that maps to logical disk space associated
with a Common Provisioning Group (CPG) and is therefore capable of growing on demand.
user data
For standard base volumes, the data that is written to the user space.
virtual copy
A snapshot created using the copy-on-write technique.
virtual volume
A virtual storage unit created by mapping data from one or more logical disks.
VLUN
Virtual logical unit number. A VLUN is a virtual volume-LUN pairing expressed as either an active
VLUN or as a VLUN template.
VLUN template
A rule that sets up the association between the name of the virtual volume and a LUN-host,
LUN-port, or LUN-host-port combination. The three types of VLUN templates are host-sees,
port-presents, and matched-set.
VSP
Virtual Service Processor.
WWN
World-Wide Name. A unique 64-bit value used to identify Fibre Channel devices on an arbitrated
loop. The WWN consists of a prefix issued by the IEEE to uniquely identify the company and a
suffix that is issued by the company.
63