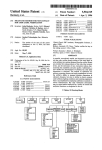
1
AICS Implementation Guide Produced by July 9, 1998 AICS Implementation Guide (Draft)) Table of Contents Table of Contents INTRODUCTION................................................................................................................................................ 1 BACKGROUND......................................................................................................................................................... 1 PURPOSE................................................................................................................................................................. 1 HOW TO USE THIS DOCUMENT ................................................................................................................................ 1 AICS SCANNING WORKSTATION LOCATION............................................................................................................. 3 SECTION 1: BELL AND HOWELL AICS SCANNING WORKSTATION SETUP...................................... 4 1-A. BELL AND HOWELL AICS SCANNING WORKSTATION CONFIGURATION.............................................................. 4 1-B. BELL AND HOWELL AICS SCANNING CHECKLIST.............................................................................................. 5 1-C. STEPS FOR INSTALLING THE AICS BELL AND HOWELL SCANNING WORKSTATION.............................................. 6 1-D. CONFIGURE/INSTALL KOFAX KF-9250 ACCELERATOR CARDS AND BELL AND HOWELL SCANNER ...................... 6 1-E. TROUBLESHOOTING BELL AND HOWELL, AND KOFAX PROBLEMS: ................................................................... 15 SECTION 2: HEWLETT PACKARD AICS SCANNING WORKSTATION SETUP .................................. 18 2-A. HEWLETT PACKARD AICS SCANNING WORKSTATION CONFIGURATION........................................................... 18 2-B. HEWLETT PACKARD AICS SCANNING CHECKLIST .......................................................................................... 19 2-C. STEPS FOR INSTALLING THE AICS HEWLETT PACKARD SCANNING WORKSTATION........................................... 20 2-D. CONFIGURE/INSTALL HEWLETT PACKARD SCANNER ....................................................................................... 20 2-E. TROUBLESHOOTING HEWLETT PACKARD SCANNER PROBLEMS ........................................................................ 25 SECTION 3: HEWLETT PACKARD LASERJET 5SI PRINTER ................................................................ 26 SECTION 4: SOFTWARE SETUP.................................................................................................................. 27 4-A. PAPER KEYBOARD SOFTWARE INSTALLATION................................................................................................. 27 4-B. RPC BROKER................................................................................................................................................ 29 4-C. AICS SERVER SOFTWARE.............................................................................................................................. 29 4-D. AICS CLIENT SOFTWARE .............................................................................................................................. 30 SECTION 5: USING THE AICS SCANNING WORKSTATION.................................................................. 46 5-A. RUNNING THE AICS SCANNING WORKSTATION APPLICATION......................................................................... 46 5-B. BEGINNING SCANNING................................................................................................................................... 46 5-C. RUNNING THE AICS SCANNING WORKSTATION TUTORIAL.............................................................................. 47 SECTION 6: AICS SCANNING TIPS ............................................................................................................. 48 6-A. AICS SCANNING HINTS................................................................................................................................. 48 6-B. AICS EXCEPTION HANDLING......................................................................................................................... 49 APPENDIX A. CHANGING AICS WORKSTATION PARAMETERS ........................................................ 50 APPENDIX B. SCANNABLE ENCOUNTER FORM..................................................................................... 54 CRITICAL ELEMENTS OF A SCANNABLE FORM ......................................................................................................... 54 SAMPLE SCANNABLE ENCOUNTER FORM ................................................................................................................ 55 APPENDIX C. SCANNER CALIBRATION .................................................................................................... 56 APPENDIX D. ADJUSTING SCANNER BRIGHTNESS............................................................................... 58 GLOSSARY ....................................................................................................................................................... 59 July 30, 1998 ii AICS Implementation Guide Introduction Introduction Background The Office of Veterans Health Information Systems and Technology determined that Veterans Affairs (VA) field facilities needed a tool to help them capture outpatient data. A decision was made to implement image-based scanning at medical centers to upload patient data to the VISTA database. Several pilot projects were developed to test the concept. The outcome of these projects was the Automated Information Collection System (AICS), which became a package of its own with the release of AICS Version 2.1. AICS Version 3.0 was released to all VA medical centers on April 30, 1997. The Medical Care Cost Recovery (MCCR) Program Office purchased and distributed the personal computers (PCs), scanners and printers to support the AICS software at VA facilities. Purpose Based on the recent AICS survey it is evident that the AICS is not being used to the extent that it was designed. The survey results indicate that there are common reasons why sites have not fully implemented AICS scanning. At a high level, these reasons consist of a need for training in installing hardware and software, understanding how to use the AICS when it is up and running, and for following a consistent problem resolution process. The AICS Implementation Guide is phase 1 of a comprehensive implementation plan that will include an implementation guide, training, and customer support during the implementation phase of AICS scanning. The design of this AICS Implementation Guide is to provide step by step instructions in the installation of the AICS scanning hardware and software. After this installation is complete AICS scanning can begin. This document does not address other factors such as encounter form editing, scanning error correction, and workflow processes associated with AICS scanning. Issues beyond the scope of this document such as training and customer support will be addressed in the near future. How To Use This Document This document contains information that may be needed by several different parties within the Veterans Health Administration (VHA). It is intended to guide VHA facilities in implementing AICS scanning. This document contains information aimed toward all audiences who may play a role in the sites’ AICS scanning implementation. July 30, 1998 1 AICS Implementation Guide NOTE: Introduction Steps/Procedures in this guide are written specifically for Windows 95 Operating System. Sections 1, 2, and 3 are intended for the person responsible for installing and configuring hardware at the site, usually the site’s Information Resource Management Services (IRM). Someone comfortable with installing new hardware/software on a PC should perform the installation of scanners. Follow the instructions provided by hardware manufacturers. Section 4 is intended for the person responsible for installing software releases at the site, which may be an IRM or a trained user. Sections 5, 6, and 7 are intended to be a refresher on how to use AICS scanning. This section may be referenced by an IRM to assist with scanning calibration, but will most likely be used by an AICS user as a refresher of previously taught skills. When using this guide, users should have the following documentation on hand: • AICS V3.0 Installation Guide • AICS V3.0 Release Notes • AICS V3.0 Technical Manual • AICS V3.0 User Manual • AICS Patch IBD*3*3 documentation • RPC Broker Version 1.0 Installation Guide • RPC Broker Version 1.0 Package Security Guide • RPC Broker Version 1.0 Technical Manual • RPC Broker Version 1.0 User Manual If missing any of the documents listed above, please contact OCIO National Help Desk at 1-888-596-4357. • Bell and Howell 6338 Duplex Scanner Manual • Bell and Howell Accufeed User Manual • Hewlett Packard ScanJet 4P documentation • Hewlett Packard 4Si Laser Printer documentation • Kofax KF-9250 Installation Guide July 30, 1998 2 AICS Implementation Guide • Introduction Paper Keyboard User Guide Please contact EDS Customer Support at 1-800-762-3371 (refer to NIH contract) for missing documents. AICS Scanning Workstation Location The locations of the AICS Scanning Workstations are crucial to the overall workflow. Consideration should be given to the size of clinic and the type of encounter forms to be used (single-sided or double-sided). For large clinics with a high volume of patients, using duplex scanning and a centralized Bell and Howell scanning workstation should be considered. The Bell and Howell scanning workstation could also be used in a decentralized area supporting many clinics of medium size. The Hewlett Packard (HP) scanning workstations are ideal for smaller clinics using simplex encounter forms. The HP scanning workstations can be located either in a centralized clinic or a decentralized area depending on each clinic’s workflow process and the availability of HP scanning workstations at the site. Installation of scanners and computer equipment should be performed by someone comfortable with installation of new hardware by following manufacturer’s instructions. NOTE: The chosen location must have TCP/IP VISTA network connectivity. HINT: The Bell and Howell scanning workstation can also be used for high-volume simplex scanning. Double-sided scanning can also be accomplished on the HP scanner by reversing sides of the document. July 30, 1998 3 AICS Implementation Guide Section 1: Bell and Howell AICS Scanning Workstation Setup Section 1: Bell and Howell AICS Scanning Workstation Setup 1-A. Bell and Howell AICS Scanning Workstation Configuration • If installing hardware and software procured for AICS scanning by the MCCR Program Office that are still in their original packing materials and the Kofax KF-9250 accelerator cards are already installed in the PC, then follow in sequence: Section 1-B (page 5), Bell and Howell AICS Scanning Checklist Section 1-C (page 6), Steps for Installing the AICS Bell and Howell Scanning Workstation Section 1-D, Configure/Install Kofax KF-9250 Accelerator Cards and Bell and Howell Scanner, Steps 3 (page 8) and 6 (page 14) • If installing hardware and software procured for AICS scanning by the MCCR Program Office and the Kofax KF-9250 accelerator cards are NOT installed in the PC, then follow in sequence: Section 1-B (page 5), Bell and Howell AICS Scanning Checklist Section 1-C (page 6), Steps for Installing the AICS Bell and Howell Scanning Workstation Section 1-D (page 6), Configure/Install Kofax KF-9250 Accelerator Cards and Bell and Howell Scanner • If installing hardware and software procured for AICS scanning by the MCCR Program Office that has been set up, but is not fully operational; or if the equipment is not MCCR Program Office procured, then follow in sequence: Section 1-B (page 5), Bell and Howell AICS Scanning Checklist Section 1-C (page 6), Steps for Installing Bell and Howell AICS Scanning Workstation Section 1-D (page 6), Configure/Install Kofax KF-9250 Accelerator Cards and Bell and Howell Scanner July 30, 1998 4 AICS Implementation Guide Section 1: Bell and Howell AICS Scanning Workstation Setup NOTE: Please read Section 1-E (page 16), Troubleshooting Bell and Howell, and Kofax Problems, before contacting OCIO National Help Desk. 1-B. Bell and Howell AICS Scanning Checklist The following hardware and software is required to begin the Bell and Howell AICS scanning workstation setup: NOTE: If any of the required equipment from the checklist is missing, please contact your site’s receiving office. NOTE: Some or all of this hardware and software may already be installed on PC. • Hardware At a minimum, 486 CPU-based PC with 20 megabytes of RAM is required (Pentium 100 with 32 megabytes of RAM or higher is recommended) Bell and Howell 6338 Duplex Scanner Bell and Howell Accufeed Sheetfeeder Two Kofax KF-9250 accelerator cards; these cards are labeled “KF-9250” Two Kofax cables; these cables can be identified by the markings on the connectors located on the cable ends; the 25 pin connector is labeled “SCANNER,” and the 62 pin connector is labeled “KOFAX” Paper Keyboard Security Key; the Paper Keyboard Security Key (looks like a blue gender changer) is an adapter that attaches to the parallel port of a PC workstation and allows use of the Paper Keyboard Software • Software Microsoft Windows 95 currently running on the PC workstation Kofax configuration software diskette; this diskette is labeled “KIPP Version 2.12 Peripheral Drivers for Windows” Paper Keyboard Version 2.53 software and documentation (see Section 4-A) Kernel RPC Broker (see Section 4-B) AICS Version 3.0 (see Section 4-C) AICS patch IBD*3*3 (see Section 4-D) July 30, 1998 5 AICS Implementation Guide • Section 1: Bell and Howell AICS Scanning Workstation Setup Other Requirements Each workstation must be networked to a VISTA server 1-C. Steps for Installing the Bell and Howell AICS Scanning Workstation Step 1. Locate and unpack the equipment if necessary. Step 2. Connect monitor, keyboard, mouse, and power cable to PC. Follow instructions provided by the PC manufacturer. Step 3. Install Bell and Howell Sheet Feeder. Follow instructions as per Bell and Howell manual. Step 4. 1-D. Power on the PC to check that the PC boots up properly Configure/Install Kofax KF-9250 Accelerator Cards and Bell and Howell Scanner Step 1. Set the Jumper Settings (JP100, JP101) on the KF-9250 Accelerator cards 1. Unpack the two KF-9250 Accelerator cards. 2. Select one to be the master and one to be the slave, and label them as such. The label should be applied to a visible portion of the bracket. July 30, 1998 6 AICS Implementation Guide 3. Section 1: Bell and Howell AICS Scanning Workstation Setup Set the jumpers on the hardware accelerators to the following: master slave JP100: 300 – 307 JP101: 10 JP100: 340 – 347 JP101: 3 Use the diagram below to assist in setting the master JP100 and JP101 jumpers. Use the diagram below to assist in setting the slave JP100 and JP101 jumpers. July 30, 1998 7 AICS Implementation Guide Step 2. Section 1: Bell and Howell AICS Scanning Workstation Setup Install the Kofax KF-9250 Accelerator Cards 1. From the Windows task bar, select Start. 2. Choose Shutdown. 3. Select Shutdown the computer. 4. Click Yes. 5. Unplug PC and remove PC cover. 6. Place the master KF-9250 accelerator card in the first available ISA slot. The master scans the front side of the page. 7. Place the slave KF-9250 accelerator card in the slot next to the master. The slave scans the backside of the page. 8. Reassemble PC. Connect monitor, keyboard, mouse, and power cable to CPU. Step 3. Attach Bell & Howell 6338 Scanner 1. Obtain the two Kofax scanner cables to connect the scanner with the Kofax KF9250 accelerator cards. 2. Choose one cable and attach the 62-pin connector marked ‘KOFAX’ into the connector on the master Kofax accelerator card. 3. Using the same cable, attach the connector marked ‘SCANNER’ to the left port if facing the rear of the scanner; this is the master port. 4. Using the second cable, attach the 62-pin connector marked ‘KOFAX’ into the connector on the slave Kofax accelerator card. 5. Using the same cable, attach the connector marked ‘SCANNER’ to the right port if facing the rear of the scanner; this is the slave port. Step 4. Install Kofax Software 1. Power up PC. 2. Insert the Kofax software diskette into the drive a:. 3. From the Windows task bar, select Start. July 30, 1998 8 AICS Implementation Guide 4. Choose Run. 5. Type a:\install. 6. Click OK. Section 1: Bell and Howell AICS Scanning Workstation Setup The [KIPP 2.12 Driver Installation for Windows] screen appears. 7. Press <Enter>. The [KIPP 2.12 Driver Installation for Windows] screen appears displaying the following: C:\KIPP 8. Press <Enter>. The [KIPP 2.12 Driver Installation for Windows] screen appears displaying the following: C:\KIPP\DRIVER 9. Press <Enter>. The [KIPP 2.12 Driver Installation for Windows] screen appears displaying the following: C:\KIPP\BIN 10. Press <Enter>. The [KIPP 2.12 Driver Installation for Windows] screen appears displaying the following: C:\KIPP\BIN 12. Press <Enter>. The [Kofax Driver Installation] screen appears. 13. Choose “3) Install KIPP software” and press <Enter>. The [Kofax Driver Installation] screen appears. 14. Choose “1) Complete Software Install” and press <Enter>. July 30, 1998 9 AICS Implementation Guide Section 1: Bell and Howell AICS Scanning Workstation Setup The [Install All Software] screen appears. 15. Press <Y> to Install Software Now. 16. After the files are loaded, choose “3) Return to Previous Menu” and press <Enter>. 17. Choose “4) Exit” and press <Enter>. The [Press a Key to continue] screen appears. 18. Press <Enter>. The [Finished - Install] screen appears. 19. Click the MS-DOS icon in the upper left corner of window. 20. Select Close. Step 5. Configure the Kofax software: 1. From the Windows task bar, select Start. 2. Choose Run. 3. Type c:\kipp\bin\kippcfg. 4. Click OK. The [KIPP 2.12 Driver Configuration for Windows] screen appears. 5. Press <Enter>. The [Is Your PC’s bus an MCA bus?] screen appears. 6. Press <N> for no. The [Kofax Driver Configuration] screen appears. 7. Choose “2) Configuration of Kofax engines” and press <Enter>. The [Kofax Engine Configuration] screen appears. 8. Choose “2) Add a Kofax Engine” and press <Enter>. The [Select Kofax Engine Type to Add] screen appears. July 30, 1998 10 AICS Implementation Guide 9. Section 1: Bell and Howell AICS Scanning Workstation Setup Choose “KF-9250” and press <Enter>. The [Select I/O Port Range] screen appears. 10. Choose “300h - 307h (default)” and press <Enter>. The [Select Hardware Interrupt] screen appears. 11. Choose “IRQ 10” and press <Enter>. The [Press a key to continue] screen appears. 12. Press <Enter>. The [Kofax Engine Configuration] screen appears. 13. Choose “2) Add a Kofax Engine” and press <Enter>. The [Select Kofax Engine Type to Add] screen appears. 14. Choose “KF-9250” and press <Enter>. The [Select I/O Port Range] screen appears. 15. Choose “340h - 347h” and press <Enter>. The [Select Hardware Interrupt] screen appears. 16. Choose “IRQ 3” and press <Enter>. The [Press a key to continue] screen appears. 17. Press <Enter>. The [Kofax Engine Configuration] screen appears. 18. Choose “4) Return to Previous Menu” and press <Enter>. The [Kofax Driver Configuration] screen appears. 19. Choose “3) Configuration of Scanners” and press <Enter>. The [Kofax Scanner Configuration] screen appears. 20. Choose “1) Select Kofax Engine” and press <Enter>. July 30, 1998 11 AICS Implementation Guide Section 1: Bell and Howell AICS Scanning Workstation Setup 21. Press <Backspace> and type 1 and press <Enter>. The [Kofax Scanner Configuration] screen appears. 22. Choose “2) Add or replace a Scanner” and press <Enter>. The [Select Scanner for Engine 1 KF9250] screen appears. 23. Choose “Bell & Howell 6338” and press <Enter>. The [Select Options for Scanner BH 6338_MASTER] screen appears. 24. Choose “Black Border Removal” and press <Enter>. The [Press a key to continue] screen appears. 25. Press <Enter>. 26. Press <Backspace>, type 2, and press <Enter>. The [Select Options for Scanner BH 6338_SLAVE] screen appears. 27. Choose “Black Border Removal” and press <Enter>. The [Press a key to continue] screen appears. 28. Press <Enter>. The [Kofax Scanner Configuration] screen appears. 29. Choose “4) Display Current Configuration” and press <Enter>. The following screen is displayed: Engine: Engine 1 KF9250 300 10 Devices: BH 6338_Master Engine: Engine 2 KF9250 340 03 Devices: BH 6338_Slave 30. Press <Enter>. The [Kofax Scanner Configuration] screen appears. 31. Choose “5) Return to previous menu” and press <Enter>. July 30, 1998 12 AICS Implementation Guide Section 1: Bell and Howell AICS Scanning Workstation Setup 32. Choose “5) Exit” and press <Enter>. The [Kofax engine configuration has been changed] screen appears. 33. Press <Y> to save the changes. The [HOW SHALL WE HANDLE IT?] screen appears. 34. Highlight “Go ahead and modify.” 35. Press <Enter>. The [C] screen appears. 36. Press <Enter>. The [C:\AUTOEXEC.BAT] screen appears. 37. Press <Enter>. The [Press a Key to Continue] screen appears. 38. Press <Enter>. The [Please remember to reboot your computer] screen appears. [Press a Key to Continue] screen appears. 39. Press <Enter>. The [Finished - kippcfg] screen appears. 40. Click on the MS-DOS icon in the upper left corner of window. 41. Select Close. 42. From the Windows task bar, select Start. 43. Choose Shutdown. 44. Select Shutdown the Computer. 45. Click Yes. July 30, 1998 13 AICS Implementation Guide Step 6. Section 1: Bell and Howell AICS Scanning Workstation Setup Testing Bell and Howell Scanner (Kofax). 1. Power on the scanner. WARNING: Scanner should always be powered up before the PC. 2. Power on the PC. After configuring the Kofax and rebooting the system, test to see if the scanner is working correctly by using the following instructions: During the boot up process, confirm that the messages for the Kofax Engines initialization appear. Successful initialization messages will look similar to the following: Loading Kofax firmware for Engine1 Kofax Engine Initialization may take up to one minute Loading Kofax firmware for Engine2 Kofax Engine Initialization may take up to one minute Kofax engine firmware installed Error messages will look similar to the following: Loading Kofax firmware for Engine1 Kofax Engine Initialization may take up to one minute ERROR Engine failed to initialize Press any key to continue… NOTE: Successful indication message only notes the readiness of the Kofax card and does not necessarily indicate the readiness of the scanner system. If errors occur, see Section 1-E, Troubleshooting Bell and Howell and Kofax Problems. If the Kofax Engines load successfully, proceed with the following steps: July 30, 1998 14 AICS Implementation Guide Section 1: Bell and Howell AICS Scanning Workstation Setup 3. Place a page to scan in the appropriate feeder. 4. From the Windows task bar, select Start. 5. Choose Run. 6. Type c:\kipp\bin\wcr 7. Click OK. 8. From the Windows Capture and Retrieval (WCR) application task bar, select Scanner. 9. Select Scanner Setup. 10. Verify that entry in Duplex is set to “Duplex”. 11. Click OK. NOTE: If “Duplex” is not set, select “Duplex” from the pulldown menu. If “Duplex” is not an option from the pull down menu, then see Section 1-E, Troubleshooting Bell and Howell and Kofax Problems. Kofax card positioning/seating may affect Duplex operation. 14. From the WCR application task bar, select Scanner. 15. Select Scan Document. 16. Press <Enter> to accept default file name as NEWDOC.TIF when prompted. 17. If prompted, replace existing file. Test has run successfully if the display shows the document that has been scanned. If the test is unsuccessful, see Section 1-E, Troubleshooting Bell and Howell and Kofax Problems. 1-E. Troubleshooting Bell and Howell, and Kofax Problems: Use this section if Kofax Engine errors are experienced during the bootup process of the PC or the Windows Capture and Retrieval (WCR) test does not run successfully. If after following these troubleshooting Kofax Engine errors still continue, refer to Appendix E of the KF-9250 Installation Guide that came with the Kofax Accelerator cards. July 30, 1998 15 AICS Implementation Guide Section 1: Bell and Howell AICS Scanning Workstation Setup Troubleshooting Step 1: Confirm that the settings on the KF-9250 Accelerator cards are set to the same settings as were configured during the KF-9250 software configuration. Additionally, this should be done to identify correct placement of master and slave Kofax interface cards. See Section 1-D, Step 1, Set the Jumper Settings (JP100, JP101) on the KF-9250 Accelerator cards. The jumper settings should be as follows: master JP100: 300 – 307 JP101: 10 slave JP100: 340 – 347 JP101: 3 Once the correct cards and jumper settings are verified, reinstall the interface cards as in Section 1-D, Configure/Install Kofax KF-9250 Accelerator Cards and Bell and Howell Scanner, Step 2 and 3 (page 9). Verify proper operation with Step 6 (page 14) Troubleshooting Step 2: If the jumper settings are correct and scanning still can not be performed successfully, then edit the C:\KIPP\BIN\BIC.CFG file in the following way: 1. From the Windows task bar, select Start. 2. Choose Program. 3. Select MS-DOS. 4. Type edit c:\kipp\bin\bic.cfg and press <Enter>. 5. Highlight the “10” at the end of the first line. 6. Type –1 7. Highlight the “3” at the end of the second line. 8. Type –1 9. Select File. 10. Choose Exit. The [save file dialog box] screen appears. 11. Choose Yes. July 30, 1998 16 AICS Implementation Guide Section 1: Bell and Howell AICS Scanning Workstation Setup 12. Type exit and press <Enter>. The Windows 95 Desktop appears. 13. From the Windows task bar, select Start. 14. Choose Shutdown. 15. Select Restart the computer. 16. Click Yes. 17. Rerun the test in Section 1-D, Step 6, Testing Bell and Howell Scanner (Kofax). July 30, 1998 17 AICS Implementation Guide Section 2: Hewlett Packard AICS Scanning Workstation Setup Section 2: Hewlett Packard AICS Scanning Workstation Setup 2-A. Hewlett Packard AICS Scanning Workstation Configuration • If installing hardware and software procured for AICS scanning by the MCCR Program Office that are still in their original packing materials, then follow in sequence: Section 2-B (page 19), Hewlett Packard AICS Scanning Checklist Section 2-C (page 20), Steps for Installing AICS Hewlett Packard Scanning Workstation Section 2-D (page 20), Configure/Install Hewlett Packard Scanner • If hardware and software procured for AICS scanning by the MCCR Program Office has been set up, but is not fully operational, then follow in sequence: Section 2-B (page 19), Hewlett Packard AICS Scanning Checklist Section 2-C (page 20), Steps for Installing AICS Hewlett Packard Scanning Workstation Section 2-D (page 20), Configure/Install Hewlett Packard Scanner • If the equipment is not MCCR Program Office procured, then follow in sequence: Section 2-B (page 19), Hewlett Packard AICS Scanning Checklist Section 2-C (page 20), Steps for Installing AICS Hewlett Packard Scanning Workstation. Section 2-D (page 20), Configure/Install Hewlett Packard Scanner July 30, 1998 18 AICS Implementation Guide NOTE: Section 2: Hewlett Packard AICS Scanning Workstation Setup Please read Section 2-E (page 25), Troubleshooting Hewlett Packard Scanner Problems, before contacting OCIO National Help Desk. WARNING: Do not install the scanner card unless the HP scanning software has been installed to completion. 2-B. Hewlett Packard AICS Scanning Checklist The following hardware and software are required to begin the Hewlett Packard AICS scanning workstation setup: NOTE: • Some or all of this hardware and software may already be installed on the PC. Hardware At a minimum, a 486 CPU-based PC workstation with 20 megabytes of RAM is required (A Pentium 100 with 32 megabytes of RAM is recommended) HP ScanJet 4p HP scanner card; this card is triangular in shape HP scanner interface cable; this cable is white with one end having a 50 pin connector HP Sheet Feeder Paper Keyboard Security Key; the Paper Keyboard Security Key is a connector that attaches to the parallel port of PC workstation • Software Microsoft Windows 95 currently running on the PC workstation HP ScanJet 4p Scanning Software Diskettes including PaperPort Software Diskettes Paper Keyboard Version 2.53 software and documentation (see Section 4-A) Kernel RPC Broker (see Section 4-B) AICS Version 3.0 (see Section 4-C) AICS patch IBD*3*3 (see Section 4-D) July 30, 1998 19 AICS Implementation Guide • Section 2: Hewlett Packard AICS Scanning Workstation Setup Other Requirements Each workstation must be networked to a VISTA server. 2-C. Steps for Installing the AICS Hewlett Packard Scanning Workstation Step 1. Locate and unpack the equipment if necessary. Step 2. Connect monitor, keyboard, mouse, and power cable to PC, following PC manufacturer’s instructions. Step 3. Check the rear of the PC for an installed HP SCSI interface card. STOP! If an HP interface card is installed, then it MUST BE REMOVED before proceeding. Step 4. Power on the PC to check that the PC boots up properly. WARNING: Install the HP scanning software first, and HP scanner card second. The HP Scanner card is a WIN-95 Plug and Play card. 2-D. Configure/Install Hewlett Packard Scanner Step 1. NOTE: Install Hewlett Packard Scanner Software There are diskettes for both HP ScanJet 4p and PaperPort that will be needed for this installation. 1. Write down the serial number from PaperPort Software Disk #1 to use during installation. 2. Insert HP ScanJet 4p Scanning Software Disk #1 into drive a:. 3. From the Windows task bar, select Start. 4. Choose Run. 5. Type a:setup 6. Click OK. The [HP ScanJet Scanner Master Setup] screen appears. July 30, 1998 20 AICS Implementation Guide 7. Section 2: Hewlett Packard AICS Scanning Workstation Setup Click Start. The [Hp ScanJet Scanner Master Setup] screen appears. 8. Insert PaperPort Disk 1 into drive a:. 9. Click Install. The [PaperPort Setup] screen appears. 10. Enter your site name as your name. 11. Press <Tab>. 12. Enter VHA as your company name. 13. Press <Tab>. 14. Enter the serial number which was written down in step 1 (The serial number can be found on the PaperPort Software Diskettes). 15. Click Continue. The [PaperPort Setup] screen appears. 16. Click Continue. Files will be installed from diskettes. Insert additional diskettes during this phase as prompted. Follow the on screen instructions until the [HP ScanJet Scanners Master Setup] screen appears. 17. Insert the HP ScanJet Scanning software diskette 1 into drive a:. 18. Click Install. The [Hp ScanJet Scanners Setup] screen appears. 19. Click Continue. The [HP ScanJet Scanners Setup] screen appears displaying default installation settings. 20. Click Install. The [HP ScanJet Scanners Setup] screen appears. July 30, 1998 21 AICS Implementation Guide Section 2: Hewlett Packard AICS Scanning Workstation Setup Insert additional diskettes during this phase as prompted. Follow the on screen instructions until the [HP ScanJet Scanners Setup] screen appears. 21. Confirm the “300 dpi HP Laserjet Printers” is highlighted. 22. Click OK. The [HP ScanJet Scanners Setup] screen appears stating the following: [Screen Calibration for HP Scanning Software] 23. Click OK. The [HP Screen Calibration] screen appears. Follow instructions on the screen. HINT: The further away from the screen you sit, the easier it is to tell how closely the grays blend. 24. Click OK. The [HP Screen Calibration] screen appears. Follow instructions on the screen. 25. Click OK. The [HP ScanJet Scanners Setup] screen appears stating the following: [Setup Succeeded] 26. Click OK. The [HP ScanJet Scanners Master Setup] screen appears. 27. Click OK. The [HP ScanJet Scanners Master Setup] screen appears again. 28. Click OK. The system will automatically reboot. July 30, 1998 22 AICS Implementation Guide Step 2. Section 2: Hewlett Packard AICS Scanning Workstation Setup Install Hewlett Packard Interface Card WARNING: Do not install the scanner card unless the HP scanning software has been installed to completion. NOTE: NOTE: Both the HP ScanJet scanner and HP scanner card have unique small computer system interface (SCSI) addresses. The scanner default is 2 and the card default is 7. They should be factory-set to these addresses. Note that to avoid conflicts with other SCSI devices these addresses should not be assigned to other SCSI devices in use. 1. From the Windows task bar, select Start. 2. Choose Shutdown. 3. Select Shutdown the computer. 4. Click Yes. 5. Unplug PC and remove PC cover. 6. Install the scanner card in one of the expansion slots. Press down firmly on the shorter end of the card first, then while holding the shorter end of the card press down on the longer end until it snaps in place. 7. Step 3. Reassemble PC and proceed with HP scanner installation. Install Hewlett Packard Scanner 1. On the back of the scanner, a locking mechanism is provided to prevent damage to the scanner light bar during shipment. Remove adhesive tape and pull up on the lock to unlock. 2. A SCSI terminator switch is located on the rear of the scanner between the SCSI address switch and the 50-pin cable connector. Make sure the terminator switch is turned on (+). 3. Attach the small end of the white interface cable to the connector on the scanner card. 4. Attach the larger cable end to the 50-pin connector on the back of the scanner. 5. Attach the power cord to the scanner and power up the scanner. July 30, 1998 23 AICS Implementation Guide Section 2: Hewlett Packard AICS Scanning Workstation Setup 6. Power up the computer; a message that Windows has found new hardware will be displayed and will ask for drivers to install. 7. Insert HP Scanning Software disk #1 into drive a:. 8. Click OK The drivers for the scanner card will be copied from the disk. Step 4. 1. Testing Hewlett Packard Scanner Confirm that the scanner is powered on. WARNING:The scanner must be turned on before the PC is rebooted! 2. From the Windows task bar, select Start. 3. Choose Shutdown. 4. Select Restart the computer. 5. Click Yes. 6. After the PC reboots, from the Windows task bar, select Start. 7. Choose Settings. 8. Choose Control Panel. 9. Double click the HP ScanJet Scanners icon. 10. Choose Test tab. 11. Click Scanner. 12. Follow the instructions on the screen. 13. Click OK. 14. Click Done. July 30, 1998 24 AICS Implementation Guide 2-E. Section 2: Hewlett Packard AICS Scanning Workstation Setup Troubleshooting Hewlett Packard Scanner Problems For information on troubleshooting HP scanning problems please refer to the HP ScanJet4 Scanner manual, Section 4, Solving Problems. July 30, 1998 25 AICS Implementation Guide Section 3: Hewlett Packard LaserJet 5Si Printer Section 3: Hewlett Packard LaserJet 5Si Printer With the addition of scanning to the AICS package, a need for duplex printing and for a printer that could handle high volume printing as well as print pages that would be scannable and compatible with the AICS workstation software, the HP LaserJet 5Si printer was purchased. This printer prints 24 pages per minute (ppm), handling a wide variety of paper weights and sizes. Three input paper trays and two output bins handle a variety of print media. The HP LaserJet 5Si comes with 4 MB of memory with the potential to expand memory to 132 MB, and the potential to add additional printer features with four single inline memory module (SIMM) slots. 35 scaleable fonts as well as 10 True Type fonts are included in this printer. Some additional options have been purchased with the HP LaserJet 5Si that add to the capability and efficiency of this printer. They are an envelope feeder, duplex unit for printing 2 sided documents, 2000 sheet input tray (tray 4), and a multi-bin mailbox (works in mailbox, job separation and stacking mode). There are additional parameters and definitions that must be set up in order for the printer to be workable and usable to print AICS encounter forms and duplex printing. There are many differing network factors and variables at each site (such as wiring/connector schemes, terminal server configurations, sysgen definitions, physical device setups, VMS print queues, and so forth). It is difficult to standardize one combination of printer setups, and device and terminal type definitions for printing Encounter Forms and subsequent output reports (action profile, health summary, and so forth). It is very important to remember that each unique Terminal Type (Device Subtype) must be defined in the Encounter Form Printers file (357.94) with Printer Language Type equal to PCL5. If there is a need to print from Windows, a new network printer will need to be set up in order to use the device. Software is included with the HP LaserJet 5Si that must be installed on each individual PC to enable this capability. For more information on setting up the Hewlett Packard laser printer refer to either, the AICS User Manual, V3.1, Appendix D, HP LaserJet 5Si Printer or the HP LaserJet 5Si manufacturer’s documentation. WARNING: Recycled paper should NOT be used with the HP laser printer. July 30, 1998 26 AICS Implementation Guide Section 4: Software Setup Section 4: Software Setup 4-A. Paper Keyboard Software Installation. Before proceeding with the Paper Keyboard software installation, confirm that this software has not already been installed on the PC by performing the following steps: • From the Windows task bar, select Start. • Select Programs to see if the Paper Keyboard entry appears. If the Paper Keyboard entry appears, then skip the Paper Keyboard Software Installation section and proceed to Section 4-D, AICS Client Software. Step 1. Install Paper Keyboard Key Attach the Paper Keyboard Security Key to the parallel printer port of the PC. A Paper Keyboard Security Key is required to use the software. NOTE: A printer or other device can be used with the key attached to the parallel port. Step 2. Install Paper Keyboard Software 1. Insert Paper Keyboard software diskette #1 into drive a:. 2. From the Windows task bar, select Start. 3. Choose Run. 4. Type a:install. 5. Click OK. The [Welcome to Paper Keyboard ICR version 2.53] screen appears. 6. Click OK. The [Menu Choices] screen appears. 7. Highlight ”Express Installation”. 8. Click OK. The [Type of Scanner/Interface you will be using] screen appears. July 30, 1998 27 AICS Implementation Guide 9. Section 4: Software Setup Highlight Kofax 92xx/72xx if Bell and Howell 6338 scanner has been connected; or HP ScanJet compatible if the HP ScanJet 4p scanner has been connected. 10. Click OK. The [Install fonts if you will design forms on this computer] screen appears. 11. Highlight Will not design forms on this computer. 12. Click OK. The [Please Choose Your Installation Directory On A Fixed Drive] screen appears. 13. Select C:\PAPERKEY. 14. Click OK. The [Be sure to install and test the …] screen appears. 15. Click OK. The [Installing Files...] screen appears along with completion bars displaying installation progress; a prompt will appear to insert additional disks during this phase. Continue until the [How Shall We Handle It] screen appears with 3 selections. 16. Select the default Go ahead and modify. 17. Click OK. The [Install] screen appears stating the following: [We need to examine the following file C:\AUTOEXEC.BAT]. If the path is different, change the path designation accordingly; otherwise use the default. 18. Click OK. The Paper Keyboard icons are created and displayed. The [Paper Keyboard has been successfully installed] screen appears. 19. Click OK. July 30, 1998 28 AICS Implementation Guide Section 4: Software Setup The [Please remember to reboot your computer] screen appears. 20. Click OK. 21. From the Windows task bar, select Start. 22. Choose Shutdown. 23. Select Restart the computer. 24. Click Yes. 4-B. RPC Broker The RPC Broker should be installed by the site IRM on the workstation before installation of the AICS workstation software. Successful installation can be tested with the EGCHO.EXE command, which will allow the authorized users to sign on to VISTA and perform various demonstrations. Consult the site IRM for assistance on running this test. For more information on the RPC Broker see the following documents: • RPC Broker Version 1.0 Installation Guide • RPC Broker Version 1.0 Technical Manual • RPC Broker Version 1.0 User Manual • RPC Broker Version 1.0 Package Security Guide NOTE: Make sure that RPC Broker patches are up to date. Edit files for IP addresses as per RPC Broker manuals. 4-C. AICS Server Software The site IRM should install the Server Portion of AICS V3.0 and all subsequent AICS server software patches. Consult the site IRM for additional assistance. For more information on the AICS V3.0 see the following documents: • AICS V3.0 Installation Guide • AICS V3.0 Release Notes July 30, 1998 29 AICS Implementation Guide 4-D. Section 4: Software Setup • AICS V3.0 Technical Manual • AICS V3.0 User Manual AICS Client Software The most recent version of the AICS client software is AICS 3.0 patch IBD*3*3. If an earlier version of AICS is currently running, use the instructions below to upgrade your system. If you are installing the AICS client software for the first time, AICS 3.0 patch IBD*3*3 can be installed using the instructions below. NOTE: AICS 3.0 patch IBD*3*3 performs a complete installation of the AICS client software, excluding AICS tutorial. For a full tutorial obtain and install AICS version 3.0 prior to the patch installation. WARNING: The RPC Broker software and Paper Keyboard must be installed before this installation. AICS 3.0 patch IBD*3*3 The client software and the documentation files are available on the following CIO Field Offices Anonymous Software directories: CIO Field Office FTP address Directory Albany 152.127.1.5 Anonymous/software Hines 152.129.1.110 Anonymous/software Salt Lake 152.131.2.1 Anonymous/software To retrieve the IBD_30_3 patch from a site listed above, follow the instructions below: 1. From the Windows task bar, select Start. 2. Choose Programs. 3. Choose MS-DOS prompt. 4. Type cd \ and press <Enter>. 5. Type FTP ADDRESS (select address from the list above ) and press <Enter>. The [User:] prompt appears. July 30, 1998 30 AICS Implementation Guide Section 4: Software Setup WARNING: From this point on type in lowercase. 6. Type anonymous and press <Enter>. The [Password:] prompt appears. 7. Type “lastname” and press <Enter>. If this does not work, please see the site IRM representative. The [ftp>] prompt appears. 8. Type binary and press <Enter>. This ensures that the file will download in binary format. 9. Type cd software and press <Enter>. 10. Type get IBD_30_3.exe and press <Enter>. This step downloads the file to the workstation. Please note file location of patch. 11. Type bye and press <Enter>. The [C:\>] screen appears. 12. Type md patch and press <Enter>. This creates a directory called patch. 13. Type move IBD_30_3.exe c:\patch and press <Enter>. 14. Click on the MS-DOS icon in the upper left corner of the window. 15. Click Close. 16. From the Windows task bar, select Start. 17. Choose Run. 18. Type C:\patch\IBD_30_3.exe and press <Enter>. 19. Take the default prompts as shown in the following instructions. July 30, 1998 31 AICS Implementation Guide NOTE: Section 4: Software Setup The install program creates an AICS directory, three subdirectories (unrforms, images, backup), and a new Windows Program Group. It populates the Program Group with the AICS Scanning Work Center Icon, the AICS Scanning Work Center Help Icon, and the AICS Scanning Work Center Uninstall Icon. WARNING: If at any time the installation is aborted, IBD_30_3.exe needs to be rerun. July 30, 1998 32 AICS Implementation Guide Section 4: Software Setup Initial Screen Answer OK to start the installation of the Workstation. installation. July 30, 1998 Choosing Cancel will abort the 33 AICS Implementation Guide Section 4: Software Setup Destination Directory Choose the directory where the AICS Scanning Workstation will be installed. The default directory will be contained in the Destination Directory box. If you wish to install in another directory, choose your preference, then OK. Choosing Cancel will abort the installation. July 30, 1998 34 AICS Implementation Guide Section 4: Software Setup Backup Screen If the user wishes to make backup copies of the files that are modified during the installation, choose Yes. If backup copies are not desired, answer No. Choosing Cancel will abort the installation. July 30, 1998 35 AICS Implementation Guide Section 4: Software Setup Backup Directory Select the directory that will store the files that will be backed up during installation. The default will be in the Destination Directory box, choose OK or choose the directory in which to store the files in, then choose OK. Choosing Cancel will abort the installation. July 30, 1998 36 AICS Implementation Guide Section 4: Software Setup Paper Keyboard Directory Select the path that contains Paper Keyboard. Two Master Form Spec files will be installed there. The default will be in the C:\Paperkey box. Choose OK or choose the directory you wish to install the Master Form Spec files in, then choose OK. Choosing Cancel will abort the installation. July 30, 1998 37 AICS Implementation Guide Section 4: Software Setup Delete Old Form Specs Answer Yes to enable the automatic deletion of form specs in the Paper Keyboard directory with file names EF*.FS. Choosing No will not enable this to occur. Choosing Cancel will abort the installation. Remember to make backup copies of all files if you have not already done so. July 30, 1998 38 AICS Implementation Guide Section 4: Software Setup Deleting Old Form Specs Confirmation Answering OK will enable the form spec deletion to occur. Those files in the Paper Keyboard directory with filenames EF*.FS will be deleted. July 30, 1998 39 AICS Implementation Guide Section 4: Software Setup Select Scanner Select the type of scanner attached to this workstation from the pulldown list. The correct Paper Keyboard configuration files will be loaded by AICS. Choose OK to select the scanner listed in the box. Choosing Cancel will abort the installation. NOTE: The scanner chosen at this point is used to set a configuration file. If you ever change the type of scanner connected to this workstation, you will need assistance to change the configuration file. Reinstalling will not change it. Log a NOIS call for assistance. July 30, 1998 40 AICS Implementation Guide Section 4: Software Setup HP Scanner Selected Choose OK to verify the scanner chosen in the previous screen. July 30, 1998 41 AICS Implementation Guide Section 4: Software Setup Install Tutorials Choose Yes to install the four tutorial files for the scanning software. Choosing No will not install these files. July 30, 1998 42 AICS Implementation Guide Section 4: Software Setup Workstation ID Choose the Workstation ID. The default ID from the installation script will be contained in the box. Each Workstation should have a unique ID. Choose one and select OK. Choosing Cancel will abort the installation. WARNING: Workstation ID must be from A - T. Each workstation must have a unique ID. July 30, 1998 43 AICS Implementation Guide Section 4: Software Setup Setting DDE Time-out Answering OK to this prompt enables the DDE time-out to be set to 120 seconds. This screen will only display on the first installation. July 30, 1998 44 AICS Implementation Guide Section 4: Software Setup Start Menu Choose Yes to add a short cut for the AICS Scanning Workstation to the Start Menu. Choose No, not to do so. Choosing Cancel will abort the installation. July 30, 1998 45 AICS Implementation Guide Section 5: Using the AICS Scanning Workstation Section 5: Using the AICS Scanning Workstation 5-A. Running the AICS Scanning Workstation Application Step 1. From the Windows Desktop, double click the AICS Scanning Workstation icon The AICS application window appears. Step 2. From the AICS application task bar 1. Select File and choose VISTA Logon; or click on the Key button. The [DHCP Sign on] screen appears. 2. Type your Access Code and press <Tab>. 3. Type your Verify Code. 4. Click OK. Paper Keyboard gets loaded and Vista Logon occur at this point. The menu options can be accessed and scanning can begin. See Section 5-B, Beginning Scanning. If you receive a message that you are not registered to use AICS or you do not hold the required security key, contact your application coordinator or IRM Service. Either the option to use AICS has not been assigned to you on VISTA, or you have not been assigned the security key. NOTE: 5-B. If you are not familiar with AICS scanning, run the AICS Scanning Tutorial before continuing, see Section 5-C, Running the AICS Scanning Workstation Tutorial. Beginning Scanning Step 1. 1. Review/Setup AICS Workstation Parameters. Review the Current Parameters to the right of the AICS workstation screen. AICS supports a number of different configuration parameters that enable Medical Centers to custom fit each workstation to their environment. Verify that the parameters are set up to your specifications. July 30, 1998 46 AICS Implementation Guide Section 5: Using the AICS Scanning Workstation Take the following steps to change workstation parameters, see Appendix A for more information. 2. From the AICS scanning workstation menu bar click Options. 3. Choose Preferences. 4. Select workstation parameters that meet your needs. Step 2. 5-C. Scanning Encounter Forms 1. Insert scannable encounter form(s) into the scanner. See Appendix B for more information on identifying a scannable encounter form. 2. Click the Start button. Running the AICS Scanning Workstation Tutorial Once the AICS scanning workstation is up and running, run the AICS scanning tutorial to become familiar with scanning operations. There are two ways to run the AICS scanning tutorial. They are as follows: 1. You can run the AICS scanning tutorial from the CD-ROM that can be provided by the site’s Ambulatory Data Capture (ADC) Teamleader or acquired from VA Employee Education. 2. If you have loaded AICS v3.0 before loading the AICS IBD*3*3 patch, then you can run the tutorial from within the AICS Help option. To run the AICS scanning tutorial in this manner, follow the steps listed below. NOTE: To run the AICS Scanning Tutorial, the PC will need to have sound capability. Step 1. Run the AICS scanning workstation tutorial 1. From the AICS scanning workstation menu bar, click Help. 2. Choose Tutorial. The [Select Tutorial] screen appears. 3. Click Scanning Demo. July 30, 1998 47 AICS Implementation Guide Section 6: AICS Scanning Tips Section 6: AICS Scanning Tips 6-A. AICS Scanning Hints • Test the scannability of the encounter forms using one of the Manual Data Entry options. These options mimic scanning and can be used to see how an encounter form will behave when scanned. • Plan to start small. Initially, bring up one small clinic using one of the HP single-sided scanners, and then add clinics as you become comfortable with the operation. • Scanning calibration may be necessary if you consistently experience problems with locating the anchors of the encounter form. See Appendix C, Scanner Calibration, to calibrate the scanner. • Four short demonstrations and tutorials are available on CD-ROM that can be used for user training. See either your site’s ADC Teamleader, or contact VA Employee Education for more information. • If during the scanning process, you note that bubbles are being missed, or that stray marks are being interpreted as bubbled marks on a form, it may be necessary to adjust the scanner brightness. To do so see Appendix D, Adjusting Scanner Brightness. • Install the HP scanning software before the HP scanner card. Do not install the HP scanner card unless the HP scanning software has been installed to completion. • The Bell and Howell and HP scanners must be turned on before the PC is rebooted or powered on. • When performing the FTP download of the IBD*3*3 patch, ensure that you are typing in lowercase. • During the AICS software installation, the workstation ID must be from A – T, and each workstation must have a unique ID. • If at any time you choose to abort the AICS patch installation, you will need to rerun IBD_30_3.exe. • Recycled paper should not be used with the HP LaserJet 5si printer. • The RPC Broker software and Paper Keyboard must be installed before the AICS IBD*3*3 patch installation. July 30, 1998 48 AICS Implementation Guide 6-B. Section 6: AICS Scanning Tips AICS Exception Handling The following three areas where exception handling comes into play are: • On the workstation during scanning • On the AICS server • While (Patient Care Encounter) PCE attempts to store the data The most common types of exceptions will be those returned by PCE for missing or inaccurate data. These exceptions are stored by PCE and the fact that an exception occurred is stored in the FORMS TRACKING file. Errors that occur in the AICS server software generally are due to database problems or when conflicts in data cannot be resolved. Partial data may be passed to PCE. Both PCE and AICS errors and warnings are stored in the AICS ERROR AND WARNING LOG file (359.3) and can be printed from the server and viewed on the client. Generally, if some condition exists during scanning and recognition that causes the recognition of a form to fail in Paper Keyboard, the image is stored and named as previously described. These images can then be reloaded into Paper Keyboard and an attempt can be made to resolve the problem. If the problem cannot be resolved, Paper Keyboard supports printing of the image so that data entry can be performed through any of the existing options. Scanning Error Listing During scanning, errors reported by AICS or PCE are stored in the AICS ERROR & WARNING LOG file. This report allows you to print a list of the errors so that the encounter forms can be retrieved and the data validated. This report prints at 132 columns. July 30, 1998 49 AICS Implementation Guide Appendix A. Changing AICS Workstation Parameters Appendix A. Changing AICS Workstation Parameters AICS supports a number of different configuration parameters that enables Medical Centers to custom fit each workstation to their environment. Choose the Options/Preference menu bar command to edit the parameters for each AICS Workstation. After changing the parameters, clicking the Cancel button restores the values to their previous values; clicking the Okay button will accept the new parameters for the remainder of this session but does not save them for future sessions. Clicking the Save button saves the parameters for future sessions. It is recommended that changes to parameters be tested before saving them. The following is a description of each parameter and the effect it has on the operation of the workstation. Workstation Mode Centralized Scanning Mode The Centralized Scanning Mode optimizes operations for workstations that are set up as a centralized scanning area. A stack of forms are processed through the scanner, each form is scanned, recognized, validated and the appropriate action taken with the results of recognition and validation. If the form passes validation, the data from the form will be transmitted to VISTA; otherwise, an image file will be saved. Decentralized Scanning Mode The Decentralized Scanning Mode is similar to Centralized Scanning Mode except the operations are maximized for use where only one form at a time is generally put into the scanner. Each form is scanned, recognized, validated and the appropriate action taken with the results of recognition and validation. If the form passes validation, the data from the form will be transmitted to VISTA; otherwise, an image file will be saved. Scan Only Mode The Scan Only Workstation Mode is designed for those workstations that are put into clinic areas where the processing time of patients is the most critical issue. In this mode, the workstation will scan the form and save the image file for future validation. The name of the file and the location of the files depend upon other parameters. Sites running a PC network can use Scan Only Workstation to save images to a network drive and utilize a centralized validation workstation to complete the process. This enables maintaining the encounter form with the patient’s medical record and the fastest scanning process in the outpatient area. Validation Only The Validation Workstation Mode is used to validate previously saved image files. Image files may be saved one of three ways. First, images may be saved because the Save Image parameter is checked. Second, images may be saved because the Attended Operation parameter is not checked and the form failed the validation process. Third, images are July 30, 1998 50 AICS Implementation Guide Appendix A. Changing AICS Workstation Parameters automatically saved if the Form Design number, the Form ID, or the Page number printed on the form cannot be read or are not validated with their checksum values as Unrecognizable forms. In Validation Mode, the workstation will check the paths specified for the 3 types of images. If only one type of image is found, the workstation will automatically begin processing those images. If more than one type is found, then a dialog box will appear to select the type of image to process. Images will automatically be deleted after validation if the Options/Ask When Deleting menu bar command is not checked; otherwise, a dialog box will appear after each form. Operational Parameters Export Data to Vista If the Export Data to VISTA checkbox is not checked, then the workstation will not transmit data to VISTA after it validates the form. This would normally be used in conjunction with the Export Data to File parameter. This would enable each workstation to either send data directly to VISTA, send data to a text file, both, or neither. If neither is checked then it is assumed the workstation is in practice mode. Note: The Export Data to File option is not available with AICS V3.0. Attended Operations The Attended Operation checkbox should be checked if a user is at the workstation monitoring the processing of encounter forms. If this box is checked, then Paper Keyboard and AICS will display dialog boxes to the user to validate any ambiguities found during the recognition and validation process. This can simply be the validation of hand print fields, or problems such as where more than one primary provider is indicated. If the Attended Operations checkbox is not checked, then the dialog boxes will be suppressed and any forms not passing validation will automatically be saved in the Image Path directory. The first character of the filename will be the letter “V”, followed by the Workstation ID, followed by the last five characters of the Form ID, followed by the page number. (Image file VA28881.tif would be the image of Page 1 of Form ID 2888 failing validation on workstation “A”). Save Images If the Saved Image checkbox is checked, then the AICS Scanning Work Center will save the image of every page of every form in the Image Path directory. The first letter of the image file will be the workstation ID, followed by the last six characters of the Form ID, followed by the page number. (Image file A28881.tif is page 1 of encounter Form 2888 saved by workstation “A” because the Save Image check box is checked). July 30, 1998 51 AICS Implementation Guide NOTE: Appendix A. Changing AICS Workstation Parameters If this parameter is checked and the Attended Operation parameter is not checked, then files failing validation will be saved with the first letter as “V” and forms passing validation will be saved as normal. Two image files will not be created. Show Raw Data If the Show Raw Data checkbox is checked, then the data passed from the Paper Keyboard application to the AICS Scanning work center will be displayed in the data display area of the AICS Scanning work center. Being able to view raw data will allow validation that all data on the form was scanned and that it passed and was accepted in VISTA. It is also a useful debugging tool for IRM and the IRM Field offices to help resolve problems. NOTE: Used for debugging purposes and is normally not checked. Raw Data comes in 3 types, Bubbles from static’s lists, Dynamic bubbles, and Hand Print fields. The first character of the raw data indicates the type of raw data. B:16:D1110, is bubble entry 16 in the Bubble Multiple in the Form Definition file (357.95) for CPT code D1110. D:S2188(1:1, is a dynamic bubble that can be found in the Dynamic List Items multiple in the Form Tracking file (357.96). Because this data changes dynamically depending on the form being printed, the value of this data is found in the Form Tracking file. H:1:1015, is a hand print field with a value 1015. Duplex Scanner If a Duplex Scanner, such as the Bell & Howell Copyscan II purchased by DVA for its medical center, is connected to this workstation, then the Duplex Scanner checkbox should be checked. If a single-sided scanner such as the Hewlett Packard Scan Jet is connected to the workstation, the Duplex checkbox should not be checked. If a duplex scanner is connected and this box is not checked, then the second page of each form will be discarded. See respective manufacturer’s User Manual for changes to scanner operation. See also Kofax. July 30, 1998 52 AICS Implementation Guide Appendix A. Changing AICS Workstation Parameters Paper Keyboard Scanner Settings The Scanner Settings option found on the Edit Menu of Paper Keyboard should be used to adjust various parameters. Scanner The correct scanner should be listed. If the choice is in parenthesis this item is not selectable. Brightness Adjustment instructions are found in Appendix D. Sheet Feeder Mark if a sheet feeder has been attached Sequential Names Not applicable Stop When Empty Must be marked to stop scanning process Double Sided Marked only for duplex scanning Alternate Rot’n Not applicable Calibrated Scale and Offset Units Used for calibration described in Appendix C. July 30, 1998 53 AICS Implementation Guide Appendix B. Scannable Encounter Form Appendix B. Scannable Encounter Form Critical Elements of a Scannable Form For additional information on AICS scanning see Appendix C of AICS 3.0 User Manual. AICS uses a technology called Image Scanning. A complete image of the form is created and displayed in Paper Keyboard. The three following types of recognition are used to find data on the form: 1. Optical Mark Recognition (OMR) is used to identify predefined areas that have been written in or colored in. This includes the bubbles printed on the AICS forms. 2. Optical Character Recognition (OCR) is used to read preprinted characters on the page, such as the Form Design Number. 3. Intelligent Character Recognition (ICR) is used to read hand print (not cursive writing) from predefined blocks on the form. (These blocks are often called combs.) The following elements are included on every form: • Anchors • Form design number • Printed form ID • Page • Checksum values • Scan mark July 30, 1998 54 AICS Implementation Guide Appendix B. Scannable Encounter Form Sample Scannable Encounter Form July 30, 1998 55 AICS Implementation Guide Appendix C. Scanner Calibration Appendix C. Scanner Calibration Paper Keyboard is the proprietary software that was chosen to interface the AICS workstation with a scanner. Many different types of scanners may be used, and as a result of the differences between them, it may be necessary to calibrate your scanner with Paper Keyboard. Calibration should only be necessary under the following circumstances. • • • • Initial scanner hook-up on a workstation. Scanner is replaced at a workstation. Sheet feed mechanism is added or removed from the scanner. Paper Keyboard continually cannot recognize anchors on your form, forcing you to manually locate them. In order to calibrate Paper Keyboard with your scanner it is necessary to understand the components on a form that make it scannable. They are: • Anchor Marks: used to align the form • Scannable Page Block: used to determine if the page is scannable • Form, ID and Page Numbers: used to recognize the form being read During scanning, a FORM SPECIFICATION file is loaded that tells Paper Keyboard where to look for the anchors and scannable page block on a form. Paper Keyboard will attempt to locate these items in order to align the form before recognizing the data on the form. Sometimes, due to variations in scanners and/or shrinkage of forms, Paper Keyboard will not be able to locate these items. Calibrating Paper Keyboard with your scanner upon initial setup should prevent this from occurring. To calibrate the scanner, use the following steps. 1. Print a form to calibrate. • Use a form that has actual printed patient data with: • new VA logos for anchors July 30, 1998 56 AICS Implementation Guide Appendix C. Scanner Calibration • • areas to be scanned near the top and bottom of one page • a FORM or ID number located on the top of the form You do NOT need to calibrate for each different form you have. You are simply selecting a form to use as a guide. 2. Start up the AICS software. 3. Highlight the key located in the upper left-hand corner of the AICS window. This will result in a sign-on to VISTA. 4. From the AICS workstation screen, go to File/Get Form Spec option, retrieve the form spec (type in the form spec number -#) for the form you printed in Step 1. 5. Exit from the AICS workstation software. 6. Start Paper Keyboard from the start menu (WIN95). 7. Under File/Open Form Spec, open file C:\vista\aics\formspec\EF<#>.fs. 8. Under Edit/Preferences, turn on Inspect Each Field, but don't save this setting. 9. Under View, make sure that Show Bounds is checked. 10. From within Paper Keyboard, scan in a form by clicking the scanner icon; then click the R icon to recognize. 11. After recognizing the Form ID and the page, you should see the red outline of the scannable areas. Drag the Field Value box out of the way, and check the top and bottom of the form. Cancel Field value box, and then click DISCARD to warning. For an example, if the red boxes do not exactly match the fields, under Edit/Scanner Settings, change the value in the calibrated scale. If the red boxes appear lower than the actual location, enter a negative number in the vertical calibrated scale. Try increments of 2 or 3. 12. Save the settings. 13. Repeat these steps until you are satisfied with the alignment. July 30, 1998 57 AICS Implementation Guide Appendix D. Adjusting Scanner Brightness Appendix D. Adjusting Scanner Brightness If during the scanning process, you note that bubbles are being missed, or that stray marks are being interpreted as bubbled marks on a form, it may be necessary to adjust the scanner brightness. Perform the following steps to adjust the scanner brightness: 1. Start the AICS software and log in to the VISTA system. 2. Maximize the Paper Keyboard window that was started when you logged in. 3. Open the form spec file C:\vista\aics\formspec\AICSMSTR.FS. The AICS master form spec removes the very small dots that make up bubbles and hand print fields. 4. Under Edit/Preferences check examine each field, click OK but do not save. 5. Scan a form and click recognize. 6. If you see pieces of bubbles left after the first recognition (the very small dots appear to have run together), set the brightness lighter (move to the right). 7. If you do not see pieces of bubble but are having trouble recognizing valid marks, move this darker (to the left). 8. Generally, you want the darkest scan you can achieve and still remove all of the small dots. This may take some experimentation. July 30, 1998 58 AICS Implementation Guide Glossary Glossary accelerator cards – additional hardware to perform some function faster than is possible in software running on the normal CPU. Examples include graphics accelerators and floatingpoint accelerators. double-sided – two-sided document. duplex-scanning – scanning both sides of a document in a single pass through of the scanner. Industry Standard Architecture (ISA) – a PC expansion bus used for modems, video displays, speakers, and other peripherals. PCs with ISA have 16-bit expansion slots. jumper settings – set of electrical contacts in a plastic housing. When a jumper is placed over a set of pins, it electrically connects these pins together. parallel port – an input/output port on the workstation. Some models of printers are connected to parallel ports. DO NOT CONNECT THE SCANNER TO THIS PORT! physical device setups – the assembly and arrangement of the tools and apparatus required for the performance of an operation; the preparation and adjustment of components for an assigned task. rebooting – restarting the computer. simplex-scanning – scanning only a single side of a document as it passes through the scanner. single-sided – one-sided document. TCP/IP VISTA network connectivity – TCP/IP was developed by DARPA for internet working and encompasses both network layer and transport layer protocols. While TCP and IP specify two protocols at specific protocol layers, TCP/IP is often used to refer to the entire DoD protocol suite based upon these, including telnet, FTP, UDP and RDP. terminal server configurations – the way a computer is set up, which includes the hardware (type of CPU, peripherals, etc.) and the software. VMS print queues – virtual memory system which permits a lineup of items to be printed. wiring/connector schemes – a diagrammatic presentation of system circuitry. July 30, 1998 59