1
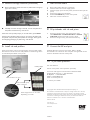
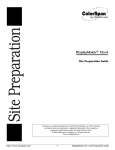
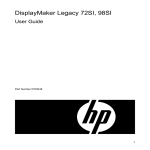
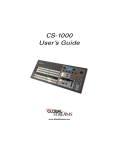
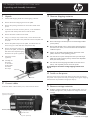
HP Designjet 35000/45000 Printer series Unpacking and Assembly Instructions 1 Unpack 1. Cut the steel shipping bands from the shipping container. 2. Remove the lid and shipping box from the pallet. 3. Remove the packing material from around the outside of the printer. 4. Locate the inks and the accessory kit box, on the shelf at the right rear side of the printer. Remove and set aside. 5. Remove the starter media and set aside. 6. Using a ½-inch (13 mm) socket wrench, remove the four bolts that attach the end plate to the pallet. Remove the end plate and set aside. 7. 8. 9. 3 Remove the pallet ramps from the pallet, and attach them as shown using two of the bolts from the previous step. Remove the bolts that attach the printer to the pallet, and the bolts that attach the L-shaped shipping brackets to the printer (4 places). Remove the bright colored tape from the media edge holders (on the platen). Reach inside the left cover to cut the plastic restraining band from the service station, and remove the band with attached cardboard spacer. Cut the zip ties holding the light blocker at the front of the platen, and lower it into operating position. Cut and remove zip ties and tape from the input and output tables (rear and front of the printer), and from the adjustable fence (rear of the printer). 16 mm 13 mm Unlock the casters (4 places). 10. Carefully roll the printer on its casters off the pallet and down the ramps. Cut and remove the shipping band that secures the service station, and completely remove it from the printer. Do not attempt to remove the carriage shipping restraints until Step 5. Bolt here 4 Bolt here 2 Remove shipping restraints Switch on the power Press the power switch on the back of the printer to the On position. The printer control panel will walk you through removing the shipping restraints from the printhead carriage (see Step 5). Connect cables Locate the cables in the accessory box, and connect as shown: Auxiliary power (24V DC) (optional, see manual) 5 Remove carriage restraints Ê With the included L-shaped hex key, loosen the four screws on the left and right arms, and pull the arms straight out from the carriage. Ê Power On/Standby switch To optional foot switch VideoNet to RIP Ì To power (220V AC) Continued on next page 5 Remove carriage restraints (continued) 7 Load roll-fed media Ë Remove the plastic spacers from the rail, behind the carriage (2 upper and 1 lower). 1. 2. 3. 4. 5. 6. Remove the media roll from its packaging. Load the media roll onto the supply spool. Load the supply spool onto the printer (unroll from the top of the spool). Unspool the media onto the platen. Press the Load Media key on the control panel. Follow the onscreen instructions. 8 Fill printheads with ink and prime When the control panel prompts you to load media, press Cancel. 1. Wearing the included protective gloves, remove the ink blotter pad and plastic wrap from the platen (under the carriage). Place gloves and shipping packaging in plastic bag, and discard. 2. On the Front Page screen, press the Tools key, then select Maintenance > Printhead Procedures > Load Ink in All Heads. Wait for the load process to finish. On the Front Page screen, press the Prime Bars key. 6 9 Connect the RIP and print Upper spacer (1 of 2) Lower spacer Ì Carefully move the carriage to the left, unscrew the plates from the platen with the hex key, and remove. Install ink and profilers Open each ink box, pull out ink supply tube, remove profiler. Install the ink boxes into the wire rack and profilers into the docking station as indicated by the labels on the printer. Install the RIP and connect it to the printer. Refer to the RIP documentation for instructions. The computer running the RIP can be stored on the shelf in the rear of the printer. 10 Install profilers If you have questions... See: User Manual Press ? on the printer control panel for quick help For service and support in North America: 800.925.0563 Outside North America: +1 952.944.4040 En Español: +1 952.943.3627 E-mail: [email protected] Web: www.colorspan.com Filter Push connector into port or contact your reseller Ink connection ports, below ink boxes © Copyright 2007 Hewlett-Packard Development Company, L.P. Printer supports four or six colors, depending on model The information contained herein is subject to change without notice. The only warranties for HP products and services are set forth in the express warranty statements accompanying such products and services. Nothing herein should be construed as constituting an additional warranty. HP shall not be liable for technical or editorial errors or omissions contained herein. Printed in the US www.hp.com www.colorspan.com Revision A 0706479