1
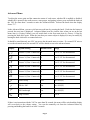
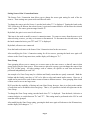
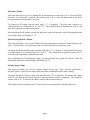
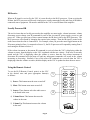
User’s Guide
Digital Whole Home Audio
Distribution System
Document Number 62R00-1 Rev A
October, 2006
Copyright © 2006 Home Automation, Inc.
All Rights Reserved
Precautions
Exposure to extremely high noise levels may cause a permanent hearing loss. Individuals vary considerably to noise induced
hearing loss but nearly everyone will lose some hearing if exposed to sufficiently intense noise for a sufficient time. The U.S.
Government's Occupational Safety and Health Administration (OSHA) has specified the following permissible noise level
exposures:
DURATION PER DAY (HOURS)
SOUND LEVEL (dB)
8
90
6
93
4
95
3
97
2
100
1
103
According to OSHA, any exposure in the above permissible limits could result in some hearing loss.
Important Safety Instructions:
1.
Read all safety and operating instructions before using this product.
2.
All safety and operating instructions should be kept for future reference.
3.
Read and understand all warnings listed on the operating instructions.
4.
Follow all operating instructions to operate this product.
5.
This product should not be used near water (.e. bathtub, sink, swimming pool, wet basement, etc.).
6.
Only use dry cloth to clean this product.
7.
Do not block any ventilation openings.
8.
Do not install this product near any heat sources; such as, radiators, heat registers, stove or other apparatus (including
heat producing amplifiers) that produce heat.
9.
Do not defeat the safety purpose of the polarized or grounding type plug. A polarized plug has two blades with one wider
than the other. A grounding-type plug has two blades and a third grounding prong. The wide blade or the third prong are
provided for your safety If the provided plug does not fit into your outlet, consult an electrician for replacement of the
obsolete outlet.
10.
Protect the power cord being walked on or pinched, particularly at plugs, convenience receptacles and the point where
they exit from the apparatus. Do not break the ground pin of the power supply cord.
11.
Only use attachments specified by the manufacturer.
12.
Use only with the cart, stand, tripod, bracket, or table specified by the manufacturer or sold with the apparatus. When a
cart is used, use caution when moving cart/apparatus combination to avoid injury from tip-over.
13.
Unplug this apparatus during lightning storms or when unused for long periods of time.
14.
Care should be taken so that objects do not fall and liquids are not spilled into the unit through the ventilation ports or
any other openings.
15.
Refer all servicing to qualified service personnel. Servicing is required when the apparatus has been damaged in any
way; such as, a liquid has been spilled or objects have fallen into the apparatus, the apparatus has been exposed to rain or
moisture, does not operate normally or has been dropped.
16.
WARNING: To reduce the risk of fire or electric shock, do not expose this apparatus to rain or moisture.
CONTENTS
Introduction ........................................................................................................................1
General ................................................................................................................................................... 1
Operation ............................................................................................................................2
Zone On/Off ........................................................................................................................................... 2
All Zones Off .......................................................................................................................................... 3
Setting Zone Volume ............................................................................................................................. 3
Source Selection ..................................................................................................................................... 3
Zone Menu.............................................................................................................................................. 3
Setting Zone Bass Level ......................................................................................................................................................4
Setting Zone Treble Level ...................................................................................................................................................4
Setting Zone Balance Level .................................................................................................................................................4
Advanced Menu ..................................................................................................................................... 5
Setting Source Gain / Connection Status .............................................................................................................................6
Zone Group..........................................................................................................................................................................6
IR Enable / Disable ..............................................................................................................................................................7
IR Passthrough Enable / Disable..........................................................................................................................................7
Setting Paging Volume ........................................................................................................................................................7
IR Receive............................................................................................................................................... 8
Locally Processed IR ............................................................................................................................. 8
Using the Remote Control..................................................................................................................... 8
IR Passthrough ...................................................................................................................................... 8
IR Passthrough ...................................................................................................................................... 9
IR Output ............................................................................................................................................... 9
Connecting Your Music Source.......................................................................................10
Page / Mute .......................................................................................................................11
Introduction
Thank you for purchasing your new Hi-Fi by HAI audio distribution system. You are about to enjoy the
freedom and convenience of listening to and sharing music from your stereo, iPod™, satellite radio,
digital cable TV, computer, CD player, or any other music source in any room in your home.
Hi-Fi by HAI is a six-source, eight-zone audio distribution system that powers speakers through digital
amplification. Its modular design gives you the flexibility for expansion as your needs change.
General
Each of the six possible audio sources are connected directly to Remote Input Modules (RIM) in rooms
that will have music sources that you wish to use. When you plug any music source into a RIM using a
standard stereo input jack, it can be shared with any room that has a Volume-Source Control (VSC).
Additionally, each RIM features a routed IR emitter jack and includes a flasher to allow you to use the
remote control of your source equipment in any room that has a VSC.
The audio sources can be selected and controlled by any VSC. The VSC provides the capability to
change the power state, volume, balance, treble, and bass settings for each zone. Additionally, each
VSC include an IR receiver that allows you to remotely control the Hi-Fi system and/or audio sources
from any zone in the house.
You can also use the VSC to control advanced features of Hi-Fi. While in Advanced Mode, you can set
the source gain and the connection status of each source and whether IR is enabled or disabled, whether
IR is passed to the audio sources, zone groups, and paging volume for each zone.
Furthermore, Hi-Fi by HAI can plug and play with HAI's Omni home control systems and Lumina
lighting control systems. When connected, the HAI controller can set each zone's source and volume for
parties, watching TV, morning news, or any other activity. Any changes made to the power state,
volume, or source at a VSC will be updated on the HAI controller and displayed on an HAI OmniTouch
touchscreen.
Page 1
Operation
When an audio zone is turned on and the Volume-Source Control (VSC) in that zone is idle, the blue
display will show the current volume level of the zone.
VOLUME
PUSH TO SELECT
VSC
You can change the zone power on/off state, select an alternative audio source, and adjust the zone
volume by either pressing or turning the knob.
All knob turns are ignored while the knob is being pressed.
Zone On/Off
If a zone is off, it can be turned on by turning the rotary knob at the zone VSC or by pressing the knob.
In response, the zone amplifier is turned on.
To turn the zone off, you must turn the knob counterclockwise until the display indicates "00". After
five seconds of inactivity, the display on the VSC and the zone amplifier are turned off.
Page 2
All Zones Off
If you wish to turn all zones off, press the knob and hold it for 3 - 5 seconds. Release the knob when the
display shows "FF". All zone amplifiers are turned off and the volume for each zone is set to "00".
Setting Zone Volume
Turning the knob on the VSC clockwise will increase the volume and counterclockwise will decrease
the volume in that zone. The volume is increased and decreased in 5 percent increments from 0-100
percent. The display on the VSC will display the current volume setting. When the zone volume is set
to 100 percent, the VSC will display 99.
If the zone is currently muted, turning the knob in either direction turns mute off and audio is heard at
the current volume setting. Any subsequent knob turns will increase or decrease the volume from the
current volume setting.
Source Selection
To change the audio source in a zone, press down on the knob. The current source number is displayed
on the VSC. Press again to cycle through all available audio sources. Each time the button is pressed
and then released, the next available source is displayed. If a particular source is not connected, it will
not be displayed and you will not have the option of connecting the VSC to that source. Once the last
source is reached, pressing down again will bring you back to the first source connected to the system.
If the VSC is displaying the source and there is no interaction with the VSC for 3 seconds, it will revert
back to displaying the current volume level.
Zone Menu
To adjust bass, treble, and balance level settings for a zone, press and hold the knob on the zone VSC for
1.5 - 3 seconds to enter the Zone Menu. Release the knob when the display shows "bA".
In the Zone Menu, you can cycle between bass, treble, and balance level by pressing the knob. Each
time the button is pressed, the next item is displayed. Zone Menu items are circular; thus, when you are
on the last menu item (i.e. Balance) you will switch back to the first menu item (i.e. Bass) by pressing
the knob once again. When the item that you want to adjust is displayed, it may be modified by turning
the knob clockwise or counterclockwise. The initial values for the bass, treble, and balance are set to 0
and can range from -9 to 9.
Page 3
Display
System Setting
Default Value
Range
Ba
Tr
bL
Bass
0
-9 to 9
Treble
0
-9 to 9
Balance
0
-9 to 9
If there is no interaction with the VSC for more than 20 seconds, the menu will be exited and the display
will revert back to the volume setting. You can also manually exit from the Zone Menu by pressing and
holding the knob for at least 2 seconds.
Setting Zone Bass Level
The Bass item allows you to change the bass level setting for the zone. To change the bass level setting,
turn the knob when "bA" is displayed. Turning the knob clockwise will increase the bass level and
counterclockwise will decrease the bass level. The bass level can range from -9 to 9.
By default, the bass level is set to zero.
After modifying the Bass setting, pressing the knob once again will advance to the Treble menu item,
and the display will change to "tr".
Setting Zone Treble Level
The Treble item allows you to change the treble level setting for the zone. To change the treble level
setting, turn the knob when "tr" is displayed. Turning the knob clockwise will increase the treble level
and counterclockwise will decrease the treble level. The treble level can range from -9 to 9.
By default, the treble level is set to zero.
After modifying the Treble setting, pressing the knob once again will advance to the Balance menu item,
and the display will change to "bL".
Setting Zone Balance Level
The Balance item allows you to change the balance level setting for the zone. To change the balance
level setting, turn the knob when "bL" is displayed. Turning the knob clockwise (1 to 9) will attenuate
the left channel. Turning the knob counterclockwise (-1 to -9) will attenuate the right channel.
By default, the balance level is set to zero.
Page 4
Advanced Menu
To adjust the source gain and the connection status of each source, whether IR is enabled or disabled,
whether IR is passed to the audio sources, zone groups, and paging volume, press and hold the knob on
the VSC for more than 5 seconds to enter the Advanced Menu. Release the knob when the display
shows "G1".
In the Advanced Menu, you can cycle between each item by pressing the knob. Each time the button is
pressed, the next item is displayed. Advanced Menu items are circular; thus, when you are on the last
menu item (i.e. Paging Volume) you will switch back to the first menu item (i.e. Source 1 Gain) by
pressing the knob once again. When the item that you want to adjust is displayed, it may be modify by
turning the knob clockwise or counterclockwise.
It should be noted that only one VSC can access the advanced menu at a time. If a second VSC tries to
access the advanced menu, the second VSC will be denied access to the advanced menu.
Display
System Setting
Default Value
Range
G1
G2
G3
G4
G5
G6
Gr
Ir
IP
PG
Source 1 (Gain / Connected) 0
0 to 15 / FF for disconnected
Source 2 (Gain / Connected) 0
0 to 15 / FF for disconnected
Source 3 (Gain / Connected) 0
0 to 15 / FF for disconnected
Source 4 (Gain / Connected) 0
0 to 15 / FF for disconnected
Source 5 (Gain / Connected) 0
0 to 15 / FF for disconnected
Source 6 (Gain / Connected) 0
0 to 15 / FF for disconnected
Zone Group
Off
On / Off (FF)
IR On / Off
On
On / Off (FF)
IR Passthrough
On
On / Off (FF)
Page Volume
0
0 to 99
If there is no interaction with the VSC for more than 20 seconds, the menu will be exited and the display
will revert back to the volume setting. You can also manually exit from the Advanced Menu by
pressing and holding the knob for at least 2 seconds.
Page 5
Setting Source Gain / Connection Status
The Source Gain / Connection item allows you to change the source gain setting for each of the six
sources. These settings are system-wide and affect all zones.
To change the source gain for Source 1, turn the knob when "G1" is displayed. Turning the knob on the
VSC clockwise will increase the selected source’s gain and counterclockwise will decrease the selected
source’s gain. The source gain can range from 00-15.
By default, the gain is set to zero for all sources.
This item is also used to modify a source’s connection status. To remove a source from the source cycle
when selecting a source, you may set its status as disconnected. To disconnect the selected source, turn
the knob counterclockwise, past "00" until "FF" is displayed.
By default, all sources are connected.
Press the knob to advance to the Source Gain / Connection item for the next source.
After modifying the Gain / Connection setting for all six sources, pressing the knob once again will
advance to the Zone Group menu item, and the display will change to "Gr".
Zone Group
Zone grouping allows you to connect two or more zones to the same source, so that all zones in that
group always play the same source. When zones are placed in a group, you can change the source from
any VSC in that group. All other settings, such as volume, are specific to each zone and must be
performed independently at each VSC.
An example of a Zone Group may be a kitchen and family room that are openly connected. Both the
kitchen and the family room have a VSC to be able to select and control audio sources. However, it
would not be practical for each of these rooms to listen to different sources. Zone grouping allows both
of these zones to act as one larger zone.
Hi-Fi provides the capability of having only one Zone Group; however, there is no limit to the number
of zones that can be included in this zone group. That is, it is possible to include all eight zones in the
Zone Group.
To change the Zone Group setting, turn the knob when "Gr" is displayed. Turn the knob, clockwise or
counterclockwise, to switch between "On" and "FF". This setting must be performed at the VSC in each
zone that will be grouped.
After modifying the Zone Group setting, pressing the knob once again will advance to the IR menu item,
and the display will change to "Ir".
Page 6
IR Enable / Disable
This menu item allows you to set whether the IR information received at the VSC is sent to the Hi-Fi
processor. By default IR is enabled, thus allowing the VSC to route the information to the Hi-Fi
processor whenever an IR signal is received.
To change the IR setting, turn the knob when "Ir" is displayed. Turn the knob, clockwise or
counterclockwise, to switch between "On" and "FF". This setting must be performed at the VSC in each
zone and is applicable to that particular zone.
After modifying the IR setting, pressing the knob once again will advance to the IR Passthrough menu
item, and the display will change to "IP".
IR Passthrough Enable / Disable
This menu item allows you to select whether IR information from the remote is routed directly to the
source. This will allow you to remotely control a connected audio source from any zone.
To change the IR Passthrough setting, turn the knob when "IP" is displayed. Turn the knob, clockwise
or counterclockwise, to switch between "On" and "FF". This setting must be performed at the VSC in
each zone and is applicable to that particular zone.
After modifying the IR Passthrough setting, pressing the knob once again will advance to the IR
Passthrough menu item, and the display will change to "PG".
Setting Paging Volume
This menu item allows you to set the paging volume for the zone. Thus, when the Page input is
activated, Source 6 will act as the input source and audio is transmitted at this volume setting.
To change the Paging Volume setting, turn the knob when "PG" is displayed. To increase the volume
from 00, you must turn the knob clockwise until the desired volume is displayed. The maximum
volume value is 99. To decrease the volume, turn the knob counterclockwise.
This setting must be performed at the VSC in each zone and is applicable to that particular zone.
Page 7
IR Receive
When an IR signal is received by the VSC, it is sent directly to the Hi-Fi processor. Upon receiving the
IR data, the Hi-Fi processor will decode it and process certain commands locally and route all IR data to
connected source equipment. IR must be enabled for the VSC to send IR data to the amplifier.
Locally Processed IR
The twelve items that are locally processed at the amplifier are mute toggle, volume increment, volume
decrement, source change (one IR command for each of the six sources), power toggle, power on, and
power off. When you press any of these remote buttons, the IR data is sent to the Hi-Fi processor. The
Hi-Fi processor will respond by changing the required zone settings. Then the IR signal is routed to the
audio source that the zone is connected to. For example, when you press the mute toggle button on the
IR remote pointed at Zone 1 (connected to Source 3), the Hi-Fi processor will respond by muting Zone 1
and routing the IR data to Source 3.
If the volume increment or decrement IR command is received when the VSC is displaying either the
volume or source, then the display on the VSC is updated with the new volume. If the zone is currently
muted and the VSC is displaying either the volume or source, then the first volume increment or
decrement IR command will turn mute off and any subsequent commands will result in the volume
increasing or decreasing. Similarly if any of the source IR commands are received when the VSC is
displaying either the volume or source, then the display on the VSC is updated to show the new source.
Using the Remote Control
To use the Hi-Fi Remote Control, point it at the VSC
in the desired zone and press appropriate button(s)
as follows:
POWER
MUTE
1
2
SOURCE
1) Power: This button turns the zone on and off.
3
2) Mute: This button turns mute on and off.
3) Source: These buttons select the audio source
to be heard in the zone.
4) Volume Down: This button decreases the
volume in the zone.
5) Volume Up: This button increases the volume
in the zone.
Page 8
4
1
2
3
4
5
6
-
VOLUME
+
5
IR Passthrough
When IR Passthrough is enabled, IR data can also be routed to the connected source equipment. After
decoding the received IR, the Hi-Fi processor will then route the IR signal to the source which is
logically connected to that VSC.
IR Output
Each RIM ships with an IR flasher (62A08-1). The IR flasher is used for sending IR data to the source
equipment. When you point your source equipment remote control at the IR receiver in the VSC and
send a signal, the IR data is routed to the appropriate RIM (to which the source is connected), which
then sends the IR signal through the IR flasher to the source equipment.
IR OUT
AUDIO IN
Hi-Fi RIM
Remote Input Module
RIM
IR RECEIVER
WINDOW
IR FLASHER
IR
SOURCE EQUIPMENT
(FRONT)
Page 9
Connecting Your Music Source
Each Remote Input Module (RIM) located throughout your house is used to pick up music from your
home theater, kitchen TV, computer, personal music player, satellite radio, Media Center, CD player, or
any music source with an audio output.
Plug any music source into a RIM using a
standard stereo input jack. That music can
then be shared with any room that has a
Volume-Source Control (VSC).
SOURCE EQUIPMENT
(BACK)
AUDIO OUT
IR OUT
AUDIO IN
Hi-Fi RIM
Remote Input Module
For source equipment that has female
RCA connectors, you may use the HAI
3.5mm male to 2 RCA male retractable
patch cable (Part Number: 62A14-1).
RIM
SOURCE 2
Bring your MP3 player to a room with a
RIM, plug it in, and then enjoy your
favorite music in any room with a VSC.
MP3
PLAYER
IR OUT
AUDIO IN
For source equipment that has a 3.5mm
female connector (similar to an earphone
jack), you may use the HAI 3.5mm male
to 3.5mm male stereo retractable patch
cable (Part Number: 62A13-1).
Hi-Fi RIM
Remote Input Module
RIM
Page 10
Page / Mute
Hi-Fi has the capability of playing audio over all speakers in your home in special circumstances. For
example, it can announce when someone is at the door or when the telephone is ringing. This feature is
called paging. If paging is used, the paging audio source will be connected as audio Source 6. When an
audio page is initiated, all zones will be turned on at the paging volume that was configured in the
Advanced Menu and switched to Source 6. When the page is complete, all zones will be returned to
their previous source selection, power state, and volume setting.
When Hi-Fi is making an announcement using the Page function, every VSC in the systems will display
"PG", indicating that a page is being sent to all zones. Once the page is complete, every VSC will revert
back to displaying its current volume or turn off, as appropriate.
If desired, the Page function can be used to mute all zones instead of making an announcement. For
example, you may simply want all of the zones on the Hi-Fi systems to be muted when someone is at the
door or when the telephone is ringing.
To configure Hi-Fi to mute all zones, set the Paging Volume for each zone to 00 as described under
“Setting Paging Volume” in this guide.
Page 11
HAI • New Orleans, LA • U S A