1
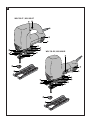
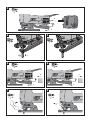
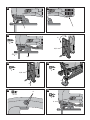
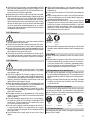
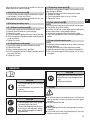
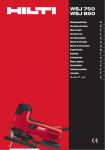
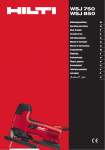
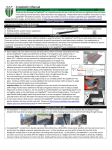
377834
377834
WSJ 750/850
Bedienungsanleitung
de
Operating instructions
en
Mode d'emploi
fr
1
WSJ 750-ET / WSJ 850-ET
2
1
3
4
5
6
7
14
13
12
WSJ 750-EB / WSJ 850-EB
8
11
9
10
1
16
3
4
15
5
6
7
14
13
12
8
11
9
10
16
15
2
1
4
3
2
3
4
4
2
2
1
1
5
3
5
6
1
1
4
2
3
3
2
7
4
8
1
1
2
2
10
9
III II
I
O
11
5
1
2
4
3/6
3/6
12
13
1
1
2/4
2
3
14
2
15
1
1
2
16
1
4
4
2
3
5
2
7
6
3
5
7
6
WSJ 750-ET / WSJ 750-EB / WSJ 850-ET / WSJ 850-EB
orbital action jig saw and WSJ-DRS dust removal system
It is essential that the operating instructions
are read before the tool is operated for the
first time.
1. General information
1.1 Signal words and their meaning
Always keep these operating instructions
together with the tool.
-CAUTIONUsed to draw attention to a potentially dangerous situation which could lead to minor personal injury or damage to the equipment or other property.
Ensure that the operating instructions
are with the tool when it is given to other
persons.
-NOTEUsed to draw attention to an instruction or other useful
information.
1.2 Pictograms
Operating controls and parts On / off switch
Lockbutton (only WSJ 750-ET and WSJ 850-ET)
Ventilation slots
Stroke rate adjustment thumbwheel
Dust removal system connector
Baseplate
Orbital action adjustment lever
Baseplate locking screw
Guide roller
Saw blade (insert tools)
Guard
Blade holder
Saw blade release lever
Dust removal hood
Low-friction baseplate cover
Anti-splinter insert
Warning signs
General
warning
Warning:
electricity
Warning:
hot surface
Obligation signs
Wear
eye
protection
Wear
ear
protection
Wear
protective
gloves
Wear
breathing
protection
Symbols
Read the
operating
instructions
before use.
Contents
1. General information
2. Description
3. Tools and accessories
4. Technical data
5. Safety precautions
6. Before use
7. Operation
8. Care and maintenance
9. Troubleshooting
10. Disposal
11. Warranty
12. EC declaration of conformity
Page
13
14
14
15
16
18
19
20
21
22
22
23
These numbers refer to the corresponding illustrations. The illustrations can be found on the fold-out cover
pages. Keep these pages open while studying the operating instructions.
In these operating instructions, the WSJ 750-ET / WSJ
750-EB / WSJ 850-ET / WSJ 850-EB orbital action jig
saw is referred to as “the tool”.
Location of identification data on the tool
The type designation and serial number can be found on
the rating plate on the tool. Make a note of this data in
your operating instructions and always refer to it when
making an enquiry to your Hilti representative or service
department.
Type:
Serial no.:
13
en
2. Description
en
2.1 Correct use
The tool is an electrically-powered orbital action jig saw
for cutting wood, plastic, metal, plasterboard (drywall
panel) and fiberboard. It is designed for professional
use.
The working environment may be a construction site,
workshop, occupied living accommodation or other workspace and the work carried out may include construction, renovation or conversion. Use of the tool for cutting materials containing asbestos is not permissible.
The tool may be powered only by an electric supply providing a voltage and frequency in compliance with the
specification given on its rating plate.
The items supplied include:
– Electric tool incl. saw blade
– Operating instructions,
– Packaging
– Accessories (dust removal module, anti-splinter insert,
dust removal adaptor, low-friction baseplate cover,
hex. socket wrench, dust removal hood)
3. Tools and accessories
Saw blade
Dust removal module
Anti-splinter insert
Dust removal adaptor
Low-friction baseplate cover
Hex. socket wrench
Dust removal hood
W-CS
WSJ-DRS
W-ASJ SS
W-ASJ AS
W-ASJ GL
5-W-A SW5
W-ASJ AH
3.1 WSJ-DRS dust removal module
3.1.4 Technical data
WSJ-DRS dust removal module for the WSJ 850-ET and
WSJ 850-EB
Power input
80 W
Suction performance
400 l/min
Weight
250 g
Dimensions (LxWxH)
150x60x100 mm
3.1.1 General information
Location of identification data on the tool
The type designation and serial number can be found on
the rating plate on the tool. Make a note of this data in
your operating instructions and always refer to it when
making an enquiry to your Hilti representative or service
department.
Type:
WSJ-DRS
Serial no.:
3.1.2 Safety
Use as directed
The WSJ-DRS may be used only in conjunction with the
WSJ 850-ET and WSJ 850-EB.
Use of the WSJ DRS for materials containing asbestos
or for metal, glass and carbon fiber dust is not permissible.
Use of the WSJ-DRS for damp or explosive dust is not
permissible.
3.1.3 General safety precautions
When changing the filter, hold the tool and/or the WSJDRS so that the filter drawer can be pulled out vertically downwards. This prevents dust escaping.
● We recommend that breathing protection is worn
when changing the filter.
●
14
3.1.5 Before use
-NOTEThe dust removal hood must be fitted in front of the saw
blade when the dust removal module is in use (see 6.5).
Attaching the dust removal module 1. Unplug the supply cord from the electric socket.
2. Fit the dust removal adaptor into the opening on the
tool.
3. Push the dust removal adaptor toward the tool from
below until it engages.
4. Push the dust removal module onto the tool and the
dust removal adaptor until it is heard to engage.
Detaching the dust removal module
1. Unplug the supply cord from the electric socket.
2. Press the two buttons on the dust removal module
(one on each side) and hold them in this position.
3. Pull the dust removal module away from the tool and
the dust removal adaptor toward the rear.
4. Release the dust removal adaptor from the tool by
pushing it downwards.
5. Push the dust removal adaptor downwards and pull it
out of the tool.
Emptying the dust container
3. Pull the dust container downwards away from the tool.
4. Empty the dust out of the container by tapping it lightly or, alternatively, use a vacuum cleaner to clean out
the container (wear breathing protection).
-CAUTION●
●
●
Dust may be released into the air when
emptying the dust removal module.
Dust may be harmful to the respiratory system.
Wear breathing protection.
3.1.6 Care and maintenance
We recommend use of compressed air and a cloth for
cleaning the dust removal module. Do not use water, oil,
grease or cleaning agents.
-NOTEHold the dust removal module so that the dust removal
adaptor faces upwards.
1. Unplug the supply cord from the electric socket.
2. Press the two buttons on the dust removal module
(one on each side) simultaneously.
3.1.7 Changing and cleaning the filter
Change the filter if it becomes defective or if so badly
soiled that cleaning is no longer possible. Disassemble
it to facilitate thorough cleaning. Especially after cutting
plaster or plasterboard (drywall panel), the filter should
be cleaned thoroughly to ensure no loss of suction power
by the dust removal system. Clean the filter carfully, using
compressed air or a vacuum cleaner.
4. Technical data
Tool
Nominal power rating
Mains frequency
WSJ 750-ET
WSJ 750-EB
WSJ 850-ET
WSJ 850-EB
750 W
750 W
850 W
850 W
50 / 60 Hz
50 / 60 Hz
50 / 60 Hz
50 / 60 Hz
Nominal voltage
110 V
230 V
110 V
230 V
Mains current
7.5 A
3.8 A
8.0 A
4,.1 A
Weight of tool
2.6 kg
2.5 kg
2.6 kg
2.5 kg
Dimensions (LxWxH)
256x75x201 mm 256x75x194 mm 256x75x201 mm 256x75x194 mm
Stroke rate
900–3000 1/min. 900–3000 1/min. 900–3000 1/min. 900–3000 1/min.
Stroke
28 mm
28 mm
28 mm
28 mm
Max. cutting depth in wood
up to 120 mm
up to 120 mm
up to 150 mm
up to 150 mm
Max. cutting depth in aluminium up to 25 mm
up to 25 mm
up to 25 mm
up to 25 mm
Max. cutting depth in mild steel
up to 10 mm
up to 10 mm
up to 10 mm
up to 10 mm
Angular cutting (left / right)
0–45°
0–45°
0–45°
0–45°
Number of orbital action settings 0-1-2-3
0-1-2-3
0-1-2-3
0-1-2-3
Blade connection end
T-shank
T-shank
T-shank
T-shank
Dust removal adapter exterior dia. 30 mm for hose adapter
Double insulated (in accordance with EN 50144)
protection class II (double insulated) Z
Vibration-absorbing grip
Interference immunity
Radio and television interference suppression
In accordance with EN 55014-2
In accordance with EN 55014-1
Noise and vibration information (measured in accordance with EN 50144)
Typical A-weighted sound power level (LwA):
≤ 101 dB (A) WSJ-EB / ≤ 100 dB (A) WSJ-ET
Typical A-weighted sound pressure level (LpA):
≤ 88 dB (A) WSJ-EB / ≤ 87 dB (A) WSJ-ET
Wear ear protection!
Typical weighted vibration at the grips:
3.1 m/s2 WSJ-EB / 3.0 m/s2 WSJ-ET
Right of technical changes reserved!
15
en
5. Safety precautions
en
5.1 Basic information concerning safety
In addition to the information relevant to safety given
in each of the sections of these operating instructions,
the following points must be strictly observed at all
times.
-ATTENTIONRead all safety precautions and instructions! Failure to
observe the following safety precautions and instructions may lead to electric shock, fire and/or serious
injury.
Observe the information given in the operating instructions concerning operation, care and maintenance.
● Nevertheless, the tool and its accessories may present
hazards when used incorrectly by untrained personnel or when misused.
● Do not make use of incorrect accessories (e.g. the
wrong circular saw blade, the wrong extraction connector or the wrong type of vacuum cleaner).
● To avoid the risk of injury, always use only Hilti original accessories.
● Connect the tool to an external dust removal system
if the material to be cut produces dust hazardous to
health.
● Modification of the tool is not permissible.
● Do not use the tool for cutting tree branches or logs.
●
5.2 Take the necessary precautions to make the
workplace safe
Ensure that the workplace is well lit.
Ensure that the workplace is well ventilated.
Keep the working area tidy. Objects which could cause
injury should be removed from the working area. Untidiness at the workplace may lead to accidents.
● Keep the area above and below the cutting line free of
obstacles.
● Secure the workpiece. Use clamps or a vice to hold
the workpiece securely in position. It is then held more
safely and both hands remain free for holding and
operating the tool.
● Wear protective goggles. Wear breathing protection
if the work creates dust.
● Wear suitable working clothing. Do not wear loose
clothing, loose long hair or jewelry as these can become
caught up in moving parts. Wear a hair net if you have
long hair.
● When working, keep other persons, particularly children,
outside the range of the tool. Do not permit other persons to touch the electric tool or the extension cord.
● Avoid unusual body positions. Work from a secure
stance and stay in balance at all times.
●
●
●
16
Connect the dust removal system. Ensure that it is
connected and used correctly.
● To avoid tripping and falling when working, always lead
the supply cord, extension cord and extraction hose
away to the rear.
● Concealed electric cables or gas and water pipes present a serious hazard if damaged while you are working. Accordingly, check the area in which you are working beforehand (e.g. using a metal detector). Avoid
contact between your body and earthed / grounded
objects, such as pipes or radiators. External metal parts
of the tool may become live, for example, when an electric cable is damaged inadvertently.
●
5.3 General safety precautions
Use the right electric tool for the job. Do not use the
tool for purposes for which it was not intended. Use
the tool only as directed and when it is in faultless
condition.
● Use only the original accessories and auxiliary equipment listed in the operating instructions. Use of accessories or items of auxiliary equipment other than those
listed in the operating instructions may present a risk
of personal injury.
● Take the influences of your surroundings into account.
Do not expose the tool to rain or snow and do not use
it in damp or wet conditions. Do not use the tool where
there is a risk of fire or explosion.
● Keep the tool, especially its grip surfaces, clean and
free from oil and grease.
● Do not overload the tool. It will operate more efficiently
and more safely within the performance range for
which it was designed.
● Always hold the tool securely, with both hands on the
grips provided.
● Switch on the tool only after it has been brought into
position where the cut is to be made.
● The dust removal hood should not be disassembled.
● Store tools in a safe place when not in use. When not
in use, tools should be stored in a dry, high place or
locked away where they are out of reach of children.
● Avoid unintentional starting. Do not carry the tool with
your finger on the on/off switch. Check that the on /
off switch is in the “off” position before plugging the
supply cord into the electric socket.
● Disconnect the supply cord plug from the socket when
the tool is not in use (e.g. during breaks, before maintenance and before changing insert tools).
● Switch the tool off before transporting it.
● Take care of your insert tools. You will be able to work
more efficiently and more safely if the insert tools are
kept sharp and clean. Observe instructions on care and
maintenance and on changing insert tools.
●
Check that all moving parts are undamaged and that
they function properly without sticking. All parts must
be fitted correctly and fulfill all of the conditions necessary to ensure faultless operation.
● Never place your hands in front of or on the saw blade.
● Check the tool for possible damage. Protective devices
and any parts that may have suffered slight damage
should be checked for correct operation and functionality before further use of the electric tool. Safety
devices or other parts that are found to be damaged
must be replaced or repaired properly by an authorized repair workshop unless otherwise indicated in
the operating instructions.
●
5.3.1 Mechanical
Check that wrenches etc. have been removed from
the tool before switching it on.
● Observe the instructions concerning care and maintenance and replacement of insert tools in good time.
● Ensure that the insert tools used are equipped with the
correct connection end system and that they are properly fitted and secured in the chuck.
● The safety guard for the saw blade must always be fitted in order to prevent inadvertent contact with the
saw blade or the moving parts above the saw blade.
●
5.3.2 Electrical
Protect yourself against electric shock. Avoid body
contact with earthed / grounded objects, e.g. pipes
and radiators etc.
● Check the condition of the tool’s supply cord at regular intervals. The supply cord should be replaced by
a trained electrical specialist if damage is found. Also
regularly check the condition of extension cords and
replace these if damage is found.
● Check the condition of the tool. Do not operate the tool
if it is found to be damaged, if it is not complete or if
its controls cannot be operated faultlessly.
● Do not touch the supply cord in the event of it suffering damage while working. Disconnect the supply cord
plug from the socket.
● Damaged switches must be replaced at a Hilti service
center. Do not use the tool if it cannot be switched off
and on properly.
● The tool should be repaired only by a trained electrical specialist (Hilti service center using original Hilti
spare parts. Failure to observe this point may result
in a risk of accident to the user.
● Do not use the supply cord for purposes for which it
is not intended. Never carry the tool by the supply
cord. Do not pull the plug out of the socket by pulling
the supply cord.
● Do not expose the supply cord to heat, oil or sharp
edges.
●
When working outdoors, use only extension cords
approved and correspondingly marked as suitable for
outdoor use.
● In the event of a power cut: Switch off and unplug the
tool.
● Avoid using extension cords with multiple sockets
and the simultaneous use of several electric tools connected to one extension cord.
● Never operate the tool when it is dirty or wet. Dust or
dampness on the surface of the tool make it difficult
to hold and, under unfavorable conditions, may lead
to electric shocks. Accordingly, have the tool checked
regularly at a Hilti service center if it is used frequently
for cutting conductive materials.
●
5.3.3 Thermal
Warning:
hot surface
●
Wear
protective
gloves
The insert tool may become hot during use. You should
therefore wear protective gloves when changing insert
tools.
5.3.4 Dust
Wear respiratory protection when the work causes
dust.
● Before beginning work, find out the hazard class of
the dust produced by the work. Use only an industrial vacuum cleaner with an officially approved protection classification in compliance with your local dust
control regulations for work with the tool.
●
5.4 Requirements to be met by users
The tool may be operated, serviced and repaired only
by authorized, trained personnel. This personnel must
be informed of any special hazards that may be encountered.
● Always concentrate on the job you are doing. Proceed
carefully and do not use the tool if your full attention
is not on the job.
●
5.5 Personal protective equipment
The user and any other persons in the vicinity must wear
suitable eye protection, ear protection and protective
gloves. They must also wear respiratory protection if no
dust removal system is used.
Wear
eye
protection
Wear
ear
protection
Wear
protective
gloves
Wear
breathing
protection
5.6 Protective devices
Never operate the tool without the applicable protective
devices (dust hood).
17
en
6. Before use
-CAUTION-
en
●
●
●
The cutting edges of the saw blade
are sharp.
The cutting edges may present a risk
of injury.
Wear protective gloves.
6.1 Extension cords
If extension cords are used: Use only extension cords
of a type approved for the intended purpose and of adequate cross section. Failure to observe this point may
result in reduced performance and may cause the cord
to overheat. Replace damaged extension cords. Use only
correspondingly marked and approved extension cords
for working outdoors. Recommended minimum cross
sections and max. cord lengths:
Mains voltage Conductor cross section
110 V
230 V
1.5 mm2
2.5 mm2
20 m
50 m
30 m
100 m
Extension cords for outdoor use
For outdoor work use only extension cords approved and
correspondingly marked as suitable for outdoor use.
6.2 Fitting the saw blade 1. Unplug the supply cord from the electric socket.
2. Press the saw blade release lever and hold it in this
position.
3. Push the saw blade into the blade holder (teeth facing cutting direction) until it engages.
4. Hold the blade against the resistance felt and then
allow the blade release lever to return to its original
position.
5. Check that the blade is held securely by gripping and
pulling it.
6.3 Changing the saw blade -NOTEWhen changing the saw blade, hold the tool in such a
way that persons or animals cannot be injured by the
saw blade as it is ejected.
1. Unplug the supply cord from the electric socket.
2. Press the saw blade release lever to the side as far as
it will go. The saw blade is then released and ejected.
6.4 Dust removal using an external dust removal system
-NOTEUse of a dust removal system reduces exposure to dust,
increases safety at the workplace by ensuring better vis18
ibility of the cutting line and helps to keep the workplace
tidy by greatly reducing the amount of dust and wood
chips in the working area.
Connect the external dust removal system before working with the tool for long periods when cutting wood or
other materials that may cause considerable dust.
The dust removal hood must be fitted when the tool is
being used with a dust removal system.
6.4.1 Connecting the system 1. Unplug the supply cord from the electric socket.
2. Fit the dust removal adaptor into the opening on the
tool.
3. Push the dust removal adaptor toward the tool from
below until it engages.
4. Connect the vacuum cleaner hose to the dust removal
adaptor.
6.4.2 Disconnecting the system 1. Unplug the supply cord from the electric socket.
2. Disconnect the vacuum cleaner hose from the dust
removal adaptor.
3. Push the dust removal adaptor downwards and pull
it out of the tool.
6.5 Dust removal hood
6.5.1 Fitting the dust removal hood 1. Unplug the supply cord from the electric socket.
2. Push the dust removal hood onto the tool from the
front until it engages.
6.5.2 Removing the dust removal hood 1. Unplug the supply cord from the electric socket.
2. Tilt the dust removal hood slightly and pull it away
from the tool toward the front.
6.6 Sawdust blower
The blower keeps the cutting line free of dust and chips
by directing a jet of air toward the saw blade.
6.7 Adjusting the orbital action The four orbital action settings permit cutting performance and quality of cut to be adjusted to suit the material being cut.
Orbital action adjustment lever is used to set the tool to
one of the four orbital action settings.
Please observe the following recommendations:
The lower the orbital action setting, the finer and cleaner the cut.
The optimum setting can be determined by making test
cuts.
Setting 0:
Setting I:
Setting II:
SettingIII:
No orbital action
Low orbital action
Medium orbital action
High orbital action
Please refer to the information provided with the saw
blade for details of correct settings.
6.8 Adjusting the stroke rate 1. Set the stroke rate adjustment thumbwheel to a position between 1 (slow) and 6 (fast).
Please refer to the information provided with the saw
blade for details of correct settings.
6.9 Adjusting the cutting angle
6.9.1 Setting the cutting angle 1. Unplug the supply cord from the electric socket.
2. Remove the dust removal system adaptor.
3. Release the screw.
4. Pull the baseplate slightly toward the front of the tool.
5. Set the baseplate to the desired angle according to the
scale on the tool.
6. Tighten the screw.
6.9.2 Resetting the cutting angle
1. Unplug the supply cord from the electric socket.
2. Release the screw.
3. Return the baseplate to the 0° position.
4. Push the baseplate back to its original position (toward
the rear of the tool).
5. Tighten the screw.
6.10 Offsetting the baseplate To facilitate sawing close to edges, the baseplate can be
repositioned as follows:
1. Unplug the supply cord from the electric socket.
2. Release the screw.
3. Push the baseplate back as far as it will go.
4. Tighten the screw.
6.11 Anti-splinter insert -NOTEThe anti-splinter insert cannot be used with certain types
of saw blades (e.g. offset blades).
Use of the anti-splinter insert helps prevent splintering
of the surface when sawing wood materials.
1. Unplug the supply cord from the electric socket.
2. Press the anti-splinter insert into the baseplate from
below.
6.12 Low-friction baseplate cover
-NOTEUse the low-friction baseplate cover to avoid scratching
sensitive materials.
1. Unplug the supply cord from the electric socket.
2. Hook the cover onto the front edge of the baseplate.
3. Press the cover against the baseplate until it snaps
into place.
7. Operation
-CAUTION●
●
-CAUTION●
●
●
The cutting edges of the saw blade
are sharp.
The cutting edges may present a risk
of injury.
Wear protective gloves.
-CAUTION●
●
●
The sawing operation swirls up dust
and wood chips into the air.
The dust and wood chips may be harmful to the eyes and respiratory system.
Wear protective goggles and breathing protection.
●
Operation of the tool creates noise.
Excessive noise may damage the hearing.
Wear ear protection.
7.1 System
-NOTE● To achieve good cutting performance and ease the
load on the tool, always use blades that are in good
condition.
● Do not overload the tool.
-CAUTIONWhen working with the tool, always guide it away from
the body.
● Lift the tool away from the workpiece only after the
blade has come to a standstill.
●
19
en
●
Lay the tool down only after the blade has come to a
standstill.
-CAUTION●
en
●
●
The saw blade becomes hot during
long periods of use.
There is a risk of burning if the blade
is touched.
Wear protective gloves.
7.2 Switching on / off
7.2.1 On / off switch (WSJ 750-ET /
WSJ 850-ET) 1. Plug the supply cord into the electric socket.
2. Switch the tool on by pressing the on / off switch.
– Switching on: Press the on / off switch.
– Switching off: Release the on / off switch.
– Sustained
operation:
Press the on / off switch and then
press the switch lockbutton.
– Switching off: Press the on / off switch again and
then release it.
7.2.2 On / off switch (WSJ 750-EB /
WSJ 850-EB) 1. Plug the supply cord into the electric socket.
2. Switch the tool on / off by way of the sliding switch.
7.3 Plunge sawing -NOTEUse the plunge sawing method only for soft materials.
Only short blades should be used.
1. Plug the supply cord into the electric socket.
2. Set the orbital action regulation lever to the 0 position.
3. Bring the front edge of the baseplate into contact with
the workpiece.
4. Hold the tool securely and press the on / off switch.
5. Press the tool firmly against the workpiece and begin
the plunge movement by reducing the angle between
the baseplate and the workpiece.
6. Once the blade has penetrated the workpiece, bring
the tool into the normal working position (with the
entire baseplate surface in contact with the workpiece).
7. Continue sawing along the cutting line.
8. Care and maintenance
Unplug the supply cord from the electric socket.
8.1 Care of blades
Used saw blades should be cleaned to remove resin
deposits at regular intervals as clean blades achieve
a higher cutting performance. Resin deposits can be
removed by placing the saw blades in a bath of paraffin (kerosene) or commercially available resin remover
for 24 hours.
●
8.2 Care of the tool
The tool was lubricated adequately when it was manufactured. After long periods of heavy use it is recommended that the tool is inspected and serviced at
a Hilti workshop. This will increase the life expectancy of the tool and avoid unnecessary repair costs.
● Repairs to the electrical section of the tool may be carried out only by a trained electrical specialist.
The outer casing of the tool is made from impact-resistant plastic. Sections of the grip are made from an elastomer material (WSJ 850-ET/-EB).
Never operate the tool when the ventilation slots are
blocked. Clean the ventilation slots carefully using a dry
brush. Do not permit foreign objects to enter the interior
of the tool. Clean the outside of the tool at regular intervals
using a slightly damp cloth. Do not use a spray, steam
pressure cleaning equipment or running water for cleaning.
This may negatively affect the electrical safety of the tool.
Always keep the grip surfaces of the tool free from oil and
grease. Do not use cleaning agents which contain silicone.
8.3 Maintenance
Check all external parts of the tool for damage at regular
intervals and check that all controls operate faultlessly.
Do not operate the tool if parts are damaged or when the
controls do not function faultlessly. If necessary, your
electric tool should be repaired at a Hilti repair center.
Repairs to the electrical section of the tool may be carried out only by trained electrical specialists.
●
20
8.4 Checks after care and maintenance
After care and maintenance, check that all protective
devices are fitted and that they function faultlessly.
9. Troubleshooting
Fault
The saw blade drops out.
Possible cause
Remedy
The saw blade is not engaged correctly. Reinsert the saw blade, taking care to
ensure that the blade holder is fully open
and the saw blade is pushed in against the
resistance felt.
The blade clamping mechanism is
Clean the blade holder.
dirty.
The saw blade cannot be
The blade clamping mechanism is
Clean the blade holder.
inserted.
dirty.
The tool cannot be
The supply cord is not plugged in.
Check that the supply cord is plugged in.
switched on.
The switch is defective or dirty.
Clean the exterior of the switch with a
cloth or have the switch checked by a
trained electrical specialist.
The switch cannot be lock- The switch is defective or dirty.
Clean the exterior of the switch with a
ed in the sustained running
cloth or have the switch checked by a
position (WSJ 750-ET and
trained electrical specialist.
850-ET)
The orbital action cannot
The tool is dirty.
Clean and remove foreign matter from
be adjusted.
the slot for the orbital action adjustment
lever.
No orbital action.
The tool is dirty.
Check the area of the orbital action fork
and remove any dirt or foreign matter.
The orbital action adjustment lever
Set the lever to the desired position.
is set to the "0" position.
Speed cannot be adjusted. The stroke rate adjustment thumb- Clean the exterior of the thumbwheel or
wheel is dirty or defective.
have the tool checked by a trained
electrical specialist.
Speed too high or too low. The wrong stroke rate is set.
Check the stroke rate setting
(scale on the thumbwheel) and adjust it
accordingly.
Dust removal with the
The dust removal hood is not fitted. Check that the vacuum cleaner is working
vacuum cleaner or dust
and that the dust removal adaptor and
removal module doesn’t
dust removal hood are fitted.
work.
The passages in the tool and / or dust Clean the passages in the tool or dust
removal adapter are dirty or blocked. removal adapter.
The baseplate cannot be
The securing screw has not been
Check the screw and release it if necespivoted.
released or the connection between sary. Clean the area between the baseplate
the baseplate and the tool is dirty.
and the tool.
An accessory cannot
The point of attachment to the base- Clean the point of attachment to the basebe fitted (WSJ 850-ET/-EB) plate is dirty or the wrong accessory plate and check whether a suitable accesis being used.
sory is being used.
The dust removal module The module is not correctly attached Check that the module is correctly
doesn’t function.
to the tool.
attached to the tool.
The dust container is full.
Empty the dust container.
The filter is dirty.
Clean the filter or fit a new dust container.
The cut is not straight.
The blade is unsuitable for the
Use the saw blade recommended by Hilti
application.
for the application you are carrying out.
The blade is blunt or damaged.
Use a suitable, new saw blade.
The material being cut
Stroke rate and cutting force is too
Reduce the stroke rate and apply less
overheats.
high.
pressure.
The material being cut
Inadequate lubrication when cutting Use a new saw blade and ensure adequate
overheats (metal).
metal.
lubricant is applied between the saw blade
and workpiece.
21
en
10. Disposal
Most of the materials from which Hilti electric tools are manufactured can be recycled. The materials must be
correctly separated before they can be recycled. In many countries, Hilti has already made arrangements for taking
back your old electric tools for recycling. Please ask your Hilti customer service department or Hilti representative for further information.
Should you wish to return the electric tool yourself to a disposal facility for recycling, proceed as follows:
Dismantle the electric tool as far as possible without the need for special tools. Use absorbent paper to wipe oily
parts clean and to collect any grease that runs out (total quantity approx. 50 ml). This paper should also be disposed
of correctly. On no account should oil or grease be allowed to enter the waste water system or to find its way
into the ground.
The individual parts should be separated as follows:
Part / assembly
Main material
Toolbox
Plastic
Gear housing
Plastic with magnesium alloy / brass parts
Grip
Plastic
Motor housing
Plastic
Fan
Plastic
Motor (rotor and stator)
Steel and copper
Supply cord
Copper, elastomer
Gearing parts
Metal
Main switch, electronics
Baseplate (WSJ 750-EB/- ET)
Steel
Baseplate (WSJ 850-EB/-ET)
Cast aluminium and steel
Baseplate cover
Plastic
Anti-splinter insert
Plastic
Dust removal adaptor
Plastic
Screws, small parts
Steel
Operating instructions
Paper
Recycling
Plastics recycling
Scrap metal
Plastics recycling
Plastics recycling
Plastics recycling
Electronic scrap
Electronic scrap
Scrap metal
Electronic scrap
Scrap metal
Scrap metal
Plastics recycling
Plastics recycling
Plastics recycling
Scrap metal
Paper recycling
11. Warranty
Hilti warrants that the tool supplied is free of defects in
material and workmanship. This warranty is valid as long
as the tool is operated and handled correctly, cleaned
and serviced properly and in accordance with the Hilti
operating instructions, all warranty claims are made within 12 months (unless other mandatory national regulations
prescribe a longer minimum period) from the date of the
sale (invoice date), and the technical system is maintained. This means that only original Hilti consumables,
components and spare parts may be used in the tool.
This warranty provides the free-of-charge repair or replacement of defective parts only. Parts requiring repair or
replacement as a result of normal wear and tear are not
covered by this warranty.
Additional claims are excluded, unless mandatory
national rules prohibit such exclusion. In particular,
Hilti is not obligated for direct, indirect, incidental or
consequential damages, losses or expenses in con22
nection with, or by reason of, the use of, or inability to
use the tool for any purpose. Implied warranties of
merchantability or fitness for a particular purpose are
specifically excluded.
Send the tool and/or related parts immediately upon discovery of a defect to the local Hilti marketing organisation for repair or replacement.
This constitutes Hilti’s entire obligation with regard to
warranty and supersedes all prior or contemporaneous
comments and oral or written agreements concerning
warranties.
12. EC declaration of conformity
Designation:
Type:
Year of design:
Orbital action jig saw
WSJ 750-ET / WSJ 750-EB /
WSJ 850-ET / WSJ 850-EB
and WSJ-DRS
2003
en
We declare, on our sole responsibility, that this product
complies with the following directives and standards:
73/23/EWG, 89/336/EWG, 98/37/EG, EN 55014-1,
EN 55014-2, EN 50144-1, EN 50144-2-10, EN 610003-2, EN 61000-3-3.
Hilti Corporation
Ronald Fehlmann
Head of BU Cutting and Sanding
March 2003
Dr. Heinz-Joachim Schneider
Head of BA Light Duty Systems
March 2003
23
Hilti Corporation
Hilti = registered trademark of Hilti Corp., Schaan W 2750 1003 25-Pos. 1 1 Printed in Liechtenstein © 2003
Right of technical and programme changes reserved S. E. & O.
377834 / A
FL-9494 Schaan
Tel.: +423 / 234 2111
Fax: +423 / 234 29 65
www.hilti.com