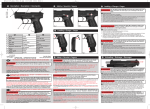
1
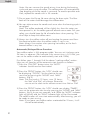
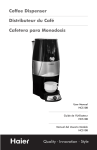
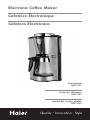
Electronic Coffee Maker
Cafetière Électronique
Cafetera Electrónica
User Manual
HDC10SS
Guide de l’Utilisateur
HDC10SS
Manual del Usuario Modelo
HDC10SS
Quality • Innovation • Style
English
IMPORTANT SAFEGUARDS
When using electrical appliances, basic safety precautions
should always be followed, including the following:
1. Read all instructions carefully.
2. Do not touch hot surfaces. Use handles or knobs.
3. To protect against fire, electric shock and injury to persons do not
immerse cord, plug or unit in water or other liquid.
4. Close supervision is necessary when any appliance is used by or
near children.
5. Unplug from outlet when not in use and before cleaning. Allow cooling before putting on or taking off parts and before cleaning the
appliance.
6. Do not operate any appliance with a damaged cord or plug, or after
the appliance malfunctions or has been damaged in any manner.
Return appliance to the nearest authorized service facility for examination, repair or adjustment.
7. TO REDUCE THE RISK OF FIRE OR ELECTRIC SHOCK DO NOT
REMOVE THE BOTTOM COVER. NO USER-SERVICEABLE PARTS
INSIDE. REPAIR SHOULD BE DONE BY AUTHORIZED SERVICE PERSONNEL ONLY.
8. The use of accessory not evaluated for use with appliance may cause
injuries
9. Do not use outdoors.
10. Do not let cord hang over edge of table or counter, or touch hot surfaces, including the stove.
11. Do not place on or near a hot gas or electric burner, or in a heated
oven.
12. To disconnect, turn all controls to “Off”, then remove plug from wall
outlet.
13. Never use warm or hot water to fill the water reservoir. Use cold
water only.
1
English
14. Scalding may occur is the cover is lifted or removed during the brewing cycle.
15. Do not use appliance for other than intended use.
16. Snap the lid securely onto the carafe before serving.
17. The container is designed for use with this appliance. It must never
be used on a range top or in a conventional or microwave oven.
18. Do not set a hot carafe on a wet or cold surface.
19. Do not use a cracked carafe or a carafe that has a loose or weakened handle.
20. Do not clean coffee maker with scouring powders, steel wool pads,
or other abrasive materials.
SAVE THESE INSTRUCTIONS
HOUSEHOLD USE ONLY
Staple your receipt to your manual.
You will need it to obtain warranty service.
2
English
TABLE OF CONTENTS
PAGE
Important Safeguards ....................................................................1
Parts and Features ..........................................................................5
Before Using for the First Time ......................................................6
Operation ..............................................................................................6
Care and Cleaning ..........................................................................8
Cleaning Mineral Deposits ............................................................8
Hints for Great Tasting Coffee ......................................................9
Storage ............................................................................................9
Limited Warranty ..........................................................................10
3
English
Polarized Plug
This appliance has a polarized plug, To reduce the risk of electric shock,
this plug is intended to fit into a polarized outlet only one way, If the
plug does not fit fully into the outlet, reverse the plug, If it still does not
fit, contact a qualified electrician, Do not attempt to defeat this
safety feature.
Power Cord
A short power-supply cord is provided to reduce risks resulting from
becoming entangled in or tripping over a long cord. An extension cords
may be used if care is exercised in their use:
The marked electrical rating of extension cord is equal to or greater
than the electrical rating of this appliance. The electrical rating of this
appliance is listed on the bottom panel of the unit.
The extension cord should be arranged so that it will not hang off of
the counter top or table top where it can be pulled on by children or
tripped over.
4
English
PARTS AND FEATURES
6
1
2
7
3
4
5
9
8
5
1. Water Reservoir
6. Flip Up Cover
2. Removable Filter
7. Water Level Indicator
3. Removable Filter Basket
8. Keep Warm Plate
4. Power On Indicator Light
9. Carafe
5. Control Panel/LCD Display
English
BEFORE USING FOR THE FIRST TIME
1. Unpack the unit.
2. Check the contents against the accessories list.
3. Remove all labels and the protective film.
4. Select a suitable location for the unit on a flat, stable surface close to
a power outlet.
Check to ensure all accessories are included and the unit is not damaged. Be sure the filter and filter basket are assembled properly. Before
your first brew cycle, you will need to cycle the unit twice with water to
remove any sediment. Brew clean water by filling the reservoir up to the
MAX marker and follow the steps below (but do not use ground coffee
at this time), then pour the cycled water out of the carafe. Repeat 2
times. Remove and Clean carafe, Lid, Filter and filter basket thoroughly
with warm water.
OPERATION
Making Coffee
1) Open the flip up lid of coffee maker, use the carafe to fill the water
reservoir with cold water. Watch the left or right water level indicator
for your desired fill level. The water level should between the MAX
and MIN.
2) Place the filter basket in the filter basket in the unit. Make sure it is
properly seated. Then place the filter into the filter basket.
3) Add ground coffee to filter. One level tablespoon for every cup is
recommended, but you may adjust according to your personal taste.
4) Place the carafe on warming plate.
Note: Please make sure the carafe is properly seated on to the
warming plate.
5) Plug the power cord into the outlet, the LCD will
display “AM 12:00” (fig.1).
6) Press the “ON/OFF” button, the “RUN” indicator
lamp will now be illuminated. The brewing cycle
will now begin.
6
English
Note: You can remove the carafe at any time during the brewing
cycle and pour a cup of coffee. The coffeemaker will automatically
stop dripping while the carafe is removed. To avoid a possible over
flow, replace the carafe with in 30 seconds.
7) Do not open the flip up lid cover during the brew cycle. The flow
back of hot water could damage the coffeemaker.
8) You can take remove the carafe and serve when the brewing cycle is
completed.
Note: The coffee produced will be slightly less than the water you
have poured in, as the coffee grounds absorb some water. For your
safety, you should keep the lid of carafe down when pouring. This
also helps to keep the coffee warm.
9) Always turn the coffee maker off and unplug the power cord from
the electrical outlet when the coffee maker is not in use.
Note: Always Use caution when pouring hot coffee, as the fresh
brewed coffee is very hot.
Automatic/Delayed Brew Function
Your coffee maker is fully programmable. You can set it to brew up to
24 hours in advance. (For example if the current time is 5:10 PM, you
can set the coffee maker to automatically start at 8:15PM)
First follow steps 1 through 5 of the above “making coffee” section.
Now you will need to set the automatic start function as follows:
1) Press the “ON/OFF” button twice; the “AUTO”
indicator should now be illuminated.
2) Press the “PROG” button; the “LCD” should now
be displaying “CLOCK”. Set the clock to the current time by pressing the “HOUR” and “MIN”
buttons. (Fig.2)
Note: The time cycle is 12 hours, ever 12 hours;
the “AM” and “PM” will change. Please be
sure to set the clock to the correct current time “AM or “PM”
3) Press the “PROG” button; the “LCD” should now display “TIMER”,
now set the automatic start time by pressing the “HOUR” and “MIN”
buttons. (fig.3) As per our example, at 8:15PM the “AUTO” indicator
light will go off, and the “RUN” indicator light will be illuminated.
The coffee maker will now start automatically. After brewing, you will
be ready to start serving.
Note: If you leave your coffee maker unattended for 2 hours, it will
shut off automatically.
7
English
CARE AND CLEANING
CAUTION: Be sure to unplug this appliance before cleaning. To protect
against electrical shock, do not immerse cord, plug or unit
in water or liquid. After each use, always make sure the
plug is first removed from wall outlet.
1) Clean the filter, carafe and carafe lid after each use in hot, sudsy
water.
2) Wipe the product’s exterior surface with a soft, damp cloth to remove
stains.
3) Water droplets may build up in the area above the filter and drip
onto the product base during brewing. To control the dripping, wipe
off the area with a clean, dry cloth after each use of the product.
4) Use a damp cloth to gently wipe the warming plate. Never use an
abrasive cleaner to clean your coffee maker.
CLEANING MINERAL DEPOSITS
• To keep your coffee maker operating efficiently, you should clean
away any mineral deposits left behind by hard water. This can be the
result of the water quality in your area and the frequency you use
your coffee maker. Please follow these directions to clean mineral
deposits:
• Fill the carafe with one part white vinegar and three parts cold water,
then pour the water and vinegar mixture into the water reservoir. Do
not add ground coffee. Brew the water-vinegar solution as per the
normal brewing instructions. Repeat until no yellow liquid brews
through. If necessary, brewing with tap water until vinegar odor is
gone.
8
HINTS FOR GREAT-TASTING COFFEE
1. A clean coffee maker is essential for making great-tasting coffee.
Regularly clean your coffee maker as specified in the “CLEANING
AND MAINTENANCE” section. Always use fresh, cold water in the
coffee maker.
2. Store unused coffee grounds in a cool, dry place. After opening a
package of coffee grounds, reseal it tightly and store it in a refrigerator to maintain its freshness.
3. For optimum coffee taste, buy whole coffee beans and grind them
finely just before brewing.
4. Do not reuse coffee grounds since this will greatly reduce the coffee’s
flavor. Reheating coffee is not recommended as coffee is at its peak
flavor immediately after brewing.
5. Clean the coffee maker when over-extraction causes oiliness. Small
oil droplets on the surface of brewed, black coffee are due to the
extraction of oil from the coffee grounds.
6. Oiliness may occur more frequently if heavily roasted coffees are
used.
STORAGE
Unplug the unit and allow it to cool. Always clean the unit before storing. Store your coffee maker in its original box in a clean dry place.
Never pack up your coffee maker while it is still hot. Never wrap cord
tightly around the appliance. Do not put any stress on the cord where it
enters the unit, as it could cause the cord to fray and break.
9
LIMITED WARRANTY
Full One Year
This warranty covers all defects in
workmanship or materials for a period
of 12 months from the date of
purchase, provided you are able to
present a valid proof-of-purchase (the
original receipt)
Exceptions: Commercial or Rental Use
Warranty is 90 days from date of
original purchase.
This warranty covers appliances within
the Continental United States, Puerto
Rico and Canada.
What is not covered by this
warranty:
Damage from other than normal use
or improper installation.
Damage from misuse, abuse, accident,
alteration, lack of proper care and
maintenance.
Failure caused by build-up of food
matter or water deposits.
Product, whose rating label has been
removed or altered.
Product serviced by other than
authorized service center.
Replacement or repair of household
fuses, circuit breakers or wiring.
Labor, shipping charges and
replacement of defective parts beyond
the initial 12-month period.
Do not return this product to the store.
If you need assistance with this
product, please contact "Haier
Customer Satisfaction Service at
1-877-337-3639 between 9:00 AM
and 5:00 PM (EST) Monday to Friday.
Before calling, please have the
following information available:
Model number of your appliance. The
name and address of the store you
purchased the unit from and the date
of purchase. A clear description of the
problem.
Haier will repair or replace any part
free of charge including labor that fails
due to a defect in materials or
workmanship, or replace with a
comparable model.
THIS LIMITED WARRANTY IS
GIVEN IN LIEU OF ALL OTHER
WARRANTIES, EXPRESSED OR,
INCLUDING THE WARRANTIES OF
MERCHANTABILITY AND FITNESS
FOR A PARTICULAR PURPOSE.
The remedy provided in this warranty is
exclusive and is granted in lieu of all
other remedies.
This warranty does not cover incidental
or consequential damages, so the
abovelimitations may not apply to you.
Some states do not allow limitations on
how long an implied warranty lasts, so
the above limitations may not apply to
you.
This warranty gives you specific legal
rights, and you may have other rights,
which vary, from state to state.
Haier America
New York, NY 10018
10
IMPORTANT
Do Not Return This Product To The Store
If you have a problem with this product, please contact the "Haier Customer Satisfaction
Center" at 1-877-337-3639.
DATED PROOF OF PURCHASE REQUIRED FOR WARRANTY SERVICE
IMPORTANT
Ne pas Réexpédier ce Produit au Magasin
Pour tout problème concernant ce produit, veuillez contacter le service des
consommateurs ‘Haier Customer Satisfaction Center’ au 1-877-337-3639.
UNE PREUVE D’ACHAT DATEE EST REQUISE POUR BENEFICIER DE LA GARANTIE.
IMPORTANTE
No regrese este producto a la tienda
Si tiene algún problema con este producto, por favor contacte el "Centro de Servicio al
Consumidor de Haier" al 1-877-337-3639 (Válido solo en E.U.A).
NECESITA UNA PRUEBA DE COMPRA FECHADA PARA EL SERVICIO DE LA GARANTIA
115V, 60 Hz
Made in China
Fabriqué en Chine
Hecho en China
Haier America
New York, NY 10018
Issued: January - 06
Printed in China