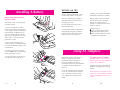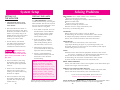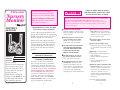
1
Ultra clear Nursery Monitor by OWNERS MANUAL Please read this Owners Manual completely BEFORE first use of your monitor! Pay special attention to the warnings. Keep these instructions for future reference. Congratulations on your purchase of a Graco® Nursery Monitor! Graco is the recognized leader in the design and manufacture of quality baby products. We believe your new Graco® Nursery Monitor is a wise choice. Before using your Nursery Monitor, please take a few minutes to read this Owners Manual. The short time you spend reading these instructions will help you use your Nursery Monitor properly. Model No. MChannels CSerial No. SDear Customer, Please fill in the model and serial numbers above from the label inside the battery compartment of your new Nursery Monitor. Both Parents Unit and Nursery Unit MUST be set to the same channel for the system to operate. © 1998 Graco 900-5-98 Please save your Owners Manual for future use. Customer Satisfaction Our goal is to make every product the best it can be! We are also committed to supporting our products after purchase. If you would like to speak with Graco about your product, please contact our Customer Service Department at 1-800-345-4109. Our knowledgeable staff will be ready to answer any questions you may have concerning parts, use or maintenance. When you call, please have the model and serial numbers ready so your call may be processed quickly and efficiently. 2 Failure to follow these warnings and the assembly instructions could result in serious injury or death. This device is designed only to monitor the sounds of your child. It will not alert you to your childs silent activities. This product is not designed or intended for use as a medical monitor. Always be sure that both the transmitter and receiver are working properly and are within range of each other. ! STRANGULATION HAZARD. ! Keep the adapter cords out of the ! reach of children. Do not use with ! extension cords. ! DO NOT place the Nursery Unit ! or its cord within your childs ! reach. Do not put the Nursery ! Unit inside a crib or playard. ! DO NOT OPEN THE TRANSMIT! TER, RECEIVER OR ADAPTER. ! NO USER-SERVICEABLE PARTS ! INSIDE. RISK OF ELECTRIC ! SHOCK, FIRE OR DEATH. ! DO NOT immerse any part of ! the Nursery Monitor in water. ! Clean only with a dry cloth. ! DO NOT place unit near water ! and moisture. Do not use the ! Nursery Unit outdoors. Do not ! use the monitor near possibly wet ! areas, such as a bathtub, shower, ! wash basin, sink, laundry tub, ! swimming pool, wet basement, etc. ! Keep Nursery Monitor away from ! heat sources, such as fireplaces, ! radiators, stoves, and TVs or other ! appliances. Heat can damage the ! case or electrical parts. ! Use ONLY with 110-120 volt AC ! electrical outlets. ! Protect the AC adapter cords. ! Place them so they are not walked ! on or pinched by furniture or other ! items. ! DO NOT use the monitor if: - The adapter cords or plugs have ! been damaged. - The unit has been exposed to ! liquids. - Unit has been dropped or is ! damaged inside. ! Allow for proper ventilation when ! units are in use. Do not cover the ! nursery or parents unit with any ! object such as a blanket. Do not ! place it in a drawer or in any ! location which would muffle the ! sound or interfere with the normal ! flow of air. FCC ID# M6Y001010049R M6Y001010049T 3 4 Product Features FRONT VIEW: REAR VIEW: Antenna Antenna Power Light Channel Selector* Power Light Channel Selector* Handle Handle Signal Indicator Lights Belt Clip AC Adapter Jack AC Adapter Jack On/Off/ Volume Control On/Off Switch Nursery Unit (Transmitter) Parents Unit (Receiver) *Both the Parents Unit and the Nursery Unit MUST be set to the same channel. If receiver detects sounds from another nursery monitor or cordless phone, set both units to the other channel. If problem persists, contact Graco. 900-5-98 5 6 AC Adapters (2 included) 7 Battery Compartment 8 Installing A Battery Battery changing should only be done by an adult. The Parents Unit can be operated on battery power. BATTERY USE TIPS Remove battery from Parents Unit if it will not be used for a long time. Charging of a rechargeable battery should only be done by an adult. Remove a dead battery promptly. A dead battery left in unit may leak, damaging your unit. Battery power will be conserved when Parents Unit is powered through AC adapter. It is not necessary to remove battery when using AC adapter. Do not attempt to recharge a nonrechargeable battery. 1. Push a screwdriver or similar object into slot at top of the battery cover. Angle tool toward antenna to release battery lid. Remove cover with an upward motion as shown. The cover is designed to open only with a tool so as not to be easily opened by a child. A rechargeable battery CANNOT be recharged by plugging AC adapter into the Parents Unit. Remove the battery from unit to recharge it. Change battery if: ! Signal reception becomes poor ! Indicator lights begin to dim ! Static noise develops (also check ! for appliance interference) ! 2. Snap a nine volt battery into proper terminals. An alkaline battery is recommended. Place battery into compartment. 3. Position cover so its two short tabs are inside battery compartment, lined up with slots in case. Using AC Adapters 4. Lower the battery cover into the slot. Snap the cover into place. The Parents Unit can use either a battery or standard 120 volt AC household current. The Nursery Unit uses standard 120 volt AC household current only. The included AC adapters must be used for this purpose. To use AC adapters, plug the connector on the cord into the AC adapter jack on the side of the unit. Then plug adapter into a standard wall outlet. 900-5-98 9 10 11 Use ONLY the Graco® adapters included with the unit. Do not use these adapters with other equipment under any circumstances. If units do not work, check that AC adapters are plugged into working outlets. When electricity is off (from a power failure, etc.), the transmitter will NOT work, since it only operates on AC current. 12 System Setup SETTING UP THE MONITOR 1. Check that both Nursery Unit and Parents Unit are set to the same channel. 2. Discard the decorative sticker on the front of the Parents unit. Place the Nursery Unit within 10 feet (2-3 meters) of your baby. Plug an AC adapter into the jack on the side of the Nursery Unit. Plug it into a working 120 volt AC outlet. 3. Aim the Nursery Unit toward your baby. Check that there are no walls or large objects that could block sound transmission. Do not place the Nursery Unit or AC adapter cord within your childs reach. DO NOT place Nursery Unit inside a crib or play yard. 4. Turn on the Nursery Unit using the ON/OFF switch on the left side. The red power light should come on. 5. Install a nine volt battery into the Parents Unit, or plug it into a working 120 volt AC outlet using the other AC adapter. 6. Turn on the Parents Unit using the volume control dial on the right side. The red power light should come on. 900-5-98 13 Solving Problems TESTING THE UNITS It is VERY IMPORTANT to test the system when first set up, and at regular times thereafter. Test the units any time they may have been damaged or have not been used for a long time. 1. If two adults are present, have one take the Parents Unit to different locations, trying various volume settings, while the other speaks into the Nursery Unit. 2. If only one adult is available, place a ticking clock, radio, or other sound-producing device near the Nursery Unit to test it. 3. When testing, keep the level of your childs sounds in mind, and adjust the volume accordingly. 4. If there is sound interference, switch both the Nursery Unit and the Parents Unit to the other channel setting. NOTE: As with all radio frequency devices, transmission range and reception may vary. Your Nursery Monitor uses public airwaves, so it is possible for conversations near the Nursery Unit to be broadcast to other nursery monitors, radios, cordless phones or scanners outside your home. For your privacy, always turn off the Nursery Unit when not in use. This monitor operates on one or more of the following frequencies: 49.830 Mhz, 49.845 Mhz, 49.860 Mhz, 49.875 Mhz, 49.890 Mhz. Maximum signal strength is 10 millivolts/meter at 3 meters. 14 Most problems have a simple solution. First, check that: ! Power is turned ON for both units ! Both units are plugged in (or battery is fresh in Parents Unit) ! Electrical outlet works ! Units are set to same channel ! Volume is turned up on Parents Unit ! Parents Unit is in range of the Nursery Unit If necessary, try the following ideas: NO SOUND: Battery dead or weakreplace or use AC adapter. Channel settings do not matchset both units to same channel. AC adapter not properly connectedcheck the connections. Nursery Unit covered or blockedremove the obstruction. WEAK SOUND: Parents Unit too far from Nursery Unitmove closer. Large objects blocking the signaltry repositioning Nursery Unit. Check that antennas are vertical and are not touched by other objects. Volume setting too lowturn it up. STATIC: Interference from other electrical equipmenteliminate cause of static (TVs, mixers, computers, fans, fluorescent lights, light dimmers, etc.) Parents Unit too far from Nursery Unitmove them closer. Channel settings do not matchset both units to same channel. Try other channel on both Parents Unit and Nursery unit. SHRILL NOISE (FEEDBACK): Nursery Unit and Parents Unit too close togethermove them farther apart. Volume set too highlower the volume. PARENTS UNIT DISPLAY LIGHTS STAY ON: Nursery Unit is offturn it on, or check AC adapter and power outlet. Parents Unit too far from Nursery Unitmove them closer. If you cannot solve the problem, please contact our Customer Service Department at 1-800-345-4109. Do not attempt to modify the unit. Any modifications to the transmitter and/or receiver can void the operators authority to operate the equipment. 15 16