1
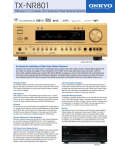
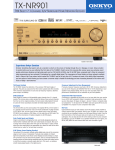
RF-Link
2.4GHz Digital Wireless
Color Security/Baby Monitor
Model: ABM-4161
User's Manual
1 Package Content
Camera x 1
Monitor x 1
Power Adapters x 2
Battery for Monitor ( 3.7V 1000mAH Li-ion ) x 1
User's Manual x 1
Figures and Quick Guide
Product Layout
Monitor (Fig. 1)
1. LCD screen
2. Antenna
3. VOX: Voice Operated Transmission button
4. Power indicator LED
5. Link indicator LED
6. Volume indicator LEDs
7. Speaker
8. VOX (Voice Operated Transmission) indicator LEDs
9. Brightness adjustment buttons
10. Power / Volume control
11. Power adapter socket
12. Battery compartment
13. Clamp / Stand
2 Camera (Fig. 2)
1. Antenna
2. Power indicator LED
3. Infrared LEDs
4. Lens
5. Supporting stand
6. Night-light button
7. Night-light
8. Microphone
9. Battery compartment
10. Power ON / OFF switch
11. Power adapter socket
3 Set Up
Camera Setup
1.1 Power Supply
Loading the Batteries (See Fig. 3)
1. Loosen the screw on the bottom of the camera by using a screw driver. (Step 1)
2. Open the battery compartment cover. (Step 2)
3. Insert 4 AAA-size batteries (follow the plus (+) and minus (-) signs inside the battery compartment). (Step 3)
Note : The camera uses either 4 AAA batteries (alkaline battery recommended) or AC power current.
4. Close the battery compartment cover, and make sure it is locked securely.
Note 1: Do not mix old batteries with new ones.
Note 2: Remove the batteries from the camera if you do not plan to use it for a prolonged period of time.
5. Slide the POWER switch to the ON position. The LED on the camera (red light) will light up. (Step 4)
Note: When battery power is sufficient, the light is constantly red; when it is low, the LED light will start blinking.
Using AC Power (See Fig. 4)
1. Plug one end of the power adapter into a wall outlet and the other end into the bottom of the camera. (Step 1, 2)
2. Slide the ON/OFF switch to the ON position. The LED on the camera (red light) will light up. (Step 3)
4 1.2 Fine Tuning (See Fig. 5)
Place the camera in a convenient location, point the lens towards the observation area and adjust the angle by rotating
the lens head.
1.3 Night light (See Fig. 6)
Press the night light button, the night light LEDs will remain ON.
5 1.4 Night vision
The camera has nine high-intensity LEDs for picking up clear images in the dark. When the built-in photo sensor detects
low ambient light levels, the LEDs will automatically activate.
Monitor Setup
2.1 Power Supply
Loading the Battery (See Fig.7)
1. Open the battery compartment cover on the rear of the monitor. (Step 1)
2. Insert the battery and make sure the polarity is correct. (Step 2)
Note: The monitor uses 3.7V 1000mAH (Li-ion) battery or the household AC power.
4. Turn the monitor on. (Step 3)
Note 1: When battery power is sufficient, the light is constantly red; when it is low, the LED light will start blinking.
Note 2: Remove the battery from the monitor if you do not plan to use it for a prolonged period of time.
5. Adjust the volume to a comfortable level.
Using AC Power (See Fig. 8)
1. Plug one end of the power adapter into a wall outlet and the other end into the bottom of the monitor. (Step 1, 2)
2. Turn the monitor on. (Step 3)
3. Adjust the volume to a comfortable level.
Note 1: When charging starts, the "POWER" LED will appear blue. If charging is finished (fully charged), the
"POWER"LED light will turn red.
Note 2: When the camera and the monitor is linked, the "Link" LED will become green; otherwise, the "Link" LED
will become red and blinking.
6 Note 3: "OUT OF RANGE" would be displayed on the LCD screen if the monitor is exceeds the range. (See Fig. 9)
2.2 Brightness Setting (See Fig. 10)
Adjust the Brightness selection button
/
to adjust brightness.
2.3 VOX (voice-operated transmission) Function (See Fig. 11)
1. Press the "VOX" button of the monitor. This will turn off the screen but the "VOX" LED will remain ON (blue).
2. When the sound from the camera reaches the set level, the screen will turn on automatically. It will turn off again after
30 seconds if no sound is detected.
7 Troubleshooting
You don't get a signal at all
•
Make sure the camera and the monitor are turned on.
•
Make sure the power plugs are pushed all the way in.
•
If the camera/monitor is powered by batteries, replace all batteries with new ones.
If the signal is poor, or there is interference
•
If there is a microwave oven in use in the path between the camera and monitor, remove the microwave oven or
turn it off.
•
Make sure the camera and the monitor is within range of each other (range of approximately 450 feet; 150 meters
in a clear line of sight).
•
If the power LED is on but only voice signal input is detected, the monitor can be in voice-activated mode. Press
the Auto button to turn on the screen.
Care and Maintenance
•
Keep all parts and accessories out of children's reach.
•
Fingerprints or dirt on the lens surface can adversely affect camera performances. Avoid touching the lens
surface with your fingers.
•
Should the lens become dirty, use a blower to blow off dirt and dust, or a soft, dry cloth to wipe off the lens.
•
Keep the camera dry. Precipitation, humidity, and other liquids contain minerals will corrode electronic circuits.
•
Do not use or store in dusty, dirty areas.
•
Do not store in hot areas. High temperatures can shorten the life of electronic devices and/or melt certain plastics.
•
Do not store in very cold areas. When the system warms up (to its normal temperature), moisture can form inside
the case, which may damage electronic circuit boards.
8 •
Do not attempt to open the case. Non-expert handling of the device may damage the system.
•
Avoid dropping or strong shocks.
•
Operate this product using only with the power supply included or provided as an accessory.
•
Do not overload electrical outlets or extension cords this can result in fire or electric shocks.
•
Do remember that you are using public airwaves when you use the system and that sound and video may be
broadcast to other 2.4 GHz receiving devices. Conversations, even from rooms near the camera, may be
broadcast. To protect the privacy of your home, always turn the camera off when not in use.
Warning: Changes or modifications to this unit not expressly approved by the party responsible for compliance could
void the user authority to operate the equipment.
To comply with FCC RF exposure compliance requirements, a separation distance of at least 20 cm must be maintained
between the antenna of this device and all persons. This Transmitter must not be co-located or operating in conjunction
with any other antenna or transmitter.
9