1
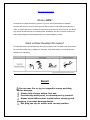
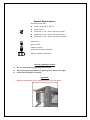
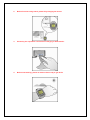
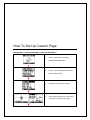
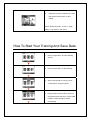
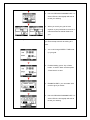
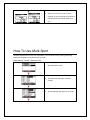
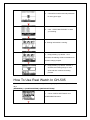
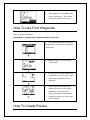
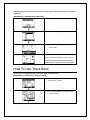
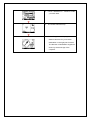
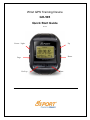
Wrist GPS Training Device
GH-505
Quick Start Guide
V 2.0
Power / Light
Up
Down
Page
Esc/Lap
Enter
http://www.gs-sport.com
What is GPS?
GPS stands for Global Positioning System. For 3D fix, we need at least four satellites.
Normally the accuracy of GPS under open sky which means no tall building and clear sky is
within 10 meters per second. Therefore, if the device shift 10 meter at that second, the device
may shows 36 kilometer per hour instant speed. Nowadays, the GPS consumer product has
built in adjust algorithm and assisted method to extend capability of GPS.
What is Water Resistant 50 meters?
It is wearable around household sinks, while playing sports, and in shallow water. It should not
be worn while scuba diving. Suitable for swimming, white water rafting, no snorkeling water
related work, and fishing.
Note!!
Do not near fire or lay on magnetic source avoiding
device damage.
Please fully charge before first use.
Considering waterproof, no decompose by yourself.
Please wipe USB connect inside before charging and
plugging to prevent damage device.
Put plug the clip to watch with correct position.
Symbol Explanations
GPS status indicator
z
Flash: No signal or 3D fix
z
Solid: 3D fix
z
Solid with 1 bar: 3D fix with poor signal
z
Solid with 2 bar: 3D fix with good signal
z
Solid with 3 bar: 3D fix with strong signal
Clock alert
Power meter
Cadence sensor
Heart rate monitor indication
Battery capacity indication
Note for Upgrading Firmware
z
Do not interrupt during upgrading the firmware
z
When the upgrading firmware fail, please go over the process again
z
Choose the firmware file carefully
CAUTION !
1.
Before connecting to device, please be aware of the direction
2.
Before first time using watch, please fully charging the device.
3.
Please dry the clip before connection of charging or data transfer.
4.
Before start training, please let antenna face to sky to get 3D fix
How To Set Up Custom Page
Set up the custom page and function list before your training.
[MAIN MENU] > [CONFIGURATION] > [SET CUSTOM PAGE ]
1.
Press ‘’Page button’’ to select
CONFIGURATION menu.
2.
Chose ‘’ SET CUSTOM PAGE’’ then
press ‘’Enter button’’.
3.
Modify the screen field number.
4.
There have four types of screen field
could be choose for every page.
5.
Select the function coefficient you want
then press ’Enter button’’ to save
setting.
Press ‘’ESC/LAP button’’ to exit or ‘’Page
button’’ to go back to main menu
How To Start Your Training And Save Data
1. Press ‘’Page button’’ to select training
screen.
2. Press ‘’Enter button’’ to start training.
3. When chronometer is running, press
‘’Enter button’’ quickly to pause.
4. Keep pressing ‘’Enter button’’ around 2
seconds till the screen show ‘’SAVE AND
FINSIH’’ means the file be saved
successfully.
5. Then chronometer will be reset to zero.
How To Use Virtual Trainer
In order to improve and enhance your training performance. GH-505 provides virtual trainer to
pretend your coach to improve your performance through mutual training and reaction.
[MAIN MENU] > [GYM] > [TRAINER]
There are three types to set your training
partner.
[DIST /TIME]
Set distance for 3 km and time for 15
minutes which means the virtual trainer will
finish 3km within 15 minutes to compete with
you.
1. You could change DIST / TIME to set up
your goal.
2. Finished setting, press ‘’Up or Down
button’’ to select ‘’Start’’ and then press
‘’Enter button’’ to start.
3. ENABLE ALERT ? you can select YES
or NO to give you a alert.
4. DO YOU RECORD RUNNING DATE ? If
select YES the chronograph will start to
record your training.
5. When you reach your goal or have
superior or poor performance to trainer, it
will show good job / do harder next time
[DIST /SPEED]
Set distance for 5 km and speed for 10 km/hr
which means you have to keep your speed
over 10km/hr.
1. You could change DIST / SPEED to set
up your goal.
2. Finished setting, press ‘’Up or Down
button’’ to select ‘’Start’’ and then press
‘’Enter button’’ to start.
3. ENABLE ALERT ? you can select YES
or NO to give you a alert.
4. DO YOU RECORD RUNNING DATE ? If
select YES the chronograph will start to
record your training.
5. When you reach your goal or have
superior or poor performance to trainer, it
will show ahead or behind distance to
you.
[SPEED /TIME]
Set speed 10km/hr and time 01:00:00 means
you have to keep 10km/hr to training till 1
hour.
1. You could change SPEED / TIME to set
up your goal.
2. Finished setting, press ‘’Up or Down
button’’ to select ‘’Start’’ and then press
‘’Enter button’’ to start.
3. ENABLE ALERT ? you can select YES
or NO to give you a alert.
4. DO YOU RECORD RUNNING DATE ? If
select YES the chronograph will start to
record your training.
5. When you reach your goal or have
superior or poor performance to trainer, it
will show ahead or behind distance to
you.
How To Use Multi-Sport
GH-505 could be use on Iron-man competition, you could set running, biking, swimming
training time/ speed on GH-505 to train yourself.
[MAIN MENU] > [GYM] > [MULTISPORT]
1. Press ’’Page button’’ to select
MULTISPORT screen.
2. There are five multi sport could be
chosen.
3. Set the training sport type as you want.
4. Choose filed number and set parameter
for every sport type.
5. Click ‘’ START MULTISPORT’’ to start
your training.
6. Training information is running.
7. Keep pressing ‘’Up button ‘’ for 2
seconds, the training will be on transition for
clothes change purpose.
8. Keep pressing ‘’Up button’’ another 2
seconds, the training will go on next
sport and then continue recording
process.
How To Use Real Watch In GH-505
GH-505 could be used as a real watch for digital or analog display. Watch mod operation for 14
days.
[MAIN MENU] > [CONFIGURATION] >[WATCH SETTINGS]
1. Chose ‘’WATCH SETTINGS’’ from
CONFIGRAITON menu.
2.
(A)There are three selections could be enter
to watch mode by 5 ,10 MINUTES. It means
watch mode will be entered after 5 or 10
minutes when system is stand by. OFF
means always in operation mode.
(B) The watch mode shows DATE, TIME
mode or you can press ‘’Page + Down
button’’ to enter watch mode.
3. Press Up or Down button could change
Analog or Digital type.
or
Digital mode
Analog mode
4. Press ‘’Up button ‘’and Page button’’ at
the same time around 2 seconds. You can
exit watch mode.
How To Create Waypoint And Save it
before start route
- Create Waypoint
[MAIN MENU] > [NAVIGATION] >[SAVE WAYPOINT]
1. You can save the current position. If the
GPS position is fixed, it shows the
longitude, latitude and elevation on the
screen.
3. Use Up and Down button to scroll to the
item you wish to modify and then use the
‘’Enter button’’ to select and confirm.
4. When you finish the modification, input a
“enter sign” character or press the ‘’Esc
/Lap button’’ to exit.
4.
Move highlight to "CONFIRM?" and
press ‘’Enter button’’ . The location
data will be stored in the memory
How To Use Find Waypoints
If you want to find the place which you have saved the waypoint, you can use this function to
find your waypoint and track it.
[MAIN MENU] > [NAVIGATION] >[FINW WAYPOINT] >[LIST ALL]
1.
Use Up and Down button to scroll to
the Waypoint you wish to go to and press
‘’Enter button’’.
2. Highlight "GOTO?" item and press
‘’Enter button’’.
3. You will see your current position and
destination point on the screen, and
those nearby waypoints are also
displayed.
4.
Press ‘’Page button’’ display the
distance and time for you to reach
destination on the right part of
screen. The direction of destination
waypoint is shown by the arrow sign
of the compass.
How To Create Routes
Several waypoints result in a route. You can plan your route by connection of sequent
waypoints.
[MAIN MENU] > [NAVIGATION] >[ROUTES]
1.
Press ‘’Enter button’’.
2. Choose the waypoint you want to go
3. After planed your route and then select
"FOLLOW?"
4. The screen will show map , you could
use’’ Up and Down button’’ to zoom in and
out the map view. Press ’’Enter button and
ESC button can slip to next or last waypoint.
How To Use Track Back
To use track can guide you go back along your training record.
[MAIN MENU] > [ACTIVITY] >[ACTIVITY INFO]
1.
You will see all data you saved, press ‘’
Enter button’’ to enter.
2. Click ‘’ TRACK BACK?’’ and then press
‘’Enter button’’.
3. Chose ‘’ Backward’’ or ‘’ Forward’’ to start
your track back.
4. The screen will show map
5.
Press ‘’Page button’’ display the
distance and time for you to reach
destination on the right part of screen.
The direction of destination waypoint is
shown by the arrow sign of the
compass.