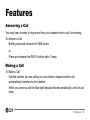
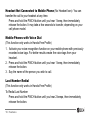
1
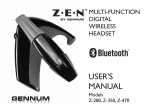
TM
Digital
Wireless
Headset
®
User’s
Manual
Models: 5000, 5500
Ear tip
Ear hook
Ear tip
Volume control (+)
(*switch feature)
SIDE button
BACK VIEW
Charging port /
Audio input port (Model 5500)
Volume control (-)
(*switch feature)
PINCH button
Dual microphone array
FRONT VIEW
* See “Switching Volume Control Buttons” on page 11.
TOP VIEW
TM
2
Powerful acoustic processing in a wireless headset!
Congratulations on your purchase of an nXZEN™ headset – the most technically
advanced hands-free wireless headset in the world. Your nXZEN headset delivers
the clearest voice quality, even in noisy traveling conditions. Your nXZEN headset
contains the most powerful Digital Signal Processor (DSP) available in any
Bluetooth® headset, enabling high performance and advanced features and
functions that keep you clearly connected with your world.
FrontWave™ Technology – the “cocoon of quality” around your voice
The nXZEN wireless headset uniquely shields your voice from extraneous noise
using twin microphones and the FrontWave Extreme patented algorithm.
FrontWave generates a "cocoon of quality" around your voice, using a near-field
acoustic beam that only transmits the sounds coming from the area of your mouth.
For optimum results, face away from the loudest or closest noise sources when
practical. This will significantly improve the quality of your transmitted voice, and
ensures a clear conversation in even the noisiest situations.
We hope you enjoy your new nXZEN wireless headset and will delight in the
clearly connected comfort that only the nXZEN wireless headset delivers!
TM
3
Contents
Powerful acoustic processing in a wireless headset! .......................................................... 3
FrontWave™ Technology – the “cocoon of quality” around your voice .............................. 3
Quick Start
Wearing Your Headset With the Ear Hook.......................................................................... 8
Wearing Your Headset Without the Ear Hook..................................................................... 8
Charging the nXZEN Headset............................................................................................. 9
Low Battery State Notification....................................................................................... 9
Turning the Headset On and Off ....................................................................................... 10
Adjusting the Digital Volume Control................................................................................. 10
Switching Volume Control Buttons ............................................................................. 11
Pairing the Headset and Multiple Pairings ........................................................................ 12
Initiate Bluetooth Connection...................................................................................... 13
Switching Between Previously Paired Devices........................................................... 13
Changing the Ear Tip ........................................................................................................ 14
Changing the Ear Hook..................................................................................................... 14
TM
4
Features
Answering a Call ...............................................................................................................
Making a Call ....................................................................................................................
Mobile Phones with Voice Dial ...................................................................................
Last Number Redial ....................................................................................................
Muting and Un-Muting the Microphone While on an Active Call.................................
Ending a Call.....................................................................................................................
Transferring the Call between Mobile Phone and Headset...............................................
Call Waiting .......................................................................................................................
15
15
16
16
17
17
18
18
Advanced Features
Stereo Music Audio Input (Model 5500)............................................................................ 19
Graphic Equalizer (Model 5500) ....................................................................................... 20
Safety Warnings ................................................................................................................ 21
Limited Warranty ............................................................................................................... 22
FCC Notice ........................................................................................................................ 24
Industry Canada Notice ..................................................................................................... 24
EU Notice .......................................................................................................................... 25
Specifications .................................................................................................................... 26
Gennum Contact Information ............................................................................................ 27
TM
5
Contents of this package
•
•
•
•
•
•
•
•
•
1 nXZEN Digital Wireless Headset
4 Ear Tips – 2 Small, 1 Medium, 1 Large
1 User's Manual
1 AC Wall Charger
2 Ear Hooks (different sizes)
1 Quick Reference Card
1 USB Charging Cable
1 Stereo Audio Cable (Model 5500 only – to connect to your CD/MP3 player)
1 Installation CD (Model 5500 only)
TM
6
Quick Start
The headset can be worn on either ear. Rotate the ear hook to wear the headset
on the left or right ear.
The volume control buttons can be switched so that the volume (+) button is
always the top button. See “Switching Volume Control Buttons” on page 11.
To change the ear tip, see “Changing the Ear Tip” on page 14.
To change or remove the ear hook, see “Changing the Ear Hook” on page 14.
TM
Quick Start
7
Wearing Your Headset With the
Ear Hook
1
1. Loop the ear hook behind your ear.
2. Press the headset's ear tip into your ear
until you have a snug fit.
3. Point the headset's microphones toward
your mouth.
2
Wearing Your Headset Without
the Ear Hook
1. Press the
headset's ear
tip into your
ear until you
have a snug fit.
2. Point the
headset's
microphones
toward your
mouth.
3
1
2
TM
8
Quick Start
Charging the nXZEN Headset
Before use, charge the headset using the supplied charger. The headset contains
a rechargeable battery.
1. Turn the headset off.
2. Connect the charger to the headset.
3. Connect the charger to the electrical wall outlet. The light indicator turns on
during charging. The light indicator turns off when the charge is complete
(approximately 2 hours).
4. Disconnect the charger from the wall outlet and the headset.
Low Battery State Notification
When you hear a beep (tone) every minute, your headset is warning you that
there is 15 minutes of battery life left. The warnings increase to every 10 seconds
when there is 5 minutes or less battery life. When the battery holds no charge the
headset powers off and needs to be recharged.
Caution: The nXZEN headset includes a lithium polymer rechargeable battery.
Use only the included charger and specified method for charging the battery. If
the headset is damaged beyond repair or the battery has reached the end of its
useful lifespan, dispose of the used battery in accordance with local regulations.
TM
Quick Start
9
Turning the Headset On and Off
To Turn the nXZEN Headset On
Press and hold the SIDE button until 2 quick flashes of blue light occur,
followed by a 3-second flash. A series of ascending tones (low to high) can be
heard from your headset.
To Turn the nXZEN headset Off
Press and hold the SIDE button until 4 quick flashes of blue light occur, or 4
beeps followed by 5 descending tones (high to low) can be heard from your
headset.
Adjusting the Digital Volume Control
When on a call, the volume control on your headset is synchronized to the volume
on your phone. That is, as you change the volume you see the volume bars on
your phone change accordingly. However, if you change the volume control on
your phone, it has no effect on the headset volume level.
To Increase Volume
Press and release the volume control (+) button for slight volume increase.
Press and hold down the volume control (+) button for continuous increase.
TM
10 Quick Start
To Decrease Volume
Press and release the volume control (-) button for slight volume decrease.
Press and hold down the volume control (-) button for continuous decrease.
You will hear a single beep on your headset when you have reached the top or
bottom of the volume range.
Switching Volume Control Buttons
The headset volume (+) control is the top button for a right ear fit. The volume
control (+) button can be switched when you wear the headset on your left ear.
To Switch Volume (+) and Volume (-) button controls
Press both buttons at the same time until your headset plays a ‘volume switch
successful’ melody.
TM
Quick Start 11
Pairing the Headset and Multiple Pairings
1. Turn the headset on.
2. Press and hold the PINCH button until you hear 4 beeps or see 4 flashes, then
release the button. The blue light indicator is on when the headset is in pairing
mode.
3. Activate your mobile phone's/device's Bluetooth feature.
4. Follow the phone's instructions for pairing. The phone displays a message
"nXZEN", when the headset is detected.
5. Follow the phone's instructions to accept the pairing.
The PIN code or PASSKEY is 0000.
6. Pairing is successful when you hear your headset play a "pairing successful"
melody and the light indicator turns off. The mobile phone may display a
message "pairing successful" and may display a headset icon, "nXZEN".
(Refer to your phone's user manual.)
7. Repeat steps 1 to 5 to pair with up to two additional phones or devices.
TM
12 Quick Start
Initiate Bluetooth Connection
Depending on your phone model, you may have to initiate a Bluetooth connection
using the phone. Select "connect to Bluetooth device" from your phone or press
and hold the PINCH button on your headset until you hear a single beep, then
release the button.
If you encounter difficulties pairing the headset with your mobile phone, visit our
website zen.gennum.com or consult your dealer.
Switching Between Previously Paired Devices
Your headset can be paired with up to 3 Bluetooth phones or devices but
connected to only one phone or device at a time.
To Switch the headset between paired phones/devices
1. Turn on your headset.
2. Turn on the other phone/device. Note that your other phone or device is
already paired with your headset. Please refer to “Initiate Bluetooth
Connection” on page 13.
TM
Quick Start 13
Changing the Ear Tip
With one hand, firmly grasp the end of the ear tip between your thumb and index
finger. With the other hand, grasp the body of the headset. Remove the ear tip
with a gentle tug. To replace the ear tip,
reverse this procedure by aligning the hole in
the ear tip and pushing it on the ear piece
end until it is firmly seated in position.
Note: To replace the translucent ear tip, first
pull back the flanges, then replace it as
described above.
flange
Changing the Ear Hook
Firmly grasp the end of the ear hook between
your thumb and index finger. Squeeze the end of
the ear hook and gently slide the end of the ear
hook out.
To replace the ear hook, align the end of the ear
hook with the holes on the back of the headset
and then gently slide the ear hook in.
TM
14 Quick Start
Features
Answering a Call
You may hear a series of ring tones from your headset when a call is incoming.
To Answer a Call
Briefly press and release the SIDE button
or
Press and release the PINCH button after 1 beep.
Making a Call
To Make a Call
Dial the number you are calling on your phone's keypad and the call
automatically transfers to the headset.
When you are on a call the blue light indicator flashes periodically until the call
ends.
TM
Features 15
Headset Not Connected to Mobile Phone (No Headset Icon): You can
transfer the call to your headset at any time.
Press and hold the PINCH button until you hear 1 beep, then immediately
release the button. It may take a few seconds to transfer, depending on your
cell phone model.
Mobile Phones with Voice Dial
(This function only works in Hands-Free Profile)
1. Activate your voice recognition function on your mobile phone with previously
recorded voice tags. For better results create the voice tags from your
headset.
2. Press and hold the PINCH button until you hear 1 beep, then immediately
release the button.
3. Say the name of the person you wish to call.
Last Number Redial
(This function only works in Hands-Free Profile)
To Redial Last Number
Press and hold the PINCH button until you hear 2 beeps, then immediately
release the button.
TM
16 Features
Muting and Un-Muting the Microphone While on an Active Call
To Mute the Call
Briefly press and release the PINCH button. A single beep followed by
periodic beeps is heard, indicating the headset is muted.
To Un-mute the Call
Briefly press and release the PINCH button. The periodic beeps heard from
your headset stops, indicating that the call has been un-muted.
Ending a Call
To End a Call
Briefly press and release the SIDE button
or
Press and release the PINCH button after 3 beeps.
TM
Features 17
Transferring the Call between Mobile Phone and Headset
(This function only works in Hands-Free Profile)
To Transfer the Call from the Headset to the Phone
Press and hold the PINCH button until you hear 1 beep, then immediately
release the button.
To Transfer the Call from the Phone to the Headset
Press and hold the PINCH button until you hear 1 beep, then immediately
release the button. There may be a few seconds delay before the call is
transferred.
Call Waiting
(This function only works in Hands-Free Profile)
To Accept the Waiting Call and place the First Call On-Hold
Press and hold the PINCH button until you hear 1 beep, then immediately
release the button.
To Swap Between the Active and the Held Call
Press and hold the PINCH button until you hear 1 beep, then immediately
release the button.
TM
18 Features
Advanced Features
Stereo Music Audio Input (Model 5500)
This feature allows you to listen to stereo music through your headset. On an
incoming call, the music will be muted to allow you to hear the ring tones and
answer the call. At the end of the call, the music will be un-muted.
To Connect Your Music Player
Connect the CD or MP3 music player into your headset by using the provided
audio interface cable.
To Activate Stereo Mode
Press the SIDE button for 2 beeps. Adjust the volume level on the audio
device as required.
To Exit Stereo Mode
Press the SIDE button for 2 beeps.
TM
Advanced Features 19
Graphic Equalizer (Model 5500)
The graphic equalizer allows you to customize the sound you hear in each mode
of operation: Stereo Music or Phone.
To Use the Graphic Equalizer
Install the application and follow the PDF instructions from the provided CD.
TM
20 Advanced Features
Safety Warnings
• This package contains small parts which may be hazardous to children under 3.
• Headsets encourage hands-free operation of phones while driving or conducting other activities. You should nonetheless ensure you obey the laws regarding
cell-phone use while driving, and give your full attention to the operation of your
vehicle.
• Do not attempt to use this device if it is submerged in liquid. Immediately unplug
all electrical connections.
• Users with pacemakers or other electrical medical devices should consult with
their physicians before using cell-phones or a headset.
• The use of wireless devices and their accessories may be prohibited or
restricted in certain areas. Always obey the laws and regulations on the use of
these products.
TM
21
Limited Warranty
Gennum Corporation warrants that your headset will be free from defects in material or
workmanship for a period of one (1) year from the date of purchase, under normal use and
conditions. During this period, if the headset is found to be defective in materials or
workmanship,Gennum will repair or replace it, at the sole option of Gennum, at no charge to
you. If Gennum determines that it is not possible to repair or replace the headset, it may, at its
sole option, refund the purchase price paid for the headset.
Gennum manufactures its hardware products from parts and components that are new or
equivalent to new in accordance with industry standard practices.
THESE ARE THE SOLE AND EXCLUSIVE REMEDIES FOR BREACH OF WARRANTY BY
GENNUM. IN NO EVENT SHALL GENNUM BE LIABLE FOR DAMAGES EXCEEDING THE
SALE PRICE FOR YOUR HEADSET.
You are responsible for packing the defective headset properly in the original packaging, and for
the cost of shipping. A copy of the original receipt must be included. Shipping instructions will be
given by technical support at Gennum. For all warranty and service related matters, please see
the Gennum Contact Information on the last page of this manual. Warranty repairs are
completed at no charge for parts or labour, and Gennum will pay the cost of shipping the
repaired or replaced product back to you. Warranty repairs may use new or refurbished
replacement parts. Goods will not be accepted for return for non-warranty reasons without the
express prior written approval of Gennum. Gennum reserves the right to make the final decision
on any warranty claim that may be questionable. This limited warranty does not cover and
Gennum will not be responsible for failures or defects due to misuse, neglect, abuse, accidents,
TM
22
alterations, improper or unauthorized installation or service, unauthorized removal or repairs,
failure to follow instructions, fire, floods, acts of God, or spills of food or liquids.
EXCEPT FOR THE EXPRESS LIMITED WARRANTY PROVIDED ABOVE, THE HEADSET,
FIRMWARE, SOFTWARE, WALL CHARGER WITH ADAPTERS, REPLACEMENT EAR TIPS
AND WRITTEN MATERIALS ARE PROVIDED "AS IS" WITHOUT REPRESENTATION,
CONDITION OR WARRANTY OF ANY KIND, WHETHER EXPRESS, IMPLIED OR
STATUTORY, AND GENNUM SPECIFICALLY EXCLUDES ALL OTHER CONDITIONS AND
WARRANTIES, INCLUDING BUT NOT LIMITED TO IMPLIED CONDITIONS AND
WARRANTIES OF MERCHANTABILITY AND FITNESS FOR A PARTICULAR PURPOSE. IN
NO EVENT SHALL GENNUM BE LIABLE FOR ANY INDIRECT, INCIDENTAL, SPECIAL OR
CONSEQUENTIAL DAMAGES ARISING DIRECTLY OR INDIRECTLY IN CONNECTION
WITH THE HEADSET, THE USE OF THE HEADSET OR OTHERWISE, WHETHER FOR
LOSS OF PROFITS, BUSINESS REVENUES OR OTHERWISE.
This warranty sets forth the entire responsibility of Gennum with respect to the headset,
firmware, and software, wall charger with adapters, replacement tips and written materials. Your
exclusive remedy is repair, replacement or refund as stated herein. In no event shall Gennum's
liabilities exceed the cost of correcting defects as provided herein and any such liabilities will
terminate upon expiration of the warranty period. This warranty is valid only when the headset is
purchased from a Gennum Authorized Dealer, and applies only to the original purchaser.
Headsets with the serial number or model designation removed, altered, replaced or defaced
are not covered by this warranty.
TM
23
FCC Notice
This device contains FCC ID SD7GR2316 which complies with part 15 of the FCC
Rules. Operation is subject to the following two conditions:
1. This device may not cause harmful interference, and
2. This device must accept any interference received, including interference that
may cause undesired operation.
Changes or modifications not expressly approved by the party responsible for
compliance could void the user's authority to operate the equipment. Please refer
to the zen.gennum.com website for more information.
Industry Canada Notice
This device contains IC: 6022A-GR2316 which complies with RSS 210 of Industry
Canada. Operation is subject to the following two conditions: (1) this device may
not cause harmful interference, and (2) this device must accept any interference
received, including interference that may cause undesired operation.
TM
24
EU Notice
DECLARATION OF CONFORMITY
In accordance with Annex IV of the EU directive 1999/5/EC, Gennum Corporation
declares under our responsibility that the product:
Type:
Intended Purpose:
Equipment Class:
5000, 5500
Bluetooth Headset
1
complies with the appropriate essential requirements of the Article 3 of the R&TTE
and the other relevant provisions, when used for its intended purpose. Please
refer to the zen.gennum.com website for more information.
TM
25
Specifications
Typical Weight:
16 grams
Size:
length 59.9mm, height 28.5mm
DSP Performance:
120MIPS
Stereo:
16 kHz audio bandwidth processor
Audio Path:
20-bit end-to-end path
Typical Talk Time:
up to 7 hours
Typical Standby Time:
100 hours (from a full charge)
Typical Recharge Time: 2 hours (from a full discharge)
Battery:
Lithium Polymer
Four-Button Operation
Multiple Device Pairing
Design and specifications are subject to change without notice.
TM
26
Gennum Contact Information
To download the latest version of this manual or to contact our Customer Support
Centre please visit our website at nxzen.com
Corporate Address:
Gennum Corporation
970 Fraser Drive, Burlington, Ontario, Canada L7L 5P5
www.gennum.com
TM
27
Trademarks™ and Registered Trademarks®
The Bluetooth® word mark and logos are owned by the Bluetooth SIG, Inc. and any use of such
marks by Gennum Corporation is under license. The nXZEN and FrontWave Extreme
trademarks are owned by Gennum Corporation.
© Copyright 2005 Gennum Corporation. All rights reserved. Printed in Canada.
36343 - 4