1
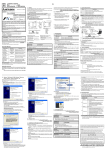
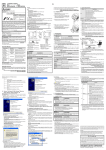
GE Appliances
Water Filtration System
Owner’s Manual
and Installation
GNUL30B
GNUT05B
GXEM01B
Faucet & Base
GNUT05B and GNUL30B are
Tested and Certified by NSF
International against ANSI/NSF
Standard 42 for Particulate
Reduction Class I, Chlorine
Reduction Class I and Taste
and Odor Reduction.
GNUL30B is Tested and Certified
by NSF International against
ANSI/NSF Standard 53 for Cyst,
Turbidity and Lead Reduction.
GXEM01B is Tested and Certified
by NSF International against
ANSI/NSF Standard 42 for
materials and structural integrity
requirements only.
Part No. 215C1044P006-1 Pub. No. 49-50023-2
7205716
4-99 JR
Troubleshooting Tips
Installation Instructions
Operating Instructions
Safety Instructions
Safety Information . . . . . . . . . . . 3
Welcome to the GE family. We’re proud of our quality products and we are
committed to providing dependable service. You’ll see it in this easy-to-use Owner’s
Manual and you’ll hear it in the friendly voices of our customer service department.
Best of all, you’ll experience these values each time you use the Water Filtration
system. That’s important, because your new system will be part of your family for
many years. And we hope you will be part of ours for a long time to come.
Operating Instructions
. . . .4–7
Specification Guidelines . . . . . . . . . . . . .4
Using the System . . . . . . . . . . . . . . . . . .5
Filter Cartridge Replacement . . . . . . . . . .6
Flush Procedure . . . . . . . . . . . . . . . . . . . .7
Installation Instructions . .8–12
Important Recommendations . . . . . . . . . .8
Tools/Materials Required . . . . . . . . . . . . .8
Step-by-Step Instructions . . . . . . . . .9–11
Feed Water Supply . . . . . . . . . . . . . . . . .9
Faucet Installation . . . . . . . . . . . . . . . .10
Wall Mounting . . . . . . . . . . . . . . . . . . .11
Tubing Connection . . . . . . . . . . . . . . . .11
Filter Cartridge Replacement . . . . . . . .12
Troubleshooting Tips
Before You Call For Service . . . . . . . . . . .13
We thank you for buying GE. We appreciate your purchase, and hope you will
continue to rely on us whenever you need quality appliances for your home.
IMPORTANT!
Fill out and return the Consumer Product Registration Card that is
packed with this product. If you cannot find it, please send in the
duplicate card printed in the back of this manual.
FOR YOUR RECORDS
Write the model and serial numbers here:
#
#
You can find them on the sump bracket.
Staple sales slip or cancelled check here.
Proof of the original purchase date is needed to obtain service under
the warranty.
READ THIS MANUAL
Inside you will find many helpful hints on how to use and maintain
your water system properly. Just a little preventive care on your part
can save you a great deal of time and money over the life of your
system.
IF YOU NEED SERVICE
Customer Service
Customer Service
Congratulations!
You are Now Part of the GE Family.
Product Registration . . . . . . . . . . . . .15, 16
Parts List . . . . . . . . . . . . . . . . . . . . . .17, 18
Warranty . . . . . . . . . . . . . . . . . . . . . . . . .19
Service Telephone
Numbers . . . . . . . . . . . . . . . . . . . . . . . . .20
2
You’ll find many answers to common problems in the Before You
Call For Service section. If you review our chart of Troubleshooting Tips
first, you may not need to call for service at all.
If you do need service, you can relax knowing help is only a phone
call away. A list of toll-free customer service numbers is included in
the back section.
Safety Instructions
IMPORTANT SAFETY INFORMATION.
READ ALL INSTRUCTIONS BEFORE USING.
your safety, the information in this manual must be followed to minimize the risk of
WARNING! For
property damage or personal injury.
SAFETY PRECAUTIONS
■ Use the Water Filtration system on a potable,
safe-to-drink, home COLD water supply only.
The filter cartridges will not purify the water,
or make it safe to drink.
WARNING: Do not use with water that is
microbiologically unsafe or of unknown quality
without adequate disinfection before or after
the system. Systems certified for cyst reduction
may be used on disinfected water that may contain
filterable cysts.
■ Do not use on a hot water supply (100°F. max.).
This Water Filtration system must be properly installed and located in accordance with the Installation
Instructions before it is used.
■ Install or store where it will not be exposed to
temperatures below freezing or exposed to any
type of weather. Water freezing in the system
will damage it. Do not attempt to treat water
over 100°F.
■ Your Water Filtration system will withstand up to
125 pounds per square inch (psi) water pressure.
If your house water supply pressure is higher than
100 psi, install a pressure reducing valve before
installing the Water Filtration system.
WARNING: Discard all unused and packaging
material after installation. Small parts remaining
after installation could be a choke hazard.
Installation Instructions
PROPER INSTALLATION
Operating Instructions
■ Check with your local public works department
for plumbing codes. You must follow these
guidelines as you install the Water Filtration
system.
Troubleshooting Tips
Read and follow this Safety Information carefully.
SAVE THESE INSTRUCTIONS
Customer Service
3
Many bad tastes and/or odors are removed
from water using activated carbon filter
cartridges. They are most often used to
remove a chlorine taste and odor. They can
also reduce other undesirable elements
from drinking water supplies, such as
organic chemical contaminants and lead.
NOTE: Small amounts of hydrogen sulfide
(noticeable as “rotten egg” odor) may be
reduced by taste and odor filters for a short
time, but the carbon media is quickly
exhausted. Other water conditioning
equipment is usually required for the
continuous treatment of hydrogen sulfide.
The Water Filtration system uses two filter cartridges.
Filter IIa. FXUTB—(Optional filter choices)
Filter I. FXUSB—a sediment filter cartridge
a taste and odor filter cartridge
• Reduces dirt, rust and sediment
• 6000 gallons
Operating Instructions
Safety Instructions
Specification guidelines.
• Reduces unpleasant tastes and odors
• Reduces 99.5% chlorine
• 1 micron, carbon block
IIb. FXULB—a lead/cyst filter cartridge
• 1250 gallons
• Reduces 95.7% lead
Installation Instructions
• Reduces 99.5% chlorine
• Reduces 99.98% filterable cysts (such as
cryptosporidium and giardia)
• Reduces turbidity by 99.7%
• Absolute (>99.9%) one-micron carbon
block
Troubleshooting Tips
Minimum - Maximum Supply Water Pressure—40–125 pounds per square inch (psi)
Minimum - Maximum Supply Water Temperature—40–100°F.
Inlet - Outlet—3/8″ NPT, fittings and tubing included
Maximum Filtered Water Flow—0.6 gpm
Customer Service
Depending on the treatment needed for a specific water supply, the water filtration system can be
customized using any combination of the preceding filter cartridges.
4
Safety Instructions
About the water filtration system.
Using the Water Filtration System and About the Filter Cartridge
The countertop faucet dispenses filtered drinking
water when opened. It has a hand-operated, springloaded closed lever to prevent waste. You can keep
the faucet open by pushing upward on the lever to
lock it against the faucet spout.
Filtered water faucet
Open
Lock
open
Operating Instructions
Filter Cartridge Life—Several variables determine
how long the cartridges will last in your Water
Filtration system. These include:
1 How much water you use.
How much sediment, taste and/or odor, lead, or
2 other
unwanted substance, is in the water.
Installation Instructions
No matter which Water Filtration system you have,
you should replace the cartridges every six months,
when indicated by the electronic indicator light on
the base. In extremely poor water supplies, you may
notice the return of the unwanted substance in
your water before the six months are up. In this
case the cartridges should be replaced
immediately. If the system is also for lead or
chemical contaminant removal, it is MORE
IMPORTANT to replace the cartridges at least every
six months.
NOTE: If the water supply contains high amounts of
sediments, the carbon filters may plug with them,
reducing filtered water flow to the system faucet.
Cartridge replacement is needed to restore flow.
After about six months, the indicator light begins
to flash. It is time to replace the filter cartridges.
When replacing the filter cartridges, also replace
the batteries in the battery pack. Two “AA”
batteries are required.
Troubleshooting Tips
Electronic Indicator Light—The electronic indicator
light on the base of the faucet is a six month timer
that shows you when to replace the filter cartridges.
When the battery pack is first installed, the
indicator light will light briefly to show that the
electronics are operating. If this does not happen,
the batteries may be installed backwards or the
leadwires are not connected.
Indicator light
Customer Service
5
Safety Instructions
About the water filtration system.
Filter Cartridge Replacement
CAUTION: Never remove the sumps when water pressure is in the Water Filtration system.
the water supply/saddle valve to the filter. (See Fig. 1 in the Installation Overview section
1 Close
for location of the saddle valve.) Open the filtered water faucet.
the sump, using the sump wrench tool provided, from the filter head by rotating the
2 Remove
sump as shown in the below illustration. Be careful, the sump may be full of water. Be sure to
Operating Instructions
keep the large o-ring seal.
Bracket
Head
Cartridge
O-ring seal
Sump
Sump
Turn sump wrench tool
provided clockwise
Sump
TURN SUMP
TO REMOVE
Filter Ι
Installation Instructions
TURN SUMP
TO INSTALL
Label
Filter ΙΙ
3 If you are replacing a filter cartridge, remove and discard the used filter cartridge.
sure the inside of the sump is clean. Thoroughly wash the inside of the sump with hot,
4 Be
soapy water and rinse.
the wrapper from the new filter cartridge and insert the filter cartridge in the sump.
5 Remove
Some cartridges fit either way, while others fit only one way. Observe markings on the
cartridge.
NOTE: The Water Filtration system uses two different types of filter cartridges. Be sure to
install them correctly.
The sediment (FXUSB) filter cartridge should always be placed in the Filter Ι sump.
Troubleshooting Tips
lubricate the o-ring seal in the sump with clean silicone grease. Be sure it is fully
6 Lightly
seated in its groove.
the sump up to the filter head, aligning the center hole in the cartridge with the
7 Hold
protrusion on the bottom of the head.
careful not to cross-thread, rotate the sump onto the filter head and tighten securely
8 Being
by hand.
NOTE: If the sump will not tighten up to the head, you may have the cartridge in upside
down. Take the cartridge out and check for correct orientation.
Repeat steps 2 through 8 for the taste/odor (FXUTB) or lead/cyst (FXULB) filter cartridge in the
9 Filter
ΙΙ sump.
on the filtered water faucet. Then, slowly open the water supply/saddle valve and allow
10 Turn
the filter housing to fill.
Customer Service
11 Close the filtered water faucet. Then, check for leaks between the sump and the head.
NOTE: If leaking, turn off the water supply and turn on the filtered water faucet. Disassemble
the filter and check the o-ring for cuts, flat spots, etc., and sealing surfaces for foreign
material. Clean the o-ring and lightly lubricate with clean silicone grease. Carefully press
into the groove in the sump.
you are replacing the batteries, remove, properly discard and install two new “AA”
12 Ifalkaline
batteries in the battery pack. Removing the batteries or momentarily disconnecting
the leadwires resets the six month electronic timer.
6
filter cartridges contain activated carbon. When new, turn on the filtered water faucet
13 The
for ten minutes to flush the system.
Safety Instructions
Flush Procedure
Whenever water of unknown quality is passed through the GE Water Filtration system, filter elements
should be discarded and the filtration system flushed.
Circumstances that may require flushing the system are:
■ Boil-water advisory.
■ Flooding of the GE Water Filtration system.
■ Long-term non-use.
Operating Instructions
The procedure for flushing the GE Water Filtration system is:
1 See Filter Cartridge Replacement section and follow steps 1, 2, 3, and 4.
reinstall the sumps (without the filter elements), turn water on, and flush water through the
2 Next,
faucet for one minute.
3 Then, turn water off, remove sumps, empty water out of sumps and install new filter elements.
4 Follow steps 6–9 in the Filter Cartridge Replacement section to complete.
Installation Instructions
Troubleshooting Tips
Customer Service
7
Safety Instructions
Installation Instructions
Important Installation Recommendations
Read entire manual. Failure to follow all guides and rules could cause personal injury or property damage.
■ Check with your local public works department for plumbing codes. You must follow their guides as you install
the Water Filtration system.
■ Use the Water Filtration system on a potable, safe-to-drink, home COLD water supply only. The filter cartridges will
not purify water or make unsafe water safe to drink. DO NOT use on HOT water (100° F. max.).
Operating Instructions
■ Your Water Filtration system will withstand up to 125 psi water pressure. If your house water supply pressure is
higher than 100 psi during the day (it may reach higher levels at night), install a pressure reducing valve before
the system.
Installation Instructions
■ Protect the Water Filtration system and piping from freezing. Water freezing in the system will damage it.
■ Slotted and Phillips screwdrivers
Contents included with the product:
■ Pliers and adjustable jaw wrench
■ Water filter assembly, including mounting bracket
and screws
WARNING: Do not use with water that is microbiologically unsafe or of unknown quality without
adequate disinfection before or after the system. GNUL30 is certified for cyst reduction and may be used
on disinfected water that may contain filterable cysts. The water should be tested periodically to verify
that the system is performing satisfactorily. Small parts remaining after the installation could be a choke
hazard. Discard safely.
Tools and Materials Required for Installation
■ Hand or battery powered drill and 1 ⁄ 4 ″ bit
(saddle valve installation)
■ Electric drill and drill bit to drill 1″-1 1 ⁄ 4 ″ hole
(type as required) if mounting hole is needed for
faucet
Troubleshooting Tips
CAUTION: To avoid damaging the sink, consult
a qualified plumber or installer for drilling
procedures. Special drill bits may be needed
for porcelain or stainless steel.
■ Product Literature (Owner’s Manual and
Installation, Product Data Sheet, Owner Product
Registration Card)
■ Water supply/saddle valve
■ Filtered water faucet, for sink or countertop
mounting including an electronic indicator faucet
base and battery pack
■ 3 ⁄ 8 ″ tubing and fittings to make all needed
connections
■ Sump wrench
Installation Overview
Washer
Fig. 1
Locate the drinking water
system on the cold water
supply pipe, under the
kitchen and/or bathroom
sink, to filter the cold
drinking water.
Filtered
water faucet
Adapter
Nut
Sink
Tubing
Battery pack
Water out
Water supply valve
Customer Service
Hot Cold
Shutoff valve
NOTE:To change the filter cartridge, you
must turn off the water. A nearby shutoff
valve is convenient. Most sinks already have
shutoff valves on the supply pipes.
Water in
Insert
Nut
Filter ΙΙ
Tubing
Filter Ι
8
Mounting
screw (2)
Feed Water Supply
Check and comply with local plumbing codes as you plan, then install a cold feed water supply fitting. For new
home installation using standard plumbing fittings, see Fig. 2A below. A typical installation for existing
homes using the saddle valve is shown in Fig. 2B below.
A. PREFERRED INSTALLATION
Turn off the cold water supply.
Complying with plumbing codes, install a
2 fitting
on the cold water pipe to adapt 3 ⁄ 8 ″ OD
1
Fig. 2A.
Preferred water supply connection
(using compression fitting)
Typical location
Water supply valve
Insert
Operating Instructions
tubing. A typical connection is shown in Fig. 2A
(parts not included). Make sure a water supply
valve is used.
Safety Instructions
Step-by-step installation instructions.
Ferrule
Cold
water
3⁄8″ tubing to inlet
1
2
3
shock, use a battery powered
hand drill only to make the
hole. DO NOT USE AN
ELECTRIC DRILL.
Fig. 2B. Optional water supply connection (using saddle valve)
Pre-drill
1⁄4″ hole
Troubleshooting Tips
B. OPTIONAL HOME INSTALLATION Where codes permit
NOTE: Codes in the state of Massachusetts require installation by a licensed plumber and do not
permit the use of the saddle valve. For installation, use plumbing code 248-CMR of the Commonwealth
of Massachusetts.
Turn off the cold water supply
Close the water supply valve by
Open the main water supply
and attach saddle valve as
turning the handle clockwise.
valve and several house
shown in Fig. 2B.
faucets to purge air from the
system. Close faucets when
DANGER: To protect yourself
water runs smoothly.
from serious injury or fatal
Installation Instructions
Cold
water
pipe
Seal—make sure the
seal is in place
Customer Service
Nut (2)—not required if
holes in clamp are threaded
Clamp X
Valve
Clamp Z
Washer
Handle
Tubing adapter
Compression nut
Use to connect the tubing
❵
9
Safety Instructions
Step-by-step installation instructions.
Electronic Faucet Installation
Fig. 3A.
Screw (2)
Be sure there is room underneath the sink to make the
needed connections. Select one of the following places to
install the faucet:
Faucet
base
—IN an existing sink spray attachment or soap dispenser
hole.
—IN a hole to be drilled in the sink top.
Nut (2)
Operating Instructions
—IN a hole to be drilled in the countertop, next to
the sink.
Installation Instructions
NOTE: Looking at Fig. 3D, be sure the faucet base will fit
flat against the surface at the selected location so the
gasket will seal. The base may have to be angled sideways
or diagonally.
1
If drilling is needed, make a 1″-1 1 ⁄ 4 ″ dia. hole. Be
sure to use the proper procedure for drilling porcelain
or stainless steel. Special drill bits may be needed.
2
Looking at Fig. 3A, insert a screw into the NONSLOTTED base mounting hole. Turn a flat nut
a few turns onto the screw.
3
Position the base gasket over the mounting hole. Set
the base on the gasket, routing the leadwire through
the mounting hole. Holding the flat nut under the
sink with one finger, tighten the screw until just snug.
Customer Service
Troubleshooting Tips
4
Turn the remaining flat nut a few turns onto
the other screw. Position the screw in the slotted base
mounting hole and tighten until snug. Make sure the
gasket position is properly aligned and carefully tighten
both screws until the base is held firmly in place. Do
not overtighten and break the base.
5
Assemble the top faucet base and hex nut onto the
faucet stud (Fig. 3C). Tighten the nut until snug.
6
Insert washer into tubing adapter. Securely tighten to
faucet stud.
7
Feed the length of 3⁄8″ OD tubing from the bottom,
up through the faucet base. Connect to the tubing
adapter as shown in Fig. 3D., tightening the
compression nut securely.
8
Remove the short shipping tube and insert the spout
into the faucet body.
9
Lower the faucet assembly and lock into place
on the faucet base.
TOP VIEW
Fig. 3B.
Screw (2)
Nut (2)
1″-1 1/4″ dia.
mounting
hole in sink or
countertop
Faucet
base
Gasket
Fig. 3C.
ASSEMBLED
Spout
Lever
Faucet
Faucet stud
Top faucet base
Hex nut
Washer
Tubing
adapter
Compression
nut
Compression nut
3/8″ tubing, (run
to Filter 2 outlet)
Faucet base
10
Base leadwire connector
(to battery pack)
Fig. 3D.
The bracket can be used as a template for marking the location of the mounting screws. When determining
the location of the bracket make sure you leave 1-1 ⁄ 2 ″ to 2″ of free area under the sumps to allow for sump
removal and enough space on either side to make the tubing connections.
Make Tubing Connections
the length of 3⁄8″ tubing, connected to the bottom of faucet, to the filter system outlet, Fig.1 in the
1 Run
Installation Overview section. Allow enough slack in the tubing to be able to place the system on the floor
2 Slide a compression nut onto the end of the tubing and push a tubing insert into the tubing.
3 Connect the tubing and tighten the compression nuts securely.
the preceding steps to connect a length of tubing between the filter system inlet and the water
4 Repeat
supply/saddle valve, Fig. 1 in the Installation Overview section.
Fig. 4
7-9⁄16″
Installation Instructions
Tubing
connector
Mounting
bracket
Mounting
screws
Tubing
connector
Sump
Sump
Filter ΙΙ
Filter Ι
Battery Pack Installation and Connection
In a dry location, within reach of the electronic base 3′ leadwire, select a place for the battery pack (see
Fig. 1 on page 8). The battery pack attaches to most surfaces, using the included “sticky-back” Velcro™
strip.
Customer Service
battery pack uses two size “AA” batteries. Check to be sure they are installed correctly. Then,
2 The
remove the paper backing on the Velcro™ strip and secure the pack in place.
3 Fasten electronic base leadwire and battery pack connector together.
Troubleshooting Tips
1-1⁄2″ to 2″
1
Operating Instructions
in front of the sink. Measure and cut the end of the tubing square.
Safety Instructions
Mounting Bracket to Cabinet Wall
11
Filter Cartridge Installation or Replacement
CAUTION: Never remove sumps with water pressure in the Water Filtration system.
1 Close the water supply/saddle valve (Fig. 1 and 2A) to the filter. Open the filtered water faucet.
the sump off of the filter head as shown (use the sump wrench provided). Be careful, the sump
2 Turn
is full of water. Locate and save the large o-ring seal. Remove and discard the used filter cartridge.
3 Be sure the inside of the sump is clean. Thoroughly wash with hot, soapy water and rinse.
the wrapper and labels from the new filter cartridge and insert the filter cartridge in the sump.
4 Remove
Some cartridges fit either way, while others fit only one way. Observe markings on the end of the cartridge.
Operating Instructions
Safety Instructions
Step-by-step installation instructions.
The sediment (FXUSB) filter cartridge should always be placed in the Filter I sump.
lubricate the o-ring seal, in the sump, with clean silicone grease. Be sure it is fully seated in its
5 Lightly
groove.
the sump up to the filter head, aligning the center hole in the cartridge with the protrusion on the
6 Hold
bottom of the head.
NOTE: If the sump will not tighten up to the head, you may have the cartridge in upside down. Take the
cartridge out and check the markings on the end of the cartridge for correct orientation.
Installation Instructions
7 Being careful not to cross-thread, turn the sump onto the filter head and hand tighten securely (see Fig. 5).
8 Repeat steps 2 through 7 for the taste/odor (FXUTB) or lead/cyst (FXULB) filter cartridge in the Filter ΙΙ sump.
the filtered water faucet. Then, slowly open the water supply/saddle valve and allow the filter
9 Open
housing to fill.
10 Close the filtered water faucet. Then, check for leaks between the sump and the head.
NOTE: If leaking, turn off the water supply and open the filtered water faucet. Then, disassemble the filter
and check the o-ring for cuts, flat spots, etc., and sealing surfaces for foreign material. Clean the o-ring and
lubricate with clean silicone grease. Carefully press into the groove in the sump.
and install two new “AA” alkaline batteries in the battery pack. Removing the batteries or
11 Remove
momentarily disconnecting the leadwires resets the six month electronic base timer.
Troubleshooting Tips
filter cartridges contain activated carbon. When new, open the filtered water faucet for ten minutes
12 The
to flush the system.
Fig. 5
Bracket
Head
Cartridge
Sump
Customer Service
O-ring seal
TURN SUMP
TO INSTALL
Sump
Replacement label
TURN SUMP
TO REMOVE
Filter ΙΙ
Sump
wrench
Filter Ι
To
loosen
12
Safety Instructions
Before you call for service…
Troubleshooting Tips
Save time and money! Review the chart below
first and you may not need to call for service.
What To Do
Water contains tiny
black particles
New filter cartridges contain
activated carbon, which is a
harmless black powder.
• Turn on the filtered water faucet and allow these
harmless carbon particles to purge from the cartridge.
Turn off the faucet when the water is clear.
Water has air bubbles
and is cloudy
Air in system after installation.
• Will go away after water runs for a while.
Indicator light on the
faucet base is flashing
Six months usage has occurred.
This is the maximum life of the
filter cartridges.
• Replace both filter cartridges and batteries in the
battery pack.
Indicator light on the
faucet base is not working
The faucet base leadwire
is not connected to the battery
pack leadwire.
• Connect.
Batteries may need to be
replaced or they may have been
installed incorrectly.
• Observe orientation markings on the holder and install
correctly. Replace batteries if they are old.
Leadwires damaged.
• Inspect and repair as needed.
The filter cartridges are no
longer removing chlorine
from the water supply.
• Replace both filter cartridges and batteries in the
battery pack.
Chlorine taste and /or
odor in the product water
Installation Instructions
Possible Causes
Operating Instructions
Problem
Troubleshooting Tips
Customer Service
13
Customer Service
Troubleshooting Tips
Installation Instructions
Operating Instructions
Safety Instructions
Notes.
14
GE Service Protection Plus™
GE, a name recognized worldwide for quality and dependability, offers you Service
Protection Plus ™—comprehensive protection on all your appliances—No Matter
What Brand!
Benefits Include:
• Backed by GE
• All brands covered
• Unlimited service calls
• All parts and labor costs included
• No out-of-pocket expenses
• No hidden deductibles
• One 800 number to call
We’ll Cover Any Appliance.
Anywhere. Anytime.*
You will be completely satisfied with our service protection or you may request your money back
on the remaining value of your contract. No questions asked. It’s that simple.
Protect your refrigerator, dishwasher, washer and dryer, range, TV, VCR and much more—any brand!
Plus there’s no extra charge for emergency service and low monthly financing is available. Even icemaker
coverage and food spoilage protection is offered. You can rest easy knowing that all your valuable
household products are protected against expensive repairs.
Place your confidence in GE and call us in the U.S. toll-free at 800-626-2224
for more information.
*All brands covered, up to 20 years old, in the continental U.S.
✁
Please place in envelope and mail to:
General Electric Company
Warranty Registration Department
P.O. Box 34070
Louisville, KY 40232-4070
15
Cut here
Consumer Product Ownership Registration
Dear Customer:
Thank you for purchasing our product and thank you for placing your
confidence in us. We are proud to have you as a customer!
Follow these three steps to protect your new appliance investment:
1 2 3
After mailing
the registration
below, store this
document in a safe
place. It contains
information you
will need should
you require service.
Our service number
is 800-GE-CARES
(800-432-2737).
Complete and mail
your Consumer
Product Ownership
Registration today.
Have the peace of
mind of knowing we
can contact you in
the unlikely event of
a safety modification.
Model Number
Read your Owner’s
Manual carefully.
It will help you
operate your new
appliance properly.
If you have questions,
or need more
information call the
GE Answer Center®
800.626.2000.
Serial Number
Important: If you did not get a registration card with your product,
detach and return the form below to ensure that your
product is registered.
✁
Consumer Product Ownership Registration
t
an
ort l
p
i
Im Ma ay!
d
To
First
Name
Mr. ■
Model Number
Ms. ■
Mrs. ■
Miss ■
Last
Name
Street
Address
Apt. #
City
State
Date Placed
In Use
Month
Phone
Number
Zip
Code
Day
_
GE Appliances
General Electric Company
Louisville, Kentucky 40225
16
Year
_
Serial Number
Cut here
Operating Instructions
Saddle Valve
Safety Instructions
Parts List.
*
Installation Instructions
Troubleshooting Tips
Customer Service
*NOTE: Codes in the state of Massachusetts require installation by a licensed plumber and do not
permit the use of the saddle valve. For installation, use plumbing code 248-CMR of the Commonwealth
of Massachusetts.
17
REF. NO.
0001
0002
0003
0004
0005
0006
0007
0008
0009
0010
0012
0014
0015
0016
0017
0018
0019
Installation Instructions
Operating Instructions
Safety Instructions
General Electric parts catalog.
0020
0021
0022
0023
0024
0025
Customer Service
Troubleshooting Tips
0200
0999
18
PART NO.
WS02X10001
WS28X10010
WS22X10008
WS22X10007
WS02X10003
WS22X10002
WS19X10011
WS03X10001
WS30X10002
WS22X10003
WS07X10008
WS02X10004
WS03X10003
WS03X10002
WS15X10008
WS15X10002
WS10X10001
WS10X10008
WS02X10007
WS10X10002
WS02X10008
WS08X10003
WS06X10001
FXUTB
FXUSB
FXULB
WX5X140
49-50023
PART DESCRIPTION
SCREW #10-14 X 3/4″
MOUNTING BRACKET
NUT 3/8″ ΤUΒΕ
INSERT 3/8″ ΤUΒΕ
SCREW #10-14 X 1/4″
ELBOW 3/8″ NPT X 3/8″
HEAD
O-RING 3-3/8″ X 3-5/8″
SUMP
NIPPLE 3/8″ NPT X 1-1/2″
TUBING 3/8″ X 20 FT–WH
NUT 3/8″
ADAPTER TUBING
WASHER
SADDLE VALVE /SUPPLY
FAUCET ASM.
BASE FAUCET, TOP
TOP FAUCET BASE BLACK
SCREW #6-32 X 1-3/8″
BASE FAUCET KIT
NUT
GASKET FAUCET
HOLDER BATTERY
FILTER-TASTE & ODOR
FILTER-SEDIMENT
FILTER-LEAD/CYST
WRENCH SUMP
PM MANUAL USE & CARE/
INSTALLATION
G
N
U
L
3
0
B
0
1
G
N
U
T
0
5
B
0
1
G
X
E
M
0
1
B
0
1
8
1
2
2
2
2
2
2
2
1
1
2
2
2
1
1
1
2
1
2
1
1
1
1
1
8
1
2
2
2
2
2
2
2
1
1
2
2
2
1
1
1
2
1
2
1
1
1
1
1
8
1
2
2
2
2
2
2
2
1
1
2
2
2
1
1
1
2
1
2
1
1
1
1
1
1
Safety Instructions
GE Water Filtration System Warranty.
All warranty service provided by our SmartWater™ Authorized Servicer Network.
For service, call 800-GE-CARES.
GE Will Replace:
One Year
From the date of the
original purchase
Model GXEM01B
Any part of the Water Filtration system (excluding filters) which fails due to a defect in materials or
workmanship. During this limited one-year warranty, GE will also provide, free of charge, all labor
(does not include service trip to home) to replace the defective part.
One Year
From the date of the
original purchase
Models GNUT05B
and GNUL30B
Any part of the Water Filtration system (excluding filters) which fails due to a defect in materials or
workmanship. During this full one-year warranty, GE will also provide, free of charge, all labor
and in-home service to replace the defective part.
What GE Will Not Cover:
■ Filter cartridges.
■ Improper installation.
■ Replacement of house fuses or resetting of circuit
breakers.
■ Failure of the product if it is abused, misused, or used for
other than the intended purpose or used commercially.
■ Damage to the product caused by accident, fire, floods or
acts of God.
■ Use of this product where water is microbiologically
unsafe or of unknown quality, without adequate
disinfection before or after the system. Systems certified
for cyst reduction may be used on disinfected water that
may contain filterable cysts.
■ Incidental or consequential damage to personal property
caused by possible defects with this appliance.
Some states do not allow the exclusion or limitation of incidental or consequential damages. This warranty gives
you specific legal rights, and you may also have other rights which vary from state to state. To know what your
legal rights are, consult your local or state consumer affairs office or your state’s Attorney General.
Warrantor: General Electric Company. Louisville, KY 40225
Troubleshooting Tips
This warranty is extended to the original purchaser and any succeeding owner for products purchased for home
use within the USA. In Alaska, the warranty excludes the cost of shipping or service calls to your home.
Installation Instructions
■ Service trips to your home to teach you how to use the
product.
Operating Instructions
For The Period Of:
Customer Service
19
Safety Instructions
Service Telephone Numbers.
GE Answer Center® 800.626.2000
The GE Answer Center® is open 24 hours a day, 7 days a week.
In-Home Repair Service 800-GE-CARES (800-432-2737)
Operating Instructions
Expert GE repair service is only a phone call away.
Special Needs Service 800.626.2000
800-TDD-GEAC (800-833-4322)
Installation Instructions
GE offers, free of charge, a brochure to assist in planning a barrier-free kitchen for persons
with limited mobility.
Service Contracts 800-626-2224
Purchase a GE service contract while your warranty is still in effect and you’ll receive a
substantial discount. GE Consumer Service will still be there after your warranty expires.
Parts and Accessories 800-626-2002
Individuals qualified to service their own appliances can have parts or accessories sent directly
to their homes (VISA, MasterCard and Discover cards are accepted).
Troubleshooting Tips
Instructions contained in this manual cover procedures to be performed by any user. Other servicing
generally should be referred to qualified service personnel. Caution must be exercised, since
improper servicing may cause unsafe operation.
Service Satisfaction
If you are not satisfied with the service you receive from GE:
First, contact the people who serviced your appliance.
Customer Service
Next, if you are still not pleased, write all the details—including your phone number—to:
Manager, Customer Relations
GE Appliances
Appliance Park
Louisville, KY 40225
20