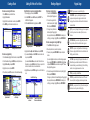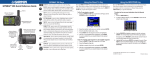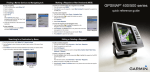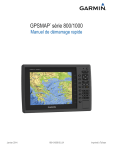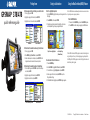
1
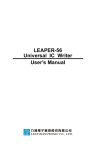
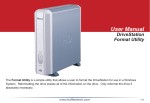
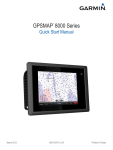
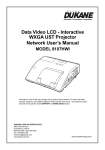
Finding Items
GPSMAP 378/478
®
quick reference guide
To find a waypoint or other item from your current location:
1. From any page, press FIND.
2. Highlight a category from the list, and press ENTER.
3. Highlight an item in the results list, and press ENTER.
Find Menu
Going to a Destination
To Go To a highlighted map item:
1. Use the ROCKER to highlight the item you want to navigate to on the
Map Page.
2. Press NAV/MOB, and then press ENTER.
3. Follow the magenta route created on the Map Page. You can also
use the Compass Page to help you navigate to the point.
Using the Man OverBoard (MOB) Feature
Use the MOB function to simultaneously mark and set a course to a location
for quick response to emergency situations.
To start the MOB function:
1. Press and hold the NAV/MOB key, or press the NAV/MOB key twice.
2. Press ENTER to confirm and begin navigating to the MOB location.
Search Results
To find an item from another location using the Find menu:
1. From any page, press FIND.
2. Press MENU. Highlight Near Other, and press ENTER.
3. Select a reference point on the map, and press ENTER. The list
changes to show items nearest to the new map location.
To find an item from another location on the Map Page:
1. From the Map Page, use the ROCKER to pan to the location you
want, and press FIND.
2. Highlight a category from the list, and press ENTER.
3. Highlight an item the list, and press ENTER.
Navigate Options with
Map Feature Highlighted
Navigation Shown
on the Map Page
(Marine Mode)
To activate a Go To from the Find menu:
Press the NAV/MOB key.
Use the ROCKER to highlight Go To Point, and press ENTER.
From the Find menu, highlight Waypoints, and press ENTER.
Select a waypoint from the list, and press ENTER to open the
Waypoint Review Page.
5. With the Go To button highlighted, press ENTER to begin navigation.
1.
2.
3.
4.
MOB Confirmation Window
When a MOB is initiated, a MOB waypoint is created, and the unit begins to
navigate to that point. Use any of the navigation pages to guide you back to
the MOB point. The MOB waypoint is stored in the Waypoint list and can be
deleted like any other waypoint.
GPSMAP 478 shown
Find From Map Pointer
Search Results
190-00683-01 Rev. A
© Copyright 2006 Garmin Ltd. or its subsidiaries
Printed in Taiwan
Creating a Route
To create a route using the Find menu:
1.
2.
3.
4.
Press MENU twice to open the Main Menu.
Highlight the Route tab.
Highlight the first available blank route slot, and press ENTER.
Press ENTER again to find items to add to the route.
Adding Via Points to Your Route
To add Via Points to your route in Automotive Mode:
1. While navigating your route, press NAV/MOB.
2. Use the ROCKER to select Edit Vias, and press ENTER. The
Add/Edit Vias Page appears.
3. With the Add Via Point button highlighted, press ENTER.
Marking a Waypoint
To mark your current location:
1. Press and hold ENTER/MARK until
the New Waypoint Page appears.
2. To accept the waypoint with the
default name and symbol, highlight
OK, and press ENTER/MARK.
3. To change the any information on
New Waypoint Page
the New Waypoint Page, highlight
the appropriate field and press ENTER/MARK. After entering and
confirming your changes, highlight OK, and press ENTER/MARK.
To create a new waypoint using the Map Page:
Route Tab
Adding Points to the Route
To create a route graphically:
1.
2.
3.
4.
5.
From the Route tab, highlight the first blank slot, and press ENTER.
On the Route Review Page, press MENU to open the Options menu.
Highlight Edit on Map, and press ENTER.
Highlight a map item, and press ENTER.
When finished, press QUIT twice to return to the Route Review Page.
Navigate Options
Add Via Point
4. Highlight either Use Map or Use Find Menu, and press ENTER.
5. If you selected Use Map, use the ROCKER to select an item on the
map, and press ENTER.
If you selected Use Find Menu, select an item from the Find menu.
Remember you can press MENU while the Find menu is open to find
an item near another location, such as the destination.
6. Highlight Done, and press ENTER to apply the new Via Points to the
route.
Add/Edit Vias Page
Route Review Page
Options Menu
Creating a New Route
on the Map
Before a Via Point
is Added
New Via Point Added
Before the Destination
1. Press PAGE until the Map Page appears.
2. Move the pointer to a map location or map feature.
3. Press and quickly release ENTER/MARK to capture the pointer
location.
If you have highlighted a map feature, an information page appears
after you press ENTER/MARK. Use the ROCKER to highlight Save
and press ENTER/MARK to save the item as a waypoint. The New
Map Waypoint Page appears.
4. To accept the waypoint with the default name and symbol, highlight
OK and press ENTER/MARK.
To change any information on the New Map Waypoint Page, highlight
the appropriate field and press ENTER/MARK. After entering and
confirming your changes, highlight OK and press ENTER/MARK.
Keypad Usage
IN/OUT—press to zoom in or out on the Map Page.
PAGE/MODE—press to cycle through the main pages in
sequence or end an operation in progress and return to the
main page. Press and hold to switch between Marine Mode and
Automotive Mode.
QUIT—press to cycle through the main pages in reverse sequence,
revert to the previous value in a data entry field, or cancel a
function.
ENTER/MARK—press to select a highlighted option, initiate
entry, and then confirm. Press and hold to mark a waypoint.
MENU/Wx—press to view Options Menu for the current page.
Press twice to display the Main Menu. Press and hold to turn the
Map Page weather off and on.
NAV/MOB—press to display the Navigation Menu window. In
Marine Mode, press and hold to activate the MOB function. In
Automotive Mode, press and hold to display the Next Turn Page
and have the voice prompt announce the next turn.
FIND—press to display the Find Menu.
POWER—press and hold to turn the unit on or off. Press and
release to adjust the backlighting and external speaker volume.
ROCKER—press up, down, left, or right to select menu options,
enter data, or move the pointer on the Map Page.