1
®
Models RCS-S3000T
RCS-S5000U
RCS-S5000B
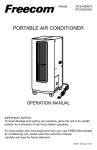
PORTABLE AIR CONDITIONER
OPERATION MANUAL
IMPORTANT NOTICE:
To avoid damage and voiding your warranty, place both units in their
upright positions for a minimum of two hours before operating.
For best results, and more enjoyment from your new FREECOM portable
air conditioning unit, please read this instruction manual
carefully and save for future reference.
3000-398
TABLE OF CONTENTS
Owner's Record ............................................................................................................2
Features ........................................................................................................................3
Specifications ................................................................................................................3
Hardware (Included) ....................................................................................................3
Important Safety Information ........................................................................................4-5
Product Parts ................................................................................................................6
The Control Panel ........................................................................................................7
Before Using ................................................................................................................8
Installation ....................................................................................................................8-10
Indoor Unit ..............................................................................................................8
Outdoor Unit ............................................................................................................9-10
Disconnecting Tube Set ..........................................................................................10
Operation ....................................................................................................................11-12
Cooling ..................................................................................................................11
Operating the Timer ..............................................................................................12
Wireless Remote Control Operation ......................................................................12
Maintenance and Cleaning..........................................................................................13-15
Draining Water Tank ................................................................................................13
Cleaning Air Filter....................................................................................................14
Cleaning Cabinet Exterior ......................................................................................15
Storage..........................................................................................................................15
Troubleshooting ............................................................................................................16
WARNING:
TO REDUCE THE RISK OF FIRE OR ELECTRIC SHOCK, DO NOT EXPOSE INDOOR
UNIT TO RAIN OR MOISTURE.
DO NOT OPEN CABINET. DANGEROUS HIGH VOLTAGE IS PRESENT. REFER
SERVICING ONLY TO QUALIFIED PERSONNEL.
Your air conditioner contains a refrigerant which is converted from a gas to a
liquid by a highly efficient compressor. It has been designed to operate in a
vertical position only. Should it be necessary to lay the unit on its side, place it in
its upright position for a minimum of two hours before restarting or operating the
unit. This time period permits the liquids, gases and oils contained within the
sealed systems to return to their proper positions.
OWNER’S RECORD
Enter product information here for future use:
Date of Purchase
Dealer
Model No.
Serial No.
FEATURES
Thank you for purchasing the FREECOM RCS-S3000T Portable Air Conditioner. The
RCS-S3000 and RCS-S5000 series Portable Air Conditioners are designed with many
state-of-the art features:
• Wireless remote control enables operation of up to 16 feet (5 meters) from indoor unit.
• Quiet, durable caster wheels allow for easy movement of indoor unit.
• Efficient "split" design for maximum cooling and easy installation.
• Convenient, electronic operation panel enables one-touch control of all functions.
• Provides clean, fresh, air conditioned, dehumidified air.
• Automatic, oscillating louvers provides air distribution over a wide area.
• Low-noise, rotary compressor cools from air-to-air—no water required.
• Attractive design and easy-to-clean exterior cabinet.
SPECIFICATIONS
Model
Power/Electrical
Requirements
Cooling Capacity
Input
EER
RCS-S3000T
RCS-S5000U
RCS-S5000B
110/115 volt, 60Hz
230 Volt, 50Hz
220 Volt, 50Hz
12,500 BTU/h (3,630W)
15,000 BTU/h (4,360W)
15,000 BTU/h (4,360W)
1100W
1,380W
1,380W
11.4
10.9
10.9
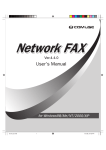
HARDWARE (INCLUDED)
F.
A.
B.
C.
G.
D.
E.
A.
B.
C.
D.
E.
Wall Bracket (2)
1/4" (6mm) screws and anchors (4)
Set screws (2)
Support belt with hook (2)
Open-ended wrench
(1 each—24 mm and 21 mm)
H.
F. Remote control (1)
G. "AAA" batteries (2)
H. Dust Caps (2 sets)
3
TRES IMPORTANT
Pour éviter les risques d'incendie ou de choc électrique, n'exposez pas l'appareil à la
pluie ou à l'humidité.
En cas de panne, faites appel au service après-vente qualifié pour effectuer des
réparations sur cet appareil.
Votre climatiseur contient un réfrigérant qui passe d'une phase gazeuse à une phase
liquide au moyen d'un compresseur. Il doit être utilisé en position verticale. Si pour une
raison quelconque vous deviez le coucher sur le coté, ne le remettez en route que deux
heures environ après l'avoir replacé en position verticale. Ceci permettra le repositionnement correct des liquides et gaz du système réfrigérant.
INSTRUCTIONS DE SECURITE
A lire attentivement avant utilisation
Sécurité
•
Ne pas arrêter l'appareil en débranchant la prise de courant en cours de
fonctionnement. Ceci pourrait endommager le circuit de contrôle (dommage exclu
de la gantie). Utilisez toujours le bouton "ON/OFF" du tableau de commande.
•
Ne pas glisser le cordon d'alimentation sous la moquette ou des tapis.
•
Ne pas recouvrir l'appareil avec des vêtements, serviettes ou objets similaires.
•
Ne pas obstruer l'entrée ou la sortie d'air, ni bloquer les déflecteurs oscillants.
•
Ne pas débrancher l'appareil si vos mains sont humides : il y a risque de choc
électrique.
•
Ne pas placer d'objets sur le dessus de l'appareil.
Positionnement
•
•
•
•
Ne pas coucher l'appareil sur les côtés : il doit être maintenu en position verticale.
Ne pas placer l'appareil près d'une source de chaleur, ou l'exposer directement aux
rayons du soleil. Protéger la pièce de l'exposition directe du soleil en fermant rideaux
et stores, etc...pour améliorer le rafraîchissement.
Ne pas placer l'appareil près de rideaux qui risquent de bloquer l'entrée ou la sortie
d'air (distance minimale: 50 cm).
Vérifier que l'appareil est placé sur une surface plane.
Utilisation
•
•
•
4
Ne pas transporter l'appareil en fonctionnement.
Ne pas essayer de modifier ou de réparer vous-même l'appareil : ceci peut être
dangereux et annulera la garantie.
Ne pas utiliser l'appareil sans filtre à air.
IMPORTANT SAFETY INFORMATION
PLEASE READ AND FOLLOW ALL SAFETY INFORMATION AND INSTRUCTIONS
BEFORE OPERATING YOUR NEW FREECOM AIR CONDITIONER.
WARNING:
ELECTRICAL SHOCK HAZARD. Failure to follow the safety information below can result
in severe personal injury or property damage.
•
•
•
•
•
•
•
•
Use this product only with the proper electrical voltage. (See “Specifications.”)
DO NOT use the electrical plug to start or stop the unit. Doing so could cause damage to the control circuit and invalidate the warranty. Use only the Power on/off "I/O"
button on control panel to turn the unit on or off. Avoid pulling, folding, or stretching
the electrical cord. When plugging in the unit, never touch or bend the metal prongs
and always use the molded plug handle.
DO NOT plug this appliance into an outlet that is being used by other appliances or
electrical devices. An overloaded electrical circuit or outlet may result in fire and/or
injury from electrical shock and damage to the product. If the outlet or electrical circuit becomes warm or hot and/or the designated fuse or breaker switch trips or fails,
this may be an indication of an electrical overload. Turn off the air conditioner immediately using the power on/off "I/O" button and contact a qualified electrician to determine the problem.
DO NOT run power cord under carpeting or rugs as this may result in fire.
DO NOT use an extension cord with this product.
DO NOT plug in or unplug the power cord with wet hands.
DO NOT expose indoor unit to water or moisture.
DO NOT use indoor unit outdoors.
CAUTION:
Failure to follow the safety information below can result in minor personal injury, property
damage, damage to the unit, and voiding your warranty.
•
•
•
•
•
•
•
•
•
•
•
•
•
DO NOT cover either unit with clothes, towels, blanket, or other similar materials.
DO NOT block or cover air intake, exhaust, or oscillating louvers.
DO NOT touch oscillating louvers or blower while the unit is operating.
DO NOT attempt to carry the unit or roll the unit over carpet, rough, or uneven surfaces.
DO NOT operate the unit without the air filter properly installed.
DO NOT insert pointed objects into grille or louvers—especially while the unit is operating.
Never use the unit as a dryer or put clothes or any other items on either unit.
Never place air conditioner near flammable materials.
Never put heavy objects on the unit.
To avoid damage and maintain proper operation, place indoor unit a minimum of 30
inches from curtains, furniture, blankets, loose material, or any other obstructions.
Keep the unit a safe distance from stairs.
DO NOT use or operate the product in a confined space, such as a closet.
To avoid water leakage and damage:
• Always operate the product on a solid, level surface.
• Before moving the unit, always turn it off using the power on/off "I/O" button on
the control panel and empty the water tank. Allow the unit to stand at
least five (5) minutes.
• DO NOT drop the unit or place it on its sides, back, top or front. Always keep
the unit in its upright position.
To reduce the possibility of illness from excessive cooling: avoid direct, continuous
exposure and never place the unit in a closed space occupied by persons incapable
of operating the product properly.
5
PRODUCT PARTS
C
A
F
D
B
E
A
L
FRONT VIEW
G
Q
P
B
M
N
K
A.
B.
C.
D.
E.
F.
G.
H.
I.
J.
K.
L.
M.
N.
O.
P.
Q.
6
Indoor Unit
L
Outdoor Unit
L H I
Control Panel
O
J
Horizontal Air Louver
Air Outlet
REAR VIEW
Built-in Handle
Air Filter
Emergency Water Drain Tube
Water Drain Plug
Power Cord
Flex Tube
Caster Wheels
Connector Cover
Fan
Drain Port (outdoor unit)
Support Plate
Interlocking Fastener (for securing outdoor unit onto indoor unit)
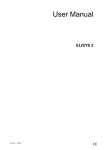
THE CONTROL PANEL
4
3
10
11
9
8
7
6
5
2
1
1.
POWER ON/OFF "I/O"
Easy push-button control switch to turn the unit ON and OFF.
2. MODE
There are five different fan speed settings:
• AUTO—Automatic fan speed with cooling setting by room temperature.
• HI—High fan speed with cooling setting
• MED—Medium fan speed with cooling setting
• LO—Low fan speed with cooling setting.
• FAN—Fan only (no cooling)
3. MODE LEDs
Individual LED lights to show mode in operation.
4. COMPRESSOR LED
Lights to show compressor is operating (cooling modes).
5. THERMO CONTROL
The Thermo Control automatically defaults to a temperature of approximately 77ÞF when
the unit is initially plugged in and started. Press right button to lower cooling setting;
press left button to raise cooling setting. Each press of either button adjusts the temperature control by approximately 1ÞF. The temperature setting range is 68ÞF to 86ÞF.
6. DIGITAL DISPLAY WINDOW
Digital display shows room temperature and "TIMER" setting, if applicable.
7. TIMER SET
Adjustable 24 hour timer can be programmed to turn off or on after pre-selected time.
8. TIMER LED
Individual LED lights to show if the timer is selected for "ON" or "OFF."
9. AUTO SWING
Press to automatically begin (or stop) louvers moving up and down.
10. DRAIN WATER LED
Lights to indicate water must be drained.
11. REMOTE CONTROL OPERATION SENSOR
7
BEFORE USING
IMPORTANT: Remove unit from packaging and discard clear, plastic wrapping. Place
both units in upright position for a minimum of two hours before operating for the first
time.
CAUTION: Never use line/tube set to move, carry, or lift units. DO NOT place units
near open flame or heat source.
INSTALLATION
Indoor Unit
1.
Place indoor unit on a solid, level surface.
Operating this unit on uneven or
soft surfaces may cause vibration,
noise, and possible water leakage.
2.
Place indoor unit at least 30" from any
draperies or other obstructions.
Carefully push the unit on its castor wheels
to desired location.
3.
Determine a location for outdoor unit.
If surface mounting, be sure outdoor unit
can be placed at least 12" from any wall. Be
sure the location is within reach of the tube
set. The outdoor unit should be on a flat,
level, solid surface or wall-mounted using
the supplied mounting brackets.
NOTE: Height location of outdoor unit must not
exceed 6 feet (2 meters) above indoor unit.
CAUTION: Do not operate unit without
air filter properly in place.
4.
8
Check that air filter is clean and properly
installed.
INSTALLATION (contd.)
Outdoor Unit
The outdoor unit can be either surface placed or wall-mounted. In either case, the outdoor unit must be fitted so the flexible tube set easily reaches the indoor unit. The flexible tube set can be routed through a window, door, or wall. For routing through a wall,
please consult a certified contractor to perform interior and exterior hole cutting and disconnecting the tube set.
1. Determine an exterior position for outdoor unit. Double check and measure that the
flexible tube set reaches the location of the indoor unit. For outdoor unit, determine
whether the unit will be surface placed on a flat, solid, surface or wall mounted.
NOTE: Height location of outdoor unit must not exceed 6 feet (2 meters) above
indoor unit.
2. For routing tube set through a small window or wall, remove
flexible tube set. See "Disconnecting Tube Set" for detailed
information.
There are two choices for installing the outdoor unit: surface
placement and wall-mounting. See below for surface placing
the outdoor unit. To wall-mount outdoor unit, please continue
with "Wall-Mounting" for mounting instructions.
Surface Placement:
3. Place outdoor unit on a flat, level surface (i.e. terrace or
balcony). Be sure the outdoor unit is at least 12"
(30 cm) from any wall or other obstructions. The
outdoor unit needs a free-flow of air to operate properly.
NOTE: For surface placement, please proceed to the
instructions detailed under "OPERATION."
Wall-Mounting:
3. Locate supplied mounting brackets. Hold brackets against
exterior wall at desired location. DO NOT exceed a height
of 6 feet above indoor unit. Double check and measure
distance of flexible tube set. Be sure mounting location
and height are within the distance of the flexible tube set.
4. Place mounting brackets against wall at desired height.
Measure and mark mounting hole locations as shown.
9
INSTALLATION (contd.)
Wall-Mounting (contd.)
CAUTION: Always wear eye protection (safety goggles) when drilling.
5. Using a drill bit (masonry drill bit for concrete), drill mounting hole locations. Mount
brackets to exterior wall with supplied 1/4" anchors(4) and 1/4" screws (4).
6. Check that brackets are secure on wall.
7. Use handle to carefully lift outdoor unit onto
mounting brackets. The top tabs on the mounting
bracket will fit into the bottom metal brackets on
the back of the unit. The small plastic tabs on the
outdoor unit will fit into the rectangular slots on
the bottom of the bracket. Install set screws to
secure outdoor unit to top of bracket.
Check that outdoor unit is tightly secured
on brackets before releasing.
8. Hook and secure one end of support belt onto
round hole on mounting bracket on back of unit.
Secure other end of support belt to wall with the
appropriate hardware.
Disconnecting Tube Set
This air conditioner is equipped with convenient quick Connect Couplings which allow for
the removal and routing of the Tube Set through narrow windows or walls.
CAUTION: Removing and re-connecting the Tube Set should be performed only by a
qualified heating and air conditioning professional.
Instructions for the removal and re-connecting of the Tube Set are available to qualified
trade professionals by separate request to a Freecom Dealer.
IMPORTANT NOTICE: High pressure refrigerant gas and lubricants are present in
the Tube Set. Improper removal of the Quick Connect Couplings could result in
personal injury from exposure to high-pressure refrigerant materials. Improper
connection of the Tube Set could result in refrigerant leaks. Leaking or loss of
refrigerant materials will result in poor cooling performance and eventual damage
to the motor compressor.
CAUTION: Leaking refrigerant exposed to an open flame or other heat source
may produce toxic fumes.
10
OPERATION
CAUTION: To avoid damage and voiding your warranty, place both units in their
upright positions for a minimum of two hours before operating. DO NOT operate
unit without air filter properly in place or while tube set is disconnected.
Cooling
This unit is intended to cool a 300-600 square foot area. The unit’s cooling capacity will
vary according to room temperature and humidity. Consult your Freecom dealer for
specific application and suitability.
1. Plug power cord into a standard household outlet. Use this
product only with the proper electrical voltage. See
“SPECIFICATIONS” on page 3.
WARNING: Do not plug this appliance into an outlet that is being used by other
appliances or electrical devices. When installing the electrical plug into the outlet,
never touch or bend the metal prongs and always push plug into outlet by using the
molded plug. Never use the electrical plug to start or stop the unit and avoid pulling,
folding, or stretching the electrical cord.
2. Press Power On/Off ("I/O") button on control panel. The unit will power up
and air will begin blowing from the front louvers.
NOTE: This unit is equipped with a special safety time delay feature.
The compressor (cooling mechanism) may be delayed for up to five
minutes. This safety feature prevents damage to the compressor.
The "COMP. ON" light will turn on while the compressor is running.
3. Press “MODE” button on control panel to choose "AUTO," "HI," "MED,"
"LO," or "FAN." The FAN setting is for air circulation only and does not
provide any cooling. To change from a cooling mode to fan mode, press
power on/off "I/O" button to turn unit off. Press power on/off "I/O" button
again and immediately press "MODE" button to FAN setting. If the air conditioner is re-started, the unit will be in the previously selected mode.
4. Press either "THERMO CONTROL" button to control a
colder or cooler setting. The default temperature is 77ÞF.
Press right button to lower cooling setting; press left button
to raise cooling setting. Each press of the button will adjust
the temperature approximately 1ÞF. The temperature setting can be adjusted from 68ÞF to 86ÞF.
CAUTION: To avoid injury or damage and voiding the warranty,
DO NOT manually adjust the louvers.
5. Press “AUTO SWING” button on control panel to begin oscillating
horizontal louvers. The louvers will move slowly up and down for optimum
air distribution. Press button again to maintain a desired “fixed” position to
distribute more cooling air to one side of the room.
11
OPERATION (contd.)
Operating the Timer
If you wish to check the timer setting after the timer has been programmed, press the
"TIMER-SET" button on control panel while timer "ON" or "OFF" light is on. The display
will show the hours remaining until the timer function is operating. Pressing "TIMERSET" again will increase timer setting.
To Turn Unit On with Timer
1. While the unit is off, press “TIMER-SET” button on control
panel to program the air conditioning unit to turn on in 1-24
hours. The timer "ON" light will turn on. You may also set
Mode and Thermo Control settings at this time. The unit will
turn on at the programmed time.
If you wish to check the timer, press the "TIMER-SET" button
on control panel while timer "ON" light is on. The display will show the hours remaining until the timer function is operating. Pressing "TIMER-SET" again will increase
timer setting.
2. To cancel timer setting, press "TIMER-RESET" button. If the power on/off "I/O" button is pressed while a timer "ON"setting is scheduled, the timer function will be cancelled and the unit will continue to operate as normal.
To Turn Unit Off with Timer
1. While the unit is on, press “TIMER-SET” button on control
panel to program the air conditioning unit to turn off in 1-24
hours. The timer "OFF" light will turn on. The unit will turn off
at the programmed time.
2. To cancel timer setting, press "TIMER-RESET" button. If the power on/off "I/O" button is pressed while a timer "OFF" setting is scheduled, the unit will turn off and the
programmed "OFF" time will be cleared.
Wireless Remote Control Operation
The Wireless Remote Control has the same
control buttons as are on the Control Panel. All
functions operate the same as described under
"CONTROL PANEL." The remote requires two
"AAA" size batteries (included).
NOTE: The Wireless Remote Control will operate up to 16 feet (5 meters) from indoor unit.
1. Press "POWER on/off" button to remotely
operate unit.
2. Press function buttons, as desired,
to control air conditioner. See
"CONTROL PANEL" for button
controls and functions.
12
MAINTENANCE AND CLEANING
Draining Water Tank
When the condensate water tank is full, the “DRAIN WATER” indicator light
will flash, the unit will sound several initial warning beeps, and the unit will
automatically turn off.
IMPORTANT: For the indoor unit's condensate drain pump to function properly,
the outdoor unit must not be more than 6 feet above indoor unit.
NOTE: If emptying water tank before “DRAIN WATER” alert, press Power On/Off "I/O"
button to stop unit if it is operating.
1. Unplug power cord from outlet. Allow unit to remain off for 3-5
minutes.
2. Remove screw from from plastic mounting bracket on drain tube.
3. Remove plug from condensate tube (on back of indoor unit) and
drain water into a shallow bucket. Be sure tank is completely empty.
Replace plug tightly onto end of tube.
4. Replace tube and plastic mounting bracket to original position.
5. Plug power cord into outlet. Press Power On/Off ("I/O")
button.
13
MAINTENANCE AND CLEANING (contd.)
Cleaning Air Filter
This unit has one air filter. For best results and maximum performance,
clean filter every two weeks, or as required by environmental conditions.
CAUTION: Neglect or failure to regularly clean the filter will result in
poor efficiency, reduced performance, possible damage to the unit,
and voiding your warranty.
1. Press Power On/Off "I/O" button to stop unit if it is operating.
Unplug power cord from outlet.
2. Locate filter on top, rear side of indoor unit. Carefully pull filter
from top of indoor unit.
3. Place air filter on a flat, level surface so “dirty” side of filter
faces up. Using a brush or nozzle vacuum attachment, gently
vacuum “dirty” side of filter. Turn filter over and vacuum other
side. Use care not to damage or puncture the filter mesh. DO
NOT use brushes, brooms, or other course materials to clean
the filters.
4. Hold air filter, “dirty” side down, under cool, running water. DO
NOT use hot water, harsh detergents, chemicals, solvents, gasoline or any other abrasive materials or household items to clean
the filters. Be sure to rinse all residue from the air filter mesh.
Carefully shake air filter to remove excess water. Allow air filter to
dry completely before reinstalling into unit.
WARNING: Forcing filter improperly into unit may cause damage.
Repair due to improper filter installation is not covered under
warranty.
5. Align bottom of filter with opening in top, rear side of indoor unit.
Carefully slide filter completely into place.
CAUTION: DO NOT operate the unit without the air filter
properly installed.
14
MAINTENANCE AND CLEANING (contd.)
Cleaning Cabinet Exterior
WARNING: ELECTRICAL SHOCK HAZARD:
•
•
•
•
•
Never operate or (un)plug unit with wet hands.
Turn off unit and unplug from wall outlet before cleaning.
Never submerse the unit in any type of liquid or expose to heavy moisture.
Never spray, pour, or sponge water directly onto the unit .
Never use brushes, brooms, harsh detergents, chemicals, solvents, gasoline, or
any other abrasive materials or household items to clean the unit.
• Remove excess moisture from cabinet and grill areas, and make sure indoor
unit and filter are completely dry before installation/operation.
1. Press Power On/Off "I/O" button to stop unit if it is operating. Unplug
power cord from outlet.
2. Wipe cabinet exterior with a soft cloth dampened with warm water
(not to exceed 100Þ) and a mild detergent. Use a dry cloth to
completely dry cabinet exterior.
3. Remove loose debris and lint from air intake grills by using a soft
brush vacuum attachment.
STORAGE
INDOOR UNIT
1. Press power on/off "I/O" button if unit is operating. Unplug
power cord from outlet.
2. Drain water tube. See "Draining Water Tank" on page 13
for detailed instructions.
3. For long-term storage, turn the unit on to "FAN" mode and
allow the unit to run for 3-4 hours. This will dry the inside of the unit.
4. Carefully wrap power cord and secure with cord wrap on back of unit.
5. Store unit in its UPRIGHT POSITION in a cool, dry indoor location. If possible, store
unit in its original box. DO NOT store unit in direct sunlight.
OUTDOOR UNIT
1.
2.
3.
4.
5.
Unplug power cord (on indoor unit) from outlet.
Carefully remove outdoor unit from mounting brackets and/or hooks.
Slowly tilt the outdoor unit to drain water from the drain port.
Clean cabinet surface of outdoor unit (see "Cleaning Cabinet Exterior" above).
Carefully lift the outdoor unit and align the support plates on the outdoor unit with the
interlocking fasteners on the indoor unit. Carefully hang the outdoor unit onto the
back of the indoor unit.
6. Cover the two connected units with a large, plastic bag.
7. Store two connected units in a cool, dry place. Do not store in direct sunlight.
15
TROUBLESHOOTING
Before contacting a dealer or qualified service technician, please read and check the
following troubleshooting guide. If, after reviewing and performing the following solutions, your unit should continue to operate improperly, turn unit off and contact your
Freecom dealer for service.
CAUTION: Always use a qualified electrician to check/repair electrical systems.
PROBLEM
SOLUTION
Unit does not turn on.
1.
2.
3.
4.
5.
6.
7.
Unit running low air flow or
cooling.
1.
2.
3.
4.
Compressor stops after a short
time.
1.
2.
3.
Unit noisy when operating.
1.
2.
3.
4.
5.
Water leaking from unit.
1.
2.
3.
Make sure city power supply is normal.
Check plug is correctly installed into outlet.
Check fuses and household breaker
switches.
Remove electrical plug from outlet. Check electrical
cord and plug for damage.
Water tank is full. Check "DRAIN WATER" light. If
it is on, drain water tank. See "MAINTENANCE
AND CLEANING".
Compressor delay feature may be active. Unplug
unit and wait for 3-5 minutes. Plug unit into outlet
and press "POWER ON/OFF" switch.
Check/replace roller in cabinet. Please consult a
qualified service technician for service.
Check and clean air filter.
Check louvers and grills for obstacles or debris.
Check MODE and/or THERMO CONTROL
selection and adjust for higher air output.
(See "OPERATION.")
Allow unit to stand upright for a minimum of two
hours before attempting to operate.
Power voltage is too low. Use only proper voltage
when operating. See "SPECIFICATIONS."
Using an extension cord can reduce power. DO
NOT use an extension cord; plug directly into wall
outlet.
Thermo-control has been activated. Reset the thermo control by turning unit off for 5 minutes.
Check that unit is on a flat, level, solid surface.
Check filter is installed properly.
Turn unit off. Check louvers and grills for
obstructions.
Allow unit to stand upright for a minimum of two
hours before attempting to operate.
The refrigerant causes the unit to make a "bubbling"
sound during operation. This is normal.
Check that unit is on a flat, level, solid surface.
Check that water drain tube is secure in its plastic
holder on the back of the indoor unit. Check that
plug is secure and in place on water drain tube.
Height of outdoor unit must not exceed 6 feet above
indoor unit.