1
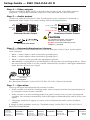
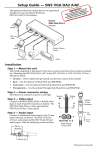
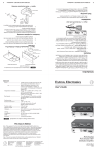
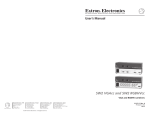
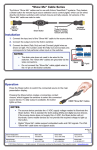
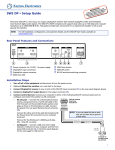
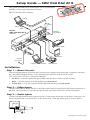
Setup Guide — SW2 VGA DA2 AF R This guide provides basic instructions for an experienced installer to set up and operate the Extron SW2 VGA DA2 AF R switcher. Laptop AC Power LBC w/ Audio Cable Front Extron SW2 VGA DA2 AF R UN Switcher SW ITC HE Network Connection D X. A MA 0.5 -24 2 SW A VG 2 AF DA R 0 100 E OT /REM AS A UT S 1 Rear S 2 TP OU T 1 B PU IN PU T 2 IN 2 1 ITC SW TO E AU ACTIV H 60 50/ -24 100 Hz Stereo Audio A 0.5 0 Power Monitor Network Connection Laptop or VGA Computer LCD Projector Installation Step 1 — Mount the unit Turn off all equipment or disconnect it from power sources and mount the switcher as desired. See “Installing Adapter Plates” and “Mounting the SW2 VGA DA2 AF R” in the SW2 VGA DA2 AF R User’s Manual for details: • On desk — Place 4 rubber feet (provided) onto the four corners of the switcher. • Rack — Use the optional 1U Rack Shelf, part #70-485-01. • Under-desk — Use the optional Under-Desk Mount Kit, part #70-212-01. Step 2 — Video inputs Connect an RGBHV, RGBS, RGsB, or RsGsBs video input to each 15-pin HD input connector, as desired. One connector is on the front panel and a second connector is on the rear panel. Step 3 — Audio inputs Connect an unbalanced stereo input to each 3.5 mm stereo mini jack, as desired. One jack is on the front panel and a second jack is on the rear panel. Wire the audio plug as shown below. Tip (L) Ring (R) Sleeve ( ) (Continued on reverse side) Setup Guide — SW2 VGA DA2 AF R Step 4 — Video outputs Connect an RGBHV, RGBS, RGsB, or RsGsBs video display to the 15-pin HD connector (output B). A 15-pin HD connector (output A) is also provided for a local monitor. Step 5 — Audio output Connect an audio device to the 3.5 mm, 5-pole captive screw connector for balanced or unbalanced audio output. For correct wiring, follow the diagram below. Balanced Audio Output R R Tip NO Ground Here Sleeve(s) Tip NO Ground Here L L Tip Ring Sleeve(s) Tip Ring Unbalanced Audio Output CAUTION For unbalanced audio, connect the sleeve(s) to the ground contact. DO NOT connect the sleeve(s) to the negative (-) contacts. Do not tin the wires! Step 6 — Autoswitching/contact closure Connect a contact closure control device to the left three pins of the 3.5 mm, 5-pole captive screw connector. • Pin 1 — selects input 1 when connected to ground (pin 3). • Pin 2 — selects input 2 when connected to ground (pin 3). • Pin 3 — connects to the ground wire (equipment ground). • Pins 4 and 5 — if jumpered or shorted together will turn the autoswitching mode on. When the autoswitching mode is on, the switcher automatically switches to the highest numbered input that has an active sync signal. CONTACT AUTO-SW 1 2 Jumper pins 4 & 5 for autoswitching. Contact Closure Control See “Rear Panel Features” in the SW2 VGA DA2 AF R User’s Manual for details. Step 7 — Operation Power up all input and output devices and the switcher. • If the switcher is in manual switching mode, select an input from the front panel buttons or by using the contact closure controller. • If the switcher is in autoswitching mode (rear panel Contact/Auto-sw pins are jumpered together), the switcher automatically selects the highest numbered input with an active sync signal. • The image should now appear on screen, and sound from the audio source should be audible. If image or audio problems occur, see “Troubleshooting” in the SW2 VGA DA2 AF R User’s Manual for further details. Extron USA - West Headquarters +800.633.9876 Inside USA / Canada Only +1.714.491.1500 +1.714.491.1517 FAX Extron USA - East Extron Europe Extron Asia Extron Japan Extron China Extron Middle East +800.633.9876 +800.3987.6673 +800.7339.8766 +81.3.3511.7655 +81.3.3511.7656 FAX +400.883.1568 +971.4.2991800 +971.4.2991880 FAX +1.919.863.1794 +1.919.863.1797 FAX +31.33.453.4040 +31.33.453.4050 FAX +65.6383.4400 +65.6383.4664 FAX Inside USA / Canada Only Inside Europe Only Inside Asia Only © 2009 Extron Electronics. All rights reserved. Inside China Only +86.21.3760.1568 +86.21.3760.1566 FAX 68-460-52 Rev. A 07 09