1
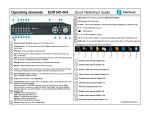
Operating elements
ECOR264 Quick Reference Guide
18
Enter/ Arrow keys: Instead of or in combination with a mouse, you can use
these keys to change the Menu settings.
19
Power LED: This LED ON indicates Power on.
20
HDD LED:This LED ON indicates HDD active.
21
Alarm LED: This LED ON indicates Alarm active.
22
Network LED: This LED ON indicates Network active.
22
Record LED: This LED ON indicated Record active.
Description of on-screen main menu (control bar)
1
Remote Control Receiver: Receiver for IR remote control.
2
USB 2.0 (front): For connecting USB-Flash-Drive to copy/archive video or for
firmware upgrades.
DVD+RW burner for DVD model. (D models only) (Replaced by hot swap drive on
“R” models)
3
4
Channel keys 1~16 (1~9, 1~4): Press channel key (CH1~CH16) / (CH1~CH9) /
(CH1~CH4) to display that channel in full screen view.
5
◄I /◄◄: Fast reverse playback or step reverse playback depending on playback
mode.
I I / ◄: Reverse playback or pause
6
1
2
3
4
5
1
Express menu (manual chapter 4.2)
2
Camera menu (manual chapter 4.3)
3
Record & Play menu (manual chapter 4.4)
7
■ Stop playback
8
►/ I I: Forward playback or pause
9
►►/I►: Fast Forward playback or step forward playback depending on playback
mode.
View: Press this key to switch between 4x, PiP (Picture In Picture),full screen, 9x,
10x, 13x and 16x.
4
Alarm & event menu (manual chapter 4.5)
5
Schedule menu (manual chapter 4.6)
11
SEQ: Switch sequence mode on/off.
6
Network menu (manual chapter 4.7)
12
Display: Press this key to switch display of channels and status bar.
7
Disk menu (manual chapter 4.8)
8
Display menu (manual chapter 4.9)
9
System menu (manual chapter 4.10)
10
13
Monitor: Switch between Main monitor and call monitor.
14
Zoom: In full screen mode, 2x electronic zoom. Pressing the zoom key again
switches the electronic zoom off.
15
Search: Press this key to enter Search Menu.
16
Menu/ESC: Press this key to enter/exit MAIN SETUP MENU
17
Copy: Press this key to enter Copy Menu.
6
7
8
9
10
10 Information menu (manual chapter 4.11)
P/N:4605XCOR16001AR
Operation
ECOR264 Quick Reference Guide
1. Monitor display formats
6. Playback search
The monitor allows full screen, picture-in-picture, 4x, 9x, 10x, 13x and 16x multiscreen
display (PiP in live mode only) as well as sequence view.
Press the SEARCH key to enter the playback search menu.
From the menu on the left, choose the search method:
Display format switching
Repeated VIEW key actuation switches between the display formats mentioned above.
Full screen:
Select one of the channel keys 1 ~ 16 (16 CH model), 1~9 (9 CH model), 1~4 (4 CH
model)
-
Time search
Enter time and date of the requested recording position and click PLAY.
Upon successful search, the monitor automatically switches to playback mode and
playback starts at the requested position.
-
Event search
Select time and date as well as the relevant camera(s). In the “Event“ row, select
the requested event type (alarm, motion, video loss, others) and confirm
your selection by clicking SEARCH. After the search, a list of available events is
displayed. Select the relevant event from the list and click PLAY.
The monitor automatically switches to playback mode and playback starts at the
selected position.
Sequence (automatic switch, available in live mode only)
Press the SEQ key to start / stop the automatic switching mode.
2. Menu start
Press the MENU key to access the main menu bar (front key no. 16). Control the menu
either through mouse or through the arrow keys (front keys no. 18).
-
Smart search
Select time and date as well as the relevant camera(s). Click “Grid Setting“ key to
edit motion grid setup. Confirm your selection by clicking SEARCH. After the search,
a list of available motion is displayed. Select the relevent motions from the list and
click PLAY. The monitor automatically switches to playback mode and playback starts
at the selected position.
-
Snapshot search
Select among thumbnail images extracted from the recorded video at a user defined
interval, at a specific date and time, in response to various types of events. Confirm
your selection by clicking SEARCH. After the search, all the snapshots will be
displayed. The result gives user an efficient review of significant activities.
3. Brightness – contrast – color
Brightness, contrast and color can individually be set for each video channel. Select the
camera menu (2nd icon) and enter the option “Video adjust“. Define the values by using
either the mouse or the arrow keys located around the ENTER key. After adjusting the
values, exit the menu by either pressing the MENU key 3 times or mouseclick on the
cross in the menu bar (top right corner).
4. Recording
Recording starts directly after the recorder has booted; there is no separate LED or
display.
5. Playback
Start the playback at the latest HDD playback position by pressing the PLAY key (Quick
Play function deactivated!).
Fast forward / reverse:
Use the „Fast Forward“ key to play video images forward / reverse with up to 32x speed
(1x,2x,4x,8x,16x,32x and >>> “minute steps“)
Pause:
Actuate </II or >/II to freeze the current playback position.
7. Archiving video data
To archive to USB, insert a USB stick into the USB socket at the front. To archive to
CD/DVD, insert the CD/DVD into the DVD+RW burner at the front . Press the COPY key
in live mode to display the context menu.
Enter start and end time of the video export as well as the camera number and press
COPY to start the video data export.
If requested, the player software can also be exported to the USB stick or CD/DVD by
activating the checkbox “Player“.
Exit the menu by either pressing the MENU key several times or mouseclick on the cross
in the menu bar (top right corner).