1
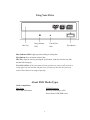
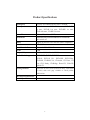
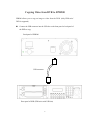
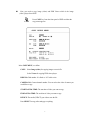
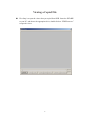
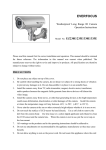
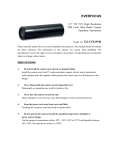
EPR200 Quick Installation Guide About this manual Before installing and using this unit, please read this Manual carefully. Date: Feb. 2006 Table of Contents Hardware System Requirements....................................................................................3 Using Your Drive ...........................................................................................................4 About DVD Media Types ..............................................................................................4 Product Specifications ...................................................................................................5 Copying Video from DVR to EPR200...........................................................................6 Viewing a Copied File ...................................................................................................8 Disc Care......................................................................................................................13 Troubleshooting & Technical Support .........................................................................14 2 Hardware System Requirements Minimum ® ® Intel Pentium III 800 MHz. 256 MB memory. Used for such things as data backup. Recommended Intel Pentium 4 1.0 GHz. 512 MB memory. Highly recommended for DVD+RW UDF format recording. 3 Using Your Drive Busy Indicator LED Disc Tray Forced Eject Hole Eject Button Busy Indicator LED: Lights up when reading or writing data. Eject Button: Press to load or unload a disc. Disc Tray: Open or close by pressing the eject button. Load discs into the tray with the label side facing up. Forced Eject Hole: If the eject button will not open the tray, insert a stiff rod such as a large paper clip into the hole and push in to eject the tray after the drive has been turned off and the disc has stopped spinning. About DVD Media Types Media compatibility Disc Types DVD+RW UDF format EPR200 Supports Read (by connecting to a PC) Write (from a DVR, EDR series) 4 Product Specifications Read Speed: 16x max. DVD-ROM and 48x max. CD-ROM Write Speed: DVD+R: 16x max., DVD+RW: 8x max., DVD+R DL: 4x max., DVD-R: 16x max., DVD-RW: 6x max., CD-R: 48x max., CD-RW: 24x max. Access Time: 120 ms (CD), 140 ms (DVD) Mechanism: Motorized tray load mechanism for horizontal and vertical use Audio: Digital-out and line-out at the back (MPC compatible) Interface: IDE/ATAPI Burst Transfer Rate: PIO mode 4/Ultra DMA 33 Cache: 2 MB Compatibility: MPC level 3, Multi Read, PC2001 Media/Modes Supported: DVD-ROM, DVD-R, DVD-RW, DVD+R, DVD+R DL, DVD+RW, DVD-Video, CD-ROM, CD-ROM XA, CD-Audio, CD Extra, CD Text, CD-I Ready, CD-Bridge, Photo-CD, VideoCD, Hybrid CD Writing Methods: DAO (disc at once), SAO (session at once), TAO (track at once) with zero gap, variable or fixed packet, multisession Dust Protected Enclosure Forced Eject Hole 5 Copying Video from DVR to EPR200 EPR200 allows you to copy an image or video from the DVR. (Only EDR series’ DVR is supported) Connect the USB connector into the USB slot on the front panel or back panel of the DVR to copy. Back panel of EPR200 USB connector Front panel of DVR (EDR series with USB slot) 6 Now, you need to copy image (video) and EDR Viewer which is the image (video) player from DVR. COPY Press COPY key from the front panel of DVR and then the copy menu appears. In the COPY MENU, we define: COPY: Select Image (video) for copying images to movie file. Select Viewer for copying EDR viewer player. DISK NO: Disk number. It is fixed as “01” in this series. CAMERA NO: Camera channel number. You can select the video of camera you would like to copy. START DATE & TIME: The start time of video you want to copy. END DATE & TIME: The end time of video you want to copy. DEVICE: The media (USB/CF) you wish to store the file. Press SELECT to copy after setting up everything. 7 Viewing a Copied File First Step is to open the viewer that you copied from DVR. Insert the DVD-RW to your PC, and choose the appropriate drive, double-click on “EDRViewer.exe” to open the viewer. 8 Once the viewer is opened, click on “Load file” to load the archived EDR MPEG Files (.arv) that you just copied from DVR. Then, click on “Open”, and it will start to play the video automatically. 9 Press STOP button whenever you would like to stop playing the video. Press PLAY button whenever you would like to play the video again. Press PAUSE button whenever you would like to pause the playing video. During playback mode, press PAUSE button to freeze the playing back picture. Press << STEP for reverse playback, or press STEP>> for slow forward. Or you can simply drag the slide bar to the position where you would like to view the image. 10 The option “CAPTURE” allows you to capture a specific still image that you copied. Press CAPTURE button, and the instant image will be captured, save the image as .jpg file to your desired file location. 11 The option “Save to AVI” allows you to convert automatically the .arv file to AVI file, which is a convenient way for most PC users. Press Save to AVI button, and the copied .arv file will be converted and saved to your desired file location. Note: Viewer is only supported by Windows XP. If you have other PC system than Windows XP, you would need to setup a burning software first in order to download the viewer. 12 Disc Care ¾ ¾ To clean the disc, use a soft cloth and wipe from the inside to the outside edge rather than in a circular motion. Do not use record-cleaning or anti-static agents as the solutions may damage a ¾ ¾ disc. Always store discs in proper storage cases when not in use. Check for dirt, dust, or fingerprints on a disc’s recording side before inserting into the unit. ¾ ¾ ¾ ¾ Avoid touching or scratching the recording side of the disc. Hold the disc only by the edges or by the center hole and one edge. Do not affix stickers, labels, or tape to the disc. Discard warped or cracked discs as they may cause damage to the drive. ¾ Avoid unusually shaped discs such as “business card” CDs. 13 Troubleshooting & Technical Support Nothing happens when eject button is pressed: ¾ Make sure the power cable is securely connected to the drive. ¾ Verify the computer is powered-up and running. Drive is very loud when reading/writing: ¾ Make sure the drive is securely mounted to the computer’s chassis. Excessive vibration can be caused by loose or uneven mounting. Still having problems? ¾ Visit Everfocus’ website at http://www.everfocus.com or call +886-2-26982334for assistance. 14 EverFocus Electronics Corp. Head Office: 12F, No.79 Sec. 1 Shin-Tai Wu Road, Hsi-Chih, Taipei, Taiwan TEL: +886-2-26982334 China Office: Room 609, Technology Trade Building, Shandgdi Information Industry Base, Haidian District, Beijing,China FAX: +886-2-26982380 www.everfocus.com.tw TEL: +86-10-62971096 FAX: +86-10-62971432 www.everfocus.com.cn USA Office: 1801 Highland Ave. Unit A Duarte, CA 91010, U.S.A. TEL: +1-626-844-8888 FAX: +1-626-844-8838 Japan Office: 1809 WBG MARIBU East 18F, 2-6 Nakase.Mihama-ku. Chiba city 261-7118, Japan www.everfocus.com TEL : +81-43-212-8188 European Office: Albert-Einstein-Strasse 1 D-46446 Emmerich, Germany TEL: 49-2822-9394-0 www.everfocus.de Your EverFocus product is designed and Ihr EverFocus Produkt wurde entwickelt und manufactured with high quality materials and hergestellt mit qualitativ hochwertigen Materialien components which can be recycled and reused. und Komponenten, die recycelt und wieder This symbol means that electrical and electronic verwendet werden können. equipment, at their end-of-life, should be Dieses Symbol bedeutet, dass elektrische und ® EverFocus P/N: MPR2G00100 15