1
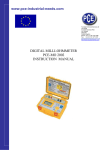
Electric Digital Kettle
OWNER’S MANUAL
Model EK119H
120V., 60Hz., 1800 Watts.
EURO-PRO Operating LLC
Boston, MA, 02465
1 (800) 798-7398
www.euro-pro.com
COPYRIGHT © 2008 EURO-PRO OPERATING LLC
IMPORTANT SAFETY INSTRUCTIONS
When using your Electric Digital Kettle, basic safety precautions should always
be observed, including the following:
1.
2.
3.
4.
5.
6.
7.
8.
9.
10.
11.
12.
13.
Read all instructions before using your
Electric Digital Kettle.
Before connecting the kettle to the power
supply, check that the voltage indicated
on the appliance (underside of the power
base) corresponds with the voltage in
your home.
Do not touch hot surfaces. Always use
handles or knobs.
Close supervision is necessary when
any appliance is used by or near
children.
To protect against electric shock, do
not immerse cord, plug or kettle in water
or any other liquids.
Do not let cord hang over edge of
table or counter, or touch hot surfaces.
Do not operate appliance with damaged
cord or plug or after the appliance
malfunctions or has been damaged in
any manner. Return appliance to
EURO-PRO Operating LLC for
examination, repair or adjustment.
Do not place hot kettle on or near paper,
cloth or other flammable material.
Position the kettle properly on the power
base before switching on.
Never leave the kettle unattended when
plugged in. When using this appliance,
provide adequate air space above and
on all sides for air circulation.
Never place a hot kettle on surfaces
where heat may cause a problem.
Always place hot kettle on an insulated
heat pad.
Do not place the base or the kettle on
or near a hot gas or electric burner.
Never place or use the kettle on a range
top or in a microwave oven. Use only
with the power base.
14. Always unplug the power base and
empty the kettle when not in use.
15. Do not allow liquid to evaporate from
kettle. Do not heat kettle when empty.
16. Use only the power base provided,
and keep it clean and dry.
17. To disconnect, depress ‘On/Off’ button,
and ensure that ‘On/Off’ LED is not
illuminated. Then remove the plug.
Always hold the plug, and never pull
the cord.
18. Extreme caution must be used when
moving an appliance containing hot
liquids.
19. Never put less water in the kettle to
boil than is indicated by the “MIN” mark
on the water level window.
20. Always ensure that the lid is closed
and the filter is in place when using the
appliance. Do not lift the lid when the
unit is in use. Scalding may occur if
the lid is removed during the brewing
cycles.
21. Do not fill above the ‘MAX’ or below
the ‘MIN’ mark on the kettle body.
WARNING: If this kettle is overfilled,
boiling water may be ejected.
22. Ensure that the kettle is on a stable,
flat surface.
23. Always take care to pour boiling water
slowly and carefully without tipping the
kettle too fast.
24. To avoid possible steam damage, turn
spout away from walls or cabinets
during use.
25. Avoid contact with steam from the
spout when the water is boiling or just
after it has switched off.
26. Do not clean kettle with scouring
powders, steel wool pads or other
abrasive materials as these will
damage the finish of the appliance.
IMPORTANT SAFETY INSTRUCTIONS
27. Do not use outdoors or while standing
in a damp area.
28. Do not use appliance for other than
intended use.
29. Lift and tilt cover away from you
carefully to avoid scalding and allow
water to drip into unit.
30. USE CARE when opening the lid for
refilling when the kettle is HOT.
31. Do not hold the switch in the
“Temperature” hold position or tamper
with the switch to fix it in the “ON”
position as this may cause steam to be
ejected from around the lid and could
damage the automatic switch-off
mechanism.
32. Do not attempt to connect any other
appliance to the power base unit,
or tamper with the connector in any
way.
33. Do not touch the kettle with wet
hands.
34. Do not place any utensils or baby
bottles into the kettle.
35. WARNING: Do not place the power
base unit onto any metal surfaces
such as metal trays or stove tops
when it is plugged into a power
source of any kind.
36. Always unplug the power base when
the appliance is not in use.
This unit has a short power supply cord to
reduce the risk resulting from becoming
entangled in or tripping over a long cord.
It is not recommend to use an
extension cord but should one be
required:
1. An extension cord may be used if the
electrical rating is equal to or greater
than the rating of the kettle. Use an
extension cord rated 15 amperes or
greater.
2. Care must be taken to arrange the
extension cord so that it will not
drape over the countertop or tabletop
where it can be pulled on by children
or tripped over.
WARNING: Danger of Scalding. Please use caution when using
the kettle. The steam emitted from this appliance is very hot.
SAVE THESE INSTRUCTIONS
For Household Use Only
SAVE THESE INSTRUCTIONS
For Household Use Only
WARNING: To reduce the risk of electric shock, this appliance has a polarized plug
(one blade is wider than the other). This plug will fit in a polarized outlet only one way.
If the plug does not fit fully in the outlet, reverse the plug. If it still does not fit, contact a
qualified electrician to install the proper outlet. Do not modify the plug in any way.
1
Rev. 08/05A
2
Getting To Know Your Electric Digital Kettle
FEATURES OF ELECTRIC DIGITAL KETTLE
1. LED TEMPERATURE DISPLAY
6. TEMPERATURE HOLD
BUTTON
The LED temperature display screen
will display the temperature selected.
Press this button to keep heated
water at the temperature selected.
2. LID RELEASE BUTTON
The lid release button allows you
to open the lid without touching hot
areas.
7. CONCEALED HEATING
ELEMENT
Concealed heating element
provides faster heating and easier
clean-ups.
3. POWER “ON” LIGHT
1.
2.
3.
4.
5.
6.
7.
8.
9.
Lid
Anti-Scale Filter
Lid Hinge Pins
Pouring Spout
Main Unit
Lid Release Button
Cool Touch Handle
Water Level Window
Power Base With Cord Storage
10. Power Connector
11. Temperature Hold Light
12. Power On Light
13. On/Off Button
14. Temperature Hold Button
15. LED Temperature Display
16. Variable Temperature Control
17. Control Panel
Technical Specifications
Voltage:
Power:
120V., 60Hz.
1800 Watts
The power “On” light will illuminate
when the “On/Off” button is pressed
to the “On” position. It will turn off
when the “On/Off” button is pressed
to stop the boiling process or when
the desired temperature has been
reached.
8. POWER BASE WITH CORD
STORAGE
Allows for easy cord storage.
9. WATER LEVEL WINDOW
Easy-to-read indicators lets you
know how much water is left.
4. VARIABLE TEMPERATURE
CONTROL
10. AUTO SHUT-OFF
Turning this knob will select the
water temperature desired. The
temperature goes up in 10˚
increments from 80˚F to 210˚F.
210˚F is shown as a series of
automated symbols. Pushing this
knob will automatically set it to the
boiling point (210˚F).
Will turn the unit off when the
water has reached the set
temperature or the kettle is empty.
11. SAFETY SHUT-OFF
Will turn the unit off if there is no
water left in the kettle.
5. ANTI-SCALE FILTER
Note: Illustrations may differ from actual unit.
3
To protect your beverages from
water scale deposits.
4
OPERATING INSTRUCTIONS
OPERATING INSTRUCTIONS
Preparing Your Kettle
Using Your Kettle
BEFORE FIRST USE: Remove any
packaging material or stickers from your
kettle.
1. Place the power base on a flat, stable
surface.
2. Fill the kettle to the “Max” indicator on
the water level window (2 quarts /
2 liters). (Fig. 1)
3. Ensure that the anti-scale filter is
attached to lid. If it is not, then snap
the anti-scale filter into place.
4. Snap the lid onto the lid hinge pins
that are on either side of the kettle
and lock the lid in place.
5. Place the kettle on the power base
and press the On/Off button.
6. Set the variable temperature control
to the highest temperature setting
(210˚F) and let the water come to a
boil until the kettle shuts off
automatically. (Fig. 2)
7. Discard this water and repeat the
process one more time.
8. Rinse the kettle two or three times.
The kettle is now ready for use.
1. Lift the kettle off the base before
filling.
2. Press the lid release button for easy
filling. (Fig. 3)
Lid Release
Button
Fig. 3
3. Fill the kettle to the desired amount of
water using the water level window as
your guide. Ensure that water is
between the ‘MIN’ and ‘MAX’ levels.
CAUTION: Do not allow kettle to boil dry
as this will cause damage to the kettle.
WARNING: If the kettle is overfilled,
there is a risk that water will spit out of
spout.
4. Make sure that the lid is securely
locked in place and that the kettle is
seated correctly on the base.
5. The LED temperature display on the
control panel will blink ‘OFF’ when
the kettle is placed on the power
base. Press the On/Off button to turn
the unit “On”. The power “On” light will
illuminate.
6. Turn the variable temperature control
to the desired temperature, 80˚F to
210˚F or push it to set it directly to
210˚F. Once the temperature of the
water has reached the set
temperature, the unit will
automatically shut off and the power
“On” light will turn off.
7. If you wish to keep your water at the
set temperature, press the
temperature hold button. The
temperature hold light will now
illuminate. (Fig. 4)
MAX
Level
Fig. 1
Fig. 2
LED
Temperature
Display
Variable
Temperature
Control
Temperature
Hold
Button
Fig. 4
5
Variable
Temperature
Control
8. To stop the temperature hold feature,
press the temperature hold button
one more time and the temperature
hold light will turn off.
9. To turn the unit “Off”, depress the
On/Off button. The power “On” light
will turn “Off”.
10. Remove the kettle from the power
base for convenient and easy serving.
CAUTION: Do not place hot kettle
directly onto furniture or flammable
materials. Use a hot plate or cloth under
the kettle when placing on a table,
countertop or other furniture.
NOTE: The kettle will not turn on if the
temperature of the water in the kettle is
higher than the temperature selected.
11. After use, empty the kettle and ensure
that the temperature hold is “Off”.
The unit will automatically shut off
when the set temperature of the water
has been reached.
12. Unplug the power base from the
electrical outlet.
To Shorten Power Cord Length:
Wrap the extra cord length around
hidden cord storage until length is correct
for base placement. Make sure that the
cord has been properly wrapped and the
base is seated firmly.
Don’ts
•
•
•
•
•
Never use the cordless kettle for
boiling or heating anything other than
water.
Never place any utensils, containers
or baby bottles in unit.
Never immerse unit or power base in
water or any other liquid.
Never let unit run dry.
Never leave unit unattended when in
use.
Do’s
• Use caution when pouring hot water.
• When boiling water for baby formula,
always boil water to boiling point
(210˚F) and then let it cool. Follow
the manufacturer’s instructions on
how to prepare the baby formula.
• Always ensure that there is water in
kettle before turning the unit on.
• Always use fresh water.
• Always unplug power base when unit
is not in use.
• Rinse the anti-scale filter regularly.
• Hold kettle firmly when lifting from
power base.
Care and Maintenance of Your
Kettle
WARNING: Always disconnect the
appliance from the power source before
cleaning. Never immerse the kettle or
base in water or any other liquid.
It is necessary to clean your cordless
kettle regularly to ensure optimum
performance. Mineral deposits in tap
water may cause the water level window
and the inside of the kettle to discolor.
1. To remove build-up, fill the kettle
with 1 part vinegar and 5 parts
water and leave it unplugged
overnight or for a period of
approximately 8 hours. Do not use
cordless kettle while descaling
solution is inside.
2. After the period of soaking, empty
the kettle. Due to the fact that a small
amount of solution will be left in the
kettle, it is necessary to rinse the
kettle out with clean water 2 or 3
times. Your kettle is now ready for
use.
3. The outside of the kettle can be
wiped clean with a soft damp cloth.
NOTE: Never use any chemical, steel
wool, or abrasive cleaners to clean any
part of the kettle.
Hints & Tips
•
•
•
•
•
6
Boil water for hot water bottles.
Heat water for manicures and
pedicures.
Boil water for baby formulas.
Warm water for warm compresses.
Boil water for tea, coffee and instant
soup broth.
TROUBLE SHOOTING GUIDE
TR O U B LE S H O O TIN G G U ID E
P R O B LE M
Flashing “O ff” on LC D
W ater does not boil
‘O n/O ff’ light will not
illum inate when
depressed
PO S S IB LE R E AS O N
1.
D epress O n/O ff button and
select a desired
tem perature.
The kettle is not plugged
into a 120V A C electrical
outlet.
The ‘O n/Off’ button was not
depressed to start the
heating process.
1.
The kettle m ust be plugged
into a 120V A C electrical
outlet.
D epressed the ‘O n/O ff’
button to start the heating
process.
W ater has not cooled down
from desired tem perature.
1.
1.
K ettle has not been
program m ed.
1.
2.
1.
PO S SIB LE SO LU T IO N
2.
Increase tem perature
selection.
EK119H
ONE (1) YEAR LIMITED WARRANTY
EURO-PRO OPERATING LLC warrants this product to be free from defects in material and
workmanship for a period of one (1) year from the date of purchase when utilized for normal
household use.
If your appliance fails to operate properly while in use under normal household conditions within
the warranty period, return the complete appliance and accessories, freight prepaid. For
Customer Service support, call 1 (800) 798-7398 or visit our website www.euro-pro.com.
If the appliance is found to be defective in material or workmanship, EURO-PRO Operating LLC
will repair or replace it free of charge. Proof of purchase date and $12.95 to cover the cost of
return shipping and handling must be included.*The liability of EURO-PRO Operating LLC is
limited solely to the cost of the repair or replacement of the unit at our option. This warranty does
not cover normal wear of parts and does not apply to any unit that has been tampered with or
used for commercial purposes. This limited warranty does not cover damage caused by misuse,
abuse, negligent handling or damage due to faulty packaging or mishandling in transit. This
warranty is extended to the original purchaser of the unit and excludes all other legal and/or
conventional warranties. The responsibility of EURO-PRO Operating LLC, if any, is limited to
the specific obligations expressly assumed by it under the terms of the limited warranty. In no
event is EURO-PRO Operating LLC liable for incidental or consequential damages of any
nature whatsoever. Some states do not permit the exclusion or limitation of incidental or
consequential damages, so the above may not apply to you. This warranty gives you specific
legal rights, and you may also have other rights which vary from state to state or province to
province.
*Important: Carefully pack item to avoid damage in shipping. Be sure to include proof of
purchase date and to attach tag to item before packing with your name, complete address
and phone number with a note giving purchase information, model number and what you
believe is the problem with item. We recommend you insure the package (as damage in
shipping is not covered by your warranty). Mark the outside of your package “ATTENTION
CUSTOMER SERVICE”. We are constantly striving to improve our products, therefore the
specifications contained herein are subject to change without notice.
---------------------------------------------------------------------------------------------------------------------------------
OWNERSHIP REGISTRATION CARD
FOR CANADIAN CONSUMERS ONLY
Please fill out and mail the product registration card within ten (10) days of purchase. The
registration will enable us to contact you in the unlikely event of a product safety notification. By
returning this card you acknowledge to have read and understood the instructions for use, and
warnings set forth in the accompanying instructions.
RETURN TO EURO-PRO OPERATING LLC, 4400 Bois Franc, St-Laurent, QC, H4S 1A7
EK119H
_________________________________________________________________________
Appliance model
_________________________________________________________________________
Date purchased
Name of store
_________________________________________________________________________
Owner’s name
_________________________________________________________________________
Address
City
State
Zip Code
7
Printed in China
8