1
PowerLite 935W
®
Quick Setup
Before using the projector, make sure you read the safety instructions in the
online User’s Guide.
Video device
4
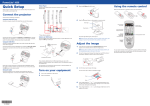
Connect up to 5 video devices and use the Source Search button on the
projector or remote control to switch between them.
Press the
power button on the projector or remote control.
Power Button
Using the remote control
Power Light
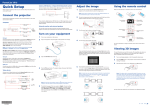
Make sure the batteries are installed as shown (two AA batteries).
RCA video cable (composite video)
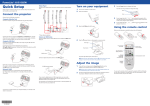
Connect the projector
S-Video cable
Audio cable
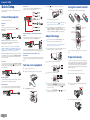
Choose from the following connections.
Connect the square end of a USB cable to the projector’s �
USB
TypeB (square) port. Connect the flat end of the cable to any USB port on
your computer.
Audio cable
Connect a digital camera, USB flash drive, USB storage device, or Epson
document camera DC-06 to the projector’s USB TypeA (flat) port.
Windows® XP or later: After turning on the projector, follow
the on-screen instructions to install the Epson USB Display software
(EMP_UDSE.EXE; only on first connection).
Connect one end of a VGA cable to the projector’s Computer1 or Computer2
port, and the other end to your computer’s �
monitor port. If you are using
a notebook, switch it to external display (see “Troubleshooting”). You can also
connect an audio cable.
Turn projector on and off
language, press the Menu button on the remote control. Select
Extended and press Enter. Select Language and press Enter. Select your
language and press Enter. Press the Menu to exit the menu system.
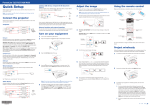
Adjust the image
Control projector
volume
1If you don’t see an image, press the Source Search button on the
Access projector
menus
If you connect a digital camera, USB flash drive, or USB storage device, you can
use the projector’s Slideshow feature. See the online User’s Guide for details.
2To raise the image, press the foot release button and lift the front of the
projector. Release the button to lock the foot in position.
For more information on using the remote control, see the online User’s
Guide.
External monitor, external speakers, and
microphone
Project wirelessly
You can also connect an external monitor, external speakers, and a microphone
to your projector to enhance your presentations. See the online User’s Guide for
details.
3
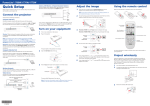
Turn on your equipment
1
Turn on your computer or video source.
2
Plug in the projector. The power light on the projector turns orange.
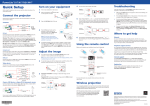
Follow the steps here to connect the projector wirelessly over an 802.11b,
802.11g, or 802.11n wireless network. You must install the optional Epson
wireless LAN module (part number V12H418P12). Your computer must have
a wireless card or built-in wireless interface, and be running Windows 8,
Windows 7, Windows Vista®, Windows XP Professional x64, or Windows XP, or Mac OS X 10.5.8 to 10.8.x.
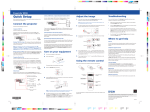
Turn the zoom ring to reduce or enlarge the image.
Zoom ring
1
4
Rotate the focus ring to sharpen the image.
Turn off the projector and unplug the power cord.
2Slide the air filter cover latch and open the air filter cover.
Focus ring
5If your image looks like
Wired network
3
Open the A/V Mute slide all the way.
or
, you’ve placed the projector off to
one side of the screen at an angle. Place it directly in front of the center
of the screen, facing the screen squarely. Or press the or buttons on
the projector to correct it.
6If your image looks like
or
, press the
or
3Remove the screw securing the wireless LAN module stopper, then
remove the stopper.
buttons on the
projector to correct it.
4
*412439300*
Navigate projector
menus
Note: If you still see a blank screen or have other display problems, see
the troubleshooting tips on the back of this sheet.
You can connect the projector wirelessly over an 802.11b, 802.11g, or 802.11n
wireless network. See “Project wirelessly” for instructions.
*412439300*
Choose which source
to display
Turn off projector
display and sound
projector or the remote control to select the image source.
Wireless network
You can connect the projector to your network using an Ethernet cable. ����
See
“Project over a wired network” on the back of this sheet for instructions.
5The default language of the menu system is English. To select another
HDMI cable
Camera, USB device, or Epson DC-06 document
camera
Monitor port
power button twice, then
unplug it. You don’t have to wait for the projector to cool down.
Component video to VGA cable
USB port
Mac OS X 10.5.8 or higher: After turning on the projector, the setup folder
for USB Display appears in the Finder. Double-click USB Display Installer and
follow the on-screen instructions to install the Epson USB Display software
(only on first connection).
The power light flashes green, then stays on.
Note: To shut down the projector, press the
Computer
Note: If the software screen does not display automatically, open My
Computer or Computer, then double-click EPSON_PJ_UD. If it still does not
display, access the projector’s Extended menu and select USB Display as the
USB Type B setting. See the online User’s Guide for instructions.
Insert the wireless LAN module into the port.