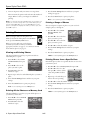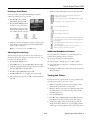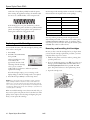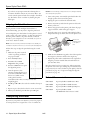
1
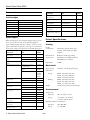
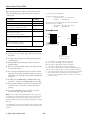
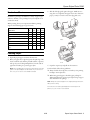
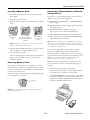
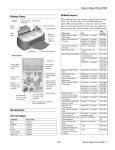
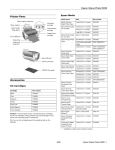
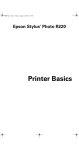
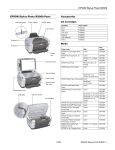
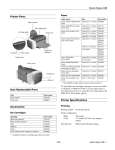
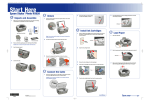
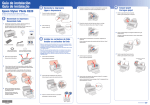
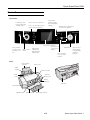
Epson Stylus Photo R340
Printer Parts
Control Panel
Print photos from
memory cards and
external devices
Press and hold
for 2 sec. to turn
the printer on or
off
Choose print
settings such as
layout and quality
settings
Press + to zoom in and crop
Press – to view 9 photos at a
time for quicker searching
Print on CDs or
DVDs
Adjust printer
settings and
perform printer
maintenance
Navigate menu options and
choose menu settings
LCD screen Return to
previous menu
or cancel menu
selection
Start printing
Go to next menu
or choose menu
selection
Cancel control
panel settings
or stop printing
and cancel
print job
Printer
Paper support
extension
Paper
support
Printer cover
Preview monitor
Edge
guide
Memory
card cover
EXT I/F
USB port
USB port
Control panel
CD/DVD tray
Output tray
Output tray extension
8/05
Epson Stylus Photo R340 - 1
Epson Stylus Photo R340
Accessories
Ink Cartridges
Cartridge
Part number
Paper name
Size
Part
number
Epson Ink Jet
Transparencies
Letter (8.5 x 11 inches)
S041064
Epson Iron-On Transfer
Paper
Letter (8.5 x 11 inches)
S041153
Black
T048120
T048320
Epson Glossy Photo
Greeting Cards
Letter (8.5 x 11 inches),
perforated edges
S041606
Magenta
Cyan
T048220
Epson Photo Stickers
A6 (4.1 x 5.8 inches)
S041144
Yellow
T048420
Letter*
SCR1001
Light Magenta
T048620
Epson Semigloss Scrapbook
Photo Paper
Light Cyan
T048520
Letter*
SCR1002
Color Multipack
T048920
PremierArt™ Matte
Scrapbook Photo Paper for
Epson
Epson Papers
Printer Specifications
When printing from your computer using the Epson® printer
driver, you can choose from any of the following Epson
papers. When printing without a computer, select one of the
papers marked with an asterisk (*) See page 3 for information
about paper settings. The printer also works with plain paper.
Paper name
Size
Part
number
Epson Premium Bright
White Paper
Letter (8.5 x 11 inches)*
S041586
Epson Photo Quality Ink Jet
Paper
Letter (8.5 x 11 inches)*
S041062
Legal (8.5 x 14 inches)
S041067
Epson Photo Quality Ink Jet
Cards
A6 (4.1 x 5.8 inches)
Epson Glossy Photo Paper
Printing
Nozzle
configuration
540 nozzles (90 each: black, cyan,
magenta, yellow, light cyan, light
magenta)
Print direction
Bidirectional with logic seeking
Control code
ESC/P Raster, ESC/P-R command,
EPSON Remote command
S041054
Input buffer
128KB
Borderless 4 x 6 inches,
non-perforated*
S041458
Mechanical
4 x 6 inches, perforated
edges
S041134/
S041671
Paper capacity
Letter (8.5 x 11 inches)*
S041141/
S041649/
S041272/
S041271
120 sheets of 24 lb (90 g/m2) paper
Dimensions
Storage
Width: 19.0 inches (483 mm)
Depth: 11.8 inches (300 mm)
Height: 7.4 inches (188 mm)
Printing
Width: 19.0 inches (483 mm)
Depth: 18.8 inches (478 mm)
Height: 11.7 inches (297 mm)
Epson Matte Paper
Heavyweight
Borderless 8 x 10 inches*
Letter (8.5 x 11 inches)*
S041257
Epson Double-Sided Matte
Paper
Letter (8.5 x 11 inches)
S041568
Epson Ultra Premium Glossy
Photo Paper
Letter (8.5 x 11 inches)*
S041935
Borderless 4 x 6 inches*
S041934
Epson Premium Glossy
Photo Paper
Letter (8.5 x 11 inches)*
S041286/
S041667
Environmental
Borderless 4 x 6 inches*
S041682
Temperature
Borderless 5 x 7 inches*
S041464
Operation
50 to 95 °F (10 to 35 °C)
Borderless 8 x 10 inches*
S041465
Storage
Epson Premium Semigloss
Photo Paper
Letter (8.5 x 11 inches)*
S041331
−4 to 140 °F (−20 to 60 °C)
1 month at 104 °F (40 °C)
Borderless 4 x 6 inches*
S041982
Epson Premium Luster
Photo Paper
Letter (8.5 x 11 inches)*
S041405
Epson Photo Quality Self
Adhesive Sheets
A4 (8.3 x 11.7 inches)
S041106
2 - Epson Stylus Photo R340
S041467
Weight
13.4 lb (6.1 kg) without ink cartridges
Humidity (without condensation)
8/05
Operation
20 to 80% RH
Storage
5 to 85% RH
Epson Stylus Photo R340
Electrical
Specification
120 V Model
Input voltage *
99 to 132 V
Rated frequency
Selecting the Media or Paper Type
Setting
220−240 V Model
198 to 264 V
When printing from your computer, select the following
Paper Type/Media Type settings in the driver software.
50 to 60 Hz
Input frequency
49.5 to 60.5 Hz
Rated current
0.4 A
0.2 A
Power consumption Approx. 13 W (ISO10561 Letter Pattern)
Approx. 3 W in standby mode
* Check the label on the back of the printer for your printer’s
voltage.
Safety Approvals
Safety standards
UL 1950, CSA 22.2 No. 950
EMI
FCC part 15 subpart B class B
CSA C108.8 Class B
Select this Paper Type/
Media Type setting
For this paper
Ink Cartridges
Plain paper sheets
Epson Iron-On Transfer Paper
Plain Paper
Epson Premium Bright White Paper
Bright White Ink Jet Paper
Epson Photo Quality Ink Jet Paper
Epson Photo Quality Ink Jet Cards
Epson Photo Quality Self Adhesive
Sheets
Epson Ink Jet Transparencies
Photo Quality Ink Jet Paper
Epson Matte Paper Heavyweight
Epson Double-Sided Matte Paper
PremierArt Matte Scrapbook Photo
Paper for Epson
Matte Paper Heavyweight
Epson Photo Paper
Photo Paper
Epson Glossy Photo Paper
Epson Photo Quality Glossy Paper
Epson Glossy Photo Greeting Cards
Glossy Photo Paper
Specification
Black ink cartridge
Color ink cartridge
Color(s)
Black
Cyan, Magenta, Yellow,
Light Cyan, Light Magenta
Cartridge life
2 years from production date (if unopened)
(within 6 months after opening package, at 77 °F
[25 °C])
Storage
temperature
−4 to 104 °F (−20 to 40 °C)
1 month at 104 °F (40 °C)
Epson Ultra Premium Glossy Photo
Paper
Ultra Premium Glossy
Photo Paper
Freezing
temperature*
3.2 °F (−16 °C)
Epson Premium Glossy Photo Paper
Premium Glossy Photo
Paper
Dimensions
0.5 × 2.9 × 2.2 inches (W × D × H)
12.7 × 73.5 × 55.3 mm (W × D × H)
Epson Photo Stickers®
Photo Stickers
Epson Premium Luster Photo Paper
Epson ColorLife Photo Paper
Premium Luster Photo
Paper
Epson Premium Semigloss Photo
Paper
Epson Semigloss Scrapbook Photo
Paper
Premium Semigloss Photo
Paper
Envelopes
Envelopes
* Ink thaws and is usable after approximately 3 hours at
77 °F (25 °C).
Caution: Epson recommends the use of original Epson ink cartridges
only. Products not manufactured by Epson may cause damage to
your printer and will not be covered by Epson’s warranties.
Do not use an ink cartridge if the date on the cartridge has expired.
Do not refill ink cartridges. The printer calculates the amount of ink
remaining using an IC chip on the ink cartridge, so even if the
cartridge is refilled, the IC chip will report that it is empty.
8/05
Epson Stylus Photo R340 - 3
Epson Stylus Photo R340
When printing without a computer (in stand-alone mode),
select the following Paper Type settings from the printer’s
control panel.
For this paper
Select this Paper
Type setting
Epson Ultra Premium Glossy Photo Paper
Ultra Premium
Epson Premium Glossy Photo Paper
Premium Glossy
Epson Premium Semigloss Photo Paper
Epson Semigloss Scrapbook Photo Paper
Semigloss
Epson Premium Luster Photo Paper
Premium Luster
Epson Photo Paper
Epson Glossy Photo Paper
Epson Glossy Photo Greeting Cards
Photo Paper
Epson Matte Paper Heavyweight
PremierArtTM Matte Scrapbook Photo Paper for
Epson
Matte
Plain paper
Epson Photo Quality Ink Jet Paper
Epson Premium Bright White Paper
Plain Paper
Do not load curled or folded paper.
Use papers under these conditions:
Temperature: 59 to 77 °F (15 to 25 °C)
Humidity:
40 to 60% RH
Store printouts on Photo Quality Glossy Film and Self Adhesive
Sheets under these conditions:
Temperature: 59 to 86 °F (15 to 30 °C)
Humidity:
20 to 60% RH
Printable area
A
B-L
A
B-R
D-R
D-L
C
E
single sheets/index cards
envelopes
Media Loading Guidelines
❏ See page 2 for a list of Epson papers that can be used with
this printer.
borderless
(4 × 6, 5 × 7, 8 × 10,
and letter-size only)
❏ Load paper short edge first, even when printing landscapeoriented pictures.
A: The minimum top margin is 0.12 inch (3.0 mm).
B-L: The minimum left margin is 0.12 inch (3.0 mm)
B-R: The minimum right margin is 0.12 inch (3.0 mm)
C: The minimum bottom margin is 0.12 inch (3.0 mm)
D-L: The minimum left margin for envelopes is 0.20 inch (5.0 mm)
D-R: The minimum right margin for envelopes is 0.20 inch (5.0 mm)
E: The minimum bottom margin for envelopes is 0.78 inch (20 mm)
** When printing with the borderless setting, print quality may
decline in the top and bottom areas of the printout, or the area
may be smeared.
❏ Always handle sheets by the edges, and don’t touch the
printable surface.
❏ Be sure to load the printable (whiter) side of the media face
up in the sheet feeder.
❏ Do not load paper higher than the arrow mark on the left
edge guide. (Some papers should be loaded just one sheet at
a time. Make sure you check any instructions included with
the paper.)
❏ In addition to the Media Type (or Paper Type) setting,
remember to select the correct Paper Size for your media.
❏ If the package includes protective sheets between the sheets
of media, be sure to remove the protective sheets before
printing.
❏ Some special media have a cut corner that you need to
position in the upper right when loading.
Note: Since the quality of any particular brand or type of paper may
be changed by the manufacturer at any time, Epson cannot attest to
the quality of any non-Epson brand or type of paper. Always test
samples of paper stock before purchasing large quantities or printing
large jobs.
Poor quality paper may reduce print quality and cause paper jams and
other problems. If you encounter problems, switch to a higher grade
of paper.
4 - Epson Stylus Photo R340
8/05
Epson Stylus Photo R340
3. Slide the left edge guide against the paper. Make sure it is
snug, but not so tight that the paper is bent. (For letter-size
paper, you may not need to move the edge guide over.)
Borderless Photos
BorderFree™ printing is available for a variety of paper types
and sizes, whether you’re printing from your computer or in
stand-alone mode.
When printing from your computer, BorderFree printing
supports the following paper types and sizes:
Paper name
Letter
size
4×6
5×7
8 × 10
Epson Photo Paper
Yes
No
No
No
Epson Glossy Photo Paper
Yes
Yes
No
No
Epson Premium Glossy Photo Paper
Yes
Yes
Yes
Yes
Epson Premium Semigloss Photo
Paper
Yes
No
No
No
Epson Premium Luster Photo Paper
Yes
No
No
No
Epson Matte Paper Heavyweight
Yes
No
No
Yes
Epson Ultra Premium Glossy Photo
Paper
Yes
Yes
No
No
Letter
Loading Paper
1. Open the paper support and raise the extension.
2. Place your paper short edge first against the right edge of the
feeder, under the tab, with the printable (whiter or glossier)
side up. If you are loading multiple sheets, fan the stack of
paper before loading it to prevent paper jams.
4×6
4. Open the output tray and pull out the extension.
You should also follow these guidelines:
Note: Don’t load paper above the arrow mark inside the left edge
guide. Some special papers can be loaded only one sheet at a
time. See your on-screen User’s Guide for details.
❏ Always load the short edge first, even when you’re printing
landscape-oriented pictures.
❏ When using special papers, check the paper package for
additional instructions. Some papers require using a support
sheet included in the package.
Note: Always keep unused paper in the original package and store it
flat to prevent curling.
For instructions on loading special papers and envelopes in the
printer, see your on-screen User’s Guide.
8/05
Epson Stylus Photo R340 - 5
Epson Stylus Photo R340
Slide the tray under the tab and the two rollers. Push it in
until the arrows on the tray and guide are aligned. Don’t
push the tray in too far; line up the arrows exactly.
Loading CDs and DVDs
Follow these steps to load CDs and DVDs into your printer:
Load tray under tab
Caution: If you don’t insert the tray correctly, you may damage the
printer or tray.
1. Push in the output tray extension and lower the CD/DVD
tray guide.
Line up arrows
Keep tray level
Lower CD/DVD
tray guide
See Printer Basics for more information on printing CDs
and DVDs.
Push in extension
Printing Without a Computer
2. Place the CD or DVD on the CD tray with the white or
printable side face-up. Make sure the disc lies flat on the
tray.
Your printer can print photos stored:
❏ On a memory card
To print on a small CD (8-cm), place the small CD ring on
the tray first, then place the CD inside the ring.
❏ In a digital camera
❏ On a USB data storage device, such as a CD-R drive,
thumb drive, or an Iomega® Zip® drive
Caution: Make sure you always use the small CD ring when
printing 8-cm CDs and that the CD and ring lie flat on the tray;
otherwise the printer may be damaged.
❏ On a Bluetooth®-enabled device with the optional
Bluetooth Photo Print adapter
Make sure the image files meet these requirements:
Always use this ring
with 8-cm CDs
❏ JPEG files or uncompressed Tiff files only
❏ The file storage device complies with DCF (Design rule for
Camera File systems) Version 1.0
❏ Resolutions ranging from 160 × 160 to 4600 × 4600 pixels
3. Insert the tray into the printer carefully, making sure it is
level, not tilted up or down.
6 - Epson Stylus Photo R340
8/05
Epson Stylus Photo R340
Inserting a Memory Card
Connecting a Digital Camera or External
Storage Device
1. Press the P power button to turn on your Epson Stylus
Photo R340.
If you have one of the following devices, you can connect it
directly to your printer using a USB cable:
2. Open the memory card door.
❏ Digital camera with PictBridge® or USB DP (USB Direct
Print™) support
3. Insert the memory card into one of the three slots, as shown
below.
❏ USB thumb drives (see http://support.epson.com for a list
of compatible drives)
❏ USB CD/DVD burners and drives (see http://
support.epson.com for a list of compatible drives)
❏ 100 or 250MB Iomega Zip drive, AC or USB powered
CompactFlash or
Microdrive
(left)
Memory Stick,
SD (Secure Digital), or
MMC (MultiMediaCard)
(middle)
❏ Memory cards with a commercially available USB adapter
(such as the MicroTech™ ZiO!™)
SmartMedia or
xD Picture Card
(right)
Note: Epson cannot guarantee the compatibility of any cameras or
drives. If you’re not sure about your camera or drive, you can try
connecting it. If it’s not compatible, you’ll see a screen saying that the
connected device cannot be used.
Note: Insert just one card at a time. See your on-screen User’s
Guide for supported photo file formats.
4. Push the card in carefully until it stops (it doesn’t go in all
the way). When it is in, the card light comes on.
If you are using a Zip disk or a thumb drive, it must be
formatted as a FAT16 disk. If you insert a Macintoshformatted Zip disk or thumb drive, you see an error message
saying that the inserted card cannot be used with the printer.
5. Close the memory card door.
After a moment, the printer reads and counts the number of
images on your card. When it’s done, your images are
available for printing.
Tip: When you connect a CD drive, you can also print photos
from Picture CDs that you get from your photo lab.
When you connect a digital camera or storage device, the
printer treats it like a memory card. Follow these steps to
connect it:
Removing Memory Cards
If your printer is connected to your computer, you need to
eject the memory card from your computer before you remove
the card from the printer, see Printer Basics for instructions on
removing your memory card.
1. Remove any memory cards from the printer.
If you leave a card in the printer, images will be read from
the card instead of your camera or storage device.
Otherwise, make sure the card light is not flashing, then pull
the card straight out of the slot.
2. Connect the USB cable from your camera or storage device
to the EXT I/F USB port on the front of the printer. Some
digital cameras require a special USB cable; if so, be sure to
use the one that came with the camera.
Card light
Caution: Do not eject a card while the card light is flashing, or you
may lose data on the card.
8/05
Epson Stylus Photo R340 - 7
Epson Stylus Photo R340
3. Press the Print Settings button and choose your print
settings (see page 9).
3. Turn on the printer and your camera or storage device.
After a moment, the printer reads and counts the number of
images. When it’s done, your images are available for
printing.
4. Press the x Start button to print your photos.
Note: To cancel printing, press the y Stop button.
Note: If you used the Stylus Photo R340 to back up your images on a
Zip disk, CD, or another storage device (see Printer Basics), they’re
stored in folders (001, 002, etc.). Use the u and d buttons on the
printer’s control panel to highlight the folder you want to open, then
press OK to open it.
Printing a Range of Photos
Choose and print a sequence of photos on your card—for
example, photos 7 through 12.
1. Press l or r to choose Print
Range of Photos, then
press OK.
Printing Photos
2. Press l or r to choose the first
photo you want to print.
Before you begin, make sure the printer is in
Memory Card mode. If the printer is in CD/DVD
mode, press the Memory Card button.
3. Press l or r to choose the last
photo you want to print.
Before you print, make sure you load paper
and insert your camera’s memory card in the
appropriate card slot (see page 7), or connect an external
device that has photos (see page 7).
4. Press u or d to select the number of copies.
5. Press the Print Settings button and choose your print
settings.
Viewing and Printing Photos
6. Press the x Start button to print your photos.
The View and Print option lets you preview and choose
individual photos to print.
Note: To cancel printing, press the y Stop button.
1. Press l or r to choose View
and Print Photos, then press
OK.
Printing Photos from a Specific Date
2. Press l or r to choose the
photo you want to print.
1. Press l or r to choose Print by Date, then press OK.
Print all the photos taken on a specific date that are stored on
your memory card.
2. Press u or d to choose a date,
then press r to select it. (Select
a date and press l to deselect
it.)
3. Press u or d to select the
number of copies.
4. Repeat steps 2 and 3 for each additional photo you want to
print.
3. Repeat step 2 for each date you
want to choose for printing.
5. Press the Print Settings button and choose your print
settings.
4. Press u or d to select the number of copies.
6. Press the x Start button to print your photo(s).
5. Press the Print Settings button and choose your print
settings.
Note: To cancel printing, press the y Stop button.
6. Press the x Start button to print your photo.
Printing All the Photos on a Memory Card
Note: To cancel printing, press the y Stop button.
The Print All Photos option lets you print all the photos on
your memory card at once.
1. Press l or r to choose Print All
Photos, then press OK.
2. Press u or d to select the
number of copies.
8 - Epson Stylus Photo R340
8/05
Epson Stylus Photo R340
Printing a Proof Sheet
7. Select one of the following layout options, then press OK.
Print a proof sheet showing thumbnail images and photo
numbers for all the photos on your card.
Prints one photo per sheet, borderless; fits the photo
lengthwise on the paper.
Prints one photo per sheet with borders around the edges.
1. Press l or r to choose Print
Proof Sheet, then press OK.
Prints a photo on the top half of the sheet.
2. Press the Print Settings button
and choose your print settings.
Prints two photos per sheet.
Depending on your paper size,
the proof sheet will print in 20-,
30-, or 80-up layouts, as shown:
Prints four photos per sheet.
Prints eight photos per sheet.
4 × 6, 20-up
5 × 7, 30-up
Prints 20 photos per sheet; the photo number and date are
also printed with each photo. (Good for printing larger-size
index prints.)
Letter, 80-up
3. Make sure you have enough sheets of paper loaded to print
all the images on your card, then press the x Start button
to print your proof sheet(s).
Prints a CD/DVD jewel case insert with one photo on one
side of the insert.
Prints a CD/DVD jewel case insert with twenty-four
photos; twelve on each side of the insert.
Note: To cancel printing, press the y Stop button.
Additional Standalone Features
Choosing Print Settings
See Printer Basics for information on other features that are
available when printing without a computer:
After choosing the photos you want to print, make sure you
choose the appropriate settings for your paper type, size, and
print layout, as described below.
❏ cropping, adjusting, and enhancing photos
1. Press the Print Setting button.
❏ printing single or multiple photos on CDs or DVDs
2. Press the d button to choose Paper Type, then press OK.
❏ using a CD-R drive or Zip drive to back up photos from a
memory card
3. Select the setting that matches the type of paper you loaded,
then press OK. Refer to the table below:
❏ Printing from a Bluetooth-enabled device with the optional
Bluetooth adapter.
4. Press d to select Paper Size and press OK.
5. Press u and d to choose your paper size and press OK.
Testing the Printer
6. After selecting the paper size, press d to select Layout and
press OK.
You may need to run a printer check to see if a problem comes
from the printer itself or some other source.
1. Make sure any memory cards are removed (page 7), then
disconnect the printer cable from the printer.
2. Make sure that letter size paper is loaded in the sheet feeder,
the CD/DVD tray is not inserted in the printer, and the
CD/DVD guide is up.
3. Press the Setup button.
4. Press d to choose Nozzle Check. Press the r button, then
press Start. The printer prints the nozzle check pattern.
5. Compare the quality of the printed check page with the
sample shown below. If there are no print quality problems,
such as gaps or missing segments in the test lines, the printer
8/05
Epson Stylus Photo R340 - 9
Epson Stylus Photo R340
Use these Epson ink cartridges within six months of installing
them and before the expiration date on the package:
itself is fine. The problem probably lies with the printer
driver settings, the application settings, the interface cable
(be sure to use a shielded cable), or the computer itself.
If the check page does not print satisfactorily, as shown
below, or if it doesn’t print at all, there is a problem with the
printer. For example, if any segment of the printed lines is
missing, this could mean a clogged ink nozzle.
Cartridge
Part number
Black
T048120
Cyan
T048220
Magenta
T048320
Yellow
T048420
Light Cyan
T048520
Light Magenta
T048620
You can purchase genuine Epson ink and paper from an
authorized Epson reseller. To find the nearest reseller, please
call 800-GO-EPSON (800-463-7766). To purchase online,
visit www.epsonstore.com (U.S. sales only). In Canada, please
call (800) 463-7766 for reseller referral.
Replacing an Ink Cartridge
You can check the status of the ink cartridges by looking at the
icons on the control panel.
Removing and Installing Ink Cartridges
1. Press Setup.
Be sure you have a new ink cartridge before you begin. Once
you start the ink cartridge replacement procedure, you must
complete all the steps in one session.
2. Press d to choose Ink Levels,
then press OK.
1. Make sure the printer is turned on and not printing, then
open the printer cover.
The level of ink shown on the
icons indicates the
approximate amount of ink
remaining. If an ink cartridge
is low, you see a caution
symbol. This is a good time to make sure you have a
replacement cartridge.
2. If you see an Ink Out message, press OK. If you don’t see a
message, press the Setup button, then Press d to choose
Ink Cartridge Replacement, then press OK. Press OK
again. The print head moves to the replacement position.
3. Open the cartridge cover.
If an ink cartridge is empty, you see a message on the
display telling you that the cartridge needs to be replaced.
3. Press OK, then press Setup to exit the Setup menu.
Caution: You cannot print if any ink cartridge is empty. Leave the
empty cartridge installed in the printer until you have obtained a
replacement, or the ink remaining in the print head nozzles may dry
out. To ensure good results, use genuine Epson ink cartridges and do
not refill them. Other products may cause damage to your printer not
covered by Epson’s warranty.
When an installed cartridge is more than six months old, you
may need to replace it if printouts don’t look their best. If the
quality doesn’t improve after cleaning and aligning the print
head, you can replace the cartridge.
10 - Epson Stylus Photo R340
8/05
Epson Stylus Photo R340
4. Press in the tab on the back of the cartridge and lift the
cartridge out of the printer. Dispose of it carefully.
Cleaning the Print Head
If your printouts are unexpectedly light or faint, or dots or
lines are missing from the image, you may need to clean the
print head. This unclogs the nozzles so they can deliver ink
properly. Print head cleaning uses ink, so clean it only if
quality declines.
Warning: Keep ink cartridges out of the reach of children and do
not drink the ink.
You can clean the print head either from the printer’s control
panel or using your printer software. To clean it using the
printer software, the printer must be connected directly to
your computer (not over a network); see your on-screen User’s
Guide for details.
If ink gets on your hands, wash them thoroughly with soap and
water. If ink gets in your eyes, flush them thoroughly with
water.
Caution: When you don’t turn on your printer for a long time, the
print quality can decline, so turn it on at least once a month to
maintain good print quality.
Follow these steps to clean the print head from the printer’s
control panel:
5. Unwrap the new ink cartridge.
Caution: Don’t touch the green circuit board or
remove any labels.
1. Make sure the printer is turned on but not printing.
2. Press the Setup button.
6. Lower the cartridge into the holder, with the
green circuit board facing the front. Then gently push the
cartridge down until it clicks into place.
3. Press d to highlight Head Cleaning, then press OK.
4. To begin cleaning, press Start. The printer makes noise and
you see a message on the LCD screen. Cleaning takes about
30 seconds.
Caution: Do not turn off the printer or interrupt the cleaning
process.
5. When cleaning is done, press OK to run a nozzle check to
confirm the print head nozzles are clean.
Make sure letter-size plain paper is loaded in the printer,
then press Start. The nozzle check pattern prints.
7. If you need to replace another ink cartridge, repeat steps 4
through 6 before continuing with step 8.
6. Examine the nozzle check pattern you printed. Each
staggered horizontal and straight vertical line should be
complete, with no gaps in the pattern, as shown below:
8. Close the ink cartridge cover.
❏ If your printout looks okay, you’re done. Press Back to
finish.
❏ If there are any gaps (as shown below), press OK and
then Start to clean the print head again.
9. Press OK and close the printer cover.
The printer begins charging the ink delivery system.
10. When you see a message that charging is complete (after
about a minute), press OK.
8/05
Epson Stylus Photo R340 - 11
Epson Stylus Photo R340
If you don’t see any improvement after cleaning three or
four times, check the solutions in your Printer Basics. You
can also turn the printer off and wait overnight—this allows
any dried ink to soften—and then try cleaning the print
head again.
Caution: To avoid damage, always leave the ink cartridges installed
when transporting the printer.
1. Turn on the printer, wait until the print head locks in the
far right position, then turn off the printer.
2. Unplug the power cord from the electrical outlet.
3. Remove any memory cards from the printer and close the
memory card cover.
Aligning the Print Head
4. Remove any paper from the printer, push down the paper
support extension, and close the paper support.
If your printouts contain misaligned vertical lines or
horizontal banding, you may need to align the print head.
5. Open the printer cover. Secure the ink cartridge holder to
the printer with tape as shown, then close the printer cover.
You can align the print head either from the printer’s control
panel or using your printer software. To align the print head
from the printer software, the printer must be connected
directly to your computer (not over a network); see your onscreen User’s Guide for details.
Tape the ink
cartridge holder
to the printer
case
Note: For the best results, load letter-size Epson Photo Quality Ink
Jet Paper in the printer whenever you check the print head alignment.
Follow these steps to align the print head using the control
panel:
1. Make sure the printer is turned
on but not printing, and lettersize paper is loaded.
6. Make sure the CD/DVD tray guide is closed, then push in
the output tray extension and close the output tray.
7. Repack the printer and its attachments in the original box
using the protective materials that came with them. See
your Start Here sheet.
2. Press the Setup button.
3. Press d to choose Head
Alignment, then press OK.
Keep the printer level as you transport it. After transporting
the printer, remove the tape securing the print head and test
your printer. If you notice a decline in print quality, clean the
print head (see page 11); if output is misaligned, align the
print head (see page 12).
4. Press the x Start button to print
the alignment pattern.
5. Once the pattern is done
printing, examine the first row or
set of boxes (marked #1). Select
the box (1-9) which is most
evenly printed, with no
noticeable streaks or lines. You may need to use a
magnifying glass.
Related Documentation
6. Press r, press u or d to choose the box number, then press
OK.
7. Repeat step 6 to select the best box for sets #2, #3, and #4.
8. When you’re finished, press OK, then press OK again.
Transporting the Printer
If you move your printer some distance, you need to prepare it
for transportation in its original box or one of a similar size.
12 - Epson Stylus Photo R340
8/05
CPD-20396
Epson Stylus Photo R340 Printer Basics
CPD-20406
Epson Stylus Photo R340 Start Here
CPD-20397
Epson Stylus Photo R340 Quick Reference
CPD-20398
Epson Stylus Photo R340
CD-ROM with electronic User’s Guide