1
English
User’s Manual/ 使用说明书
412147402
Illustrations
English
A
C
B
D
ab
cd
2
E
1
English
F
5
G
7
4
6
3
8
H
9
I
10
11
12
English
J
13
14
K
15
English
English
Illustrations
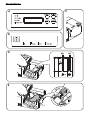
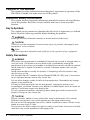
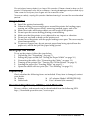
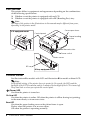
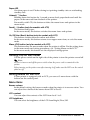
Most of the illustrations are at the beginning of this manual. They may be different from your printer in
appearance, depending on your printer model. See the list below for the meaning of the numbers in the
illustrations.
1.
2.
3.
4.
5.
6.
Paper guide
Screw
Power supply connector
Ethernet connector
USB connector
Serial interface connector
(9-Pin D-Sub)
7.
Serial interface connector
(25-Pin D-Sub)
8. Cable hook
9. Rollers
10. Paper path
11. Head plate
12. Thermal head
13. Platen lever
14. Platen frame
15. Cleaning card
Restriction of Use
When this product is used for applications requiring high reliability/safety, such as transportation
devices related to aviation, rail, marine, automotive, etc.; disaster prevention devices; various safety
devices, etc.; or functional/precision devices, etc.; you should use this product only after giving
consideration to including fail-safes and redundancies into your design to maintain safety and total
system reliability. Because this product was not intended for use in applications requiring extremely high
reliability/safety, such as aerospace equipment, main communication equipment, nuclear power control
equipment, or medical equipment related to direct medical care, etc., please make your own judgment on
this product’s suitability after a full evaluation.
Caution
All rights reserved. No part of this publication may be reproduced, stored in a retrieval system, or
transmitted in any form or by any means, electronic, mechanical, photocopying, recording, or otherwise,
without the prior written permission of Seiko Epson Corporation. No patent liability is assumed with
respect to the use of the information contained herein. While every precaution has been taken in the
preparation of this book, Seiko Epson Corporation assumes no responsibility for errors or omissions.
Neither is any liability assumed for damages resulting from the use of the information contained herein.
Neither Seiko Epson Corporation nor its affiliates shall be liable to the purchaser of this product or third
parties for damages, losses, costs, or expenses incurred by purchaser or third parties as a result of:
accident, misuse, or abuse of this product or unauthorized modifications, repairs, or alterations to this
product, or (excluding the U.S.) failure to strictly comply with Seiko Epson Corporation’s operating and
maintenance instructions.
Seiko Epson Corporation shall not be liable against any damages or problems arising from the use of any
options or any consumable products other than those designated as Original Epson Products or Epson
Approved Products by Seiko Epson Corporation.
EPSON is a registered trademark of Seiko Epson Corporation in Japan and other countries/regions.
NOTICE: The contents of this manual are subject to change without notice.
Copyright © 2011 Seiko Epson Corporation
TM-L500A User’s Manual 5
English
Purpose of This Manual
This manual provides information describing basic operations to operators of the
TM-L500A to enable safe and correct use of the printer.
Important Safety Information
This section presents important information intended to ensure safe and effective
use of this product. Read this section carefully and store it in an accessible
location.
Key to Symbols
The symbols in this manual are identified by their level of importance, as defined
below. Read the following carefully before handling the product.
WARNING:
Warnings must be followed carefully to avoid serious bodily injury.
CAUTION:
Cautions must be observed to avoid minor injury to yourself, damage to your
equipment, or loss of data.
Note:
Notes have important information and useful tips on the operation of your equipment.
Safety Precautions
WARNING:
Shut down your equipment immediately if it produces smoke, a strange odor, or
unusual noise. Continued use may lead to fire. Immediately unplug the
equipment and contact your dealer or a Seiko Epson service center for advice.
Never attempt to repair this product yourself. Improper repair work can be
dangerous.
Never disassemble or modify this product. Tampering with this product may
result in injury or fire.
Use the specified AC adapter (Epson Model M159B (PS-180)) only. Connection
to an improper power source may cause fire.
Do not allow foreign matter to fall into the equipment. Penetration by foreign
objects may lead to fire.
If water or other liquid spills into this equipment, unplug the power cord
immediately, and then contact your dealer or a Seiko Epson service center for
advice. Continued usage may lead to fire.
Do not use aerosol sprayers containing flammable gas inside or around this
product. Doing so may cause fire.
CAUTION:
Do not connect cables in ways other than those mentioned in this manual.
Different connections may cause equipment damage and burning.
Be sure to set this equipment on a firm, stable, horizontal surface. Product may
break or cause injury if it falls.
Do not use in locations subject to high humidity or dust levels. Excessive humidity
and dust may cause equipment damage or fire.
6
TM-L500A User’s Manual
English
Do not place heavy objects on top of this product. Never stand or lean on this
product. Equipment may fall or collapse, causing breakage and possible injury.
Take care not to injure your fingers on the manual cutter.
To ensure safety, unplug this product before leaving it unused for an extended
period.
Usage Notes
❏
❏
❏
❏
❏
❏
❏
❏
Install the printer horizontally.
When installing, leave enough space around the printer for loading paper,
turning on/off the power switch, removing jammed paper, and so on.
Make sure cords and foreign objects are not caught in the printer.
Do not open the covers during printing or autocutting.
Make sure that the printer is not subjected to any impact or vibration.
Do not put any food or drink on the printer case.
Do not move the printer with the paper loading cover open. The cover may be
closed unexpectedly.
To prevent a paper jam, do not prevent paper from being ejected from the
paper exit, and do not pull the paper being ejected.
Setting up the Printer
To set up the printer, follow the steps below.
1. Unpacking (See “Unpacking” on page 7.)
2. Setting the paper width (See “Setting the Paper Width” on page 10.)
3. Connecting the cables (See “Connecting the Cables” on page 11.)
4. Turning on the printer (See “Turning On/Off the Printer” on page 9.)
5. Loading the paper (See “Loading Paper” on page 11.)
6. Operation check with test print (See “Test Printing” on page 12.)
Unpacking
Check whether the following items are included. If any item is damaged, contact
your dealer.
❏ Printer
❑ AC adapter (Model: M159B [PS-180])
❏ Cable hook
❑ User’s manual (this manual)
Downloading Drivers, Utilities, and Manuals
Drivers, utilities, and manuals can be downloaded from the following URL.
http://download.epson-biz.com/?service=pos
TM-L500A User’s Manual 7
English
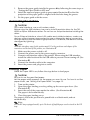
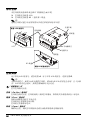
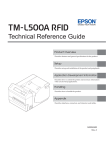
Part Names
This printer differs in equipment and appearance depending on the combinations
of the following specifications.
❏ Whether or not the printer is equipped with an LCD
❏ Whether or not the printer is equipped with a BP (Boarding Pass) tray
Note:
The shape of the printer in the illustrations in this manual may be different from yours,
depending on the printer model.
Cover open lever
LCD-equipped model
Control panel
Paper loading
cover
LCD
Manual cutter
Power switch
Platen cover
BP tray
BP tray-equipped model
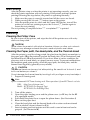
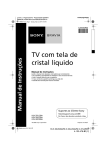
Control Panel
See illustration A for models with LCD and illustration B for models without LCD.
Note:
In the default setting, if the printer does not operate for 10 seconds, the LEDs and the
backlight of the LCD become dim, and for 5 minutes, the backlight of the LCD is turned off.
They come back on when you operate the control panel.
(Power) LED
On when the printer is turned on.
On Line LED
On when the printer is online. Off when the printer is offline: during test printing,
in the menu mode, or in an error status.
Error LED
On when the paper loading cover or the platen frame is open.
Flashes when the printer is in an error status.
Off when the printer is operating normally.
8
TM-L500A User’s Manual
English
Paper LED
On when paper is out. Flashes during test printing standby state or autoloading
standby state.
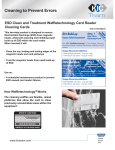
Unload ( ↑ ) button
Holding down this button for 1 second or more feeds paper backward until the
paper can be removed from the back of the printer.
For models with LCD, this button switches the menu items and options in the
menu mode.
Feed ( ↓ ) button (only for models with LCD)
This button feeds paper.
In the menu mode, this button switches the menu items and options.
On/Off Line (Back) button (only for models with LCD)
This button switches between online and offline.
In the menu mode, this button returns to an upper menu item, or exits the menu
mode.
Menu (OK) button (only for models with LCD)
This button enters the menu mode when the printer is offline. For the setting items
in the menu mode and setting procedures, see “Setting Menu on the LCD”
In the menu mode, this button sets the displayed setting option.
Turning On/Off the Printer
Use the power switch on the right side of the printer to turn the printer on and off.
Note:
Be sure to turn on and off the power switch when the power cord is connected to the
printer.
Before turning on the printer soon after turning it off, make sure the LEDs on the control
panel are off.
Setting Menu on the LCD
If your printer is equipped with an LCD, you can set 3 menu items with the
buttons on the control panel.
Menu Items
Buzzer volume
In the default setting, the buzzer sounds when the printer is in an error status. You
can adjust the volume of the buzzer from OFF to level 5.
LCD contrast
You can adjust the contrast of the LCD from level 1 to 3.
LCD brightness
You can select the brightness of the LCD from Bright/Dim/Off.
TM-L500A User’s Manual 9
English
Setting Procedures
1.
2.
3.
4.
5.
6.
Turn on the printer.
When “On Line” is displayed on the LCD, press the On/Off Line (Back)
button to put the printer offline.
Press the Menu (OK) button to display “[Setting menu]” on the LCD.
Use the Unload ( ↑ ) button and Feed ( ↓ ) button to display the setting item
for which you want to make a setting, and press the Menu (OK) button.
Use the Unload ( ↑ ) button and Feed ( ↓ ) button to display the setting
options, and press the Menu (OK) button to set it.
To make another setting, press the On/Off Line (Back) button once to return
to the menu selecting screen.
To finish setting, press the On/Off Line (Back) button twice to exit the menu
mode.
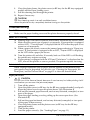
Setting the Paper Width
You can use 4 types of paper width; 50.8/54/79.5/82.5 mm by removing or
changing the paper guides installed in the printer. The default setting is 54 mm
paper width with the paper guides installed in grooves b and d in illustration D.
CAUTION:
Be sure to set the paper width before using the printer. Do not change it once
you start using the printer.
When setting the paper width from the default setting, be sure to make the
setting for the paper width with the utility software for the TM-L500A.
Setting the Paper Width to 82.5 mm
To change the paper width to 82.5 mm, remove the paper guide installed in
groove b in illustration D.
1. Make sure the printer is turned off.
2. Open the paper loading cover by pulling up the cover open lever. (See
illustration C)
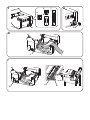
3. Remove the screw fixing the paper guide installed in groove b in
illustration D. (See illustration E)
4. Remove the paper guide by pulling it up. (See illustration E)
Setting the Paper Width to 79.5 mm
To change the paper width to 79.5 mm, remove the paper guides installed in
grooves b and d, and install one of them in groove c in illustration D.
1. Remove 2 paper guides by following the same steps as “Setting the Paper
Width to 82.5 mm”
2. Install one of the removed paper guides in the groove c in illustration D so
that the projections of the paper guide are aligned with the holes along the
groove.
3. Fix the paper guide with the screw.
Setting the Paper Width to 50.8 mm
To change the paper width to 50.8 mm, remove the paper guide installed in
groove b in illustration D, and install it in groove a.
10
TM-L500A User’s Manual
English
1.
2.
3.
Remove the paper guide installed in grooves b by following the same steps as
“Setting the Paper Width to 82.5 mm”
Install the removed paper guide in groove a in illustration D so that the
projection of the paper guide is aligned with the hole along the groove.
Fix the paper guide with the screw.
Connecting the Cables
CAUTION:
For a serial interface, use a null modem cable.
Before using the USB interface, be sure to install the printer driver for the TML500A or Epson USB device driver. Do not turn on the printer before installing the
driver.
For an Ethernet interface, when LAN cables are installed outdoors, make sure
devices without proper surge protection are cushioned by being connected
through devices that do have surge protection. Otherwise, the devices can be
damaged by lightning.
Note:
Available interfaces vary by the printer model. For the positions and shapes of the
connectors on the back of the printer, see illustration F.
1. Make sure the power switch is off.
2. Connect the power cord to the power supply connector.
3. Connect each interface cable to the printer. When using the USB interface,
install the cable hook and fix the USB cable to prevent it from coming off. (See
illustration G)
4. Connect the interface cable to the computer.
5. Insert the power cord plug into a socket.
Loading Paper
When the Paper LED is on, follow the steps below to load paper.
CAUTION:
Be sure to use the specified paper.
Set the paper width properly for the paper you want to use. For how to set the
paper width, see “Setting the Paper Width” on page 10.
1.
2.
Turn on the printer.
Open the paper loading cover by pulling up the cover open lever. (See
illustration C)
3. Insert the end of the paper under the rollers. (See illustration H)
The paper is fed automatically.
4. Close the paper loading cover.
The paper is fed to the position of a punch hole or a black mark, and cut
automatically.
Note:
For the BP tray-equipped model, up to 20 sheets of fanfold paper can be stored in the BP
tray.
TM-L500A User’s Manual
11
English
Test Printing
After the printer setup or when the printer is not operating correctly, you can
check the printer operation with test printing. If the printer performs pattern
printing following the steps below, the printer is operating normally.
1. Make sure the paper is correctly inserted and all the covers are closed.
2. While pressing the Unload ( ↑ ) button, turn on the printer.
3. After the printer prints its status and the Paper LED flashes, turn off the
printer to exit the test printing or press the Unload ( ↑ ) button again to
restart the test printing.
The test printing is completed when "*** completed***” is printed.
Cleaning
Cleaning the Printer Case
Be sure to turn off the printer, and wipe the dirt off the printer case with a dry
cloth or a damp cloth.
CAUTION:
Never clean the product with alcohol, benzine, thinner, or other such solvents.
Doing so may damage or break the parts made of plastic and rubber.
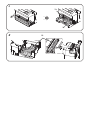
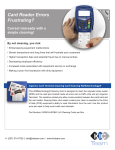
Cleaning the Paper path, the Head plate, and the Thermal Head
After the printer is used for a long period, the glue from the labels accumulates in
the paper path (10 in illustration I), and on the head plate (11 in illustration I) and
the thermal head (12 in illustration I). If you leave them in such a condition, the
glue may stick to issued labels, or a paper jam may occur. To prevent malfunctions
and maintain good print quality, clean the paper path, the head plate, and the
thermal head regularly (generally every month).
CAUTION:
The thermal head can be very hot after printing. Be careful not to touch it, and
let it cool before you clean it.
Do not damage the thermal head by touching it with your fingers or any hard object.
1.
Prepare a cleaning card.
Note:
Epson recommends KICTeam cleaning card. Please purchase it from KICTeam's web site.
URL: http://www.kicteam.com/
Model: KCTP2639 (For Baggage Tag)
KCTP2638 (For Boarding Pass)
2.
3.
4.
5.
6.
7.
12
Turn off the printer.
Open the paper loading cover and the platen cover. (or BP tray for the BP
tray-equipped model)
Push down the platen lever to open the platen frame. (See illustration J)
Blow out the paper dust.
Clean the head plate and the thermal head with a cotton swab moistened
with an alcohol solvent (ethanol or IPA)
Insert cleaning card into printer until the card is seen in front and can be
grasped. (See illustration K)
TM-L500A User’s Manual
English
8.
Close the platen frame, the platen cover (or BP tray for the BP tray-equipped
model) and the Paper loading cover.
9. Pull the cleaning card through the printer.
10. Repeat if necessary.
CAUTION:
Use the cleaning cards in a well ventilated room.
Allow the printer to dry completely before turning on the printer.
Troubleshooting
Error LED is on
Make sure the paper loading cover and the platen frame are properly closed.
Error LED is flashing
❏
❏
❏
❏
❏
Printing stops if the head overheats and resumes automatically when it cools.
Make sure the correct type of paper is set properly. If your printer is equipped
with an LCD, “Check paper” is displayed on the LCD when the paper is not
correct or set improperly.
When a paper jam occurs, remove the jammed paper referring to “Paper jam
occurs” If your printer is equipped with an LCD, “Paper JAM” is displayed
on the LCD when a paper jam occurs.
Turn the printer off, and after 10 seconds, back on. If the LED is still flashing,
the printer may require servicing.
If your printer is equipped with an LCD and “Fatal error” is displayed on the
LCD, turn off the printer as soon as possible. The printer requires servicing.
Printout is faint
When a foreign substance such as paper powder attaches to the thermal head,
print quality may be degraded. In such case, see “Cleaning the Paper path, the
Head plate, and the Thermal Head” on page 12 to clean the thermal head.
Paper jam occurs
CAUTION:
Do not touch the thermal head, because it can be very hot after printing. Let it
cool before you remove the jammed paper.
1.
2.
3.
4.
5.
6.
7.
8.
Turn off the printer.
Open the platen cover (or BP tray for the BP tray-equipped model), and push
down the platen lever to open the platen frame. (See illustration J)
Pull out the jammed paper forward, and cut any distorted, crumpled, or torn
parts of the paper.
Open the paper loading cover by pulling up the cover open lever. (See
illustration C)
Pull out the paper backward, and cut any distorted, crumpled, or torn parts
of the paper if there are any.
Close the platen frame and the platen cover (or BP tray for the BP trayequipped model).
Turn on the printer.
Load the paper correctly. (See “Loading Paper” on page 11.)
TM-L500A User’s Manual
13
English
Specifications
Printing method
Thermal line
Paper
Boarding pass Width: 82.5 ± 0.5 or 79.5 ± 0.5 mm
dimensions
Length: 203.2 ± 0.38 and 187.325 mm
Thickness: 75 ~ 200 µm
Baggage tag
Width: 54 ± 0.5 mm or 50.8 ± 0.5 mm
Length: 400 ~ 600 mm
Thickness: 220 µm or less
Interface
Serial (RS-232)/Ethernet (10BASE-T/100BASE-TX)/
USB [Compliance: USB 2.0, Communication speed: Full-speed (12 Mbps)]
Power supply
AC adapter (Model: M159B [PS-180])
Temperature
Operating:
Storage:
5 to 45°C {41 to 113°F}
–20 to 50°C {-4 to 122°F}, except for paper
Humidity
Operating:
Storage:
10 to 80% RH
10 to 90% RH, except for paper
Overall dimensions
(H × W × D)
Model without BP-tray
Model without LCD: 122 × 156 × 230 mm {4.80 × 6.14 × 9.06"}
Model with LCD: 147 × 156 × 236 mm {5.83 × 6.14 × 9.29"}
Model with BP-tray
147 × 156 × 328 mm {5.83 × 6.14 × 12.91"}
Weight (mass)
Approx. 2.8 kg {6.2 lb}
Mbps: megabits per second
14
TM-L500A User’s Manual
ºÚÃÂ÷–Œƒ
简体中文
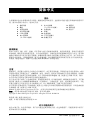
图示
大多数图示是在本说明书的开头部分。根据您的打印机型号,这些图示可能与您打印机的外表有所不
同。图示中各数字的含义,请参见下表。
1.
2.
3.
4.
5.
6.
卷纸导板
螺丝
电源连接器
以太网连接器
USB 连接器
串口连接器
(D-Sub 9 针脚)
7. 串口连接器
(D-Sub 25 针脚)
8. 电缆挂钩
9. 滚轴
10. 走纸通道
11. 打印头金属片
12. 热敏打印头
13. 滚筒杆
14. 滚筒边框
15. 清洁卡
使用限制
将本产品用于飞机、列车、船舶、汽车等的与运行直接相关的装置、防灾防盗装置、各种安全装置等
要求机能、精度等具备高度可信性、安全性的用途时;为维持这些系统整体的可信性与安全,请采取
故障自动防护设计及冗长设计等措施,在确保系统全体安全的基础上使用本公司产品。本产品并非以
使用于太空设备、干线通信机器、原子力控制设备、医疗机器等需具备高度可信性与安全性的用途。
若使用于前述用途时,请客户充分进行确认和判断本产品的适用性。
注意
版权所有。没有精工爱普生公司的正式书面许可,本手册不得复制,不得保存在可再生系统内,或以
任何形式任何手段进行电子、机械转载、复印、录制等。使用本手册内的有关信息无须授权。在编辑
本手册时我们考虑到了各项防备措施,对于手册中的错误和遗漏,精工爱普生公司概不负责。同时,
也不负责由于使用本手册中的信息内容造成的损失。
本产品由于用户或第三方造成的事故、错误使用和乱用,以及擅自改装、修理或变更式样等,不严格
遵守精工爱普生公司的操作和维修要求 (美国除外),引起的危害、损失、费用和付出款项等,不论
是精工爱普生公司还是其它有关的集团公司,对于该顾客或第三方概不负有任何责任。
由于使用非正规爱普生产品或非精工爱普生公司指定许可的任何附件或任何消耗品,从而造成的损
失和故障,精工爱普生公司概不负责。
EPSON 是 Seiko Epson Corporation 在日本、中华人民共和国及其它国家或地区的注册商标。
备注:本手册中的内容有可能发生更改,恕不事先通知。
Copyright © 2011 Seiko Epson Corporation. All rights reserved. 20120330
制造商 : 精工爱普生株式会社
地址 : 日本东京都新宿区西新宿 2-4-1
对于中国的用户
此为 A 级产品,在生活环境中,该产品可能会造成无线电干扰。在这种情况下,可能需要用户对其干
扰采取切实可行的措施。
TM-L500A 使用说明书 15
ºÚÃÂ÷–Œƒ
本说明书的用途
本说明书向 TM-L500A 的使用者提供有关基本操作的说明信息以确保安全、正确地
使用打印机。
重要安全信息
本章节介绍有关确保本产品的安全和有效使用的重要信息。请仔细阅读此部分并将
其保存在便于拿到的地方。
主要标识
本手册中的标识,根据重要程度不同而分别为下列等级,在使用产品之前,请仔细
阅读下列内容。
警告:
务必遵守警告内容,以免造成重大的人身伤害。
注意:
必须对注意事项加以注意,以免对你本人造成伤害、设备造成损伤、或数据丢失。
注:
注中包含有关设备操作的重要信息和有用提示。
安全注意事项
警告:
如果发生冒烟、异常气味、或者不正常的噪音时,请立即关闭机器。继续使用可能会引
起火灾。应该立即拔掉插头,并与销售商或精工爱普生服务中心取得联系询问处理办法。
请勿试图自行维修本机。不正确的维修是很危险的。
请勿自行拆卸或校正。不正确的动作会对本机造成伤害或火灾。
只能使用规定的 AC 适配器(EPSON 型号 M159B (PS-180))。连接到不适当的电源
上可能会导致火灾。
防止任何异物落入机内,以免引起火灾。异物进入机器可能会导致火灾。
如果有水或其他液体溅入机内,请立即拔掉电源线,并且与销售商或精工爱普生服务中
心取得联系询问处理办法。继续使用可能会导致火灾。
请勿在本产品的内部及周围使用可燃性气体的喷雾器。否则可能造成火灾。
注意:
请勿使用未在本手册中提到的方法来连接线缆,不同连接方式可能会导致本机损坏和烧
毁。
确认将本机安放在一个坚固,稳定的水平面上。机器如果落下则可能会破裂或损坏。
请勿在潮湿或灰尘较多的地方使用本机。过度潮湿和灰尘过多可能使得机器损坏或发生
火灾。
请勿在机器上放置任何重物。不要站在机器上或靠在机器上。这些作法可能会使装置摔
落或毁坏,或可能导致破损和伤害。
小心手动裁纸刀划伤手指。
为了确保安全,长时间不使用时,请拔出本机的电源插头。
16 TM-L500A 使用说明书
ºÚÃÂ÷–Œƒ
使用注意事项
❏
❏
❏
❏
❏
❏
❏
❏
请水平安装打印机。
安装时,在打印机周围留出足够的空间以便装纸、打开 / 关闭电源开关、取出
卡纸等等。
确保线缆和异物没有卡在打印机中。
请勿在打印或自动裁纸期间打开盖板。
确保打印机不会受到任何撞击或振动影响。
请勿将任何食物或饮料放在打印机外壳上。
请勿在装纸盖打开的情况下移动打印机。此盖可能意外关闭。
为防止卡纸,请勿阻止纸张从出纸口输出,也不要拉扯正在输出的纸张。
设置打印机
按以下步骤设置打印机。
1. 开箱 (请参见第 17 页上的 “ 开箱 ”。)
2. 设置纸宽 (请参见第 20 页上的 “ 设置纸宽 ”。)
3. 连接电缆 (请参见第 20 页上的 “ 连接电缆 ”。)
4. 打开打印机 (请参见第 19 页上的 “ 打开 / 关闭打印机 ”。)
5. 装纸 (请参见第 21 页上的 “ 装纸 ”。)
6. 通过测试打印进行操作检查 (请参见第 21 页上的 “ 测试打印 ”。)
开箱
检查是否包含以下各项。如果任何一项受损,请与销售商店联系。
❏ 打印机
❑ AC 适配器 (型号 : M159B [PS-180])
❑ 使用说明书 (本说明书)
❏ 电缆挂钩
下载驱动程序、应用程序以及操作说明
驱动程序、应用程序以及操作说明可以从下列 URL 下载。
http://download.epson-biz.com/?service=pos
TM-L500A 使用说明书 17
ºÚÃÂ÷–Œƒ
部件名称
本打印机的设备和外观会因以下规格组合而不同。
❏ 打印机是否配备 LCD
❏ 打印机是否配备 BP (登机牌)纸盘。
注:
您的打印机可能与本说明书图示中的打印机形状有所不同。
开盖手柄
配备 LCD 的型号
控制面板
装纸盖
LCD
手动裁纸刀
电源开关
滚筒盖
BP 纸盘
配备 BP 纸盘的型号
控制面板
对于带有 LCD 的型号,请参见图 A,对于不带 LCD 的型号,请参见图 B。
注:
在默认设置下,如果 10 秒不操作打印机,则 LED 和 LCD 的背光会变暗,且 5 分钟
后,LCD 的背光会熄灭。操作控制面板时又会变亮。
(电源指示)灯
打开打印机时点亮。
在线 (On Line)指示灯
打印机在线时点亮。打印机离线(测试打印期间、菜单模式中或错误状态)时熄灭。
错误 (Error)指示灯
装纸盖或滚筒边框打开时点亮。
打印机处于错误状态时闪烁。
打印机正常操作时熄灭。
缺纸 (Paper)指示灯
缺纸时点亮。测试打印预备状态或自动装纸预备状态期间闪烁。
18 TM-L500A 使用说明书
ºÚÃÂ÷–Œƒ
退纸 (Unload) ( ↑ ) 键
按住此键 1 秒钟或以上会使卷纸后退,以致卷纸可从打印机背后取出。
对于带有 LCD 的型号,此键用于在菜单模式中切换菜单项目和选项。
进纸 (Feed) ( ↓ ) 键 (仅带有 LCD 的型号)
按下此键进纸。
在菜单模式中,此键用于切换菜单项目和选项。
在线 / 离线 ( 返回 )On/Off Line (Back) 键 (仅带有 LCD 的型号)
按下此键切换在线和离线状态。
在菜单模式中,此键用于返回至上级菜单项目或退出菜单模式。
菜单 (OK) Menu (OK) 键 (仅带有 LCD 的型号)
按下此键在打印机离线时进入菜单模式。有关菜单模式的设置项目和设置步骤,请
参见 “ 在 LCD 上进行菜单设置 ”。
在菜单模式中,此键用于设置显示的设置选项。
打开 / 关闭打印机
使用打印机右侧的电源开关打开和关闭打印机。
注:
请务必在电源线已连接至打印机的情况下打开和关闭电源开关。
打开刚关闭不久的打印机前,确保控制面板上的 LED 已熄灭。
在 LCD 上进行菜单设置
如果您的打印机配备了 LCD,则可使用控制面板上的按键设置 3 个菜单项目。
菜单项目
蜂鸣器音量
默认设置中,蜂鸣器会在打印机处于错误状态时鸣响。您可以从 OFF (关闭)至等
级 5 调整蜂鸣器的音量。
LCD 的对比度
您可以从等级 1 至 3 调整 LCD 的对比度。
LCD 的亮度
您可以在 Bright (亮)/Dim (暗)/Off (关闭)之间选择 LCD 的亮度。
设置步骤
1.
2.
3.
4.
5.
6.
打开打印机。
当 LCD 上显示 “On Line” 时,按下在线 / 离线 (返回)On/Off Line (Back)
键使打印机离线。
按下菜单 (OK) Menu (OK) 键在 LCD 上显示 “[Setting menu]”。
使用退纸 (Unload)( ↑ ) 键和进纸 (Feed)( ↓ ) 键显示您要进行设置的设置项目,
然后按下菜单 (OK) Menu (OK) 键。
使用退纸 (Unload)( ↑ ) 键和进纸 (Feed)( ↓ ) 键显示设置选项,然后按下菜单
(OK) Menu (OK) 键进行设置。
要进行其他设置,按一下在线 / 离线(返回)On/Off Line (Back) 键返回至菜单
选择屏幕。要完成设置,按两下在线 / 离线 (返回)On/Off Line (Back) 键以退
出菜单模式。
TM-L500A 使用说明书 19
ºÚÃÂ÷–Œƒ
设置纸宽
通过移除或改变安装在打印机中的卷纸导板,您可使用 4 种类型的纸宽:50.8/54/
79.5/82.5 mm。默认设置为 54 mm 的纸宽,卷纸导板安装在图 D 的凹槽 b 和 d 中。
注意:
请务必在使用打印机前设置纸宽。一旦开始使用打印机就不要再更改。
当设置不同于默认设置的纸宽时,请务必使用 TM-L500A 的工具软件设置纸宽。
将纸宽设为 82.5 mm
要将纸宽更改为 82.5 mm,请移除图 D 中凹槽 b 内安装的卷纸导板。
1.
2.
3.
4.
请确保关闭打印机。
通过拉起开盖手柄打开装纸盖。(请参见图 C)
移除图 D 中凹槽 b 内所安装卷纸导板的固定螺丝。(请参见图 E)
拉起卷纸导板将其移除。(请参见图 E)
将纸宽设为 79.5 mm
要将纸宽更改为 79.5 mm,请移除凹槽 b 和 d 中安装的卷纸导板,然后将其中一块
导板安装在图 D 的凹槽 c 中。
1.
2.
3.
按照与 “ 将纸宽设为 82.5 mm” 相同的步骤移除 2 块卷纸导板。
将其中一块移除的卷纸导板安装在图 D 的凹槽 c 中,使卷纸导板的突出部位对
凹槽边沿的孔。
用螺丝固定卷纸导板。
将纸宽设为 50.8 mm
要将纸宽更改为 50.8 mm,请移除图 D 的凹槽 b 中安装的卷纸导板,然后将其安装
在 a 中。
1. 按照与 “ 将纸宽设为 82.5 mm” 相同的步骤移除凹槽 b 中安装的卷纸导板。
2. 将移除的导板安装在图 D的凹槽a中,使卷纸导板的突出部位对凹槽边沿的孔。
3. 用螺丝固定卷纸导板。
连接电缆
注意:
对于串行接口,使用对绞线。
使用 USB 接口前,请务必安装 TM-L500A 的打印机驱动程序或 Epson USB 设备驱动程
序。请勿在安装驱动程序前打开打印机。
对于以太网接口,当 LAN 电缆安装在室外时,通过与带有电涌保护装置的设备相连,确
保没有适当电涌保护装置的设备得到防护。否则,闪电可能将设备损坏。
注:
所提供的接口随打印机型号而异。有关打印机背面接口的位置和形状,请参见图 F。
1.
2.
3.
4.
5.
请确保关闭电源开关。
将电源线连接到电源连接器。
将各接口电缆连接到打印机上。当使用 USB 接口时,安装电缆挂钩并固定 USB
电缆以防其脱落。(请参见图 G)
将接口电缆连接到计算机上。
将电源线插销插入电源插座。
20 TM-L500A 使用说明书
ºÚÃÂ÷–Œƒ
装纸
当缺纸 (Paper)指示灯点亮时,请按照以下步骤装纸。
注意:
请务必使用指定的纸张。
为您要使用的纸张设置正确的纸宽。有关如何设置纸宽,请参见第 20 页上的 “ 设置纸
宽 ”。
1. 打开打印机。
2. 通过拉起开盖手柄打开装纸盖。(请参见图 C)
3. 在滚轴下方插入卷纸末端。(请参见图 H)
卷纸自动进给。
4. 关闭装纸盖。
卷纸进至打孔位置或黑色标记位置时自动裁切。
注:
对于配备了 BP 纸盘的型号,BP 纸盘中最多可存放 20 张连续折叠纸。
测试打印
设置打印机后或打印机操作不正确时,可通过测试打印检查打印机操作情况。如果
打印机能按照以下步骤进行图形打印,则表示打印机操作正常。
1. 请确保卷纸正确插入且所有盖板均关闭。
2. 按下退纸 (Unload)( ↑ ) 键并打开打印机。
3. 打印机打印其状态且缺纸 (Paper) 指示灯闪烁后,关闭打印机以退出测试打印
或再次按下退纸 (Unload)( ↑ ) 键以重新开始测试打印。
当打印 “*** completed***” 时完成测试打印。
清洁
清洁打印机外壳
请务必关闭打印机,然后用干布或微湿的布擦去打印机外壳上的灰尘。
注意:
切勿使用酒精、汽油、稀释剂或其他类似溶剂清洁本机。否则可能导致塑料和橡胶部件
损坏或断裂。
清洁走纸通道、顶板和热敏打印头
打印机使用较长时间后,标签的胶粘剂将逐渐积累在走纸通道内 (图 I 中的 10),
以及顶板 (图 I 中的 11)和热敏打印头 (图 I 中的 12)。如放置不理,胶黏剂可能
会粘到打印出的标签,或可能会发生卡纸。为了防止发生故障和保持优良的打印质
量,请定期清洁走纸通道、打印头金属片以及热敏打印头 (一般为每月一次)。
注意:
在打印后,热敏打印头可能会很烫。小心不要触摸,待其冷却后,方可进行清洁。
请勿用手指或任何硬物触碰热敏打印头,以免将其损坏。
TM-L500A 使用说明书 21
ºÚÃÂ÷–Œƒ
1.
准备好一张清洁卡。
注:
Epson 推荐使用 KICTeam 清洁卡。请从 KICTeam 公司的网站上购买。
URL:http://www.kicteam.com/
型号:KCTP2639 (行李标签专用)
KCTP2638 (登机牌专用)
2.
3.
4.
5.
6.
7.
关闭打印机电源。
打开装纸盖和滚筒盖 (或 BP 纸盘,对于配备 BP 纸盘的型号)。
按下滚筒杆,以打开滚筒边框。(请参见图 J)
吹除纸屑。
使用含有酒精 (乙醇或异丙醇)的棉花棒清洁顶板和热敏打印头。
将清洁卡插入打印机,直至清洁卡从打印机前部露出并能将其抓住。(请参见
图 K)
8. 关闭滚筒边框、滚筒盖 (或 BP 纸盘,对于配备 BP 纸盘的型号)以及装纸盖。
9. 将清洁卡从打印机中拉出。
10. 如需要可重复上述操作。
注意:
请在通风良好的房间内使用清洁卡。
请在打印机完全干燥之后才打开其电源。
故障排除
错误 (Error )指示灯点亮
请确保正确关闭装纸盖和滚筒边框。
错误 (Error )指示灯闪烁
❏
❏
❏
❏
❏
如果打印头过热将会停止打印,待其冷却后会自动恢复打印。
请确保正确设置适当类型的纸张。如果您的打印机配备了 LCD,则纸张错误或
设置不当时 LCD 上会显示 “Check paper” (检查纸张)信息。
当发生卡纸时,请参考 “ 发生卡纸 ” 取出卡住的纸。如果您的打印机配备了
LCD,则发生卡纸时 LCD 上会显示 “Paper JAM” (卡纸)信息。
请将打印机关闭,10 秒钟后再打开。如果 LED 仍闪烁,则打印机可能需要维
修。
如果您的打印机配备了 LCD 且 LCD 上显示 “Fatal error”(严重错误)信息,
请尽快关闭打印机。打印机需要维修。
打印件模糊不清
当热敏打印头上粘有纸粉等异物时,打印质量可能会下降。在这种情况下,请参见
第 21 页上的 “ 清洁走纸通道、顶板和热敏打印头 ” 清洁热敏打印头。
发生卡纸
注意:
请勿触碰热敏打印头,因为其在打印后可能会很烫。待其冷却后,方可取出卡住的纸。
1. 关闭打印机。
22 TM-L500A 使用说明书
ºÚÃÂ÷–Œƒ
2.
3.
4.
5.
6.
7.
8.
打开滚筒盖 (或 BP 纸盘,对于配备 BP 纸盘的型号),然后按下滚筒杆手柄以
打开滚筒边框。(请参见图 J。)
向前拉出卡住的纸并裁去任何变形、起皱或破损的部分卷纸。
通过拉起开盖手柄打开装纸盖。(请参见图 C)
向后拉出纸张并裁去任何变形、起皱或破损的部分卷纸。
关闭滚筒边框和滚筒盖 (或 BP 纸盘,对于配备 BP 纸盘的型号)。
打开打印机。
正确装纸。(请参见第 21 页上的 “ 装纸 ”。)
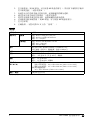
规格
打印方式
纸张尺寸
热敏行
登机牌
宽度 : 82.5±0.5 或 79.5±0.5 mm
长度 : 203.2±0.38 和 187.325 mm
厚度 : 75 ~ 200 µm
行李标签
宽度 : 54±0.5 mm 或 50.8±0.5 mm
长度 : 400 ~ 600 mm
厚度 : 220 µm 或以下
接口
串行 (RS-232)/ 以太网 (10BASE-T/100BASE-TX)/
USB [ 兼容 : USB 2.0,通信速度 : 全速 (12 Mbps)]
电源
AC 适配器 (型号 : M159B [PS-180])
温度
操作 :
储存 :
5 至 45 ℃ {41 至 113°F}
-20 至 50 ℃ {-4 至 122°F},纸除外
湿度
操作 :
储存 :
10 至 80%RH
10 至 90%RH,纸除外
总体尺寸
(H×W×D)
没有 BP 纸盘的型号
没有 LCD 的型号 : 122×156×230 mm {4.80×6.14×9.06"}
带有 LCD 的型号 : 147×156×236 mm {5.83×6.14×9.29"}
带有 BP 纸盘的型号
147×156×328 mm {5.83×6.14×12.91"}
重量 (质量)
大约 2.8 kg {6.2 lb}
Mbps:兆位每秒
TM-L500A 使用说明书 23
Printed in China
中国印刷