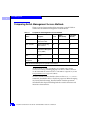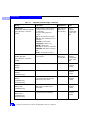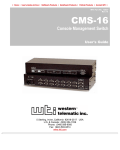
1
EMC Enterprise Storage
Departmental Switch
Model DS-16B
HARDWARE REFERENCE MANUAL
P/N 014002999-00
EMC Corporation
Corporate Headquarters: (508) 435-1000, (800) 424-EMC2
171 South Street, Hopkinton, MA 01748-9103
Fax: (508) 435-5374 Service: (800) SVC-4EMC
Contents
Copyright © 2000 EMC Corporation. All rights reserved.
Printed May 2000
No part of this publication may be reproduced or distributed in any form or by any means, or stored in a
database or retrieval system, without the prior written consent of EMC Corporation.
The information contained in this document is subject to change without notice. EMC Corporation assumes no
responsibility for any errors that may appear.
All computer software programs, including but not limited to microcode, described in this document are
furnished under a license, and may be used or copied only in accordance with the terms of such license.
EMC either owns or has the right to license the computer software programs described in this document.
EMC Corporation retains all rights, title and interest in the computer software programs.
EMC Corporation makes no warranties, expressed or implied, by operation of law or otherwise, relating to this
document, the products or the computer software programs described herein. EMC CORPORATION
DISCLAIMS ALL IMPLIED WARRANTIES OF MERCHANTIBILITY AND FITNESS FOR A PARTICULAR
PURPOSE. In no event shall EMC Corporation be liable for (a) incidental, indirect, special, or consequential
damages or (b) any damages whatsoever resulting from the loss of use, data or profits, arising out of this
document, even if advised of the possibility of such damages.
Regulatory Agency Certification
Connectrix DS-16B has been extensively tested and certified to met UL1950, CSA 950, IEC 950/EN 60950
Safety of Information Technology Equipment Including Electrical Business Equipment; FCC Rules Part 15
Subpart B; CISPR22 Class A; EN55022; EN50082-1.
Canada:
This class A digital apparatus complies with Canadian ICES-003.
Cet appareil numérique de la classe A est conforme à la norme NMB-003 du Canada.
Europe:
Warning!
This is a Class A product. In a domestic environment this product may cause radio interference in which case
the user may be required to take adequate measures.
Achtung!
Dieses ist ein Gerät der Funkstörgrenzwertklasse A. In Wohnbereichen können bei Betrieb dieses Gerätes
Rundfunkstörungen auftreten, in welchen Fällen der Benutzer für entsprechende Gegenmaßnahmen
verantwortlich ist.
Attention!
Ceci est un produit de Classe A. Dans un environnement domestique, ce produit risque de créer des
interférences radioélectriques, il appartiendra alors à l'utilisateur de prendre les mesures spécifiques
appropriées.
ii
Departmental Switch Model DS-16B Hardware Reference Manual
Contents
Japan:
United States:
This equipment generates, uses, and may emit radio frequency energy. The equipment has been type tested
and found to comply with the limits for a Class A digital device pursuant to Part 15 of FCC rules, which are
designed to provide reasonable protection against such radio frequency interference.
Operation of this equipment in a residential area may cause interference in which case the user at his own
expense will be required to take whatever measures may be required to correct the interference.
Any modifications to this device - unless expressly approved by the manufacturer - can void the user’s
authority to operate this equipment under part 15 of the FCC rules.
Taiwan:
Departmental Switch Model DS-16B Hardware Reference Manual
iii
Contents
Trademark Information
EMC2 (the EMC logo), EMC, ICDA (Integrated Cached Disk Array), MOSAIC:2000, and Symmetrix are registered trademarks and EMC Enterprise Storage,
EMC Storage Logic, Celerra, CopyPoint, DataReach, EDM, EOS, Extended-Online, FarPoint, InfoMover, PowerPath, SDMS, SRDF, TimeFinder, The EMC
Effect, and The Enterprise Storage Company are trademarks of EMC Corporation.
All other trademarks used herein are the property of their respective owners.
iv
Departmental Switch Model DS-16B Hardware Reference Manual
Notices
FCC Warning (USA
only)
This equipment has been tested and complies with the limits for a
Class A computing device pursuant to Part 15 of the FCC Rules.
These limits are designed to provide reasonable protection against
harmful interference when equipment is operated in a commercial
environment. This equipment generates, uses, and can radiate radio
frequency energy and, if not installed and used in accordance with
the instruction manual, may cause harmful interference to radio
communications. Operating this equipment in a residential area is
likely to cause harmful interference in which case the user is
responsible for repairs.
VCCI Statement
This is a Class A product based on the standard of the Voluntary
Control Council For Interference by Information Technology
Equipment (VCCI). If this equipment is used in a domestic
environment, radio disturbance may arise. When such trouble occurs,
the user may be required to take corrective actions.
CE Statement
The standards compliance label on the DS-16B Switch contains the CE
mark which indicates that this system conforms to the provisions of
the following European Council Directives, laws, and standards:
Electro Magnetic Compatibility (EMC) Directive 89/336/EEC and
the Complementary Directives 92/31/EEC and 93/68/EEC:
- EN550022, Class A; Emissions Industrial Environment
- EN 50082-2 Immunity Industrial Environment
- EN61000-4-2 Electro Static Discharge
Departmental Switch Model DS-16B Hardware Reference Manual
v
Warnings and Cautions
- EN61000-4-3 Radiated RF
- EN61000-4-4 Electrical Fast Transients
- EN61000-4-5 Surge
- EN61000-4-6 Conducted RF
- EN61000-4-11 Line Interruption
Low Voltage Directive (LVD) 73/23/EEC and the Complementary
Directive 93/68/EEC:
- EN 60950:92 A1:93 & A2:93 & A3:95 & A4:96 & A11:97
- EN60825-1:199/A11, -2
Canadian
Requirements
This class A digital apparatus meets all requirements of the Canadian
Interference-Causing Equipment Regulations.
Cet appareil numerique de la classe A respecte toutee les exigences
du Regiements sur le material brouilleur du Canada.
Laser Compliance
vi
This equipment contains class 1 laser products, and it complies with
FDA radiation Performance Standards, 21 CFR Subchapter J
Departmental Switch Model DS-16B Hardware Reference Manual
Contents
Notices ...............................................................................................................................v
Preface........................................................................................................................... xiii
Chapter 1
Introduction
Introduction .......................................................................................1-2
DS-16B Switch Features ............................................................1-2
Performance................................................................................1-3
Manageability.............................................................................1-3
System Components .........................................................................1-4
Fabric Operating System ..........................................................1-4
GBICs...........................................................................................1-4
Chapter 2
Installation
Unpacking the Switch ......................................................................2-2
Site Considerations ...........................................................................2-3
Cooling Requirements ..............................................................2-3
Power Requirements .................................................................2-3
Installation Considerations..............................................................2-4
Standalone ..................................................................................2-4
Fiber Channel Cable Connections ...........................................2-4
Ethernet Connection..................................................................2-5
Verify Power-On Self Test (POST) ...........................................2-5
Departmental Switch Model DS-16B Hardware Reference Manual
vii
Contents
Chapter 3
Switch Management
Comparing Switch Management Access Methods ......................3-2
Managing Through Front Panel Buttons.......................................3-3
Control Buttons..........................................................................3-3
Activating Menu Display .........................................................3-4
DS-16B Switch Menus ......................................................................3-5
Commands .................................................................................3-6
Configuration Menu .................................................................3-9
Operation Menu ......................................................................3-17
Switch Online ...........................................................................3-18
Status Menu..............................................................................3-20
Test Menu..................................................................................3-26
Chapter 4
Front Panel Diagnostics
Front Panel Diagnostics ...................................................................4-2
Diagnostic Overview ................................................................4-2
Diagnostic Front Panel Displays .............................................4-3
Isolating a System Fault............................................................4-3
Removing Power .......................................................................4-3
Status and Activity Indicators ........................................................4-4
Front Panel LED Port Indicators .............................................4-4
Initialization Steps .....................................................................4-4
Power-On Diagnostics (POST) ................................................4-5
Diagnostic Tests.................................................................................4-6
Test Menu....................................................................................4-6
Appendix A
Specifications
General Specifications ....................................................................A-2
Fabric Management Specifications ...............................................A-3
Safety Specifications .......................................................................A-4
Optical Port Specifications ......................................................A-5
Environmental Specifications .................................................A-5
Power Supply............................................................................A-6
Appendix B
Switch Support
Switch Support ................................................................................ B-2
Support Tool .................................................................................... B-2
viii
Departmental Switch Model DS-16B Hardware Reference Manual
Contents
Appendix C
Error Messages
Error Message Formats .................................................................. C-2
Front Panel Message Formats ................................................ C-2
Diagnostic Error Message Formats .............................................. C-4
Error Message Numbers ......................................................... C-5
Error Message Tables .................................................................. C-10
Sales and Service Locations .................................................................................s-1
Index ................................................................................................................................ i-1
Departmental Switch Model DS-16B Hardware Reference Manual
ix
Contents
x
Departmental Switch Model DS-16B Hardware Reference Manual
Figures
1-1
2-1
2-2
3-1
3-2
3-3
4-1
4-2
Departmental Switch Model 16B Front Panel .......................................... 1-2
Model DS-16B with Two Power Supplies ................................................. 2-3
Dual SC Fiber Optic Plug connector .......................................................... 2-5
Front Panel Functionality ............................................................................ 3-3
Menu Hierarchy ............................................................................................ 3-5
Temperature Sensor Approximate Locations on Motherboard .......... 3-24
LED Indicators .............................................................................................. 4-3
Switch Setup to Run Cross Port Test ....................................................... 4-10
Departmental Switch Model DS-16B Hardware Reference Manual
xi
Figures
xii
Departmental Switch Model DS-16B Hardware Reference Manual
Preface
As part of its effort to continuously improve and enhance the performance
and capabilities of its product line, EMC periodically releases new revisions
of hardware and microcode. Therefore, some functions described in this
manual may not be supported by all revisions of microcode, software, or
hardware presently in use. If your unit does not offer a function described in
this manual, please contact your EMC representative for a hardware,
software, or microcode update.
The Departmental Switch Model DS-16B Hardware Reference Manual
describes how to use and maintain the Model DS-16B switch.
Audience
The audience for this manual includes:
•
Field Technicians
Departmental Switch Model DS-16B Hardware Reference Manual
xiii
Preface
How this Manual is
Organized
Related Publications
Conventions Used in
This Manual
The following table describes how the manual is organized.
For Information On
See
Switch features and system
components
Chapter 1, Introduction,
Installing and setting up the switch
Chapter 2, Installation,
Managing the switch via the front
panel
Chapter 3, Switch Management,
Diagnostics and troubleshooting
Chapter 4, Front Panel Diagnostics,
Technical specifications
Appendix A, Specifications,
Customer support
Appendix B, Switch Support,
Error messages
Appendix C, Error Messages,
Other publications that may provide related information include:
•
Departmental Switch Model DS-8B or DS-16B Fabric OS
Reference Manual (069001028)
•
Fibre Channel Standards
EMC uses the following conventions for notes, cautions, warnings,
and danger notices.
A note presents information that is important, but not hazard-related.
!
CAUTION
A caution contains information essential to avoid damage to the
system or equipment. The caution may apply to hardware or
software.
WARNING
A warning contains information essential to avoid a hazard that can
cause severe personal injury, death, or substantial property damage
if you ignore the warning.
xiv
Departmental Switch Model DS-16B Hardware Reference Manual
Preface
DANGER
A danger notice contains information essential to avoid a hazard
that will cause severe personal injury, death, or substantial property
damage if you ignore the warning.
EMC uses the following type style conventions in this guide:
•
Specific filenames or complete paths.
Window names and menu items in text.
Selections you can make from the user
interface, including buttons, icons, options,
and field names.
Emphasis in cautions and warnings.
Italic
•
•
New terms or unique word usage in text.
Command line arguments when used in text.
Fixed space
Examples of specific command entries that you
would type, displayed text, or program listings.
For example:
Boldface
•
•
•
QUERY [CUU=cuu|VOLSER=volser]
Fixed italic
Where to Get Help
Arguments used in examples of command line
syntax.
Obtain technical support by calling your local sales office.
If you are located outside the USA, call the nearest EMC office for
technical assistance. These offices are listed at the back of this
manual.
For service, call:
United States: (800) 782-4362 (SVC-4EMC)
Canada:
(800) 543-4782 (543-4SVC)
Worldwide:
(508) 497-7901
and ask for Customer Service.
Your Comments
Your suggestions will help us continue to improve the accuracy,
organization, and overall quality of the user publications. Please
e-mail us at [email protected] to let us know your
opinion or any errors concerning this manual.
Departmental Switch Model DS-16B Hardware Reference Manual
xv
Preface
xvi
Departmental Switch Model DS-16B Hardware Reference Manual
1
Invisible Body Tag
Introduction
• Introduction ........................................................................................1-2
• System Components ..........................................................................1-4
Introduction
1-1
1
Introduction
Introduction
Figure 1-1
Departmental Switch Model 16B Front Panel
The Department Switch Model 16B is a 16-port Fibre Channel Gigabit
switch that provides connectivity for up to 16 Fibre Channel
compliant device ports, and a fabric operating system for building
and managing a Fabric. A Fabric is an active, intelligent, interconnect
scheme for Fibre Channel server and storage nodes. Figure 1-1 shows
the front view of the switch. This chapter discusses:
•
Features
•
System Components
WARNING
The DS-16B switch contains two power supplies. To remove all
power from the system, disconnect both power supply cords.
DS-16B Switch
Features
The switch is a high-performance Fibre Channel Gigabit Switch with
the following features:
•
Simple – Easy setup and configuration. After Power-On Self-Test
(POST), you need only to add the switch’s Internet Protocol (IP)
address. The remainder of the switch’s setup is automated.
•
Intelligent – The switch’s fabric operating system allows discovery
of all connected devices and determines optimum data paths
without intervention, supporting up to 32 interconnected
switches.
•
Flexible – Modular design with multiple GBIC modules
supporting fiber transmission media. The switch’s modular
construction gives the switch a range of flexibility in creating,
upgrading, maintaining, and configuring a Fabric.
1-2
Departmental Switch Model DS-16B Hardware Reference Manual
Introduction
•
Reliable – Highly integrated, reliable, multifunction (ASIC)
devices are used throughout the switch.
•
High performance – Low-latency, high-performance design
resulting in a worst-case data-transfer latency of less than two
microseconds from any port at peak Fibre Channel performance
of 100 MB/sec. The latency may differ when the destination or
device is a loop.
•
Automated congestion management – Virtual channels lets the
switch use sophisticated congestion management techniques that
are performed automatically by the switch.
•
Cascading – You can cascade switches for large Fabric support.
Up to 32 switches can be interconnected for a large Fabric with
hundreds of Fabric connections.
•
Universal – DS-16B switch ports are designed to support F, FL and
E-port modes of operation with the software selecting the
optimum mode of operation.
Performance
A minimum aggregate routing capacity of 4,000,000 frames/sec is
specified for Class 2, Class 3, and Class F frames. Non-blocking
throughput of up to 8 x 100MBytes/sec (0.8 GBytes/sec) is provided.
A maximum switch latency of less than two microseconds is specified
for Class 2, Class 3, and Class F frames when the output port is free.
Manageability
The unit may be managed in band or out of band via Telnet, via
SNMP, via SES or via the Web by connecting to the 10/100BaseT
Ethernet port.
Introduction
1-3
1
1
Introduction
System Components
The motherboard is enclosed in an air-cooled chassis which may be
either mounted in a standard rack or used as a standalone unit. The
chassis includes an RJ-45 Ethernet connection for switch set up and
management.
Fabric Operating
System
Included with the switch is a fabric operating system tuned for each
installation. The system provides a large number of commands and
libraries to manage real time tasks. See the Departmental Switch Model
DS-8B or DS-16B Fabric OS Reference Manual for details about software
features.
GBICs
The switch accommodates up to sixteen GBIC modules. All interfaces
have status lights visible from the front panel giving a quick, visual
check of the switch port’s status and activity.
GBIC modules supported are the short wavelength (SWL) and long
wavelength (LWL) fiber-optics.
If your installation requires installing less than sixteen GBIC
modules, the unused port positions are protected by a metal,
spring-loaded door.
1-4
SWL Fiber-Optic GBIC
Module
The SWL fiber-optic GBIC module, with an SC connector color-coded
black, is based on shortwave length 850 µm lasers supporting 1.0625
Gbps link speeds. This GBIC module supports 50-micron,
multi-mode fiber-optic cables up to 500 meters in length. The SWL
GBIC module uses a Class 1 laser, which complies with the 21 CFR,
subpart (J) as of the date of manufacture.
LWL Fiber-Optic GBIC
Module
The LWL fiber-optic GBIC module, with SC connector color-coded
blue, is based on long wavelength 1300 µm lasers supporting 1.0625
Gbps link speeds. This GBIC module supports 9-micron single-mode
fiber-optic cables up to 10 kilometers in length with a maximum of
five splices.
Departmental Switch Model DS-16B Hardware Reference Manual
2
Invisible Body Tag
Installation
• Unpacking the Switch .......................................................................2-2
• Site Considerations ............................................................................2-3
• Installation Considerations...............................................................2-4
Installation
2-1
2
Installation
Unpacking the Switch
While unpacking the switch, check to make sure the following items
are included:
•
Switch unit
•
Requested GBIC modules
•
Accessory kit containing the following:
• Power cord, if ordered
• Manuals
• Software Feature Guides
• Rubber mounting feet
Save packing materials in case you need to return the switch.
2-2
Departmental Switch Model DS-16B Hardware Reference Manual
Installation
Site Considerations
Cooling
Requirements
Cooling air is drawn into the chassis by four fans mounted near the
rear of the chassis, venting exhausted air through the front of the
switch.
Do not block the front or rear air vents. The switch must have free access to
ambient air for cooling.
Power Requirements
Switch power connection is via switched connectors on the switch’s
front panel, as shown in Figure 2-1. The switch power requirements
are:
•
Properly wired, earth-grounded outlet
•
Input voltage: 85 – 265 VAC
•
Total power: Up to 155 watts (depending on configuration, see
Appendix A, Specifications)
•
Input line frequency: Nominally 47 to 63 Hz
The switch has an autoranging power supply that automatically
accepts voltages and line frequencies within its range. A green power
on indicator light is above the power switch.
Power Supply 2
Figure 2-1
Power Supply 1
Model DS-16B with Two Power Supplies
The switch meets IEC 801-5 surge voltage requirements, however, there is
no other provision for surge protection built into the switch’s power
supplies. An installation should include normal provisions to assure clean
power.
Site Considerations
2-3
2
2
Installation
Installation Considerations
The switch has optional mounting hardware to mount the switch in a
standard 19-inch rack. If the switch has had its rubber mounting feet
installed, they may need to be removed for a rack installation.
Standalone
The switch is shipped in its standalone configuration. Adhesive
rubber feet are supplied if the switch is surface mounted. Rubber feet
installation is required for proper or safe switch operation.
To install the adhesive rubber feet:
1. Clean the four depressions at each corner of the chassis bottom so
that they are free of dust.
2. Remove the rubber feet from the sheet and place one in each
depression.
3. Firmly press the rubber feet in place.
Fiber Channel
Cable Connections
Table 2-1
All network cable connections are to the switch’s front panel. All
recommended cabling supports the switch’s 1.0625-Gbps transfer
rate, as shown in Table 2-1.
Cabling Connections
Cable type
Cable Specification
Maximum run
length
GBIC module
Optical
Wavelength
SWL Fiber Optic Duplex SC plug connectors
Multimode fiber
50 mm core diameter
125 mm cladding diameter duplex
cable
500 meters
1641 feet
780-860 µm
without open fiber
control (non-OFC)
LWL Fiber
Optica
10 Kilometers
84480 feet
1270-1350 µm
without open fiber
control (non-OFC)
Duplex SC plug connectors
Single mode fiber
9 mm core diameter
125 mm cladding diameter duplex
cable
The switch is not designed to interoperate with devices using an Open Fibre
Control optical interface.
2-4
Departmental Switch Model DS-16B Hardware Reference Manual
Installation
Fiber cable connections are made to the switch’s front panel using
standard dual SC plug connectors as shown in Figure 2-2.
Figure 2-2
Dual SC Fiber Optic Plug connector
The connectors are keyed and must be inserted into the GBIC
module’s connector in proper alignment. In most cases, one of the
two connector plugs is a different color to aid in proper connector
alignment.
Remove the protective plug from the GBIC. Do not force the fiber optic plug
into the GBIC module as you may damage the connector, the GBIC module,
or both. Make certain the fiber surface is clean, free of dust or debris, before
inserting the connector into GBIC module.
Ethernet
Connection
Connecting an existing Ethernet 10/100BaseT LAN to the switch via
the front panel RJ-45 connector gives access to the switch’s internal
SNMP agent and also allows remote Telnet and Web access for
remote monitoring and testing.
The connection is only for Telnet, SNMP agent and the Web-based Server
access. No Fabric connection is used via this connection.
Verify Power-On Self
Test (POST)
When the switch is powered on it automatically runs the POST. From
the front panel the indications of a normal POST include a pause, a
momentary flashing of the lights, followed by a series of diagnostics
tests. See Power-On Diagnostics (POST) on page 4-5 for more
information.
Installation Considerations
2-5
2
2
Installation
2-6
Departmental Switch Model DS-16B Hardware Reference Manual
3
Invisible Body Tag
Switch Management
• Comparing Switch Management Access Methods .......................3-2
• Managing Through Front Panel Buttons ........................................3-3
• DS-16B Switch Menus .......................................................................3-5
Switch Management
3-1
3
Switch Management
Comparing Switch Management Access Methods
There are several access methods for managing a switch. Table 3-1
summarizes the different management access methods.
Table 3-1
Comparison of Management Access Methods
Method
Description
Local
In-Band
(Fibre Channel)
Out-of-band
(Ethernet)
Front panel controls
Managed through control
located on the switch
Yes
No
No
Telnet commands
Managed remotely using
Telnet commands
No
Yes
Yes
Managing with SNMP
Managed remotely using
Simple Network Management
Protocol (SNMP)
No
Yes
Yes
Managing through
SES*
Managed SCSI-3 Enclosure
Services
No
Yes
No
Web-based
management*
Managed remotely though
web
No
Yes
Yes
* SES and Web-based Management are optionally licensed features.
An advanced set of controls and displays are available using a Telnet
connection for testing and debugging purposes. Before a Telnet connection
can be established the switch must have an IP address assigned to it, use the
front panel buttons to assign an IP address.
To reset a switch to factory default values use the Reset to Default
command, described in Reset to Default on page 3-16. Before changing
any factory default settings, become familiar with the operations
described in this chapter including both the switch’s functions and
interactive characteristics.
3-2
Departmental Switch Model DS-16B Hardware Reference Manual
Switch Management
Managing Through Front Panel Buttons
Figure 3-1 shows the front panel buttons.
<Up> button
<Enter> button
Display
<Tab/Esc> button
<Down> button
Figure 3-1
Control Buttons
Table 3-2
RJ45 10Base-T
Connection
Front Panel Functionality
Table 3-2 lists the primary control button functions. The function of
the button changes depending on the menu level. Buttons either
control navigating through the menus or
incrementing/decrementing numeric values.
Control Buttons
Control Button
Description
<Down>
<Down> scrolls down the command list, or if the user is changing a numeric display it
decrements the displayed value.
<Up>
<Up> scrolls up the command list, or if the user is changing a numeric display,
pressing this button increments the numeric value.
<Tab/Esc>
<Tab/Esc> tabs through multiple options. When displaying a menu item, pressing the
<Tab/Esc> button reverses through previous commands and, if pressed repeatedly,
turns off the front panel display.
<Enter>
<Enter> accepts the input and executes the selected function. To abort an entry,
pressing <Tab/Esc> navigates to the previous item.
When entering a number, the <Up> and <Down> buttons start in the
slow mode and change to the fast mode if either button is held down.
Most numbers go to a maximum of 255; for a large number, it may be
faster to use the <Down> button.
Managing Through Front Panel Buttons
3-3
3
3
Switch Management
Activating Menu
Display
The switch’s front panel display is normally not illuminated. Pressing
the front panel buttons activates the display:
Select Menu:
Configuration Menu
If no command is issued, the display turns off after 30 seconds.
3-4
Departmental Switch Model DS-16B Hardware Reference Manual
Switch Management
DS-16B Switch Menus
The following menus are controlled using the front panel buttons:
Choose Menu
Status Menu
Operation Menu
Configuration Menu
Switch
Offline
-Switch Name
- Ethernet IP Address
- Switch Online
- Ethernet Subnetmask
-WorldWide Name
- Port Disable
- Fibre Channel IP Address
-Firmware Version
P
ort
Enable
- Fibre Channel Subnetmask
-Current Date
- QuickLoop Disable
- Gateway Address
-Booted at
QuickLoop
Enable
- Domain
- QuickLoop Port Disable -Firmware Date
- BB_credit
- QuickLoop Port Enable
- R_A_TOV
-Flash Date
- Close Telnet Session
- E_D_TOV
-BootProm
Date
- Reboot
- Operating Mode
-Up
Time
- Non-SCSI Tachyon Mode
-Powered Time
- Disable Device Probing
- VC Encoded Address Mode
-Port Type
- Disable Translative Mode
-Module Type
- Per-Frame Route Priority
-Port Throughput
- VC Link Ctl
-Temperature
- VC Class 2
-Error Log
- VC Class 3
-Licenses
- VC Multicast
- VC Priority 2-7
- Always send RSCN?
- Send FAN Frames?
- Frame Collection
- Set QuickLoop Port
- Unset QuickLoop Port
- QuickLoop Partner WWN
- Reset to Default
Test Menu
- Switch Offline
- Switch Online
- Memory Test
- Port Register Test
- Central Memory Test
- CMI Conn Test
- CAM Test
- Port Loopback Test
- Cross Port Test
- Spin Silk Test
- SRAM Data Retention Test
- CM EM Data Retention Test
- Display Test
- Push Button Test
Note: Items in Bold are available with the QuickLoop Software
Figure 3-2
Menu Hierarchy
DS-16B Switch Menus
3-5
3
3
Switch Management
Commands
Table 3-3 shows the front panel commands and their equivalent
Telnet command.
Table 3-3
3-6
Front Panel and Telnet Commands
Menu
Front Panel
Telnet Command
Default
Configuration
Ethernet IP Address
ipAddrSet
10.1.2.3
Ethernet Submask
ipAddrSet
none
Fibre Channel IP Address
ipAddrSet
none
Fibre Channel Subnetmask
ipAddrSet
none
Gateway Address
ipAddrSet
none
Domain
configure
0
BB_credit
configure
16 (G_Port) - 0 (FL_Port)
R_A_TOV
configure
10000
E_D_TOV
configure
2000
Operating Mode
configure
0
Non-SCSI Tachyon Mode
configure
0
Isolated Operation
configure
0
Disable Device Probing
configure
0
VC-Encoded Address Mode
configure
0
Disable Translative Mode
configure
0
Per-Frame Route Priority
configure
0
VC Link Ctl
configure
0
VC Class 2
configure
2
VC Class 3
configure
3
VC Multicast
configure
7
VC Priorities
configure
0,1,2,2,2,2,3,3
Frame Collection
configure
Piling
Set QuickLoop Port
configure
0
Departmental Switch Model DS-16B Hardware Reference Manual
Switch Management
Table 3-3
Menu
Operation
Status
Front Panel and Telnet Commands (continued)
Front Panel
Telnet Command
Default
Unset QuickLoop Port
configure
0
QuickLoop Partner WWN
a/Partner
00:00:00:00:00:00:00:00
Reset to Default
configDefault
N/A
Switch Offline
SwitchDisable
N/A
Switch Online
SwitchEnable
N/A
Port Disable
portDisable <portno>
N/A
Port Enable
portEnable <portno>
N/A
QuickLoop Disable
a/Disable
N/A
QuickLoop Enable
a/Enable
N/A
QuickLoop Port Disable
a/Port Disable
N/A
QuickLoop Port Enable
a/Port Enable
N/A
Close Telnet Session
logout
N/A
Reboot
reboot
N/A
Switch Name
switchShow
N/A
Worldwide Name
switchShow
N/A
Firmware Version
version
N/A
Current Date
date
N/A
Booted At
version
N/A
Firmware Date
version
N/A
Flash Date
version
N/A
Boot Prom Date
version
N/A
Up Time
uptime
N/A
Powered Time
uptime
N/A
Port Type
switchShow
N/A
Module Type
switchShow
N/A
DS-16B Switch Menus
3-7
3
3
Switch Management
Table 3-3
Menu
Test
3-8
Front Panel and Telnet Commands (continued)
Front Panel
Telnet Command
Default
Port Throughput
portPerfShow
N/A
Temperature
tempShow
N/A
Error Log
errShow
N/A
Licenses
licenseShow
N/A
Switch Offline
SwitchDisable
N/A
Switch Online
SwitchEnable
N/A
Memory Test
ramTest
N/A
Port Register Test
portRegTest
N/A
Central Memory Test
centralMemoryTest
N/A
CMI Conn Test
cmiTest
N/A
CAM Test
cam Test
N/A
Port Loopback Test
portLoopbackTest
N/A
Cross Port Test
crossPortTest
N/A
Spin Silk Test
spinSilk
N/A
SRAM Data Retention Test
sramRetentionTest
N/A
CMEM Data Retention Test
cmemRetentionTest
N/A
Display Test
N/A
N/A
Push-Button Test
N/A
N/A
Departmental Switch Model DS-16B Hardware Reference Manual
Switch Management
Configuration Menu
Table 3-4
You configure the switch using the Configuration Menu. Pressing
<Enter> while in the Configuration Menu selects the option to
choose commands.
Configuration Menu
Configuration menu
See Page
Ethernet IP Address
3-11
Ethernet Subnetmask
3-11
Fibre Channel IP Address
3-12
Fibre Channel Subnetmask
3-12
Gateway Address
3-13
Domain
3-13
BB_credit
3-13
R_A_TOV
3-14
E_D_TOV
3-14
Operating Mode
3-15
Non-SCSI Tachyon Mode
3-12
Isolated Operation
3-12
Disable Device Probing
3-12
VC-Encoded Address Mode
3-12
Disable Translative Mode
3-12
Per-Frame Route Priority
3-12
VC Link Ctl
3-15
VC Class 2
3-15
VC Class 3
3-15
VC Multicast
3-15
VC Priorities
3-16
Frame Collection
3-16
DS-16B Switch Menus
3-9
3
3
Switch Management
Table 3-4
Configuration Menu (continued)
Configuration menu
See Page
Set QuickLoop Port
Unset QuickLoop Port
QuickLoop Partner WWN
Reset to Default
3-16
After changing any of the following menus from the front panel or Telnet
connection, you must reboot the switch for the changes to take effect.
Ethernet IP Address
Pressing <Enter> while Ethernet IP address is selected, displays
the switch’s Ethernet IP address:
Ethernet IP address:
10. 00. 00. 10
The switch’s default IP address, as shown, is a temporary address
derived from the switch’s WWN. Enter a valid IP address.
To enter an IP address
1. Use <Up> and <Down> to increment or decrement the displayed
value. The underlined cursor indicates the numbers to modify.
When entering a number, <Up> and <Down> start in the slow
mode and move to the fast mode if the button is held down. The
numbers go to a maximum of 255 and wraps to zero; for a large
number, it may be faster to use the <Down> button.
2. After entering a number, press <Tab/Esc> to move the cursor to
modify the next field.
3. After setting the IP address, pressing <Enter> stores the value.
Ethernet Subnetmask
Pressing <Enter> while Ethernet Subnetmask is selected, displays:
.
Ethernet Subnetmask
none
3-10
Departmental Switch Model DS-16B Hardware Reference Manual
Switch Management
The default subnet mask value is none. Refer to the network
administrator for the appropriate subnet mask.
Enter the switch’s subnet address by using <Up> and <Down> to
increment or decrement the displayed value. The numbers with the
underline cursor is the group to modify.
Fibre Channel IP
Address
Pressing <Enter> while Fibre Channel IP address is selected,
displays:
Fibre Channel IP address:
0. 0. 0. 0
The default Fibre Channel IP address is 0.0.0.0, as shown in the
example. Enter a valid IP address.
To update the Fibre Channel’s IP address
1. Use <Up> and <Down> to increment or decrement the displayed
value. The underlined cursor indicates the numbers to modify.
2. After entering a number, press <Tab/Esc> to move the cursor to
modify the next field.
3. After setting the Fibre Channel’s IP address, pressing <Enter>
stores the value.
!
CAUTION
The Fibre Channel IP address should NOT be set to the same
address as the Ethernet IP address -- two different addresses are
required.
Fibre Channel
Subnetmask
Pressing <Enter> while Fibre Channel Subnetmask is selected,
displays:
Fibre Channel Subnetmask
none
The default subnetmask value is none, as shown in the example.
Consult your network administrator for the appropriate subnetmask.
Enter the switch’s Fiber Channel Subnetmask by using <Up> and
<Down> to increment or decrement the displayed value.
DS-16B Switch Menus
3-11
3
3
Switch Management
Gateway Address
Pressing <Enter> while Gateway address is selected, displays:
Gateway address:
0. 0. 0. 0
The default gateway address is shown above. You must enter a valid
gateway address, if required.
To enter the gateway address
1. Use <Up> and <Down> to increment or decrement the displayed
value. The underlined cursor indicates the numbers to modify.
2. After entering a number, press <Tab/Esc> to move the cursor to
modify the next field.
3. After setting the gateway address, pressing <Enter> stores the
value.
Domain
Pressing <Enter> while Domain is selected, displays:
Domain:
0
The domain number uniquely identifies the switch in a Fabric. This
switch ID is normally automatically assigned by the switch and may
be any value between 1 and 239. If VC-Encoded Address Mode is in
effect, then the values are between 0 and 31. You may also assign this
number manually.
BB_credit
Pressing <Enter> while BB_credit is selected, displays:
BB_credit:
16
The number represents the number of buffers, from 1 to 16, available
to the host. For a complete description of buffer-to-buffer credit, refer
to the industry specification Fibre Channel Physical and Signalling
Interface (FC-PH).
3-12
Departmental Switch Model DS-16B Hardware Reference Manual
Switch Management
R_A_TOV
Pressing <Enter> while R_A_TOV is selected, displays:
R_A_TOV:
10000
Resource Allocation Time Out Value (R_A_TOV) is adjustable in
1-second increments using front panel controls, but its value is
displayed in milliseconds. This variable works with the variable
E_D_TOV to determine the switch’s actions when presented with an
error condition. Allocated circuit resources with detected errors are
not released until the time value has expired. If the condition is
resolved prior to the timing out, the internal time out clock resets and
waits for the next error condition.
The range is 1 to 120 seconds.
The set value must be larger than the set value for the Error Detect Time Out
Value.
E_D_TOV
Pressing <Enter> while E_D_TOV is selected, displays:
E_D_TOV:
2000
E_D_TOV (Error Detect Time Out Value) is adjustable in 1-second
increments using the front panel controls, but its value is displayed in
milliseconds.
Use the flashSet command during a Telnet session to set the E_D_TOV or
R_A_TOV value (in milliseconds) for values other than whole seconds.
This timer is used to flag a potential error condition when an
expected response is not received (an acknowledgment or reply in
response to packet receipt, for example) within the set time limit. If
the time for an expected response exceeds the set value, then an error
condition is met.
The range is 1 to 60 seconds.
The set value must be less than the set value for the Resource Allocation Time
Out Value.
DS-16B Switch Menus
3-13
3
3
Switch Management
Operating Mode
Table 3-5
The operating modes are determined by the host adapter. The six
operating modes for the switch are:
Operating Mode Definitions
Mode
Description
Non-SCSI Tachyon Mode
When set, multiple sequences from different sources are interleaved to
Tachyon-based controllers at Sequence boundaries rather than at
frame boundaries, resulting in better performance from Tachyon-based
controllers.
Isolated Operation
Setting this mode isolates the switch from the rest of the Fabric.
Disable Device Probing
When this is set, devices that do not register themselves with the Name
Server will not be present in the Name Server data base.
VC-Encoded Address Mode
When this mode is set, frame source and destination addresses utilize
an address format compatible with some first-generation switches.
Disable Translative Mode
The setting is only relevant if VC Encoded Address Mode is also set.
When set, this maintains explicit address compatibility with some firstgeneration switches.
Per-Frame Route Priority
In addition to the eight virtual channels used in frame routing priority,
support is also available for per-frame based prioritization when this
value it set. When set, the virtual channel ID will be used in conjunction
with a frame header to form the final virtual channel ID.
The administrator determines the adapter in use, then sets the switch
for the corresponding operating mode.
Virtual Channels
The switch provides the ability to tune the switch in a specific
application.
The first two virtual channels are reserved for the switch’s internal
functions and are not available.
The default virtual channel settings are already optimized for switch
performance. Changing the default values, if properly selected, may improve
switch performance somewhat, but may also severely degrade performance.
You should not change these settings without fully understanding the
change’s effects.
3-14
Departmental Switch Model DS-16B Hardware Reference Manual
Switch Management
VC Link Ctl
Pressing<Enter> while VC Link Ctl is selected, displays:
VC Link Ctl:
0
The Virtual Channel Link Control changes the link control channel.
There are two options: 0 and 1.
Option 0 forces data receipt acknowledgments on Class 2 channels to
be sent back on the data channel. This traffic consumes a portion of
the available data channel bandwidth.
Option 1 allows data receipt acknowledgment packets to use the
VC-1 (internal switch traffic channel) which frees additional
bandwidth in the data channel, and transfers the data receipt traffic
load to the switch’s internal traffic channel.
VC Class 2
Pressing <Enter> while VC Class 2 is selected, displays:
VC Class 2:
2
This example shows the default channel as 2, but you can also select
virtual channel 3, 4, or 5.
VC Class 3
Pressing <Enter> while VC Class 3 is selected, displays:
VC Class 3:
3
This example shows the default channel as 3, but you can select
virtual channel 2, 4, or 5.
VC Multicast
Pressing <Enter> while VC Multicast is selected, displays:
VC Multicast:
7
The virtual channel multicast is shown as channel 7 in the example.
You may change the multicast transmission channel to either virtual
DS-16B Switch Menus
3-15
3
3
Switch Management
channel 6 or 7. Verify that the multicast channel has the frame class
priority set to the frame class of the expected traffic.
VC Priorities
Pressing <Enter> while VC Priorities is selected, displays:
VC Priorities:
0,1,2,2,2,2,3,3
The numbers displayed show the priorities assigned to each of the
switch’s virtual channels. Positions 1 and 2, starting at the left of the
display, are fixed and displays 0 or 1.
The first position, a ‘0’, shows and indicates that this virtual channel,
assigned to handle internal switch traffic, has the highest priority.
This priority value cannot be changed by the user.
The second position, indicated with a 1, shows the priority assigned
by the virtual channel link control as described in the VC Link Ctl on
page 3-15.
The third through eighth positions can have only a 2 or a 3 indicating
that the channel gives priority to either Class 2 frame traffic or to
Class 3 frame traffic.
Frame Collection
Pressing <Enter> while Frame Collection is selected, displays:
Frame Collection:
Method? Bundle/Piling
This command specifies two frame collection methods, bundle and
piling. Using bundling, frames are separated in different queues
based on source/destination pairs. Using piling, frames are
accumulated per destination AL_PA If NL_Ports can handle multiple
frames in a loop. Additionally, piling can minimize loop traffic by
reducing overhead and increases the loop efficiency.
To set, press <Tab/Esc> for Bundle or <Enter> for Piling.
Reset to Default
Pressing <Enter> while Reset to Default is selected, displays:
Reset to Default
Accept?
Yes
3-16
No
Departmental Switch Model DS-16B Hardware Reference Manual
Switch Management
Selecting the Yes option then pressing <Enter> causes all values in the
Configuration Menu to reset to default conditions. Once the Ethernet
IP address and the Switchname are changed, they are not reset to
default values.
Resetting the switch to default causes all configuration settings, names,
and passwords entered to be reset to default settings.
Operation Menu
Table 3-6
You control the switch’s overall operational state using the Operation
Menu. Pressing <Enter> while the Operation Menu is selected,
allows you to select commands:
Operation Menu
Operation menu
See Page
Switch Offline
3-18
Switch Online
3-19
Port Disable
3-19
Port Enable
3-19
QuickLoop Disable
QuickLoop Enable
QuickLoop Port Disable
QuickLoop Port Enable
Close Telnet Session
Reboot
3-20
DS-16B Switch Menus
3-17
3
3
Switch Management
Switch Offline
The shutdown process is initiated from the front panel by pressing
<Enter> while the Switch Offline message is displayed.
Operation Menu:
Switch Offline
You can observe and verify this process by watching the front panel
LEDs change color from green to slow flashing amber as each port goes
inactive.
After all multicast and broadcast paths have been rerouted, the
F_Ports and FL_Ports are taken offline. This is followed by making all
routes through the switch unavailable by increasing path cost to hex
‘00 00 00 00’. E_Ports are then taken offline individually as all routes
through a given E_Port are eliminated.
Switch Online
Pressing <Enter> while the Switch Online message is selected,
brings the switch online.
Operation Menu:
Switch Online
Port Disable
Pressing <Enter> while the Port Disable message is selected,
displays a submenu to select the port to disable.
Operation Menu:
Port Disable
Pressing <Enter> while a selected port is displayed, disables the port.
The LED associated with the port changes from green to amber
indicating the selected port has been disabled.
Port Disable
Accept?
Yes
3-18
No
Departmental Switch Model DS-16B Hardware Reference Manual
Switch Management
Port Enable
Pressing <Enter> while the Port Enable message is displayed opens
a submenu where you select the port.
Operation Menu:
Port Enable
Pressing <Enter> while the selected port is displayed, enables the
selected port. The LED associated with selected port changes from
amber to green indicating the port has been enabled. When FL_Ports
are enabled, the port initializes the loop attempting to be the master.
Port Enable
Accept?
Yes
No
Close Telnet Session
Reboot
Pressing <Enter> while the Reboot message is displayed causes the
switch to reboot immediately.
Operation Menu:
Reboot
Rebooting the switch causes it to immediately exit all current
processes and states, and start the POST process. Exercise caution
using the reboot command on a switch connected to the Fabric.
Pressing <Enter> while the screen above is selected, displays:
Reboot
Accept?
Yes
No
Selecting Yes causes the switch to immediately reboot. Selecting No or
pressing <Tab/Esc> exits this function.
DS-16B Switch Menus
3-19
3
3
Switch Management
Status Menu
You can retrieve information on the switch using the Status Menu.
The menu is informational only; you cannot make changes to the
switch’s status from this menu.
Press <Enter> while the Status Menu is selected to select commands.
Table 3-7
Switch Name
Status Menu
Status Menu
See Page
Switch Name
3-21
Worldwide Name
3-21
Firmware Version
3-22
Current Date
3-22
Booted At
3-22
Firmware Date
3-22
Flash Date
3-23
Boot Prom Date
3-23
Up Time
3-23
Powered Time
3-23
Port Type
3-23
Module Type
3-24
Port Throughput
3-24
Temperature
3-25
Error Log
3-26
Licenses
3-23
Pressing <Enter> while Switch Name is selected, displays:
:
Switch Name:
sw15
3-20
Departmental Switch Model DS-16B Hardware Reference Manual
Switch Management
Worldwide Name
Pressing <Enter> while Worldwide Name is selected, displays:
Worldwide Name:
10:0:0:60:69:0:0:e
The switch’s WWN is a unique numeric identifier for each switch and
it is assigned by the manufacturer. A numbering scheme
administrated globally assures that this WWN is unique.
Firmware Version
Pressing <Enter> while Firmware Version is selected, displays:
Firmware Version
v1.4
Current Date
Pressing <Enter> while Current Date is selected, displays:
Current Date:
Mon Oct 21 10:23:35 1997
Booted At
Pressing <Enter> while Booted At is selected, displays:
Booted At:
Sat Sep 19 18:34:20 1997
Firmware Date
The date always reflects the firmware assembly date. The Firmware
Date reflects the date code of the current executing firmware on the
CPU. Flash Date reflects the firmware date in flash memory. These
dates may not match if the flash memory has been updated with new
firmware but the switch has not yet been rebooted. When the switch
is rebooted the flash code becomes the executing CPU code, both
dates match.
Pressing <Enter> while Firmware Date is selected, displays the date
of the switch’s firmware:
Firmware Date:
Jun 12 08:48:29 PDT 1997
DS-16B Switch Menus
3-21
3
3
Switch Management
Flash Date
Pressing <Enter> while Flash Date is selected, displays:
Flash Date:
Jun 12 08:48:29 PST 1997
This display gives the date and time for the last flash firmware
update. If you upgrade the firmware in flash memory with a different
firmware version, the date the new firmware was entered is
displayed.
Use this date to quickly establish the date the firmware was updated.
Boot Prom Date
Pressing <Enter> while Boot Prom Date is selected, displays:
Boot Prom Date:
Jun 12 08:48:29 PST 1997
Up Time
Pressing <Enter> while Up Time is selected, displays:
Up Time
6 day, 22:20
This display shows the time the switch has been up since the last
reboot of the switch.
Powered Time
Pressing <Enter> while Powered Time is selected, displays:
Powered Time
137 days, 8:287
This display shows the time the switch has been powered on.
Port Type
Pressing <Enter> while Port Type is selected, displays:
Port Type:
EFEG GFGF xxxx xxxx N
This display shows the status of each port on the switch. The ports
start with the first port on the switch which is the port in the top left
3-22
Departmental Switch Model DS-16B Hardware Reference Manual
Switch Management
position when the ports are viewed from the switch’s front panel. The
definitions assigned to the example are:
Module Type
•
E – E_Port is an interswitch expansion port, used to connect to an
E_Port of another switch to build a larger switch Fabric.
•
F – F_Port, the Fabric access port is used to connect an N_Port and
is used within the switch Fabric for control and management.
•
L – FL_Port is a switch port connected to an arbitrated loop.
•
G – G_Port is a generic port that can operate either as an E_Port or
an F_Port but has not yet assumed a specific function in the
Fabric.
•
U – U_Port
•
N – N_Port is used within the switch itself for internal switch
control traffic. It does not have an external physical port.
•
x – Indicates no interface module is installed.
Pressing <Enter> while Module Type is selected, displays:
Module Type:L
This display shows the type of GBIC module installed in a port as
follows:
Port Throughput
•
L = long-wavelength
•
S = short-wavelength
Pressing <Enter> while Port Throughput is selected, displays:
Port Throughput:
Port 0
75MB/s
This display shows port throughput on the switch. The throughput
number represents the number of bytes received plus the number of
bytes transmitted per second and is displayed as bytes/second (B/s),
kilobytes/second (KB/s) or megabytes/second (MB/s). You can
select different ports using <Up> and <Down>, from port 0 to port 15
and all ports, and is used to monitor a single or the aggregated of all
port(s) performance.
DS-16B Switch Menus
3-23
3
Switch Management
Temperature
Pressing <Enter> while Temperature is selected, displays:
Temperature:
36
34 37
36
35
Using the <Up> or <Down> buttons, the user can toggle between Centigrade
(default) and Fahrenheit temperature values.
2
1
Rear of switch
3
3
5
4
Front
Figure 3-3
Temperature Sensor Approximate Locations on Motherboard
The numbered temperature sensor locations on the motherboard,
shown in Figure 3-3, correspond to the temperature in the display.
Sensor number 1 corresponds to the first temperature, 36, sensor
number two corresponds to the second temperature, 34, and so forth.
The temperature readings are shown at a rate of one reading per
second on the front panel. Readings obtained during a Telnet session
are single reading made at command execution.
3-24
Departmental Switch Model DS-16B Hardware Reference Manual
Switch Management
Error Log
Selecting Error Log, then pressing <Enter>, displays:
01 Feb 12 08:48:29 (23)
Err SENSOR-FAILED-3
The error log stores the last 64 error types sensed by the switch. The
front panel display shows:
•
Error number (01-64)
•
Date and time of the last occurrence each error type was sensed
•
Total number of occurrences of each error type
•
Error type
•
Error level for each error type, with error level 1 being the most
critical; Error level 2 and error level 3, warning, are the other error
levels displayed.
• 0–Panic (when this level is reached, the switch automatically
reboots and the display no longer shows the error)
• 1–Critical
• 2–Error
• 3–Warning
• 4–Info
• 5–Debug
In the sample above, the first line shows that this is the first error (01)
found on Feb 12 08:48:29 and had (23) occurrences. The second line
shows that the error type is SENSOR-FAILED with a severity level of
3 (warning).
The error occurrence count, shown in brackets at the end of the first line, does
not appear until the error occurrence is higher than one.
DS-16B Switch Menus
3-25
3
3
Switch Management
Licenses
Selecting Licenses, then pressing <Enter>, displays:
Licenses
01f
The license display shows a bit map in hex of the installed license
options. The current list of license options is: web=1, zoning=2,
SES=4, QuickLoop=8, Fabric=16
Test Menu
3-26
The tests available from the Test Menu are part of the diagnostic and
fault isolation capabilities. See Chapter 4, Front Panel Diagnostics, for
more information.
Departmental Switch Model DS-16B Hardware Reference Manual
4
Invisible Body Tag
Front Panel Diagnostics
•
•
•
•
Front Panel Diagnostics ....................................................................4-2
Status and Activity Indicators..........................................................4-4
Front Panel LED Port Indicators......................................................4-4
Diagnostic Tests..................................................................................4-6
Front Panel Diagnostics
4-1
4
Front Panel Diagnostics
Front Panel Diagnostics
This section gives a diagnostic overview and discusses:
•
Diagnostic Overview
•
Status and Activity Indicators
•
Diagnostic Tests
See Appendix C, Error Messages, for the actual error message descriptions.
Diagnostic
Overview
The switch is designed for maintenance free operation. When there is
a suspected failure, the switch has self diagnostic capabilities to aid in
isolating any equipment or Fabric failures.
The switch supports Power-On Self-Tests (POSTs) and diagnostic
tests. The diagnostic tests determine the switch’s status and isolate
problems.
Telnet commands are used to determine the switch’s status, error
conditions, and switch operating statistics.
You perform diagnostics using either the switch’s front panel controls
or commands via a Telnet session. The front panel and Telnet
diagnostics overlap in function but are mutually exclusive. You can,
for example, start a diagnostic from Telnet, and monitor the results
using both the front panel display and via Telnet.
If a test is started using the front panel, you can monitor the test
progress, but cannot control the test through Telnet. If you start a test
using Telnet, attempting to control the test via the front panel may
lock up the switch and require a reboot.
The actual tests performed by the front panel and via a Telnet are
identical. Because the front panel displays a two line limit, more
detailed test results can be displayed via Telnet.
4-2
Departmental Switch Model DS-16B Hardware Reference Manual
Front Panel Diagnostics
Diagnostic Front
Panel Displays
If you suspect a switch or a Fibre Channel port failure, a visual check
of the color LED Indicators, shown in Figure 4-1, determines the
status of each port. See Status and Activity Indicators on page 4-4 for
additional information
LED Indicators
Figure 4-1
Isolating a System
Fault
Power Indicator LED
LED Indicators
Various loopback paths are built into the switch hardware for
diagnostic purposes. A loopback path test within the switch verifies
the proper internal Fibre Channel port logic functions and the paths
between the interfaces and central memory.
The switch’s diagnostics also support external loops which include
GBIC modules in cross port configurations. These port-to-port
diagnostics allow checking installed fiber cables and port fault
isolation.
Removing Power
Error messages are stored in RAM and are lost when power is removed from
the switch. Access the error message log to view and note any error messages
before removing power from the switch.
Front Panel Diagnostics
4-3
4
4
Front Panel Diagnostics
Status and Activity Indicators
Front Panel LED Port
Indicators
Table 4-1
The color and flash speed of each port’s LED, as described in
Table 4-1, indicates the individual port’s status.
Port LED Status Indicators
Port’s LED
Definition
No light showing
No light or signal carrier (no module, no cable) for media interface
Steady yellow
Receiving light or signal carrier, but not yet online
Slow yellow
(flashes two seconds)
Disabled (result of diagnostics or portDisable command)
Fast yellow
(flashes a half second)
Error, fault with port
Steady green
Online (connected with external device over cable)
Slow green
(flashes two seconds)
Online, but segmented (loopback cable or incompatible switch)
Fast green
(flashes a half second)
Internal loopback (diagnostic)
Flickering green
Online and frames flowing through port
Initialization Steps
At power-on or reset, the following steps are executed:
1. Preliminary POST diagnostics
2. VxWorks operating system initialization
3. Hardware initialization (resets, internal addresses assigned to
ASICs, serial port initialized, front panel initialized)
4. Full POST
5. Link initialization; receiver/transmitter negotiation to bring
connected ports online
6. Fabric analysis; the switch checks for ports connected to other
Fabric elements. If there are other Fabric elements connected, it
identifies the master switch.
4-4
Departmental Switch Model DS-16B Hardware Reference Manual
Front Panel Diagnostics
7. Address assignment; after the master switch is identified, port
addresses may be assigned. Each switch tries to keep the same
addresses that were previously used. These are stored in the
switch’s configuration flash PROM.
8. Routing table construction; after addresses are assigned, the
unicast routing tables are constructed.
9. Enable normal port operation.
Power-On
Diagnostics (POST)
The following table lists the diagnostic tests automatically run during
POST. POST behaves differently depending on the boot method.
A power cycle (power off & power on) is considered a cold boot. All
other boots from a powered-on state (per reboot, panic, etc.) are
considered warm boots.
POST execution per cold boot executes the long version of ramTest.
POST execution per warm boot executes a shorter version of ramTest.
Boot time with POST varies depending on the boot method.
A switch rebooted with POST disabled will generate the
DIAG-POST_SKIPPED error log message.
If a error is detected during POST, it is written to the system error log
and is available for analysis via Telnet.
If the error prohibits the switch from completing the boot process
(fatal error), the switch stops the boot process and displays the error
on the switch’s front panel display.
If the error occurred in the POST processing before the switch is able
to display the boot failure cause, the switch’s front panel power on
indicator flashes (instead of its normal steady light) indicating the
switch failed the boot process and is not operating.
A switch boot failure indicates the switch must be taken offline to be repaired
or replaced. Contact your service representative as described in Appendix B,
Switch Support.
Status and Activity Indicators
4-5
4
4
Front Panel Diagnostics
Diagnostic Tests
The following tests are available from the switch’s front panel and via
Telnet. For details on how to use the switch’s front panel buttons and
how to access the Test Menu from the front panel, refer to the section
Managing Through Front Panel Buttons on page 3-3.
Accessing the switch via Telnet provides a more detailed response indicating
the switch’s condition and allows the use of some commands which do not
have an equivalent front panel command.
Test Menu
Pressing <Enter> while the Test Menu is displayed on the switch’s
front panel, allows you to select the following operations:
•
Switch Offline
•
Switch Online
•
Ram Test
•
Port Register Test
•
Central Memory Test
•
CMI Conn Test
•
CAM Test
•
Port Loopback Test
•
Cross Port Test
•
Spin Silk Test
•
SRAM Data Retention Test
•
CMEM Data Retention Test
•
Display Test
•
Push Button Test
See Appendix C, Error Messages for the actual error message descriptions.
4-6
Departmental Switch Model DS-16B Hardware Reference Manual
Front Panel Diagnostics
Table 4-2
Offline and Online Test
Offline Tests
Offline & Online Tests
portRegTest
ramTest
centralMemoryTest
crossPortTest
cmiTest
sramRetentionTest
cmemRetentionTest
camTest
portLoopbackTest
spinSilk
Switch Offline
Pressing <Enter> while Switch Offline is selected displays:
Switch Offline:
Accept?
Yes
No
Tests that would jeopardize data transmission require taking the
switch offline. If the switch is not offline, a prompt appears before the
test is allowed to proceed.
Switch Online
Pressing <Enter> while Switch Online is selected displays:
Switch Online:
Accept?
Yes
No
After the switch is offline, proceed with the test.
Ram Test
Pressing <Enter> while ramTest is selected displays:
System Memory Test at
0x1021d460 len 13091456
Diagnostic Tests
4-7
4
4
Front Panel Diagnostics
If the memory tests OK, the front panel displays:
0x10199a10 len 13091456
ramTest: passed
Related error messages: DIAG-MEMORY, DIAG-MEMSZ,
DIAG-MEMNULL
Port Register Test
Pressing <Enter> while Port Register Test is selected displays a
reminder to take the switch offline if it is not offline. If the message is
displayed, take the switch offline.
Pressing <Enter> starts the test, which checks the switch’s ASIC
registers. The ports tested are 0 to 15.
If the test is successful, the panel displays RegTest: passed.
Port Reg Test
RegTest: passed
Related error messages: DIAG-REGERR, DIAG-REGERR_UNRST,
DIAG-BUS_TIMEOUT
Central Memory Test
4-8
The centralMemoryTest verifies that the central memory in each
Loom ASIC is functioning correctly by checking the following:
•
The built-in-self-repair (BISR) circuit in each Loom chip does not
report failure to repair bad cells (bisr test).
•
The data cells can be uniquely written and read correctly (data
write/read test).
•
The data in any one asic can be read from any other ASIC (loom
connection test).
•
Bad parity can be detected and flagged in the error register and
interrupt posted (parity error test).
•
Buffer number error can be detected and flagged in the error
register and interrupt posted (buffer number error test).
•
Chip number error can be detected and flagged in the error
register and interrupt posted (chip number error test).
Departmental Switch Model DS-16B Hardware Reference Manual
Front Panel Diagnostics
Pressing <Enter> while Central Memory Test is selected displays a
reminder to take the switch offline, if it is not offline. If the message is
displayed, take the switch offline.
If the switch passes the test, Passed is displayed:
Central MemTest: passed
Related error messages: DIAG-CMBISTRO, DIAG-CMBISRF,
DIAG-LCMTO, DIAG-LCMRS, DIAG-LCMEM, DIAG-LCMEMTX,
DIAG-CMNOBUF, DIAG-CMERRTYPE, DIAG-CMERRPTN,
DIAG-PORTABSENT, DIAG-BADINT, DIAG-TIMEOUT,
DIAG-INTNOTCLR
CMI Test
The cmiTest verifies that control messages can be correctly sent from
any ASIC to any ASIC. It also tests that the checksum check is ok. The
switch must be offline.
Related error messages: DIAG-BADINT, DIAG-INTNIL,
DIAG-CMISA1, DIAG-CMINOCAP, DIAG-CMIINVCAP,
DIAG-CMIDATA, DIAG-CMICKSUM
SRAM Retention Test
The sramRetentionTest verifies that data written into the ASIC
memories are retained and that data bits do not “drop” when read
after some amount of delay since the write. The switch must be
offline.
Related error messages: DIAG-REGERR, DIAG-REGERR_UNRST,
DIAG-BUS_TIMEOUT
cmemRetention Test
The cmemRetentionTest verifies that data written into the SRAMs
that make up the central memory are retained and that data bits do
not “drop” when read after some amount of delay since the write.
The switch must be offline.
Related error messages: DIAG-LCMEM, DIAG-LCMRS,
DIAG-LCMTO
CAM Test
The camTest verifies that the SID translation required by QuickLoop
and implemented using content addressable memories (cam) are
functioning correctly. The switch must be offline.
Related error messages: DIAG-CAMINIT, DIAG-CAMSID,
DIAG-XMIT
Diagnostic Tests
4-9
4
4
Front Panel Diagnostics
Port Loopback Test
The portLoopbackTest verifies the intended functional operation of
the switch by sending frames from each port’s transmitter back to the
same port’s receiver via an internal hardware loopback.
Pressing <Enter> while Port Loopback Test is selected displays a
reminder to take the switch offline, if it is not offline. If the message is
displayed, take the switch offline.
The Port Loopback Test is an internal test which continues to run
until you press any button. While the test is running, all GBIC
module front panel LEDs rapidly flicker green indicating that the test
is finding no errors and is processing.
To stop the test, press any button, Aborted is displayed:
Port Loopback Test: Aborted
Related error messages: DIAG-INIT, DIAG-PORTDIED,
DIAG-XMIT, DIAG-TIMEOUT, DIAG-ERRSTAT, DIAG-STATS,
DIAG-DATA, DIAG-PORTABSENT
Cross Port Test
The crossPortTest verifies the intended functional operation of the
switch by sending frames from each port’s transmitter via the GBIC
and external cable and back to another port’s receiver. It exercises the
entire path of the switch.
Figure 4-2 is a recommended connection when executing the
crossPortTest. The cables need not be connected as such. A port can
be connected to any port in the same switch provided the connection
is of the same technology; meaning SW ports must connect to SW
ports and LW ports to LW ports.
0
1
2
3
4
7
8
9
10
13
5
12
6
Figure 4-2
4-10
Switch Setup to Run Cross Port Test
Departmental Switch Model DS-16B Hardware Reference Manual
11
14
15
Front Panel Diagnostics
All ports on the switch must be connected or else the switch shows an error
condition. When running the cross port test, you must set the operating mode
value to 0 or 1. Modes 2 and 3 do not send out the ELP used to discover
switches. If the ELP is not sent, the switch does not know the port is
connected to another port on the same switch and the test fails.
If an error is encountered during the test, the error is displayed on
either the front panel display or during the Telnet session.
Related error messages: DIAG-INIT, DIAG-PORTDIED,
DIAG-XMIT, DIAG-TIMEOUT, DIAG-ERRSTAT, DIAG-STATS,
DIAG-PORTWRONG, DIAG-DATA, DIAG-PORTABSENT
Spin Silk Test
The spinSilk test verifies the intended functional operation of the
switch by sending frames from each port’s transmitter via the GBIC
and external cable, and back to another port’s receiver at the full
hardware speed of 1Gb/s. It exercises the entire path of the switch.
The switch must be offline.
Because the CPU is not comparing data on each frame as with the
other two frame tests, the DIAG-DATA error is never reported during
spin silk. However, the other error messages defined for
crossPortTest and their corresponding probable causes and actions
are applicable to the spin silk test.
Pressing <Enter> while Spin Silk Test is selected displays a
reminder to take the switch offline, if it is not offline. If the message is
displayed, take the switch offline.
Pressing <Enter> starts the Spin Silk Test and displays:
SpinSilk: Press any
button to terminate
If an error is encountered during the test, the error is displayed on
either the front panel display or via Telnet.
When running the Spin Silk Test, you must set the operating mode value to 0
or 1. Modes 2 and 3 do not send out the ELP used to discover switches. If the
ELP is not sent, the switch does not know the port is connected to another
port on the same switch and the test fails.
Diagnostic Tests
4-11
4
4
Front Panel Diagnostics
Related error messages: DIAG-INIT, DIAG-PORTDIED,
DIAG-XMIT, DIAG-PORTSTOPPED, DIAG-ERRSTAT,
DIAG-ERRSTATS, DIAG-PORTABSENT
Display Test
Push Button Test
Pressing <Enter> while Display Test is selected causes a series of
test characters to be displayed. Use this test to determine that the
display is functioning properly.
Pressing <Enter> while Push Button Test is selected displays:
Push Button Test
1 & 4 to exit
:
324
1
Pressing any front panel button causes the corresponding button
number to move to the second line. To exit this test, simultaneously
press the 1 (down) and 4 (enter) buttons.
4-12
Departmental Switch Model DS-16B Hardware Reference Manual
A
Invisible Body Tag
Specifications
• General Specifications ......................................................................A-2
• Fabric Management Specifications .................................................A-3
• Safety Specifications .........................................................................A-4
Specifications
A-1
A
Specifications
General Specifications
Table A-1 shows the switch specifications.
Table A-1
A-2
Switch Specifications
Specifications
Description
Fibre Channel protocol
ANSI Fibre Channel Standard (FC-PH)
Fabric Initialization
Complies with FC-SW 3.2
IP Over Fibre Channel (FC-IP)
Complies with 2.3 of the FCA profile
System architecture
Nonblocking shared-memory switch
System processor
Superscalar 33-Mhz Intel i960RP
Number of Fibre Channel Ports
16 ports
Fibre Channel port speed
1.0625 Gbps full duplex
Modes of operation
Fibre Channel Class-2 service and Fibre Channel Class-3 connectionless
service
Aggregate switch I/O bandwidth
16 Gbps, full duplex
Frame buffers
16 buffers per port at 2112 bytes per frame
Fabric latency
<2 microseconds with no contention
Data transmission range
up to 500 m (1,625 ft.) for short-wavelength optical link
Up to 10 kilometers (84,480 ft.) for long-wavelength optical link
Chassis types
Back-to-front airflow (power supply out front)
Departmental Switch Model DS-16B Hardware Reference Manual
Specifications
Fabric Management Specifications
Table A-2 shows Fabric management specifications:
Table A-2
Fabric Management Specifications
Standard Features
Description
Fabric management
Simple Name Server, Alias Server, SNMP, Telnet, World Wide Web
User interface
RJ45 front panel connector for 10/100Base-T Ethernet
Fabric Management Specifications
A-3
A
A
Specifications
Safety Specifications
Table A-3 Shows Safety specifications:
Table A-3
A-4
Safety Specifications
Country
Safety
EMC
Canada
CSA 22.2 No. 950 Third Edition
CSA C108.8 Class A
United States
UL 1950 Third Edition
FCC Part 15 Class A
Japan
EN60950+A1+A2+A3+A4+A11
VCCI Class A
International
EN60950+A1+A2+A3+A4+A11
EN55022 Level A/
CISPR22 Class A
United Kingdom/Ireland
EN60950+A1+A2+A3+A4+A11;7
3/23/EEC
EN55022 Level A;
89/336/EEC
France
EN60950+A1+A2+A3+A4+A11;7
3/23/EEC
EN55022 Level A;
89/336/EEC
Germany
EN60950+A1+A2+A3+A4+A11;7
3/23/EEC
EN55022 Level A;
89/336/EEC
Austria
EN60950+A1+A2+A3+A4+A11;7
3/23/EEC
EN55022 Level A;
89/336/EEC
Spain/Portugal/Italy
EN60950+A1+A2+A3+A4+A11;7
3/23/EEC
EN55022 Level A;
89/336/EEC
Sweden
EN60950+A1+A2+A3+A4+A11;7
3/23/EEC
EN55022 Level A;
89/336/EEC
Norway
EN60950+A1+A2+A3+A4+A11
Finland
EN60950+A1+A2+A3+A4+A11;7
3/23/EEC
EN55022 Level A;
89/336/EEC
Denmark
EN60950+A1+A2+A3+A4+A11;7
3/23/EEC
EN55022 Level A;
89/336/EEC
Australia
AS/NZS 3548:1995 Class A
New Zealand
AS/NZS 3548:1995 Class A
Departmental Switch Model DS-16B Hardware Reference Manual
Specifications
Optical Port
Specifications
Fibre Channel interfaces of a DS-16B switch equipped with an optical
port interface uses a short wavelength (780 to 850 µm.) or long
wavelength (1270 to 1350 µm) laser transmitter. The laser complies
with 21 CFR(J) Class 1 laser safety requirements. It uses Non-Open
Fibre Control (OFC) Optical GBICs in the circuit. Safe Class 1
operation is guaranteed by limiting optical power emitted by the
port, thereby eliminating the need for physical shutters. The optical
GBIC uses the duplex-SC connector scheme.
Environmental
Specifications
The switch’s primary operating environments are server rooms,
network equipment closets, and office environments. The acceptable
environmental ranges for a the switch are shown in Table A-4.
Table A-4
Environmental Specifications
Specification
Value
Temperature (operating)
10×C to 40 ×C
Temperature (non-operating)
-35×C to 65 ×C
Operating humidity
5% to 85% noncondensing @ 40×C
Nonoperating humidity
95% RH noncondensing @ 40×C
Operating Altitude
0 to 3 kilometers above sea level
Nonoperating Altitude
0 to 12 kilometers above sea level
Operating shock
5g, 11MS duration, half sine
Nonoperating shock
20g, 11MS duration, sq.wave
Operating vibration
5, [email protected] octave/minute
Nonoperating vibration
10, [email protected] octave/minute
Safety Specifications
A-5
A
A
Specifications
Dimensions
The switch may be configured for either rack mount or tabletop use.
Rack Mount Dimensions
2U, 19-in. rack mount (EIA compliant)
H: mm (1.71 in.), W: 428.6 mm (16.88 in.), D: 450.0 mm (17.72 in.)
Table Top Dimensions
H: mm (1.86 in.), W: 428.6 mm (16.88 in.), D: 450.0 mm (17.72 in.)
Weight
25 lbs.
Power Supply
The switch has a universal power supply capable of functioning
worldwide without voltage jumpers or switches. The supply is
autoranging in terms of accommodating input voltages and line
frequencies. A semi-custom switching power supply, repackaged for
the requirements of the switch enclosure architecture, is used.
The power supply meets the requirements shown in Table A-5.
Table A-5
Power Supply Requirements
Specification
Value
Total power
155 watts
Input voltage
85 to 265 VAC
Input line frequency
47 to 63 Hz
Inrush Current
10 Amps Peak, > 300 usec - hot/cold start
Harmonic Distortion
Active power factor correction per IEC1000-3-2
Input Line Protection
Fused in both hot & neutral lines
Maximum Dimensions
3.5”W X 1.5”H X 11”L
Redundancy
Dual Supplies - Hot Pluggable
BTU Rating
155 watts X 3.412 BTU/hr/watts = 529 BTU/hr
The power supply has a modular design that plugs directly into the
enclosure through the front panel, mating to an internal blind_mate
connector. It provides facilities to support a dual redundant power
supply configuration, in which the supplies are hot-swappable.
An integral on/off switch, input filter and power indicator are
provided in the power supply.
A-6
Departmental Switch Model DS-16B Hardware Reference Manual
B
Invisible Body Tag
Switch Support
• Switch Support .................................................................................. B-2
• Support Tool ...................................................................................... B-2
Switch Support
B-1
B
Switch Support
Switch Support
Support for your switch can be obtained from EMC. Please contact
EMC to report hardware or software problems.EMC is also the
correct source for switch repairs or for supplying spare components.
Support Tool
Included in the switch software is a command that will display of a
variety of information that is helpful in diagnosing switch related
problems. This command is suppportShow. This command can be
entered into a telnet session command window and the results
should be saved and supplied to your support contact.
B-2
Departmental Switch Model DS-16B Hardware Reference Manual
C
Invisible Body Tag
Error Messages
• Error Message Formats .................................................................... C-2
• Diagnostic Error Message Formats................................................. C-4
• Error Message Tables ...................................................................... C-10
Error Messages
C-1
C
Error Messages
Error Message Formats
There are two error message formats depending on whether you are
gathering information from the front panel or via Telnet. The front
panel shows an abbreviated message and via Telnet displays the
entire error message.
In all cases, the last error encountered is the first error displayed. Up
to 32 messages are held in a buffer. If the 32 message limit is
exceeded, the messages are overwritten in a first in, first out
sequence.
Error messages are stored in volatile RAM and are lost whenever power is
removed from the switch. Access the error message log to view error
messages before removing power.
Front Panel
Message Formats
The switch’s front panel displays error messages, as shown:
Feb 12 08:48:29
DIAG-REGERR_UNRST-1
The first line includes the error’s date and time. The beginning of
each second line on the front panel display starts with the module
name (Diag), error name (REGERR_UNRST), and the severity level
(1).
The possible values are:
•
1-critical
•
2-error
•
3-warning
•
4-informational
•
5-debug
If the same error occurs within the same module (for example,
DIAG-REGERR_UNRST) but on different ports, the number of occurrences
for that message is incremented in brackets (up to 999), and the error number
is not incremented (that is, this error, though it may occur 999 times, occupies
one message in the 32-message buffer.
C-2
Departmental Switch Model DS-16B Hardware Reference Manual
Error Messages
To display error message from the front panel
1. From the front panel, select the Status menu.
2. Select Error Log.
3. Scroll through the error log (if no errors encountered, the panel
displays “No Error”).
Error Message Formats
C-3
C
C
Error Messages
Diagnostic Error Message Formats
If any port fails during a diagnostic test, it is marked BAD in the status
display.
To retest a port which has been marked BAD, clear the port and set to
OK using the diagClearError (port#) command. This command
clears the port status only and does not clear the logs or change the
port’s condition. The diagClearError (port#) command should
only be used during diagnostic procedures to reset a bad port for
retest.
Some messages contain the following abbreviations:
•
sb = Should Be
•
er = Bits in error
If you run the portStatsShow or the diagShow command prior to running
a test, errors may appear as a result of the normal synchronization process.
These errors should be addressed if the number of errors found increases
when running the portStatsShow command again.
Running any of the tests discussed in “Front Panel Test Menu” clears the
accumulated errors before the test is run.
Table C-1
C-4
Probable Failure Actions
Failed test
Replace
ramTest
DRAM module or mainboard assembly
portRegTest
mainboard assembly
centralMemoryTest
mainboard assembly
cmiTest
mainboard assembly
cmemRetentionTest
mainboard assembly
sramRetentionTest
mainboard assembly
camTest
mainboard assembly
portLoopbackTest
rmainboard assembly
crossPortTest
mainboard assembly, GBIC or fiber cable
spinSilk
mainboard assembly, GBIC or fiber cable
Departmental Switch Model DS-16B Hardware Reference Manual
Error Messages
Error Message
Numbers
Table C-2
An error number ERR#xxxx appears at the end of an error message.
Table C-2 matches each error number with the test that caused the
error and the name of the error. Look up the complete definition of
the error name and the actions that will correct it in Table C-3.
Error Message Codes Defined
Error Number
Test Name
Error Name
0001
n/a
DIAG-CLEAR_ERR
0004
n/a
DIAG-POST_SKIPPED
0B15
sramRetentionTest
DIAG-REGERR
0B16
DIAG-REGERR_UNRST
0B0F
DIAG-BUS_TIMEOUT
1F25
cmemRetentionTest
DIAG-LCMRS
1F26
DIAG-LCMTO
1F27
DIAG-LCMEM
0110
ramTest
DIAG-MEMORY
0111
DIAG-MEMSZ
0112
DIAG-MEMNULL
0415
portRegTest
DIAG-REGERR
0416
DIAG-REGERR_UNRST
040F
DIAG-BUS_TIMEOUT
Diagnostic Error Message Formats
C-5
C
C
Error Messages
Table C-2
Error Message Codes Defined (continued)
Error Number
Test Name
Error Name
1020
centralMemoryTest
DIAG-CMBISRTO
1021
DIAG-CMBISRF
1025
DIAG-LCMRS
1026
DIAG-LCMTO
1027
DIAG-LCMEM
1028
DIAG-LCMEMTX
1029
DIAG-CMNOBUF
102A
DIAG-CMERRTYPE
102B
DIAG-CMERRPTN
102C
DIAG-INTNOTCLR
103O
DIAG-BADINT
106F
DIAG-TIMEOUT
2030
cmiTest
2031
DIAG-INTNIL
2032
DIAG-CMISA1
2033
DIAG-CMINOCAP
2034
DIAG-CMIINVCAP
2035
DIAG-CMIDATA
2036
DIAG-CMICKSUM
223B
camTest
223C
C-6
DIAG-BADINT
Departmental Switch Model DS-16B Hardware Reference Manual
DIAG-CAMINIT
DIAG-CAMSID
Error Messages
Table C-2
Error Message Codes Defined (continued)
Error Number
Test Name
Error Name
2640
portLoopbackTest
DIAG-ERRSTAT (ENCIN)
2641
DIAG-ERRSTAT (CRC)
2642
DIAG-ERRSTAT (TRUNC)
2643
DIAG-ERRSTAT (2LONG)
2644
DIAG-ERRSTAT (BADEOF)
2645
DIAG-ERRSTAT (ENCOUT)
2646
DIAG-ERRSTAT (BADORD)
2647
DIAG-ERRSTAT (DISCC3)
264F
DIAG-INIT
265F
DIAG-PORT_DIED
266E
DIAG-DATA
266F
DIAG-TIMEOUT
2660
DIAG-STATS(FTX)
2661
DIAG-STATS(FRX)
2662
DIAG-STATS(C3FRX)
2670
DIAG-PORTABSENT
2671
DIAG-XMIT
Diagnostic Error Message Formats
C-7
C
C
Error Messages
Table C-2
C-8
Error Message Codes Defined (continued)
Error Number
Test Name
Error Name
3040
crossPortTest
DIAG-ERRSTAT(ENCIN)
3041
DIAG-ERRSTAT(CRL)
3042
DIAG-ERRSTAT(TRUNC)
3043
DIAG-ERRSTAT(2LONG)
3044
DIAG-ERRSTAT(BADEOF)
3045
DIAG-ERRSTATENCOUT)
3046
DIAG-ERRSTAT(BADORD)
3047
DIAG-ERRSTAT(DISC3)
304F
DIAG-INIT
305F
DIAG-PORTDIED
3060
DIAG-STATS (FTX)
3061
DIAG-STATS (FRX)
3062
DIAG-STATS (C3FRX)
306E
DIAG-DATA
306F
DIAG-TIMEOUT
3070
DIAG-PORTABSENT
3071
DIAG-XMIT
3078
DIAG-PORTWRONG
Departmental Switch Model DS-16B Hardware Reference Manual
Error Messages
Table C-2
Error Message Codes Defined (continued)
Error Number
Test Name
Error Name
384F
spinSilk
DIAG-INIT
385F
DIAG-PORTDIED
3840
DIAG-ERRSTAT (ENCIN)
3841
DIAG-ERRSTAT (CRC)
3842
DIAG-ERRSTAT (TRUNC)
3843
DIAG-ERRSTAT (2LONG)
3844
DIAG-ERRSTAT (BADEOF)
3845
DIAG-ERRSTAT (ENCOUT)
3846
DIAG-ERRSTAT (BADORD)
3847
DIAG-ERRSTAT (DISCC3)
3870
DIAG-PORTABSENT
3871
DIAG-XMIT
3874
DIAG-PORTSTOPPED
Diagnostic Error Message Formats
C-9
C
C
Error Messages
Error Message Tables
Table C-3
Message
C-10
Diagnostic Error Messages
Description
Probable Cause
Action
DIAG-BADINT
Err#1030, 2030
[centralMemoryTest, cmiTest]
Port received an interrupt when not
expecting one
ASIC failure
Replace
mainboard
assembly
DIAG-BUS_TIMEOUT
Err#0BoF, 4040F
[portRegTest, sramRetentionTest]
ASIC register or ASIC SRAM did not
respond to an ASIC data access
ASIC failure
Replace
mainboard
assembly
DIAG-CAMINIT
Err#223B
[camTest]
Port failed to initialize due to one of the
following reasons:
Switch not disabled
Diagnostic queue absent
Malloc failed
Chip is not present
Port is not in loopback mode
Port is not active
Software operational
setup error or
mainboard failure
Retry, reboot or
replace
mainboard
assembly
DIAG-CAMSID
Err#223C
[camTest]
ASIC failed SID NO translation test.
ASIC failure
Replace
mainboard
assembly
DIAG-CLEAR_ERR
Err#0001
Port’s diag error flag (OK or BAD) is
cleared.
Informational Only
None required
DIAG-CMBISRF
Err#1021
[centralMemoryTest]
ASIC’s Central Memory SRAMs did not
complete the BISR within the timeout
period
ASIC failure
Replace
mainboard
assembly
DIAG-CMBISRTO
Err#1020
[centralMemoryTest]
ASIC’s Central Memory SRAMs did not
complete the BISR within the timeout
period
ASIC failure
Replace
mainboard
assembly
DIAG-CMERRPTN
Err#102B
[centralMemoryTest]
Error detected at the wrong port
ASIC failure
Replace
mainboard
assembly
DIAG-CMERRTYPE
Err#102A
[centralMemoryTest]
Port got the wrong CMEM error type
ASIC failure
Replace
mainboard
assembly
Departmental Switch Model DS-16B Hardware Reference Manual
Error Messages
Table C-3
Message
Diagnostic Error Messages (continued)
Description
Probable Cause
Action
DIAG-CMICKSUM
Err#2036
[cmiTest]
CMI message received failed bad
checksum test.
ASIC or mainboard
failure
Replace
mainboard
assembly
DIAG-CMIDATA
Err#2035
[cmiTest]
CMI data received did not match data
transmitted
ASIC or mainboard
failure
Replace
mainboard
assembly
DIAG-CMIINVCAP
Err#2034
[cmiTest]
Unintended ASIC erroneously got CMI
capture flag
ASIC or mainboard
failure
Replace
mainboard
assembly
DIAG-CMINOCAP
Err#2033
[cmiTest]
CMI intended receiver ASIC failed to get
CMI capture flag.
ASIC or mainboard
failure
Replace
mainboard
assembly
DIAG-CMISA1
Err#2032
[cmiTest]
An attempt to send a CMI message from
ASIC to ASIC failed.
ASIC failure
Replace
mainboard
assembly
DIAG-CMNOBUF
Err#1029
[centralMemoryTest]
Port could not get any buffer
ASIC failure
Replace
mainboard
assembly
DIAG-DATA
Err#266E, 306E
[portLoopbackTest, crossPortTest]
Payload received by port did not match
payload transmitted.
mainboard, GBIC
module or fiber
cable failure
Replace
mainboard
assembly, GBIC
module or fiber
cable
Error Message Tables
C-11
C
C
Error Messages
Table C-3
Diagnostic Error Messages (continued)
Message
C-12
Description
Probable Cause
Action
DIAG-ERRSTAT
Err#2640-2647, 3040-3047, 3840-3847
[portLoopbackTest, crossPortTest,
spinSilk]
Port Error Statistics counter is non-zero,
meaning an error was detected when
receiving frames.
One of the following status errors
occurred.
Enc_in – Encoding error, inside frame
CRC_err – Cyclic redundancy check on
frame failed
TruncFrm – Truncated frame
FrmTooLong – Frame too long
BadEOF – Bad end of file
Enc_out – Encoding error, outside frame
BadOrdSet – Bad symbol on fiber-optic
cable
DiscC3 – Discarded Class 3 frames
ASIC, mainboard,
GBIC module or
fiber cable failure
Replace
mainboard
assembly, GBIC
module or fiber
cable
DIAG-INIT
Err#264F, 304F, 384F
[portLoopbackTest, crossPortTest,
spinSilk]
Port failed to go active in the loopback
mode requested.
ASIC, mainboard,
GBIC module or
fiber cable failure
Replace
mainboard
assembly, GBIC
module or fiber
cable
DIAG-INTNIL
Err#2031
[cmiTest]
ASIC failed to get a CMI error (interrupt)
ASIC failure
Replace
mainboard
assembly
DIAG-INTNOTCLR
Err#102C
[centralMemoryTest]
The interrupt bit could not be cleared.
ASIC failure
Replace
mainboard
assembly
DIAG-LCMEM
Err#1027
[centralMemoryTest,
cmemRetentionTest]
Data read from the Central Memory
location did not match data previously
written into the same location
ASIC failure
Replace
mainboard
assembly
DIAG-LCMEMTX
Err#1F27, 1028
[centralMemoryTest]
Central Memory transmit path failure:
ASIC 1 failed to read ASIC 2 via the
transmit path
mainboard failure
Replace
mainboard
assembly
DIAG-LCMRS
Err#1F25, 1025
[centralMemoryTest,
cmemRetentionTest]
Central Memory Read Short: M bytes
requested but got less than M bytes
ASIC failure
Replace
mainboard
assembly
Departmental Switch Model DS-16B Hardware Reference Manual
Error Messages
Table C-3
Message
Diagnostic Error Messages (continued)
Description
Probable Cause
Action
DIAG-LCMTO
Err#1F26, 1026
[centralMemoryTest,
cmemRetentionTest]
Central Memory Timeout: Data transfer
initiated did not complete within the
timeout period.
ASIC failure
Replace
mainboard
assembly
DIAG-MEMNULL
Err#0112
[ramTest]
Test failed to malloc.
mainboard failure
Replace
mainboard
assembly
DIAG-MEMSZ
Err#0111
[ramTest]
Memory size to be tested is less than or
equal to zero
mainboard failure
Replace
mainboard
assembly
DIAG-MEMORY
Err#0110
[ramTest]
Data read from RAM location did not
match previously written data into same
location
CPU RAM failure
Replace
mainboard
assembly or
DRAM module
DIAG-PORTABSENT
Err#2670, 3070, 3870
[portLoopbackTest, crossPortTest,
spinSilk]
Port is not present
ASIC or mainboard
failure
Replace
mainboard
assembly
DIAG-PORTDIED
Err#265F, 305F, 385F
[portLoopbackTest, crossPortTest,
spinSilk]
Port was in loopback mode and then went
inactive
ASIC, GBIC module
or fiber cable failure
Replace
mainboard
assembly, GBIC
module or fiber
cable
DIAG-PORTSTOPPED
Err#3874
[spinSilk]
Port is no longer transmitting, as indicated
by the Number Of Frames Transmitted
counter being stuck at N frames.
ASIC, GBIC module
or fiber cable failure
Replace
mainboard
assembly, GBIC
module or fiber
cable
DIAG-PORTWRONG
Err#3078
[crossPortTest]
Frame erroneously received by port M
instead of the intended port N
ASIC failure
Replace
mainboard
assembly
DIAG-POST_SKIPPED
Err# 0004
[switch initialization]
POST is skipped. It’s message
recommended that POST be executed.
Informational Only
None required
DIAG-REGERR
Err#0B15, 0415
[portRegTest, sramRetentionTest]
Data read from ASIC register or ASIC
SRAM did not match data previously
written into same location
ASIC failure
Replace
mainboard
assembly
Error Message Tables
C-13
C
C
Error Messages
Table C-3
Message
Description
Probable Cause
Action
DIAG-REGERR_UNRST
Err#0B16, 0416
[portRegTest, sramRetentionTest]
Port failed to unreset.
ASIC failure
Replace
mainboard
assembly
DIAG-STATS
Err#2660-2662, 3060 - 3062
[portLoopback Test, crossPortTest]
Port counter value did not match the
number of frames actually transmitted.
Possible counters reporting:
FramesTx - number of frames transmitted
FramesRx - number of frames received
Cl3FrmRx - number of Class 3 frames
received
ASIC, GBIC module
or fiber cable failure
Replace
mainboard
assembly, GBIC
module or fiber
cable
DIAG-TIMEOUT
Err#266F, 306F, 386F
[portLoopbackTest, crossPortTest,
centralMemoryTest]
For portLoopbackTest and crossPortTest:
Port failed to receive frame within timeout
period
For centralMemoryTest:
Port failed to detect an interrupt within the
timeout period.
ASIC, GBIC module
or fiber cable failure
Replace
mainboard
assembly, GBIC
module or fiber
cable
DIAG-XMIT
Err#2271, 2671, 3071, 3871
[portLoopbackTest, crossPortTest,
spinSilk, camTest]
Port failed to transmit frame
ASIC failure
Replace
mainboard
assembly
Table C-4
C-14
Diagnostic Error Messages (continued)
System Error Messages
Message
Description
Probable Cause
Action
CONFIG CORRUPT
The switch configuration
information has become
irrevocably corrupted.
OS error
The system automatically
resorts to the default
configuration settings.
CONFIG OVERFLOW
The switch configuration
OS error
information has grown too large
to be saved or has an invalid size.
Contact customer support.
CONFIG VERSION
The switch has encountered an
unrecognized version of the
switch configuration.
OS error
The system automatically
resorts to the default
configuration settings.
FABRIC, SEGMENTED,
LOG_WARNING
Fabric segmented.
Incompatible fabric
Reconfigure fabric or
parameters/switches zones.
Conflict zones
Departmental Switch Model DS-16B Hardware Reference Manual
Error Messages
Table C-4
System Error Messages (continued)
Message
Description
Probable Cause
Action
FABRIC, NO_ALIASID, LOG_WARNING No free multicast alias
Too many multicast
groups in use
Remove some of the
groups.
FABRIC, BADILS, LOG_WARNING
Bad ISL-ELS size
The ISL-ELS
payload is wrong.
Contact customer support
FLASH, BAD_MIRROR,
LOG_WARNING
The system’s flash memory has
encountered an error.
OS error
The system attempts to
recover from its mirrored
backup. Contact customer
support.
RPC, SVC_EXIT
An RPC service daemon has
terminated prematurely or
unexpectedly.
OS error
Contact customer support.
RPC, SVC_REG
An RPC service daemon could
not establish service for a
particular protocol handler.
OS error
Contact customer support.
TEMP, 1_FAILED, LOG_WARNING
Switch overheated
Fan Failure
Contact customer support.
TEMP, 2_FAILED, LOG_ERROR
Switch overheated
Fan Failure
Contact customer support.
TEMP, 3_FAILED, LOG_CRITICAL
Switch overheated
Fan Failure
Contact customer support.
TEMP, 4_FAILED, LOG_CRITICAL
Switch overheated
Fan Failure
Contact customer support.
TEMP, 5_FAILED, LOG_CRITICAL
Switch overheated
Fan Failure
Contact customer support.
FANS, 1_FAILED, LOG_WARNING
Switch overheated
Fan Failure
Contact customer support.
FANS, 2_FAILED, LOG_ERROR
Switch overheated
Fan Failure
Contact customer support.
FANS, 3_FAILED, LOG_CRITICAL
Switch overheated
Fan Failure
Contact customer support.
FANS, 4_FAILED, LOG_CRITICAL
Switch overheated
Fan Failure
Contact customer support.
FANS, 5_FAILED, LOG_CRITICAL
Switch overheated
Fan Failure
Contact customer support.
FANS, 6_FAILED, LOG_CRITICAL
Switch overheated
Fan Failure
Contact customer support.
POWER, 1_FAILED, LOG_CRITICAL
Switch Power Failure
Power Supply
Failure
Contact customer support.
POWER, 2_FAILED, LOG_CRITICAL
Switch Power Failure
Power Supply
Failure
Contact customer support.
FCIU, IUBAD, L, S
Invalid IU
OS error
Contact customer support
Error Message Tables
C-15
C
C
Error Messages
Table C-4
C-16
System Error Messages (continued)
Message
Description
Probable Cause
Action
FCIU, IUCOUNT, L, S
Total number of IUs Count < 0
OS error
Contact customer support
FCPH, EXCHBAD, L, S
Bad exchange
OS error
Contact customer support
FCPH, EXCHFREE, L, S
Unable to free an exchange
OS error
Contact customer support
MQ, QWRITE, L, M
Message queue overflow
Task blocked
Contact customer support
MQ, QREAD, L, M
Message queue unread
OS error
Contact customer support
MQ, MSGTYPE, E, M
Unknown message type
OS error
Contact customer support
SEMA, SEMGIVE, L, M
Unable to give a semaphore
OS error
Contact customer support
SEMA, SEMTAKE, L, M
Unable to take a semaphore
OS error
Contact customer support
SEMA, SEMFLUSH, L, M
Unable to flush a semaphore
OS error
Contact customer support
PANIC, TASKSPAWN, LOG_PANIC
task creation failed
OS error
Contact customer support
PANIC, SEMCREATE, LOG_PANIC
Semaphore creation failed
OS error
Contact customer support
PANIC, SEMDELETE, LOG_PANIC
Semaphore deletion failed
OS error
Contact customer support
PANIC, QCREATE, LOG_PANIC
Message queuer failed
OS error
Contact customer support
PANIC, QDELETE, LOG_PANIC
Message queuer deletion failed
OS error
Contact customer support
PANIC, MALLOC, LOG_PANIC
Memory allocation failed
OS error
Contact customer support
PANIC, FREE, LOG_PANIC
Memory free failed
OS error
Contact customer support
PANIC, INCONSISTENT, LOG_PANIC
Data out of sync
OS error
Contact customer support
PANIC, INTCONTEXT, LOG_PANIC
Data out of sync
OS error
Contact customer support
PANIC, ZOMTIMSET, LOG_PANIC
Attempt to set a zombie timer
OS error
Contact customer support
PANIC, ZOMTIMKILL, LOG_PANIC
Zombie timer destroyed
OS error
Contact customer support
PANIC, FREETIMRLSD, LOG_PANIC
Free timer released
OS error
Contact customer support
PANIC, TIMEUSECNT, LOG_PANIC
Timer use count exceeded
OS error
Contact customer support
PANIC, LSDB_CKSUM, LOG_PANIC
Link State Database checksum
failed
OS error
Contact customer support
SYS, NOMEM, LOG_CRITICAL
No memory
OS error
Contact customer support
SYS, SYSCALL, LOG_ERROR
System call failed
OS error
Contact customer support
Departmental Switch Model DS-16B Hardware Reference Manual
Error Messages
Table C-4
System Error Messages (continued)
Message
Description
Probable Cause
Action
SYS, BADPTR, LOG_ERROR
Bad system pointer
OS error
Contact customer support
SYS, INTRPT, LOG_CRITICAL
Bad system interrupt
OS error
Contact customer support
SYS, FLASHRD, LOG_ERROR
FLASH memory read error
OS error
Contact customer support
SYS, FLASHWR, LOG_ERROR
FLASH memory write error
OS error
Contact customer support
TIMERS, ENQFAIL, LOG_CRITICAL
Invalid timeout value
OS error
Contact customer support
TIMERS, MSG,LOG_WARNING
Invalid message
OS error
Contact customer support
FLANNEL, PHANTOM, LOG_WARNING Port’s PLT limit exceeded
OS error
Contact customer support
ASIC, MINI_BUFFER, LOG_WARNING
ASIC Failure
Bad mainboard
Contact customer support
LSDB, LSID, LOG_ERROR
Link State ID ‘d out of range
OS error
Contact customer support.
LSDB, NOLOCALENTRY,
LOG_CRITICAL
No database entry for local Link
State Record
OS error
Contact customer support.
LSDB, NOLSR, LOG_WARNING
No Link State Record for domain
OS error
Contact customer support.
LSDB, MAXINCARN, LOG_WARNING
Local Link State Record reached
max incarnation
OS error
Contact customer support.
FLOOD, INVLSU, LOG_WARNING
Discard received LSU
OS error
Contact customer support.
FLOOD, INVLSR, LOG_WARNING
Unknown LSR type
OS error
Contact customer support.
FLOOD, LSRLEN, LOG_ERROR
Excessive LSU length
OS error
Contact customer support.
HLO, INVHLO, LOG_ERROR
Invalid Hello received from port
OS error
Contact customer support.
HLO, HLOTIMEOUT, LOG_ERROR
Incompatible Hello timeout from
port
OS error
Contact customer support.
HLO, DEADTIMEOUT, LOG_ERROR
Incompatible Inactivity timeout
from port
OS error
Contact customer support.
FSPF, SCN, LOG_WARNING
Illegal SCN
OS error
Contact customer support.
FSPF, NBRCHANGE, LOG_WARNING
Wrong neighbor ID in Hello
message from port
OS error
Contact customer support.
FSPF, INPORT, LOG_ERROR
Input port out of range
OS error
Contact customer support.
FSPF, VERSION, LOG_ERROR
FSPF version not supported
OS error
Contact customer support.
FSPF, SECTION, LOG_ERROR
Wrong Section Id
OS error
Contact customer support.
Error Message Tables
C-17
C
C
Error Messages
Table C-4
C-18
System Error Messages (continued)
Message
Description
Probable Cause
Action
FSPF, REMDOMAIN, LOG_ERROR
Remote Domain ID out of range
OS error
Contact customer support.
NBFSM, NGBRSTATE, LOG_ERROR
Wrong input to neighbor FSM
OS error
Contact customer support.
MCAST, ADDPORT, LOG_WARNING
Add port failed
OS error
Contact customer support.
MCAST, REMPORT, LOG_WARNING
Remove port failed
OS error
Contact customer support.
MCAST, ADDBRANCH, LOG_ERROR
Add branch failed
OS error
Contact customer support.
MCAST, REMBRANCH, LOG_ERROR
Remove branch failed
OS error
Contact customer support.
MCAST, NOPARENT, LOG_ERROR
Null parent
OS error
Contact customer support.
MCAST, NOPARENTLSR,
LOG_ERROR
Null lsrP
OS error
Contact customer support.
UCAST, ADDPATH, LOG_CRITICAL
Add path failed
OS error
Contact customer support.
UCAST, ADDPORT, LOG_WARNING
Add port failed
OS error
Contact customer support.
UCAST, REMPORT, LOG_WARNING
Remove port failed
OS error
Contact customer support.
UCAST, RRTIM, LOG_CRITICAL
Invalid reroute timer ID
OS error
Contact customer support.
UCAST, SPFCOST, LOG_WARNING
No minimum cost path in
candidate
OS error
Contact customer support.
UCAST, RELICPDB, LOG_WARNING
Relic PDB to Domain
OS error
Contact customer support
Departmental Switch Model DS-16B Hardware Reference Manual
Sales and Service
Locations
Corporate
Headquarters
EMC Corporation
Hopkinton, Massachusetts
01748-9103 U.S.A.
508-435-1000
1-800-424-EMC2
Asia Pacific
Headquarters
EMC Japan K.K.
P.O. Box 323
Shinjuku-Mitsui Bldg., 55
1-1, Nishi-Shinjuku
2-chome Shinjuku-ku
Tokyo 163-0466 JAPAN
Tel: 81-3-3345-3211
Fax: 81-3-3345-3221
North American Sales
and Service Locations
Atlanta, GA 404-705-4750
Baltimore, MD 410-850-4324
Bellevue, WA 425-201-6400
Bethesda, MD 301-530-0091
Boston, MA 617-449-8100
Charlotte, NC 704-521-9773
Chicago, IL 708-390-8800
Cincinnati, OH 513-745-0300
Cleveland, OH 216-573-1162
Columbus, OH 614-436-3900
Dallas, TX 972-233-5676
Denver, CO 303-294-9966
Farmington Hills, Ml 313-553-4810
Ft. Lauderdale, FL 305-776-3622
Greensboro, NC 910-665-1077
Departmental Switch Model DS-16B Hardware Reference Manual
s-1
Sales and Service Locations
Houston, TX 713-621-9800
Indianapolis, IN 317-577-9766
Inglewood, CA 310-364-1222
Irvine, CA 714-833-1442
Lenexa, KS 913-469-9292
Long Island, NY 516-393-5045
Minneapolis, MN 612-835-1994
Montreal, Quebec 514-856-6166
Nashville, TN 615-781-4394
New York City, NY 212-564-6866
Ottawa, Ontario 613-233-0111
Orlando, FL 407-855-4087
Phoenix, AZ 602-955-0702
Philadelphia, PA 610-834-7740
Pittsburgh, PA 412-922-5222
Portland, OR 503-293-8450
Raleigh, NC 919-420-0405
Rochester, NY 716-387-0970
Salt Lake City, UT 801-532-1454
San Diego, CA 619-576-1880
San Francisco, CA 415-871-1970
Southington, CT 860-620-6730
Springfield, NJ 201-467-7979
St. Louis, MO 314-469-9005
Tampa, FL 813-282-0274
Toronto, Ontario 905-206-1580
Tulsa, OK 918-663-2255
Vancouver, BC 604-270-1657
Vienna, VA 703-893-8400
International Sales
Locations
s-2
Berlin, Germany (49) 30 25 49 31 86
Bologna, Italy (39) 51 522579
Brescia, Italy (39) 30 2421791
Brussels, Belgium (32) 2 725 74 25
Cape Town, South Africa (27) 21 686 1430
Dublin, Ireland (353) 1 475 4172
Durban, South Africa (27) 31 83 6611
Dusseldorf, Germany (49) 2131 9191 0
Frankfurt, Germany (49) 6196 4 72 80
Hamburg, Germany (49) 4069 69 610
Hong Kong, Taikooshing (852) 2839 9600
Johannesburg, South Africa (27) 11 807 5300
Leatherhead, Surrey, UK (44) 1372 36 0000
Departmental Switch Model DS-16B Hardware Reference Manual
Sales and Service Locations
Lyon, France (33) 7 860 1330
Marseille, France (33) 4292 2549
Melbourne, Australia (61) 3 653 9519
Milan, Italy (39) 02 409081
Munich, Germany (49) 89 14 31 320
Nagoya, Japan (81) 52 223 1900
Newton Le Willows, Merseyside, UK (44) 1942 275 511
Nieuwegein, Netherlands (31) 03 6055777
Nuernberg, Germany (49) 911 2379260
Osaka, Japan (81) 6 373 8300
Padua, Italy (39) 49 8235853
Paris, France (33) 1 3082 5100
Pretoria, South Africa (27) 12 663 6635
Rome, Italy (39) 06 8552116
Schlieren, Switzerland (411) 743 4949
Seoul, Korea (82) 2 539 4455
Singapore (65) 338 9265
Stuttgart, Germany (49) 7152 979340
Sydney, Australia (61) 2 922 7888
Toulouse, France (33) 6131 6262
Turin, Italy (39) 11 746527
Vienna, Austria (43) 1 599 99 627
Departmental Switch Model DS-16B Hardware Reference Manual
s-3
Sales and Service Locations
s-4
Departmental Switch Model DS-16B Hardware Reference Manual
Index
B
BadEOF C-12
BadOrdSet C-12
BB_credit 3-12
boot failure 4-5
boot prom date 3-22
booted at 3-21
buttons
down 3-3
enter 3-3
tab/esc 3-3
up 3-3
C
Central Memory Test command 4-9
commands
Central Memory Test 4-9
Display Test 4-12
Memory Test 4-7
Port Loopback Test 4-10
Port Register Test 4-8
Push Button Test 4-12
Spin Silk Test 4-11
Switch Offline 4-7
Switch Online 4-7
components, system 1-4
configuration menu 3-9, 3-15
BB_credit 3-12
domain 3-12
E_D_TOV 3-13
ethernet IP address 3-10
ethernet subnetmask 3-10
fibre channel IP address 3-11
fibre channel subnetmask 3-11
Frame Collection 3-16
gateway address 3-12
operating mode 3-14
R_A_TOV 3-13
reset to default 3-16
VC class 3 3-15
VC link ctl 3-15
VC multicast 3-15
VC priorites 3-16
virtual channels 3-14
connections
ethernet 2-5
fibre optic cable 2-4
cooling requirements 2-3
CRC_err C-12
current date 3-21
D
diagnostics 4-2
dimensions
rackmount A-6
table top A-6
DiscC3 C-12
Display Test command 4-12
display, activating 3-4
domain 3-12
down button 3-3
Departmental Switch Model DS-16B Hardware Reference Manual
i-1
Index
E
M
E_D_TOV 3-13
Enc_in C-12
Enc_out C-12
enter button 3-3
error log 3-25
ethernet connections 2-5
ethernet IP address 3-10
ethernet subnetmask 3-10
managing DS-16B
comparison of methods 3-2
via front panel buttons 3-2
managing switch via front panel buttons 3-3
Memory Test command 4-7
menu
configuration 3-9
display, activating 3-4
status 3-20
module type 3-23
F
features 1-2
fiber optic cable connections 2-4
fibre channel IP address 3-11
fibre channel protocol A-2
fibre channel subnetmask 3-11
Figure 2-2 2-5
firmware date 3-21
firmware version 3-21
flash date 3-22
Frame Collection 3-16
FrmTooLong C-12
O
operating mode 3-14
operation system 4-4
operations menu
port disable 3-18
port enable 3-19
reboot 3-19
switch offline 3-18
switch online 3-18
P
G
gateway address 3-12
GBIC module 1-4
I
initialization 4-4
installation
attaching rubber feet 2-4
cooling requirements 2-3
power requirements 2-3
rackmount considerations 2-4
unpacking the switch 2-2
L
LEDs
flash speed and color 4-4
green 4-4
yellow 4-4
link initialization 4-4
port disable 3-18
port enable 3-19
Port Loopback Test command 4-10
Port Register Test command 4-8
port status 3-22
port throughput 3-23
POST 4-4
power requirements 2-3
Push Button Test command 4-12
R
R_A_TOV 3-13
reboot 3-19
requirements
cooling 2-3
power 2-3
reset to default 3-16
S
specifications A-2
Spin Silk Test command 4-11
i-2
Departmental Switch Model DS-16B Hardware Reference Manual
Index
status menu 3-20
boot prom date 3-22
booted at 3-21
current date 3-21
error log 3-25
firmware date 3-21
firmware version 3-21
flash date 3-22
module type 3-23
port status 3-22
port throughput 3-23
switch name 3-20
temperature 3-24
worldwide name 3-21
switch name 3-20
switch offline 3-18
Switch Offline command 4-7
switch online 3-18
Switch Online command 4-7
system components 1-4
T
tab/esc button 3-3
temperature 3-24
test menu 4-6
TruncFrm C-12
U
up button 3-3
V
VC class 2 3-15
VC class 3 3-15
VC link ctl 3-15
VC multicast 3-15
VC priorities 3-16
virtual channels 3-14
VxWorks 4-4
W
worldwide name 3-21
Departmental Switch Model DS-16B Hardware Reference Manual
i-3
Index
i-4
Departmental Switch Model DS-16B Hardware Reference Manual