1
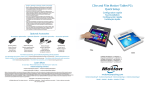
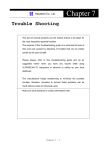
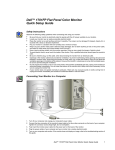
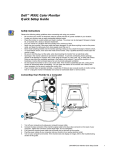
Dell Model UltraScan P1690 Color Monitor Quick Setup Installation rapide du moniteur couleur DELL UltraScan P1690 Dell UltraScan P1690 Farbmonitor - Kurzinstallation Configuración rápida del monitor en color P1690 UltraScan de DELL Configuração rápida do Monitor colorido DELL UltraScan P1690 Kolorowy monitor DELL UltraScan P1690 - Szybka instalacja www.dell.com 1 Before contacting Customer Service, please refer to the User’s Guide on CD-ROM. Connecting Your Monitor to Your Computer(s) 1. Turn off your computer(s) and unplug its power cable(s). 2. Connect your first computer to video input 1(HD15) 1 using the supplied HD15 video signal cable. If you have a second computer, connect it to video input 2 (BNC) 2 using the BNC video signal cable (not supplied). 3. Connect the other end(s) of the video signal cable(s) to the video output(s) of your computer(s). 4. Connect the power cable for your monitor to the power port on the back of the monitor. 5. Plug the power cables of your computer(s) and your monitor into a nearby outlet. 6. Turn on your computer(s) and monitor. If the monitor does not display an image please go to the troubleshooting section of this guide. Monitor Controls and Indicators Driver Installation When prompted by the Operating System for the monitor drivers, insert CD and select the CD-ROM as the disk containing the drivers. WINDOWS 98 • Windows 98 will auto-detect the new monitor and start the “Add New Hardware Wizard” if the drivers are not already installed. Click the NEXT button to search for drivers. Check the CD-ROM drive box to install the drivers off the CD-ROM and click NEXT. Confirm Windows found the drivers on the CD-ROM and click NEXT again to install the drivers. • To manually install or update the driver, click on START, SETTINGS, CONTROL PANEL, DISPLAY SETTINGS tab, ADVANCED, MONITOR tab, CHANGE. This will start the “Update Device Driver Wizard”. Follow the same steps as the “Add New Hardware Wizard” above. WINDOWS 95 • To determine the Windows 95 version, right click on the “My Computer” icon on the desktop and select “Properties”. The version number is listed under the “System” section. • Version 4.00.950A - Click on START, SETTINGS, CONTROL PANEL, DISPLAY, SETTINGS tab, CHANGE DISPLAY TYPE, CHANGE, HAVE DISK, type the CD-ROM drive letter in the box and click OK. • Version 4.00.950B - Click on START, SETTINGS, CONTROL PANEL, DISPLAY, ADVANCED PROPERTIES, MONITOR tab, HAVE DISK, type the CD-ROM drive letter in the box and click OK. 2 1. 2. 3. 4. 5. Selects the input signal connector. Displays the OPTION menu to adjust the monitor’s options. Displays the SCREEN menu to adjust the picture’s quality. Displays the SIZE menu to adjust the picture’s size. Displays the BRIGHTNESS/CONTRAST menu and functions as the m/M buttons when selecting menu items. 6. Lights up in amber when the monitor is in power saving mode. 7. Recalls the adjustments to the factory settings. 8. Displays the COLOR menu to adjust the picture’s color temperature. 9. Displays the GEOMETRY menu to adjust the picture’s rotation and shape. 10.Displays the CENTER menu to adjust the picture’s centering. 11.Displays the BRIGHTNESS/CONTRAST menu and functions as the </, buttons when selecting menu items. 12.Turns the monitor on and off. The 1 (power) indicator lights up in green when the monitor is turned on. Accessing the User’s Guide through Online or CD-ROM 1. To view the most up-to-date Online User’s Guide, go to www.dell.com and go to the support section of the website. If you do not have Internet access, continue with step 2. 2. Insert the CD into your CD-ROM drive. A start-up document should launch automatically. Note: If the start-up document does not launch automatically, click on the START button, RUN, type “D:\monitor.htm”, and click OK. Substitute the correct CD-ROM drive letter if it is not the “D:”drive. 3. Click on the appropriate icon to bring up the User’s Guide in the desired language. Troubleshooting Poor Picture Images No video/LED off (no power) No video/LED on • Ensure a tight fit to both the monitor receptacle and the electrical outlet. • Test electrical outlet by plugging in working electrical device such as a lamp. • Make sure that the power button has been depressed, and wait for the power LED to light on. • Try another power cord on the monitor. Use the power cord from the system and power the monitor on with the signal cable disconnected. If monitor is working correctly, a self test pattern should appear. • Ensure that the video connector is seated properly. Tighten screws securely with fingers. • Ensure that the computer is switched on. • Increase brightness and contrast controls. • Turn the monitor off and unplug the signal cable(s). Check for bent or broken pins. • With the signal cable(s) still disconnected, turn the monitor on. If the monitor is working correctly, a self test pattern should appear. • Perform monitor reset or recall. For more information refer to Troubleshooting section in User’s Guide on your CD. Safety Instructions Please read and follow these instructions when connecting and using your computer monitor: • To help avoid damaging your computer, be sure the voltage selection switch on the power supply is set to match the alternating current (AC) power available at your location: • 115 volts (V)/60 hertz (Hz) in most of North and South America and some Far Eastern countries such as Japan, South Korea, and Taiwan. • 230 V/50 Hz in most of Europe, the middle East, and the Far East. Also be sure your monitor is electrically rated to operate with the AC power available in your location. • Never insert anything metallic into the monitor openings. Doing so may create the danger of electric shock. • To avoid electric shock, never touch the inside of the monitor. Only a qualified technician should open the monitor’s case. • Never use your monitor if the power cord has been damaged. Do not allow anything to rest on the power cord, and keep the cord away from where people could trip over it. • Be sure to hold the plug, not the cord, when disconnecting the monitor from an electric socket. • Openings in the monitor cabinet are provided for ventilation. To prevent overheating, these openings should not be blocked or covered. Also, avoid using the monitor on a bed, sofa, rug, or other soft surface. Doing so may block the ventilation openings in the bottom of the cabinet. If you put the monitor in a bookcase or some other enclosed space, be sure to provide adequate ventilation. • Put your monitor in a location with low humidity and a minimum of dust. Avoid places like damp basement or dusty hallways. • Do not expose the monitor to rain or use it near water (in kitchens, next to swimming pools, etc.). If the monitor accidentally gets wet, unplug it and contact an authorized dealer immediately. You can clean the monitor with a damp cloth when necessary, but be sure to unplug the monitor first. • Place the monitor on a solid surface and treat it carefully. The screen can be damaged if dropped, sharply hit or touched with a sharp or abrasive implement. • Locate your monitor near an easily accessible AC outlet. • If your monitor does not operate normally - in particular, if there are any unusual sounds or smells coming from it - unplug it immediately and contract an authorized dealer or service center. Information in this document is subject to change without notice. 1994 -1999 Dell Computer Corporation. All rights reserved. Reproduction in any manner whatsoever without the written permission of Dell Computer Corporation is strictly forbidden. Trademarks used in this text: Dell and the DELL logo are registered trademarks of Dell Computer Corporation;Windows is a registered trademark of Microsoft Corporation. Other trademarks and trade names may be used in this document to refer to either the entities claiming the marks and names or their products. Dell Computer Corporation disclaims any proprietary interest in trademarks and trade names other than its own. July 1999 P/N 8840P, 7840P and 1050P www.dell.com 3 Printed in Japan Imprimé au Japon Gedruckt in Japan Impreso en Japón Impresso no Japão Wydrukowano w Japonii 3-867-904-01(1) www.dell.com P/N: 8840P 7840P 1050P